Wi-Fi HD Camera with Night Vision NETCAM HD. User Manual Guide d'utilisation. F7D7602fc 8820fc01325 Rev. A00
|
|
|
- Véronique Boutin
- il y a 8 ans
- Total affichages :
Transcription
1 Wi-Fi HD Camera with Night Vision NETCAM HD User Manual Guide d'utilisation F7D7602fc 8820fc01325 Rev. A00

2 TABLE OF CONTENTS Getting Started... 1 What s in the Box....1 Initial Setup...1 Set Up Your Camera Wirelessly Through Your Mobile Devices... 2 Troubleshooting, Support, and Warranty Troubleshooting...28 Technical Support...29 Belkin International, Inc., Limited 2-Year Product Warranty Getting to Know Your Wi-Fi Camera...19 Front Panel Back Panel...20 Regulatory Information...33 FCC Statement...33 IC Statement...34 Technical Details Software Features and Specifications...21 Hardware Features and Specifications...25 System Requirements...27 Resetting the Camera...27

3 GETTING STARTED Congratulations on buying a Belkin NetCam HD. This device will enable you to easily check in on your home and your loved ones when you are away. What s in the Box NetCam HD Power Supply Initial Setup To get started, you will need: Your wireless router, its network name (SSID), and password. An Android device (Version 2.2 or later) or an iphone, ipad, or ipod touch (ios Version 4.1 or later). Quick Installation Guide Mounting Kit 1
, and password. An Android device (Version 2.")
4 GETTING STARTED Set Up Your Camera Wirelessly Through Your Mobile Devices 2. Switch the NetCam to Setup Mode by flipping up the switch on the back of the camera 1. Plug the NetCam into a power outlet Please make sure the switch is in setup mode and the Wi-Fi light is blinking. 2

5 GETTING STARTED 3. Download the NetCam App from the App Store or Google Play 4. Set Up on iphone, ipad, or ipod touch 4.1 Connect your mobile device to NetCam Wi-Fi signal Go to Settings > Wi-Fi on your iphone/ipad/ipod touch and connect to the camera s Wi-Fi signal. 3

6 GETTING STARTED 4.2 Launch the NetCam App Once your device establishes a connection with the camera, launch the NetCam App. You should see a pop-up message like the one below. Click Yes to set up your camera. 4.3 Camera Setup Click Continue to begin setup. 4

7 GETTING STARTED 4.4 Camera Preview The camera will show you a preview after successfully connecting to your device. 4.5 Connect to Internet Choose your Wi-Fi network to connect to the Internet. Click Connect Camera to Internet. 5

8 GETTING STARTED 4.6 Connect to Internet Enter your Wi-Fi password if you have a security-enabled network. Please wait for the camera to establish connection with the Internet. 6

9 GETTING STARTED 4.7 Create an Account If this is your first time setting up your camera, you will need to create an account. 4.8 Use Existing Account If you have an existing account, select Use Existing and then enter your account information. Click Sign in. 7

10 GETTING STARTED 4.9 Set Up Camera Info Create the camera name and its description. Click Continue. It will take a few seconds to register the camera with the server. 8

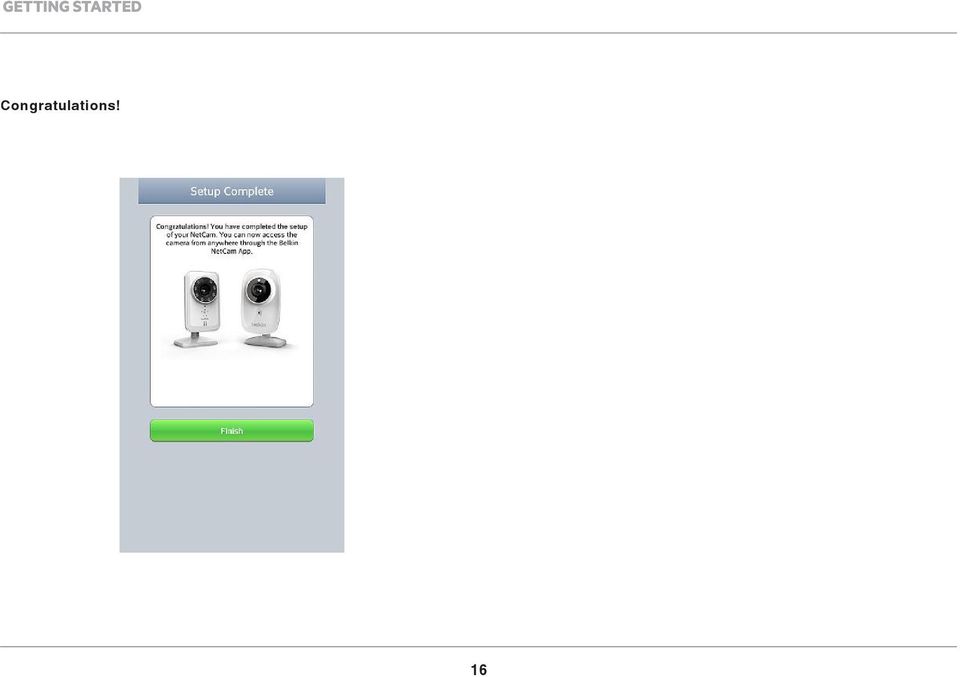
11 GETTING STARTED 4.10 Setup Complete Congratulations! Please flip the setup switch down on the back of the NetCam. Click Finish to complete the setup. 9

12 GETTING STARTED 5. Set Up on Android Devices 5.1 Connect your device to NetCam Wi-Fi signal 5.2 Launch NetCam App Once your device establishes a connection with the camera, launch the NetCam App. You should see a pop-up message like the one below. Click Yes to set up your camera. Go to Settings > Wireless and Network > Wi-Fi settings and connect to the camera Wi-Fi signal. 10

13 GETTING STARTED 5.3 Camera Setup Click Continue to begin setup. 5.4 Camera Preview The camera will show you a preview after successfully connecting to your device. Click Connect camera to Internet. 11

14 GETTING STARTED 5.5 Connect to the Internet Choose your Wi-Fi network to connect to the Internet. 5.6 Connect to Internet Enter your Wi-Fi password if you have a security-enabled network. 12

15 GETTING STARTED Please wait for the camera to establish an Internet connection. 5.7 Create an Account If this is your first time setting up your camera, you will need to create an account. 13

16 GETTING STARTED 5.8 Use Existing Accounts If you have an existing account, select Use Existing and then enter your account information. Click Sign in. 5.9 Set Up Camera Info Create the camera name and its description. 14

17 GETTING STARTED Click Continue. It will take a few seconds to register the camera with the server Setup Complete Please flip the setup switch down on the back of the NetCam. Click Finish to complete the setup. 15

18 GETTING STARTED Congratulations! 16
19 GETTING STARTED 6. Mounting Your Camera (optional) Unscrew camera post from the base and remove weight. Attach screws to wall and hang plate onto screws. 1/8 in or 5.5mm 2.5mm 17

20 GETTING STARTED Align base with plate and screw on camera post. 18

21 GETTING TO KNOW YOUR Wi-Fi CAMERA Front Panel A: Brightness sensor B: Camera sensor C: IR LED D: Microphone 19
22 GETTING TO KNOW YOUR Wi-Fi CAMERA Back Panel B: Network Green: Connected to server Orange: Connected to local area network only Flashing Amber: Not connected to any network Flashing Green: Connected to network, ready to set up C: Power Green: Power On D: Camera Stand You can adjust the NetCam s position by adjusting the stand. E: Reset button Reset System: Press and hold for 1 second to reset the system. Factory Default: Press and hold for 20 seconds to restore factory default settings. LED Indicators A: Setup Green: Setup up mode on Amber: Setup mode initializing Light Off: Setup mode off F: Setup switch Flip up to switch to setup mode. Flip down to switch to camera mode. 20
23 TECHNICAL DETAILS Software Features and Specifications App on ios or Android Camera setup Live camera viewing Save snapshot and video from the live stream Live one-way audio Camera settings Enable/disable alert Camera sharing Set camera status (online, offline, private) Auto adjust Video stream (Frame rate, video resolution, quality) General settings Reset password Sign in automatically Invite friends to view your camera Invite friends to view your camera Enable/disable alert User account management Create new user account Reset password Web App Live camera viewing Live audio on selected PC web browsers (Internet Explorer, Firefox, and Google Chrome ) Camera settings Camera firmware upgrade Delete camera 21
24 TECHNICAL DETAILS Main Window Camera Status Configure Camera Camera Configuration Name: Name of your camera Share/unshare: Make your camera public to your friends or not. Status: Change camera status to be online, offline, or private. Rotation: Select Normal or Flipped Vertically on the videos. IR: Select Auto, On, or Off of IR LEDs. Auto Adjust Frame Rate: Up to 25fps Quality: 1-5 (Best = 5) Video Size: 1280x720, 640x360, 320x180 Microphone > Enable/Disable Microphone alert > Enable/Disable alert 22
25 TECHNICAL DETAILS Camera Viewer Take a Snapshot Record Video Enable Microphone 23
26 TECHNICAL DETAILS Protection To protect your security against a hacker, a pop-up message will alert you if someone else is logged into your account at the same time as you. Web Browser Access this link via Internet Explorer, Netscape, Firefox, or Google Chrome: Then you can view the camera via your PC. 24
27 TECHNICAL DETAILS Hardware Features and Specifications Camera Image Sensor 2MP 1/3.2 inch CMOS sensor Lens Focal length: 3.0mm, F2.0 View Angle Horizontal: 78 Vertical: 45 Diagonal: 90 Still Image Capture Video Features Audio Audio In Audio Compression 720P still capture Adjust image size and quality Built-in microphone, -38 db ± 2 db G.711, PCM IR LEDs 8 IR LEDs, 850nm 8-meter illumination distance IR Mode Ambient Light Sensor Video Codecs H.264 Resolution Frame Rate Always on Always off Auto mode IR turns on when luminance decreases to about 3 lux IR turns off when luminance increases to about 8 lux RoHS-compliant 560nm luminance detector 1280x720, 640x360, 320x180 Up to 25frames Networking Network Interface Wireless Connectivity Radio Specifications Antenna b/g/n WLAN b/g/n Wireless with WEP/WPA/WPA2 security RF band: ISM Band 2.4GHz Channels: Varies by country RF Power Output n: 14 ± 1 dbm Average g: 14 ± 1 dbm Average b: 16 ± 1 dbm Average Type: Chip antenna, SMD Gain: 1.5 dbm peak Efficiency: above 80% 25
28 TECHNICAL DETAILS General System Processor: RT5350 Speed: 360MHz DRAM: 64MB Flash: 16MB Power External AC-to-DC switching power adapter Input: V AC, 50/60Hz, Output: 5V DC, 1A Button Reset Button Reset system: Press less than 1 second to reset the system Factory default: Press and hold 20 seconds to restore the factory default settings Switch Setup mode switch: Turn setup mode on and off LEDs Setup Mode LED Solid Green: Setup Mode on Amber: In progress to switch to Setup Mode No light: Setup Mode off Network LED Solid Amber: Local network ok Solid Green: Connection to Internet ok Flashing Amber: No network yet Flashing Green: Global Internet ok System LED Solid Green: System on 26
29 TECHNICAL DETAILS System Requirements iphone, ipad, or ipod touch with ios 4.1 or above or Android devices Version 2.2 or above PC OS: Windows XP, Windows Vista, or Windows 7, or Mac OS X v Snow Leopard PC browsers: Internet Explorer 8, Google Chrome 16, Firefox 11.1, Safari 5.1 Using the latest Adobe Flash Player Resetting the Camera The Reset button is used in rare cases. In the unlikely event that your camera functions improperly, please use a pin to reset the camera. The Reset button is where the arrow below points. Reset the camera when the switch is in OFF mode. After the reset, the camera will resume to the default setting. Reset system: Press and hold for 1 second to reset the system Reset to factory default: Press and hold for 20 seconds to restore the factory default settings 27
30 TROUBLESHOOTING, SUPPORT, AND WARRANTY If I buy more cameras, could I use the same username to connect them? Unlimited cameras can be added under your own account, but each one should have a different camera name. The figure below shows that you can have different cameras under your account. How can I share my cameras with my friends? Log in to your account. Under the camera configuration, find the Sharing icon. Type in your friends addresses to invite them to see your camera. 28
31 TROUBLESHOOTING, SUPPORT, AND WARRANTY How can I upgrade the firmware? Access your NetCam s account from a web browser. Under the camera configuration, a screen will pop up like the one below. Click Update Now. It will take about 5~10 minutes to upgrade the new firmware. Can I change my username? Your username is what identifies your account information, and once set, it cannot be changed. If you later do not like your username, the only recourse is to create a new account. Please note that any subscription services registered in the old account (if applicable) cannot be transferred to the new account. Forgot or lost your password? The NetCam App login screen has a link labeled Forgot your password? that takes you to the account sign-in webpage. Type in your username and address, and then click the Reset button to begin the process of setting up a new password. Technical Support US 29
32 TROUBLESHOOTING, SUPPORT, AND WARRANTY Belkin International, Inc., Limited 2-Year Product Warranty What this warranty covers. Belkin International, Inc. ( Belkin ) warrants to the original purchaser of this Belkin product that the product shall be free of defects in design, assembly, material, or workmanship. What the period of coverage is. Belkin warrants the Belkin product for two years. What is not covered by this warranty? All above warranties are null and void if the Belkin product is not provided to Belkin for inspection upon Belkin s request at the sole expense of the purchaser, or if Belkin determines that the Belkin product has been improperly installed, altered in any way, or tampered with. The Belkin Product Warranty does not protect against acts of God such as flood, lightning, earthquake, war, vandalism, theft, normal-use wear and tear, erosion, depletion, obsolescence, abuse, damage due to low voltage disturbances (i.e. brownouts or sags), nonauthorized program, or system equipment modification or alteration. What will we do to correct problems? Product Warranty. Belkin will repair or replace, at its option, any defective product free of charge (except for shipping charges for the product). Belkin reserves the right to discontinue any of its products without notice, and disclaims any limited warranty to repair or replace any such discontinued products. In the event that Belkin is unable to repair or replace the product (for example, because it has been discontinued), Belkin will offer either a refund or a credit toward the purchase of another product from Belkin. com in an amount equal to the purchase price of the product as evidenced on the original purchase receipt as discounted by its natural use. 30
33 TROUBLESHOOTING, SUPPORT, AND WARRANTY How to get service. To get service for your Belkin product you must take the following steps: 1. Contact Belkin International, Inc., at E. Waterfront Drive, Playa Vista, CA 90094, Attn: Customer Service, within 15 days of the Occurrence. Be prepared to provide the following information: a. The part number of the Belkin product b. Where you purchased the product. c. When you purchased the product. d. Copy of original receipt 2. Your Belkin Customer Service Representative will then instruct you on how to forward your receipt and Belkin product and how to proceed with your claim. Belkin reserves the right to review the damaged Belkin product. All costs of shipping the Belkin product to Belkin for inspection shall be borne solely by the purchaser. If Belkin determines, in its sole discretion, that it is impractical to ship the damaged equipment to Belkin, Belkin may designate, in its sole discretion, an equipment repair facility to inspect and estimate the cost to repair such equipment. The cost, if any, of shipping the equipment to and from such repair facility and of such estimate shall be borne solely by the purchaser. Damaged equipment must remain available for inspection until the claim is finalized. Whenever claims are settled, Belkin reserves the right to be subrogated under any existing insurance policies the purchaser may have. 31
34 TROUBLESHOOTING, SUPPORT, AND WARRANTY How state law relates to the warranty. THIS WARRANTY CONTAINS THE SOLE WARRANTY OF BELKIN. THERE ARE NO OTHER WARRANTIES, EXPRESSED OR, EXCEPT AS REQUIRED BY LAW, IMPLIED, INCLUDING THE IMPLIED WARRANTY OR CONDITION OF QUALITY, MERCHANTABILITY OR FITNESS FOR A PARTICULAR PURPOSE, AND SUCH IMPLIED WARRANTIES, IF ANY, ARE LIMITED IN DURATION TO THE TERM OF THIS WARRANTY. Some states do not allow limitations on how long an implied warranty lasts, so the above limitations may not apply to you. IN NO EVENT SHALL BELKIN BE LIABLE FOR INCIDENTAL, SPECIAL, DIRECT, INDIRECT, CONSEQUENTIAL OR MULTIPLE DAMAGES SUCH AS, BUT NOT LIMITED TO, LOST BUSINESS OR PROFITS ARISING OUT OF THE SALE OR USE OF ANY BELKIN PRODUCT, EVEN IF ADVISED OF THE POSSIBILITY OF SUCH DAMAGES. This warranty gives you specific legal rights, and you may also have other rights, which may vary from state to state. Some states do not allow the exclusion or limitation of incidental, consequential, or other damages, so the above limitations may not apply to you. 32
35 REGULATORY INFORMATION DECLARATION OF CONFORMITY WITH FCC RULES FOR ELECTROMAGNETIC COMPATIBILITY We, Belkin International, Inc., of E. Waterfront Drive, Playa Vista, CA 90094, declare under our sole responsibility that the device, F7D7602v1, complies with Part 15 of the FCC Rules. Operation is subject to the following two conditions: (1) this device may not cause harmful interference, and (2) this device must accept any interference received, including interference that may cause undesired operation. Caution: Exposure to Radio Frequency Radiation. The radiated output power of this device is far below the FCC radio frequency exposure limits. Nevertheless, the device shall be used in such a manner that the potential for human contact during normal operation is minimized. When connecting an external antenna to the device, the antenna shall be placed in such a manner to minimize the potential for human contact during normal operation. In order to avoid the possibility of exceeding the FCC radio frequency exposure limits, human proximity to the antenna shall not be less than 20cm (8 inches) during normal operation. Federal Communication Commission Interference Statement and can radiate radio frequency energy and, if not installed and used in accordance with the instructions, may cause harmful interference to radio communications. However, there is no guarantee that interference will not occur in a particular installation. If this equipment does cause harmful interference to radio or television reception, which can be determined by turning the equipment off and on, the user is encouraged to try to correct the interference by one of the following measures: Reorient or relocate the receiving antenna. Increase the separation between the equipment and receiver. Connect the equipment into an outlet on a circuit different from that to which the receiver is connected. Consult the dealer or an experienced radio/tv technician for help. FCC Caution: Any changes or modifications not expressly approved by the party responsible for compliance could void the user s authority to operate this equipment This device and its antenna(s) must not be co-located or operating in conjunction with any other antenna or transmitter. This device is going to be operated in 5.15~5.25GHz frequency range, it is restricted for indoor environment only. This equipment has been tested and found to comply with the limits for a Class B digital device, pursuant to Part 15 of the FCC Rules. These limits are designed to provide reasonable protection against harmful interference in a residential installation. This equipment generates, uses 33
36 REGULATORY INFORMATION IMPORTANT NOTE: FCC Radiation Exposure Statement: This equipment complies with FCC radiation exposure limits set forth for an uncontrolled environment. This equipment should be installed and operated with a minimum distance of 23cm between the radiator and your body. IC Statement: This Class B digital apparatus complies with Canadian ICES-003. Cet appareil numerique de la classe B conforme a la norme NMB-003 du Canada. Industry Canada Statement: This device complies with RSS-210 of the Industry Canada Rules. Operation is subject to the following two conditions: (1) This device may not cause interference, and (2) This device must accept any interference, including interference that may cause undesired operation of the device. IMPORTANT NOTE: Radiation Exposure Statement: This equipment complies with IC radiation exposure limits set forth for an uncontrolled environment. This equipment should be installed and operated with a minimum distance of 20cm between the radiator and your body. Déclaration d exposition aux radiations: Cet équipement est conforme aux limites d exposition aux rayonnements IC établies pour un environnement non contrôlé. Cet équipement doit être installé et utilisé avec un minimum de 20 cm de distance entre la source de rayonnement et votre corps. This radio transmitter (IC: 3623A-F7D7602V1/ Model: F7D7602V1) has been approved by Industry Canada to operate with the antenna types listed below with the maximum permissible gain and required antenna impedance for each antenna type indicated. Antenna types not included in this list, having a gain greater than the maximum gain indicated for that type, are strictly prohibited for use with this device. Ce dispositif est conforme a la norme CNR- standards d Industrie Canada applicable aux appareils radio exempts de licence. Son fonctionnement est sujet aux deux conditions suivantes: (1) le dispositif ne doit pas produire de brouillage prejudiciable, et (2) ce dispositif doit accepter tout brouillage recu, y compris un brouillage susceptible de provoquer un fonctionnement indesirable. 34
37 REGULATORY INFORMATION Avertissement: Ce dispositif a été conçu pour fonctionner avec une antenne ayant un gain maximal de PCB dipole antenne avec db [3.1]. Une antenne à gain plus élevé est strictement interdite par les règlements d Industrie Canada. L impédance d antenne requise est de 50 ohms. Conformément à la réglementation d Industrie Canada, le présent émetteur radio peutfonctionner avec une antenne d un type et d un gain maximal (ou inférieur) approuvé pourl émetteur par Industrie Canada. Dans le but de réduire les risques de brouillage radioélectriqueà l intention des autres utilisateurs, il faut choisir le type d antenne et son gain de sorte que lapuissance isotrope rayonnée équivalente (p.i.r.e.) ne dépasse pas l intensité nécessaire àl établissement d une communication satisfaisante. Le présent émetteur radio (IC: 3623A-F7D7602V1/ Model: F7D7602V1) a été approuvé par Industrie Canada pour fonctionner avec les types d antenne énumérés ci-dessous et ayant un gain admissible maximal et l impédance requise pour chaque type d antenne. Les types d antenne non inclus dans cette liste, ou dont le gain est supérieur au gain maximal indiqué, sont strictement interdits pour l exploitation de l émetteur. 35
38 2013 Belkin International, Inc. All rights reserved. All trade names are registered trademarks of respective manufacturers listed. Windows, Windows Vista, and Internet Explorer are either registered trademarks or trademarks of Microsoft Corporation in the United States and/or other countries. ipad, iphone, ipod touch, Mac OS, and Safari are trademarks of Apple Inc., registered in the U.S. and other countries. App Store is a service mark of Apple Inc. Wi-Fi is a registered trademark of the Wi-Fi Alliance. Android, Google Chrome, and Google Play are trademarks of Google Inc.
39 TABLE OF CONTENTS Mise en route... 1 Contenu de la boîte... 1 Configuration initiale... 1 Configurez votre caméra sans fil au moyen de vos appareils mobiles. 2 Dépannage, soutien et garantie Dépannage...28 Soutien technique...29 Garantie limitée de 2 ans de Belkin International, Inc. sur le produit. 30 Connaître votre caméra Wi-Fi Face avant Face arrière...20 Information réglementaire...33 Déclaration FCC...33 Énoncé d Industrie Canada...34 Détails techniques Fonctions logicielles et spécifications Fonctions matérielles et spécifications...25 Configuration requise...27 Réinitialisation de la caméra...27
40 GETTING STARTED Félicitations pour votre choix d une NetCam Belkin. Cet appareil vous permettra de jeter facilement un coup d œil sur votre domicile et vos êtres chers pendant votre absence. Contenu de la boîte NetCam HD Bloc d alimentation Configuration initiale Pour commencer, vous aurez besoin de ce qui suit : Votre routeur sans fil, son nom de réseau (SSID) et son mot de passe. Un appareil Android (version 2.2 ou plus récente) ou un iphone, ipad ou ipod touch (ios version 4.1 ou plus récente) Guide d installation rapide Trousse de montage 1
41 MISE EN ROUTE Configurez votre caméra sans fil au moyen de vos appareils mobiles 2. Réglez la NetCam en mode Configuration en poussant vers le haut le commutateur situé à l arrière de la caméra 1. Branchez la NetCam sur une prise de courant Veuillez vous assurer que le commutateur est en mode Configuration et que le voyant Wi-Fi clignote. 2
42 MISE EN ROUTE 3. Téléchargez l application NetCam depuis le site App Store ou Google Play 4. Configuration sur un iphone, ipad ou ipod touch 4.1 Sélectionnez le signal Wi-Fi NetCam pour votre appareil mobile Sélectionnez «Réglages > Wi-Fi» sur votre iphone/ipad/ipod touch, puis sélectionnez le signal Wi-Fi de la caméra. 3
43 MISE EN ROUTE 4.2 Lancez l application NetCam Une fois la connexion établie avec la caméra, lancez l application NetCam. Un message semblable à celui-ci devrait s afficher. Cliquez sur «Oui» pour configurer votre caméra. 4.3 Configuration de la caméra Cliquez sur «Continuer» pour commencer la configuration. 4
44 MISE EN ROUTE 4.4 Prévisualisation La caméra vous donnera un aperçu d image une fois connecté à votre appareil. 4.5 Connexion à Internet Sélectionnez votre réseau Wi-Fi pour vous connecter à Internet. Cliquez sur «Connecter la caméra à Internet». 5
45 MISE EN ROUTE 4.6 Connexion à Internet Attendez que la caméra établisse la connexion à Internet. Entrez votre mot de passe Wi-Fi si vous avez un réseau sécurisé. 6
46 MISE EN ROUTE 4.7 Création d un compte Si vous configurez votre caméra pour la première fois, vous devez créer un compte. 4.8 Utilisation d un compte existant Si vous avez déjà un compte, sélectionnez «Utiliser existant» et entrez les détails de votre compte. Cliquez sur «Se connecter». 7
47 MISE EN ROUTE 4.9 Définition des informations de la caméra Attribuez un nom à la caméra et donnez une description. Cliquez sur «Continuer». Il faudra quelques secondes pour enregistrer la caméra sur le serveur. 8
48 MISE EN ROUTE 4.10 Configuration terminée Félicitations! Poussez le commutateur à l arrière de la NetCam vers le bas. Cliquez sur «Terminer» pour compléter l installation. 9


49 MISE EN ROUTE 5. Configuration sur des appareils Android 5.1 Sélectionnez le signal Wi-Fi NetCam pour votre appareil 5.2 Lancez l application NetCam Une fois la connexion établie avec la caméra, lancez l application NetCam. Un message semblable à celui-ci devrait s afficher. Cliquez sur «Oui» pour configurer votre caméra. Sélectionnez «Réglages > Sans fil» et «Réseau > Réglages Wi-Fi», puis sélectionnez le signal Wi-Fi de la caméra. 10
50 MISE EN ROUTE 5.3 Configuration de la caméra Cliquez sur «Continuer» pour commencer la configuration. 5.4 Prévisualisation La caméra vous donnera un aperçu d image une fois connecté à votre appareil. Cliquez sur «Connecter la caméra à Internet». 11
51 MISE EN ROUTE 5.5 Connexion à Internet Sélectionnez votre réseau Wi-Fi pour vous connecter à Internet. 5.6 Connexion à Internet Entrez votre mot de passe Wi-Fi si vous avez un réseau sécurisé. 12
52 MISE EN ROUTE Attendez que la caméra établisse une connexion Internet. 5.7 Création d un compte Si vous configurez votre caméra pour la première fois, vous devez créer un compte. 13
53 MISE EN ROUTE 5.8 Utilisation d un compte existant Si vous avez déjà un compte, sélectionnez «Utiliser existant» et entrez les détails de votre compte. Cliquez sur «Se connecter». 5.9 Définition des informations de la caméra Attribuez un nom à la caméra et donnez une description. 14
54 MISE EN ROUTE Cliquez sur «Continuer». Il faudra quelques secondes pour enregistrer la caméra sur le serveur Configuration terminée Poussez le commutateur à l arrière de la NetCam vers le bas. Cliquez sur «Terminer» pour compléter l installation. 15
55 MISE EN ROUTE Félicitations! 16
56 MISE EN ROUTE 6. Montage de votre caméra (facultatif) Dévissez le pied de la caméra de la base et retirez le poids. Fixez les vis au mur et accrochez la plaque sur les vis. 1/8 in or 5.5mm 2.5mm 17
57 MISE EN ROUTE Alignez la base avec la plaque et vissez-la sur le pied de la caméra. 18
58 CONNAÎTRE VOTRE CAMÉRA WI-FI Face avant A : Détecteur de luminosité B : Capteur de la caméra C : Voyant infrarouge D : Microphone 19
59 CONNAÎTRE VOTRE CAMÉRA WI-FI Face arrière B: Réseau Vert : Connecté au serveur Orange : Connecté au réseau local seulement Ambre clignotant : Connecté à aucun réseau Vert clignotant : Connecté au réseau, prêt pour la configuration C: Alimentation Vert : Sous tension D : Pied de la caméra Vous pouvez régler la position de la NetCam en ajustant le pied. E : Bouton de réinitialisation Réinitialisation du système : Appuyez sur le bouton et maintenez-le enfoncé pendant 1 seconde pour réinitialiser le système. Paramètres du fabricant : Appuyez sur le bouton et maintenez-le enfoncé pendant 20 secondes pour rétablir les paramètres par défaut définis en usine. Témoins lumineux A: Configuration Vert : Mode Configuration activé Ambre : Mode Configuration en phase d initialisation Voyant éteint : Mode Configuration désactivé F: Commutateur de configuration Poussez le commutateur vers le haut pour passer en mode Configuration. Poussez le commutateur vers le bas pour passer en mode Caméra. 20
60 TECHNICAL DETAILS Technical Features Fonctions logicielles et spécifications Application sur ios ou Android Configuration de la caméra Visionnement en direct de la caméra Sauvegarde de capture d écran et de vidéo à partir du flux en direct Communication audio unidirectionnelle en direct Réglages de la caméra o Activer/désactiver les alertes par courriel o Partage de caméra o Définir l état de la caméra (en ligne, hors ligne, privé) o Réglage automatique Flux vidéo (fréquence d images, résolution vidéo, qualité) Réglages généraux o Réinitialisation du mot de passe o Se connecter automatiquement Inviter des amis à visionner votre caméra Supprimer la caméra Inviter des amis à visionner votre caméra Activer/désactiver les alertes par courriel Gestion de compte d utilisateur Créer un nouveau compte d utilisateur Réinitialisation du mot de passe Application Web Visionnement en direct de la caméra Audio en direct sur certains navigateurs Web pour PC (Internet Explorer, Firefox et Google Chrome ) Réglages de la caméra Mise à niveau du micrologiciel de la caméra 21
61 DÉTAILS TECHNIQUES Fenêtre principale État de la caméra Configurer la caméra Configuration de la caméra Nom : Nom de votre caméra Partager/arrêter le partage : Rendre votre caméra accessible à vos amis ou non. État : Changer l état de la caméra à En ligne, Hors ligne ou Privé. Rotation : Sélectionner Normal ou Renverser verticalement sur les vidéos. Infrarouge : Sélectionner «Auto», «On» ou «Off» sur les voyants infrarouges. Réglage automatique o Fréquence d images : Jusqu à 25 images par seconde o Qualité : 1-5 (Meilleure = 5) o Taille de la vidéo : 1280x720, 640x360, 320x180 Microphone : Activer/Désactiver microphone Alertes par courriel > Activer/Désactiver alertes par courriel 22
62 DÉTAILS TECHNIQUES Visionneuse de caméra Capture instantanée Enregistrer vidéo Activer microphone 23
PRESENTATION REMOTE TÉLÉCOMMANDE DE PRÉSENTATION. User Guide Manuel de l utilisateur
 PRESENTATION REMOTE TÉLÉCOMMANDE DE PRÉSENTATION User Guide Manuel de l utilisateur Targus Presentation Remote Introduction Thank you for your purchase of the Targus Presentation Remote. This cordless
Paxton. ins-20605. Net2 desktop reader USB
 Paxton ins-20605 Net2 desktop reader USB 1 3 2 4 1 2 Desktop Reader The desktop reader is designed to sit next to the PC. It is used for adding tokens to a Net2 system and also for identifying lost cards.
Instructions Mozilla Thunderbird Page 1
 Instructions Mozilla Thunderbird Page 1 Instructions Mozilla Thunderbird Ce manuel est écrit pour les utilisateurs qui font déjà configurer un compte de courrier électronique dans Mozilla Thunderbird et
How to Login to Career Page
 How to Login to Career Page BASF Canada July 2013 To view this instruction manual in French, please scroll down to page 16 1 Job Postings How to Login/Create your Profile/Sign Up for Job Posting Notifications
WiFi Security Camera Quick Start Guide. Guide de départ rapide Caméra de surveillance Wi-Fi (P5)
") #45 #46 WiFi Security Camera Quick Start Guide Guide de départ rapide Caméra de surveillance Wi-Fi (P5) #47 Start Here 1 Is this you? TECH SUPPORT CTRL ALT DEL 2 If yes, turn to page three 1 3 If not,
#45 #46 WiFi Security Camera Quick Start Guide Guide de départ rapide Caméra de surveillance Wi-Fi (P5) #47 Start Here 1 Is this you? TECH SUPPORT CTRL ALT DEL 2 If yes, turn to page three 1 3 If not,
Package Contents. System Requirements. Before You Begin
 Package Contents DWA-125 Wireless 150 USB Adapter CD-ROM (contains software, drivers, and manual) Cradle If any of the above items are missing, please contact your reseller. System Requirements A computer
GIGABIT PCI DESKTOP ADAPTER DGE-530T. Quick Installation Guide+ Guide d installation+
 GIGABIT PCI DESKTOP ADAPTER Quick Installation Guide+ Guide d installation+ Check Your Package Contents Quick Installation Guide Gigabit Ethernet PCI Adapter CD with Manual and Drivers DO NOT insert the
Thank you for choosing the Mobile Broadband USB Stick. With your USB Stick, you can access a wireless network at high speed.
 Thank you for choosing the Mobile Broadband USB Stick. With your USB Stick, you can access a wireless network at high speed. Note: This manual describes the appearance of the USB Stick, as well as the
TABLE DES MATIERES A OBJET PROCEDURE DE CONNEXION
 1 12 rue Denis Papin 37300 JOUE LES TOURS Tel: 02.47.68.34.00 Fax: 02.47.68.35.48 www.herve consultants.net contacts@herve consultants.net TABLE DES MATIERES A Objet...1 B Les équipements et pré-requis...2
Guide d'installation rapide TFM-560X YO.13
 Guide d'installation rapide TFM-560X YO.13 Table of Contents Français 1 1. Avant de commencer 1 2. Procéder à l'installation 2 Troubleshooting 6 Version 06.08.2011 16. Select Install the software automatically
Thank you for choosing the Mobile Broadband USB Stick. With your USB Stick, you can access a wireless network at high speed.
 Thank you for choosing the Mobile Broadband USB Stick. With your USB Stick, you can access a wireless network at high speed. Note: This manual describes the appearance of the USB Stick, as well as the
Quick Installation Guide TEW-P21G
 Quick Installation Guide TEW-P21G Table of of Contents Contents... 1. Avant de commencer... 2. Comment effectuer les connexions... 3. Utilisation du serveur d'impression... 1 1 2 3 Troubleshooting... 7
Logitech Tablet Keyboard for Windows 8, Windows RT and Android 3.0+ Setup Guide Guide d installation
 Logitech Tablet Keyboard for Windows 8, Windows RT and Android 3.0+ Setup Guide Guide d installation English.......................................... 3 Français.........................................
Contents Windows 8.1... 2
 Workaround: Installation of IRIS Devices on Windows 8 Contents Windows 8.1... 2 English Français Windows 8... 13 English Français Windows 8.1 1. English Before installing an I.R.I.S. Device, we need to
Notice Technique / Technical Manual
 Contrôle d accès Access control Encodeur USB Mifare ENCOD-USB-AI Notice Technique / Technical Manual SOMMAIRE p.2/10 Sommaire Remerciements... 3 Informations et recommandations... 4 Caractéristiques techniques...
Instructions pour mettre à jour un HFFv2 v1.x.yy v2.0.00
 Instructions pour mettre à jour un HFFv2 v1.x.yy v2.0.00 HFFv2 1. OBJET L accroissement de la taille de code sur la version 2.0.00 a nécessité une évolution du mapping de la flash. La conséquence de ce
Logitech Speaker System Z553 Setup Guide Guide d installation
 Logitech Speaker System Z553 Setup Guide Guide d installation Logitech Speaker System Z553 English................. 3 Français................ 10 www.logitech.com/support...19 2 Package contents Logitech
WEB page builder and server for SCADA applications usable from a WEB navigator
 Générateur de pages WEB et serveur pour supervision accessible à partir d un navigateur WEB WEB page builder and server for SCADA applications usable from a WEB navigator opyright 2007 IRAI Manual Manuel
Lavatory Faucet. Instruction Manual. Questions? 1-866-661-9606 customerservice@artikaworld.com
 Lavatory Faucet Instruction Manual rev. 19-01-2015 Installation Manual You will need Adjustable Wrench Adjustable Pliers Plumber s Tape Hardware list (included) Allen Key Socket wrench tool Important Follow
Garage Door Monitor Model 829LM
 Garage Door Monitor Model 829LM To prevent possible SERIOUS INJURY or DEATH from a closing garage door: NEVER permit children to operate or play with door control push buttons or remote control transmitters.
Quick Setup Guide Guide de configuration rapide. Tablet Device SGPT12 Series Tablette électronique Série SGPT12
 Quick Setup Guide Guide de configuration rapide Tablet Device SGPT12 Series Tablette électronique Série SGPT12 Welcome / Bienvenue Congratulations on your purchase of this Xperia Tablet S. This Quick Setup
VTP. LAN Switching and Wireless Chapitre 4
 VTP LAN Switching and Wireless Chapitre 4 ITE I Chapter 6 2006 Cisco Systems, Inc. All rights reserved. Cisco Public 1 Pourquoi VTP? Le défi de la gestion VLAN La complexité de gestion des VLANs et des
Folio Case User s Guide
 Fujitsu America, Inc. Folio Case User s Guide I N S T R U C T I O N S This Folio Case is a stylish, lightweight case for protecting your Tablet PC. Elastic Strap Pen Holder Card Holders/ Easel Stops Figure
Quick Start Guide This guide is intended to get you started with Rational ClearCase or Rational ClearCase MultiSite.
 Rational ClearCase or ClearCase MultiSite Version 7.0.1 Quick Start Guide This guide is intended to get you started with Rational ClearCase or Rational ClearCase MultiSite. Product Overview IBM Rational
Contrôle d'accès Access control. Notice technique / Technical Manual
 p.1/18 Contrôle d'accès Access control INFX V2-AI Notice technique / Technical Manual p.2/18 Sommaire / Contents Remerciements... 3 Informations et recommandations... 4 Caractéristiques techniques... 5
Tutoriel de formation SurveyMonkey
 Tutoriel de formation SurveyMonkey SurveyMonkey est un service de sondage en ligne. SurveyMonkey vous permet de créer vos sondages rapidement et facilement. SurveyMonkey est disponible à l adresse suivante
Nouveautés printemps 2013
 » English Se désinscrire de la liste Nouveautés printemps 2013 19 mars 2013 Dans ce Flash Info, vous trouverez une description des nouveautés et mises à jour des produits La Capitale pour le printemps
Quick Installation Guide TBW-106UB H/W: V1
 Quick Installation Guide TBW-106UB H/W: V1 Table of Contents... 1. Avant de commencer... 2. Procéder à l'installation... 3. Configuration de l'adaptateur Bluetooth... Troubleshooting... 1 1 2 5 7 Version
Quick Installation Guide TW100-BRV304
 Quick Installation Guide TW100-BRV304 Table of of Contents Contents Français... 1. Avant de commencer... 2. Installation du matériel... 3. Configuration du routeur... 1 1 2 3 Troubleshooting... 5 Version
SERVEUR DÉDIÉ DOCUMENTATION
 SERVEUR DÉDIÉ DOCUMENTATION Release 5.0.6.0 19 Juillet 2013 Copyright 2013 GIANTS Software GmbH, All Rights Reserved. 1/9 CHANGE LOG Correction de bug divers (5.0.6.0) Ajout d une option de relance automatique
Once the installation is complete, you can delete the temporary Zip files..
 Sommaire Installation... 2 After the download... 2 From a CD... 2 Access codes... 2 DirectX Compatibility... 2 Using the program... 2 Structure... 4 Lier une structure à une autre... 4 Personnaliser une
Access Point AP-010BT/AP-100BT Guide de démarrage rapide
 Access Point AP-010BT/AP-100BT Guide de démarrage rapide Acc-Pt-FR-QS Rév E 1/15 Connexion du point d accès 1. Faites glisser le joint torique dans le sillon dans le connecteur. Remarque : Si vous choisissez
Start me quick! Français
 Start me quick! Français Descriptif de la caméra: Contenu de l emballage: Installation de la caméra: Capteur de luminosité Lampe indicatrice Lentille de la caméra Lampes de l éclairage infrarouge Charnière
Utiliser une WebCam. Micro-ordinateurs, informations, idées, trucs et astuces
 Micro-ordinateurs, informations, idées, trucs et astuces Utiliser une WebCam Auteur : François CHAUSSON Date : 8 février 2008 Référence : utiliser une WebCam.doc Préambule Voici quelques informations utiles
Software and Hardware Datasheet / Fiche technique du logiciel et du matériel
 Software and Hardware Datasheet / Fiche technique du logiciel et du matériel 1 System requirements Windows Windows 98, ME, 2000, XP, Vista 32/64, Seven 1 Ghz CPU 512 MB RAM 150 MB free disk space 1 CD
DOCUMENTATION - FRANCAIS... 2
 DOCUMENTATION MODULE CATEGORIESTOPMENU MODULE CREE PAR PRESTACREA INDEX : DOCUMENTATION - FRANCAIS... 2 INSTALLATION... 2 CONFIGURATION... 2 LICENCE ET COPYRIGHT... 3 SUPPORT TECHNIQUE ET MISES A JOUR...
Quick Installation Guide TV-IP400 TV-IP400W
 Quick Installation Guide TV-IP400 TV-IP400W Table of of Contents Contents Français... 1. Avant de commencer... 2. Installation du matériel... 3. Configuration de la Webcam... Troubleshooting... 1 1 2 3
Touchstone WR2100 Wireless Repeater
 Touchstone WR2100 Wireless Repeater Quick Installation Guide i Package Contents The following items should be included: If any of these items are damaged or missing, please contact your service provider
PAR RINOX INC BY RINOX INC PROGRAMME D INSTALLATEUR INSTALLER PROGRAM
 PAR RINOX INC BY RINOX INC PROGRAMME D INSTALLATEUR INSTALLER PROGRAM DEVENEZ UN RINOXPERT DÈS AUJOURD HUI! BECOME A RINOXPERT NOW OPTIMISER VOS VENTES INCREASE YOUR SALES VISIBILITÉ & AVANTAGES VISIBILITY
Quick Installation Guide
 Quick Installation Guide PowerLine AV+ Wireless N Mini Extender Version 1.10(NA) February 18, 2013 Wi-Fi Configuration Note Package Contents PowerLine AV+ Wireless N Mini Extender ENGLISH CAT5 Ethernet
Compléter le formulaire «Demande de participation» et l envoyer aux bureaux de SGC* à l adresse suivante :
 FOIRE AUX QUESTIONS COMMENT ADHÉRER? Compléter le formulaire «Demande de participation» et l envoyer aux bureaux de SGC* à l adresse suivante : 275, boul des Braves Bureau 310 Terrebonne (Qc) J6W 3H6 La
Fabricant. 2 terminals
 Specifications Fabricant Nominal torque (Nm) 65 Minimal torque (Nm) 0,63 Coil resistance - 20 C (ohms) 20 Rated current DC (A) 1 Rotor inertia (kg.m 2 ) 2.10-3 Weight (kg) 7,20 Heat dissipation continuous
lundi 3 août 2009 Choose your language What is Document Connection for Mac? Communautés Numériques L informatique à la portée du Grand Public
 Communautés Numériques L informatique à la portée du Grand Public Initiation et perfectionnement à l utilisation de la micro-informatique Microsoft Document Connection pour Mac. Microsoft Document Connection
Practice Direction. Class Proceedings
 Effective Date: 2010/07/01 Number: PD - 5 Title: Practice Direction Class Proceedings Summary: This Practice Direction describes the procedure for requesting the assignment of a judge in a proceeding under
RULE 5 - SERVICE OF DOCUMENTS RÈGLE 5 SIGNIFICATION DE DOCUMENTS. Rule 5 / Règle 5
 RULE 5 - SERVICE OF DOCUMENTS General Rules for Manner of Service Notices of Application and Other Documents 5.01 (1) A notice of application or other document may be served personally, or by an alternative
Guide de démarrage rapide
 Guide de démarrage rapide Thermostat programmable Wi-Fi RTH6500WF Wi-Fi Series Bienvenue Il est facile de configurer et de préparer le système. 1 2 3 Installez votre thermostat. Connectez le réseau sans
Table of Contents. Product Overview. Troubleshooting. Setting Up Your EA-Series Router. Specifications. Linksys EA-Series.
 User Guide EA6350 Linksys EA-Series Table of Contents Table of Contents Product Overview EA6350.....................................1 Setting Up Your EA-Series Router Where to find more help.........................
DOCUMENTATION - FRANCAIS... 2
 DOCUMENTATION MODULE SHOPDECORATION MODULE PRESTASHOP CREE PAR PRESTACREA INDEX : DOCUMENTATION - FRANCAIS... 2 INSTALLATION... 2 Installation automatique... 2 Installation manuelle... 2 Résolution des
ClickShare. Manuel de sécurité
 ClickShare Manuel de sécurité R5900015FR/01 18/10/2013 Barco nv President Kennedypark 35, 8500 Kortrijk, Belgium Tél.: +32 56.23.32.11 Fax: +32 56.26.22.62 Support: www.barco.com/esupport Rendez nous visite
THE EVOLUTION OF CONTENT CONSUMPTION ON MOBILE AND TABLETS
 THE EVOLUTION OF CONTENT CONSUMPTION ON MOBILE AND TABLETS OPPA investigated in March 2013 its members, in order to design a clear picture of the traffic on all devices, browsers and apps. One year later
Quick Installation Guide TV-IP212/TV-IP212W TV-IP312/TV-IP312W H/W: A1.0R
 Quick Installation Guide TV-IP212/TV-IP212W TV-IP312/TV-IP312W H/W: A1.0R Table Table of Contents of Contents... 1. Avant de commencer... 2. Installation du matériel... 3. Installation du serveur de caméra
Quick Installation Guide TV-IP422 TV-IP422W H/W: A1.0R
 Quick Installation Guide TV-IP422 TV-IP422W H/W: A1.0R Table Table of Contents of Contents... 1. Avant de commencer... 2. Installation du matériel... 3. Configuration de la Webcam... Troubleshooting...
calls.paris-neuroscience.fr Tutoriel pour Candidatures en ligne *** Online Applications Tutorial
 calls.paris-neuroscience.fr Tutoriel pour Candidatures en ligne Online Applications Tutorial 1/4 Pour postuler aux Appels d Offres de l ENP, vous devez aller sur la plateforme : calls.parisneuroscience.fr.
Le Cloud Computing est-il l ennemi de la Sécurité?
 Le Cloud Computing est-il l ennemi de la Sécurité? Eric DOMAGE Program manager IDC WE Security products & Solutions Copyright IDC. Reproduction is forbidden unless authorized. All rights reserved. Quelques
Download de handleiding op aquilavizion.com. Il manuale può essere scaricato dal sito aquilavizion.com
 HOME VIZION Nous vous remercions d avoir choisi Aquila Vizion. Afin de profiter pleinement et durablement de votre caméra Home Vizion, nous vous invitons à lire attentivement les instructions de montage
Règlement sur le télémarketing et les centres d'appel. Call Centres Telemarketing Sales Regulation
 THE CONSUMER PROTECTION ACT (C.C.S.M. c. C200) Call Centres Telemarketing Sales Regulation LOI SUR LA PROTECTION DU CONSOMMATEUR (c. C200 de la C.P.L.M.) Règlement sur le télémarketing et les centres d'appel
Quick Installation Guide TE100-P1P
 Quick Installation Guide TE100-P1P Table of of Contents Contents... 1 1. Avant de commencer... 1 2. Procéder à l'installation... 2 3. Configuration du serveur d'impression... 3 4. Ajout de l'imprimante
Warning: Failure to follow these warnings could result in property damage, or personal injury.
 Western Steel & Tube 1 Storage Locker Extended Storage Locker Storage Cabinet Assembly And Use Instructions Warning: Failure to follow these warnings could result in property damage, or personal injury.
Acce s aux applications informatiques Supply Chain Fournisseurs
 Acce s aux applications informatiques Supply Chain Fournisseurs Toujours plus de service pour vous ; rapide, pratique, sécurisé, écologique et gratuit! Vous vous connectez à notre site MESSIER BUGATTI
Le No.1 de l économie d énergie pour patinoires.
 Le No.1 de l économie d énergie pour patinoires. Partner of REALice system Economie d énergie et une meilleure qualité de glace La 2ème génération améliorée du système REALice bien connu, est livré en
USB 598. Quick Start Guide (Windows) Guide de démarrage rapide (Windows) USB Modem. Modem USB. www.sierrawireless.com
 Guide de démarrage rapide (Windows) USB Modem. Modem USB. www.sierrawireless.com") USB 598 With Avec USB Modem Quick Start Guide (Windows) Modem USB Guide de démarrage rapide (Windows) www.sierrawireless.com This guide provides installation instructions for users of: Windows Vista Windows
USB 598 With Avec USB Modem Quick Start Guide (Windows) Modem USB Guide de démarrage rapide (Windows) www.sierrawireless.com This guide provides installation instructions for users of: Windows Vista Windows
PRECAUTIONS DESCRIPTION DU PRODUIT
 Vous venez d acquérir un produit de la marque Essentiel b et nous vous en remercions. Nous apportons un soin particulier au design, à l'ergonomie et à la simplicité d'usage de nos produits. Nous espérons
Gestion des prestations Volontaire
 Gestion des prestations Volontaire Qu estce que l Income Management (Gestion des prestations)? La gestion des prestations est un moyen de vous aider à gérer votre argent pour couvrir vos nécessités et
NOTICE D UTILISATION FACILE
 NS-555100-FACILE-1312 NOTICE D UTILISATION FACILE 1 Sommaire Recommandations de sécurité... 3 Composition du kit... 4 Description du système...6 et 7 Branchement de la caméra...8 et 9 Chapître 1 : Utilisation
REPETEUR SANS FIL N 300MBPS
 REPETEUR SANS FIL N 300MBPS Guide d installation rapide DN-70181 Introduction : Le DN-70181 est un répéteur Wi-Fi permettant une connexion réseau filaire/sans fil conçu spécialement pour les besoins des
Sommaire 1. Aperçu du Produit
 Sommaire 1. Aperçu du Produit... 1 2. Caractéristiques du Produit... 2 3. Contenu du Pack... 3 4. Données techniques... 3 5. Configuration Matérielle Minimum... 3 6. Description du Produit... 4 6.1 Affichage
Guide d installation rapide
 Internet Control Station Guide d installation rapide ANDROID FR ICS-1000 CONTENU DE L EMBALLAGE Tout d abord, veuillez contrôler si l emballage contient les articles suivants : 4 Internet Control Station
Harmony Smart Keyboard Add-on. Setup Guide Guide d installation
 Harmony Smart Keyboard Add-on Setup Guide Guide d installation Contents / Sommaire English................. 3 Français................. 9 support.myharmony.com/smart-keyboard-add-on 2 E Ch Pg Package contents
4-441-095-22 (1) Network Camera
 Network Camera") 4-441-095-22 (1) Network Camera Guide de l outil SNC easy IP setup Logiciel version 1.0 Avant d utiliser cet appareil, lisez attentivement ce manuel et conservez-le pour vous y reporter ultérieurement.
4-441-095-22 (1) Network Camera Guide de l outil SNC easy IP setup Logiciel version 1.0 Avant d utiliser cet appareil, lisez attentivement ce manuel et conservez-le pour vous y reporter ultérieurement.
Frequently Asked Questions
 Frequently Asked Questions GENERAL Q: Can I connect an external hard drive, USB stick or MP3 player to copy files to the device? A: Yes, you can. The device supports USB HOST function, which can read USB
Principe de TrueCrypt. Créer un volume pour TrueCrypt
 Sommaire : Principe de TrueCrypt...1 Créer un volume pour TrueCrypt...1 Premier montage...6 Réglages...8 Save Currently Mounted Volumes as Favorite...8 Settings > Preferences...9 TrueCrypt Traveller pour
Wireless IP Camera 75790, 75790WH, 75791 Quick Start Guide Guide de départ rapide
 Wireless IP Camera 75790, 75790WH, 75791 Quick Start Guide Guide de départ rapide 1 Is this you? Start Here TECH SUPPORT CTRL ALT DEL 2 If yes, skip to advanced setup. 3 If not, write down the following:
Quick Installation Guide TEW-AO12O
 Quick Installation Guide TEW-AO12O Table of of Contents Contents Français... 1 1. Avant de commencer... 1 2. Installation du matériel... 2 3. Montage... 4 Troubleshooting... 6 Version 10.04.2007 1. Avant
LOGICIEL D'ADMINISTRATION POUR E4000 & G4000 MANAGEMENT SOFTWARE FOR E4000 & G4000
 LOGICIEL D'ADMINISTRATION POUR E4000 & G4000 MANAGEMENT SOFTWARE FOR E4000 & G4000 TABLE DES MATIÈRES TITRE PAGE Présentation - - - - - - - - - - - - - - - - - - - - - - - - - - - - - - - - - - - -4 Le
MiniBrute SE Connection logiciel de configuration 1.0.3
 MANUEL DE L'UTILISATEUR MiniBrute SE Connection logiciel de configuration 1.0.3 1 ére édition: Mai 2014 Les informations contenues dans ce mode d emploi sont sujettes à changements sans préavis et ne représentent
Quick Installation Guide TV-IP410 TV-IP410W H/W: A1.0R
 Quick Installation Guide TV-IP410 TV-IP410W H/W: A1.0R Table Table of Contents of Contents... 1. Avant de commencer... 2. Installation du matériel... 3. Configuration de la Webcam... Troubleshooting...
Cheque Holding Policy Disclosure (Banks) Regulations. Règlement sur la communication de la politique de retenue de chèques (banques) CONSOLIDATION
 Regulations. Règlement sur la communication de la politique de retenue de chèques (banques) CONSOLIDATION") CANADA CONSOLIDATION CODIFICATION Cheque Holding Policy Disclosure (Banks) Regulations Règlement sur la communication de la politique de retenue de chèques (banques) SOR/2002-39 DORS/2002-39 Current to
CANADA CONSOLIDATION CODIFICATION Cheque Holding Policy Disclosure (Banks) Regulations Règlement sur la communication de la politique de retenue de chèques (banques) SOR/2002-39 DORS/2002-39 Current to
Duplicateur et Station d Accueil pour Disque Dur USB 3.0 vers SATA
 Duplicateur et Station d Accueil pour Disque Dur USB 3.0 vers SATA SATDOCK22RU3 / SATDOC2RU3GB / SATDOC2RU3EU *Le produit actuel peut varier des photos DE: Bedienungsanleitung - de.startech.com FR: Guide
Microscope numérique portable Celestron (HDM) Modèle nº 44300 Informations, spécifications et instructions
 Modèle nº 44300 Informations, spécifications et instructions") Microscope numérique portable Celestron (HDM) Modèle nº 44300 Informations, spécifications et instructions Nous vous remercions d avoir fait l acquisition d un microscope numérique portable Celestron.
Microscope numérique portable Celestron (HDM) Modèle nº 44300 Informations, spécifications et instructions Nous vous remercions d avoir fait l acquisition d un microscope numérique portable Celestron.
Guide d installation de SugarCRM Open Source version 4.5.1
 Guide d installation de SugarCRM Open Source version 4.5.1 Version 1.0.2 Mentions légales Mentions légales Ce document est susceptible de modification à tout moment sans notification. Disclaimer / Responsabilité
If the corporation is or intends to become a registered charity as defined in the Income Tax Act, a copy of these documents must be sent to:
 2014-10-07 Corporations Canada 9th Floor, Jean Edmonds Towers South 365 Laurier Avenue West Ottawa, Ontario K1A 0C8 Corporations Canada 9e étage, Tour Jean-Edmonds sud 365 avenue Laurier ouest Ottawa (Ontario)
FCM 2015 ANNUAL CONFERENCE AND TRADE SHOW Terms and Conditions for Delegates and Companions Shaw Convention Centre, Edmonton, AB June 5 8, 2015
 FCM 2015 ANNUAL CONFERENCE AND TRADE SHOW Terms and Conditions for Delegates and Companions Shaw Convention Centre, Edmonton, AB June 5 8, 2015 Early-bird registration Early-bird registration ends April
SUGARCRM Sugar Open Source Guide d Installation de French SugarCRM Open Source Version 4.2
 SUGARCRM Sugar Open Source Guide d Installation de French SugarCRM Open Source Version 4.2 Version 1.0.5 Mentions légales Mentions légales Ce document est susceptible de modification à tout moment sans
Gestion de tablettes Baie pour 16
 Gestion de tablettes Baie pour 16 GUIDE DE L UTILISATEUR TABLE DES MATIÈRES Revue des symboles de danger... 2 Composants... 2 Configuration du chargement... 3-4 DEL et synchronisation... 4-5 Nettoyage
Support Orders and Support Provisions (Banks and Authorized Foreign Banks) Regulations
 Regulations") CANADA CONSOLIDATION CODIFICATION Support Orders and Support Provisions (Banks and Authorized Foreign Banks) Regulations Règlement sur les ordonnances alimentaires et les dispositions alimentaires (banques
CANADA CONSOLIDATION CODIFICATION Support Orders and Support Provisions (Banks and Authorized Foreign Banks) Regulations Règlement sur les ordonnances alimentaires et les dispositions alimentaires (banques
Quick Installation Guide TV-IP110 TV-IP110W H/W: A1.0R
 Quick Installation Guide TV-IP110 TV-IP110W H/W: A1.0R Table Table of Contents of Contents... 1. Avant de commencer... 2. Installation du matériel... 3. Configuration de la Webcam... Troubleshooting...
Simply Share, Save & Stream
 3-year warranty garantie de 3 ans mediashare TM Simply Share, Save & Stream Quick Start Guide Guide de démarrage rapide home network storage unité de stockage pour réseau à domicile share your photos!
LIFTMASTER INTERNET GATEWAY USER S GUIDE CONNECT & CREATE. Featuring MyQ Technology
 LIFTMASTER INTERNET GATEWAY USER S GUIDE Featuring MyQ Technology This User s Guide will help you get the most from your LiftMaster MyQ enabled products when using a smartphone, tablet, or computer to
Guide de l'utilisateur. Linksys AE1000 Adaptateur USB sans fil - N hautes performances
 Guide de l'utilisateur Linksys AE1000 Adaptateur USB sans fil - N hautes performances Table des matières Table des matières Chapitre 1 : Présentation du produit 1 Voyant 1 Chapitre 2 : Installation 2 Installation
AMENDMENT TO BILL 32 AMENDEMENT AU PROJET DE LOI 32
 THAT the proposed clause 6(1), as set out in Clause 6(1) of the Bill, be replaced with the following: Trustee to respond promptly 6(1) A trustee shall respond to a request as promptly as required in the
Vanilla : Virtual Box
 Vanilla : Virtual Box Installation Guide for Virtual Box appliance Guide d'installation de l'application VirtualBox Vanilla Charles Martin et Patrick Beaucamp BPM Conseil Contact : charles.martin@bpm-conseil.com,
Alarma Inalámbrica Externa Modèle: SA-001S. Manuel d instructions
 Alarma Inalámbrica Externa Modèle: SA-001S Manuel d instructions TABLE DES MATIÈRES INTRODUCTION... 2 INSTALLATION... 2-4 PROGRAMMATION PROGRAMME LES TÉLÉCOMMANDES, LES DÉTECTEURS 4-6 OU UN PANNEAU DE
SA-32 / SA-62 INSTRUCTION MANUAL - MANUEL D INSTRUCTIONS
 SA-32 / SA-62 INSTRUCTION MANUAL - MANUEL D INSTRUCTIONS 4 5 6 7 4 5 6 7 1. Telephone Paging Volume Control 1. Contrôle de volume Paging Téléphone 2. Microphone Volume Control 2. Contrôle volume du microphone
HYPERDRIVE iusbport Guide d utilisation
 HYPERDRIVE iusbport Guide d utilisation L iusbport met le système de Cloud à portée de tous! Ce mini adaptateur permet de partager en wifi le contenu audio, vidéo, photo et documents de n importe quel
MiFi 2. Quick Start Guide
 MiFi 2 Quick Start Guide gettingstarted GETTING TO KNOW YOUR MiFi 2 INTELLIGENT MOBILE HOTSPOT With MiFi 2 by Novatel Wireless you can connect laptops, tablets, ereaders, gaming consoles and more up to
03/2013. Mod: WOKI-60IP/TR. Production code: DTWIC 6000
 03/2013 Mod: WOKI-60IP/TR Production code: DTWIC 6000 ENCASTRABLE INDUCTION DROP IN INDUCTION 11/2011 TECHNICAL FEATURES DOCUMENTATION S.A.V. Notice d utilisation : FX00326-A Guide d intervention : ---
Lecteur Multimédia Numérique
 Avertissements Avertissement: Des changements ou modifications de cet appareil non expressément approuvés par la partie responsable de la conformité annulerait l autorisation pour l utilisateur de faire
Manuel de l utilisateur
 TENVIS Technology Co,.LTD Manuel de l utilisateur Pour Caméras MJPEG JPT3815W M319W IPROBOT2 IP391W IP60xW Version 1.0.1 Index Configuration de Base... 3 Installation Matériel... 3 Pour Windows... 3 Mode
Boîtier Externe USB 3.0 pour Disque Dur 2,5 SATA III avec soutien UASP
 Boîtier Externe USB 3.0 pour Disque Dur 2,5 SATA III avec soutien UASP S2510BMU33 *Le produit actuel peut varier de la photos DE: Bedienungsanleitung - de.startech.com FR: Guide de l'utilisateur - fr.startech.com
esms Desktop Guide de l utilisateur
 1 esms Desktop Guide de l utilisateur 2 3 Table des matières Introduction... 3 Conditions... 3 Installation... 4 Créer un compte esms Desktop... 7 Envoyer un message SMS... 9 Décompte des caractères...10