Digitales 4-Kanal-Thermometer. Digital 4-Channel Thermometer OPERATING INSTRUCTIONS Seite 20-35
|
|
|
- Isaac Desroches
- il y a 8 ans
- Total affichages :
Transcription
1 VOLTCRAFT Digitales 4-Kanal-Thermometer BEDIENUNGSANLEITUNG Seite 4-19 Digital 4-Channel Thermometer OPERATING INSTRUCTIONS Seite Thermomètre digital à 4 canaux NOTICE D EMLPOI Seite Digitale thermometer met 4 kanalen GEBRUIKSAANWIJZING Seite Best.-Nr. / Item-No. / N 0 de commande / Bestnr.: Version 11/08

2 VOLTCRAFT IM INTERNET Impressum Diese Bedienungsanleitung ist eine Publikation von Voltcraft, Lindenweg 15, D Hirschau, Tel.-Nr. 0180/ ( Alle Rechte einschließlich Übersetzung vorbehalten. Reproduktionen jeder Art, z.b. Fotokopie, Mikroverfilmung, oder die Erfassung in elektronischen Datenverarbeitungsanlagen, bedürfen der schriftlichen Genehmigung des Herausgebers. Nachdruck, auch auszugsweise, verboten. Diese Bedienungsanleitung entspricht dem technischen Stand bei Drucklegung. Änderung in Technik und Ausstattung vorbehalten. Copyright 2008 by Voltcraft Impressum /legal notice in our operating instructions These operating instructions are a publication by Voltcraft, Lindenweg 15, D Hirschau/Germany, Phone / ( All rights including translation reserved. Reproduction by any method, e.g. photocopy, microfilming, or the capture in electronic data processing systems require the prior written approval by the editor. Reprinting, also in part, is prohibited. These operating instructions represent the technical status at the time of printing. Changes in technology and equipment reserved. Copyright 2008 by Voltcraft Informations /légales dans nos modes d'emploi Ce mode d'emploi est une publication de la société Voltcraft, Lindenweg 15, D Hirschau/Allemagne, Tél / ( Tous droits réservés, y compris de traduction. Toute reproduction, quelle qu'elle soit (p. ex. photocopie, microfilm, saisie dans des installations de traitement de données) nécessite une autorisation écrite de l'éditeur. Il est interdit de le réimprimer, même par extraits. Ce mode d'emploi correspond au niveau technique du moment de la mise sous presse. Sous réserve de modifications techniques et de l'équipement. Copyright 2008 by Voltcraft Colofon in onze gebruiksaanwijzingen Deze gebruiksaanwijzing is een publicatie van de firma Voltcraft, Lindenweg 15, D Hirschau/Duitsland, Tel / ( Alle rechten, vertaling inbegrepen, voorbehouden. Reproducties van welke aard dan ook, bijvoorbeeld fotokopie, microverfilming of de registratie in elektronische gegevensverwerkingsapparatuur, vereisen de schriftelijke toestemming van de uitgever. Nadruk, ook van uittreksels, verboden. Deze gebruiksaanwijzing voldoet aan de technische stand bij het in druk bezorgen. Wijziging van techniek en uitrusting voorbehouden. Copyright 2008 by Voltcraft 01_1108_02/HK

3 Diese Bedienungsanleitung gehört zu diesem Produkt. Sie enthält wichtige Hinweise zur Inbetriebnahme und Handhabung. Achten Sie hierauf, auch wenn Sie dieses Produkt an Dritte weitergeben. Heben Sie deshalb diese Bedienungsanleitung zum Nachlesen auf! Eine Auflistung der Inhalte finden Sie in dem Inhaltsverzeichnis mit Angabe der entsprechenden Seitenzahlen auf Seite 7. This operating manual belongs to this product. It contains important information on the commissioning and handling of the product. Please bear this in mind, even if you pass it on to other people. Please keep this operating manual for future reference! A list of the contents can be found on page 23 in the table of contents, indicating the number of the relevant pages. Le mode d emploi suivant correspond au produit ci-dessus mentionné. Il comporte des instructions importantes relatives à sa mise en service et son maniement! Il faut respecter ces instructions, même si ce produit est transmis à tierce personne! Gardez donc ce mode d emploi pour toute consultation ultérieure! Vous trouverez une liste des éléments contenus dans l index page 39 avec indication des pages correspondantes à consulter. Deze gebruiksaanwijzing behoort tot het product digitale thermometer 304. Ze bevat belangrijke aanwijzingen m.b.t. inwerkingstelling en hantering. Gelieve hiermee rekening te houden, zelfs indien u de digitale thermometer aan derden doorgeeft. U dient deze gebruiksaanwijzing zorgvuldig te bewaren voor latere raadpleging! Een lijst met alle onderwerpen met de bijbehorende bladzijden vindt u in de inhoudsopgave op pagina 56. 2

4 3
5 Einführung Sehr geehrter Kunde Mit dem Digitalthermometer 304 haben Sie ein Temperaturmeßgerät nach dem neuesten Stand der Technik erworben. Der Aufbau entspricht der DIN VDE 0411, Teil 1 für Meßgeräte = EN Darüber hinaus ist es EMV-geprüft (für den Hausbereich) und entspricht somit den Anforderungen der geltenden europäischen und nationalen Richtlinien. Die Konformität wurde nachgewiesen; die entsprechenden Unterlagen sind beim Hersteller hinterlegt. Um diesen Zustand zu erhalten und einen gefahrlosen Betrieb sicherzustellen, müssen Sie als Anwender diese Bedienungsanleitung beachten! Bei technischen Fragen wenden Sie sich bitte an: Deutschland: Tel. 0180/ , Fax 0180/ Bitte verwenden Sie für Ihre Anfrage unser Formular im Internet. unter der Rubrik: Kontakt Mo. - Fr bis Uhr Österreich: Schweiz: Tel.-Nr.: 0848/ Fax-Nr.: 0848/ support@conrad.ch Mo. - Fr bis Uhr, bis Uhr 4

6 Bestimmungsgemäße Verwendung Messung von Temperaturen im Bereich von -200 C bis C bzw. 328 F bis F über einen oder zwei bis zu vier (unabhängige) externe/n Temperatursensor/en (K-Typ). Messung von Temperaturen im Bereich von 50 C bis max C bzw. 58 F bis +392 F mit den zwei beiliegenden K-Typ-Temperatursensoren. Signalübertragung bidirektional auf einen IBM-kompatiblen PC mit Windows 98 oder höher über die serielle Schnittstelle. Eine Messung unter widrigen Umgebungsbedingungen ist nicht zulässig. Widrige Umgebungsbedingungen sind: - Nässe oder zu hohe Luftfeuchtigkeit, - Staub und brennbare Gase, Dämpfe oder Lösungsmittel, - Gewitter bzw. Gewitterbedingungen wie starke elektrostatische Felder usw. Eine andere Verwendung als zuvor beschrieben, führt zur Beschädigung des Meßgerätes, außerdem ist dies mit Gefahren, wie z. B. Kurzschluß, Brand, elektrischer Schlag etc. verbunden. Das gesamte Produkt darf nicht geändert, bzw. umgebaut werden! Die Sicherheitshinweise sind unbedingt zu beachten! 5

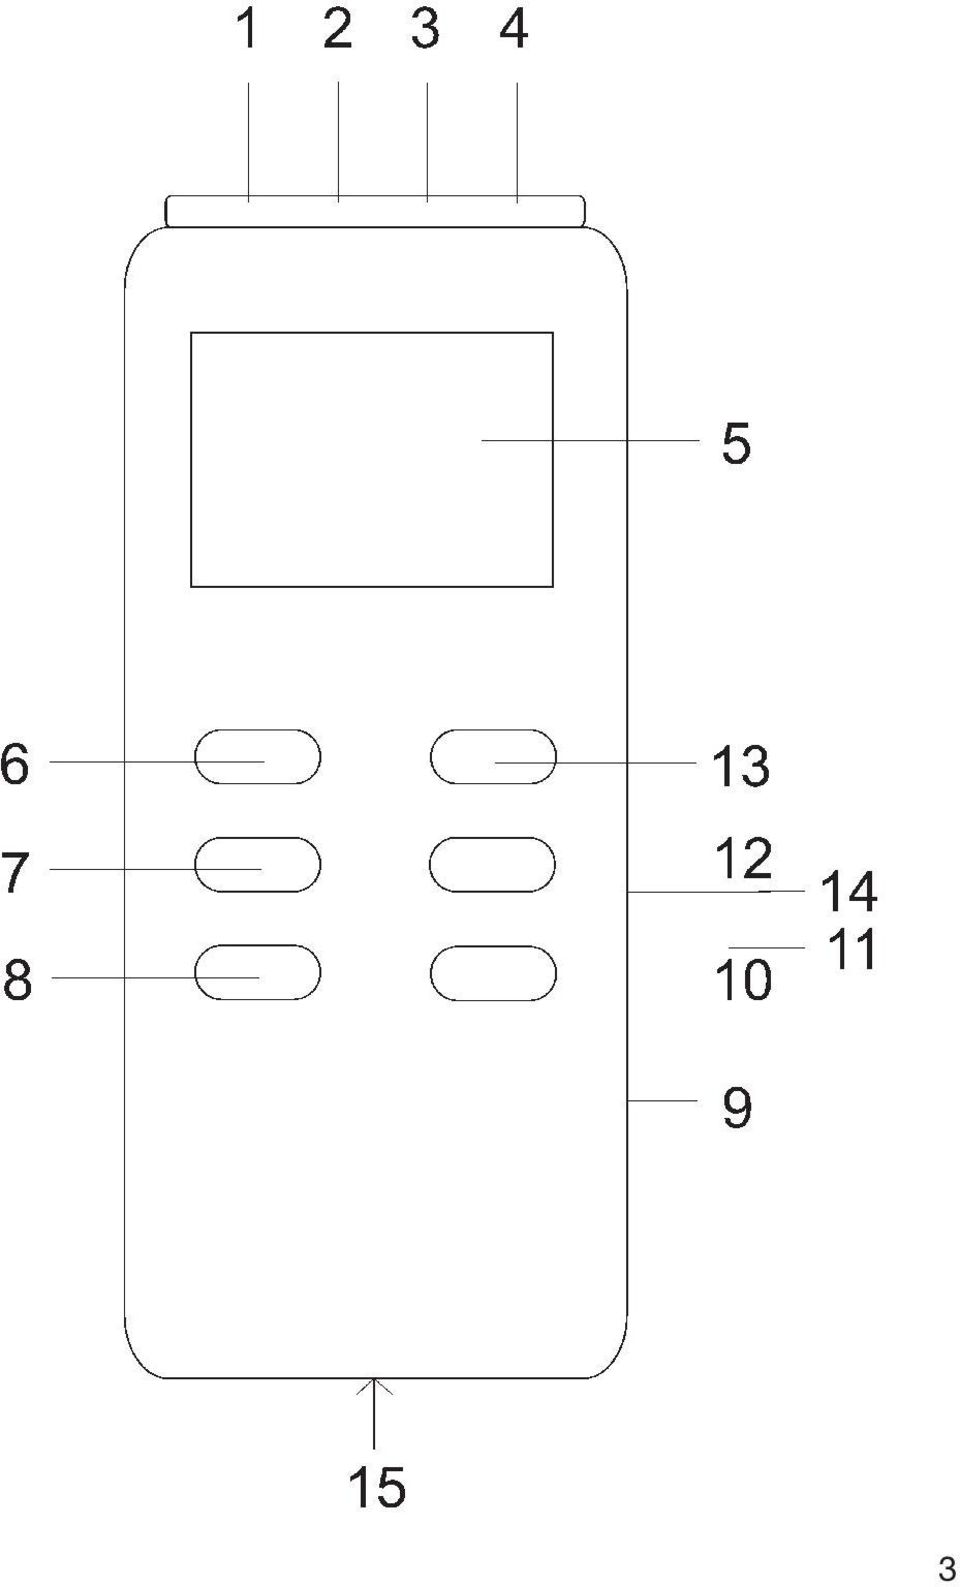
7 Bedienungselemente Abbildung (Ausklappseite) 1. Meßeingang "+" und " ", Kanal T1, für einen K Typ Temperatursensor 2. Meßeingang "+" und " ", Kanal T2, für einen K Typ Temperatursensor 3. Meßeingang "+" und " ", Kanal T3, für einen K Typ Temperatursensor 4. Meßeingang "+" und " ", Kanal T4, für einen K Typ Temperatursensor 5. Multifunktionsanzeige mit 4 x 4 stelliger Ziffernanzeige und Anzeige der Funktionen und Maßeinheiten 6. Ein-/Aus-Taster, in Zweitfunktion zum Ein und Ausschalten der Hintergrundbeleuchtung 7. Taster "HOLD" zum Festhalten einen Meßwertes (bei sich schnell ändernden Meßsignalen) 8. Taster "REL" (für Relativwertmessung = Bezugswertmessung) 9. Versorgungsbuchse für den Anschluß eines geeigneten 9 VDC Netzadapters " " innen 10. Umschalttaster für den Wechsel der Maßeinheit von " C" auf " F" und umgekehrt 11. Serielle RS 232 Schnittstelle (3,5 mm Stereo Klinkenbuchse), bidirektional 12. "MAX MIN" Taster für die Meßwertaufzeichnung Maximalwert und Minimalwert 13. Taster "T1 T2" für die Anzeige der Temperaturdifferenz von Kanal 1 minus dem Kanal Trimmer für die Kalibrierung (für das Kalibrierlabor) 15. Abdeckung für das darunterliegende Batteriefach 6
 8. Taster \"REL\" (für Relativwertmessung = Bezugswertmessung) 9.")
8 Inhaltsverzeichnis Einführung Bestimmungsgemäße Verwendung Bedienungselemente (Ausklappseite) Inhaltsverzeichnis Sicherheitshinweise Vorstellung Handhabung, Inbetriebnahme Durchführung von Messungen Entsorgung Behebung von Störungen Wartung und Pflege Technische Daten, Meßtoleranzen Sicherheitshinweise Bei Schäden, die durch Nichtbeachtung der Bedienungsanleitung entstehen, erlischt der Garantieanspruch! Für Folgeschäden, die daraus resultieren, übernehmen wir keine Haftung. Bei Sach- oder Personenschäden, die durch unsachgemäße Handhabung oder Nichtbeachtung der Sicherheitshinweise verursacht werden, übernehmen wir keine Haftung. In solchen Fällen erlischt jeder Garantieanspruch. - Um einen gefahrlosen Betrieb sicherzustellen, muß der Anwender die Sicherheitshinweise und Warnvermerke beachten ("Achtung!" und "Hinweis!"), die in dieser Gebrauchsanweisung enthalten sind. Folgende Symbole gilt es zu beachten: 7

9 = Lesen Sie die Bedienungsanleitung - Meßgeräte und Zubehör sind kein Spielzeug und gehören somit keinesfalls in Kinderhände! - In gewerblichen Einrichtungen sind die Unfallverhütungsvorschriften des Verbandes der gewerblichen Berufsgenossenschaften für elektrische Anlagen und Betriebsmittel zu beachten. - In Schulen, Ausbildungseinrichtungen, Hobby- und Selbsthilfewerkstätten ist der Umgang mit Meßgeräten durch geschultes Personal verantwortlich zu überwachen. - Achten Sie beim Umgang mit dem Thermometer darauf, daß die Meßmedien unbedingt spannungslos sind! Seien Sie besonders vorsichtig beim Umgang mit Spannungen größer 25 V Wechsel- (AC) bzw. größer 35 V Gleichspannung (DC). Bereits bei diesen Spannungen können Sie bei Berührung elektrischer Leiter einen lebensgefährlichen elektrischen Schlag erhalten. - Überprüfen Sie vor jeder Messung Ihr Meßgerät bzw. Ihre Temperatursensoren auf Beschädigung(en). - Die Spannung zwischen Meßgerät und Erde darf 24 VACrms bzw. 60 VDC keinesfalls überschreiten. - Arbeiten Sie mit dem Meßgerät nicht in Räumen oder bei widrigen Umgebungsbedingungen, in/bei welchen brennbare Gase Dämpfe oder Stäube vorhanden sind oder vorhanden sein können. Vermeiden Sie zu Ihrer eigenen Sicherheit unbedingt ein Feuchtoder Naßwerden des Meßgerätes bzw. der Meßleitungen. Vermeiden Sie den Betrieb in unmittelbarer Nähe von 8
 bzw.")
10 a) starken magnetischen Feldern (Lautsprecher, Magnete) b) elektromagnetischen Feldern (Transformatoren, Motore, Spulen, Relais, Schütze, Elektromagneten usw.) c) elektrostatischen Feldern (Auf-/Entladungen) d) Sendeantennen oder HF-Generatoren - Verwenden Sie das Dig. Thermometer nicht kurz vor, während oder kurz nach einem Gewitter (Blitzschlag! / energiereiche Überspannungen!). Achten Sie darauf, daß Ihre Hände, Schuhe, Kleidung, der Boden, das Meßgerät bzw. die Meßleitungen, Schaltungen und Schaltungsteile usw. unbedingt trocken sind. - Wenn anzunehmen ist, daß ein gefahrloser Betrieb nicht mehr möglich ist, so ist das Gerät außer Betrieb zu setzen und gegen unbeabsichtigten Betrieb zu sichern. Es ist anzunehmen, daß ein gefahrloser Betrieb nicht mehr möglich ist, wenn - das Gerät sichtbare Beschädigungen aufweist, - das Gerät nicht mehr arbeitet und - nach längerer Lagerung unter ungünstigen Verhältnissen oder - nach schweren Transportbeanspruchungen. - Schalten Sie das Meßgerät niemals gleich dann ein, wenn es von einem kalten in einen warmen Raum gebracht wird. Das dabei entstandene Kondenswasser kann unter Umständen Ihr Gerät zerstören. Lassen Sie das Gerät uneingeschaltet auf Zimmertemperatur kommen. Vorstellung Dieses Digitalthermometer 304K mit PC-Anschluß ist mit mehreren Besonderheiten ausgerüstet, welche manche Messung sinnvoll ergänzen: 9

11 Bei der Funktion "MAX MIN" ist es beispielsweise möglich, den jeweils größten oder kleinsten auftretenden Meßwert zu ermitteln und festzuhalten. Mit der Funktion "HOLD" können Sie sich schnell ändernde Meßwerte festhalten (fürs Meßprotokoll). Mit dem Taster "T1 T2" wird die Differenz aus Kanal 1 (minus) Kanal 2 angezeigt. Mit dem Taster " C/ F" wählen Sie zwischen zwei Maßeinheiten: der "englischen" in Grad Fahrenheit und der "resteuropäischen" in Grad Celsius. Wenn Sie, schließlich, den Taster REL (mit Dreiecksymbol) betätigen wird die aktuelle Temperaturanzeige auf "0.0" gesetzt und nur noch die Differenz (Delta) angezeigt. Und mit dem Einschalttaster läßt sich eine Hintergrundbeleuchtung einoder ausschalten. Der Meßbereich erstreckt sich von 200 C bis C oder von 328 F bis F. Der Temperaturbereich der beiliegenden Sensoren ist jedoch auf 50 V bis +200 C (-58 F bis +392 F) begrenzt. Das Digitale 4 Kanal Thermometer 304 ist sowohl im Hobby- Bereich als auch im beruflichen oder schulischen Bereich usw. universell einsetzbar. Handhabung, Inbetriebnahme A Einbau der Batterie - Batteriewechsel Damit Ihr Meßgerät einwandfrei funktioniert, muß es mit einer 9-V- Blockbatterie bestückt werden. Wenn das Batteriewechselsymbol in der Mitte links im Display erscheint, müssen Sie einen Batteriewechsel durchführen. Hierzu gehen Sie wie folgt vor: - Trennen Sie Ihr Meßgerät vom Meßkreis (und vom PC, falls angeschlossen bzw. vorhanden), - entfernen Sie die Temperatursensoren vom Meßgerät, - schalten Sie es aus und - schieben Sie die Batteriefachabdeckung vorsichtig in Pfeilrichtung ab. - Trennen Sie die verbrauchte Batterie vom Anschlußclip und 10
 betätigen wird die aktuelle Temperaturanzeige auf \"0.0\" gesetzt und nur noch die Differenz (Delta) angezeigt.")
12 - ersetzen Sie die Batterie durch eine unverbrauchte gleichen Typs. - Nach erfolgtem Batteriewechsel legen Sie die angeschlossene Batterie in das Batteriefach und - verschließen Sie dieses wieder sorgfältig. - Achten Sie beim Verschließen des Batteriefaches darauf, daß die Leitung des Anschlußclip's (rot/schwarz) nicht gequetscht wird. Achtung! Betreiben Sie das Meßgerät auf keinen Fall im geöffneten Zustand. Lassen Sie keine verbrauchten Batterien im Meßgerät, da selbst auslaufgeschützte Batterien korrodieren können und dadurch Chemikalien freigesetzt werden können, welche Ihrer Gesundheit schaden bzw. das Batteriefach zerstören. Verbrauchte Batterien sind als Sondermüll zu betrachten und müssen daher umweltgerecht entsorgt werden. Hierfür gibt es bei den Fachhändlern bzw. in den Wertstoffhöfen spezielle Sammelbehälter. B Anschluß der Sensoren Verwenden Sie für Ihre Messungen stets nur den dafür spezifizierten Temperatursensor (in diesem Fall K-Typ). Achten Sie vor jedem Anschluß auf den Zustand des Anschlußsteckers bzw. Sensorendes ("Perle") sowie auf die unbeschädigte Isolation. Achtung! Achten Sie stets darauf, daß nur der Temperatursensor den zu messenden Temperaturen ausgesetzt ist. Beachten Sie unbedingt die Sicherheitshinweise und die technischen Daten bezüglich der Betriebstemperatur. Überschreiten Sie niemals die max. Eingangsgrößen. 11

13 C Inbetriebnahme C1 Grundeinstellung Mit dem farbigen Taster "I" wird das Meßgerät ein- oder ausgeschaltet. Das Gerät kann auch über die Auto-Power-Off-Funktion abgeschaltet werden. Auto-Power-Off bedeutet automatische Abschaltung des Gerätes in den sog. "Sleep-Mode" (Bereitschaft oder "Stand-by"). Das Gerät schaltet nach ca. 30 Min "ab", wenn keine Taster betätigt werden oder die Auto-Power-Off-Funktion nicht vorher ausgeschaltet wurde. Die Auto-Power-Off-Funktion läßt sich abstellen indem Sie den Taster Hold beim Einschalten des Thermometers mitbetätigen. Ein akustisches Signal (zweimal kurz hintereinander) zeigt an, daß die automatische Abschaltung abgestellt wurde. Wollen Sie das Meßgerät schon vor Ablauf von 30 Minuten abschalten, so müssen Sie den Taster 3s lang betätigen (gedrückt halten) In der Anzeige wird Ihnen ein sog. "Count Down" angezeigt: "P -0FF " In Zweitfunktion dient der Taster zum Ein-/Ausschalten der Hintergrundbeleuchtung, bei ungünstigen Lichtverhältnissen. Da die Beleuchtung allerdings relativ viel Energie verbraucht, sollten Sie diese nicht zu oft verwenden. Hinweis! Nach ca. 26s wird die Hintergrundbeleuchtung automatisch abgeschaltet. C2 Tastenbelegungen a) MAX MIN Durch Betätigung des Taster "MAX MIN" gelangen Sie in die Maximal- und Minimalwertanzeige. Es werden fortlaufend die höchsten 12

14 und niedrigsten auftretenden Temperaturen aller Eingänge ermittelt und abgespeichert. Über den Taster "MAX MIN" ist mit jeder Betätigung abwechselnd der Maximalwert "MAX", der Minimalwert "MIN" oder der augenblickliche Meßwert "MAX MIN" (blinkend) ablesbar. Um die Funktion zu verlassen, betätigen Sie den Taster "MAX MIN" ca. 2 Sekunden lang. Hinweis! Während der Maximal-/Minimal-/Durchschnittswertaufzeichnung läßt sich Maßeinheit nicht umschalten. Auch die Funktion "REL" ist nicht einschaltbar. b) Taster "T1 T2" Mit diesem Taster legen Sie fest, welche Anzeige sichtbar ist: die Anzeige der Temperatur T1 bis T4 oder die Anzeige der Temperaturen von T1 und T2 (untereinander) bzw. rechts davon der Differenz aus T1 (minus) T2. c) HOLD - Funktion Mit jedem Tastendruck (kurzzeitig) schalten Sie die HOLD-Funktion (Hold = halten) ein oder aus. HOLD bedeutet, daß der augenblickliche Meßwert festgehalten wird, bis die Funktion Data-Hold wieder ausgeschaltet wird. Eine Umschaltung von C auf F oder umgekehrt ist genauso wenig möglich, wie die Aktivierung der Zeitanzeige oder die Funktion "MAX MIN" oder die Bezugswertmessung "REL". d) Bezugswertmessung "REL" Mit dem Taster REL wird die Bezugswertmessung gestartet. Dazu wird die aktuelle Temperaturanzeige (T1 bis T4) unabhängig von der Maßeinheit ( C oder F) auf "0.0" gesetzt. Danach werden nur noch die Differenzwerte angezeigt. Beträgt die gemessene Temperatur an Kanal T1 danach z. B. 5 Grad Celsius ( C) weniger, wird " 5 C" angezeigt. Beträgt die gemessene Temperatur an Kanal T1 dagegen 13

15 danach 25 Grad Fahrenheit mehr, wird "25 F" angezeigt. Um zur aktuellen Temperaturanzeige zurückzukehren, betätigen Sie einfach den Taster "REL" erneut einmal. Hinweis! Jeder Tastendruck wird mit einem kurzen "Beep" des eingebauten Piepsers bestätigt. e) Taster C / F Mit dem Taster " C/ F schalten Sie die Maßeinheiten um von Grad Celsius " C" auf Grad Fahrenheit " F" und umgekehrt. Diese Einstellung bleibt nicht erhalten, wenn das Digitalthermometer ausgeschaltet wird. C3 Buchsenbelegung a) Meßeingänge Die Meßbuchsen T1, T2, T3 und T4 sind sog. unipolare (+ und ) Messerkontaktbuchsen. Mit diesen Buchsen müssen Sie die K Typ Temperatursensoren verbinden, wenn Sie Temperaturmessungen entsprechend den Sensorspezifikationen durchführen wollen. Beachten Sie, daß die Messerkontakte der Verbindungsstecker unterschiedlich breit sind. Achtung! Versuchen Sie keinesfalls, die Verbindungsstecker mit Gewalt vertauscht (+ und ) in die Buchsen zu pressen. Die Buchsen würden unwiederbringlich zerstört und müßten erneuert werden. b) Serielle RS 232 Schnittstelle Die Buchse "OUTPUT" ist die serielle RS-232-Schnittstelle im 3,5- mm-stereo-klinkenformat. Die Belegung ist wie folgt festgelegt (Steckeransicht): 14
 Meßeingänge Die Meßbuchsen T1, T2, T3 und T4 sind sog.")
16 Hinten am Stecker liegt der Ground = GND = Bezugmasse (=Bezugspotential) In der Mitte des Steckers befindet sich der Kontakt RX = 5 V High Eingang (=Dateneingang) Vorne an der Spitze befindet sich der Kontakt TX = 5 V High Ausgang (=Datenausgang) Damit eine Kommunikation zwischen dem Thermometer und einem IBM kompatiblen PC stattfinden kann, müssen zuerst die Voraussetzungen dafür geschaffen werden: Eine Verbindung zwischen PC und Thermometer und die Installation der Software. Hinweis! Sowohl die Schnittstellenleitung als auch die Software sind als Paket optional erhältlich. c) Anschluß einen Netzadapters Und schließlich die Buchse DC 9V. Hier kann ein Netzgerät mit folgenden Ausgangs Daten angeschlossen werden: 9 V Gleichspannung, wenn möglich, stabilisiert, mit einem Ausgangsstrom von mind. 100 ma, einem Steckeraußendurchmesser von 3,5 mm und einem Steckerinnendurchmesser von 1,35 mm. Die Polarität: Minus " " innen, Plus " + " außen. D Gebrauchslage Betreiben Sie das Dig. 4 Kanal Thermometer 304 stets so, daß Sie die Flüssigkristallanzeige (englisch kurz: LCD) lesen können bzw. die Digitalanzeige nach oben zeigt. Über das Stativgewinde im Gehäuseunterteil kann das Meßgerät auf einem Stativ befestigt werden. Durchführung von Messungen Der Temperaturmeßbereich des Digitalthermometers reicht von 200 C bis C für K Typ Sensoren. Der Temperaturbereich 15
 Anschluß einen Netzadapters Und schließlich die Buchse DC 9V.")
17 der beiliegenden K Typ Sensoren reicht von 50 C bis max.! +200 C. Messen Sie mit den beiliegenden Fühlern keine Temperaturen größer als +200 C (=392 F). Es gilt zu beachten, daß "außerhalb" des Temperaturbereiches +18 C bis +28 C (= Bereich der garantierten Meßgenauigkeit) nur das Thermoelement der zu messenden Temperatur ausgesetzt werden darf. Zur Temperaturmessung gehen Sie wie folgt vor: 1. Verbinden Sie entsprechend Ihren Vorstellungen entweder einen oder zwei oder drei oder vier Temperatursensoren (zwei beiliegend) mit dem Thermometer und schalten Sie es ein. Achtung! Schließen Sie keine Spannungen an. Das Gerät kann dadurch zerstört werden. 2. Halten Sie den/die Temperatursensor/en (Leitungsende/n) an/in das/die spannungslose/n Meßmedium/Meßmedien (Kühlkörper usw., aber niemals ätzende oder brennbare Flüssigkeiten!). Hinweise! Sind die Temperatursensoren nicht (richtig) angeschlossen oder unterbrochen, so wird statt eines Meßwertes " " angezeigt. Entsorgung Ist das Digitalthermometer 304 trotz intakter Versorgung (9-V- Blockbatterie) nicht funktionsfähig bzw. nicht mehr reparierbar, so muß es nach den geltenden gesetzlichen Vorschriften entsorgt werden. 16
 mit dem Thermometer und schalten Sie es ein. Achtung!")
18 Behebung von Störungen Mit dem Digitalen 4 Kanal Thermometer 304 haben Sie ein Produkt erworben, welches nach dem neuesten Stand der Technik gebaut wurde. Dennoch kann es zu Problemen oder Störungen kommen. Darum ist im Folgenden beschrieben, wie Sie einige dieser Störungen relativ leicht selbst beheben können; Beachten Sie unbedingt die Sicherheitshinweise! Fehler Keine Anzeige bei eingeschaltetem Gerät Mögliche Ursache Ist die Batterie verbraucht? Hat das Meßgerät nach 30-Min-Nichtgebrauch automatisch abgeschaltet? Wartung und Kalibrierung Um die Genauigkeit des Thermometers über einen längeren Zeitraum zu gewährleisten, sollte es jährlich einmal kalibriert werden. Der Batteriewechsel ist unter "Handhabung, Inbetriebnahme A" beschrieben. Zur Reinigung des Gerätes bzw. des Display-Fensters nehmen Sie ein sauberes fusselfreies antistatisches trockenes Reinigungstuch. Achtung! Verwenden Sie zur Reinigung keine carbonhaltigen Reinigungsmittel oder Benzine, Alkohole oder ähnliches. Dadurch wird die Oberfläche des Meßgerätes angegriffen. Außerdem sind die Dämpfe gesundheitsschädlich und explosiv. Verwenden Sie zur Reinigung auch keine scharfkantigen Werkzeuge, Schraubendreher oder Metallbürsten o.ä.. 17

19 Technische Daten und Meßtoleranzen Technische Daten Display (Anzeige)......: 4 - stellige Anzeige bis 9999, mit einer kleineren vierstelligen Anzeige (Subdisplay), Symbolanzeigen und Maßeinheiten Max. Meßrate : 2,5 Messungen pro Sekunde, d.h. 5 Messungen in 2 s Arbeitstemperatur (Umgebung des Meßgerätes) : 0 C bis +50 C (32 F bis 122 F) Lagertemperatur......: -10 C bis +60 C (14 F bis 140 F, Batterie ausgebaut) relative Luftfeuchtigkeit.: 0 bis 80 %, nicht kondensierend Temperatur für garantierte Genauigkeit.....: +23 C ±5 K Temperaturkoeffizient..: zusätzlich 0,01% der Ablesung +0,03 C (bzw. 0,01% der Ablesung +0,06 F) pro K im Bereich von 0 C bis 18 C und von 28 C bis 50 C Batteriewechselsanzeige: " + - " ab unter ca. 7,3 V Batteriespannung Batterietyp : NEDA V oder 6F22 9V (Alkaline) Gewicht : 210 g (mit Batterie) Abmessungen (LxBxH) : 184 x 64 x 30 mm (ohne Leitungen) Meßtoleranzen Angabe der Genauigkeit in ±(% der Ablesung + Anzeigefehler in Kelvin "K") "K" für Kelvin steht als absoluter Wert einer Temperaturdifferenz oder Abweichung. Genauigkeit 1 Jahr lang bei einer Temperatur von +23 C ±5K, bei einer rel. Luftfeuchtigkeit von kleiner als 80 %, nicht kondensierend. Die Warm-up-Zeit beträgt 1 Minute 18
 pro K im Bereich von 0 C bis 18 C und von 28 C bis 50 C Batteriewechselsanzeige: \" + - \" ab unter ca.")
20 Meßbereich Genauigkeit Auflösung Meßgerät K-Typ -200 C bis +199,9 C ±(0,2%+1,0K) 0,1 C +200 C bis +399 C ±(0,5%+1,0K) 1 C +400 C bis C ±(0,2%+1,0K) 1 C -328 F bis -200 F ±(0,5%+2,0K) 1 F -199,9 F bis +199,9 F ±(0,2%+2,0K) 0,1 F +200 F bis F ±(0,3%+2,0K) 1 F K-Typ-Temperatursensor TP-K01-50 C bis +200 C ±2,2K oder ±0,75% -58 F bis 392 F ±3,6K oder ±0,75% Achtung! Eine Überschreitung der max. zulässigen Eingangsgrößen führt unter ungünstigen Umständen zur Beschädigung des Meßgerätes bzw. zu einer Gefährdung des Lebens des Benutzers. 19

21 Introduction Dear Customer, With the Digital Thermometer 304 you have purchased a state-ofthe-art temperature measuring device. The design corresponds to DIN VDE 0411, Part 1 for measuring devices = EN Moreover it is EMC-tested (for the interior domain) thus fulfilling the requirements of the established European and national guidelines. The conformity has been proven and the relevant documents are in the possession of the manufacturer. To preserve this condition and to ensure safe operation, the user has to observe this operating manual! In case of technical questions please contact us: Germany: Tel. 0180/ , Fax 0180/ Please use our contact form in the Internet: in the category "Contact" Mon to Thurs 8.00am to 4.30pm Fri 8.00am to 2.00pm 20
22 Prescribed Use Measurements of temperatures within the range of -200 C to C and 328 F to F resp. by means of one or two up to four (independent) external temperature sensor(s) (K-type). Measurements of temperatures within the range of 50 C to a maximum of +200 C and 58 F to +392 F resp. by means of the two enclosed K-type temperature sensors. Signal transmission bi-directionally to an IBM-compatible PC with Windows 98 or higher via the serial interface. A measurement under unfavourable ambient conditions is not admissible. Unfavourable ambient conditions are: - wetness or too high air humidity, - dust and inflammable gases, fumes or solvents, - thunderstorms or thunderstorm-like conditions as strong electrostatic fields etc. A use different to the one described above damages the measuring instrument. Moreover, this involves dangers, such as e.g. short-circuit, burning, electric shock etc. No part of the product may be modified or rebuilt! The safety instructions must be strictly observed! 21
23 Controls Illustration (fold-out page) 1. Measuring input "+" and " ", channel T1, for one K type temperature sensor 2. Measuring input "+" and " ", channel T2, for one K type temperature sensor 3. Measuring input "+" and " ", channel T3, for one K type temperature sensor 4. Measuring input "+" and " ", channel T4, for one K type temperature sensor 5. Multi-function display with 4 x 4-digit display and display of functions and measuring units 6. On/Off push-button, in secondary function to switch on and off the background lighting 7. Push-button "HOLD" for keeping a measuring value (with rapidly changing measuring signals) 8. Push-button "REL" (for relative value measurement = reference value measurement) 9. Supply jack for connecting a suitable 9V DC adapter " " inside 10. Switch for changing the measuring unit from " C" to " F" and vice versa 11. Serial RS 232 interface (3.5mm stereo jack bush), bi-directional 12. "MAX MIN" push-button for recording the maximum and minimum measuring values 13. Push-button "T1 T2" for displaying the temperature difference of channel 1 minus channel Threaded tripod bush 15. Cover for the subjacent battery compartment 22
24 Table of Contents Introduction Prescribed Use Controls (fold-out page) Table of Contents Safety Instructions Presentation Handling, Putting-into-Operation Carrying out Measurements Disposal Correcting Malfunctions Maintenance and Calibration Technical Data and Measuring Tolerances Safety Instructions The guarantees become invalid in the event of damage resulting from non-observation of the operating manual! We do not accept responsibility for such damage. Moreover, we accept no responsibility for property damage or personal injuries caused by improper use or non-observance of safety instructions. Furthermore, in all such cases guarantees become invalid. - To ensure safe operation the user has to observe the safety instructions and warning notes ("Warning!" und "Note!") contained in this operating manual. The following symbols are to be observed: 23
25 = Read the operating manual - Measuring devices and accessories are no toys and must be kept out of reach of children in all circumstances! - In industrial facilities, the safety regulations laid down by the professional trade association for electrical equipment and facilities must be adhered to. - In schools, training facilities, do-it-yourself and hobby workshops, measuring devices and accessories are to be used only under supervision of trained personnel. - When handling the thermometer take care that the measuring media are imperatively voltage less! Use special care when handling voltages over 25V AC and over 35V DC respectively. Even with these voltages you may suffer a life-threatening electric shock when touching electrical conductors. - Before each measurement check your measuring device and the temperature sensors for damage(s). - The voltage between measuring device and earth must by no means exceed 24V ACrms. and 60V DC resp. - Do not work with the measuring device in rooms or under unfavourable ambient conditions where inflammable gases, fumes or dust are present or may be present. For your own safety prevent the measuring device and the measuring leads resp. from getting damp or wet by all means. Avoid operation in direct vicinity to a) strong magnetic fields (loudspeakers, magnets) b) electromagnetic fields (transformers, motors, coils, relays, contactors, electromagnets etc.) 24
26 c) electrostatic fields (charges/discharges) d) transmitting antennas or high-frequency generators - Do not use the digital thermometer shortly before, during or shortly after a thunderstorm (lightning stroke!/high-energy excess voltages!). Make sure that your hands, shoes, clothes, the ground, the measuring device and the measuring leads resp., the circuits and the circuit elements etc. are dry by all means. - If there is reason to believe that safe operation has become impossible, the device must be put out of operation and secured against unintended operation. It can be assumed that safe operation is no longer possible, if - the device shows visible damages - the device no longer works and - it was stored under unfavourable conditions for a long period of time or - after extraordinary stress caused by transport. - Never turn on the device immediately after it has been brought from a cold into a warm room. Condensation water that forms might destroy your device. Leave the device switched off and wait until it has reached room temperature. Presentation This Digital Thermometer 304 with PC-connection is equipped with several special features suitably supplementing the range of measurements: With the"max MIN" function e.g. it is possible to establish and keep the respective highest or smallest occurring measuring value. With the function "HOLD" you can keep - rapidly - changing measuring 25
27 values (for the measuring protocol). With the bush button "T1 T2" the difference from channel 1 (minus) channel 2 is displayed. With the bush button " C/ F" you may choose between two measuring units: the "English" in degree Fahrenheit and the one of the "remaining European" countries in degree Celsius. If you finally operate the push-button REL (with triangle symbol) the actual temperature display is set to "0.0" and only the difference (delta) is displayed. And with the switch-on push-button the background lighting can be switched on and off. The measuring range extends from 200 C to C or from 328 F to F. The temperature range of the enclosed sensors however is limited to 50 C to +200 C (-58 F to +392 F). The Digital 4-Channel Thermometer 304 is universally applicable in do-it-yourself and hobby workshops as well as in the professional area and in schools. Handling, Putting-into-Operation A Inserting of battery exchanging of battery In order to work properly your measuring device has to be equipped with a 9 V compound battery. When the battery exchange symbol appears in the left centre on the display you have to carry out a battery exchange. You do this in the following way: - Disconnect your measuring device from the measuring circuit (and from the PC if connected or if any), - remove the temperature sensors from the measuring device, - switch it off and - push the battery compartment cover carefully open in the direction of the arrow. - Separate the used battery from the connecting clip and - replace the battery by a fresh one of the same type. 26
28 - After changing the battery, put the connected battery into the battery compartment and - close it again carefully. - When closing the battery compartment make sure that the line of the connecting clip (read/black) is not squeezed. Warning! Never operate the measuring device when open! Do not leave used batteries in the measuring device since even leakage-protected batteries may corrode and chemicals may be released hereby that are detrimental to your health or destroy the battery compartment. Used batteries are to be considered as special waste and therefore have to be disposed of environmentally compatible. To this aim special collecting boxes are provided at your specialized dealer s shop or in the reusable waste facilities. B Connecting the sensors Whenever carrying out a measurement only use the temperature sensor specified for the purpose (in this case the K-type). Before making any connection check the state of the connector and the sensor end ("pearl ) resp. and make sure that the insulation is intact. Warning! Always make sure that only the temperature sensor is exposed to the temperatures to be measured. Urgently bear in mind the safety instructions and the technical data concerning the working temperature. Never exceed the maximum input quantities. C Putting-into-operation C1 Basic Setting With the coloured push-button "I" the measuring device is switched on and off. The device can equally be switched off by means of the 27
29 Auto-Power-Off function. Auto-Power-Off means an automatic switching-off of the device to the so-called "Sleep-Mode" (standby). The device switches off after approximately 30 minutes if no push-buttons are operated or the Auto-Power-Off function has not been deactivated before. The Auto-Power-Off function can be deactivated by way of operating the push-button "HOLD at the same time when switching on the thermometer. An acoustic signal (twice in succession) indicates that the automatic switch-off has been deactivated. If you want to switch off the measuring device before 30 minutes have elapsed you have to operate (keep pushed down) the pushbutton for 3 seconds. The display will show you a so-called "Count Down : "P -0FF " In secondary function the push-button serves to switch on/off the background lighting when lighting conditions are unfavourable. Since the lighting however has a relatively high energy consumption you should not use it too often. Note! The background lighting is switched off automatically after approximately 26 seconds. C2 Push-Button Assignment a) MAX MIN By operating the push-button "MAX MIN" you switch over to the maximum and minimum value display. The occurring maximum and minimum temperatures of all inputs are constantly established and memorized. The push-button "MAX MIN" being operated in individual steps the maximum value "MAX", the minimum value "MIN" or the actual 28
30 measuring value "MAX MIN" (flashing) are readable in turn. To leave the function operate the push-button "MAX MIN" for about 2 seconds. Note! During maximum/minimum/average value recording the measuring unit cannot be changed. Equally the function "REL" cannot be activated. b) Push-button "T1 T2" With this push-button you determine which display is visible: the display of temperature T1 to T4 or the display of temperatures T1 and T2 (one beneath the other) or to the right of it the difference from T1 (minus) T2. c) HOLD function Whenever pushing this button (briefly) you switch the HOLD function on or off. HOLD means that the actual measuring value is kept until the data-hold function is deactivated again. Switching over from C to F or vice versa is not possible. Nor are the activation of the time display or the "MAX MIN function or the measurement of the reference value "REL. d) Measuring of Reference Value "REL" With the push-button REL the reference-value measurement is started. To this aim the actual temperature display (T1 to T4) is set to "0.0" independent of the measuring unit ( C or F). Afterwards only the difference values are displayed. If afterwards the measured temperature at channel T1 is less e.g. by 5 degrees Celsius ( C), " 5 C" is displayed. If, however, afterwards the measured temperature at channel T1 is more by 25 degrees Fahrenheit, "25 F" is displayed. To return to the actual temperature display you have only to operate the push-button "REL" once more. 29
31 Note! Whenever you push the button an integrated beeper will give you acoustic feedback in form of a short "beep. e) Push-Button C/ F With the push-button C/ F you change the measuring unit from degrees Celsius " C" to degrees Fahrenheit " F" and vice versa. This setting is not kept when the digital thermometer is switched off. C3 Jack Assignment a) Measuring Inputs The measuring jacks T1, T2, T3 and T4 are so-called unipolar (+ and ) blade contact jacks. You have to connect the K-type temperature sensors to these jacks if you want to carry out temperature measurements according to the sensor specifications. Please note that the blade contacts of the connecting plugs are different in breadth. Warning! Never try to force the connecting plugs into the jacks when confused (+ and )! The jacks would be irretrievably destroyed and would have to be replaced. b) Serial RS 232 Interface The OUTPUT" jack is a serial RS-232 interface in 3.5mm stereo jack format. The assignment is established as follows (connector plan): At the back of the connector there is the ground = GND = reference mass (=reference potential) In the middle of the connector there is contact RX = 5V High Input (= data input) In front at the tip there is contact TX = 5V High Output (= data output) 30
32 In order to make communication possible between the thermometer and an IBM-compatible PC, at first the prerequisite conditions have to be established: A connection between PC and thermometer and the installation of the software. Note! The interface circuit as well as the software are optionally available as packages. c) Connecting an Adapter And finally jack 9V DC. Here an adapter with the following output data can be connected: 9V DC voltage, if possible stabilised, with an output current of at least 100mA, an external connector diameter of 1.35mm and an internal connector diameter of 1.35mm. The polarity: minus "-" inside, plus "+ outside. D Working Position Always operate the Digital 4-Channel Thermometer 304 in a position that you can read the LCD display or that the digital display points to the top resp. Via the tripod thread in the bottom part of the housing the measuring device can be fixed to a tripod. Carrying Out Measurements The temperature measuring range of the digital thermometer extends from 200 C to C for K-type sensors. The temperature range of the enclosed K-type sensors extends from 50 C to a maximum! of +200 C. Do not measure temperatures above +200 C (= 392 F) with the sensors enclosed. 31
33 Please bear in mind that "outside the temperature range +18 C to +28 C (= range of guaranteed measuring accuracy) only the thermo element may be exposed to the temperature to be measured. To carry out a measurement you proceed as follows: 1. Connect according to your ideas either one or two or three or four temperature sensors (two enclosed) to the thermometer and switch it on. Warning! Do not apply any voltages. This may destroy the device. 2. Hold the temperature sensor/sensors (line end/ends) at/into the voltageless measuring medium/media (dissipators and so on, but never corrosive or inflammable liquids!). Note! If the temperature sensors are not (correctly) connected or interrupted, " " is displayed instead of a measuring value. Disposal If the Digital Thermometer 304 despite intact supply (9 V compound battery) is not ready for use or beyond repair it has to be disposed of in accordance with the relevant legal rules. Correcting Malfunctions With the Digital 4-Channel Thermometer 304 you have purchased a state-of-the-art product. Nevertheless problems or malfunctions may arise. Therefore you find in the following a description of how 32
34 you can correct some of these malfunctions yourself with relative ease; please observe the safety instructions in any case! Malfunction No display with the device switched on Possible Cause Has the battery been used up? Has the measuring device automatically switched off after having been idle for 30 minutes? Maintenance and Calibration To ensure the accuracy of the thermometer over a longer period of time it should be calibrated yearly. The battery exchange is described under "Handling, Putting-into- Operation A. To clean the device or the display window please use a clean, non-linting, antistatic, dry cloth. Warning! Do not use carbon-containing cleaning agents, benzines, alcohols or the like as these attack the surface of the device. Furthermore, the fumes are detrimental to your health and explosive. Do not use sharp tools, screwdrivers, metal brushes, etc. for cleaning. 33
35 Technical Data and Measuring Tolerances Technical Data Display : 4-digit display up to 9999, with a 4- digit subdisplay, symbol display and measuring units Maximum measuring rate... : 2.5 measurements per second, i.e. 5 measurements in 2 seconds Working temperature (ambient temperature) : 0 C to +50 C (32 F to 122 F) Storage temperature : -10 C to +60 C (14 F to 140 F, battery removed) Relative air humidity : 0 to 80 %, non-condensing Temperature for guaranteed accuracy : +23 C ±5 K Temperature coefficient.... : additionally 0.01% of reading C (resp. 0.01% of reading F) per K in the range of 0 C to 18 C and from 28 C to 50 C Battery exchange display... : " + - " less than approx. 7.3V battery voltage Battery type : NEDA V or 6F22 9V (alkaline) Weight : 210g (with battery) Dimensions (l X b X h) : 184 x 64 x 30mm (without wires) Measuring tolerances Indication of accuracy in ± (% of reading + display error in Kelvin "K") "K" for Kelvin stands as absolute value of a temperature difference or deviation. Accuracy for the period of one year at a temperature of +23 C ±5K, at a relative air humidity of less than 80 %, non-condensing. The warm-up time is 1 minute. 34
36 Measuring range Accuracy Resolution K-type measuring device -200 C to C ±(0.2%+1.0K) 0.1 C +200 C to +399 C ±(0.5%+1.0K) 1 C +400 C to C ±(0.2%+1.0K) 1 C -328 F to -200 F ±(0.5%+2.0K) 1 F F to F ±(0.2%+2.0K) 0.1 F +200 F to+2498 F ±(0.3%+2.0K) 1 F K-type temperature sensor TP-K01-50 C to +200 C ±2.2K or ±0.75% -58 F to 392 F ±3.6K or ±0.75% Warning! Under unfavourable conditions exceeding the maximum admissible input quantities leads to damages to the measuring device or a threat to the life of the user! 35
37 Introduction Cher client, Avec l achat du présent thermomètre digital 304, vous avez fait l acquisition d un instrument de mesure correspondant aux derniers progrès de la technique moderne. Le présent produit est conforme aux exigences de la norme allemande DIN VDE 0411, partie 1 relative aux instruments de mesure (norme européenne EN ). Il est en outre conforme aux exigences de la compatibilité électromagnétique (usage domestique) et répond donc aux exigences des directives européennes et nationales en vigueur. La conformité CE a été contrôlée, les actes déclaratifs et les documents correspondants ont été consignés auprès du fabricant. Afin de maintenir le produit en bon état et d en assurer une exploitation sans risques, l utilisateur doit absolument tenir compte de et respecter ce mode d emploi! Pour toutes vos questions techniques, veuillez vous adresser au numéro suivant : Allemagne : téléphone: 0180/ , télécopie: 0180/ Veuillez utiliser notre formulaire pour votre demande dans Internet sous la rubrique Contact France: Tél Fax support@conrad.fr du lundi au vendredi de 8h00 à 18h00 le samedi de 8h00 à 12h00 Suisse: Tél 0848/ Fax 0848/ support@conrad.ch du lundi au vendredi de 8h00 à 12h00, 13h00 à 17h00 36
38 Utilisation prévue et précautions d emploi Prise de mesure de températures allant de -200 C à C ou de -328 F à F au moyen d une ou de deux, voire jusqu à quatre sondes individuelles (de type K). Prise de mesure de températures allant de -50 C à +200 C ou de - 58 F à +392 F au moyen des deux sondes de température livrées de type K. Transmission de signaux bidirectionnelle vers un ordinateur IBM compatible avec Windows 98 ou une version plus récente via interface sérielle. La prise de mesures dans des conditions environnementales défavorables n'est pas admise. Sont comprises sous conditions défavorables : - de l eau ou une humidité de l'air trop élevée, - de la poussière ou des gaz, vapeurs ou solvants inflammables, - par temps orageux ou conditions semblables telles que de forts champs électrostatiques etc. Toute utilisation autre que celle stipulée ci-dessus provoque l endommagement de cet instrument de mesure, ainsi que des risques de courts-circuits, d incendie, de décharge électrique, etc. Il n est permis ni de modifier le produit, ni de le transformer! Il faut impérativement tenir compte des consignes de sécurité! 37
39 Eléments de maniement Illustration (voir rabat) 1. Entrée de mesure "+" et "-", canal T1, pour les sondes de température de type K 2. Entrée de mesure "+" et "-", canal T2, pour les sondes de température de type K 3. Entrée de mesure "+" et "-", canal T3, pour les sondes de température de type K 4. Entrée de mesure "+" et "-", canal T4, pour les sondes de température de type K 5. Affichage multifonction avec quatre afficheurs à 4 caractères, et affichage des fonctions et des unités de mesure 6. Touche de marche/arrêt, fonction secondaire d allumage/d extinction de l éclairage de fond. 7. Touche "HOLD" pour la mémorisation d une valeur de mesure (dans le cas de signaux de mesure changeant à courts intervalles) 8. Touche "REL" (ce qui signifie mesure de valeurs relatives = mesure de valeurs de référence) 9. Douille d'alimentation pour le branchement d'un adaptateur secteur approprié á 9 volts en courant continu, "-" à l'intérieur 10. Touche de commutation pour alterner l'unité de mesure " C" à " F" et vice versa 11. Interface sérielle RS-232 (douille de jack stéréo 3,5-mm), fonctionnement bidirectionnel 12. Touche "MAX MIN" pour l'acquisition de valeurs de mesure minimale et maximale 13. Touche "T1-T2" affichant la différence de température entre le canal 1 et le canal Douille taraudée 15. Couvercle du compartiment à pile se trouvant en dessous 38
40 Index Introduction Spécification d usage Eléments de maniement (voir rabat) Index Consignes de sécurité Description du produit Maniement, mise en service Prise de mesures Elimination des déchets Dépistage d anomalies Entretien et nettoyage Caractéristiques techniques, tolérances de mesure Consignes de sécurité En cas de dommages dus à la non-observation de ce mode d emploi, la validité de la garantie est annulée. Nous déclinons toute responsabilité pour les éventuels dommages consécutifs! Nous déclinons toute responsabilité pour d éventuels dommages matériels ou corporels dus à un maniement incorrect ou à la nonobservation des consignes de sécurité! De tels cas entraînent l annulation de la garantie! Pour garantir l utilisation correcte sans risques, l utilisateur doit tenir compte des consignes de sécurité et avertissements («Attention!» et «Remarque!»), compris dans le présent mode d emploi. Tenez compte des symboles suivants : 39
41 Lisez attentivement le mode d emploi. - Les instruments de mesure et leurs accessoires ne sont pas des jouets et ne doivent en aucun cas être mis à la portée des enfants! - Dans les locaux professionnels, il faut observer les instructions pour la prévention des accidents émises par les associations professionnelles exerçant dans le domaine des installations électriques et de l outillage industriel. - Dans les écoles, les centres de formation professionnelle, les ateliers amateur et bricolage, l utilisation du produit doit être surveillée de manière responsable par du personnel qualifié. - Au cours de l'utilisation du thermomètre, faites attention à ce que les milieux dans lesquels seront effectuées les prises de mesure ne soient pas sous tension! Soyez très vigilants en présence de tensions alternatives supérieures à 25V (CA) ou de tensions continues supérieures à 35V (CC). Le contact d un conducteur électrique présentant un tel voltage suffit déjà à recevoir une décharge électrique mortelle. - Vérifiez, avant chaque prise de mesure, que votre instrument de mesure, ou vos sondes de température ne présentent pas de dommages visibles. - La tension entre l instrument de mesure et la terre ne doit en aucun cas dépasser 24 VACrms ou 60 VDC. - Ne travaillez pas avec cet instrument de mesure dans des pièces ou dans des conditions environnementales défavorables où il y a 40
Notice Technique / Technical Manual
 Contrôle d accès Access control Encodeur USB Mifare ENCOD-USB-AI Notice Technique / Technical Manual SOMMAIRE p.2/10 Sommaire Remerciements... 3 Informations et recommandations... 4 Caractéristiques techniques...
Contrôle d'accès Access control. Notice technique / Technical Manual
 p.1/18 Contrôle d'accès Access control INFX V2-AI Notice technique / Technical Manual p.2/18 Sommaire / Contents Remerciements... 3 Informations et recommandations... 4 Caractéristiques techniques... 5
03/2013. Mod: WOKI-60IP/TR. Production code: DTWIC 6000
 03/2013 Mod: WOKI-60IP/TR Production code: DTWIC 6000 ENCASTRABLE INDUCTION DROP IN INDUCTION 11/2011 TECHNICAL FEATURES DOCUMENTATION S.A.V. Notice d utilisation : FX00326-A Guide d intervention : ---
Instructions Mozilla Thunderbird Page 1
 Instructions Mozilla Thunderbird Page 1 Instructions Mozilla Thunderbird Ce manuel est écrit pour les utilisateurs qui font déjà configurer un compte de courrier électronique dans Mozilla Thunderbird et
PVCHECK Rel. 2.02 09/11/12
 Metel: HV000PVC Pag 1 of 5 Multifunction instrument for safety, functionality and performance verifications on a PV plant The multifunction instrument PVCHECK performs prompt and safe electrical checks
GIGABIT PCI DESKTOP ADAPTER DGE-530T. Quick Installation Guide+ Guide d installation+
 GIGABIT PCI DESKTOP ADAPTER Quick Installation Guide+ Guide d installation+ Check Your Package Contents Quick Installation Guide Gigabit Ethernet PCI Adapter CD with Manual and Drivers DO NOT insert the
Mesure chimique. Chemical measurement. Sonde de température Pt 1000 Inox Pt 1000 stainless steel. Ref : 703 262. Français p 1.
 Mesure chimique Chemical measurement Français p 1 English p 3 Sonde de température Pt 1000 Inox Pt 1000 stainless steel Version : 6010 Mesure chimique Sonde de température Pt 1000 Inox 1 Description La
Thank you for choosing the Mobile Broadband USB Stick. With your USB Stick, you can access a wireless network at high speed.
 Thank you for choosing the Mobile Broadband USB Stick. With your USB Stick, you can access a wireless network at high speed. Note: This manual describes the appearance of the USB Stick, as well as the
Package Contents. System Requirements. Before You Begin
 Package Contents DWA-125 Wireless 150 USB Adapter CD-ROM (contains software, drivers, and manual) Cradle If any of the above items are missing, please contact your reseller. System Requirements A computer
ARP-090G / ARP-090K NOTICE D'EMPLOI INSTRUCTION MANUAL
 2 7 NOTICE D'EMPLOI INSTRUCTION MANUAL ARP-090G / ARP-090K Lire attentivement la notice avant d utiliser l appareil Before operating this product, please read user manual completely FRANCAIS EMPLACEMENT
Contents Windows 8.1... 2
 Workaround: Installation of IRIS Devices on Windows 8 Contents Windows 8.1... 2 English Français Windows 8... 13 English Français Windows 8.1 1. English Before installing an I.R.I.S. Device, we need to
Thank you for choosing the Mobile Broadband USB Stick. With your USB Stick, you can access a wireless network at high speed.
 Thank you for choosing the Mobile Broadband USB Stick. With your USB Stick, you can access a wireless network at high speed. Note: This manual describes the appearance of the USB Stick, as well as the
Folio Case User s Guide
 Fujitsu America, Inc. Folio Case User s Guide I N S T R U C T I O N S This Folio Case is a stylish, lightweight case for protecting your Tablet PC. Elastic Strap Pen Holder Card Holders/ Easel Stops Figure
Cheque Holding Policy Disclosure (Banks) Regulations. Règlement sur la communication de la politique de retenue de chèques (banques) CONSOLIDATION
 Regulations. Règlement sur la communication de la politique de retenue de chèques (banques) CONSOLIDATION") CANADA CONSOLIDATION CODIFICATION Cheque Holding Policy Disclosure (Banks) Regulations Règlement sur la communication de la politique de retenue de chèques (banques) SOR/2002-39 DORS/2002-39 Current to
CANADA CONSOLIDATION CODIFICATION Cheque Holding Policy Disclosure (Banks) Regulations Règlement sur la communication de la politique de retenue de chèques (banques) SOR/2002-39 DORS/2002-39 Current to
1. Raison de la modification
 T Service Documentation Technicocommerciale Information Technique Rubrique F Les régulations Nouvelle version de programme de la carte SU : F1.4 P5253 JS F 67580 Mertzwiller N ITOE0117 26/09/2011 FR 1.
Paxton. ins-20605. Net2 desktop reader USB
 Paxton ins-20605 Net2 desktop reader USB 1 3 2 4 1 2 Desktop Reader The desktop reader is designed to sit next to the PC. It is used for adding tokens to a Net2 system and also for identifying lost cards.
Guide d'installation rapide TFM-560X YO.13
 Guide d'installation rapide TFM-560X YO.13 Table of Contents Français 1 1. Avant de commencer 1 2. Procéder à l'installation 2 Troubleshooting 6 Version 06.08.2011 16. Select Install the software automatically
3615 SELFIE. http://graffitiresearchlab.fr HOW-TO / GUIDE D'UTILISATION
 3615 SELFIE http://graffitiresearchlab.fr HOW-TO / GUIDE D'UTILISATION Hardware : Minitel Computer DIN FM545 45 connector (http://www.gotronic.fr/art-fiche-din-fm545-4747.htm) Cable Arduino compatible
TABLE DES MATIERES A OBJET PROCEDURE DE CONNEXION
 1 12 rue Denis Papin 37300 JOUE LES TOURS Tel: 02.47.68.34.00 Fax: 02.47.68.35.48 www.herve consultants.net contacts@herve consultants.net TABLE DES MATIERES A Objet...1 B Les équipements et pré-requis...2
Instructions pour mettre à jour un HFFv2 v1.x.yy v2.0.00
 Instructions pour mettre à jour un HFFv2 v1.x.yy v2.0.00 HFFv2 1. OBJET L accroissement de la taille de code sur la version 2.0.00 a nécessité une évolution du mapping de la flash. La conséquence de ce
Betriebsanleitung Programmierkabel PRKAB 560 Mode d emploi Câble de programmation PRKAB 560 Operating Instructions Programming cable PRKAB 560
 Betriebsanleitung Programmierkabel Câble de programmation Operating Instructions Programming cable B d-f-e 146 599-02 03.06 Camille Bauer AG Aargauerstrasse 7 CH-5610 Wohlen/Switzerland Telefon +41 56
DOCUMENTATION - FRANCAIS... 2
 DOCUMENTATION MODULE SHOPDECORATION MODULE PRESTASHOP CREE PAR PRESTACREA INDEX : DOCUMENTATION - FRANCAIS... 2 INSTALLATION... 2 Installation automatique... 2 Installation manuelle... 2 Résolution des
Your Pirelli VDSL router has been preconfigured with the following settings:
 Important Information & Installation Instructions VDSL (Analog) Dear Netstream customer Your Pirelli VDSL router has been preconfigured with the following settings: LAN IP Adress of the Pirelli router:
Fabricant. 2 terminals
 Specifications Fabricant Nominal torque (Nm) 65 Minimal torque (Nm) 0,63 Coil resistance - 20 C (ohms) 20 Rated current DC (A) 1 Rotor inertia (kg.m 2 ) 2.10-3 Weight (kg) 7,20 Heat dissipation continuous
How to Login to Career Page
 How to Login to Career Page BASF Canada July 2013 To view this instruction manual in French, please scroll down to page 16 1 Job Postings How to Login/Create your Profile/Sign Up for Job Posting Notifications
Garage Door Monitor Model 829LM
 Garage Door Monitor Model 829LM To prevent possible SERIOUS INJURY or DEATH from a closing garage door: NEVER permit children to operate or play with door control push buttons or remote control transmitters.
NORME INTERNATIONALE INTERNATIONAL STANDARD. Dispositifs à semiconducteurs Dispositifs discrets. Semiconductor devices Discrete devices
 NORME INTERNATIONALE INTERNATIONAL STANDARD CEI IEC 747-6-3 QC 750113 Première édition First edition 1993-11 Dispositifs à semiconducteurs Dispositifs discrets Partie 6: Thyristors Section trois Spécification
RULE 5 - SERVICE OF DOCUMENTS RÈGLE 5 SIGNIFICATION DE DOCUMENTS. Rule 5 / Règle 5
 RULE 5 - SERVICE OF DOCUMENTS General Rules for Manner of Service Notices of Application and Other Documents 5.01 (1) A notice of application or other document may be served personally, or by an alternative
APPENDIX 6 BONUS RING FORMAT
 #4 EN FRANÇAIS CI-DESSOUS Preamble and Justification This motion is being presented to the membership as an alternative format for clubs to use to encourage increased entries, both in areas where the exhibitor
MELTING POTES, LA SECTION INTERNATIONALE DU BELLASSO (Association étudiante de lʼensaparis-belleville) PRESENTE :
 PRESENTE :") MELTING POTES, LA SECTION INTERNATIONALE DU BELLASSO (Association étudiante de lʼensaparis-belleville) PRESENTE : Housing system est un service gratuit, qui vous propose de vous mettre en relation avec
MELTING POTES, LA SECTION INTERNATIONALE DU BELLASSO (Association étudiante de lʼensaparis-belleville) PRESENTE : Housing system est un service gratuit, qui vous propose de vous mettre en relation avec
SA-32 / SA-62 INSTRUCTION MANUAL - MANUEL D INSTRUCTIONS
 SA-32 / SA-62 INSTRUCTION MANUAL - MANUEL D INSTRUCTIONS 4 5 6 7 4 5 6 7 1. Telephone Paging Volume Control 1. Contrôle de volume Paging Téléphone 2. Microphone Volume Control 2. Contrôle volume du microphone
Le No.1 de l économie d énergie pour patinoires.
 Le No.1 de l économie d énergie pour patinoires. Partner of REALice system Economie d énergie et une meilleure qualité de glace La 2ème génération améliorée du système REALice bien connu, est livré en
DOCUMENTATION - FRANCAIS... 2
 DOCUMENTATION MODULE CATEGORIESTOPMENU MODULE CREE PAR PRESTACREA INDEX : DOCUMENTATION - FRANCAIS... 2 INSTALLATION... 2 CONFIGURATION... 2 LICENCE ET COPYRIGHT... 3 SUPPORT TECHNIQUE ET MISES A JOUR...
Règlement sur le télémarketing et les centres d'appel. Call Centres Telemarketing Sales Regulation
 THE CONSUMER PROTECTION ACT (C.C.S.M. c. C200) Call Centres Telemarketing Sales Regulation LOI SUR LA PROTECTION DU CONSOMMATEUR (c. C200 de la C.P.L.M.) Règlement sur le télémarketing et les centres d'appel
Compléter le formulaire «Demande de participation» et l envoyer aux bureaux de SGC* à l adresse suivante :
 FOIRE AUX QUESTIONS COMMENT ADHÉRER? Compléter le formulaire «Demande de participation» et l envoyer aux bureaux de SGC* à l adresse suivante : 275, boul des Braves Bureau 310 Terrebonne (Qc) J6W 3H6 La
Contrôle d accès Access control MOD-TCPIP-AI. Notice technique / Technical Manual
 Contrôle d accès Access control MOD-TCPIP-AI Notice technique / Technical Manual Notice technique Mod-TCPIP-AI 9 septembre 2008 v.1.0 p.2/16 Sommaire / Contents Sommaire / Contents...2 Remerciements...3
DOCUMENTATION MODULE BLOCKCATEGORIESCUSTOM Module crée par Prestacrea - Version : 2.0
 DOCUMENTATION MODULE BLOCKCATEGORIESCUSTOM Module crée par Prestacrea - Version : 2.0 INDEX : DOCUMENTATION - FRANCAIS... 2 1. INSTALLATION... 2 2. CONFIGURATION... 2 3. LICENCE ET COPYRIGHT... 3 4. MISES
Application Form/ Formulaire de demande
 Application Form/ Formulaire de demande Ecosystem Approaches to Health: Summer Workshop and Field school Approches écosystémiques de la santé: Atelier intensif et stage d été Please submit your application
ASSEMBLY INSTRUCTIONS DIRECTIVES POUR L'ASSEMBLAGE ombre pendant lamp lampe suspendue à tons dégradés, chocolat
 ASSEMBLY INSTRUCTIONS DIRECTIVES POUR L'ASSEMBLAGE ombre pendant lamp lampe suspendue à tons dégradés, chocolat SKU 2728089 INSTRUCTIONAL MANUAL MANUEL D'INSTRUCTIONS 270/2707 COMPONENT LIST LISTE DES
ASSEMBLY INSTRUCTIONS DIRECTIVES POUR L'ASSEMBLAGE luster chandelier lamp chandelier à trois branches en verre lustré
 ASSEMBLY INSTRUCTIONS DIRECTIVES POUR L'ASSEMBLAGE luster chandelier lamp chandelier à trois branches en verre lustré SKU 2711592 INSTRUCTIONAL MANUAL MANUEL D'INSTRUCTIONS 270/2707 COMPONENT LIST LISTE
First Nations Assessment Inspection Regulations. Règlement sur l inspection aux fins d évaluation foncière des premières nations CONSOLIDATION
 CANADA CONSOLIDATION CODIFICATION First Nations Assessment Inspection Regulations Règlement sur l inspection aux fins d évaluation foncière des premières nations SOR/2007-242 DORS/2007-242 Current to September
Frequenzzähler FC-2500. Frequency Counter FC-2500 OPERATING INSTRUCTIONS Seite 19-32. Fréquencemètre FC-2500 NOTICE D EMLPOI Seite 33-47
 VOLTCRAFT Frequenzzähler FC-2500 BEDIENUNGSANLEITUNG Seite 4-18 Frequency Counter FC-2500 OPERATING INSTRUCTIONS Seite 19-32 Fréquencemètre FC-2500 NOTICE D EMLPOI Seite 33-47 Frequentieteller FC-2500
Wie können meine Abschlüsse in Frankreich anerkannt werden?
 Wie können meine Abschlüsse in Frankreich anerkannt werden? Trotz der mittlerweile in Kraft getretenen europäischen Regelungen der beruflichen Anerkennung von Ausbildungen und Hochschuldiplomen, liegt
Editing and managing Systems engineering processes at Snecma
 Editing and managing Systems engineering processes at Snecma Atego workshop 2014-04-03 Ce document et les informations qu il contient sont la propriété de Ils ne doivent pas être copiés ni communiqués
PROJET DE LOI. An Act to Amend the Employment Standards Act. Loi modifiant la Loi sur les normes d emploi
 2nd Session, 57th Legislature New Brunswick 60-61 Elizabeth II, 2011-2012 2 e session, 57 e législature Nouveau-Brunswick 60-61 Elizabeth II, 2011-2012 BILL PROJET DE LOI 7 7 An Act to Amend the Employment
COPYRIGHT Danish Standards. NOT FOR COMMERCIAL USE OR REPRODUCTION. DS/EN 61303:1997
 COPYRIGHT Danish Standards. NOT FOR COMMERCIAL USE OR REPRODUCTION. DS/EN 61303:1997 COPYRIGHT Danish Standards. NOT FOR COMMERCIAL USE OR REPRODUCTION. DS/EN 61303:1997 COPYRIGHT Danish Standards. NOT
Die Fotografie als Lebensgefühl, mit all ihren Facetten und Ausdrucksmöglichkeiten,
 PORTFOLIO Claus Rose Photography as a way of living, with all its aspects and opportunities for expression, became my passion at an early stage. In particular the magic of nude photography, which lends
This is a preview - click here to buy the full publication NORME INTERNATIONALE INTERNATIONAL STAN DARD. Telecontrol equipment and systems
 NORME INTERNATIONALE INTERNATIONAL STAN DARD CEI IEC 870-3 Première édition First edition 1989-03 Matériels et systèmes de téléconduite Troisième partie: Interfaces (caractéristiques électriques) Telecontrol
Lavatory Faucet. Instruction Manual. Questions? 1-866-661-9606 customerservice@artikaworld.com
 Lavatory Faucet Instruction Manual rev. 19-01-2015 Installation Manual You will need Adjustable Wrench Adjustable Pliers Plumber s Tape Hardware list (included) Allen Key Socket wrench tool Important Follow
APPENDIX 2. Provisions to be included in the contract between the Provider and the. Holder
 Page 1 APPENDIX 2 Provisions to be included in the contract between the Provider and the Obligations and rights of the Applicant / Holder Holder 1. The Applicant or Licensee acknowledges that it has read
Archived Content. Contenu archivé
 ARCHIVED - Archiving Content ARCHIVÉE - Contenu archivé Archived Content Contenu archivé Information identified as archived is provided for reference, research or recordkeeping purposes. It is not subject
Interest Rate for Customs Purposes Regulations. Règlement sur le taux d intérêt aux fins des douanes CONSOLIDATION CODIFICATION
 CANADA CONSOLIDATION CODIFICATION Interest Rate for Customs Purposes Regulations Règlement sur le taux d intérêt aux fins des douanes SOR/86-1121 DORS/86-1121 Current to August 4, 2015 À jour au 4 août
WEB page builder and server for SCADA applications usable from a WEB navigator
 Générateur de pages WEB et serveur pour supervision accessible à partir d un navigateur WEB WEB page builder and server for SCADA applications usable from a WEB navigator opyright 2007 IRAI Manual Manuel
Exemple PLS avec SAS
 Exemple PLS avec SAS This example, from Umetrics (1995), demonstrates different ways to examine a PLS model. The data come from the field of drug discovery. New drugs are developed from chemicals that
POLICY: FREE MILK PROGRAM CODE: CS-4
 POLICY: FREE MILK PROGRAM CODE: CS-4 Origin: Authority: Reference(s): Community Services Department Cafeteria Services and Nutrition Education Division Resolution #86-02-26-15B.1 POLICY STATEMENT All elementary
Fonctions intégrées. Nouvelles solutions universelles & système de communication
 Fonctions intégrées Nouvelles solutions universelles & système de communication avec les nouvelles solutions universelles Hazemeyer... avancez d une génération thanks to the new flexible solutions by Hazemeyer...
Once the installation is complete, you can delete the temporary Zip files..
 Sommaire Installation... 2 After the download... 2 From a CD... 2 Access codes... 2 DirectX Compatibility... 2 Using the program... 2 Structure... 4 Lier une structure à une autre... 4 Personnaliser une
OUVRIR UN COMPTE CLIENT PRIVÉ
 OUVRIR UN COMPTE CLIENT PRIVÉ LISTE DE VERIFICATION Pour éviter tous retards dans le traitement de votre application pour l ouverture d un compte avec Oxford Markets ( OM, l Entreprise ) Veuillez suivre
Logitech Tablet Keyboard for Windows 8, Windows RT and Android 3.0+ Setup Guide Guide d installation
 Logitech Tablet Keyboard for Windows 8, Windows RT and Android 3.0+ Setup Guide Guide d installation English.......................................... 3 Français.........................................
I. COORDONNÉES PERSONNELLES / PERSONAL DATA
 DOSSIER DE CANDIDATUREAPPLICATION FORM 2012 Please tick the admission session of your choice FévrierFebruary SeptembreSeptember MASTER OF ART (Mention the subject) MASTER OF SCIENCE (Mention the subject)
Support Orders and Support Provisions (Banks and Authorized Foreign Banks) Regulations
 Regulations") CANADA CONSOLIDATION CODIFICATION Support Orders and Support Provisions (Banks and Authorized Foreign Banks) Regulations Règlement sur les ordonnances alimentaires et les dispositions alimentaires (banques
CANADA CONSOLIDATION CODIFICATION Support Orders and Support Provisions (Banks and Authorized Foreign Banks) Regulations Règlement sur les ordonnances alimentaires et les dispositions alimentaires (banques
ETABLISSEMENT D ENSEIGNEMENT OU ORGANISME DE FORMATION / UNIVERSITY OR COLLEGE:
 8. Tripartite internship agreement La présente convention a pour objet de définir les conditions dans lesquelles le stagiaire ci-après nommé sera accueilli dans l entreprise. This contract defines the
Utiliser une WebCam. Micro-ordinateurs, informations, idées, trucs et astuces
 Micro-ordinateurs, informations, idées, trucs et astuces Utiliser une WebCam Auteur : François CHAUSSON Date : 8 février 2008 Référence : utiliser une WebCam.doc Préambule Voici quelques informations utiles
MODE D EMPLOI USER MANUAL
 notice_cd 853:notice 9/01/08 15:08 Page 1 CAFETIÈRE À DOSETTES Coffee pad machine CD 853 GIACOMO MODE D EMPLOI USER MANUAL notice_cd 853:notice 9/01/08 15:08 Page 2 FRANÇAIS WHITE & BROWN vous félicite
Réserve Personnelle. Persönliche Reserve. Emprunter et épargner en fonction de vos besoins. Leihen und sparen je nach Bedarf
 crédit épargne Réserve Personnelle Emprunter et épargner en fonction de vos besoins Persönliche Reserve Leihen und sparen je nach Bedarf Réserve Personnelle Vous voulez disposer à tout moment des moyens
THE LAW SOCIETY OF UPPER CANADA BY-LAW 19 [HANDLING OF MONEY AND OTHER PROPERTY] MOTION TO BE MOVED AT THE MEETING OF CONVOCATION ON JANUARY 24, 2002
![THE LAW SOCIETY OF UPPER CANADA BY-LAW 19 [HANDLING OF MONEY AND OTHER PROPERTY] MOTION TO BE MOVED AT THE MEETING OF CONVOCATION ON JANUARY 24, 2002](/thumbs/19/276456.jpg "THE LAW SOCIETY OF UPPER CANADA BY-LAW 19 [HANDLING OF MONEY AND OTHER PROPERTY] MOTION TO BE MOVED AT THE MEETING OF CONVOCATION ON JANUARY 24, 2002") 2-aes THE LAW SOCIETY OF UPPER CANADA BY-LAW 19 [HANDLING OF MONEY AND OTHER PROPERTY] MOTION TO BE MOVED AT THE MEETING OF CONVOCATION ON JANUARY 24, 2002 MOVED BY SECONDED BY THAT By-Law 19 [Handling
2-aes THE LAW SOCIETY OF UPPER CANADA BY-LAW 19 [HANDLING OF MONEY AND OTHER PROPERTY] MOTION TO BE MOVED AT THE MEETING OF CONVOCATION ON JANUARY 24, 2002 MOVED BY SECONDED BY THAT By-Law 19 [Handling
INDIVIDUALS AND LEGAL ENTITIES: If the dividends have not been paid yet, you may be eligible for the simplified procedure.
 Recipient s name 5001-EN For use by the foreign tax authority CALCULATION OF WITHHOLDING TAX ON DIVIDENDS Attachment to Form 5000 12816*01 INDIVIDUALS AND LEGAL ENTITIES: If the dividends have not been
WiFi Security Camera Quick Start Guide. Guide de départ rapide Caméra de surveillance Wi-Fi (P5)
") #45 #46 WiFi Security Camera Quick Start Guide Guide de départ rapide Caméra de surveillance Wi-Fi (P5) #47 Start Here 1 Is this you? TECH SUPPORT CTRL ALT DEL 2 If yes, turn to page three 1 3 If not,
#45 #46 WiFi Security Camera Quick Start Guide Guide de départ rapide Caméra de surveillance Wi-Fi (P5) #47 Start Here 1 Is this you? TECH SUPPORT CTRL ALT DEL 2 If yes, turn to page three 1 3 If not,
Module Title: French 4
 CORK INSTITUTE OF TECHNOLOGY INSTITIÚID TEICNEOLAÍOCHTA CHORCAÍ Semester 2 Examinations 2010 Module Title: French 4 Module Code: LANG 6020 School: Business Programme Title: Bachelor of Business Stage 2
Gestion des prestations Volontaire
 Gestion des prestations Volontaire Qu estce que l Income Management (Gestion des prestations)? La gestion des prestations est un moyen de vous aider à gérer votre argent pour couvrir vos nécessités et
Credit Note and Debit Note Information (GST/ HST) Regulations
 Regulations") CANADA CONSOLIDATION CODIFICATION Credit Note and Debit Note Information (GST/ HST) Regulations Règlement sur les renseignements à inclure dans les notes de crédit et les notes de débit (TPS/ TVH) SOR/91-44
CANADA CONSOLIDATION CODIFICATION Credit Note and Debit Note Information (GST/ HST) Regulations Règlement sur les renseignements à inclure dans les notes de crédit et les notes de débit (TPS/ TVH) SOR/91-44
Natixis Asset Management Response to the European Commission Green Paper on shadow banking
 European Commission DG MARKT Unit 02 Rue de Spa, 2 1049 Brussels Belgium markt-consultation-shadow-banking@ec.europa.eu 14 th June 2012 Natixis Asset Management Response to the European Commission Green
Improving the breakdown of the Central Credit Register data by category of enterprises
 Improving the breakdown of the Central Credit Register data by category of enterprises Workshop on Integrated management of micro-databases Deepening business intelligence within central banks statistical
that the child(ren) was/were in need of protection under Part III of the Child and Family Services Act, and the court made an order on
 was/were in need of protection under Part III of the Child and Family Services Act, and the court made an order on") ONTARIO Court File Number at (Name of court) Court office address Applicant(s) (In most cases, the applicant will be a children s aid society.) Full legal name & address for service street & number, municipality,
ONTARIO Court File Number at (Name of court) Court office address Applicant(s) (In most cases, the applicant will be a children s aid society.) Full legal name & address for service street & number, municipality,
GAME CONTENTS CONTENU DU JEU OBJECT OF THE GAME BUT DU JEU
 GAME CONTENTS 3 wooden animals: an elephant, a Polar bear and an African lion 1 Playing Board with two tree stumps, one red and one blue 1 Command Board double sided for two game levels (Green for normal
printed by www.klv.ch
 Zentralkommission für die Lehrabschlussprüfungen des Verkaufspersonals im Detailhandel Lehrabschlussprüfungen für Detailhandelsangestellte 2006 Französisch Leseverständnis und gelenkte Sprachproduktion
Bedienungsanleitung Digitaler Kartenmesser ONLINE 1.
 Bedienungsanleitung Digitaler Kartenmesser ONLINE 1. Funktionen : Digitaler Entfernungsmesser für Landkarten Masstäbe von 1:100 bis 1:99.999.999 Taschenrechner Uhrzeitanzeige / Count Down Timer Thermometer
RAPID 3.34 - Prenez le contrôle sur vos données
 RAPID 3.34 - Prenez le contrôle sur vos données Parmi les fonctions les plus demandées par nos utilisateurs, la navigation au clavier et la possibilité de disposer de champs supplémentaires arrivent aux
SERVEUR DÉDIÉ DOCUMENTATION
 SERVEUR DÉDIÉ DOCUMENTATION Release 5.0.6.0 19 Juillet 2013 Copyright 2013 GIANTS Software GmbH, All Rights Reserved. 1/9 CHANGE LOG Correction de bug divers (5.0.6.0) Ajout d une option de relance automatique
WINTER BOAT STORAGE SYSTEM SYSTÈME DE REMISAGE HIVERNAL POUR BATEAU
 MANUAL / MANUEL VIDEO WINTER BOAT STORAGE SYSTEM SYSTÈME DE REMISAGE HIVERNAL POUR BATEAU ASSEMBLY INSTRUCTIONS GUIDE D ASSEMBLAGE NAVIGLOO 14-18½ ft/pi FISHING BOAT! RUNABOUT! PONTOON BOAT! SAILBOAT (SAILBOAT
accidents and repairs:
 accidents and repairs: putting the pieces together accidents et réparations : réunir le tout nobody can repair your Toyota like Toyota Unfortunately, accidents do happen. And the best way to restore your
Guide d installation Deco Drain inc. DD200
 Guide d installation Deco Drain inc. DD200 Pour plus informations et pour télécharger les guides d installation en couleur, visitez notre site web. www.decodrain.com Soutien technique : Composez le : 514-946-8901
Nouveautés printemps 2013
 » English Se désinscrire de la liste Nouveautés printemps 2013 19 mars 2013 Dans ce Flash Info, vous trouverez une description des nouveautés et mises à jour des produits La Capitale pour le printemps
DOCUMENTATION - FRANCAIS... 2
 DOCUMENTATION MODULE PRETTYSLIDER MODULE PRESTASHOP CREE PAR PRESTACREA INDEX : DOCUMENTATION - FRANCAIS... 2 INSTALLATION... 2 Installation automatique... 2 Installation manuelle... 2 Résolution des problèmes...
Deadline(s): Assignment: in week 8 of block C Exam: in week 7 (oral exam) and in the exam week (written exam) of block D
: Assignment: in week 8 of block C Exam: in week 7 (oral exam) and in the exam week (written exam) of block D") ICM STUDENT MANUAL French 2 JIC-FRE2.2V-12 Module Change Management and Media Research Study Year 2 1. Course overview Books: Français.com, niveau intermédiaire, livre d élève+ dvd- rom, 2ième édition,
ICM STUDENT MANUAL French 2 JIC-FRE2.2V-12 Module Change Management and Media Research Study Year 2 1. Course overview Books: Français.com, niveau intermédiaire, livre d élève+ dvd- rom, 2ième édition,
Please kindly find below a synoptic table showing the various ways of transport from Mahe to La Digue, with a stop over on Praslin:
 Travel information: Island? Please kindly find below a synoptic table showing the various ways of transport from Mahe to La Digue, with a stop over on Praslin: From Mahé to Praslin From Praslin to La Digue
Le passé composé. C'est le passé! Tout ça c'est du passé! That's the past! All that's in the past!
 > Le passé composé le passé composé C'est le passé! Tout ça c'est du passé! That's the past! All that's in the past! «Je suis vieux maintenant, et ma femme est vieille aussi. Nous n'avons pas eu d'enfants.
Manuel d installation et de maintenance (serrures LR128 E)
") Manuel d installation et de maintenance (serrures LR128 E) Manuel comprenant : Installation de la gâche GV et GVR :............................................ page 2 Position et réglage du shunt - Cales
Manuel d installation et de maintenance (serrures LR128 E) Manuel comprenant : Installation de la gâche GV et GVR :............................................ page 2 Position et réglage du shunt - Cales
INSTRUMENTS DE MESURE SOFTWARE. Management software for remote and/or local monitoring networks
 INSTRUMENTS DE MESURE SOFTWARE SOFTWARE Logiciel de supervision des réseaux locaux et/ou distants Management software for remote and/or local monitoring networks MIDAs EVO 4 niveaux de fonctionnalités
English Q&A #1 Braille Services Requirement PPTC 144918. Q1. Would you like our proposal to be shipped or do you prefer an electronic submission?
 English Q&A #1 Braille Services Requirement PPTC 144918 Q1. Would you like our proposal to be shipped or do you prefer an electronic submission? A1. Passport Canada requests that bidders provide their
PRESENTATION REMOTE TÉLÉCOMMANDE DE PRÉSENTATION. User Guide Manuel de l utilisateur
 PRESENTATION REMOTE TÉLÉCOMMANDE DE PRÉSENTATION User Guide Manuel de l utilisateur Targus Presentation Remote Introduction Thank you for your purchase of the Targus Presentation Remote. This cordless
AMENDMENT TO BILL 32 AMENDEMENT AU PROJET DE LOI 32
 THAT the proposed clause 6(1), as set out in Clause 6(1) of the Bill, be replaced with the following: Trustee to respond promptly 6(1) A trustee shall respond to a request as promptly as required in the
Produktinformation. Monitor MOM 711-0 und MOM 711-1. Monitor MOM 711-0 and MOM 711-1. Moniteur MOM 711-0
 MOM711_0_01_021843 20.09.2002 8:00 Uhr Seite 1 Produktinformation Monitor MOM 711-0 und MOM 711-1 Monitor MOM 711-0 and MOM 711-1 Moniteur MOM 711-0 MOM711_0_01_021843 20.09.2002 8:00 Uhr Seite 4 English
Pentype-Multimeter VC-86. Pen-type multimeter VC-86. Multimètre stylo VC 86. BEDIENUNGSANLEITUNG Seite 4-22. OPERATING INSTRUCTIONS Page 23-41
 Pentype-Multimeter VC-86 BEDIENUNGSANLEITUNG Seite 4-22 Pen-type multimeter VC-86 OPERATING INSTRUCTIONS Page 23-41 Multimètre stylo VC 86 NOTICE D EMLPOI Page 42-61 Best.-Nr. / Item-No. / N 0 de commande:
Comprendre l impact de l utilisation des réseaux sociaux en entreprise SYNTHESE DES RESULTATS : EUROPE ET FRANCE
 Comprendre l impact de l utilisation des réseaux sociaux en entreprise SYNTHESE DES RESULTATS : EUROPE ET FRANCE 1 Objectifs de l étude Comprendre l impact des réseaux sociaux externes ( Facebook, LinkedIn,
Logitech Speaker System Z553 Setup Guide Guide d installation
 Logitech Speaker System Z553 Setup Guide Guide d installation Logitech Speaker System Z553 English................. 3 Français................ 10 www.logitech.com/support...19 2 Package contents Logitech
VTP. LAN Switching and Wireless Chapitre 4
 VTP LAN Switching and Wireless Chapitre 4 ITE I Chapter 6 2006 Cisco Systems, Inc. All rights reserved. Cisco Public 1 Pourquoi VTP? Le défi de la gestion VLAN La complexité de gestion des VLANs et des
AND / ET USER GUIDE UK HARDWIRED CONTROL PANEL UK GUIDE UTILISATEUR CENTRALE D ALARME FILAIRE F 496572 1
 AND / ET UK USER GUIDE HARDWIRED CONTROL PANEL UK F GUIDE UTILISATEUR CENTRALE D ALARME FILAIRE 496572 1 English UK Operator Controls and Displays On both control panel and remote keypad the LEDs display
Warning: Failure to follow these warnings could result in property damage, or personal injury.
 Western Steel & Tube 1 Storage Locker Extended Storage Locker Storage Cabinet Assembly And Use Instructions Warning: Failure to follow these warnings could result in property damage, or personal injury.
Stainless Steel Solar Wall Light
 V 2.9 Stainless Steel Solar Wall Light User Manual Please read and understand all instructions before use.retain this manual for future reference. V 2.9 Stainless Steel Solar Wall Light SPECIFICATIONS