WA-8800N EN FR ES. electric steam sterilizer & dryer
|
|
|
- Oscar Bureau
- il y a 8 ans
- Total affichages :
Transcription
1 WA-8800N EN FR ES electric steam sterilizer & dryer STÉRILISATEUR ÉLECTRIQUE AVEC SÉCHEUR À VAPEUR ESTERILIZADOR DE VAPOR Y SECADO ELÉCTRICO

2

3 TABLE OF CONTENTS ENGLISH... 2 EN what comes in your box... 3 safeguards... 4 control panel guide... 5 diagram... 6 prior to first use... 7 Let s get started... 7 but really, it s only 3 steps... 9 how to clean... 9 trouble shooting warranty... 1 FRANÇAIS le contenu de votre boîte mises en garde guide du panneau de contrôle diagramme avant la première utilisation comment vous en servir trois étapes simples le nettoyage le dépannage garantie ESPAÑOL lo que viene en su caja precauciones guía del panel de control diagrama antes del primer uso empecemos pero de verdad, son sólo 3 pasos cómo limpiarlo resolución de problemas garantía

4 THANK YOU FOR CHOOSING WABI BABY TM EN The WABI BABY TM sterilizer & dryer is designed to meet the modern day parents needs to provide a safe, healthy and convenient choice for your baby. With revolutionary features of sterilizing and drying all built into one unit, it allows you to easily sterilize and dry bottles with just a press of a button. The WABI BABY TM sterilizer & dryer is made of 100% BPA-free material to ensure a nontoxic environment for your baby s daily use of feeding items. The design of the WABI sterilizer & dryer requires minimal countertop space and can hold an industry-leading capacity of 8 tall bottles, nipples, caps and feeding items. Although the WABI sterilizer & dryer was originally designed for baby bottles, it is also the perfect unit to use for breast pump components, pacifiers, baby food containers and anything else that you want to sterilize. The WABI sterilizer & dryer is a patented technology with industry-leading design functions that will give parents more time to enjoy with their families. Please visit for the most current information and FAQs. 2

5 WHAT COMES IN YOUR BOX EN A Lid PP B Accessory Basket PP C Bottle Rack PP D Chamber PP E Air Flow Deflector PP F Electronic Base Unit PP G Plate Rack PP H Measuring Cup PP I Tongs PP j Air Filter PP 1 Air Vent 2 Heating Plate SU304 stainless steel 3 Control Panel 4 Auto Shut-Off Limit Switch NOTE: PP (polypropylene) plastic (#5) is free from BPA, phthalate, and PVC. 3
 plastic (#5) is free from BPA, phthalate, and")
6 SAFEGUARDS EN When using electrical appliances, basic safety precautions should always be followed including the following: 1. Not for space heating purpose. 2. To protect against electrical shock DO NOT IMMERSE cord or plugs or sterilizer base in water or other liquid when cleaning. 3. DO NOT place sterilizer and its cord beside or near damp or hot areas, electric burner or in a heated oven especially while in use. 4. Do not use outdoors. 5. Always use on a level heat resistant surface. 6. When in use, electric sterilizer contains hot water and steam. 7. Extreme caution must be used when moving an appliance containing hot oil or other hot liquids. 8. Do not touch hot surfaces. Use handles and knobs. 9. Always keep the electric sterilizer and its plug out of reach of small children 10. Ensure that the power supply voltage marked on the appliance corresponds with your main supply. 11. To disconnect, turn any control cycle off, then remove plug from wall outlet. 12. Ensure water has been added to the base unit before switching the unit on. 13. Always add 100ml / 3.3 oz of water before use. If you put too little or too much water into the sterilizer it will not operate correctly. 14. Always unplug from the electric outlet when not in use. Allow to cool before putting on or taking off any parts. 15. Close supervision is necessary when any appliance is used near children. 16. Do not operate any appliance with a damaged cord or plug or after the appliance malfunctions or has been damaged in any manner. Return appliance to the nearest authorized service facility for examination, repair, or adjustment. 17. The use of accessory attachments is not recommended as this may cause injuries. 18. This sterilizer is intended to be used in household environment such as a. staff kitchen areas in shops, offices and other working environments. b. farm houses. c. by clients in hotels, motels and other residential type of environments. d. bed and breakfast. 19. This appliance is not intended for use by person (including children) with reduced physical, sensory or mental capabilities, or lake of experience and knowledge, unless they have been given supervision or instruction concerning the use of the appliance by a person responsible for their safety. 20. Do not open while in use as this product contains boiling water. Beware of venting steam from the vent holes in the lid. 21. Allow at least 30 minutes interval between two operations and make sure the unit has been cooled down before pressing the start button for sequential use. 22. Steam venting from the unit can cause burns. Always allow 5 minutes to cool down after the cycle finishes before lifting the lid. 23. KEEP CHILDREN AWAY from this sterilizer at all time. 24. NEVER place the power cord on top of the heating plate (boiling bowl) on the base unit. 25. DO NOT place any cloth on the cover while in use, or it may hinder the steam from venting properly. 26. User maintenance other than cleaning or descaling is not required for this product. 27. DO NOT attempt to dismantle or repair the sterilizer unless done by a qualified person or an authorized service agent. Damaged supply cord or parts must be replaced by the manufacturer or authorized service agent to prevent any injuries and hazards. 28. A short power-supply cord is provided to reduce the risks resulting from becoming entangled in or tripping over a longer cord. 29. Extension cords may be used if care is exercised in their use. 30. If an extension cord is used: a. The marked electrical rating of the extension cord should be at least as great as the electrical rating of the appliance. b. The extension cord should be a grounding type 3-wire cord. c. The longer cord should be arranged so that it will not drape over the countertop or tabletop where it can be tripped over, snagged, or pulled on unintentionally (especially by children). 31. To provide continued protection against risk of electric shock, connect to properly grounded outlets only. 32. CAUTION: Risk of electric shock, disconnect electric power before servicing. 33. Do not sterilize very small parts which can fall through the opening in the bottom of the chamber which may cause damage to the heating plate and causing the small parts to melt in the heating plate. 34. Use only distilled water, bottle water or fresh running water to sterilize. Never use any additives. 35. SAVE THESE INSTRUCTIONS. 4

7 CONTROL PANEL GUIDE EN A Quick Drying Quick 10 minutes of hot air drying with Negative Ion technology to deodorize. B Drying Time Press repeatedly to select the preset drying time. Setting Preset drying time: minutes. C Steam Sterilize 15 minutes of steam sterilizing.* *More or less than 100ml of water in the heating plate may affect the default sterilization time. D 15 minutes of steam sterilization time followed Auto Mode: by 45 minutes of hot air drying with Negative Sterilize + Dry Ion deodorizing. Press the drying button during + Deodorize drying cycle to change time setting. E Power Off Press to switch off any operation. F Indicator Lamp Illumination indicates the current operating mode. G Remaining Minute Display Displays the remaining minutes for current operating mode. 5

8
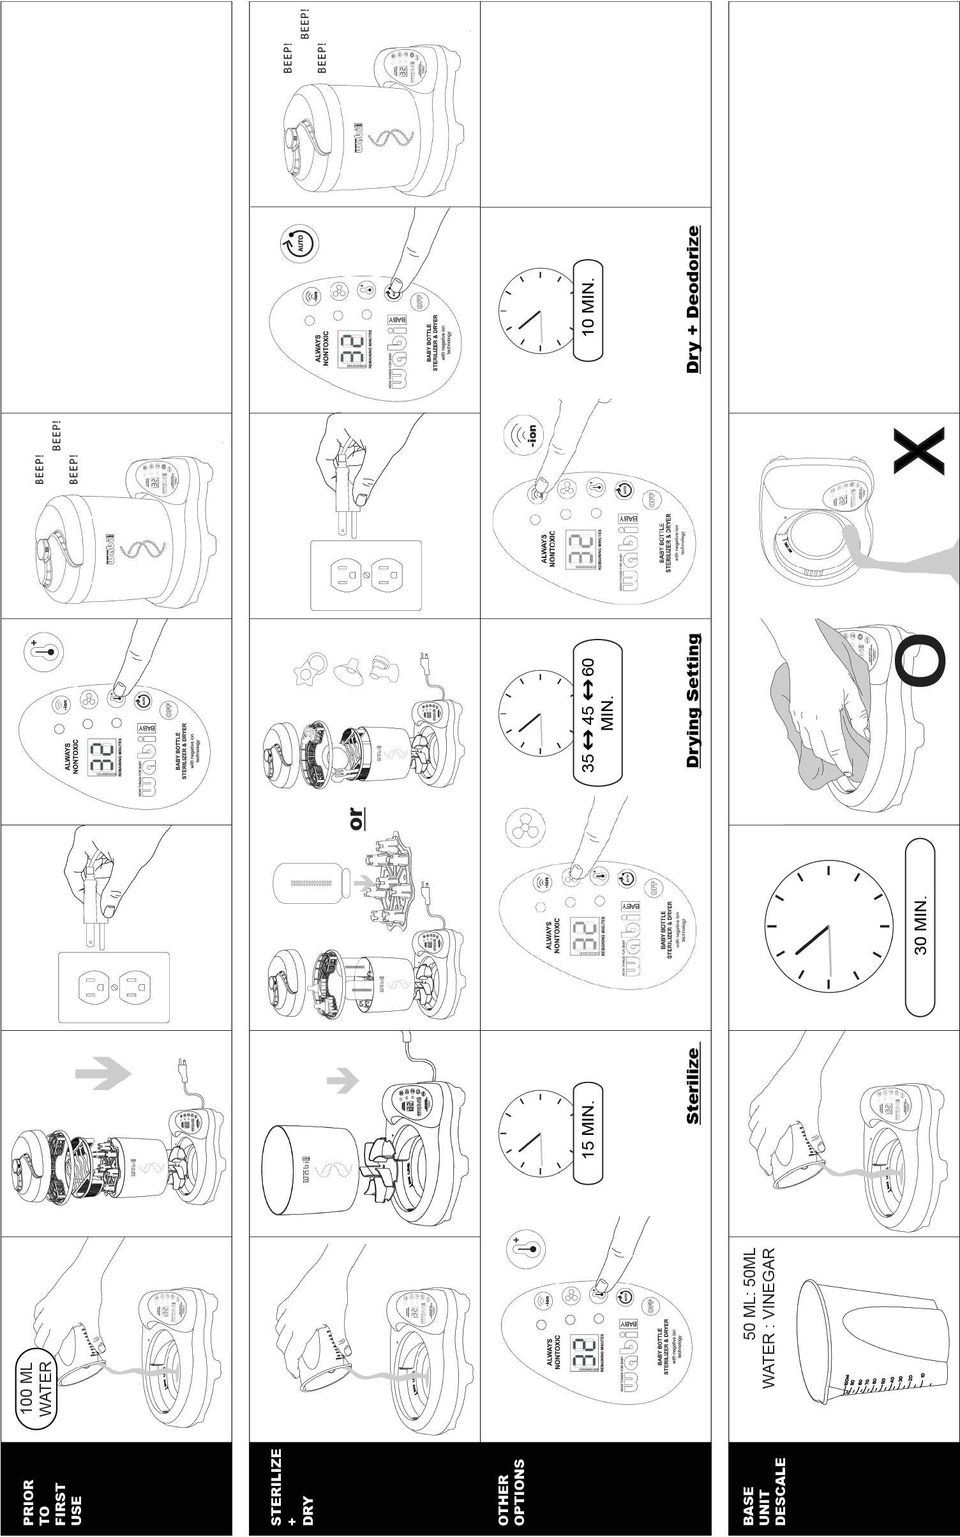
9 PRIOR TO FIRST USE EN (i) (ii) (iii) 1. Clean before first use. Lid, racks, chamber, and accessories: Dishwasher safe, or clean with soapy warm water before first use. Electronic Base Unit: Wipe clean only. WARNING: Never immerse the electrical base unit in water. 2. Pour 100ml of water onto the stainless steel heating plate. (i) 3. Place the bottle chamber on the sterilizer base. Next, place the bottle, plate and accessories rack inside the bottle chamber. Close the lid. (ii) 4. Press Sterilize cycle on the control panel. This will take 15 minutes. After the cycle is done, you will hear 3 beeping sounds. Let it cool for 15 minutes before first use. (iii) LET S GET STARTED 1. All items intended for sterilization must be washed clean, completely rinsed with fresh water and drained. IMPORTANT: All items must be able to withstand boiling conditions in order to be sterilized and dried in this unit. (100 C or 212 F) 2. Remove the bottle chamber from the base unit. Use the measuring cup included in the package to pour exactly 100ml of fresh cold water onto the heating plate. More or less than 100ml may not sterilize the items properly. IMPORTANT: Excess amount of water on the heating plate may flow into the air vent causing the electronic base unit to fail. Please note that our warranty does not cover this type of user error. TIP: Hard water may increase mineral buildup on the heating plate. We recommend using filtered water if you live an area with hard water. 7
 LET S GET STARTED 1.")
10 3. Place the chamber on the sterilizer base. EN For bottles: a. Place the bottle rack inside the bottle chamber. b. Place the bottle necks downward into the bottle posts and place all bottle components on top of the bottles, and the bottle nipples on the accessory tray. Make sure to place all items with the larger open ends facing down and allow space in between for steam to travel freely. TIP: Most bottles have a caved-in area on its bottom. Shake off any excess water to prevent water from accumulating in those indentions. Excess water may prolong the drying time, please make sure to drain out as much water as you can. NOTE: Due to various sizes of bottles on the market, there may be cases where you won t be able to fit exactly all 8 bottles on the bottle rack. For dinnerware: a. Place plate rack inside the bottle chamber. b. Load the plates on the rack and utensils in the utensil holder. For bottle nipples, breast pump parts, pacifiers and small toys: a. Use either the bottle or plate rack. b. Place the items inside the chamber with the larger open ends facing down and make sure to allow space in between for air to travel freely. 4. Place the accessory tray on top of the bottle chamber; the accessory tray is necessary in order to close the lid, so always be sure to use it. 5. Cover the lid. 6. Plug the power cord into the outlet. 7. Choose an operation mode. (See page 6 for control panel guide) 8. When the chosen cycle is completed, the unit will beep 3 times and will shut off automatically. 9. Allow to cool for 10 minutes before opening the lid. Be careful to avoid any residual steam. 10. Use included tongs to remove the sterilized items. Handle with care, as the items will be hot. 8

11 BUT REALLY, IT S ONLY 3 STEPS 1. Pour water onto heating plate. 2. Load bottles into the chamber. 3. Press the Auto mode. EN HOW TO CLEAN With regular use, the heating plate should be descaled at least once a week to ensure it continues to work efficiently. Always unplug the unit and allow it to cool before cleaning. Bottle chamber, bottle rack, plate rack, accessory tray and lid: Dishwasher safe. Base Unit Exterior: Base unit exterior cleaning requires only wiping with a damp cloth. Heating Plate Descale: 1. Empty any remaining water from heating plate with a sponge or clean towel. 2. Fill the measuring cup with 50ml fresh water and 50ml household vinegar. Pour onto the heating plate. 3. Let it stand for a minimum of 1 hour; repeat if necessary. Make sure the solution does not overflow the heating plate and find its way into the air vent. 4. Use a sponge or cloth to absorb the cleaning solution until empty and then wipe it dry with a clean cloth. NOTE: Do note use harsh abrasives or solvents to clean the heating plate or come into contact with the unit. They can cause serious damage to the unit. WARNING: NEVER IMMERSE THE STERILIZER BASE UNIT IN WATER. IMPORTANT: NEVER POUR THE WATER OUT. WIPE DRY ONLY. There are many air vent openings on the base unit. Any attempt to pour the water out directly from the base unit may cause the water to flow into the circuit board through the vent. This will cause permanent damage to the unit and will not be covered by the warranty. 9

12 TROUBLE SHOOTING EN Problem Indicator lamp not lighting up Beeping sound Sterilizer not working Contents are still wet after drying Odor while sterilizing Odor while drying White spots on heating plate, lid, chamber, racks or basket Sterilization taking too long Bottles come out with mark Sterilization process too short Water flows out of the sterilizer Possible Cause & Solution No power; check circuit breaker or GFCI breaker. Incorrect plug voltage. Bottle chamber placed incorrectly. No water was added to the heating plate. Contents may still be wet due to the placement of the contents blocking hot air from traveling thoroughly. Press Drying mode to select desired time setting to dry again. Sometimes water accumulates on the caved-in space on the bottom of the bottles; try to shake them off before placing in the chamber. The heating plate needs to be cleaned. Possible water damage to the base unit due to water flow into the circuit board through the air vent. Scale buildup is normal and occurs more quickly in hard water areas. Descale the appliance regularly (see Heating Plate Descaling). You may have poured too much water into the heating plate or left too much water residue on the contents after cleaning. Try shaking off residual water as much as possible. Most of the time, these white spots are just drying water spots, try shaking off the excess water as much as you can after washing may help. You may not have poured enough water onto the heating plate. Be sure to pour exactly 100ml. You may have poured too much water onto the heating plate. Any excess water may flow into the air vent and cause damage to the electronic base unit. Visit our Frequently Asked Questions for more information about our product. Distributed by Wowkido, LLC model: WA-8800N 906 W. McDermott Drive Voltage: 120V, 60Hz Suite Power: 475W Allen, Texas made in China The WABI BABY TM name and logo are trademark owned by Wowkido, LLC. 10

13 WARRANTY When we use the terms we, us and our, we are referring to the Company, and when we use the terms you and your, we mean the original end-user customer. We warrant our products to be free from substantial defects in workmanship and material under normal household use in accordance with the instructions for one (1) year following the date of purchase. We will, at our discretion, replace or repair any item requiring service. This warranty shall not apply to damage arising from neglect, accidental damage, or commercial use of the product. This is a limited warranty. Liability for consequential damages is expressly excluded. Proof of purchase is required. EN Replacement / Credit If our product fails to meet our limited warranty during the warranty period, we will, at our option, replace the product free of charge or provide you with a replacement of comparable value. Any replacement may be conditioned upon the return of the defective product to us at your expense. What Our Limited Warranty Does Not Cover We offer this limited warranty only when the product is used by the original end-user customer. We offer no other warranty. Additionally, while our warranty is excellent, there are other limits to it. We offer NO WARRANTY in cases of damage in transit, inadequate care or neglect, abuse, abnormal use, accidents, normal wear and tear damage due to environmental or natural elements, failure to follow product instructions, immersion in water, water damage to the base unit due to false attempt, improper installation, improper storage or maintenance of the products, or improper service or causes not arising out of defects in material and workmanship. Disclaimer of Other Warranties The Express Warranties in the preceding section are exclusive and in lieu of all other warranties. However, to the extent applicable law does not permit disclaimers of certain implied warranties, such warranties are limited to the warranty period identified above. Some states and countries do not allow limitations on how long an implied warranty lasts, so the above limitations may not apply to you. Limitation on Damages In no event shall we be liable for incidental, compensatory, punitive, consequential, indirect, special or other damages. Our aggregate liability with respect to a defective product is limited to the monies paid to us. State Variations This warranty gives you specific legal rights, and you may also have other rights which vary based on state, province or country. Contact Us If you have a warranty claim or request, or any customer care questions, please contact us. 11

14

15 MERCI D AVOIR CHOISI WABI BABY TM Le stérilisateur électrique avec sécheur à vapeur WABI BABY est conçu pour répondre aux besoins des parents modernes en offrant un choix sécuritaire, sain et pratique pour votre bébé. Avec des fonctionnalités révolutionnaires de stérilisation et de séchage réunies en un seul appareil, vous pouvez ainsi stériliser et sécher facilement les biberons en appuyant simplement sur un bouton. Le stérilisateur électrique avec sécheur à vapeur WABI BABY est fabriqué à partir d un matériau à 100% sans BPA afin d assurer un environnement non toxique lors de l utilisation quotidienne des articles servant à l alimentation de votre bébé. La conception du stérilisateur électrique avec sécheur à vapeur WABI BABY en fait un appareil qui ne requiert qu un espace minimal de comptoir, en plus d avoir une capacité totale, à la fine pointe de l industrie, de huit biberons de grande contenance, de tétines, de bouchons et de différents accessoires. Bien que le stérilisateur électrique avec sécheur à vapeur WABI BABY ait originellement été conçu pour des biberons, il est également l appareil parfait à utiliser pour les pièces d un tire-lait, des suces, des contenants de nourriture pour bébés et n importe quoi d autre que vous souhaitez stériliser. Le stérilisateur électrique avec sécheur à vapeur WABI BABY est une technologie brevetée, dont les fonctionnalités à la fine pointe de l industrie permettent aux parents de gagner du temps et ainsi de profiter de leur famille. FR Veuillez visiter pour l information la plus à jour et la foire aux questions (FAQ). 13

16 CE QUE VOTRE BOÎTE CONTIENT FR A Couvercle PP B Panier d accessoires PP C Panier à biberons PP D Panier PP E Détecteur du flux d air PP F Base électronique PP G Panier à assiettes PP H Tasse à mesurer PP I Pinces PP j Filtre à air PP 1 Bouche d aération 2 Unité chauffante SU304 acier inoxydable 3 Panneau de contrôle 4 Interrupteur d arrêt automatique NOTE: PP (polypropylène) en plastique (# 5) est exempt de BPA, phtalates, ni PVC. 14
 en plastique (# 5) est exempt de BPA, phtalates, ni")
17 MISES EN GARDE Quand vous utilisez des appareils électriques, vous devriez toujours prendre des mesures de sécurité telles que : 1. Cet appareil ne peut pas être utilisé comme chauffage. 2. Pour se protéger contre les chocs électriques, NE PAS IMMERGER le fil, les prises ou la base du stérilisateur dans l eau ou dans un liquide quelconque. 3. NE PAS placer le stérilisateur et son cordon à côté ou à proximité de zones humides ou chaudes, d un brûleur électrique ou dans un four chaud, en particulier durant l utilisation. 4. Ne pas utiliser à l extérieur. 5. Toujours utiliser sur une surface résistante à la chaleur bien à plat. 6. Lorsqu il fonctionne, le stérilisateur contient de l eau chaude et de la vapeur. 7. Il faut être particulièrement prudent lorsqu on déplace un appareil contenant de l huile chaude ou tout autre liquide chaud. 8. Ne pas toucher les surfaces chaudes. Utiliser les poignées et les boutons. 9. Toujours garder le stérilisateur électrique et sa prise hors de la portée des enfants. 10. S assurer que le voltage de l alimentation électrique de l appareil correspond à la capacité de votre système électrique. 11. Pour débrancher, mettre le bouton en position «Off» avant de débrancher la prise du mur. 12. S assurer que de l eau a été ajoutée à l unité avant de la mettre en marche. 13. Toujours ajouter 100 ml (3,3 onces) d eau avant l utilisation. Si vous mettez trop ou trop peu d eau dans le stérilisateur, il ne fonctionnera pas correctement. 14. Toujours le débrancher de la prise de courant lorsqu il n est pas utilisé. Toujours le laisser refroidir avant d enlever ou d ajouter une partie de l appareil. 15. Une surveillance accrue est nécessaire quand l appareil est utilisé à proximité d un enfant. 16. En aucun cas, n utilisez un appareil lorsque sa prise ou son fil sont endommagés, après un mauvais fonctionnement ou suite à une défectuosité quelconque. Retournez l appareil au service d entretien autorisé le plus proche pour le faire examiner, réparer ou ajuster. 17. L utilisation d attaches supplémentaires n est pas recommandée par le fabricant de l appareil car elles peuvent causer des blessures. 18. Ne pas utiliser l appareil pour une autre utilisation que celle qui est prévue. Ce stérilisateur est destiné à un usage domestique et à d autres utilisations semblables telles que: a. les aires de cuisine du personnel dans les magasins, les bureaux et autres environnements de travail; b. les fermes; c. par les clients d hôtels, de motels et d autres environnements de type résidentiel; d. les gîtes touristiques. 19. Cet appareil n est pas conçu pour être utilisé par des personnes (y compris des enfants) ayant des capacités physiques, sensorielles ou mentales réduites, qui manquent d expérience ou de connaissances, à moins que l utilisation se fasse sous la supervision d une personne responsable de leur sécurité. 20. Ne pas ouvrir pendant qu il fonctionne, car cet appareil contient de l eau bouillante. Prendre garde à la vapeur qui s échappe des trous d aération du couvercle. 21. Accorder un intervalle d au moins 30 minutes entre deux utilisations et s assurer que l appareil est refroidi avant d appuyer sur le bouton de démarrage pour une utilisation consécutive. 22. La vapeur qui s échappe de la bouche d aération peut brûler la peau. Attendre 5 minutes après la fin d un cycle avant d ouvrir le couvercle. 23. Garder les enfants HORS DE LA PORTÉE du stérilisateur. 24. NE JAMAIS placer la corde électrique sur l unité chauffante (base électronique) située à la base de l appareil. 25. NE PAS placer de linge sur le stérilisateur lorsque celui-ci est en marche. ou cela pourrait empêcher le stérilisateur de fonctionner correctement. 26. À part le nettoyage et le détartrage de l appareil, aucun autre entretien n est requis. 27. NE PAS tenter de démonter ou de réparer le stérilisateur à moins de le faire faire par une personne qualifiée ou un agent de service autorisé. Un cordon d alimentation ou des pièces endommagés doivent être remplacés par le fabricant ou l agent de service autorisé pour prévenir les risques. 28. Un cordon d alimentation délibérément court est fourni avec l appareil pour réduire les risques de s enchevêtrer ou de trébucher sur un long cordon. 29. Des rallonges électriques sont disponibles mais doivent être utilisées avec prudence. 30. Si une rallonge électrique est utilisée: 1. Les caractéristiques électriques indiquées sur la rallonge doivent être au moins équivalentes à celles de l appareil. 2. La rallonge devrait être un câble à trois fils avec mise à la terre. 3. La rallonge doit être placée de façon à ne pas encombrer le comptoir ou le dessus de table où elle peut être accrochée ou tirée par mégarde (particulièrement par un enfant). 31. Brancher seulement à une prise munie d une mise à la terre afin d obtenir une protection continuelle contre les chocs électriques. 32. DANGER: Risque d électrocution, débrancher de la source électrique avant de réparer. 33. Ne pas stériliser les petites pièces qui peuvent tomber dans l ouverture au bas du panier, cela peut endommager l unité chauffante et faire fondre les petites pièces. 34. Utiliser seulement de l eau distillée, de l eau embouteillée ou de l eau fraîche pour stériliser. Ne pas y mettre de produits chimiques. 35. CONSERVEZ CES INSTRUCTIONS. FR 15

18 GUIDE DU panneau de contrôle FR A Séchage rapide 10 minutes de séchage à air chaud avec la technologie ionique pour désodoriser. B C D Durée de séchage Stérilisation à la vapeur Mode auto : stériliser + sécher + désodoriser Appuyez plusieurs fois pour sélectionner le temps de séchage préréglé. Présélectionnez le temps de séchage: minutes. 15 minutes de stérilisation à la vapeur.* *Un contenu de plus de ou de moins de 100 ml d eau dans l unité chauffante peuvent affecter le temps de stérilisation par défaut. 15 minutes de stérilisation à la vapeur suivies de 45 minutes de séchage à air chaud avec désodorisation à technologie ionique. Appuyez sur le bouton séchage durant le cycle de séchage afin de changer la durée. E Off Appuyez sur le bouton pour arrêter tout fonctionnement. F Témoin lumineux Le témoin lumineux indique le cycle en cours. G Affichage des minutes restantes Affiche les minutes restantes du cycle en cours. 16

19

20 AVANT LA PREMIÈRE UTILISATION (i) (ii) (iii) 1. Nettoyez avant la première utilisation. Couvercle, supports, paniers et accessoires : Lavables en machine, peuvent aussi être lavés avec de l eau chaude et du savon avant la première utilisation. Base électronique : Essuyez seulement. ATTENTION: N immergez jamais l unité de base électrique dans l eau. FR 2. Versez 100 ml d eau dans la base chauffante en acier inoxydable. (i) 3. Placez le panier sur la base stérilisante. Ensuite, placez les paniers à biberons, assiettes et panier d accessoires à l intérieur du panier, puis fermez le couvercle. (ii) 4. Appuyez sur le cycle Stérilisation sur le panneau de contrôle. Cela prendra 15 minutes. Quand le cycle sera terminé, vous entendrez trois bips sonores. Laissez refroidir le tout 15 minutes avant la première utilisation. (iii) COMMENT VOUS EN SERVIR 1. Tous les articles destinés à la stérilisation doivent être propres, complètement rincés à l eau fraîche et égouttés. IMPORTANT: tous les articles doivent être en mesure de résister à une ébullition pour être stérilisés et séchés dans cet appareil. (100 C ou 212 F) 2. Retirez le panier à biberons de la base. Utilisez la tasse à mesurer incluse pour verser exactement 100 ml d eau froide dans l unité chauffante. Si vous mettez plus ou moins que 100 ml, vos objets pourraient ne pas être stérilisés convenablement. IMPORTANT: mettre trop d eau dans l unité chauffante pourrait faire circuler le liquide dans l évent d air et ainsi faire arrêter l unité électronique. S il vous plaît, notez que notre garantie ne couvre pas ce type d erreur de l utilisateur. 18
 4. Appuyez sur le cycle Stérilisation sur le panneau de contrôle.")
21 CONSEILS: l eau dure peut augmenter les dépôts de minéraux dans l unité chauffante. Il est recommandé d utiliser de l eau filtrée si vous vivez dans une zone où l eau est dure. 3. Placez le panier à biberons sur la base de stérilisation. Pour les biberons: a. Placez le porte-biberons à l intérieur du panier à biberons. b. Placez les cols des biberons vers le bas dans les emplacements prévus et placez toutes les parties des biberons sur le dessus, et les tétines dans le panier d accessoires. Assurez-vous de placer tous les articles avec les plus grandes ouvertures vers le bas et laissez de l espace entre chacun pour laisser la vapeur circuler librement. CONSEIL: un surplus d eau peut prolonger le temps de séchage, veuillez vous assurer d égoutter le plus d eau possible. La plupart des biberons ont un fond surélevé. Essayez d enlever l excédent d eau pour prévenir l accumulation d eau dans ces renforcements. NOTE: : à cause des différentes tailles de biberons sur le marché, il se peut que vous ne soyez pas en mesure de placer les huit biberons dans le panier à biberons. FR Pour la vaisselle : a. Placez le panier à assiettes à l intérieur du panier de biberons. b. Mettez la vaisselle sur le support et les ustensiles dans le porte-ustensiles. Pour les tétines, les pièces du tire-lait, les suces, et les petits jouets : a. Utilisez, soit le panier à biberons, soit le panier à vaisselle. b. Placez les articles à l intérieur du panier avec la plus grande ouverture vers le bas et assurez-vous de laisser de l espace entre chacun afin de laisser l air circuler librement. 4. Placez le panier d accessoires sur le dessus du panier à biberons; le panier d accessoires doit être placé afin de fermer le couvercle, assurez-vous donc de toujours l utiliser. 5. Fermez le couvercle. 6. Branchez le cordon d alimentation dans la prise. 7. Choisissez un mode d opération (voir la page 16 pour le guide du panneau de contrôle) 8. Lorsque le cycle choisi est terminé, l appareil va émettre trois bips sonores avant de s éteindre automatiquement. 9. Laissez refroidir pendant 10 minutes avant d ouvrir le couvercle. Veillez à éviter toute vapeur résiduelle. 10. Utilisez les pinces incluses afin de retirer les articles stérilisés. Manipulez les articles avec précaution puisqu ils seront chauds. 19
22 TROIS ÉTAPES SIMPLES 1. Versez l eau dans l unité chauffante. 2. Placez les biberons dans le panier. 3. Appuyez sur le mode automatique (auto). LE NETTOYAGE Lors d une utilisation régulière, l unité chauffante devrait être nettoyée au moins une fois par semaine afin d assurer son bon fonctionnement. Débranchez toujours l appareil et laissez-le refroidir avant de le nettoyer. Le panier, le casier à biberons, le panier à vaisselle, le panier d accessoires et le couvercle : Sont lavables au lave-vaisselle. FR L extérieur de l appareil de base : Le nettoyage de l extérieur de l appareil de base ne requiert qu un essuyage avec un linge humide. Pour détartrer l unité chauffante : 1. Retirez l eau qui reste dans l unité chauffante avec une éponge ou un chiffon. 2. Remplissez la tasse à mesurer de 50 ml d eau fraîche et de 50 ml de vinaigre blanc. Verser dans l unité chauffante. 3. Laisser-la reposer pendant une heure au minimum; répétez l opération si nécessaire. Assurez-vous que le mélange d eau et de vinaigre ne déborde pas de l unité chauffante et ne se retrouve pas dans l aération. 4. Utilisez une éponge ou un chiffon pour absorber le mélange puis essuyez le tout avec un chiffon propre. NOTE: ne pas utiliser de produits abrasifs ou de solvants pour nettoyer l unité chauffante ou pour nettoyer l appareil.ils peuvent causer de graves dommages à l appareil. ATTENTION: NE JAMAIS IMMERGER L APPAREIL DE STÉRILISATION DE BASE DANS L EAU. ATTENTION: NE JAMAIS VERSER L EAU À L EXTÉRIEUR. ESSUYEZ-LA SEULEMENT. Il y a plusieurs ouvertures pour la ventilation sur l appareil de base. -Toute tentative de verser l eau directement de l appareil de base peut amener l eau à s écouler dans le circuit à travers la ventilation. Cela causera des dommages permanents à l appareil et ne sera pas couvert par notre garantie. 20
Lavatory Faucet. Instruction Manual. Questions? 1-866-661-9606 customerservice@artikaworld.com
 Lavatory Faucet Instruction Manual rev. 19-01-2015 Installation Manual You will need Adjustable Wrench Adjustable Pliers Plumber s Tape Hardware list (included) Allen Key Socket wrench tool Important Follow
4600-5600 J. Nexera Distribution 1-877-629-9022 1-450-629-4366. assembly instructions consignes d assemblage instrucciones de ensamblaje
 assembly instructions consignes d assemblage instrucciones de ensamblaje English MFI Furniture makes every effort to ensure the highest level of quality control at every point of production. Rarely a negligible
ASSEMBLY INSTRUCTIONS DIRECTIVES POUR L'ASSEMBLAGE ombre pendant lamp lampe suspendue à tons dégradés, chocolat
 ASSEMBLY INSTRUCTIONS DIRECTIVES POUR L'ASSEMBLAGE ombre pendant lamp lampe suspendue à tons dégradés, chocolat SKU 2728089 INSTRUCTIONAL MANUAL MANUEL D'INSTRUCTIONS 270/2707 COMPONENT LIST LISTE DES
ASSEMBLY INSTRUCTIONS DIRECTIVES POUR L'ASSEMBLAGE luster chandelier lamp chandelier à trois branches en verre lustré
 ASSEMBLY INSTRUCTIONS DIRECTIVES POUR L'ASSEMBLAGE luster chandelier lamp chandelier à trois branches en verre lustré SKU 2711592 INSTRUCTIONAL MANUAL MANUEL D'INSTRUCTIONS 270/2707 COMPONENT LIST LISTE
Trim Kit Installation Instruction
 Trim Kit Installation Instruction Instrucciones para la Instalación del Kit de Molduras Instructions pour l'installation du Kit d'encastrement m If any hardware or parts are damaged or missing, contact
33 inch open & closed storage Rangement à espace fermé et ouvert de 33po (83.7cm) 33 pulgadas almacenaje abierto y cerra
 33 pulgadas almacenaje abierto y cerra") 33 inch open & closed storage 33 pulgadas almacenaje abierto y cerra! o not throw away packaging materials until assembly is complete.! Assemble this item on a soft surface, such as cardboard or carpet,
33 inch open & closed storage 33 pulgadas almacenaje abierto y cerra! o not throw away packaging materials until assembly is complete.! Assemble this item on a soft surface, such as cardboard or carpet,
ENGLISH 4 FRANÇAIS 6 ESPAÑOL 8
 SY ENGLISH 4 FRANÇAIS 6 ESPAÑOL 8 ENGLISH How to lubricate the sewing machine Warning! Always switch off the machine and disconnect it from the power supply before lubricating the sewing machine. 1 Always
GIGABIT PCI DESKTOP ADAPTER DGE-530T. Quick Installation Guide+ Guide d installation+
 GIGABIT PCI DESKTOP ADAPTER Quick Installation Guide+ Guide d installation+ Check Your Package Contents Quick Installation Guide Gigabit Ethernet PCI Adapter CD with Manual and Drivers DO NOT insert the
MODE D EMPLOI USER MANUAL
 notice_cd 853:notice 9/01/08 15:08 Page 1 CAFETIÈRE À DOSETTES Coffee pad machine CD 853 GIACOMO MODE D EMPLOI USER MANUAL notice_cd 853:notice 9/01/08 15:08 Page 2 FRANÇAIS WHITE & BROWN vous félicite
Instructions Mozilla Thunderbird Page 1
 Instructions Mozilla Thunderbird Page 1 Instructions Mozilla Thunderbird Ce manuel est écrit pour les utilisateurs qui font déjà configurer un compte de courrier électronique dans Mozilla Thunderbird et
Quick start guide. www.philips.com/support HTL1170B
 For product support, visit Para obtener asistencia técnica, visite Pour en savoir plus sur l assistance sur les produits, visitez le site www.philips.com/support HTL1170B Quick start guide P&F USA, Inc.
Comfort Duett. TV-kit. www.comfortaudio.com. USA: English/Français/Español. Comfort Duett
 Comfort Duett TV-kit USA: English/Français/Español www.comfortaudio.com Comfort Duett 1 English The television kit makes it possible to amplify the sound from the TV via the charger unit. As soon as Comfort
MANUEL D'UTILISATION
 CAFETIERE MANUEL D'UTILISATION Modèle : KF12 Merci de lire attentivement ce document avant la première utilisation de l'appareil CONSIGNES DE SECURITE Lors de l'utilisation d'appareils électriques, des
03/2013. Mod: WOKI-60IP/TR. Production code: DTWIC 6000
 03/2013 Mod: WOKI-60IP/TR Production code: DTWIC 6000 ENCASTRABLE INDUCTION DROP IN INDUCTION 11/2011 TECHNICAL FEATURES DOCUMENTATION S.A.V. Notice d utilisation : FX00326-A Guide d intervention : ---
Package Contents. System Requirements. Before You Begin
 Package Contents DWA-125 Wireless 150 USB Adapter CD-ROM (contains software, drivers, and manual) Cradle If any of the above items are missing, please contact your reseller. System Requirements A computer
Cafetière. Mode d Emploi. 1Notice cafetière v1.0
 Cafetière Mode d Emploi 1Notice cafetière v1.0 SOMMAIRE 1 CONSIGNES DE SÉCURITÉ... 3 2INSTALLATION DE L APPAREIL EN TOUTE SÉCURITÉ...4 3PRECAUTION CONCERNANT L UTILISATION DE L APPAREIL...5 4DESCRIPTION
Stainless Steel Deep Fryer HF 1030
 TM Stainless Steel Deep Fryer Friteuse en acier inoxydable 2012, HFEF-CAN US FR UK -10/12 1 Year Limited Warranty Un An De Garantie Limitée Thank you for purchasing the innovative Heaven Fresh Stainless
Notice Technique / Technical Manual
 Contrôle d accès Access control Encodeur USB Mifare ENCOD-USB-AI Notice Technique / Technical Manual SOMMAIRE p.2/10 Sommaire Remerciements... 3 Informations et recommandations... 4 Caractéristiques techniques...
Guide d'installation rapide TFM-560X YO.13
 Guide d'installation rapide TFM-560X YO.13 Table of Contents Français 1 1. Avant de commencer 1 2. Procéder à l'installation 2 Troubleshooting 6 Version 06.08.2011 16. Select Install the software automatically
Thank you for choosing the Mobile Broadband USB Stick. With your USB Stick, you can access a wireless network at high speed.
 Thank you for choosing the Mobile Broadband USB Stick. With your USB Stick, you can access a wireless network at high speed. Note: This manual describes the appearance of the USB Stick, as well as the
Notice d utilisation Cafetère isotherme programmable CL-ISPR12X - 938896 FR-1. Version 2013.08.27
 Notice d utilisation Cafetère isotherme programmable CL-ISPR12X - 938896 FR-1 Version 2013.08.27 INSTRUCTIONS DE SÉCURITÉ Cet appareil peut être utilisé par des enfants à partir de 8 ans et par des personnes
POLICY: FREE MILK PROGRAM CODE: CS-4
 POLICY: FREE MILK PROGRAM CODE: CS-4 Origin: Authority: Reference(s): Community Services Department Cafeteria Services and Nutrition Education Division Resolution #86-02-26-15B.1 POLICY STATEMENT All elementary
MC1-F www.primo-elektro.be
 NOTICE D UTILISATION CAFETIÈRE MUG ISOTHERME www.primo-elektro.be WWW.PRIMO-ELEKTRO.BE 2 WWW.PRIMO-ELEKTRO.BE Lisez toutes les instructions Conservez-les pour consultation ultérieure 1. CONDITIONS DE GARANTIE
SERVEUR DÉDIÉ DOCUMENTATION
 SERVEUR DÉDIÉ DOCUMENTATION Release 5.0.6.0 19 Juillet 2013 Copyright 2013 GIANTS Software GmbH, All Rights Reserved. 1/9 CHANGE LOG Correction de bug divers (5.0.6.0) Ajout d une option de relance automatique
English... 2 Français...9
 840115300 Ev01.qxd 4/17/03 1:30 PM Page 1 Thank you for buying a Hamilton Beach Commercial coffeemaker. You have made an excellent choice! All of our coffeemakers are manufactured to the highest levels
Contents Windows 8.1... 2
 Workaround: Installation of IRIS Devices on Windows 8 Contents Windows 8.1... 2 English Français Windows 8... 13 English Français Windows 8.1 1. English Before installing an I.R.I.S. Device, we need to
MANUEL D UTILISATION
 MANUEL D UTILISATION Table des matières Sécurité du produit 3 Mesures de précautions 4 Exigences électriques 5 Dépannage 5 Caractéristiques de My Rotisserie 6 Caractéristiques de My Rotisserie 7 Diagramme
STORAGE CUBE. Assembly Instructions. Instrucciones de armado. Instructions d assemblage 1Q05, 1Q11
 STORAGE CUBE Assembly Instructions contenedores para almacenaje Instrucciones de armado cube de rangement Instructions d assemblage 1Q05, 1Q11 29.5 in 74.93 cm 28.5 in 72.39 cm 23.4 in 59.43 cm Thank you
PAR RINOX INC BY RINOX INC PROGRAMME D INSTALLATEUR INSTALLER PROGRAM
 PAR RINOX INC BY RINOX INC PROGRAMME D INSTALLATEUR INSTALLER PROGRAM DEVENEZ UN RINOXPERT DÈS AUJOURD HUI! BECOME A RINOXPERT NOW OPTIMISER VOS VENTES INCREASE YOUR SALES VISIBILITÉ & AVANTAGES VISIBILITY
Warning: Failure to follow these warnings could result in property damage, or personal injury.
 Western Steel & Tube 1 Storage Locker Extended Storage Locker Storage Cabinet Assembly And Use Instructions Warning: Failure to follow these warnings could result in property damage, or personal injury.
Contrôle d'accès Access control. Notice technique / Technical Manual
 p.1/18 Contrôle d'accès Access control INFX V2-AI Notice technique / Technical Manual p.2/18 Sommaire / Contents Remerciements... 3 Informations et recommandations... 4 Caractéristiques techniques... 5
NOTICE D UTILISATION
 CAFETIERE ELECTRIQUE 1.25L REF CM4229 230V - 800W - 50Hz NOTICE D UTILISATION LIRE ATTENTIVEMENT LES INSTRUCTIONS SUIVANTES AVANT TOUTE PREMIERE UTILISATION Appareil garanti 1 an sur présentation du ticket
34 Desk + Monitor Shelf Escritorio 0,86m + Estante para monitor Bureau 0,86m + Étagère écran
 34 Desk + Monitor Shelf Escritorio 0,86m + Estante para monitor Bureau 0,86m + Étagère écran www.legarefurniture.com Assembly Montaje Assemblage Assembly Montaje Assemblage OR O OU Care & Finishing Thank
MODE D EMPLOI CAFETIERE KZ8F WWW.PRIMO-ELEKTRO.BE
 MODE D EMPLOI CAFETIERE KZ8F WWW.PRIMO-ELEKTRO.BE KZ8F WWW.PRIMO-ELEKTRO.BE CARTE DE GARANTIE Chère cliente, cher client, Nos produits sont soumis à des contrôles de qualité rigoureux. Si malgré ces contrôles,
Sécurité relative aux sièges auto et aux rehausseurs
 Sécurité relative aux sièges auto et aux rehausseurs Safety with Car Seats and Booster Seats Car crashes are the main cause of accidental death and serious injury of children. Correctly using a car or
Once the installation is complete, you can delete the temporary Zip files..
 Sommaire Installation... 2 After the download... 2 From a CD... 2 Access codes... 2 DirectX Compatibility... 2 Using the program... 2 Structure... 4 Lier une structure à une autre... 4 Personnaliser une
MAGNESIUM ENGLISH FRANÇAIS ESPAÑOL
 MAGNESIUM ENGLISH ESPAÑOL ENGLISH INSTALLATION INSTRUCTIONS CAUTION: Before starting, turn off power at main circuit panel. IMPORTANT SAFETY INSTRUCTIONS When installing or using the lighting system, basic
Le No.1 de l économie d énergie pour patinoires.
 Le No.1 de l économie d énergie pour patinoires. Partner of REALice system Economie d énergie et une meilleure qualité de glace La 2ème génération améliorée du système REALice bien connu, est livré en
Application Form/ Formulaire de demande
 Application Form/ Formulaire de demande Ecosystem Approaches to Health: Summer Workshop and Field school Approches écosystémiques de la santé: Atelier intensif et stage d été Please submit your application
DOCUMENTATION - FRANCAIS... 2
 DOCUMENTATION MODULE SHOPDECORATION MODULE PRESTASHOP CREE PAR PRESTACREA INDEX : DOCUMENTATION - FRANCAIS... 2 INSTALLATION... 2 Installation automatique... 2 Installation manuelle... 2 Résolution des
Gestion des prestations Volontaire
 Gestion des prestations Volontaire Qu estce que l Income Management (Gestion des prestations)? La gestion des prestations est un moyen de vous aider à gérer votre argent pour couvrir vos nécessités et
MANUEL D UTILISATION COFFNTEA
 MANUEL D UTILISATION COFFNTEA UD 888 Lisez attentivement ce mode d'emploi avant d'utiliser l'appareil et conservezle pour un usage ultérieur POUR USAGE DOMESTIQUE UNIQUEMENT Description générale 1. TOUCHE
Paxton. ins-20605. Net2 desktop reader USB
 Paxton ins-20605 Net2 desktop reader USB 1 3 2 4 1 2 Desktop Reader The desktop reader is designed to sit next to the PC. It is used for adding tokens to a Net2 system and also for identifying lost cards.
accidents and repairs:
 accidents and repairs: putting the pieces together accidents et réparations : réunir le tout nobody can repair your Toyota like Toyota Unfortunately, accidents do happen. And the best way to restore your
Installation Guide. Ceramic Oval Handle Trim Kit
 Installation Guide Ceramic Oval Handle Trim Kit K-251, K-253, K-258, K-260, K-262, K-264, K-273, K-274 M product numbers are for Mexico (i.e. K-12345M) Los números de productos seguidos de M corresponden
3M HEPA Vacuum 497AJK. User s Guide
 3M HEPA Vacuum 497AJK User s Guide Table of Contents Section Page Safety Instructions...3 Grounding Instructions...5 Specifications...7 To Operate...7 To Replace Filter...8 Parts List...9 Regulatory Statements...9
Archived Content. Contenu archivé
 ARCHIVED - Archiving Content ARCHIVÉE - Contenu archivé Archived Content Contenu archivé Information identified as archived is provided for reference, research or recordkeeping purposes. It is not subject
Compléter le formulaire «Demande de participation» et l envoyer aux bureaux de SGC* à l adresse suivante :
 FOIRE AUX QUESTIONS COMMENT ADHÉRER? Compléter le formulaire «Demande de participation» et l envoyer aux bureaux de SGC* à l adresse suivante : 275, boul des Braves Bureau 310 Terrebonne (Qc) J6W 3H6 La
KitchenAid Blender_ War_r_anty for_ the 50 United States, the Distr_ict of Columbia, Puer_to Rico, and Canada
 Warranty KitchenAid Blender_ War_r_anty for_ the 50 United States, the Distr_ict of Columbia, Puer_to Rico, and Canada This warranty extends to the purchaser and any succeeding owner for Blender operated
Règlement sur le télémarketing et les centres d'appel. Call Centres Telemarketing Sales Regulation
 THE CONSUMER PROTECTION ACT (C.C.S.M. c. C200) Call Centres Telemarketing Sales Regulation LOI SUR LA PROTECTION DU CONSOMMATEUR (c. C200 de la C.P.L.M.) Règlement sur le télémarketing et les centres d'appel
840107400 ENv03.qxd 12/9/02 1:30 PM Page 1. Coffeemakers...2 USA: 1-800-851-8900. Cafetières...11 Canada : 1-800-267-2826
 840107400 ENv03.qxd 12/9/02 1:30 PM Page 1 840107400 Coffeemakers...2 USA: 1-800-851-8900 Cafetières...11 Canada : 1-800-267-2826 840107400 ENv03.qxd 12/9/02 1:30 PM Page 2 IMPORTANT SAFEGUARDS When using
FRENCH INSTALLATION DES BATTERIES FIXATION DU CHARGEUR CHARGER LE CHARGEUR ACTIVER LE CHARGEUR
 FRENCH INSTALLATION DES BATTERIES 1. Retirez le boulon qui maintient la porte de la batterie. 2. Retirez le support de la batterie. 3. Installez les batteries en accord avec la signalisation de polarité
How to Login to Career Page
 How to Login to Career Page BASF Canada July 2013 To view this instruction manual in French, please scroll down to page 16 1 Job Postings How to Login/Create your Profile/Sign Up for Job Posting Notifications
PERFORMER Silver. 22 1 2 inch (57 cm) Meijer.com
 Meijer.com") PERFORMER Silver CHARCOAL GRILL Read owner s guide before using the barbecue. Lea la Guía del propietario antes de utilizar la barbacoa. Lisez le guide d'utilisation avant d'utiliser le barbecue. 22 1
PERFORMER Silver CHARCOAL GRILL Read owner s guide before using the barbecue. Lea la Guía del propietario antes de utilizar la barbacoa. Lisez le guide d'utilisation avant d'utiliser le barbecue. 22 1
Folio Case User s Guide
 Fujitsu America, Inc. Folio Case User s Guide I N S T R U C T I O N S This Folio Case is a stylish, lightweight case for protecting your Tablet PC. Elastic Strap Pen Holder Card Holders/ Easel Stops Figure
Garage Door Monitor Model 829LM
 Garage Door Monitor Model 829LM To prevent possible SERIOUS INJURY or DEATH from a closing garage door: NEVER permit children to operate or play with door control push buttons or remote control transmitters.
CAR STEREO SPEAKER CS-AR500 CS-AR680 CS-AR650 CS-AR690 INSTRUCTION MANUAL MODE D EMPLOI MANUAL DE INSTRUCCIONES
 CAR STEREO SPEAKER HAUT-PARLEURS AUTO STEREO ALTAVOCES ESTEREOFONICOS PARA AUTOMOVIL CS-AR500 CS-AR680 CS-AR650 CS-AR690 INSTRUCTION MANUAL MODE D EMPLOI MANUAL DE INSTRUCCIONES LVT1744-001A Thank you
Exceptional Brew HOUSEHOLD USE ONLY. 8-cup thermal carafe coffee maker Model: BV1800TH
 Exceptional Brew 8-cup thermal carafe coffee maker Model: BV1800TH Customer assistant line: USA 1-855- 664-1252 Thank you for purchasing this Bonavita appliance. HOUSEHOLD USE ONLY 2 year limited warranty
Thank you for choosing the Mobile Broadband USB Stick. With your USB Stick, you can access a wireless network at high speed.
 Thank you for choosing the Mobile Broadband USB Stick. With your USB Stick, you can access a wireless network at high speed. Note: This manual describes the appearance of the USB Stick, as well as the
APPENDIX 6 BONUS RING FORMAT
 #4 EN FRANÇAIS CI-DESSOUS Preamble and Justification This motion is being presented to the membership as an alternative format for clubs to use to encourage increased entries, both in areas where the exhibitor
Instructions pour mettre à jour un HFFv2 v1.x.yy v2.0.00
 Instructions pour mettre à jour un HFFv2 v1.x.yy v2.0.00 HFFv2 1. OBJET L accroissement de la taille de code sur la version 2.0.00 a nécessité une évolution du mapping de la flash. La conséquence de ce
Manuel d instruction Cafetière filtre. art.n 7174.101 19. 90
 Manuel d instruction Cafetière filtre art.n 7174.101 19. 90 Félicitations En achetant cet appareil vous venez d acquérir un appareil de qualité, fabriqué avec soin. Bien entre-tenu, cet appareil vous rendra
Guide d installation Deco Drain inc. DD200
 Guide d installation Deco Drain inc. DD200 Pour plus informations et pour télécharger les guides d installation en couleur, visitez notre site web. www.decodrain.com Soutien technique : Composez le : 514-946-8901
PARIS ROISSY CHARLES DE GAULLE
 GPS 2 34 1 E 49 0 46 N GPS* 2 56 56 E 49 0 12 N Votre contact / Your contact: et / and: Accueil : Cabines téléphoniques publiques Reception: Public telephone kiosks Navette Shuttle AÉROPORT DE TT CAR TRANSIT
Quick Installation Guide TW100-BRV304
 Quick Installation Guide TW100-BRV304 Table of of Contents Contents Français... 1. Avant de commencer... 2. Installation du matériel... 3. Configuration du routeur... 1 1 2 3 Troubleshooting... 5 Version
Mesure chimique. Chemical measurement. Sonde de température Pt 1000 Inox Pt 1000 stainless steel. Ref : 703 262. Français p 1.
 Mesure chimique Chemical measurement Français p 1 English p 3 Sonde de température Pt 1000 Inox Pt 1000 stainless steel Version : 6010 Mesure chimique Sonde de température Pt 1000 Inox 1 Description La
QUALITY INNOVATION SERVICE VALUE 2910ACS 2910MC MODEL. Can we help you? THE BUSH BUSINESS FURNITURE difference A157536
 MODEL 2910ACS 2910MC Can we help you? Thank you for purchasing this Bush Business Furniture product. We trust that you will be completely satisfied with your product for many years to come. This Bush Business
Wireless G USB Network Adapter Adaptateur réseau G sans fil USB Adaptador de red USB Wireless G
 Wireless G USB Network Adapter Adaptateur réseau G sans fil USB Adaptador de red USB Wireless G www.ativasupport.com Ativa Tech Support US: 1-866-91-ATIVA (1-866-912-8482) 2006 Ativa. All rights reserved.
Support Orders and Support Provisions (Banks and Authorized Foreign Banks) Regulations
 Regulations") CANADA CONSOLIDATION CODIFICATION Support Orders and Support Provisions (Banks and Authorized Foreign Banks) Regulations Règlement sur les ordonnances alimentaires et les dispositions alimentaires (banques
CANADA CONSOLIDATION CODIFICATION Support Orders and Support Provisions (Banks and Authorized Foreign Banks) Regulations Règlement sur les ordonnances alimentaires et les dispositions alimentaires (banques
TABLE DES MATIERES A OBJET PROCEDURE DE CONNEXION
 1 12 rue Denis Papin 37300 JOUE LES TOURS Tel: 02.47.68.34.00 Fax: 02.47.68.35.48 www.herve consultants.net contacts@herve consultants.net TABLE DES MATIERES A Objet...1 B Les équipements et pré-requis...2
Nouveautés printemps 2013
 » English Se désinscrire de la liste Nouveautés printemps 2013 19 mars 2013 Dans ce Flash Info, vous trouverez une description des nouveautés et mises à jour des produits La Capitale pour le printemps
WEB page builder and server for SCADA applications usable from a WEB navigator
 Générateur de pages WEB et serveur pour supervision accessible à partir d un navigateur WEB WEB page builder and server for SCADA applications usable from a WEB navigator opyright 2007 IRAI Manual Manuel
WILSON & FISHER BAYVIEW 40 INCH SQUARE PRINTED GLASS TOP TABLE
 WILSON & FISHER AYVIEW 40 INCH SQUARE PRINTED GLASS TOP TALE 1 GLASS TALE TOP 4 LEG FRAME 1 LEG SUPPORT M6 20 M6 15 4 8 12 ALLEN HEAD SCREW ALLEN HEAD SCREW SCREW CAPS 12 WASHERS 1 ALLEN WRENCH STEP 1
DISCLAIMER OF IMPLIED WARRANTIES; LIMITATION OF REMEDIES
 WARRANTY KITCHENAID SPIRALIZER ATTACHMENT WARRANTY FOR THE 50 UNITED STATES, THE DISTRICT OF COLUMBIA, PUERTO RICO, AND CANADA This warranty extends to the purchaser and any succeeding owner for Spiralizer
CAFETIERE NUMERIQUE 12 TASSES
 CAFETIERE NUMERIQUE 12 TASSES Numéro du modèle: 169178 UPC: 681131691789 Numéro de service à la Clientèle 1 877 207 0923 (US) 1 877 556 0973 (Canada) Merci d avoir fait l achat d un appareil GE. En accord
Quick Installation Guide TEW-AO12O
 Quick Installation Guide TEW-AO12O Table of of Contents Contents Français... 1 1. Avant de commencer... 1 2. Installation du matériel... 2 3. Montage... 4 Troubleshooting... 6 Version 10.04.2007 1. Avant
MASTER LOCK PRODUCT LIMITED LIFETIME WARRANTY
 MASTER LOCK PRODUCT LIMITED LIFETIME WARRANTY Limited Lifetime Warranty If this product or any part of the product fails due to a defect in materials or workmanship at any time during the life of the product,
Cafetière à thermoverseuse de 4 tasses
 CONSERVER LE PRÉSENT GUIDE D UTILISATION ET D ENTRETIEN. Cafetière à thermoverseuse de 4 tasses? Au DES QUESTIONS? Prière de nous téléphoner SANS FRAIS! Aux É.-U. : 1 800 231-9786 Canada : 1 800 465-6070
that the child(ren) was/were in need of protection under Part III of the Child and Family Services Act, and the court made an order on
 was/were in need of protection under Part III of the Child and Family Services Act, and the court made an order on") ONTARIO Court File Number at (Name of court) Court office address Applicant(s) (In most cases, the applicant will be a children s aid society.) Full legal name & address for service street & number, municipality,
ONTARIO Court File Number at (Name of court) Court office address Applicant(s) (In most cases, the applicant will be a children s aid society.) Full legal name & address for service street & number, municipality,
Fabricant. 2 terminals
 Specifications Fabricant Nominal torque (Nm) 65 Minimal torque (Nm) 0,63 Coil resistance - 20 C (ohms) 20 Rated current DC (A) 1 Rotor inertia (kg.m 2 ) 2.10-3 Weight (kg) 7,20 Heat dissipation continuous
RULE 5 - SERVICE OF DOCUMENTS RÈGLE 5 SIGNIFICATION DE DOCUMENTS. Rule 5 / Règle 5
 RULE 5 - SERVICE OF DOCUMENTS General Rules for Manner of Service Notices of Application and Other Documents 5.01 (1) A notice of application or other document may be served personally, or by an alternative
PRECAUTIONS IMPORTANTES
 D90 Mode d emploi Ne mettez l appareil en marche qu après avoir pris connaissance de ce mode d emploi et des conseils de sécuritémentionnés en pages 3 et 4! PRECAUTIONS IMPORTANTES Lors de l utilisation
Utiliser une WebCam. Micro-ordinateurs, informations, idées, trucs et astuces
 Micro-ordinateurs, informations, idées, trucs et astuces Utiliser une WebCam Auteur : François CHAUSSON Date : 8 février 2008 Référence : utiliser une WebCam.doc Préambule Voici quelques informations utiles
Cheque Holding Policy Disclosure (Banks) Regulations. Règlement sur la communication de la politique de retenue de chèques (banques) CONSOLIDATION
 Regulations. Règlement sur la communication de la politique de retenue de chèques (banques) CONSOLIDATION") CANADA CONSOLIDATION CODIFICATION Cheque Holding Policy Disclosure (Banks) Regulations Règlement sur la communication de la politique de retenue de chèques (banques) SOR/2002-39 DORS/2002-39 Current to
CANADA CONSOLIDATION CODIFICATION Cheque Holding Policy Disclosure (Banks) Regulations Règlement sur la communication de la politique de retenue de chèques (banques) SOR/2002-39 DORS/2002-39 Current to
DOCUMENTATION - FRANCAIS... 2
 DOCUMENTATION MODULE CATEGORIESTOPMENU MODULE CREE PAR PRESTACREA INDEX : DOCUMENTATION - FRANCAIS... 2 INSTALLATION... 2 CONFIGURATION... 2 LICENCE ET COPYRIGHT... 3 SUPPORT TECHNIQUE ET MISES A JOUR...
INDIVIDUALS AND LEGAL ENTITIES: If the dividends have not been paid yet, you may be eligible for the simplified procedure.
 Recipient s name 5001-EN For use by the foreign tax authority CALCULATION OF WITHHOLDING TAX ON DIVIDENDS Attachment to Form 5000 12816*01 INDIVIDUALS AND LEGAL ENTITIES: If the dividends have not been
Quick Installation Guide TBW-106UB H/W: V1
 Quick Installation Guide TBW-106UB H/W: V1 Table of Contents... 1. Avant de commencer... 2. Procéder à l'installation... 3. Configuration de l'adaptateur Bluetooth... Troubleshooting... 1 1 2 5 7 Version
Logitech Speaker System Z553 Setup Guide Guide d installation
 Logitech Speaker System Z553 Setup Guide Guide d installation Logitech Speaker System Z553 English................. 3 Français................ 10 www.logitech.com/support...19 2 Package contents Logitech
calls.paris-neuroscience.fr Tutoriel pour Candidatures en ligne *** Online Applications Tutorial
 calls.paris-neuroscience.fr Tutoriel pour Candidatures en ligne Online Applications Tutorial 1/4 Pour postuler aux Appels d Offres de l ENP, vous devez aller sur la plateforme : calls.parisneuroscience.fr.
AUTO ER ADAPT ER SPECIAL USE WARNING
 POWER SPECIALISTS FOR MOBILE COMPUTING AUTO ER ADAPT ER The Lind Automobile Power Adapter is designed to power your laptop computer and to charge its internal battery from an appropriate DC voltage power
Stainless Steel Solar Wall Light
 V 2.9 Stainless Steel Solar Wall Light User Manual Please read and understand all instructions before use.retain this manual for future reference. V 2.9 Stainless Steel Solar Wall Light SPECIFICATIONS
Description. Consignes de sécurité
 2 3 Description a Couvercle b Réservoir à eau c Verseuse verre ou pot isotherme (selon modèle) d Niveau d eau e Volet pivotant f Porte-filtre g Bouton d ouverture du volet h Sélecteur d arôme Modèles programmables
INVESTMENT REGULATIONS R-090-2001 In force October 1, 2001. RÈGLEMENT SUR LES INVESTISSEMENTS R-090-2001 En vigueur le 1 er octobre 2001
 FINANCIAL ADMINISTRATION ACT INVESTMENT REGULATIONS R-090-2001 In force October 1, 2001 LOI SUR LA GESTION DES FINANCES PUBLIQUES RÈGLEMENT SUR LES INVESTISSEMENTS R-090-2001 En vigueur le 1 er octobre
PRESENTATION REMOTE TÉLÉCOMMANDE DE PRÉSENTATION. User Guide Manuel de l utilisateur
 PRESENTATION REMOTE TÉLÉCOMMANDE DE PRÉSENTATION User Guide Manuel de l utilisateur Targus Presentation Remote Introduction Thank you for your purchase of the Targus Presentation Remote. This cordless
CONVENTION DE STAGE TYPE STANDART TRAINING CONTRACT
 CONVENTION DE STAGE TYPE STANDART TRAINING CONTRACT La présente convention a pour objet de définir les conditions dans lesquelles le stagiaire ci-après nommé sera accueilli dans l entreprise. This contract
First Nations Assessment Inspection Regulations. Règlement sur l inspection aux fins d évaluation foncière des premières nations CONSOLIDATION
 CANADA CONSOLIDATION CODIFICATION First Nations Assessment Inspection Regulations Règlement sur l inspection aux fins d évaluation foncière des premières nations SOR/2007-242 DORS/2007-242 Current to September
BC-1723 8-CUP. Coffee Maker 8 TASSES. Cafetière BC-1723
 BC-1723 8-CUP Coffee Maker Cafetière 8 TASSES BC-1723 BC-1723 Coffee U&C-2014.indd 1 Table of Contents 2 Important Safeguards... 3 Before Your First Use... 6 Know the Parts of Your Coffee Maker... 7 Using
ETABLISSEMENT D ENSEIGNEMENT OU ORGANISME DE FORMATION / UNIVERSITY OR COLLEGE:
 8. Tripartite internship agreement La présente convention a pour objet de définir les conditions dans lesquelles le stagiaire ci-après nommé sera accueilli dans l entreprise. This contract defines the
Dans une agence de location immobilière...
 > Dans une agence de location immobilière... In a property rental agency... dans, pour et depuis vocabulaire: «une location» et «une situation» Si vous voulez séjourner à Lyon, vous pouvez louer un appartement.
Principe de TrueCrypt. Créer un volume pour TrueCrypt
 Sommaire : Principe de TrueCrypt...1 Créer un volume pour TrueCrypt...1 Premier montage...6 Réglages...8 Save Currently Mounted Volumes as Favorite...8 Settings > Preferences...9 TrueCrypt Traveller pour