D i g i g r a m. VX222v2. Professional Stereo Sound Card. User s manual
|
|
|
- Albert Villeneuve
- il y a 8 ans
- Total affichages :
Transcription
1 VX222v2 Professional Stereo Sound Card User s manual

2 For technical support, please contact your local distributor. list available at Digigram Europe Parc de Pré Milliet, Montbonnot - FRANCE Tel: +33 (0) Fax: +33 (0) europe@digigram.com Digigram Inc Wilson Boulevard, Suite 1004, Arlington, VA USA Tel: Fax: input@digigram.com Digigram Asia Pte Ltd. 350 Orchard Road - #19-07 Shaw House Singapore Singapore Tel: Fax: info_asia@digigram.com Digigram América Latina Plaza Teopanzolco, oficina 210, Cuernavaca, Morelos, Mexico Tel: Fax: infolatin@digigram.com Copyright 2002 Digigram. All rights reserved. No portion of this manual may be reproduced without prior written consent from Digigram. The copyright protection claimed here includes photocopying, translation and/or reformatting of the information contained in this manual. While every effort has been made to ensure accuracy, Digigram is not responsible for errors and omissions, and reserves the right to make improvements or changes in the products and programs described without notice. Digigram and VX222v2 are registered trademarks or trademarks of Digigram S.A. Other trademarks are property of their respective holders. 2

3 Table of Contents VX222v2 User s Manual INFORMATION FOR THE USER... 5 IMPORTANT NOTICE... 5 CONTENTS OF THIS PACKAGE... 6 FEATURES... 6 Main hardware features... 6 HARDWARE REQUIREMENTS... 7 SOFTWARE REQUIREMENTS... 7 Supported operating systems... 7 Drivers... 7 HARDWARE INSTALLATION... 8 Installing the card... 8 Interrupt and memory address... 8 SOFTWARE INSTALLATION... 8 Installation under Mac OS X... 8 Removing the VX driver for Mac OS X... 9 Updating the VX driver for Mac OS X...10 Installation under Windows 98 SE and Millennium...10 Removing the driver under Windows 98 SE and Millennium...10 Updating the driver under Windows 98 SE and Millennium...11 Installation under Windows 2000 & XP...11 Removing the VX driver under Windows 2000 & XP...12 Updating the VX driver under Windows 2000 & XP...12 HOW TO CHECK THE INSTALLATION...13 Under Windows...13 Under Mac OS X...13 VX222V2 SETTINGS UNDER MAC OS X...14 VX Control panel...14 Sound panel...15 Audio Midi setup panel...16 DIGIGRAM WAVE MIXER...17 General operation...17 Running the program...17 Run at start-up...18 General configuration...18 Always on top of the display...18 Resetting the faders to their default values...18 Selecting the input/output mixer channel

4 Setting the default values for each mixer line selected Getting the default configuration values for the mixer line selected Leaving the mixer program General settings Record source Clock source Faders Speakers (Output) Wave out (Output) Monitoring Analog In Digital in (Input) Advanced settings Audio/Data mode Digital format Nominal out Headroom Out Nominal in Headroom In ASIO CONTROL PANEL FOR PC General settings Active stereo I/O Clock Sample size Digital output Level settings Input Output Monitoring Time Error Compensation SPECIFICATIONS CONFIGURATION INPUTS / OUTPUTS AUDIO SPECIFICATIONS APPENDICES SCHEMATIC DIAGRAM ANALOG CABLE DIAGRAM DIGITAL CABLE DIAGRAM CABLE PINOUT

5 Table de Matières VX222v2 User s Manual CONTENU DE LA BOITE...35 CARACTERISTIQUES GENERALES...35 Caractéristiques matérielles principales...36 CONFIGURATION MATERIELLE REQUISE...36 CONFIGURATION LOGICIELLE NECESSAIRE...36 Systèmes d exploitation supportés...37 Pilotes...37 INSTALLATION MATERIELLE...37 Installation de la carte...37 Interruption et adresses mémoires...37 INSTALLATION LOGICIELLE...38 Installation sous Mac OS X...38 Suppression du pilote VX sous Mac OS X...39 Mise à jour du pilote VX sous Mac OS X...39 Installation sous Windows 98 SE et Millennium...39 Suppression du pilote VX sous Windows 98 SE et Millennium...40 Mise à jour du pilote VX sous Windows 98 SE et Millennium...40 Installation sous Windows 2000 & XP...41 Suppression du pilote VX sous Windows 2000 & XP...42 Mise à jour du pilote VX sous Windows 2000 & XP...42 VERIFICATION DE L'INSTALLATION DE LA CARTE...42 Sous Windows...42 Sous Mac OS X...43 CONFIGURATION DE LA VX222V2 SOUS MAC OS X...43 Panneau de contrôle VX...43 Tableau de bord son...44 Panneau 'Audio Midi setup'...46 DIGIGRAM WAVE MIXER...46 Utilisation générale...47 Exécution du programme...47 Démarrage automatique...48 Configuration générale...48 Affichage en avant-plan...48 Ajustement des faders de niveaux aux valeurs par défaut...48 Sélection de la voie d entrée/sortie du mixer...48 Fixer les valeurs par défaut pour chaque ligne mixer sélectionnée...49 Charger les valeurs par défaut pour la ligne mixer sélectionnée

6 Quitter le programme mixer...49 General settings (Paramètrage des voies)...49 Record source (Sélection de l'entrée)...49 Clock source (Horloge d'échantillonnage)...49 Faders...50 Speakers (sortie)...50 Wave out (sortie)...50 Monitoring...50 Analog In...50 Digital In (entrée)...50 Paramètres avancés...50 Audio/Data mode...51 Digital format...51 Nominal out...51 Headroom Out...51 Nominal in...51 Headroom In...51 PANNEAU DE CONTRÔLE ASIO POUR PC...52 General settings...53 Active stereo I/O...53 Clock...53 Sample size...53 Sortie numérique...53 Ajustement des niveaux...53 Input...54 Output...54 Monitoring...54 Re-synchronisation en cas de rupture de débit...55 SPECIFICATIONS...56 CONFIGURATION...56 ENTRÉES / SORTIES...56 CARACTÉRISTIQUES AUDIO...57 ANNEXES...58 SYNOPTIQUE FONCTIONEL...58 SCHEMA DU CABLE ANALOGIQUE...58 SCHEMA DU CABLE NUMERIQUE...59 BROCHAGE

7 INFORMATION FOR THE USER VX222v2 User s Manual This device complies with part 15 of FCC rules. Operation is subject to the following two conditions: (1) This device may not cause harmful interference, and (2) This device must accept any interference received, including interference that may cause undesired operation. This equipment has been tested and found to comply with the limits for a CLASS B digital device, pursuant to Part 15 of the FCC Rules. These limits are designed to provide reasonable protection against harmful interference in a residential installation. This equipment generates, uses, and can radiate radio frequency energy and, if not installed and used in accordance with the instructions contained in this data sheet, may cause harmful interference to radio and television communications. However, there is no guarantee that interference will not occur in a particular installation. If this equipment does cause harmful interference to radio or television reception, which can be determined by turning the equipment off and on, the user is encouraged to try to correct the interference by one or more of the following measures: * reorient or relocate the receiving antenna * increase the separation between the equipment and the receiver * connect the equipment into an outlet on a circuit different from that of the receiver * consult the dealer or an experienced audio television technician. NOTE: Connecting this device to peripheral devices that do not comply with CLASS B requirements or using an unshielded peripheral data cable could also result in harmful interference to radio or television reception. The user is cautioned that any changes or modifications not expressly approved by the party responsible for compliance could void the user s authority to operate this equipment. To ensure that the use of this product does not contribute to interference, it is necessary to use shielded I/O cables. IMPORTANT NOTICE This card has been tested and found to comply with the following standards: International: CISPR22 Class B. Europe: EMC 89/336/CEE (1992) specifications. United States: FCC Rules-Part 15-Class B (digital device). In order to guarantee compliance with the above standards in an installation, the following must be done: the provided cable must not be modified. additional cables used must have their respective shield connected to each extremity. 7

8 CONTENTS OF THIS PACKAGE Thank you for purchasing a Digigram VX222v2 card. The package consists of the following components: * the VX222v2 sound card, * two breakout cables (analog and digital)* * a CD-Rom with drivers, installation notices, FAQs, etc * * the registration card* * this User s Manual *These items are not delivered with the OEM version We invite you to return the completed registration card to be informed in case of new driver releases. Feel free to visit our web site to download the latest driver release*, to get more technical information, consult FAQs, and discover our complete and updated audio product line! * in case you use an application developed by a Digigram partner, make sure that the driver provided for download has been approved by your application supplier! FEATURES VX222v2 is an audio card for PCI bus. It is Universal 33 MHz, which means it can be plugged in 5 V PCI slots as well as in 3.3 V keyed PCI slots. Main hardware features 2 balanced analog mono line inputs. Maximum input level selectable by means of the three jumpers on the card: +22 dbu (Three jumpers ON) +10 dbu (Three jumpers OFF) 2 balanced analog mono line outputs with software adjustable analog output gain. Maximum output level: +22 dbu 1 digital AES/EBU or S/PDIF stereo input. The selection of the digital input for recording excludes the selection of the analog inputs. It is possible to use the signal on the digital input as reference sampling clock for recording / playback on the analog I/Os. 8

9 VX222v2 User s Manual 1 digital AES/EBU or S/PDIF stereo output Always plays the digital version of the analog outputs 1 and 2. 1 mini jack headphone stereo output This output is in parallel of the analog outputs 1 and 2. 2 general purpose inputs and outputs (GPIO). HARDWARE REQUIREMENTS One free PCI slot (5 V or 3.3 V) Minimum Apple Macintosh configuration: PowerMac G3 or G4 with 128 MB RAM. Minimum PC configuration: Pentium III (or equivalent), 128 MB RAM. SOFTWARE REQUIREMENTS ENTS The VX222v2 requires installation of the drivers included in VX kit 5.0 or higher. Supported operating systems Mac OS 10.1 and higher Windows 98 SE, Windows ME, Windows 2000, or Windows XP Drivers The table underneath shows the drivers available for each supported operating system. Certain applications may require some particular driver. For more information, please contact your software vendor. Wave DirectSound ASIO2 Core Audio Windows 98 SE & ME Yes No Yes No Windows 2000 Yes Yes Yes No Windows XP Yes Yes Yes No Mac OS X No No No Yes 9

10 Note: MME driver is sometimes mentioned on software requirement charts. It refers to as Wave. DirectX driver is sometimes mentioned on software requirement charts. It refers to as DirectSound. HARDWARE INSTALLATION Note: The card has to be installed in the computer prior to installing its driver. Installing the card Turn off the computer and disconnect its power cord. Open the computer and position it so that you may easily access its PCI slots. Smoothly insert the card into a free PCI slot. Press it down to position it firmly. Tighten the screw, close the computer, connect the power cord and start the computer. Interrupt and memory address Hardware interrupt and addresses are automatically set up at start-up by the PCI PnP BIOS. SOFTWARE INSTALLATION Please visit the Digigram web site at for the most recent driver. In case you run a specific application developed or installed by a Digigram partner, it might require the use of a specific driver version. In this case, make sure that the updated driver has been approved by your supplier. Under Windows 9x, the driver is a Wave driver. Under Windows 2000 & XP, the driver is DirectSound. In addition, a Wave driver is available, its installation is optional. Under Mac OS X, the driver is a Core Audio driver Installation under Mac OS X 10 Switch off your Mac, and plug the VX222v2 in a free PCI slot.

11 VX222v2 User s Manual Restart the machine. Double click on the.dmg file included on the VX CDROM, or available on the Digigram web site (VXDriver x-y.dmg). This creates the VX Driver volume on the desktop. Double click on the VXDriver volume icon. A window appears with the following items: 1- Read me first 2- Install VX Control 3- Install the driver 4- Uninstall Read the read me first document. Copy the VX Control to the desktop or to any location in your disk. In the 'Install VX Driver section', choose VX222v2. Double click on the driver package 'VX222v2driver x-y-z.pkg'. Give a login/password that has administrator rights. The installation session opens. Click Continue in the welcome window. Click Continue in the 'readme' window. Select the disk you boot OS X from as destination drive; click Continue. Click Install. Click Continue Installation. Restart the Mac. Removing the VX driver for Mac OS X Open the VX Driver volume. In item 4 - Uninstall, run the uninstaller. Click on the list installed packages icon. Select the VX222v2Driver x-y-z.pkg package. Select the remove selected package icon (red cross). Give a login/password with administrator rights, and click on Ok. Click on Ok, in the alert window. Restart the computer. 11

12 Updating the VX driver for Mac OS X Just install the new version as described above to overwrite the previous version installed. Installation under Windows 98 SE and Millennium If the driver has been downloaded from our web site, it has to be expanded prior to the driver s installation as follows. Double-click on the downloaded file (self-expanding). You can use the default destination location (Windows temporary folder) or select another directory. Turn off the computer and insert the card. Restart the computer. The wizard will detect the card when it is inserted, and prompt for a new driver. Click Next to start the driver installation. Select Display a list of all the drivers to select a specific driver and click Next. Select the <Sound, video and game controllers> category and click Next. Click on the Have Disk button. Browse to the drive where the installation files are located (on the CD-Rom or in the update's extracting destination folder) and click OK. The wizard displays the suitable driver. Click OK to continue. Click on the Next button to start copying the driver files. Click on the Finish button to complete the driver installation. The registry database is updated so that the ASIO compliant programs show the Digigram VX ASIO driver in the list of available ASIO drivers. To take full advantage of your VX222v2, select the Digigram VX ASIO driver from the application program's specific audio I/O settings. Removing the driver under Windows 98 SE and Millennium To remove the VX driver, make sure the card is present before starting the following procedure: 12

13 Go to <Start> <Settings> <Control panel> <Add/Remove Programs>. Select the Digigram VX Kit and remove it. Follow the instructions of the InstallShield wizard. VX222v2 User s Manual Updating the driver under Windows 98 SE and Millennium Go to <Start> <Settings> <Control panel> <System>. Select the Device Manager tab. Open the Sound, video and game controllers category. Select the 'Digigram VX222v2' item. Click on the Properties button. Select the Driver tab. Click on the Update driver button. Click Next. Select Display a list of all the drivers to select a specific driver and click Next. Click on the Have Disk button. Browse to the folder where the installation files are located and click OK. The wizard displays the proper driver. Click OK to continue. Click on the Next button to start copying the driver files. Click on the Finish button to complete the driver installation. Reboot is not necessary. Installation under Windows 2000 & XP Turn off the computer and insert the card. Restart the computer. Windows Plug and Play wizard will detect it and request for a driver. Click on Cancel to close the Windows Plug and Play wizard. Insert the VX kit CD-ROM. The welcome page opens automatically in your web browser. Go to your soundcard s driver page and click on the link of the Windows 2000/XP version. 13

14 If you have downloaded the driver package from the web, double-click on the downloaded file (self-extracting). Select the temporary location where to expand the files, and click on Start. Click on Ok in the Finished window. The installation program is then automatically started. Otherwise double-click on setup.exe to start the installation program. Click on Next. Read the License agreement and click on Yes to confirm. Select the components to install. Select Wave if you want to install the Wave driver in addition to the DirectSound driver. Click on Next. Under XP, select Continue e anyway when the following message is displayed: The software has not passed Windows Logo testing. If you have chosen to install the Wave driver, this message will appear a second time. Select again Continue anyway. Click on Finish. The DirectSound, ASIO, (and Wave if selected) drivers are now installed. Removing the VX driver under Windows 2000 & XP Go to <Start> <Settings> <Control panel> <Add/Remove Programs>. Select the Digigram VX Kit and remove it. Follow the instructions of the InstallShield wizard. Updating the VX driver under Windows 2000 & XP Remove the driver as described above. Run the installation program of the new driver, as described above. Note: If you have done an installation without selecting the Wave driver, and you now want to install it, it is necessary to remove the (DirectSound) driver, and then re-install it. 14

15 VX222v2 User s Manual HOW TO CHECK THE INSTALLATION Under Windows Once the driver and the cards are installed according to the procedure described in this manual, you can verify that the card is properly installed and works fine as follows: Go to <Start> <Programs> <Digigram> and select Digigram Control Center. In the Digigram drivers window, select the General Information tab. In the Modules Information window the installed VX Kit modules are displayed along with their versions. In the Digigram drivers window, select the VX Setup tab for a list oft the installed cards. Each card is represented by an icon. Click on the 'Windows Multimedia properties' button to open the 'Sound & Multimedia properties' window. Select the Audio tab. The card devices are listed: VX222v2 Out #1 in Sound playback, preferred device. This is a Wave device. VX222v2 In #1 in Sound recording, preferred device. This is a Wave device. VX222v2 Audio Card (WDM) in both playback and recording, preferred device. This is a DirectSound device. In case the card is not displayed: make sure that the card is correctly inserted in the PCI slot, and screwed on the PC chassis. if necessary, uninstall the VX Kit package as described in this manual, and re-install it. Under Mac OS X Once the driver and the card are installed, the card is listed in the VX Control panel, the Sound panel, and the Audio Midi Setup panel. You can then use the card with your audio application. 15

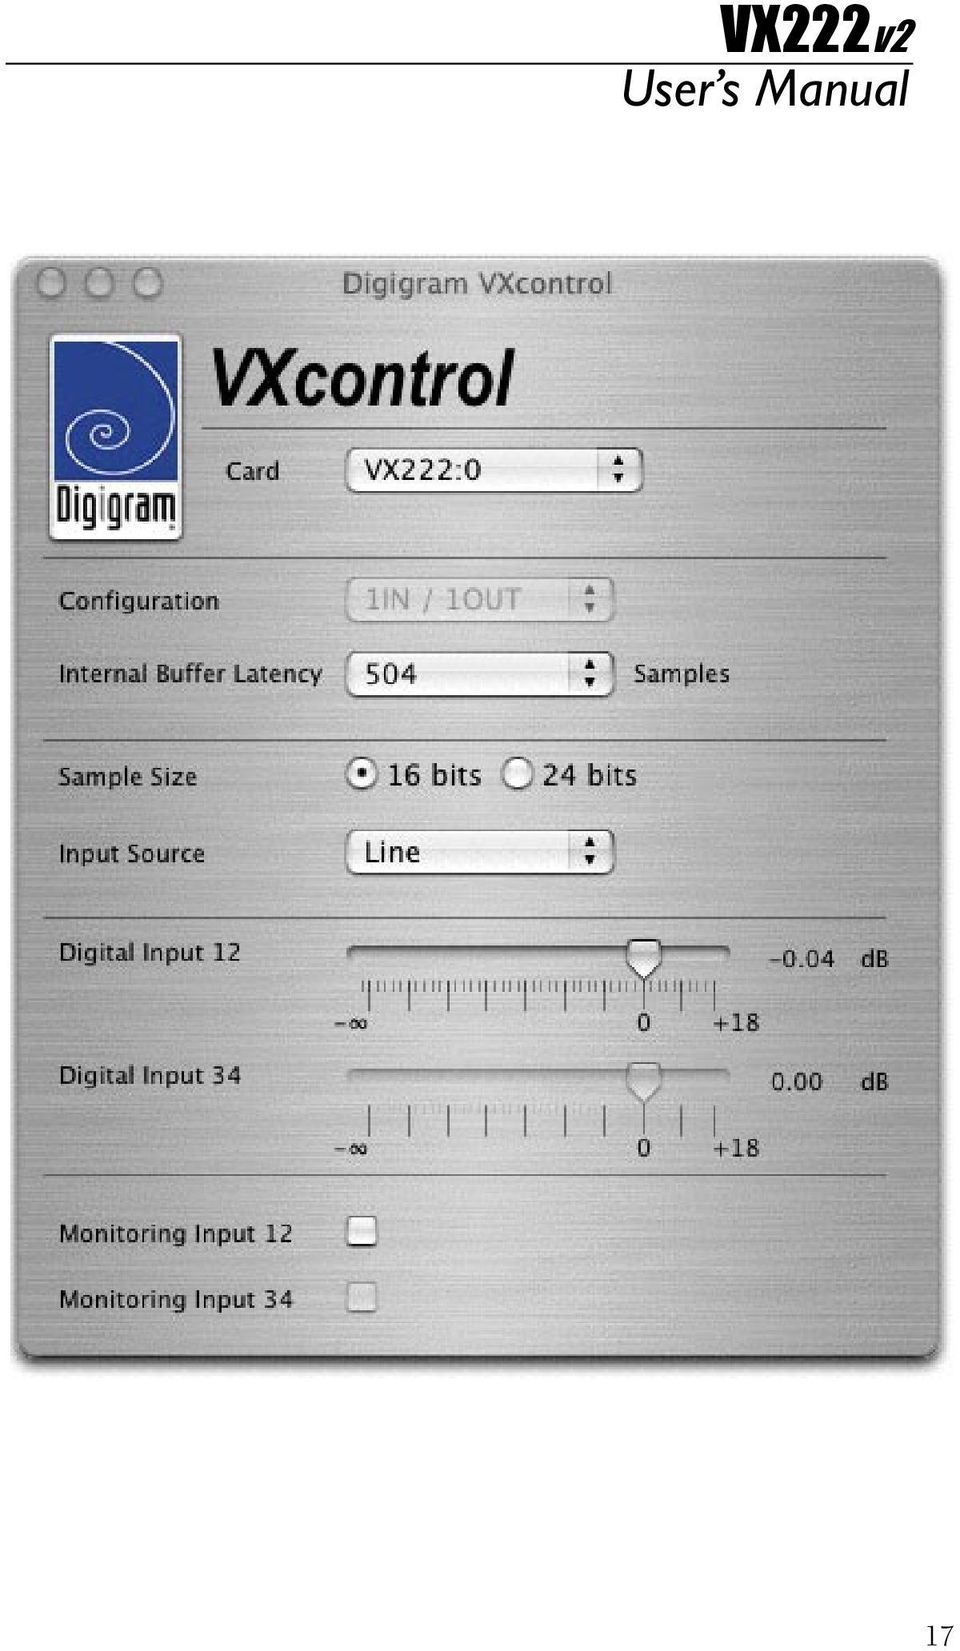
16 VX222 VX222v2 SETTINGS UNDER MAC OS X Several control panels are available to adjust the settings of the VX222v2. Some parameters can be adjusted from different panels. If a parameter is modified in a panel, its value is automatically updated in another panel. VX Control panel Use the VX Control panel to set the following parameters of your VX card: choice of card VX (if several VX cards are installed, they are noted as: VX222:0, VX222:1, etc...) latency (Internal Buffer Latency): a low latency value may lead to overloads in the audio causing clicks. If this happens, increase the latency value sample size: 16 or 24 bits selection of the input source: digital, line, line with digital synchronization hardware monitoring: can be activated or disabled by (un)checking "Monitoring Input 1 2" (Monitoring Input 3 4 is inactive). digital input gain from -72 db to +18 db: the active cursor (Digital Input 1 2) allows simultaneous adjustment of the digital gain for both inputs. 16
 latency (Internal Buffer Latency): a low latency value may lead to overloads in the audio causing clicks.")
17 VX222v2 User s Manual 17
18 Sound panel Use the Sound panel to set the following parameters of your VX card: Input tab: - source: digital (VX222 Digital), line (VX222 Line), line with digital synchronization (VX222 Line + Sync). - digital input gain for both inputs (from 99dB to +18 db). Output tab: - analog balance The analog output gain (applied to both output channels) is always accessible at the bottom of the Sound panel window. Note: When adjusting the output balance and the analog output gain from this panel, the positions of the sliders allowing to adjust the analog output gains in the Audio Midi setup panel are updated. When adjusting the digital input gain from this panel, the positions of the sliders allowing to adjust the digital input gains in the Audio Midi setup panel are updated, as well as the slider in the VX Control panel. 18

19 Audio Midi setup panel VX222v2 User s Manual This panel is accessible via Applications, Utilities. Use the Audio Midi setup panel to set the following parameters of your VX card: Hardware monitoring: Play through. Mute of the output: Device Mute. Source: digital (VX222 Digital), line (VX222 Line), line with digital synchronization (VX222 Line + Sync). Audio format for input and output Current Format): sample size, sampling frequency. Digital input gain for each input channel (from 72 db to +18 db). Analog output gain for each output channel. 19
, line (VX222 Line), line with digital synchronization (VX222 Line + Sync).")
20 DIGIGRAM WAVE MIXER The Digigram Wave Mixer serves to set input and output levels as well as other settings such as input type and digital data format. General operation Running the program The installation routine installs the Digigram Mixer icon in the Windows taskbar. By default, the program is automatically launched at system start-up. To access the program, double click on its icon or right click on it for a context menu. In case you have closed the program during your session, you can restart it from the menu <Start><Programs><Digigram><Digigram Mixer>. 20

21 Run at start-up VX222v2 User s Manual To enable/disable automatic run at start-up, right click on the Mixer icon in the taskbar, or go to the Mixer <Options> menu. Select/unselect run at startup rtup. General configuration The mixer configuration options allow selection of: input and output nominal level, input and output headroom, input type. The input and output nominal level and input and output headroom define the maximum value of the acceptable input signal. Set the nominal level to the currently used nominal level. The headroom should be set to avoid any risk of overload. If set beyond the installed card's capabilities, the driver automatically sets the correct values. In this case, the displayed values are wrong. The record source selection allows selecting digital input or analog input selection. On the VXpocket 440 only the first stereo channel may be selected for digital input. Nominal and Headroom apply simultaneously to all four channels. Always on top of the display Right click on the mixer icon in the taskbar, or go to the mixer <Options> menu. Select Always on top. Resetting the faders to their default values Click on the Options menu. Select Reset levels. Selecting the input/output mixer channel Click on the Mixer menu. Select the required board and channel mixer. 21
22 Setting the default values for each mixer line selected Right click on the mixer icon in the taskbar, or go to the mixer Options menu. Select Save current configuration as default. Getting the default configuration values for the mixer line selected Right click on the mixer icon in the taskbar, or go to the mixer Options menu. Select Load default configuration. Leaving the mixer program Click on the right button over the mixer icon in the taskbar. Select Exit. General settings Record source The record source section contains two buttons allowing selection of the input type used. Digital Input: selects the digital input. Analog Input: selects analog input. Clock source This option allows the selection of the synchronization clock source. Automatic: selects the internal clock when analog input is selected, the digital input clock when digital input is selected. Digital: selects the digital input regardless of the source input selection. 22
23 Faders VX222v2 User s Manual Various faders allow you to adjust input, output and hardware monitoring level. The faders can be reset by double clicking on their respective buttons. Speakers (Output) Applies an analog gain on the selected output device. Wave out (Output) Applies a digital gain on all files played as well as on software monitoring. Monitoring Applies a digital gain on the hardware monitoring. Analog In As the VX222v2 does not dispose of an adjustable analog input gain, this cursor applies the digital input gain. Digital In (Input) Applies a digital gain to the digital signal coming from the digital input. Advanced settings 23
24 Audio/Data mode In data mode, all digital level processing is disabled in the driver to ensure a digital stream free of any sample modification. This mode must be used to play non-pcm audio data on the digital output (Dolby AC-3 for instance). Note: Do not listen to the analog output in such a case, as clicking may cause disturbing noises! Digital format Sets the digital format of the digital output in real time: AES/EBU (professional) or S/PDIF (consumer). Nominal out Sets the nominal line output level in real time. Addition of headroom and nominal level should not exceed the maximum output level of the board (+22 dbu). Headroom Out Sets the available headroom during playback at nominal level in real time. Addition of headroom and nominal level should not exceed the maximum output level of the board (+22 dbu). Nominal in Sets the nominal input level for recording in real time. Addition of headroom to nominal level should not exceed the maximum input level of the input. Note: The VX222v2 does not dispose of an adjustable analog input gain. A modification of Nominal In or Headroom In applies the digital input gain. Headroom In Sets the available headroom while recording at nominal level in real time. Addition of headroom to nominal level should not exceed the maximum input level of the input. (+10 dbu or +22 dbu, depending on the position of the three jumpers on the board). Note: The VX222v2 does not dispose of an adjustable analog input gain. A modification of Nominal In or Headroom In applies the digital input gain 24
25 ASIO CONTROL PANEL FOR PC VX222v2 User s Manual The purpose of this control panel is to set all the parameters of your Digigram card when used with its ASIO2 driver. It must be launched from the ASIO compatible application you use. Detected Digigram boards are displayed in the left upper corner with their serial number and their I/O stereo pairs. General settings of the selected card are displayed in the right upper corner. IN and OUT settings of the selected device are displayed underneath. General settings Active stereo I/O It is recommended to activate only the I/O required to save CPU resources. 25
26 Clock The clock corresponds to the digital bit clock to which the card refers. When an analog input is selected, the Source can be either the internal clock or taken from the digital input. As soon as the digital input is selected, the clock is read from this input. The Frequency flip menu allows selecting the sampling frequency of the selected card: 32, 44.1 or 48 khz. It must be set according to the sampling frequency of the project you are working on. Sample size Defines the number of bits per sample. It must be set in accordance with the sample size of the project you are working on. Digital output Defines the format of the digital output signal: Consumer (S/PDIF) or Professional (AES/EBU). Level settings Click on the tab of the I/O device you want to set. Leaving the mouse pointer a few seconds on a slider shows the available settings range (tooltip box). The exact setting value is displayed near each slider. Input The flip box allows switching between the different types of input: line or digital. For any input type, a digital gain can be added to the signal, if necessary. Its default position is in front of the bold dot (0 db). All these input settings apply on both channels of the selected stereo device. 26
27 Output VX222v2 User s Manual The playback digital control applies a digital gain to the selected output (i.e. to what the application plays, including the software monitoring. It can be set for each channel of the selected device, or for both channels at the same time by clicking the Link box. This gain applies to both digital and analog outputs. Its default position is in front of the bold dot. The analog output gain can be set for each channel, or for both channels at the same time by clicking the Link box. This gain only applies to the analog outputs. Its default position is in front of the bold dot, unless you use headphones. In this case, decrease the levels of analog outputs 1 & 2 to prevent you from hearing damage. Monitoring ASIO applications basically use two monitoring modes: software monitoring and hardware monitoring (the latter also known as ASIO direct monitoring ). In software monitoring mode, the recorded signal is immediately played back, just as if it were read from the hard disk. This allows monitoring through effects for instance, but induces latency that can be annoying to the recording musician. In hardware monitoring mode, the recorded signal is directly routed from the inputs to the outputs of the card without passing through your audio application, avoiding the latency in the monitoring path. The monitoring slider controls the hardware monitoring level (ASIO direct monitoring) but does not control the software monitoring. Its default position is in front of the bold dot. It can be set independently for each channel. ASIO compliant applications featuring ASIO direct monitoring control this level directly using their integrated mixer. Time Error Compensation Audio data transfer may suffer from buffer underrun, in most cases due to temporary CPU overload. To avoid the loss of synchronization between input and output signals, click on the Advanced button and select: <Skip samples on outputs to compensate audio time drift> Note: This option can only fix a limited amount of errors. Too many errors occurring will result in a loss of sound quality. To avoid errors, reduce CPU load. 27
28 SPECIFICATIONS CONFIGURATION Bus/Format Size Digital Signal Processor Power requirements (+3.3 V / +5 V / +12 V / 12V) Operating: temp / humidity (non-condensing) Storage: temp/humidity (non-condensing) PCI slave mode 226 mm 99 mm at 100 MHz 0.5A / 0.1A / 0.2A / 0.1A 0 C/+50 C 5%/90% -5 C/+70 C 0%/95% INPUTS / OUTPUTS Analog line inputs (stereo) Maximum input/impedance Programmable input gain Digital inputs (stereo) Other inputs Analog outputs (stereo) Maximum output/impedance Programmable output level Digital outputs (stereo) Other outputs Access to main status bits of digital frame AES11 synchronization Connectors 1 balanced +22 dbu / >10kΩ (jumpers ON) +10 dbu / >10kΩ (jumpers OFF) digital 2 AES/EBU or S/PDIF 2 GPI (dry contact) 1 balanced +22 dbu/low impedance digital and analog 1 AES/EBU or S/PDIF headphone (600 Ω), two GPI (relay, 0.5A, 48 VCC) Yes Yes 15-pin SUB-D for analog I/O, 15-pin HD SUB-D for digital I/O, and GPI 28
29 VX222v2 User s Manual AUDIO SPECIFICATIONS Sampling frequencies available able 8, , 16, 22.05, 24, 32, 44.1, 48 Khz A/D and D/A converter resolution Frequency response at 48 khz (record + play) Signal to noise ratio (unweighted) Distortion + noise at 1 khz (record + play) Channel phase difference: 20 Hz/20 khz Analog channel cross talk 24 bits 20 Hz 20 khz: ±0.2 db >95 db <-90 db (0.002 %) <0.5 /2 <-115 db 29
30 APPENDICES SCHEMATIC DIAGRAM ANALOG CABLE DIAGRAM 30
31 DIGITAL CABLE DIAGRAM VX222v2 User s Manual 31
32 CABLE PINOUT ANALOG DIGITAL 1 R OUT + GPI OUT 1A 2 GND NC 3 L OUT - NC 4 GND AES/EBU IN - 5 NC AES/EBU IN + 6 R IN - GPI INPUT 2 7 L IN + GND/GPI INPUT COMMON 8 GND GPI INPUT 1 9 R OUT - GND 10 L OUT + NC 11 GND GPI OUT 1B 12 NC GPI OUT 2A 13 R IN + GPI OUT 2B 14 GND AES/EBU OUT + 15 L IN - AES/EBU OUT - 32
33 VX222v2 Carte son stéréo professionnelle Manuel utilisateur
34 Pour toute question de support technique, veuillez contacter votre distributeur liste disponible sur Digigram Europe Parc de Pré Milliet, Montbonnot - FRANCE Tel: +33 (0) Fax: +33 (0) europe@digigram.com Digigram Inc Wilson Boulevard, Suite 1004, Arlington, VA USA Tel: Fax: input@digigram.com Digigram Asia Pte Ltd. 350 Orchard Road - #19-07 Shaw House Singapore SINGAPORE Tel: +65, Fax: +65, info_asia@digigram.com Digigram América Latina Plaza Teopanzolco, oficina 210, Cuernavaca, Morelos, MEXICO Tel: Fax: infolatin@digigram.com Copyright 2002 Digigram. Tous droits réservés. Aucune partie de ce manuel ne peut être reproduite sans l accord préalable de Digigram. Cette réserve inclut la photocopie, la traduction et/ou la remise en forme de l information contenue dans ce manuel. Digigram ne peut être tenu responsable pour toute erreur ou omission et se réserve le droit d apporter des modifications et des améliorations sans préavis. Digigram et VX222v2 sont des marques déposées ou des marques commerciales de Digigram S.A.. Toutes les autres marques sont la propriété des sociétés respectives. 34
35 CONTENU DE LA BOITE VX222v2 Manuel utilisateur Vous venez d acquérir la carte VX222v2 et nous vous en félicitons. Dans la boîte VX222v2 vous disposez: * de la carte son VX222v2, * de deux câbles (analogique et numérique)* * d un CDROM qui contient notamment les pilotes de la carte, et une documentation détaillée de la procédure d installation de la carte et de ses pilotes.* * d une carte d enregistrement* * de ce manuel utilisateur *Ces éléments ne sont pas fournis avec la version OEM Nous vous invitons à nous retourner la carte d enregistrement complétée pour être tenu informé des dernières versions du pilote. N hésitez pas à visiter notre site Vous y trouverez les dernières versions de pilote, des informations techniques, les solutions aux questions les plus fréquemment posées et découvrirez notre gamme complète de cartes audio! * au cas où vous utiliseriez une application développée par un partenaire de Digigram, assurez-vous que le pilote mis à disposition a été approuvé par votre fournisseur d'application! Cette carte a été testée et est conforme aux normes suivantes : international: CISPR22 Class B. Europe: spécifications CEM 89/336/CEE (1992). - Etats-Unis : FCC Rules Part 15-Class B (appareil numérique). Pour assurer une conformité aux standards énumérés ci-dessus, les règles suivantes doivent être observées: le câble fourni ne doit pas être modifié. les câbles additionnels utilisés doivent avoir leur blindage respectif relié à chaque extrémité. CARACTERISTIQUES GENERALES ERALES VX222v2 est une carte audio pour bus PCI. Elle est "Universal 33 MHz", ce qui veut dire qu'elle peut être branchée dans un slot PCI de 5 V comme dans un slot PCI de 3.3 V. 35
36 Caractéristiques matérielles principales 2 entrées analogiques symétriques. Niveau maximum d'entrée réglable par trois cavaliers sur la carte: +22 dbu (trois cavaliers ON) +10 dbu (trois cavaliers OFF) 2 sorties analogiques symétriques avec gain de sortie ajustable par logiciel. 1 entrée numérique stéréo AES/EBU ou S/PDIF La sélection de l entrée numérique est exclusive de la sélection d une entrée analogique. Il est possible d'utiliser le signal sur l'entrée numérique en tant qu'horloge de référence pour l'enregistrement ou la restitution sur les entrées / sorties analogiques. 1 sortie numérique stéréo AES/EBU ou S/PDIF Cette sortie est la version numérique du signal envoyé sur les sorties analogiques 1 et 2. 1 sortie casque stéréo mini jack Cette sortie est en parallèle des sorties analogiques 1 et 2. 2 entrées/sorties Tout Ou Rien (GPIO). CONFIGURATION MATERIELLE REQUISE Un slot PCI libre (5 V ou 3.3 V) Configuration minimum pour Apple Macintosh: PowerMac G3 ou G4 avec 128 Mo de RAM. Configuration PC minimum: Pentium III (ou équivalent), 128 Mo de RAM. CONFIGURATION LOGICIELLE NECESSAIRE Pour utiliser votre carte VX222v2, vous devez installer les pilotes inclus dans le VX kit 5.0 ou suivants. 36
37 VX222v2 Manuel utilisateur Systèmes d exploitation supportés Mac OS 10.1 et suivants Windows 98 SE, Windows ME, Windows 2000, ou Windows XP Pilotes La table ci-dessous montre les pilotes disponibles pour chaque système d'exploitation supporté. Certaines applications peuvent exiger un pilote particulier. Pour plus d'information, veuillez contacter votre fournisseur de logiciel. Wave DirectSoun d ASIO2 Core Audio Windows 98 SE & ME Oui Non Oui Non Windows 2000 Oui Oui Oui Non Windows XP Oui Oui Oui Non Mac OS X Non Non Non Oui Notes: MME driver est parfois mentionné dans les configurations requises de certains logiciels. C'est une autre appellation utilisée pour Wave. DirectX driver est parfois mentionné dans les configurations requises de certains logiciels. C'est une autre appellation utilisée pour DirectSound. INSTALLATION MATERIELLE Note: La carte doit être placée dans l'ordinateur avant d'installer son pilote. Installation de la carte Arrêtez l'ordinateur et débranchez son cordon d'alimentation. Ouvrez l'ordinateur et placez-le de sorte que vous puissiez facilement accéder à ses slots PCI. Insérer doucement la carte dans un slot PCI disponible. Appuyez de manière à la positionner fermement. Serrez la vis, fermez l'ordinateur, branchez le cordon d'alimentation et mettez en marche l'ordinateur. Interruption et adresses mémoires L'interruption matérielle et les adresses sont définies automatiquement par le BIOS PCI PnP à sa mise en route. 37
38 INSTALLATION LOGICIELLE LLE Veuillez visiter le site web de Digigram à pour le pilote le plus récent. Au cas où vous utiliseriez une application spécifique développée ou installée par un partenaire de Digigram, elle pourrait exiger l'utilisation d'une version spécifique de pilote. Dans ce cas, assurez-vous que le pilote mis à jour a été approuvé par votre fournisseur. Sous Windows 9x, le pilote est un pilote Wave. Sous Windows 2000 et XP, le pilote est DirectSound. En outre, un pilote Wave est disponible, son installation est facultative. Sous Mac OS X, le pilote est de type Core Audio. Installation sous Mac OS X 38 Eteindre votre Mac et insérer la VX222v2 dans un slot PCI libre. Redémarrer l'ordinateur. Double-cliquer sur le fichier.dmg inclus sur le CDROM VX, ou disponible sur le site web de Digigram (VXDriver x-y.dmg). Ceci crée le volume "VXDriver" sur le bureau. Double-cliquer sur l'icône du volume 'VXDriver'. Une fenêtre apparaît avec les éléments suivants: 1- Read me first 2- Install VX Control 3- Install the driver 4- Uninstall Lisez le document "Read me first". Copier le VX Control au bureau ou à tout autre emplacement sur le disque. Dans la section 'Install VX Driver section', sélectionner VX222v2. Double-cliquer sur le fichier package 'VX222v2 driver x-y-z.pkg'. Donner un nom de connexion/mot de passe qui a des droits d'administrateur. La session d'installation s'ouvre. Cliquer sur Continuer dans la fenêtre d'accueil. Cliquer sur Continuer dans la fenêtre 'readme'. Sélectionner le disque de boot de Mac OS X comme destination, cliquez sur Ok.
39 Cliquer sur Installer. Cliquer Continuer l'installation. Redémarrer le Mac. Suppression du pilote VX sous Mac OS X VX222v2 Manuel utilisateur Ouvrir le volume 'VXDriver'. Dans l'élément 4 - Uninstall, exécuter l'uninstaller. Cliquer sur l'icône list installed packages. Sélectionner l'archive VX222v2Driver x-y-z.pkg. Sélectionner l'icône remove selected package icon (croix rouge). Donner une connexion/mot de passe avec des droits d'administrateur, et cliquez sur OK. Cliquer sur Ok dans la fenêtre d'alerte. Redémarrer l'ordinateur. Mise à jour du pilote VX sous Mac OS X Installer la nouvelle version comme décrit ci-dessus en écrasant la version précédente. Installation sous Windows 98 SE et Millennium Si le pilote a été chargé depuis notre site web, il faut le décompacter avant son installation. Double-cliquer sur le fichier téléchargé pour démarrer l utilitaire d auto-extraction. Vous pouvez choisir la destination par défaut (répertoire temporaire Windows) ou en sélectionner un autre. Arrêter l'ordinateur et insérer la carte. Redémarrer l'ordinateur. L assistant détecte la carte lors de son insertion et demande un nouveau pilote. Cliquer sur Suivant pour démarrer l installation. Sélectionner Afficher une liste de pilotes pour choisir un pilote spécifique. Sélectionner la catégorie Contrôleurs son, vidéo et jeu, cliquer sur Suivant. Cliquer sur Disquette fournie. 39
40 Se positionner sur l'unité où figurent les fichiers d'installation (sur le CD-Rom ou dans le dossier d'extraction du kit de mise à jour). OK. L assistant affiche alors le pilote adéquat. Cliquer sur OK pour continuer. Cliquer sur Suivant pour lancer la copie des fichiers du pilote. Cliquer sur Terminer pour achever l installation du pilote. La base de registre est mise à jour de sorte que les applications compatibles ASIO proposent Digigram VX ASIO driver dans la liste des pilotes ASIO disponibles. Pour profiter pleinement de votre VX222v2, sélectionnez le pilote Digigram VX ASIO depuis la configuration E/S audio spécifique de l'application utilisée. Suppression du pilote VX sous Windows 98 SE et Millennium Pour supprimer le pilote VX, veillez à ce que la carte soit présente avant de commencer la procédure suivante: Ouvrir <Ajout/Suppression de programmes> dans le panneau de configuration. Sélectionner Digigram VX Kit, puis le supprimer. Suivre les instructions de l assistant InstallShield. Mise à jour du pilote VX sous Windows 98 SE et Millennium 40 Dans <Démarrer>, allez à <Paramètres> <Panneau de configuration> <Système> Sélectionner l onglet Gestionnaire de périphériques. Sélectionner la catégorie Contrôleurs son, vidéo et jeu. Choisir l'élément 'Digigram VX222v2 v2'. Cliquer sur le bouton Propriétés étés. Sélectionner l onglet Pilote. Cliquer sur Mettre à jour. Suivant. Sélectionner Afficher une liste de pilotes pour choisir un pilote spécifique. Suivant. Cliquer sur Disquette fournie.
41 VX222v2 Manuel utilisateur Se positionner sur l'unité où figurent les fichiers d'installation (sur le CD-Rom ou dans le dossier d'extraction du kit de mise à jour). OK. L assistant affiche alors le pilote adéquat. Cliquer sur OK pour continuer. Cliquer sur Suivant pour lancer la copie des fichiers du pilote. Cliquer sur Terminer pour achever l installation du pilote. Un redémarrage n est pas nécessaire. Installation sous Windows 2000 & XP Arrêter l'ordinateur et insérez la carte. Redémarrer l'ordinateur. L'assistant 'Plug and Play' de Windows détecte la carte et demande un nouveau pilote. Cliquer sur Annuler pour fermer le 'Plug and Play wizard'. Insérer le CD-ROM VX kit. Sa page de présentation s ouvre automatiquement dans votre navigateur Internet. Cliquer alors sur la photo de votre carte, puis sur le lien vers sa page de pilotes. Si vous avez chargé l'archive des pilotes depuis notre site web, double-cliquez sur le fichier téléchargé pour démarrer l'utilitaire d'auto-extraction. Choisir l'emplacement provisoire où décompacter les fichiers, et cliquer sur Démarrer. Cliquer sur Ok dans la fenêtre Terminer. Le programme d'installation démarre alors automatiquement. Autrement double-cliquer sur setup.exe pour commencer le programme d'installation Suivant. Lire l accord de licence et cliquer sur Oui pour confirmer. Sélectionner les composants à installer. Choisir Wave si vous voulez installer le pilote Wave en plus du pilote DirectSound. Suivant. Sous XP, sélectionner Continuer si Windows affiche un message du type: Le logiciel n a pas subit les tests Windows Logo. Si vous avez choisi d'installer le pilote Wave, ce message apparaît une deuxième fois. Sélectionner de nouveau Continuer. Cliquer sur Terminer. 41
42 A ce niveau, les pilotes DirectSound et ASIO (et Wave si choisi) sont installés. Suppression du pilote VX sous Windows 2000 & XP Ouvrir <Ajout/Suppression de programmes> dans le panneau de configuration. Sélectionner Digigram VX Kit, puis le supprimer. Suivre les instructions de l assistant InstallShield. Mise à jour du pilote VX sous Windows 2000 & XP Supprimer le pilote comme décrit ci-dessus. Exécuter le programme d'installation du nouveau pilote comme décrit précédemment. Note: Si vous avez effectué une installation sans choisir le pilote Wave, et vous voulez l'installer maintenant, il est nécessaire de supprimer le pilote (DirectSound), et le réinstaller ensuite. VERIFICATION DE L'INSTALLATION DE LA CARTE Sous Windows Une fois que le pilote et les cartes sont installés selon le procédé décrit dans ce manuel, vous pouvez vérifier que la carte est correctement installée comme suit: Allez dans <Démarrage> <Paramètres> <Panneau de configuration> <Digigram Control Center> Dans la fenêtre 'Digigram drivers', choisir l'onglet 'General Information'. Dans la fenêtre 'Modules Information', les modules installés du kit VX et leurs versions sont affichés. Dans la fenêtre 'Digigram drivers', choisir l'onglet 'VX Setup' pour afficher une liste des cartes installées. Chaque carte est représentée par une icône. Cliquez sur le bouton 'Propriétés Windows multimédia' pour ouvrir la fenêtre 'Propriétés son & multimédia'. Sélectionner l'onglet Audio. 42
43 VX222v2 Manuel utilisateur Les cartes installées sont affichées: - 'VX222v2 Out #1' en Lecture des sons, Périphérique par défaut. Ceci est un périphérique Wave. - 'VX222v2 In #1' en Enregistrement des sons, Périphérique par défaut. Ceci est un périphérique Wave. - VX222v2 Audio Card (WDM) en Lecture et enregistrement, Périphérique par défaut. Ceci est un périphérique DirectSound. Au cas où la carte ne serait pas affichée: Assurez-vous que la carte est correctement insérée dans le slot PCI et vissée sur le châssis de l'ordinateur. Si nécessaire, désinstaller le VX kit comme décrit dans ce manuel, et le réinstaller. Sous Mac OS X Une fois que le pilote et la carte sont installés, la carte est affichée dans le panneau de contrôle VX, le tableau de bord son, et le panneau 'Audio Midi Setup'. Vous pouvez alors utiliser la carte avec votre application audio. CONFIGURATION DE LA VX222 VX222v2 SOUS MAC OS X Plusieurs panneaux de contrôle sont disponibles pour ajuster les paramètres de la VX222v2. Plusieurs paramètres peuvent être ajustés à partir de différents panneaux. Si un paramètre est modifié dans un panneau, sa valeur est automatiquement mise à jour dans un autre panneau. Panneau de contrôle VX Le panneau de contrôle VX sert à ajuster les paramètres suivants de votre carte VX: le choix de la carte VX (si plusieurs cartes VX sont installées, elles sont notées VX222:0, VX222:1, etc...). 43
44 la latence (Internal Buffer Latency): une faible valeur de latence peut conduire à des ruptures de débit dans le son, pouvant provoquer des "clacs". Si cela arrive, il est alors nécessaire d'augmenter la valeur de latence. la taille des échantillons (Sample Size): 16 ou 24 bits. la sélection de la source d'entrée: numérique, ligne, ligne avec synchronisation numérique. le monitoring matériel: peut être activé ou désactivé en cochant ou décochant l'option "Monitoring Input 1 2" (Monitoring Input 3 4 est inactif). le gain d'entrée numérique de -72 db à +18 db: le curseur actif (Digital Input 1 2) permet de régler simultanément le gain numérique des deux entrées. Tableau de bord son 44
45 VX222v2 Manuel utilisateur Le panneau de contrôle Son sert à ajuster les paramètres suivants de votre carte VX: Dans l'onglet 'Input': - la source: numérique (VX222 Digital), ligne (VX222 Line), ligne avec synchronisation numérique (VX222 line + sync) - le gain d'entrée numérique -72 db à +18 db: le curseur Input volume permet de régler simultanément le gain numérique des deux entrées Dans l'onglet 'Output': - la balance analogique Le gain de sortie analogique (appliqué aux deux voies de sortie) est toujours accessible en bas de cette fenêtre. Note: En ajustant la balance de sortie et le gain de sortie analogique dans ce panneau, les positions des curseurs permettant d'ajuster les gains de sortie analogique dans le panneau 'Audio Midi setup' sont mises à jour. En ajustant le gain d'entrée numérique dans ce panneau, les positions des curseurs permettant d'ajuster les gains d'entrée numérique dans le panneau 'Audio Midi setup' sont mises à jour, en plus du curseur dans le panneau de contrôle VX. 45
46 Panneau 'Audio Midi setup' Ce panneau est accessible via 'Applications, Outils'. Le panneau 'Audio Midi setup' sert à ajuster les paramètres suivants de votre carte VX: le monitoring matériel: Play Through le mute de la sortie: Device Mute la source: numérique (VX222 Digital), ligne (VX222 line), ligne avec synchronisation numérique (VX222 line + sync) le format audio pour l'enregsitrement et la lecture (Current Format): taille de l'échantillon, fréquence d'échantillonnage le gain numérique d'entrée pour chaque voie d'entrée (de -72 db à +18 db) le gain analogique de sortie pour chaque voie de sortie. DIGIGRAM WAVE MIXER 46
47 VX222v2 Manuel utilisateur Le mixer Digigram sert à ajuster les niveaux d entrée et de sortie de la carte, et d autres paramètres tels que le type d entrée ou le format des données numériques de sortie. Utilisation générale Exécution du programme Le programme d installation installe l icône du mixer Digigram dans la barre des tâches de Windows. Par défaut, le mixer est automatiquement démarré au démarrage du système. Pour accéder au mixer, double cliquer sur son icône dans la barre de tâches ou cliquer droit sur son icône pour un menu de contexte et sélectionner Open. Si vous avez fermé le mixer dans votre session, vous pouvez le démarrer depuis le menu <Démarrer><Programmes><Digigram><Digigram Mixer>. 47
D i g i g r a m. VXpocket 440. Professional Digital Multi-Channel Laptop Sound Card. User s manual Manuel utilisateur
 VXpocket 440 Professional Digital Multi-Channel Laptop Sound Card User s manual Manuel utilisateur Copyright 2001 Digigram. All rights reserved. No portion of this manual may be reproduced without prior
GIGABIT PCI DESKTOP ADAPTER DGE-530T. Quick Installation Guide+ Guide d installation+
 GIGABIT PCI DESKTOP ADAPTER Quick Installation Guide+ Guide d installation+ Check Your Package Contents Quick Installation Guide Gigabit Ethernet PCI Adapter CD with Manual and Drivers DO NOT insert the
Guide d'installation rapide TFM-560X YO.13
 Guide d'installation rapide TFM-560X YO.13 Table of Contents Français 1 1. Avant de commencer 1 2. Procéder à l'installation 2 Troubleshooting 6 Version 06.08.2011 16. Select Install the software automatically
Paxton. ins-20605. Net2 desktop reader USB
 Paxton ins-20605 Net2 desktop reader USB 1 3 2 4 1 2 Desktop Reader The desktop reader is designed to sit next to the PC. It is used for adding tokens to a Net2 system and also for identifying lost cards.
Package Contents. System Requirements. Before You Begin
 Package Contents DWA-125 Wireless 150 USB Adapter CD-ROM (contains software, drivers, and manual) Cradle If any of the above items are missing, please contact your reseller. System Requirements A computer
Thank you for choosing the Mobile Broadband USB Stick. With your USB Stick, you can access a wireless network at high speed.
 Thank you for choosing the Mobile Broadband USB Stick. With your USB Stick, you can access a wireless network at high speed. Note: This manual describes the appearance of the USB Stick, as well as the
Contents Windows 8.1... 2
 Workaround: Installation of IRIS Devices on Windows 8 Contents Windows 8.1... 2 English Français Windows 8... 13 English Français Windows 8.1 1. English Before installing an I.R.I.S. Device, we need to
Logitech Speaker System Z553 Setup Guide Guide d installation
 Logitech Speaker System Z553 Setup Guide Guide d installation Logitech Speaker System Z553 English................. 3 Français................ 10 www.logitech.com/support...19 2 Package contents Logitech
Thank you for choosing the Mobile Broadband USB Stick. With your USB Stick, you can access a wireless network at high speed.
 Thank you for choosing the Mobile Broadband USB Stick. With your USB Stick, you can access a wireless network at high speed. Note: This manual describes the appearance of the USB Stick, as well as the
Instructions Mozilla Thunderbird Page 1
 Instructions Mozilla Thunderbird Page 1 Instructions Mozilla Thunderbird Ce manuel est écrit pour les utilisateurs qui font déjà configurer un compte de courrier électronique dans Mozilla Thunderbird et
TABLE DES MATIERES A OBJET PROCEDURE DE CONNEXION
 1 12 rue Denis Papin 37300 JOUE LES TOURS Tel: 02.47.68.34.00 Fax: 02.47.68.35.48 www.herve consultants.net contacts@herve consultants.net TABLE DES MATIERES A Objet...1 B Les équipements et pré-requis...2
Notice Technique / Technical Manual
 Contrôle d accès Access control Encodeur USB Mifare ENCOD-USB-AI Notice Technique / Technical Manual SOMMAIRE p.2/10 Sommaire Remerciements... 3 Informations et recommandations... 4 Caractéristiques techniques...
WEB page builder and server for SCADA applications usable from a WEB navigator
 Générateur de pages WEB et serveur pour supervision accessible à partir d un navigateur WEB WEB page builder and server for SCADA applications usable from a WEB navigator opyright 2007 IRAI Manual Manuel
Instructions pour mettre à jour un HFFv2 v1.x.yy v2.0.00
 Instructions pour mettre à jour un HFFv2 v1.x.yy v2.0.00 HFFv2 1. OBJET L accroissement de la taille de code sur la version 2.0.00 a nécessité une évolution du mapping de la flash. La conséquence de ce
Logitech Tablet Keyboard for Windows 8, Windows RT and Android 3.0+ Setup Guide Guide d installation
 Logitech Tablet Keyboard for Windows 8, Windows RT and Android 3.0+ Setup Guide Guide d installation English.......................................... 3 Français.........................................
Guide d installation logicielle
 Guide d installation logicielle Drivers USB pour Windows XP/2000 X-Edit Editor/Librarian pour Windows XP/2000 Nous tenons à vous remercier d avoir choisi ce processeur DigiTech USB. Ce guide d installation
How to Login to Career Page
 How to Login to Career Page BASF Canada July 2013 To view this instruction manual in French, please scroll down to page 16 1 Job Postings How to Login/Create your Profile/Sign Up for Job Posting Notifications
DOCUMENTATION - FRANCAIS... 2
 DOCUMENTATION MODULE SHOPDECORATION MODULE PRESTASHOP CREE PAR PRESTACREA INDEX : DOCUMENTATION - FRANCAIS... 2 INSTALLATION... 2 Installation automatique... 2 Installation manuelle... 2 Résolution des
Guide pour l Installation des Disques Durs SATA et Configuration RAID
 Guide pour l Installation des Disques Durs SATA et Configuration RAID 1. Guide pour l Installation des Disques Durs SATA.. 2 1.1 Installation de disques durs Série ATA (SATA).. 2 1.2 Créer une disquette
Folio Case User s Guide
 Fujitsu America, Inc. Folio Case User s Guide I N S T R U C T I O N S This Folio Case is a stylish, lightweight case for protecting your Tablet PC. Elastic Strap Pen Holder Card Holders/ Easel Stops Figure
Summary / Sommaire. 1 Install DRIVER SR2 USB01 Windows seven 64 bits / Installation du DRIVER SR2 USB01 Windows seven 64 bits 2
 Summary / Sommaire 1 Install DRIVER SR2 USB01 Windows seven 64 bits / Installation du DRIVER SR2 USB01 Windows seven 64 bits 2 1.1 Driver Installation SR2 USB01 Windows Seven 64 bits (english) 2 1.1.1
Utiliser une WebCam. Micro-ordinateurs, informations, idées, trucs et astuces
 Micro-ordinateurs, informations, idées, trucs et astuces Utiliser une WebCam Auteur : François CHAUSSON Date : 8 février 2008 Référence : utiliser une WebCam.doc Préambule Voici quelques informations utiles
DOCUMENTATION - FRANCAIS... 2
 DOCUMENTATION MODULE CATEGORIESTOPMENU MODULE CREE PAR PRESTACREA INDEX : DOCUMENTATION - FRANCAIS... 2 INSTALLATION... 2 CONFIGURATION... 2 LICENCE ET COPYRIGHT... 3 SUPPORT TECHNIQUE ET MISES A JOUR...
PRESENTATION REMOTE TÉLÉCOMMANDE DE PRÉSENTATION. User Guide Manuel de l utilisateur
 PRESENTATION REMOTE TÉLÉCOMMANDE DE PRÉSENTATION User Guide Manuel de l utilisateur Targus Presentation Remote Introduction Thank you for your purchase of the Targus Presentation Remote. This cordless
Contrôle d'accès Access control. Notice technique / Technical Manual
 p.1/18 Contrôle d'accès Access control INFX V2-AI Notice technique / Technical Manual p.2/18 Sommaire / Contents Remerciements... 3 Informations et recommandations... 4 Caractéristiques techniques... 5
WiFi Security Camera Quick Start Guide. Guide de départ rapide Caméra de surveillance Wi-Fi (P5)
") #45 #46 WiFi Security Camera Quick Start Guide Guide de départ rapide Caméra de surveillance Wi-Fi (P5) #47 Start Here 1 Is this you? TECH SUPPORT CTRL ALT DEL 2 If yes, turn to page three 1 3 If not,
#45 #46 WiFi Security Camera Quick Start Guide Guide de départ rapide Caméra de surveillance Wi-Fi (P5) #47 Start Here 1 Is this you? TECH SUPPORT CTRL ALT DEL 2 If yes, turn to page three 1 3 If not,
PX8048 Convertisseur audio/vidéo VHS vers USB
 PX8048 Convertisseur audio/vidéo VHS vers USB 1 Convertisseur audio/vidéo VHS vers USB Guide d'installation rapide Le convertisseur vidéo/audio EasyCAP USB 2.0 convertit des enregistrements vidéo et audio
3615 SELFIE. http://graffitiresearchlab.fr HOW-TO / GUIDE D'UTILISATION
 3615 SELFIE http://graffitiresearchlab.fr HOW-TO / GUIDE D'UTILISATION Hardware : Minitel Computer DIN FM545 45 connector (http://www.gotronic.fr/art-fiche-din-fm545-4747.htm) Cable Arduino compatible
Quick Start Guide This guide is intended to get you started with Rational ClearCase or Rational ClearCase MultiSite.
 Rational ClearCase or ClearCase MultiSite Version 7.0.1 Quick Start Guide This guide is intended to get you started with Rational ClearCase or Rational ClearCase MultiSite. Product Overview IBM Rational
LOGICIEL D'ADMINISTRATION POUR E4000 & G4000 MANAGEMENT SOFTWARE FOR E4000 & G4000
 LOGICIEL D'ADMINISTRATION POUR E4000 & G4000 MANAGEMENT SOFTWARE FOR E4000 & G4000 TABLE DES MATIÈRES TITRE PAGE Présentation - - - - - - - - - - - - - - - - - - - - - - - - - - - - - - - - - - - -4 Le
Quick Installation Guide TBW-106UB H/W: V1
 Quick Installation Guide TBW-106UB H/W: V1 Table of Contents... 1. Avant de commencer... 2. Procéder à l'installation... 3. Configuration de l'adaptateur Bluetooth... Troubleshooting... 1 1 2 5 7 Version
Oracle Database SQL Developer Guide D'Installation Release 4.0 E38928-06
 Oracle Database SQL Developer Guide D'Installation Release 4.0 E38928-06 Pour accéder à la documentation détaillée de SQL Developer : voir Oracle Database SQL Developer Installation Guide Installer Oracle
Adeunis-RF Softwares. Stand-Alone configuration Manager V2. User guide version V1 FRANCAIS ENGLISH
 Adeunis-RF Softwares Stand-Alone configuration Manager V2 User guide version V1 FRANCAIS ENGLISH Adeunis RF 283 rue Louis Néel Parc Technologique Pré Roux 38920 Crolles - France Tel : +33 0)4 76 92 07
USB 598. Quick Start Guide (Windows) Guide de démarrage rapide (Windows) USB Modem. Modem USB. www.sierrawireless.com
 Guide de démarrage rapide (Windows) USB Modem. Modem USB. www.sierrawireless.com") USB 598 With Avec USB Modem Quick Start Guide (Windows) Modem USB Guide de démarrage rapide (Windows) www.sierrawireless.com This guide provides installation instructions for users of: Windows Vista Windows
USB 598 With Avec USB Modem Quick Start Guide (Windows) Modem USB Guide de démarrage rapide (Windows) www.sierrawireless.com This guide provides installation instructions for users of: Windows Vista Windows
Vanilla : Virtual Box
 Vanilla : Virtual Box Installation Guide for Virtual Box appliance Guide d'installation de l'application VirtualBox Vanilla Charles Martin et Patrick Beaucamp BPM Conseil Contact : charles.martin@bpm-conseil.com,
Quick Installation Guide TEW-P21G
 Quick Installation Guide TEW-P21G Table of of Contents Contents... 1. Avant de commencer... 2. Comment effectuer les connexions... 3. Utilisation du serveur d'impression... 1 1 2 3 Troubleshooting... 7
Once the installation is complete, you can delete the temporary Zip files..
 Sommaire Installation... 2 After the download... 2 From a CD... 2 Access codes... 2 DirectX Compatibility... 2 Using the program... 2 Structure... 4 Lier une structure à une autre... 4 Personnaliser une
DOCUMENTATION MODULE BLOCKCATEGORIESCUSTOM Module crée par Prestacrea - Version : 2.0
 DOCUMENTATION MODULE BLOCKCATEGORIESCUSTOM Module crée par Prestacrea - Version : 2.0 INDEX : DOCUMENTATION - FRANCAIS... 2 1. INSTALLATION... 2 2. CONFIGURATION... 2 3. LICENCE ET COPYRIGHT... 3 4. MISES
Micro-ordinateurs, informations, idées, trucs et astuces utiliser le Bureau à distance
 Micro-ordinateurs, informations, idées, trucs et astuces utiliser le Bureau à distance Auteur : François CHAUSSON Date : 8 février 2008 Référence : utiliser le Bureau a distance.doc Préambule Voici quelques
Garage Door Monitor Model 829LM
 Garage Door Monitor Model 829LM To prevent possible SERIOUS INJURY or DEATH from a closing garage door: NEVER permit children to operate or play with door control push buttons or remote control transmitters.
lundi 3 août 2009 Choose your language What is Document Connection for Mac? Communautés Numériques L informatique à la portée du Grand Public
 Communautés Numériques L informatique à la portée du Grand Public Initiation et perfectionnement à l utilisation de la micro-informatique Microsoft Document Connection pour Mac. Microsoft Document Connection
Guide de l'utilisateur. Linksys AE1000 Adaptateur USB sans fil - N hautes performances
 Guide de l'utilisateur Linksys AE1000 Adaptateur USB sans fil - N hautes performances Table des matières Table des matières Chapitre 1 : Présentation du produit 1 Voyant 1 Chapitre 2 : Installation 2 Installation
Principe de TrueCrypt. Créer un volume pour TrueCrypt
 Sommaire : Principe de TrueCrypt...1 Créer un volume pour TrueCrypt...1 Premier montage...6 Réglages...8 Save Currently Mounted Volumes as Favorite...8 Settings > Preferences...9 TrueCrypt Traveller pour
SERVEUR DÉDIÉ DOCUMENTATION
 SERVEUR DÉDIÉ DOCUMENTATION Release 5.0.6.0 19 Juillet 2013 Copyright 2013 GIANTS Software GmbH, All Rights Reserved. 1/9 CHANGE LOG Correction de bug divers (5.0.6.0) Ajout d une option de relance automatique
Guide d'installation et de configuration de Pervasive.SQL 7 dans un environnement réseau Microsoft Windows NT
 Guide d'installation et de configuration de Pervasive.SQL 7 dans un environnement réseau Microsoft Windows NT Ce guide explique les différentes étapes de l installation et de la configuration des composantes
4-261-700-32 (1) XDCAM Browser
 XDCAM Browser") 4-261-700-32 (1) XDCAM Browser Guide d installation Avant de faire fonctionner l appareil, veuillez lire attentivement ce mode d emploi et le conserver pour référence ultérieure. Version 1.1 2010 Sony
4-261-700-32 (1) XDCAM Browser Guide d installation Avant de faire fonctionner l appareil, veuillez lire attentivement ce mode d emploi et le conserver pour référence ultérieure. Version 1.1 2010 Sony
Prise en main. Prise en main - 0
 Prise en main 0404 Prise en main - 0 1- Introduction Creative Professional Merci d avoir choisi le Digital Audio System 0404 d E-MU. Nous avons conçu ce produit E-MU pour qu il soit logique, intuitif et
FAQ pour tablette Windows 8 (NS-15MS0832 et NS-15MS0832B) Avril 2015
 Avril 2015") FAQ pour tablette Windows 8 (NS-15MS0832 et NS-15MS0832B) Avril 2015 Navigation... 2 Question 1 : À quoi servent les icônes?... 2 Question 2 : Comment naviguer à l'aide d'une souris ou d'un pavé tactile?...
FAQ pour tablette Windows 8 (NS-15MS0832 et NS-15MS0832B) Avril 2015 Navigation... 2 Question 1 : À quoi servent les icônes?... 2 Question 2 : Comment naviguer à l'aide d'une souris ou d'un pavé tactile?...
Connexion de Votre Imprimante Multifonction à votre Réseau pour la Première Fois
 Suivant >> Connexion de Votre Imprimante Multifonction à votre Réseau pour la Première Fois PIXMA MX350 / PIXMA MX870 Mac OS 1 > Conseils de Navigation pour des utilisateurs de Macintosh
INSTRUMENTS DE MESURE SOFTWARE. Management software for remote and/or local monitoring networks
 INSTRUMENTS DE MESURE SOFTWARE SOFTWARE Logiciel de supervision des réseaux locaux et/ou distants Management software for remote and/or local monitoring networks MIDAs EVO 4 niveaux de fonctionnalités
Guide de récupération de Windows Server 2003 R2 pour serveurs Sun x64
 Guide de récupération de Windows Server 2003 R2 pour serveurs Sun x64 Sommaire Introduction 1 Procédure de réinstallation 1 Documentation associée 5 Vos commentaires nous sont utiles 5 Introduction Ce
Nouveautés printemps 2013
 » English Se désinscrire de la liste Nouveautés printemps 2013 19 mars 2013 Dans ce Flash Info, vous trouverez une description des nouveautés et mises à jour des produits La Capitale pour le printemps
Contrôle d accès Access control MOD-TCPIP-AI. Notice technique / Technical Manual
 Contrôle d accès Access control MOD-TCPIP-AI Notice technique / Technical Manual Notice technique Mod-TCPIP-AI 9 septembre 2008 v.1.0 p.2/16 Sommaire / Contents Sommaire / Contents...2 Remerciements...3
SA-32 / SA-62 INSTRUCTION MANUAL - MANUEL D INSTRUCTIONS
 SA-32 / SA-62 INSTRUCTION MANUAL - MANUEL D INSTRUCTIONS 4 5 6 7 4 5 6 7 1. Telephone Paging Volume Control 1. Contrôle de volume Paging Téléphone 2. Microphone Volume Control 2. Contrôle volume du microphone
Quick Setup Guide Guide de configuration rapide. Tablet Device SGPT12 Series Tablette électronique Série SGPT12
 Quick Setup Guide Guide de configuration rapide Tablet Device SGPT12 Series Tablette électronique Série SGPT12 Welcome / Bienvenue Congratulations on your purchase of this Xperia Tablet S. This Quick Setup
Creating a Backup of Bootable Disk and Recovery Image
 Appendix Appendix Image Backup and Recovery Procedures Thank you for purchasing a Fujitsu computer. Fujitsu is committed to bringing you the best computing experience with your new system. It is very important
calls.paris-neuroscience.fr Tutoriel pour Candidatures en ligne *** Online Applications Tutorial
 calls.paris-neuroscience.fr Tutoriel pour Candidatures en ligne Online Applications Tutorial 1/4 Pour postuler aux Appels d Offres de l ENP, vous devez aller sur la plateforme : calls.parisneuroscience.fr.
APPENDIX 2. Provisions to be included in the contract between the Provider and the. Holder
 Page 1 APPENDIX 2 Provisions to be included in the contract between the Provider and the Obligations and rights of the Applicant / Holder Holder 1. The Applicant or Licensee acknowledges that it has read
Quick Installation Guide TE100-P1P
 Quick Installation Guide TE100-P1P Table of of Contents Contents... 1 1. Avant de commencer... 1 2. Procéder à l'installation... 2 3. Configuration du serveur d'impression... 3 4. Ajout de l'imprimante
VTP. LAN Switching and Wireless Chapitre 4
 VTP LAN Switching and Wireless Chapitre 4 ITE I Chapter 6 2006 Cisco Systems, Inc. All rights reserved. Cisco Public 1 Pourquoi VTP? Le défi de la gestion VLAN La complexité de gestion des VLANs et des
Déploiement de SAS 9.1.3 Foundation
 Déploiement de SAS 9.1.3 Foundation I. Installation de SAS sur des postes en local à partir de Cédéroms 3 II. Phase de préparation au déploiement : Création des images disque 6 a) Pour une installation
Monitor LRD. Table des matières
 Folio :1/6 Table des matières 1.Installation du logiciel... 3 2.Utilisation du logiciel... 3 2.1.Description de la fenêtre de commande... 3 2.1.1.Réglage des paramètres de communication... 4 2.1.2.Boutons
WORKSHOP OBIEE 11g (version 11.1.1.5) PRE-REQUIS:
 PRE-REQUIS:") WORKSHOP OBIEE 11g (version 11.1.1.5) Durée du workshop: 2 jours Profil des participants du workshop: Profil fonctionnel ou technique Notions de modélisation multidimensionnelle et du décisionnel NB :
WORKSHOP OBIEE 11g (version 11.1.1.5) Durée du workshop: 2 jours Profil des participants du workshop: Profil fonctionnel ou technique Notions de modélisation multidimensionnelle et du décisionnel NB :
Quick Installation Guide TW100-BRV304
 Quick Installation Guide TW100-BRV304 Table of of Contents Contents Français... 1. Avant de commencer... 2. Installation du matériel... 3. Configuration du routeur... 1 1 2 3 Troubleshooting... 5 Version
SnapMusic Studio 715 Guide d Installation
 SnapMusic Studio 715 Guide d Installation Sommaire V1.0 Chapitre 1 : SnapMusic Studio 715 Installation Matérielle...2 1.1 Contenu du boîtier...2 1.1 Configuration requise...2 1.2 Installation Matérielle...2
Tutoriel de formation SurveyMonkey
 Tutoriel de formation SurveyMonkey SurveyMonkey est un service de sondage en ligne. SurveyMonkey vous permet de créer vos sondages rapidement et facilement. SurveyMonkey est disponible à l adresse suivante
DOCUMENTATION - FRANCAIS... 2
 DOCUMENTATION MODULE PRETTYSLIDER MODULE PRESTASHOP CREE PAR PRESTACREA INDEX : DOCUMENTATION - FRANCAIS... 2 INSTALLATION... 2 Installation automatique... 2 Installation manuelle... 2 Résolution des problèmes...
Oracle Learning Library Tutoriel Database 12c Installer le logiciel Oracle Database et créer une Database
 Installer le logiciel Oracle Database et créer une Database Présentation Objectif Ce tutoriel montre comment utiliser Oracle Universal Installer (OUI) pour installer le logiciel Oracle Database 12c et
VX442. Panneau de Contrôle pour Windows 98 SE, ME, 2000 et XP et Mac OS 9 & 10
 VX442 Panneau de Contrôle pour Windows 98 SE, ME, 2000 et XP et Mac OS 9 & 10 Copyright 2002 -- 2008 Digigram. Tous droits réservés. Aucune partie de ce manuel ne peut être reproduite sans l accord préalable
RAPID 3.34 - Prenez le contrôle sur vos données
 RAPID 3.34 - Prenez le contrôle sur vos données Parmi les fonctions les plus demandées par nos utilisateurs, la navigation au clavier et la possibilité de disposer de champs supplémentaires arrivent aux
Spécial Catégorie 6 Patch Cords
 Spécial Catégorie 6 Patch Cords Patent Pending Sommaire 1 - Préliminaires... 2 2 Qu est ce qu apporte la catégorie 6... 3 3 Qu est ce que l interopérabilité...3 4 Ce que PatchSee annonçait en septembre
Cheque Holding Policy Disclosure (Banks) Regulations. Règlement sur la communication de la politique de retenue de chèques (banques) CONSOLIDATION
 Regulations. Règlement sur la communication de la politique de retenue de chèques (banques) CONSOLIDATION") CANADA CONSOLIDATION CODIFICATION Cheque Holding Policy Disclosure (Banks) Regulations Règlement sur la communication de la politique de retenue de chèques (banques) SOR/2002-39 DORS/2002-39 Current to
CANADA CONSOLIDATION CODIFICATION Cheque Holding Policy Disclosure (Banks) Regulations Règlement sur la communication de la politique de retenue de chèques (banques) SOR/2002-39 DORS/2002-39 Current to
NetBak Replicator 4.0 Manuel de l utilisateur Version 1.0
 NetBak Replicator 4.0 Manuel de l utilisateur Version 1.0 Copyright 2012. QNAP Systems, Inc. All Rights Reserved. 1 NetBak Replicator 1. Avis... 3 2. Installer le logiciel NetBak Replicator... 4 2.1 Configuration
Règlement sur le télémarketing et les centres d'appel. Call Centres Telemarketing Sales Regulation
 THE CONSUMER PROTECTION ACT (C.C.S.M. c. C200) Call Centres Telemarketing Sales Regulation LOI SUR LA PROTECTION DU CONSOMMATEUR (c. C200 de la C.P.L.M.) Règlement sur le télémarketing et les centres d'appel
Practice Direction. Class Proceedings
 Effective Date: 2010/07/01 Number: PD - 5 Title: Practice Direction Class Proceedings Summary: This Practice Direction describes the procedure for requesting the assignment of a judge in a proceeding under
Bluetooth pour Windows
 Bluetooth pour Windows Mise en route 2006 Hewlett-Packard Development Company, L.P. Microsoft et Windows sont des marques déposées de Microsoft Corporation aux Etats-Unis. Bluetooth est une marque détenue
Instructions Installation ELLIS Business: Vidéo Local Windows 2003 & XP poste de Travail
 Instructions Installation ELLIS Business: Vidéo Local Windows 2003 & XP poste de Travail AVANT DE DEMARRER?? Vérifier que vos enceintes sont branchées et fonctionnent correctement?? Fermer tous les programmes
Start Here Point de départ
 Start Here Point de départ Epson Stylus C88+ Please read these instructions before using the printer. Lisez ces instructions avant d utiliser l imprimante. Install Ink Cartridges Installez les cartouches
This is a preview - click here to buy the full publication NORME INTERNATIONALE INTERNATIONAL STAN DARD. Telecontrol equipment and systems
 NORME INTERNATIONALE INTERNATIONAL STAN DARD CEI IEC 870-3 Première édition First edition 1989-03 Matériels et systèmes de téléconduite Troisième partie: Interfaces (caractéristiques électriques) Telecontrol
INSTRUCTIONS D INSTALLATION SOUS WINDOWS 7 / WINDOWS VISTA / WINDOWS XP
 Que vous soyez passionné par les jeux de tir subjectif, les jeux de rôles en ligne massivement multijoueurs ou les jeux RTS (Real Time Strategy), le gamepad Razer Nostromo vous permet de maîtriser votre
PACKZ System Requirements. Version: 2015-05-27. Version: 2015-05-27 Copyright 2015, PACKZ Software GmbH. 1
 PACKZ System Requirements Version: 2015-05-27 Copyright 2015, PACKZ Software GmbH. All rights reserved.this manual may not be copied, photocopied, reproduced, translated, or converted to any electronic
Quick Installation Guide TV-IP400 TV-IP400W
 Quick Installation Guide TV-IP400 TV-IP400W Table of of Contents Contents Français... 1. Avant de commencer... 2. Installation du matériel... 3. Configuration de la Webcam... Troubleshooting... 1 1 2 3
Pro Monitoring System 1.0. Manuel d'utilisation
 Pro Monitoring System 1.0 Manuel d'utilisation 1 Sommaire 1 Aperçu... 3 1.1 Introduction au PMS... 3 1.2 Système requis... 3 2 Installation, désinstallation et mise à jour... 4 2.1 Installation du logiciel...
4-441-095-22 (1) Network Camera
 Network Camera") 4-441-095-22 (1) Network Camera Guide de l outil SNC easy IP setup Logiciel version 1.0 Avant d utiliser cet appareil, lisez attentivement ce manuel et conservez-le pour vous y reporter ultérieurement.
4-441-095-22 (1) Network Camera Guide de l outil SNC easy IP setup Logiciel version 1.0 Avant d utiliser cet appareil, lisez attentivement ce manuel et conservez-le pour vous y reporter ultérieurement.
Guide d installation esam
 Spécification nécessaire pour PC (PC Portable et PC de bureau) Pentium 4 ou au-dessus USB 2.0, min. 2 ports disponibles (cote à coter) Connexion Internet disponible Système d exploitation: Windows 2000
Harmony Smart Keyboard Add-on. Setup Guide Guide d installation
 Harmony Smart Keyboard Add-on Setup Guide Guide d installation Contents / Sommaire English................. 3 Français................. 9 support.myharmony.com/smart-keyboard-add-on 2 E Ch Pg Package contents
DOCUMENTATION - FRANCAIS... 2
 DOCUMENTATION MODULE FOOTERCUSTOM MODULE PRESTASHOP CREE PAR PRESTACREA INDEX : DOCUMENTATION - FRANCAIS... 2 INSTALLATION... 2 Installation automatique... 2 Installation manuelle... 2 Résolution des problèmes...
Compléter le formulaire «Demande de participation» et l envoyer aux bureaux de SGC* à l adresse suivante :
 FOIRE AUX QUESTIONS COMMENT ADHÉRER? Compléter le formulaire «Demande de participation» et l envoyer aux bureaux de SGC* à l adresse suivante : 275, boul des Braves Bureau 310 Terrebonne (Qc) J6W 3H6 La
STATISTICA Version 12 : Instructions d'installation
 STATISTICA Version 12 : Instructions d'installation STATISTICA Entreprise Server Remarques : 1. L'installation de STATISTICA Entreprise Server s'effectue en deux temps : a) l'installation du serveur et
Surveillance de Scripts LUA et de réception d EVENT. avec LoriotPro Extended & Broadcast Edition
 Surveillance de Scripts LUA et de réception d EVENT avec LoriotPro Extended & Broadcast Edition L objectif de ce document est de présenter une solution de surveillance de processus LUA au sein de la solution
RULE 5 - SERVICE OF DOCUMENTS RÈGLE 5 SIGNIFICATION DE DOCUMENTS. Rule 5 / Règle 5
 RULE 5 - SERVICE OF DOCUMENTS General Rules for Manner of Service Notices of Application and Other Documents 5.01 (1) A notice of application or other document may be served personally, or by an alternative
APPENDIX 6 BONUS RING FORMAT
 #4 EN FRANÇAIS CI-DESSOUS Preamble and Justification This motion is being presented to the membership as an alternative format for clubs to use to encourage increased entries, both in areas where the exhibitor
Duplicateur et Station d Accueil pour Disque Dur USB 3.0 vers SATA
 Duplicateur et Station d Accueil pour Disque Dur USB 3.0 vers SATA SATDOCK22RU3 / SATDOC2RU3GB / SATDOC2RU3EU *Le produit actuel peut varier des photos DE: Bedienungsanleitung - de.startech.com FR: Guide
Lavatory Faucet. Instruction Manual. Questions? 1-866-661-9606 customerservice@artikaworld.com
 Lavatory Faucet Instruction Manual rev. 19-01-2015 Installation Manual You will need Adjustable Wrench Adjustable Pliers Plumber s Tape Hardware list (included) Allen Key Socket wrench tool Important Follow
Frequently Asked Questions
 Frequently Asked Questions GENERAL Q: Can I connect an external hard drive, USB stick or MP3 player to copy files to the device? A: Yes, you can. The device supports USB HOST function, which can read USB
Installer les Pilotes USB
 Installer les Pilotes USB Comment Installer les Pilotes USB 1 installation des pilotes USB Vous devez installer les Pilotes USB sur votre computer avant d installer les Outils de Synchronisation des Contacts
Table des matières ENGLISH VERSION NEAR BOTTOM OF PAGE. Transferts sécurisés de fichiers Système MFT (Managed File Transfer) Guide de l utilisateur
 Guide de l utilisateur") ENGLISH VERSION NEAR BOTTOM OF PAGE Transferts sécurisés de fichiers Système MFT (Managed File Transfer) Guide de l utilisateur Table des matières Survol...2 Considérations en matière de conformité des
ENGLISH VERSION NEAR BOTTOM OF PAGE Transferts sécurisés de fichiers Système MFT (Managed File Transfer) Guide de l utilisateur Table des matières Survol...2 Considérations en matière de conformité des
NOTICE INSTALLATION. ARCHANGE Email Simplex Office N&B/Couleur KONICA MINOLTA BUSINESS SOLUTIONS FRANCE
 NOTICE INSTALLATION ARCHANGE Email Simplex Office N&B/Couleur KONICA MINOLTA BUSINESS SOLUTIONS FRANCE Date Version Marque de révision Rédaction 31/07/2012 1 - Nicolas AUBLIN 1) PRINCIPE DE FONCTIONNEMENT...
Logitech Wireless Performance Combo MX800 Setup Guide Guide d installation
 Logitech Wireless Performance Combo MX800 Setup Guide Guide d installation Logitech Wireless Performance Combo MX800 Setup Guide Guide d installation Important information Safety, compliance, and warranty
Software and Hardware Datasheet / Fiche technique du logiciel et du matériel
 Software and Hardware Datasheet / Fiche technique du logiciel et du matériel 1 System requirements Windows Windows 98, ME, 2000, XP, Vista 32/64, Seven 1 Ghz CPU 512 MB RAM 150 MB free disk space 1 CD