IAN HACHOIR MULTIFONCTION SMZ 260 G1 HACHOIR MULTIFONCTION MULTIZERKLEINERER MINI CHOPPER. Mode d'emploi. Bedienungsanleitung
|
|
|
- Antoine St-Hilaire
- il y a 8 ans
- Total affichages :
Transcription
1 HACHOIR MULTIFONCTION SMZ 260 G1 HACHOIR MULTIFONCTION Mode d'emploi MULTIZERKLEINERER Bedienungsanleitung MINI CHOPPER Operating instructions IAN

2 Avant de lire le mode d'emploi, ouvrez la page contenant les illustrations et familiarisez-vous ensuite avec toutes les fonctions de l'appareil. Klappen Sie vor dem Lesen die Seite mit den Abbildungen aus und machen Sie sich anschließend mit allen Funktionen des Gerätes vertraut. Before reading, unfold the page containing the illustrations and familiarise yourself with all functions of the device. FR / BE Mode d'emploi Page 1 DE / AT / CH Bedienungsanleitung Seite 9 GB Operating instructions Page 17

3 A B C
4 Sommaire Page Introduction 2 Usage conforme 2 Accessoires fournis 2 Description de l'appareil 2 Caractéristiques techniques 2 Consignes de sécurité 3 Hacher 5 Battre en chantilly 6 Nettoyage 7 Réparer les dysfonctionnements 7 Mise au rebut 8 Importateur 8 Garantie et service après-vente 8 Lisez attentivement le mode d'emploi avant la première utilisation et conservez ce dernier pour une utilisation ultérieure. Lors du transfert de l'appareil à une tierce personne, remettez-lui également le mode d'emploi

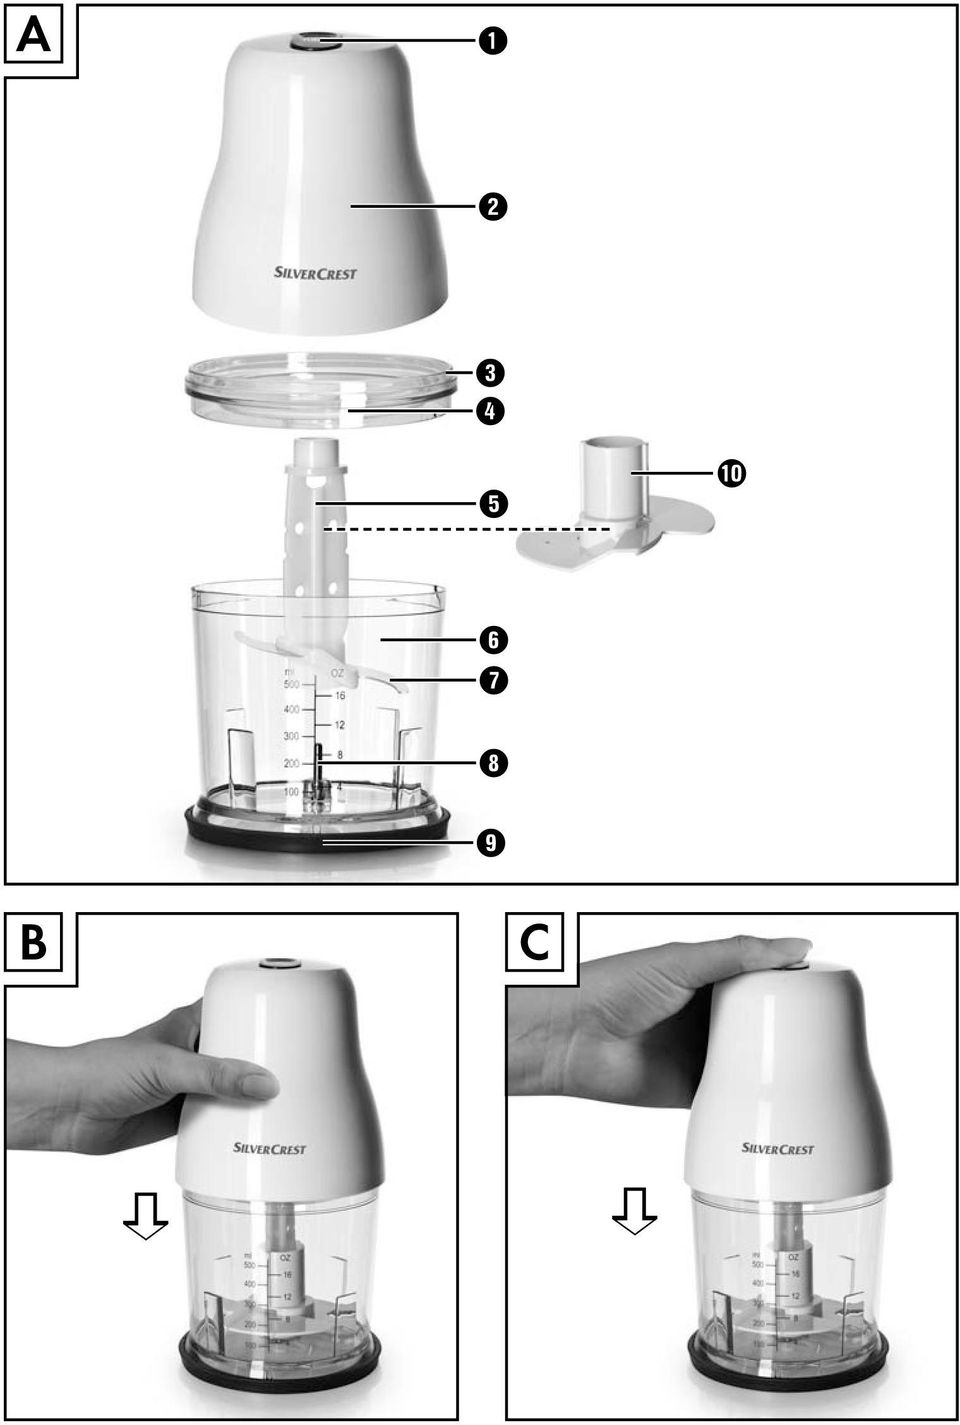
5 Hachoir multifonction Introduction Toutes nos félicitations pour l'achat de votre nouvel appareil. Ainsi, vous venez d'opter pour un produit de grande qualité. Le mode d'emploi fait partie de ce produit. Il contient des remarques importantes concernant la sécurité, l'usage et la mise au rebut. Avant l'usage du produit, veuillez vous familiariser avec toutes les consignes d'utilisation et de sécurité. N'utilisez le produit que conformément aux consignes et pour les domaines d'utilisation prévus. Conservez soigneusement le présent mode d'emploi. Si vous cédez le produit à un tiers, remettez-lui également tous les documents. Usage conforme Cet appareil sert exclusivement à couper en petits morceaux des aliments sans os en petite quantité, ou à fouetter de la crème en chantilly. Cet appareil est exclusivement destiné à un usage domestique. Son utilisation comprend également le respect de toutes les informations contenues dans ce mode d'emploi, et en particulier des consignes de sécurité. Toute autre utilisation est considérée comme non conforme et peut conduire à des dommages matériels, voire à menacer la sécurité de personnes. Toute responsabilité est exclue pour des dommages résultant d'un utilisation non conforme. Accessoires fournis Description de l'appareil Illustration A : 1 Touche turbo 2 Bloc-moteur 3 Cercle pour couvercle 4 Couvercle 5 Support du couteau 6 Bol 7 Couteau 8 Support 9 Talon d'appui 0 Module pour batteur Caractéristiques techniques Tension du secteur : V ~, 50 Hz Puissance nominale : 260 W Temps d'opération par intermittence : 1 minute Classe de protection : II / Capacité du bol mixeur : 500 ml Niveau de remplissage max. : - Aliments : jusqu'à la marque de 300 ml - Liquides : 200 ml Temps d'opération par intermittence : Le temps d'opération par intermittence indique pendant combien de temps l'appareil peut être opéré, sans que le moteur ne surchauffe ou subisse de dommages. Après le temps d'opération par intermittence indiqué, l'appareil doit être éteint jusqu'à ce que le moteur se soit refroidi. Hachoir multifonction Support du couteau avec couteau Module pour batteur Mode d'emploi - 2 -

6 Consignes de sécurité Risque d'électrocution! Raccordez le hachoir universel uniquement à une prise secteur installée en bonne et due forme avec une tension secteur de V ~, avec 50 Hz. Faites immédiatement remplacer la fiche secteur ou le cordon d'alimentation endommagé par un technicien spécialisé ou par le service clientèle afin d'éviter tout danger. Retirez la fiche secteur de la prise secteur en cas de défaillances et avant de nettoyer le hachoir universel. Débranchez le cordon d'alimentation de la prise secteur en tirant sur la fiche sans tirer sur le cordon d'alimentation lui-même. Ne courbez ou ne coincez pas le cordon d'alimentation et acheminez-le de telle manière que personne ne s'accroche dedans ou ne trébuche dessus. Vous ne devez en aucun cas plonger le bloc-moteur du hachoir universel dans du liquide et ne laisser pénétrer aucun liquide dans le boîtier du bloc moteur. N'exposez pas l'appareil à l'humidité et ne l'utilisez pas à l'extérieur. Si toutefois du liquide devait pénétrer dans le boîtier de l'appareil, débranchez immédiatement la fiche de la prise secteur et confiez l'appareil à un atelier spécialisé pour réparation. Ne saisissez jamais le hachoir universel, le cordon d'alimentation et la fiche d'alimentation avec des mains mouillées. Si le cordon d'alimentation ou le bloc-moteur sont endommagés, vous devez confier la réparation du hachoir universel à des spécialistes, avant de le réutiliser. Vous ne devez pas ouvrir le boîtier du bloc-moteur du hachoir universel. Dans ce cas, la sécurité n'est plus assurée et vous perdez le bénéfice de la garantie. Déconnectez immédiatement le hachoir universel du réseau électrique après utilisation. Pour être totalement hors tension, vous devez débrancher la fiche de la prise secteur. Risque de blessures! Avant de changer les accessoires ou les pièces supplémentaires mobiles lors de l'utilisation, l'appareil doit être mis à l'arrêt et débranché du secteur. N'utilisez pas l'appareil à d'autres fins que celles décrites dans cette notice. Procédez avec la plus grande prudence lorsque vous videz le bol mélangeur! La lame est extrêmement tranchante! Procédez avec la plus grande prudence lorsque vous nettoyez l'appareil! La lame est extrêmement tranchante! - 3 -

7 En cas d'absence de surveillance et avant l'assemblage, le désassemblage ou le nettoyage, l'appareil doit toujours être débranché du secteur. L'appareil ne doit pas être utilisé par des enfants. Tenir l'appareil et son cordon de raccordement à l'écart des enfants. Cet appareil peut être utilisé par des personnes ayant des capacités physiques, sensorielles ou mentales réduites ou un manque d'expérience et de connaissances à condition qu'elles aient reçu une supervision ou des instructions concernant l'utilisation de l'appareil en toute sécurité et qu'elles comprennent les dangers encourus. Ne pas laisser les enfants jouer avec l'appareil. Les enfants doivent être surveillés afin d'éviter qu'ils ne jouent avec l'appareil Risque de blessures lors de la manipulation avec le couteau extrêmement tranchant. Assemblez de nouveau les pièces du hachoir universel après utilisation et nettoyage afin de ne pas vous blesser au niveau du couteau libéré. Tenez le couteau hors de portée des enfants. Ne retirez jamais les denrées alimentaires du bol tant que le couteau tourne encore. Danger! Attendez que le couteau se soit immobilisé avant de retirer le bloc-moteur. Ne mettez jamais les mains dans le couteau lorsqu'il tourne encore! Risque de blessures! Risque d'incendie! Il est interdit de faire marcher le hachoir universel plus d'une minute consécutive. Vous devez à chaque fois le laisser refroidir. Attention! Veuillez tenir compte du tableau consacré aux quantités de remplissage dans le chapitre «Hacher». Sinon, vous risquez de créer des saletés par le débordement du contenu. Il est interdit de nettoyer le bloc-moteur dans le lave-vaisselle, car vous risquez de l'endommager. Ne versez aucun produit alimentaire/liquide très chaud dans l'appareil! Vous risquez autrement d'endommager l'appareil! - 4 -

8 Hacher Remarque Avant la première utilisation, vous devez soigneusement nettoyer l'appareil conformément aux instructions figurant au chapitre Nettoyage. Placez le bol 6 dans le talon d'appui 9. Insérez le support du couteau 5 avec le couteau 7 dans le support 8. Préparez les aliments en réduisant les grands morceaux de telle manière qu'ils soient adaptés au bol 6. Mettez les morceaux d'aliments dans le bol 6. A cet égard, veuillez tenir compte du tableau suivant : Denrées alimentaires Quantité de remplissage Temps de transformation Vitesse Salami 130 g 3 x 5 sec. Turbo Fromage (Gouda, jeune, température de réfrigérateur) Oignons Ail 100 g 4 x 15 sec. Turbo 100 g mode pulsant Turbo Carottes 100 g 3 x 5 sec. Normal Fruits séchés 130 g 4 x 15 sec. Turbo Amandes OEUFS (durs) 50 g grossier : 1 x 10 sec. moyen: 2 x 10 sec. fin : 3 x 10 sec. Turbo 150 g 2 x 4 sec. Turbo Noix 50 g 2 x 8 sec. Turbo Glaçons 100 g mode pulsant Turbo Fermez le bol 6 à l'aide du couvercle 4 : placezle sur le bol 6, de telle manière que les ergots du couvercle 4 s'enclenchent dans les rainures du bol 6. Tournez alors le couvercle 4 de telle manière que les ergots glissent vers le bas dans les rainures et que le couvercle 4 s'enclenche. Placez le bloc-moteur 2 sur l'embase du couvercle 3. Appuyez le bloc-moteur 2 vers le bas, comme cela est indiqué sur la figure B. Le moteur démarre avec la vitesse d'opération normale. Pour parvenir à une vitesse d'opération plus élevée "Turbo" pour les aliments à transformer, appuyez en plus du bloc-moteur 2 la touche Turbo 1 et maintenez-la enfoncée, comme cela est montré dans la figure C. Remarque Si au cours de la transformation des aliments, des morceaux d'aliments plus grands devaient s'accumuler sur les bords du bol, soulevez le bloc- moteur 2 de l'embase du couvercle 3. Agitez vigoureusement le bol 6 et recommencez ensuite du début avec la transformation. Eliminez d'éventuels résidus avec une spatule. Les aliments particulièrement durs doivent être coupés en petits morceaux avant d'être transformés (env. 2 cm). Sinon, le moteur peut se bloquer. Veuillez sélectionner la transformation par pulsations pour les aliments durs. Pour ce faire, appuyez plusieurs fois brièvement sur la touche Turbo 1 (en plus du bloc-moteur 2). Si les aliments à réduire ne sont pas réduits dans leur intégralité, vous pouvez soit les couper en plus petits morceaux ou retirer le bloc-moteur 2 de l'embase du couvercle 3. Agitez vigoureusement le bol 6 et recommencez ensuite du début avec la transformation. Une fois que les denrées alimentaires ont été réduites en morceaux, relâchez le bloc-moteur 2 et éventuellement le bouton Turbo 1. Débranchez la prise

9 Risque d'accident! Ne retirez jamais les aliments du bol 6, aussi longtemps que le couteau 7 continue de tourner. Il y a un risque de blessures et de giclement de denrées, ce qui pourrait conduire à des encrassements. Attendez jusqu'à ce que le couteau 7 se soit immobilisé. Soulevez le bloc-moteur 2 de l'embase du couvercle 3. Retirer le couvercle 4. Risque d'accident! Risque de blessures lors de la manipulation avec le couteau extrêmement tranchant 7. Maintenez le couteau 7 hors de portée des enfants. Battre en chantilly Grâce au module pour batteur 0, vous pouvez également battre de la chantilly avec cet appareil : Placez le bol 6 dans le talon d'appui 9. Faites glisser le module pour batteur 0 sur le support du couteau 5: Pour préparer 100ml de crème chantilly, insérez-le de telle manière sur le support du couteau que le module pour batteur 0 repose sur les deux couteaux et s'enclenche (Fig.1). Pour préparer 200ml de crème chantilly, tournez le module pour batteur 0 à la verticale de l'ordre de 180, afin que celui-ci ne repose plus que sur un couteau et s'enclenche. (Fig.2). Il brasse alors la crème à un niveau plus élevé : Retirez le support du couteau 5 avec le couteau 7 avec beaucoup de précaution du bol 6. Retirez les denrées alimentaires réduites en morceaux. Remarque Grâce à la réduction d'aliments plus durs et se frottant, le bol 6 peut au fil du temps prendre une apparence très terne. Ce phénomène est normal et n'a aucune incidence sur le fonctionnement de l'appareil. Fig. 1 Remarque Après avoir achevé la transformation des aliments, vous pouvez utiliser le talon d appui 9 en tant que couvercle pour le bol 6 afin de préserver le plus longtemps possible la fraîcheur des aliments. Retirez le bloc-moteur 2 et le couvercle 4 du bol 6. Le porte-lames 5 avec la lame 7 peut, si vous le souhaitez, rester dans le bol 6. Détachez le talon d appui 9 de la partie inférieure du bol 6. Vous pouvez à présent placer le talon d appui 9 sur le bol 6, afin qu il referme le bol 6. Fig. 2 Placez le support du couteau 5 avec le module pour batteur 0 sur le support

10 Remplissez de crème. Fermez le bol 6 à l'aide du couvercle 4 : placez-le sur le bol 6, de telle manière que les ergots du couvercle 4 s'enclenchent dans les rainures du bol 6. Tournez le couvercle 4 de manière à ce que les ergots s'enclenchent dans les rainures du dessous. Placez le bloc-moteur 2 sur l'embase du couvercle 3. Appuyez le bloc-moteur 2 vers le bas, comme cela est indiqué sur la figure B. Le moteur démarre à la vitesse d'opération normale. Remarque Pour réaliser la crème chantilly, la crème devrait être bien réfrigérée avant d'être battue (max. 8 C/température du réfrigérateur). Pour 100ml de crème, nous recommandons de la battre pendant env. 30 secondes à vitesse normale. Pour 200ml de crème, nous recommandons de la battre pendant env secondes à vitesse normale. En raison de diverses influences, telles que par ex. la teneur en matières grasses de la crème ou la température extérieure, la durée nécessaire pour battre la crème peut toutefois varier! Observez la crème pendant que vous la battez et adaptez le temps que vous passez à la battre selon la consistance recherchée. Nettoyage Risque de choc électrique Avant de nettoyer l'appareil, débranchez toujours la fiche secteur de la prise secteur. Lors du nettoyage, ne plongez surtout jamais l'appareil dans de l'eau ou tenez-le sous de l'eau courante. Risque d'accident! Risque de blessures lors de la manipulation avec le couteau extrêmement tranchant 7. Assemblez le hachoir universel après usage et nettoyage, afin de ne pas vous blesser au niveau du couteau libéré 7. Maintenez le couteau 7 hors de portée des enfants. Attention! Il est interdit de nettoyer le bloc-moteur 2 dans le lave-vaisselle, car vous risqueriez de l'endommager. Retirez la fiche secteur. Nettoyez le bloc-moteur 2 et le support du couteau 5 avec le couteau 7 à l'aide d'une éponge bien essorée. Nettoyez le bol 6, le module pour batteur 0, le couvercle 4 et le talon d'appui 9 à l'eau courante et séchez-les à l'aide d'un chiffon sec. Vous pouvez également nettoyer les pièces dans le lave-vaisselle, sauf le bloc-moteur 2. Si possible, placez les pièces dans le panier supérieur du lave-vaisselle. Veillez à ce que les pièces ne soient pas coincées. Réparer les dysfonctionnements Défaut : Impossible de mettre en marche l'appareil. Cause possible et remède : Un fusible domestique est défectueux. Vérifiez les fusibles de l'installation et remplacezles si nécessaire. La prise de courant est défectueuse. Essayez d'utiliser une autre prise de courant. Le hachoir universel est probablement défectueux. Contrôlez le câble de raccordement et la fiche secteur en vue d'éventuels endommagements. Faîtes contrôler l'appareil par du personnel spécialisé
.")
11 Mise au rebut L'appareil ne doit jamais être jeté dans la poubelle domestique normale. Ce produit est soumis à la directive européenne 2012/19/EU. Remettez l'appareil destiné au recyclage à une entreprise spécialisée ou au centre de recyclage de votre commune. Veuillez respecter les règlements actuellement en vigueur. En cas de doutes, contactez votre organisation de recyclage. Eliminer l'ensemble des matériaux d'emballage d'une manière respectueuse de l'environnement. Importateur KOMPERNASS HANDELS GMBH BURGSTRASSE BOCHUM GERMANY Garantie et service après-vente Cet appareil bénéficie de 3 ans de garantie à compter de la date d'achat. L'appareil a été fabriqué avec soin et consciencieusement contrôlé avant sa distribution. Veuillez conserver le ticket de caisse en guise de preuve d'achat. Si la garantie devait s'appliquer, contactez par téléphone votre interlocuteur du service après-vente. Cette condition doit être respectée pour assurer l'expédition gratuite de votre marchandise. La prestation de garantie s'applique uniquement pour les erreurs de matériaux et de fabrication, pas pour les dommages de transport, les pièces d'usure ou les dommages subis par les pièces fragiles, comme par ex. les interrupteurs ou les batteries. Le produit est exclusivement destiné à un usage privé et non commercial. La garantie est annulée en cas de manipulation incorrecte et inappropriée, d'utilisation brutale et en cas d'intervention qui n'aurait pas été réalisée par notre centre de service après-vente agréé. Cette garantie ne constitue pas une restriction de vos droits légaux. La durée de la garantie n'est pas prolongée par la garantie du fabricant. Ceci vaut également pour les pièces remplacées et réparées. Tous dommages et défauts présents dès l'achat doivent être notifiés dès que le produit est déballé, et au plus tard deux jours après la date d'achat. Toutes réparations survenant après la période sous garantie ne seront pas prises en charge. Indépendamment de la garantie commerciale souscrite, le vendeur reste tenu des défauts de conformité du bien et des vices rédhibitoires dans les conditions prévues aux articles L211-4 et suivants du Code de la consommation et aux articles 1641 et suivants du Code Civil. Service France Tel.: kompernass@lidl.fr IAN Service Belgique Tel.: (0,15 EUR/Min.) kompernass@lidl.be IAN Heures de service de notre hotline : du lundi au vendredi de 8 h à 20 h (HEC) - 8 -

12 Inhaltsverzeichnis Seite Einleitung 10 Bestimmungsgemäßer Gebrauch 10 Lieferumfang 10 Gerätebeschreibung 10 Technische Daten 10 Sicherheitshinweise 11 Zerkleinern 13 Sahne schlagen 14 Reinigen 15 Fehlfunktionen beseitigen 15 Entsorgen 16 Importeur 16 Garantie und Service 16 Lesen Sie die Bedienungsanleitung vor der ersten Verwendung aufmerksam durch und heben Sie diese für den späteren Gebrauch auf. Händigen Sie bei Weitergabe des Gerätes an Dritte auch die Anleitung aus

13 Multizerkleinerer Einleitung Herzlichen Glückwunsch zum Kauf Ihres neuen Gerätes. Sie haben sich damit für ein hochwertiges Produkt entschieden. Die Bedienungsanleitung ist Bestandteil dieses Produkts. Sie enthält wichtige Hinweise für Sicherheit, Gebrauch und Entsorgung. Machen Sie sich vor der Benutzung des Produkts mit allen Bedien- und Sicherheitshinweisen vertraut. Benutzen Sie das Produkt nur wie beschrieben und für die angegebenen Einsatzbereiche. Bewahren Sie diese Bedienungsanleitung gut auf. Händigen Sie alle Unterlagen bei Weitergabe des Produkts an Dritte mit aus. Bestimmungsgemäßer Gebrauch Dieses Gerät dient ausschließlich dem Zerkleinern von knochenlosen Lebensmitteln in kleinen Mengen oder dem Schlagen von Sahne. Dieses Gerät ist ausschließlich für die Benutzung im privaten Haushalt bestimmt. Dazu gehört auch die Beachtung aller Informationen in dieser Bedienungsanleitung, insbesonders die Sicherheitshinweise. Jede andere Verwendung gilt als nicht bestimmungsgemäß und kann zu Sachschäden oder sogar zu Personenschäden führen. Es werden keine Haftungen für Schäden, die durch nicht bestimmungsgemäßen Gebrauch entstehen, übernommen. Gerätebeschreibung Abbildung A: 1 Turbo-Taste 2 Motorblock 3 Deckel-Bund 4 Deckel 5 Messerhalter 6 Schüssel 7 Messer 8 Lager 9 Standfuß 0 Quirlaufsatz Technische Daten Netzspannung: V ~, 50 Hz Nennleistung: 260 W KB-Zeit: 1 Minute Schutzklasse: II Fassungsvermögen Schüssel: 500 ml Max. Einfüllmenge: - Lebensmittel: bis zur 300 ml-markierung - Flüssigkeiten: 200 ml KB-Zeit Die KB-Zeit (Kurzzeitbetrieb) gibt an, wie lange man ein Gerät betreiben kann, ohne dass der Motor überhitzt und Schaden nimmt. Nach der angegebenen KB-Zeit muss das Gerät solange ausgeschaltet werden, bis sich der Motor abgekühlt hat. Lieferumfang Multizerkleinerer Messerhalter mit Messer Quirlaufsatz Bedienungsanleitung

14 Sicherheitshinweise Stromschlaggefahr! Schließen Sie das Gerät nur an eine vorschriftsmäßig installierte Netzsteckdose mit einer Netzspannung von V ~, mit 50 Hz an. Lassen Sie beschädigte Netzstecker oder Netzkabel sofort von autorisiertem Fachpersonal oder dem Kundenservice austauschen, um Gefährdungen zu vermeiden. Ziehen Sie bei Betriebsstörungen und bevor Sie das Gerät reinigen den Netzstecker aus der Netzsteckdose. Ziehen Sie das Netzkabel stets am Stecker aus der Netzsteckdose, ziehen Sie nicht am Kabel selbst. Knicken oder quetschen Sie das Netzkabel nicht und verlegen Sie das Netzkabel so, dass niemand darauf treten oder darüber stolpern kann. Sie dürfen den Motorblock keinesfalls in Flüssigkeit tauchen und keine Flüssigkeiten in das Gehäuse des Motorblocks gelangen lassen. Sie dürfen das Gerät keiner Feuchtigkeit aussetzen und nicht im Freien benutzen. Falls doch einmal Flüssigkeit in das Gerätegehäuse gelangt, ziehen Sie sofort den Netzstecker des Geräts aus der Netzsteckdose und lassen Sie es von qualifiziertem Fachpersonal reparieren. Fassen Sie Gerät, Netzkabel und -stecker nie mit nassen Händen an. Wenn das Netzkabel oder der Motorblock beschädigt sind, müssen Sie das Gerät von Fachpersonal reparieren lassen, bevor Sie es erneut verwenden. Sie dürfen das Motorblock-Gehäuse nicht öffnen. In diesem Falle ist die Sicherheit nicht gegeben und die Gewährleistung erlischt. Trennen Sie das Gerät sofort nach dem Gebrauch vom Stromnetz. Nur wenn Sie den Netzstecker aus der Netzsteckdose ziehen, ist es vollständig stromfrei. Verletzungsgefahr! Vor dem Auswechseln von Zubehör oder Zusatzteilen, die im Betrieb bewegt werden, muss das Gerät ausgeschaltet und vom Netz getrennt werden. Missbrauchen Sie das Gerät nicht für andere Zwecke, als in dieser Anleitung beschrieben. Gehen Sie vorsichtig beim Leeren der Schüssel vor! Das Messer ist sehr scharf! Gehen Sie vorsichtig beim Reinigen des Gerätes vor! Das Messer ist sehr scharf!

15 Das Gerät ist bei nicht vorhandener Aufsicht und vor dem Zusammenbau, dem Auseinandernehmen oder Reinigen stets vom Netz zu trennen. Das Gerät darf nicht von Kindern benutzt werden. Das Gerät und seine Anschlussleitung sind von Kindern fernzuhalten. Dieses Gerät kann von Personen mit reduzierten physischen, sensorischen oder mentalen Fähigkeiten oder Mangel an Erfahrung und/oder Wissen benutzt werden, wenn sie beaufsichtigt oder bezüglich des sicheren Gebrauchs des Gerätes unterwiesen wurden und die daraus resultierenden Gefahren verstanden haben. Kinder dürfen nicht mit dem Gerät spielen. Kinder sollten beaufsichtigt werden, um sicherzustellen, dass sie nicht mit dem Gerät spielen. Beim Umgang mit dem extrem scharfen Messer besteht Verletzungsgefahr. Setzen Sie das Gerät nach Benutzung und Reinigung wieder zusammen, damit Sie sich nicht am freiliegenden Messer verletzen. Machen Sie das Messer für Kinder unzugänglich. Entnehmen Sie niemals die Lebensmittel aus der Schüssel, solange sich das Messer noch dreht. Verletzungsgefahr! Warten Sie, bis das Messer steht, bevor Sie den Motorblock abnehmen. Greifen Sie niemals in das noch rotierende Messer! Verletzungsgefahr! Brandgefahr! Sie dürfen das Gerät nicht länger als 1 Minute laufen lassen. Lassen Sie es danach abkühlen. Achtung! Beachten Sie die Tabelle über die Füllmengen im Kapitel Zerkleinern. Andernfalls besteht Verschmutzungsgefahr durch herausquellendes Füllgut. Sie dürfen den Motorblock nicht in der Geschirrspülmaschine reinigen, dieser würde dadurch beschädigt. Füllen Sie keine heißen Flüssigkeiten in das Gerät! Ansonsten kann das Gerät beschädigt werden!

16 Zerkleinern Hinweis Vor der ersten Benutzung müssen Sie das Gerät entsprechend den Anweisungen im Reinigungskapitel gründlich reinigen. Setzen Sie die Schüssel 6 in den Standfuß 9. Stecken Sie den Messerhalter 5 mit dem Messer 7 auf das Lager 8. Bereiten Sie das Füllgut vor, indem Sie große Stücke soweit zerkleinern, dass sie in die Schüssel 6 passen. Geben Sie das Füllgut in die Schüssel 6. Beachten Sie dabei folgende Tabelle: Lebensmittel Salami 130 g 3 x 5 Sek. turbo Füllmenge Bearbeitungszeit Geschwindigkeit Käse (Gouda, jung, kühlschranktemperatur) Zwiebeln Knoblauch 100 g 4 x 15 Sek. turbo 100 g pulsierend turbo Karotten 100 g 3 x 5 Sek. normal Dörrobst 130 g 4 x 15 Sek. turbo Mandeln Eier (hart gekocht) 50 g grob: 1 x 10 Sek. mittel: 2 x 10 Sek. fein: 3 x 10 Sek. turbo 150 g 2 x 4 Sek. turbo Walnüsse 50 g 2 x 8 Sek. turbo Eiswürfel 100 g pulsierend turbo Verschließen Sie die Schüssel 6 mit dem Deckel 4: Setzen Sie ihn so auf die Schüssel 6, dass die Nasen am Deckel 4 in die Schienen an der Schüssel 6 greifen. Drehen Sie den Deckel 4 dann so, dass die Nasen in den Schienen nach unten gleiten. Setzen Sie den Motorblock 2 auf den Deckel- Bund 3. Drücken Sie den Motorblock 2 nach unten,wie in der Abbildung B gezeigt. Der Motor startet mit der normalen Bearbeitungsgeschwindigkeit. Um eine höhere Bearbeitungsgeschwindigkeit Turbo für das Füllgut zu erhalten, drücken Sie zusätzlich zum Motorblock 2 die Turbo-Taste 1 und halten Sie diese gedrückt, wie in der Abbildung C gezeigt. Hinweis Sollten sich während der Bearbeitung größere Stücke des Füllguts an der Schüsselwand ansammeln, heben Sie den Motorblock 2 vom Deckel-Bund 3 ab. Schütteln Sie die Schüssel 6 kräftig durch und beginnen Sie anschließend mit der Bearbeitung von vorne. Entfernen Sie eventuelle Rückstände mit einem Teigschaber. Besonders harte Lebensmittel müssen vor der Bearbeitung in kleinere Stücke zerteilt werden (ca. 2cm). Ansonsten kann der Motor blockieren. Wählen Sie eine pulsierende Bearbeitung bei harten Lebensmitteln. Drücken Sie hierzu mehrfach kurzzeitig die Turbo-Taste 1 (zusätzlich zum Motorblock 2). Sollte das Füllgut nicht vollständig zerkleinert werden, können Sie es entweder in kleinere Stücke schneiden oder heben Sie den Motorblock 2 vom Deckel- Bund 3 ab. Schütteln Sie die Schüssel 6 kräftig durch und beginnen Sie anschließend mit der Bearbeitung von vorne. Wenn das Füllgut zerkleinert worden ist, lassen Sie Motorblock 2 und gegebenenfalls die Turbo-Taste 1 los. Ziehen Sie den Netzstecker
 Zwiebeln Knoblauch 100 g 4 x 15 Sek. turbo 100 g pulsierend turbo Karotten 100 g 3 x 5 Sek.")
17 Verletzungsgefahr! Entnehmen Sie niemals die Lebensmittel aus der Schüssel 6, solange sich das Messer 7 noch dreht. Es besteht Verletzungsgefahr und herausspritzender Inhalt könnte zu Verschmutzungen führen. Warten Sie bis das Messer 7 still steht. Heben Sie den Motorblock 2 vom Deckel-Bund 3. Nehmen Sie den Deckel 4 ab. Verletzungsgefahr! Beim Umgang mit dem extrem scharfen Messer 7 besteht Verletzungsgefahr. Machen Sie das Messer 7 für Kinder unzugänglich. Sahne schlagen Mit dem Quirlaufsatz 0 können Sie mit diesem Gerät auch Sahne schlagen: Setzen Sie die Schüssel 6 in den Standfuß 9. Schieben Sie den Quirlaufsatz 0 auf den Messerhalter 5: Für 100ml Sahne stecken Sie ihn so auf den Messerhalter, dass der Quirlaufsatz 0 auf beiden Messern aufliegt und einrastet (Abb.1). Für 200ml Sahne drehen Sie den Quirlaufsatz 0 vertikal um 180, so dass dieser nur noch auf einem Messer aufliegt und einrastet (Abb.2). Er pflügt dann höher durch die Sahne: Ziehen Sie den Messerhalter 5 mit dem Messer 7 vorsichtig aus der Schüssel 6. Entnehmen Sie das Füllgut. Hinweis Durch das Zerkleinern von härteren, reibenden Lebensmitteln kann die Schüssel 6 mit der Zeit ein trübes Aussehen bekommen. Dies ist normal und beeinträchtigt die Funktion des Gerätes nicht. Abb.1 Hinweis Sie können den Standfuß 9, nachdem Sie die Bearbeitung der Lebensmittel beendet haben, als Deckel für die Schüssel 6 verwenden, um die Lebensmittel länger frisch zu halten. Nehmen Sie Motorblock 2 und Deckel 4 von der Schüssel 6 ab. Der Messerhalter 5 mit dem Messer 7 kann, wenn Sie wünschen, in der Schüssel 6 verbleiben. Lösen Sie den Standfuß 9 von der Unterseite der Schüssel 6. Sie können den Standfuß 9 nun auf die Schüssel 6 setzen, so dass er die Schüssel 6 verschließt. Abb.2 Stecken Sie den Messerhalter 5 mit dem Quirlaufsatz 0 auf das Lager

18 Füllen Sie die Sahne ein. Verschließen Sie die Schüssel 6 mit dem Deckel 4: Setzen Sie ihn so auf die Schüssel 6, dass die Nasen am Deckel 4 in die Schienen an der Schüssel 6 greifen. Drehen Sie den Deckel 4 dann so, dass die Nasen in den Schienen nach unten gleiten. Setzen Sie den Motorblock 2 auf den Deckel- Bund 3. Drücken Sie den Motorblock 2 nach unten, wie in der Abbildung B gezeigt. Der Motor startet mit der normalen Bearbeitungsgeschwindigkeit. Hinweis Um Sahne zu schlagen, sollte sie vor dem Steifschlagen gut gekühlt sein (max. 8 C/Kühlschranktemperatur). Wir empfehlen bei 100ml Sahne eine Schlagzeit von ca. 30 Sekunden bei normaler Geschwindigkeit. Bei 200ml Sahne empfehlen wir eine Schlagzeit von ca Sekunden bei normaler Geschwindigkeit. Bedingt durch verschiedene Einflüsse, wie z.b. Fettgehalt der Sahne oder die Außentemperatur, kann die Schlagzeit jedoch variieren! Beobachten Sie die Sahne während des Steifschlagens und passen Sie die Schlagzeit Ihren Bedürfnissen an. Reinigen Gefahr eines elektrischen Schlags! Bevor Sie das Gerät reinigen, ziehen Sie immer den Netzstecker aus der Netzsteckdose. Sie dürfen das Gerät bei der Reinigung keinesfalls in Wasser tauchen oder unter fließendes Wasser halten. Verletzungsgefahr! Beim Umgang mit dem extrem scharfen Messer 7 besteht Verletzungsgefahr. Setzen Sie das Gerät nach Benutzung und Reinigung wieder zusammen, damit Sie sich nicht am freiliegenden Messer 7 verletzen. Machen Sie das Messer 7 für Kinder unzugänglich. Achtung! Sie dürfen den Motorblock 2 nicht in der Geschirrspülmaschine reinigen, dieser würde dadurch beschädigt. Ziehen Sie den Netzstecker. Reinigen Sie den Motorblock 2 und den Messerhalter 5 mit dem Messer 7 mit einem gut ausgedrückten Schwamm. Reinigen Sie die Schüssel 6, den Quirlaufsatz 0, den Deckel 4 und den Standfuß 9 unter fließendem Wasser und trocknen Sie diese mit einem Trockentuch. Alternativ können alle Teile, bis auf den Motorblock 2, in der Geschirrspülmaschine gereinigt werden. Legen Sie dabei, wenn möglich, die Teile in den oberen Korb der Spülmaschine. Achten Sie darauf, dass die Teile nicht eingeklemmt werden. Fehlfunktionen beseitigen Symptom: Das Gerät lässt sich nicht einschalten. Mögliche Ursache und Abhilfe: Eine Haushaltssicherung ist defekt. Überprüfen Sie die Haushaltssicherungen und erneuern Sie diese gegebenenfalls. Die Netzsteckdose ist defekt. Probieren Sie eine andere Netzsteckdose aus. Der Universalzerkleinerer ist möglicherweise defekt. Überprüfen Sie die Anschlussleitung und den Netzstecker auf Schäden. Lassen Sie das Gerät von Fachpersonal überprüfen
. Wir empfehlen bei 100ml Sahne eine Schlagzeit von ca.")
19 Entsorgen Werfen Sie das Gerät keinesfalls in den normalen Hausmüll. Dieses Produkt unterliegt der europäischen Richtlinie 2012/19/EU. Entsorgen Sie das Gerät über einen zugelassenen Entsorgungsbetrieb oder über Ihre kommunale Entsorgungseinrichtung. Beachten Sie die aktuell geltenden Vorschriften. Setzen Sie sich im Zweifelsfall mit Ihrer Entsorgungseinrichtung in Verbindung. Führen Sie alle Verpackungsmaterialien einer umweltgerechten Entsorgung zu. Importeur KOMPERNASS HANDELS GMBH BURGSTRASSE BOCHUM GERMANY Garantie und Service Sie erhalten auf dieses Gerät 3 Jahre Garantie ab Kaufdatum. Das Gerät wurde sorgfältig produziert und vor Anlieferung gewissenhaft geprüft. Bitte bewahren Sie den Kassenbon als Nachweis für den Kauf auf. Bitte setzen Sie sich im Garantiefall mit Ihrer Servicestelle telefonisch in Verbindung. Nur so kann eine kostenlose Einsendung Ihrer Ware gewährleistet werden. Die Garantieleistung gilt nur für Material- oder Fabrikationsfehler, nicht aber für Transportschäden, Verschleißteile oder für Beschädigungen an zerbrechlichen Teilen, z. B. Schalter oder Akkus. Das Produkt ist lediglich für den privaten und nicht für den gewerblichen Gebrauch bestimmt. Bei missbräuchlicher und unsachgemäßer Behandlung, Gewaltanwendung und bei Eingriffen, die nicht von unserer autorisierten Service-Niederlassung vorgenommen wurden, erlischt die Garantie. Ihre gesetzlichen Rechte werden durch diese Garantie nicht eingeschränkt. Die Garantiezeit wird durch die Gewährleistung nicht verlängert. Dies gilt auch für ersetzte und reparierte Teile. Eventuell schon beim Kauf vorhandene Schäden und Mängel müssen sofort nach dem Auspacken gemeldet werden, spätestens aber zwei Tage nach Kaufdatum. Nach Ablauf der Garantiezeit anfallende Reparaturen sind kostenpflichtig. Service Deutschland Tel.: (Kostenfrei aus dem dt. Festnetz/Mobilfunknetz) kompernass@lidl.de IAN Service Österreich Tel.: (0,15 EUR/Min.) kompernass@lidl.at IAN Service Schweiz Tel.: (0,08 CHF/Min., Mobilfunk max. 0,40 CHF/Min.) kompernass@lidl.ch IAN Erreichbarkeit Hotline: Montag bis Freitag von 8:00 Uhr - 20:00 Uhr (MEZ)

20 Content Page Introduction 18 Intended Use 18 Items supplied 18 Description of the appliance 18 Technical Data 18 Safety Instructions 19 Chopping 21 Beating cream 22 Cleaning 23 Troubleshooting 23 Disposal 24 Importer 24 Warranty and Service 24 Read the operating instructions carefully before using the device for the first time and preserve this booklet for later reference. Pass this manual on to whoever might acquire the device at a future date

21 Mini Chopper Introduction Congratulations on the purchase of your new appliance. You have selected a high-quality product. The operating instructions are a constituent of this product. They contain important information about safety, use and disposal. Before using the product, familiarise yourself with all operating and safety instructions. Use this product only as described and only for the specified areas of application. Retain these instructions for future reference. Please also pass these operating instructions on to any future owner(s). Intended Use This appliance is intended solely for chopping boneless foods in small quantities or for whipping cream. This appliance is intended exclusively for use in domestic households. This also includes observance of all information in these operating instructions, particularly the safety instructions. All other uses are deemed to be improper and can result in property damage or even in personal injury. We shall not accept liability for damages caused due to improper use of the appliance. Items supplied Description of the appliance Illustration A: 1 Turbo button 2 Motor block 3 Lid collar 4 Lid 5 Blade holder 6 Bowl 7 Knife 8 Mounting 9 Appliance base 0 Whisk attachment Technical Data Mains voltage: V ~, 50 Hz Nominal power: 260 W CO Time: 1 Minute Protection class: II / Capacity blender jug: 500 ml Max. capacity: - Foodstuffs: up to the 300 ml marking - Liquids: 200 ml CO Time The C.O. Time (Continuous Operation) details how long an appliance may be used without the motor overheating and being damaged. After the appliance has run for for this period it must be switched off until the motor has cooled itself down. Mini Chopper Blade holder with blade Whisk attachment Operating instructions
22 Safety Instructions Risk of electic shock! Connect the universal food processor only to properly installed power sockets with a mains voltage of V and 50 Hz. To avoid potentially fatal risks, arrange for a defective power plug and/or cable to be replaced at once by qualified technicians or our Customer Service Department. Unplug the universal food processor from the socket if you notice any faulty operation and when you decide to clean it. Always remove the power cable from the socket by pulling on the plug, do not pull on the cable itself. Do not crease or crimp the power cable and place the power cable in such a way to prevent anyone from stepping or tripping over it. Do not submerse the motor block of the universal food processor in liquids at any time and do not permit liquids to penetrate into the housing of the motor block. NEVER subject the appliance to moisture and do not use it outdoors. If by chance liquids do enter into the housing, unplug the appliance from the power socket immediately and have it repaired by a qualified technician. Never grasp the universal food processor, the power cable or the plug with wet hands. Should the power cable or motor block become damaged, arrange for the universal food processor to be repaired by a qualified specialist before using it again. Do not open the motor block housing of the universal food processor. Should you do so, appliance safety can no longer be assured and the warranty becomes void. Separate your universal food processor from the mains supply immediately after use. The appliance is completely free of electrical power only when you unplug it. Risk of personal injury! Before changing accessories or additional parts that are in motion during operation, the appliance must be switched off and disconnected from mains power. Never use the appliance for purposes other than those described in these instructions. Take care when emptying the bowl! The blade is very sharp! Take care when cleaning the appliance! The blade is very sharp!
23 The appliance should always be disconnected from the mains when not supervised and before assembly, disassembly or cleaning. This appliance shall not be used by children. The appliance and its connecting cable must be kept away from children. This appliance may be used by people with reduced physical, sensory or mental capabilities or lack of experience and/or knowledge if they are supervised and have been instructed in how to use the appliance safely and have understood the potential risks. Children must not play with the device. Children should be supervised to ensure that they do not play with the appliance. Handle the extremely sharp blade with caution, it can cause injuries. Reassemble the universal food processor after using and cleaning it so that you do not injure yourself with the blade. Keep the blade out of the reach of children. Never attempt to remove foodstuffs from the vessel as long as the blade is still running. Risk of serious injury! Before removing the motor block, wait until the knife has stopped rotating. NEVER try to grasp the still rotating knife blade! Risk of serious injury! Risk of fire! Do not run the universal food processor for more than 1 minute at a time. After this period allow it to cool down. Attention! Pay heed to the table of filling quantities in the chapter "Chopping". If you do not, there is a risk of soiling due to content being squeezed out. Do NOT clean the motor block in the dish-washer, doing so would damage it. Never fill the appliance with hot liquids! Otherwise the appliance could be damaged!
24 Chopping Note Before using the appliance for the first time, clean it thoroughly as per the instructions given in the chapter "Cleaning". Place the bowl 6 in the appliance base 9. Place the blade holder 5 with the knife 7 on the mounting 8. Prepare the items to be processed by cutting large pieces to a size that will fit in the bowl 6. Place the food to be processed in the bowl 6. Thereby, take note of the following table: Foodstuff Filling quantity Processing time Speed Salami 130 g 3 x 5 secs. Turbo Cheese (Gouda, young, refrigerator temperature) Onions Garlic 100 g 4 x 15 secs. Turbo 100 g pulsating Turbo Carrots 100 g 3 x 5 secs. Normal Dried fruit 130 g 4 x 15 secs. Turbo Almonds Eggs (hard boiled) 50 g coarse: 1 x 10 secs. middle: 2 x 10 secs. fine: 3 x 10 secs. Turbo 150 g 2 x 4 secs. Turbo Close the bowl 6 with the lid 4: Place it on the bowl 6 so that the lugs on the lid 4 engage in the slots on the bowl 6. Then turn the lid 4 so that the lugs slide under the slots and the lid 4 locks into place. Place the motor block 2 on the lid collar 3. Press the motor block 2 downwards, as shown in Figure B. The motor starts with the normal operating speed. To make use of the higher processing speed "Turbo", press, in addition to the motor block 2, the turbo button 1 and keep it pressed down, as shown in Figure C. Note Should larger pieces of the contents collect on the wall of the bowl while processing, lift the motor block 2 from the lid collar 3. Shake the bowl 6 vigorously and then continue with the processing. Before the processing, particularly hard foods must be cut into smaller pieces (about 2cm). Otherwise, the motor could block. With hard foodstuffs select a pulsating processing. For this, press the turbo button 1 repeatedly for a short time (in addition to the motor block 2). Should the foodstuff not be completely pulverised, you can either cut it into smaller pieces or lift the motor block 2 from the lid collar 3. Shake the bowl 6 vigorously and then continue with the processing. When the contents have been sufficiently chopped, release the motor block 2 and, if necessary, the turbo button 1. Unplug the power cable from the socket. Walnuts 50 g 2 x 8 secs. Turbo Ice cubes 100 g pulsating Turbo
25 Risk of personal injury! Never attempt to remove food from the bowl 6 when the blade 7 is still in motion. Contents could shoot out and make a mess. Wait until the blade 7 has stopped rotating. Lift the motor block 2 from the lid collar 3. Remove the lid 4. Risk of personal injury! To avoid injuries, exercise caution when handling the extremely sharp blade 7. Keep the blade 7 out of the reach of children. Carefully pull the blade holder 5 with the knife 7 out of the bowl 6. Remove the contents. Beating cream Using the whisk attachment 0, you can also whip cream with this appliance: Place the bowl 6 in the appliance base 9. Push the whisk attachment 0 onto the blade holder 5: For 100ml of cream, place it on the blade holder so that the whisk attachment 0 rests on the two blades and engages (Fig. 1). For 200ml of cream, turn the whisk attachment 0 vertically through 180, so that it rests on only one blade and engages (Fig. 2). It then ploughs higher through the cream: Note Due to the grinding of hard and abrasive foodstuffs, the bowl 6 can take on a dull appearance over time. This is normal and does not influence the functioning of the appliance. Note After you have finished processing the foodstuffs, you can use the appliance base o as a cover for the bowl y, this will help to keep the foodstuff fresh for longer. Remove the motor block 2 and the lid 4 from the bowl y. The blade retainer 5 with the blade 7 can, if you wish, remain in the bowl y. Loosen the appliance base o from the underside of the bowl y. You can now place appliance base o on the bowl y so that it seals the bowl y. Fig. 1 Fig. 2 Attach the blade holder 5 together with the whisk attachment 0 onto the mounting
26 Pour the cream in. Close the bowl 6 with the lid 4: Place it on the bowl 6 so that the lugs on the lid 4 engage in the slots on the bowl 6. Turn the lid 4 so that the lugs slide into the guides below. Place the motor block 2 on the lid collar 3. Press the motor block 2 downwards, as shown in Figure B. The motor starts with the normal operating speed. Note To whip cream optimally, it should be well chilled before being whipped (max 8 C / refrigerator temperature). For 100ml of cream we recommend a whipping time of 30 seconds at normal speed. For 200 ml of cream we recommend a whipping time of seconds at normal speed. Due to various factors, for example the fat content of the cream or the outdoor temperature, the whipping time can however vary! Observe the cream whilst whipping it and adjust the processing time to your requirements. Cleaning Risk of electric shock! Always remove the plug from the mains power sokket before cleaning the appliance. Under no circumstances may the appliance be immersed in water or held under running water during cleaning. Risk of personal injury! To avoid injuries, exercise caution when handling the extremely sharp blade 7. Reassemble the universal food processor after using and cleaning it so that you do not injure yourself on the exposed blade 7. Keep the blade 7 out of the reach of children. Attention! Do not clean the motor block 2 in the dish-washer as doing so would damage it. Unplug the power cable from the socket. Clean the motor block 2 and the blade holder 5 with the blade 7 by using a well pressed-out sponge. Clean the bowl 6, the whisk attachment 0, the lid 4 and the appliance base 9 under running water and use a tea-towel to dry them well. Alternatively, you can wash all components, EXCEPT the motor block 2, in the dish-washer. If possible, place the parts in the top basket of the dishwasher. Ensure that the parts are not trapped in any way.. Troubleshooting Symptom: The appliance will not switch on. Possible cause and remedy: A domestic electrical fuse is defect. Check the fuses and replace them if necessary. The power socket is defective. Try another power socket. The universal food processor is possibly defective. Check the power cable and the power plug for damages. Have the appliance checked by a qualified technician
27 Disposal Do not dispose of the appliance in your normal domestic waste. This product is subject to the provisions of European Directive 2012/19/EU. Dispose of the appliance through an approved disposal centre or at your community waste facility. Observe the currently applicable regulations. In case of doubt, please contact your waste disposal centre. Dispose of all packaging materials in an environmentally friendly manner. Importer KOMPERNASS HANDELS GMBH BURGSTRASSE BOCHUM GERMANY The warranty covers only claims for material and manufacturing defects, but not for transport damage, for wearing parts or for damage to fragile components, e.g. buttons or batteries. This product is for private use only and is not intended for commercial use. The warranty is void in the case of abusive and improper handling, use of force and internal tampering not carried out by our authorized service branch. Your statutory rights are not restricted in any way by this warranty. The warranty period will not be extended by repairs made under warranty. This applies also to replaced and repaired parts. Any damage and defects extant on purchase must be reported immediately after unpacking the appliance, at the latest, two days after the purchase date. Repairs made after the expiration of the warranty period are subject to payment. Service Great Britain Tel.: ( 0.10/Min.) kompernass@lidl.co.uk IAN Hotline availability: Monday to Friday 08:00-20:00 (CET) Warranty and Service The warranty for this appliance is for 3 years from the date of purchase. The appliance has been manufactured with care and meticulously examined before delivery. Please retain your receipt as proof of purchase. In the event of a warranty claim, please make contact by telephone with our Service Department. Only in this way can a post-free despatch for your goods be assured
28 KOMPERNASS HANDELS GMBH BURGSTRASSE BOCHUM DEUTSCHLAND / GERMANY Version des informations Stand der Informationen Last Information Update: 07 / 2014 Ident.-No.: SMZ260G IAN
Notice Technique / Technical Manual
 Contrôle d accès Access control Encodeur USB Mifare ENCOD-USB-AI Notice Technique / Technical Manual SOMMAIRE p.2/10 Sommaire Remerciements... 3 Informations et recommandations... 4 Caractéristiques techniques...
ASSEMBLY INSTRUCTIONS DIRECTIVES POUR L'ASSEMBLAGE ombre pendant lamp lampe suspendue à tons dégradés, chocolat
 ASSEMBLY INSTRUCTIONS DIRECTIVES POUR L'ASSEMBLAGE ombre pendant lamp lampe suspendue à tons dégradés, chocolat SKU 2728089 INSTRUCTIONAL MANUAL MANUEL D'INSTRUCTIONS 270/2707 COMPONENT LIST LISTE DES
ASSEMBLY INSTRUCTIONS DIRECTIVES POUR L'ASSEMBLAGE luster chandelier lamp chandelier à trois branches en verre lustré
 ASSEMBLY INSTRUCTIONS DIRECTIVES POUR L'ASSEMBLAGE luster chandelier lamp chandelier à trois branches en verre lustré SKU 2711592 INSTRUCTIONAL MANUAL MANUEL D'INSTRUCTIONS 270/2707 COMPONENT LIST LISTE
1. Raison de la modification
 T Service Documentation Technicocommerciale Information Technique Rubrique F Les régulations Nouvelle version de programme de la carte SU : F1.4 P5253 JS F 67580 Mertzwiller N ITOE0117 26/09/2011 FR 1.
Lavatory Faucet. Instruction Manual. Questions? 1-866-661-9606 customerservice@artikaworld.com
 Lavatory Faucet Instruction Manual rev. 19-01-2015 Installation Manual You will need Adjustable Wrench Adjustable Pliers Plumber s Tape Hardware list (included) Allen Key Socket wrench tool Important Follow
Thank you for choosing the Mobile Broadband USB Stick. With your USB Stick, you can access a wireless network at high speed.
 Thank you for choosing the Mobile Broadband USB Stick. With your USB Stick, you can access a wireless network at high speed. Note: This manual describes the appearance of the USB Stick, as well as the
GIGABIT PCI DESKTOP ADAPTER DGE-530T. Quick Installation Guide+ Guide d installation+
 GIGABIT PCI DESKTOP ADAPTER Quick Installation Guide+ Guide d installation+ Check Your Package Contents Quick Installation Guide Gigabit Ethernet PCI Adapter CD with Manual and Drivers DO NOT insert the
Contrôle d'accès Access control. Notice technique / Technical Manual
 p.1/18 Contrôle d'accès Access control INFX V2-AI Notice technique / Technical Manual p.2/18 Sommaire / Contents Remerciements... 3 Informations et recommandations... 4 Caractéristiques techniques... 5
Le No.1 de l économie d énergie pour patinoires.
 Le No.1 de l économie d énergie pour patinoires. Partner of REALice system Economie d énergie et une meilleure qualité de glace La 2ème génération améliorée du système REALice bien connu, est livré en
Folio Case User s Guide
 Fujitsu America, Inc. Folio Case User s Guide I N S T R U C T I O N S This Folio Case is a stylish, lightweight case for protecting your Tablet PC. Elastic Strap Pen Holder Card Holders/ Easel Stops Figure
Thank you for choosing the Mobile Broadband USB Stick. With your USB Stick, you can access a wireless network at high speed.
 Thank you for choosing the Mobile Broadband USB Stick. With your USB Stick, you can access a wireless network at high speed. Note: This manual describes the appearance of the USB Stick, as well as the
MODE D EMPLOI USER MANUAL
 notice_cd 853:notice 9/01/08 15:08 Page 1 CAFETIÈRE À DOSETTES Coffee pad machine CD 853 GIACOMO MODE D EMPLOI USER MANUAL notice_cd 853:notice 9/01/08 15:08 Page 2 FRANÇAIS WHITE & BROWN vous félicite
Your Pirelli VDSL router has been preconfigured with the following settings:
 Important Information & Installation Instructions VDSL (Analog) Dear Netstream customer Your Pirelli VDSL router has been preconfigured with the following settings: LAN IP Adress of the Pirelli router:
Paxton. ins-20605. Net2 desktop reader USB
 Paxton ins-20605 Net2 desktop reader USB 1 3 2 4 1 2 Desktop Reader The desktop reader is designed to sit next to the PC. It is used for adding tokens to a Net2 system and also for identifying lost cards.
Cafetière. Mode d Emploi. 1Notice cafetière v1.0
 Cafetière Mode d Emploi 1Notice cafetière v1.0 SOMMAIRE 1 CONSIGNES DE SÉCURITÉ... 3 2INSTALLATION DE L APPAREIL EN TOUTE SÉCURITÉ...4 3PRECAUTION CONCERNANT L UTILISATION DE L APPAREIL...5 4DESCRIPTION
Commutateur clavier-écran-souris 2/4 ports DKVM-2/4. Guide d utilisation. Rév. 1.3
 Commutateur clavier-écran-souris 2/4 ports DKVM-2/4 Guide d utilisation Rév. 1.3 Table des matières Introduction...1 Fonctionnalités...2 Contenu de l emballage...2 Installation du matériel...3 Face avant...
MC1-F www.primo-elektro.be
 NOTICE D UTILISATION CAFETIÈRE MUG ISOTHERME www.primo-elektro.be WWW.PRIMO-ELEKTRO.BE 2 WWW.PRIMO-ELEKTRO.BE Lisez toutes les instructions Conservez-les pour consultation ultérieure 1. CONDITIONS DE GARANTIE
MANUEL D'UTILISATION
 CAFETIERE MANUEL D'UTILISATION Modèle : KF12 Merci de lire attentivement ce document avant la première utilisation de l'appareil CONSIGNES DE SECURITE Lors de l'utilisation d'appareils électriques, des
MANUEL D UTILISATION COFFNTEA
 MANUEL D UTILISATION COFFNTEA UD 888 Lisez attentivement ce mode d'emploi avant d'utiliser l'appareil et conservezle pour un usage ultérieur POUR USAGE DOMESTIQUE UNIQUEMENT Description générale 1. TOUCHE
Instructions Mozilla Thunderbird Page 1
 Instructions Mozilla Thunderbird Page 1 Instructions Mozilla Thunderbird Ce manuel est écrit pour les utilisateurs qui font déjà configurer un compte de courrier électronique dans Mozilla Thunderbird et
Guide d'installation rapide TFM-560X YO.13
 Guide d'installation rapide TFM-560X YO.13 Table of Contents Français 1 1. Avant de commencer 1 2. Procéder à l'installation 2 Troubleshooting 6 Version 06.08.2011 16. Select Install the software automatically
Warning: Failure to follow these warnings could result in property damage, or personal injury.
 Western Steel & Tube 1 Storage Locker Extended Storage Locker Storage Cabinet Assembly And Use Instructions Warning: Failure to follow these warnings could result in property damage, or personal injury.
Réserve Personnelle. Persönliche Reserve. Emprunter et épargner en fonction de vos besoins. Leihen und sparen je nach Bedarf
 crédit épargne Réserve Personnelle Emprunter et épargner en fonction de vos besoins Persönliche Reserve Leihen und sparen je nach Bedarf Réserve Personnelle Vous voulez disposer à tout moment des moyens
APPENDIX 6 BONUS RING FORMAT
 #4 EN FRANÇAIS CI-DESSOUS Preamble and Justification This motion is being presented to the membership as an alternative format for clubs to use to encourage increased entries, both in areas where the exhibitor
03/2013. Mod: WOKI-60IP/TR. Production code: DTWIC 6000
 03/2013 Mod: WOKI-60IP/TR Production code: DTWIC 6000 ENCASTRABLE INDUCTION DROP IN INDUCTION 11/2011 TECHNICAL FEATURES DOCUMENTATION S.A.V. Notice d utilisation : FX00326-A Guide d intervention : ---
TABLE DES MATIERES A OBJET PROCEDURE DE CONNEXION
 1 12 rue Denis Papin 37300 JOUE LES TOURS Tel: 02.47.68.34.00 Fax: 02.47.68.35.48 www.herve consultants.net contacts@herve consultants.net TABLE DES MATIERES A Objet...1 B Les équipements et pré-requis...2
NOTICE D UTILISATION
 CAFETIERE ELECTRIQUE 1.25L REF CM4229 230V - 800W - 50Hz NOTICE D UTILISATION LIRE ATTENTIVEMENT LES INSTRUCTIONS SUIVANTES AVANT TOUTE PREMIERE UTILISATION Appareil garanti 1 an sur présentation du ticket
Stainless Steel Deep Fryer HF 1030
 TM Stainless Steel Deep Fryer Friteuse en acier inoxydable 2012, HFEF-CAN US FR UK -10/12 1 Year Limited Warranty Un An De Garantie Limitée Thank you for purchasing the innovative Heaven Fresh Stainless
Cafetière électrique KH1 1 12
 t;l' rilr.l' l- bifineat Kll 1112 Cafetière électrique KH1 1 12 Consignes de sécurité Usage conforme Description Prêsentation de I'appareil Installation et raccordement Fonctionnement Remplir de café
WINTER BOAT STORAGE SYSTEM SYSTÈME DE REMISAGE HIVERNAL POUR BATEAU
 MANUAL / MANUEL VIDEO WINTER BOAT STORAGE SYSTEM SYSTÈME DE REMISAGE HIVERNAL POUR BATEAU ASSEMBLY INSTRUCTIONS GUIDE D ASSEMBLAGE NAVIGLOO 14-18½ ft/pi FISHING BOAT! RUNABOUT! PONTOON BOAT! SAILBOAT (SAILBOAT
APPENDIX 2. Provisions to be included in the contract between the Provider and the. Holder
 Page 1 APPENDIX 2 Provisions to be included in the contract between the Provider and the Obligations and rights of the Applicant / Holder Holder 1. The Applicant or Licensee acknowledges that it has read
Contents Windows 8.1... 2
 Workaround: Installation of IRIS Devices on Windows 8 Contents Windows 8.1... 2 English Français Windows 8... 13 English Français Windows 8.1 1. English Before installing an I.R.I.S. Device, we need to
Fabricant. 2 terminals
 Specifications Fabricant Nominal torque (Nm) 65 Minimal torque (Nm) 0,63 Coil resistance - 20 C (ohms) 20 Rated current DC (A) 1 Rotor inertia (kg.m 2 ) 2.10-3 Weight (kg) 7,20 Heat dissipation continuous
Rainshower System. Rainshower System
 27 032 27 418 27 174 Rainshower System Rainshower System D...1...1 I...5...5 N...9...9 GR...13 TR...17 BG...21 RO...25 GB...2...2 NL...6...6 FIN...10 CZ...14 SK...18 EST...22 CN...26 F...3...3 S...7...7
First Nations Assessment Inspection Regulations. Règlement sur l inspection aux fins d évaluation foncière des premières nations CONSOLIDATION
 CANADA CONSOLIDATION CODIFICATION First Nations Assessment Inspection Regulations Règlement sur l inspection aux fins d évaluation foncière des premières nations SOR/2007-242 DORS/2007-242 Current to September
Package Contents. System Requirements. Before You Begin
 Package Contents DWA-125 Wireless 150 USB Adapter CD-ROM (contains software, drivers, and manual) Cradle If any of the above items are missing, please contact your reseller. System Requirements A computer
Règlement sur le télémarketing et les centres d'appel. Call Centres Telemarketing Sales Regulation
 THE CONSUMER PROTECTION ACT (C.C.S.M. c. C200) Call Centres Telemarketing Sales Regulation LOI SUR LA PROTECTION DU CONSOMMATEUR (c. C200 de la C.P.L.M.) Règlement sur le télémarketing et les centres d'appel
POLICY: FREE MILK PROGRAM CODE: CS-4
 POLICY: FREE MILK PROGRAM CODE: CS-4 Origin: Authority: Reference(s): Community Services Department Cafeteria Services and Nutrition Education Division Resolution #86-02-26-15B.1 POLICY STATEMENT All elementary
Produktinformation. Monitor MOM 711-0 und MOM 711-1. Monitor MOM 711-0 and MOM 711-1. Moniteur MOM 711-0
 MOM711_0_01_021843 20.09.2002 8:00 Uhr Seite 1 Produktinformation Monitor MOM 711-0 und MOM 711-1 Monitor MOM 711-0 and MOM 711-1 Moniteur MOM 711-0 MOM711_0_01_021843 20.09.2002 8:00 Uhr Seite 4 English
R.V. Table Mounting Instructions
 PTSS165 ACCESSORY MOUNTING INSTRUCTIONS Use these instructions in conjunction with your main manual to properly assemble your gas grill. Refer to the main manual for safety, operating, cleaning and maintenance
Gestion des prestations Volontaire
 Gestion des prestations Volontaire Qu estce que l Income Management (Gestion des prestations)? La gestion des prestations est un moyen de vous aider à gérer votre argent pour couvrir vos nécessités et
Die Fotografie als Lebensgefühl, mit all ihren Facetten und Ausdrucksmöglichkeiten,
 PORTFOLIO Claus Rose Photography as a way of living, with all its aspects and opportunities for expression, became my passion at an early stage. In particular the magic of nude photography, which lends
Support Orders and Support Provisions (Banks and Authorized Foreign Banks) Regulations
 Regulations") CANADA CONSOLIDATION CODIFICATION Support Orders and Support Provisions (Banks and Authorized Foreign Banks) Regulations Règlement sur les ordonnances alimentaires et les dispositions alimentaires (banques
CANADA CONSOLIDATION CODIFICATION Support Orders and Support Provisions (Banks and Authorized Foreign Banks) Regulations Règlement sur les ordonnances alimentaires et les dispositions alimentaires (banques
Compléter le formulaire «Demande de participation» et l envoyer aux bureaux de SGC* à l adresse suivante :
 FOIRE AUX QUESTIONS COMMENT ADHÉRER? Compléter le formulaire «Demande de participation» et l envoyer aux bureaux de SGC* à l adresse suivante : 275, boul des Braves Bureau 310 Terrebonne (Qc) J6W 3H6 La
Manuel d installation et de maintenance (serrures LR128 E)
") Manuel d installation et de maintenance (serrures LR128 E) Manuel comprenant : Installation de la gâche GV et GVR :............................................ page 2 Position et réglage du shunt - Cales
Manuel d installation et de maintenance (serrures LR128 E) Manuel comprenant : Installation de la gâche GV et GVR :............................................ page 2 Position et réglage du shunt - Cales
Notice d utilisation Cafetère isotherme programmable CL-ISPR12X - 938896 FR-1. Version 2013.08.27
 Notice d utilisation Cafetère isotherme programmable CL-ISPR12X - 938896 FR-1 Version 2013.08.27 INSTRUCTIONS DE SÉCURITÉ Cet appareil peut être utilisé par des enfants à partir de 8 ans et par des personnes
Destructeur de documents à coupe transversale X7CD
 Destructeur de documents à coupe transversale X7CD Guide d'utilisation 91607 Veuillez lire attentivement le manuel avant toute utilisation. Tenez particulièrement compte des consignes de sécurité suivantes.
Cheque Holding Policy Disclosure (Banks) Regulations. Règlement sur la communication de la politique de retenue de chèques (banques) CONSOLIDATION
 Regulations. Règlement sur la communication de la politique de retenue de chèques (banques) CONSOLIDATION") CANADA CONSOLIDATION CODIFICATION Cheque Holding Policy Disclosure (Banks) Regulations Règlement sur la communication de la politique de retenue de chèques (banques) SOR/2002-39 DORS/2002-39 Current to
CANADA CONSOLIDATION CODIFICATION Cheque Holding Policy Disclosure (Banks) Regulations Règlement sur la communication de la politique de retenue de chèques (banques) SOR/2002-39 DORS/2002-39 Current to
Betriebsanleitung Programmierkabel PRKAB 560 Mode d emploi Câble de programmation PRKAB 560 Operating Instructions Programming cable PRKAB 560
 Betriebsanleitung Programmierkabel Câble de programmation Operating Instructions Programming cable B d-f-e 146 599-02 03.06 Camille Bauer AG Aargauerstrasse 7 CH-5610 Wohlen/Switzerland Telefon +41 56
Principe de TrueCrypt. Créer un volume pour TrueCrypt
 Sommaire : Principe de TrueCrypt...1 Créer un volume pour TrueCrypt...1 Premier montage...6 Réglages...8 Save Currently Mounted Volumes as Favorite...8 Settings > Preferences...9 TrueCrypt Traveller pour
Guide d installation Deco Drain inc. DD200
 Guide d installation Deco Drain inc. DD200 Pour plus informations et pour télécharger les guides d installation en couleur, visitez notre site web. www.decodrain.com Soutien technique : Composez le : 514-946-8901
Application Form/ Formulaire de demande
 Application Form/ Formulaire de demande Ecosystem Approaches to Health: Summer Workshop and Field school Approches écosystémiques de la santé: Atelier intensif et stage d été Please submit your application
AMENDMENT TO BILL 32 AMENDEMENT AU PROJET DE LOI 32
 THAT the proposed clause 6(1), as set out in Clause 6(1) of the Bill, be replaced with the following: Trustee to respond promptly 6(1) A trustee shall respond to a request as promptly as required in the
Using a Walker. 2. Move your injured or weak leg toward the walker first. If you have had surgery on both legs, use either leg to begin walking.
 Using a Walker Walking with a Walker 1. Lift the walker and place it at a comfortable distance in front of you with all four of its legs on the floor. This distance is often equal to an arm s length. 2.
3615 SELFIE. http://graffitiresearchlab.fr HOW-TO / GUIDE D'UTILISATION
 3615 SELFIE http://graffitiresearchlab.fr HOW-TO / GUIDE D'UTILISATION Hardware : Minitel Computer DIN FM545 45 connector (http://www.gotronic.fr/art-fiche-din-fm545-4747.htm) Cable Arduino compatible
Instructions pour mettre à jour un HFFv2 v1.x.yy v2.0.00
 Instructions pour mettre à jour un HFFv2 v1.x.yy v2.0.00 HFFv2 1. OBJET L accroissement de la taille de code sur la version 2.0.00 a nécessité une évolution du mapping de la flash. La conséquence de ce
Kenwood Limited, New Lane, Havant, Hampshire PO9 2NH, UK www.kenwood.co.uk 56117/2
 Kenwood Limited, New Lane, Havant, Hampshire PO9 2NH, UK www.kenwood.co.uk 56117/2 O I MG510 a b c o n d O I m l e k i j f g h p q r s t Français Avant de lire, dépliez la première page pour voir les illustrations
Z-Axis Compliance Device Compliance en z
 Compensation for different vertical positions Collision recognition in Z-direction Protection of parts and work pieces Monitoring of the insertion forces during assembly operations Monitoring of the picking
Quick Setup Guide Guide de configuration rapide. Tablet Device SGPT12 Series Tablette électronique Série SGPT12
 Quick Setup Guide Guide de configuration rapide Tablet Device SGPT12 Series Tablette électronique Série SGPT12 Welcome / Bienvenue Congratulations on your purchase of this Xperia Tablet S. This Quick Setup
General Import Permit No. 13 Beef and Veal for Personal Use. Licence générale d importation n O 13 bœuf et veau pour usage personnel CONSOLIDATION
 CANADA CONSOLIDATION CODIFICATION General Import Permit No. 13 Beef and Veal for Personal Use Licence générale d importation n O 13 bœuf et veau pour usage personnel SOR/95-43 DORS/95-43 Current to June
Wie können meine Abschlüsse in Frankreich anerkannt werden?
 Wie können meine Abschlüsse in Frankreich anerkannt werden? Trotz der mittlerweile in Kraft getretenen europäischen Regelungen der beruflichen Anerkennung von Ausbildungen und Hochschuldiplomen, liegt
Kenwood Limited, New Lane, Havant, Hampshire PO9 2NH, UK www.kenwoodworld.com
 Kenwood Limited, New Lane, Havant, Hampshire PO9 2NH, UK www.kenwoodworld.com 57774/1 ESP100 series i ii UNFOLD Français Veuillez déplier les illustrations de la première page avant d utiliser votre appareil
WEB page builder and server for SCADA applications usable from a WEB navigator
 Générateur de pages WEB et serveur pour supervision accessible à partir d un navigateur WEB WEB page builder and server for SCADA applications usable from a WEB navigator opyright 2007 IRAI Manual Manuel
Archived Content. Contenu archivé
 ARCHIVED - Archiving Content ARCHIVÉE - Contenu archivé Archived Content Contenu archivé Information identified as archived is provided for reference, research or recordkeeping purposes. It is not subject
SERVEUR DÉDIÉ DOCUMENTATION
 SERVEUR DÉDIÉ DOCUMENTATION Release 5.0.6.0 19 Juillet 2013 Copyright 2013 GIANTS Software GmbH, All Rights Reserved. 1/9 CHANGE LOG Correction de bug divers (5.0.6.0) Ajout d une option de relance automatique
Mesure chimique. Chemical measurement. Sonde de température Pt 1000 Inox Pt 1000 stainless steel. Ref : 703 262. Français p 1.
 Mesure chimique Chemical measurement Français p 1 English p 3 Sonde de température Pt 1000 Inox Pt 1000 stainless steel Version : 6010 Mesure chimique Sonde de température Pt 1000 Inox 1 Description La
Typ 511. Serrure de vitrine 6005 pour portes coulissantes en verre, zamak, nickelé au mat.
 Knopfzylinder 6005 für Glas-Schiebetüren,Vitrinen etc., Zamak, matt vernickelt. Cylinder knob 6005 for glass sliding doors, die-cast, dull nickel-plated. Serrure de vitrine 6005 pour portes coulissantes
RULE 5 - SERVICE OF DOCUMENTS RÈGLE 5 SIGNIFICATION DE DOCUMENTS. Rule 5 / Règle 5
 RULE 5 - SERVICE OF DOCUMENTS General Rules for Manner of Service Notices of Application and Other Documents 5.01 (1) A notice of application or other document may be served personally, or by an alternative
How to Login to Career Page
 How to Login to Career Page BASF Canada July 2013 To view this instruction manual in French, please scroll down to page 16 1 Job Postings How to Login/Create your Profile/Sign Up for Job Posting Notifications
Once the installation is complete, you can delete the temporary Zip files..
 Sommaire Installation... 2 After the download... 2 From a CD... 2 Access codes... 2 DirectX Compatibility... 2 Using the program... 2 Structure... 4 Lier une structure à une autre... 4 Personnaliser une
DOCUMENTATION - FRANCAIS... 2
 DOCUMENTATION MODULE SHOPDECORATION MODULE PRESTASHOP CREE PAR PRESTACREA INDEX : DOCUMENTATION - FRANCAIS... 2 INSTALLATION... 2 Installation automatique... 2 Installation manuelle... 2 Résolution des
THE LAW SOCIETY OF UPPER CANADA BY-LAW 19 [HANDLING OF MONEY AND OTHER PROPERTY] MOTION TO BE MOVED AT THE MEETING OF CONVOCATION ON JANUARY 24, 2002
![THE LAW SOCIETY OF UPPER CANADA BY-LAW 19 [HANDLING OF MONEY AND OTHER PROPERTY] MOTION TO BE MOVED AT THE MEETING OF CONVOCATION ON JANUARY 24, 2002](/thumbs/19/276456.jpg "THE LAW SOCIETY OF UPPER CANADA BY-LAW 19 [HANDLING OF MONEY AND OTHER PROPERTY] MOTION TO BE MOVED AT THE MEETING OF CONVOCATION ON JANUARY 24, 2002") 2-aes THE LAW SOCIETY OF UPPER CANADA BY-LAW 19 [HANDLING OF MONEY AND OTHER PROPERTY] MOTION TO BE MOVED AT THE MEETING OF CONVOCATION ON JANUARY 24, 2002 MOVED BY SECONDED BY THAT By-Law 19 [Handling
2-aes THE LAW SOCIETY OF UPPER CANADA BY-LAW 19 [HANDLING OF MONEY AND OTHER PROPERTY] MOTION TO BE MOVED AT THE MEETING OF CONVOCATION ON JANUARY 24, 2002 MOVED BY SECONDED BY THAT By-Law 19 [Handling
MODE D EMPLOI CAFETIERE KZ8F WWW.PRIMO-ELEKTRO.BE
 MODE D EMPLOI CAFETIERE KZ8F WWW.PRIMO-ELEKTRO.BE KZ8F WWW.PRIMO-ELEKTRO.BE CARTE DE GARANTIE Chère cliente, cher client, Nos produits sont soumis à des contrôles de qualité rigoureux. Si malgré ces contrôles,
ARP-090G / ARP-090K NOTICE D'EMPLOI INSTRUCTION MANUAL
 2 7 NOTICE D'EMPLOI INSTRUCTION MANUAL ARP-090G / ARP-090K Lire attentivement la notice avant d utiliser l appareil Before operating this product, please read user manual completely FRANCAIS EMPLACEMENT
WLAN Magic-Box einrichten S. 2 Installer WLAN Magic-Box p. 10 Installare WLAN Magic-Box p. 18 WLAN Magic-Box setup p. 26
 Swisscom (Schweiz) AG Contact Center CH-3050 Bern 07/2012 www.swisscom.ch WLAN einrichten S. 2 Installer WLAN p. 10 Installare WLAN p. 18 WLAN setup p. 26 YM.AP.4742.UM.SW.D00 WLAN On/Off WLAN On/Off Nous
Quick Installation Guide TEW-AO12O
 Quick Installation Guide TEW-AO12O Table of of Contents Contents Français... 1 1. Avant de commencer... 1 2. Installation du matériel... 2 3. Montage... 4 Troubleshooting... 6 Version 10.04.2007 1. Avant
PRECAUTIONS IMPORTANTES
 D90 Mode d emploi Ne mettez l appareil en marche qu après avoir pris connaissance de ce mode d emploi et des conseils de sécuritémentionnés en pages 3 et 4! PRECAUTIONS IMPORTANTES Lors de l utilisation
Le passé composé. C'est le passé! Tout ça c'est du passé! That's the past! All that's in the past!
 > Le passé composé le passé composé C'est le passé! Tout ça c'est du passé! That's the past! All that's in the past! «Je suis vieux maintenant, et ma femme est vieille aussi. Nous n'avons pas eu d'enfants.
3M HEPA Vacuum 497AJK. User s Guide
 3M HEPA Vacuum 497AJK User s Guide Table of Contents Section Page Safety Instructions...3 Grounding Instructions...5 Specifications...7 To Operate...7 To Replace Filter...8 Parts List...9 Regulatory Statements...9
WiFi Security Camera Quick Start Guide. Guide de départ rapide Caméra de surveillance Wi-Fi (P5)
") #45 #46 WiFi Security Camera Quick Start Guide Guide de départ rapide Caméra de surveillance Wi-Fi (P5) #47 Start Here 1 Is this you? TECH SUPPORT CTRL ALT DEL 2 If yes, turn to page three 1 3 If not,
#45 #46 WiFi Security Camera Quick Start Guide Guide de départ rapide Caméra de surveillance Wi-Fi (P5) #47 Start Here 1 Is this you? TECH SUPPORT CTRL ALT DEL 2 If yes, turn to page three 1 3 If not,
NEW Fin Fan / Air cooled condenser cleaning
 Air cooled Condensers ( ACC ) Cleaning Air Cooled heat exchangers ( Finfan) Cleaning Cleaning Services Permanente installation NEW Fin Fan / Air cooled condenser cleaning New and revolutionnary high pressure
Garage Door Monitor Model 829LM
 Garage Door Monitor Model 829LM To prevent possible SERIOUS INJURY or DEATH from a closing garage door: NEVER permit children to operate or play with door control push buttons or remote control transmitters.
Utiliser une WebCam. Micro-ordinateurs, informations, idées, trucs et astuces
 Micro-ordinateurs, informations, idées, trucs et astuces Utiliser une WebCam Auteur : François CHAUSSON Date : 8 février 2008 Référence : utiliser une WebCam.doc Préambule Voici quelques informations utiles
Nouveautés printemps 2013
 » English Se désinscrire de la liste Nouveautés printemps 2013 19 mars 2013 Dans ce Flash Info, vous trouverez une description des nouveautés et mises à jour des produits La Capitale pour le printemps
BILL 203 PROJET DE LOI 203
 Bill 203 Private Member's Bill Projet de loi 203 Projet de loi d'un député 4 th Session, 40 th Legislature, Manitoba, 63 Elizabeth II, 2014 4 e session, 40 e législature, Manitoba, 63 Elizabeth II, 2014
MANUEL D UTILISATION
 MANUEL D UTILISATION Table des matières Sécurité du produit 3 Mesures de précautions 4 Exigences électriques 5 Dépannage 5 Caractéristiques de My Rotisserie 6 Caractéristiques de My Rotisserie 7 Diagramme
SIMATIC. SIMATIC STEP 7 PID Professional V12. Welcome Tour. Totally Integrated Automation www.siemens.com/tia-portal-welcometour PORTAL
 SIMATIC STEP 7 PID Professional V12 Welcome Tour Totally Integrated Automation www.siemens.com/tia-portal-welcometour Totally Integrated Automation PORTAL www.siemens.com/tia-portal SIMATIC Siemens Aktiengesellschaft
printed by www.klv.ch
 Zentralkommission für die Lehrabschlussprüfungen des Verkaufspersonals im Detailhandel Lehrabschlussprüfungen für Detailhandelsangestellte 2006 Französisch Leseverständnis und gelenkte Sprachproduktion
Start Here Point de départ
 Start Here Point de départ Epson Stylus C88+ Please read these instructions before using the printer. Lisez ces instructions avant d utiliser l imprimante. Install Ink Cartridges Installez les cartouches
that the child(ren) was/were in need of protection under Part III of the Child and Family Services Act, and the court made an order on
 was/were in need of protection under Part III of the Child and Family Services Act, and the court made an order on") ONTARIO Court File Number at (Name of court) Court office address Applicant(s) (In most cases, the applicant will be a children s aid society.) Full legal name & address for service street & number, municipality,
ONTARIO Court File Number at (Name of court) Court office address Applicant(s) (In most cases, the applicant will be a children s aid society.) Full legal name & address for service street & number, municipality,
Comparaison des performances d'éclairages
 Comparaison des performances d'éclairages Présentation Support pour alimenter des ampoules de différentes classes d'efficacité énergétique: une ampoule LED, une ampoule fluorescente, une ampoule à incandescence
PRESENTATION REMOTE TÉLÉCOMMANDE DE PRÉSENTATION. User Guide Manuel de l utilisateur
 PRESENTATION REMOTE TÉLÉCOMMANDE DE PRÉSENTATION User Guide Manuel de l utilisateur Targus Presentation Remote Introduction Thank you for your purchase of the Targus Presentation Remote. This cordless
INDIVIDUALS AND LEGAL ENTITIES: If the dividends have not been paid yet, you may be eligible for the simplified procedure.
 Recipient s name 5001-EN For use by the foreign tax authority CALCULATION OF WITHHOLDING TAX ON DIVIDENDS Attachment to Form 5000 12816*01 INDIVIDUALS AND LEGAL ENTITIES: If the dividends have not been
accidents and repairs:
 accidents and repairs: putting the pieces together accidents et réparations : réunir le tout nobody can repair your Toyota like Toyota Unfortunately, accidents do happen. And the best way to restore your
General Information / Informations générales / Allgemeine Informationen
 General Information / Informations générales / Allgemeine Informationen D K S L P 20X EWL 000 D L S G 40X EWL 000 D 2 S K 65X EWK 000 D 3 D S 150X AWM 000 D K S J * 10X W2 EWL 000 8General Information
Import Allocation Regulations. Règlement sur les autorisations d importation CONSOLIDATION CODIFICATION
 CANADA CONSOLIDATION CODIFICATION Import Allocation Regulations Règlement sur les autorisations d importation SOR/95-36 DORS/95-36 Current to May 17, 2011 À jour au 1 er 17 mai 2011 Published by the Minister
Monitor LRD. Table des matières
 Folio :1/6 Table des matières 1.Installation du logiciel... 3 2.Utilisation du logiciel... 3 2.1.Description de la fenêtre de commande... 3 2.1.1.Réglage des paramètres de communication... 4 2.1.2.Boutons
AUTO ER ADAPT ER SPECIAL USE WARNING
 POWER SPECIALISTS FOR MOBILE COMPUTING AUTO ER ADAPT ER The Lind Automobile Power Adapter is designed to power your laptop computer and to charge its internal battery from an appropriate DC voltage power
Instruction Manual. HS-636-4GBBK MP3 Player
 Instruction Manual HS-636-4GBBK MP3 Player Thank you for your purchase of this Hip Street MP3 player and we hope you enjoy using it. Please visit our website at www.hipstreetonline.com. The display screen