KEOR MULTIPLUG 600, 800 VA
|
|
|
- Edmond Pinard
- il y a 8 ans
- Total affichages :
Transcription
1 KEOR MULTIPLUG 600, 800 VA Manuel d installation Installation manual Part. LE07603AA-12/14-01 GF

2 KEOR MULTIPLUG 600, 800 VA FR FRANÇAIS 3 EN FR ENGLISH 15 IT ITALIANO 27 ES ESPAÑOL 39 2

3 KEOR LINE RT 1000, 1500, 2200, 3000 VA Table des matières 1 Introduction 4 2 Conditions d utilisation 4 3 Installation 5 4 Logiciel UPS 8 5 Signaux et contrôle 8 6 Changement des batteries 9 7 Éventuels dysfonctionnements 11 8 Caractéristiques techniques 12 FR 3

4 4 1 Introduction Keor Multiplug est un groupe de continuité (UPS) conçu pour l habitat et pour les applications commerciales. Le présent manuel contient les informations destinées à l utilisateur relatives aux modèles Keor Multiplug 600 et 800 VA. Il est recommandé de lire attentivement le présent manuel et les instructions de sécurité présentes dans l emballage avant de procéder à l installation du groupe de continuité et de veiller à respecter scrupuleusement les instructions et indications figurant plus bas. En cas de problèmes sur l UPS, il est recommandé de lire le présent manuel avant de contacter le service d assistance technique. Veiller à télécharger la dernière version du manuel sur le site : 2 Conditions d utilisation L UPS est conçu pour alimenter des appareillages de traitement de données ; la charge appliquée ne doit pas dépasser celle indiquée sur l étiquette apposée au dos de l UPS. S assurer que la tension d arrivée de l UPS correspond à la tension d alimentation sur secteur. Utiliser un câble d alimentation en entrée, certifié et doté de fiches et de prises adaptées à la tension. Le bouton ON/OFF de l UPS n isole pas électriquement les parties internes. Pour isoler l UPS, le débrancher de la prise d alimentation sur secteur. Ne pas ouvrir l habillage de l UPS, des parties internes pouvant présenter une tension dangereuse, y compris si la fiche est débranchée de l alimentation sur secteur ; dans tous les cas, aucune partie interne n est réparable par l utilisateur. Le panneau frontal de contrôle est prévu pour des opérations manuelles ; ne pas appuyer sur le panneau avec des objets pointus ou coupants. Les UPS Keor Multiplug ont été conçus pour fonctionner dans un environnement fermé, propres, non excessivement humides et exempts de liquides inflammables et de substances corrosives. Ne pas installer à proximité d appareillages qui génèrent des champs électromagnétiques intenses ni à proximité d appareillages sensibles aux champs électromagnétiques (moteurs, disques informatiques, haut-parleurs, transformateurs, écrans, etc.). Ne pas verser de liquides sur ni à l intérieur de l UPS. Ne pas positionner l UPS dans un environnement humide ni à proximité de liquides tels que : eau, solutions chimiques, etc. Éviter d exposer l UPS à la lumière directe du soleil ou à proximité de sources de chaleur. Installer à un endroit non excessivement poussiéreux et veiller à ce que les limites d humidité indiquées soient respectées. Ne pas positionner l UPS dans un environnement poussiéreux, corrosif ni à proximité de matériaux inflammables. L UPS n est pas conçu pour fonctionner en extérieur. Ne rien poser sur l UPS pour prévenir les risques de surchauffe. Maintenir une distance d au moins 20 cm entre l UPS et les autres objets ou obstructions. Brancher l UPS à une alimentation dotée d une prise de terre. S assurer que l alimentation électrique CA est dotée d une mise à la terre. Installer l UPS à proximité de la prise de secteur qui en assure l alimentation. La prise doit être facile d accès. Avant de déplacer l UPS, veiller à l éteindre et à débrancher les batteries. Ne pas oublier que, même débranchées, les batteries chargées exposent à un risque de décharge électrique. L UPS doit être chargé tous les 2 à 3 mois quand il n est pas utilisé. Installées et utilisées, les batteries se chargent automatiquement.

5 xxxxxx?????? 03/ GF KEOR MULTIPLUG 600, 800 VA 3 Installation FR mm 200 mm 200 mm 8 heures Hours 100% SCANNER - + LASER 5

6 180 mm 3 Installation IN OUT 6
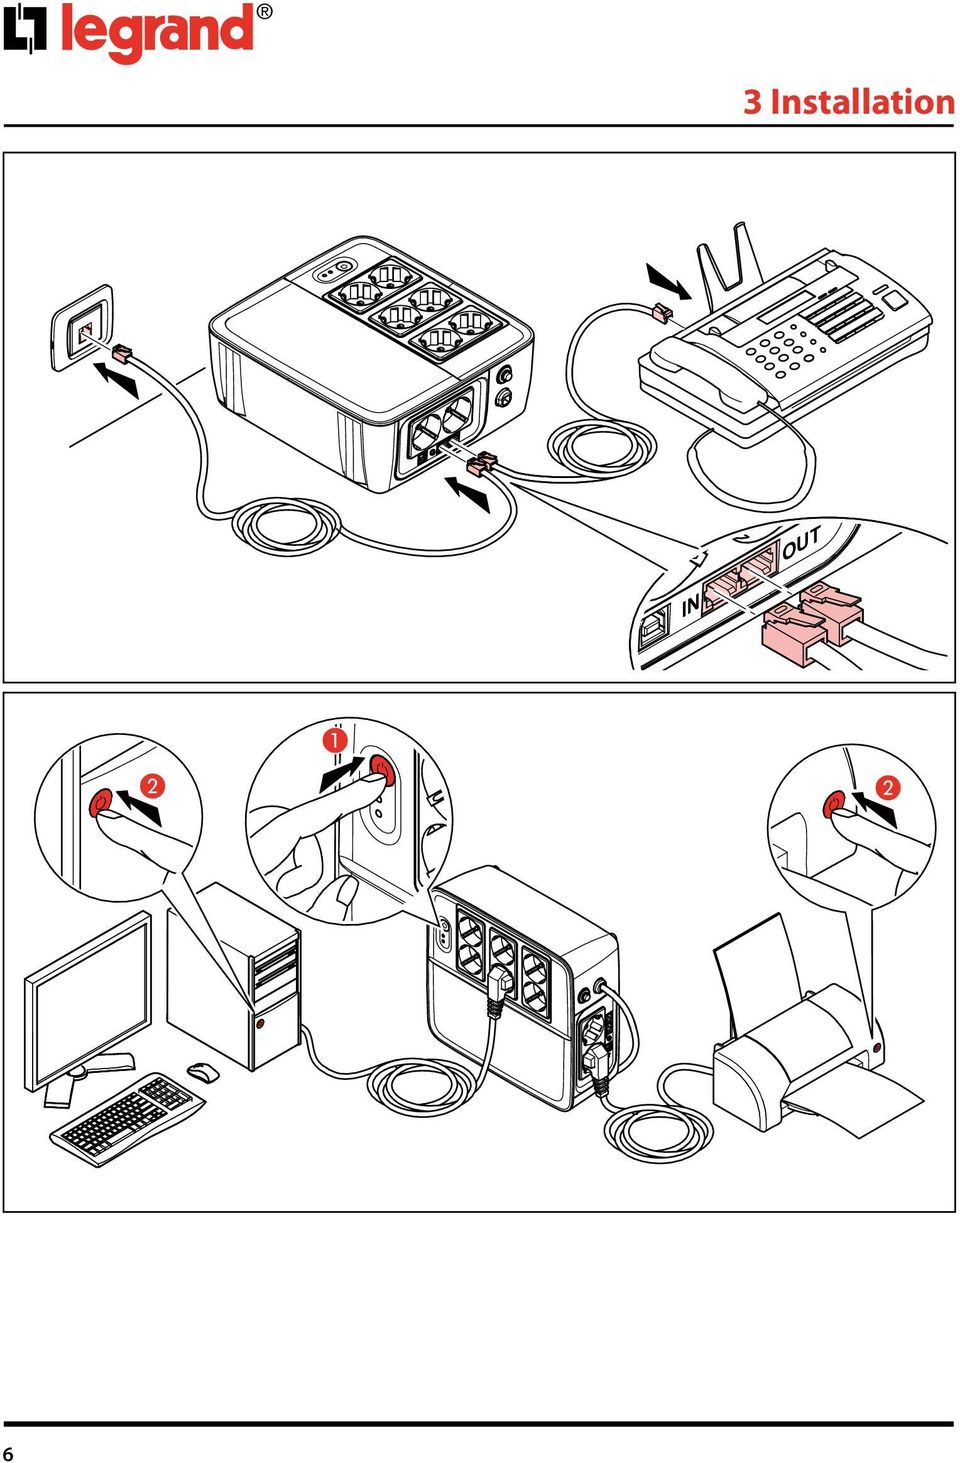
7 2 180 mm 180 mm KEOR MULTIPLUG 600, 800 VA FR mm ATTENTION Ne pas brancher d imprimantes laser ni de scanners aux sorties de l UPS compte tenu de leur haut courant de démarrage. ATTENTION Ne pas brancher aux sorties de l UPS des électroménagers (sèche-cheveux, climatiseur ou réfrigérateur par exemple). 7

8 4 Logiciel UPS Pour contrôler les paramètres de l UPS et gérer l arrêt automatique des ordinateurs alimentés par l UPS, il est possible de télécharger le logiciel UPS Communicator (pour Windows uniquement) sur le site Legrand (en accédant à la section des logiciels). Pour plus d informations, télécharger et lire le manuel du programme UPS Communicator. Branchement Indicateurs et tableau des alarmes présentes 5 Signaux et contrôles Condition Voyant bleu Voyant rouge Avertisseur sonore Alimentation sur secteur Toujours allumé OFF OFF Mode batterie niveau batterie normal Mode batterie niveau batterie faible Clignote toutes les 10 secondes Clignote à chaque seconde OFF ON 1 bip toutes les 10 secondes 1 bip à chaque seconde Mode Erreur OFF ON Bip constant Alarme de protection température excessive OFF Clignote à chaque seconde OFF 8

9 KEOR MULTIPLUG 600, 800 VA 6 Changement des batteries FR OFF 9

10 6 Battery replacement 10 ATTENTION - L entretien des batteries doit être confié ou supervisé par un personnel formé à cet effet, possédant une bonne connaissance des batteries et des normes de sécurité. - Ne pas jeter la ou les batteries sur des flammes. Les batteries pourraient exploser. - Ne pas ouvrir ni rompre les batteries. L électrolyte des batteries est toxique et dangereux pour la peau et les yeux. - Est présent un risque de décharge électrique dans la mesure où le circuit de la batterie n est pas isolé du courant CA ; aussi, est présent le risque de courant entre les cosses de la batterie et la terre. Contrôler avant de toucher les batteries à mains nues. - La batterie peut constituer un risque de décharge électrique et de courant élevé de court-circuit. Veiller à respecter les précautions suivantes lors des interventions sur les batteries : A. Retirer montre, bagues et autres objets métalliques. B. Utiliser des outils et accessoires pourvus de poignées isolantes. C. Faire usage de gants en caoutchouc et de bottes. D. Ne pas laisser d outils ni d objets métalliques sur le dessus des batteries. E. Débrancher l alimentation avant de brancher et de débrancher la batterie.

11 KEOR MULTIPLUG 600, 800 VA 7 Possible malfunctioning FR Problème Cause possible Solution Aucun voyant sur le panneau frontal L alarme retentit sans cesse alors que le secteur d alimentation ne présente pas d anomalie. L alarme retentit toutes les 2 secondes alors que le secteur d alimentation ne présente pas d anomalie. En l absence de courant, le temps de back-up est réduit. Le secteur d alimentation ne présente pas d anomalie mais le voyant clignote. Niveau batterie fiable Batterie défectueuse L UPS n est pas allumé. L UPS est en surcharge. UPS défectueux Batterie défectueuse Le panneau de charge est endommagé. L UPS est en surcharge. La tension de la batterie est trop faible. Batterie défectueuse : la surcharge pourrait être due à une température ambiante excessive ou à des interventions impropres effectuées sur la batterie. Le cordon d alimentation est desserré. Charger l UPS pendant au moins 8 heures. Changer la batterie en la remplaçant par une batterie de même type. Appuyer sur la touche d allumage pour allumer l UPS. Retirer une partie de la charge. Avant de rebrancher l appareil, s assurer que la charge correspond à la capacité de l UPS (voir les caractéristiques). Envoyer l UPS au centre d assistance. Changer la batterie en la remplaçant par une batterie de même type. Envoyer l UPS au centre d assistance. Retirer une partie de la charge critique. Charger l UPS pendant au moins 8 heures. Changer la batterie en la remplaçant par une batterie de même type. Rebrancher correctement le cordon d alimentation. 11

12 8 Caractéristiques techniques Puissance Puissance nominale (VA) 600 VA 800 VA Puissance nominale (W) 360 W 480 W Facteur de puissance 0,6 Entrée Tension nominale 230 Vca ( Vca) Courant nominal 3,4A 4,5A Détection basse tension (de Mode Secteur à Mode Batterie) 180 Vca ± 5% Rétablissement basse tension (de Mode Batterie à Mode Secteur) 190 Vca ± 5% Détection haute tension (de Mode Secteur à Mode Batterie) 270 Vca ± 5% Rétablissement haute tension (de Mode Batterie à Mode Secteur) 260 Vca ± 5% Fréquence nominale 50Hz/60Hz Basse fréquence/retour (de Mode Secteur à Mode Batterie) 45/47Hz +/- 1Hz Haute fréquence/retour (de Mode Batterie à Mode Secteur) 55/53Hz +/- 1Hz Branchement entrée Câble d entrée Câble d entrée 3x0,75 mm 2 intégré avec fiche standard allemand/français Sortie Mode Secteur Idem entrée Mode Batterie Step wave (pseudo-sinusoïdale) Fréquence Mode Secteur Idem fréquence d entrée Tension Mode Secteur Idem tension d entrée Réponse transitoire (10%->90% régime permanent) <150 ms (prise de charge, 100% charge, 2uF/W) Tension Mode Batterie 230 Vca +/- 10% Fréquence Mode Batterie 50Hz/60Hz Capacité de charge 1,2 uf Pic de tension sortie Mode Batterie 230V < Vp<400V 12
 45/47Hz +/- 1Hz Haute fréquence/retour (de Mode Batterie à Mode Secteur) 55/53Hz +/- 1Hz Branchement entrée Câble d entrée Câble d entrée 3x0,75 mm 2 intégré avec")
13 KEOR MULTIPLUG 600, 800 VA Branchements sorties Sortie Protection courts-circuits Mode Secteur Mode Batterie Protection thermique Mode Batterie Efficacité X standard allemand/italien avec back up batterie et protection contre surtensions ( / ) 2 X standard allemand/italien avec protection contre surtensions ( / ) 6 X standard français avec back up batterie et protection contre surtensions ( / ) 2 X standard français avec protection contre surtensions ( / ) Extinction en 3 cycles Fusible 7A 250 Vca Actif à transformateur > 130 ±5 degrés, rétablissement à transformateur < 75±5 degrés Mode Secteur > 95% Mode Batterie >70% Émission sonore Mode Secteur <40dB Mode Batterie <45dB Transfert Temps de transfert 2~6 ms type Batteries Type batteries 1x 12V/7Ah 1 x 12V/9Ah Tension courant 13,7 V +/- 0,25 V Courant de charge Environ 0,5A, 1A max. Protection surcharge >14,5 V +/- 0,25V arrêt chargeur tension/fréquence sortie démarrage à froid 230V/ 50Hz FR 13

14 8 Caractéristiques techniques Temps de charge 8 heures max. (capacité de charge à 90%) Fuite batterie max. 200µA Temps back up Communication Port interface Allumage Start Autres fonctions Protection contre surtensions TVSS Suppression surtensions Protection contre surtensions CA Protection contre surtensions RJ11/RJ45 Environnement 10 min. - Back up batterie calculé avec station de travail type USB Touche d allumage RJ11/RJ45 158J 312 joules 19,8 joules Température de fonctionnement de 0 C à 40 C Température de stockage de -15 C à 50 C Humidité de fonctionnement 0-90% Altitude Dimensions et poids Dimensions unité (d x l x a) (mm) m 229x250x97,5 Poids (kg) 3,8 4,1 Legrand se réserve la faculté de modifier à tout moment le contenu du présent manuel et de communiquer sous quelque forme et à travers quelque modalité que ce soit, les modifications apportées. 14

15 KEOR MULTIPLUG 600, 800 VA Index 1 Introduction 16 2 Condition of use 16 3 Installation 17 4 UPS Software 20 5 Signals and control 20 6 Battery replacement 21 7 Possible malfunctioning 23 8 Technical features 24 EN 15

16 1 Introduction The Keor Multiplug is an Uninterruptible Power Supply (UPS) designed for home and commercial applications. This manual contains information for users of the Keor Multiplug 600,800 VA models. You are advised to read carefully this handbook and the safety instruction sheet included in the packaging before installing your uninterruptible power supply, meticulously following the instructions given herein. In case of problems with the UPS, please read this manual before contacting the technical support; Please download the latest version of the manual from the website: 2 Condition of use The UPS has been designed to supply data processing equipment; The load applied must not exceed the one indicated on the rear label of your UPS. Ensure that the input voltage of the UPS matches the utility supply voltage. Use a certified input power cable with the correct plugs and sockets for the system voltage. The ON/OFF button of your UPS does not electrically isolate the internal parts. To isolate your UPS unplug it from the mains power socket. Do not open the UPS enclosures since there may be parts inside with dangerously high voltage even when the mains plug is disconnected; there are no parts inside that the user can repair. The front control panel is provided for manual operations; Do not press on the panel with sharp or pointed objects. The UPS Keor Multiplug has been designed to work in closed, clean rooms where there are no inflammable liquids or corrosive substances and where it is not too damp. Do not place near equipments that generate strong electro-magnetic fields and/or near equipments that are sensible to electro-magnetic fields. (engines, floppy disks, speakers, adapters, monitors, video, etc...) Do not pour any liquid on the UPS or inside the UPS. Do not place the UPS in humid environment or near liquid, such as water, chemical solution Do not expose the UPS to the direct sunlight or any heat sources. Ensure that the installation site is free from excessive dust and the ambient temperature and humidity are within the specified limits. Do not place the UPS in a dusty or corrosive environment or near any flammable objects. This UPS is not designed for outdoor use. To prevent overheating of the UPS do not place anything on top of the UPS. Keep the UPS 20 cm away from others objects or obstructions. Use grounded power cable to connect the UPS to the mains supply. Ensure that the AC mains supply is securely grounded. Install the UPS close to the mains socket that supply it. The socket must be easily accessible. Always switch off the UPS and disconnect the batteries when relocating the UPS. Be aware that, even when disconnected, charged batteries present a possible electric shock hazard. The UPS should be recharged every 2-3 months if unused. When installed and being used the batteries will be automatically recharged. 16

17 xxxxxx?????? 03/ GF KEOR MULTIPLUG 600, 800 VA 3 Installation mm EN 200 mm 200 mm 8 Hours 100% SCANNER - + LASER 17

18 180 mm 3 Installation IN OUT 18

19 2 180 mm 180 mm KEOR MULTIPLUG 600, 800 VA mm EN CAUTION Do not plug laser printers and scanner into the UPS outlets because of their high start-up current. CAUTION Do not plug house electric equipments, such as hair dryer, air conditioner, and refrigerator into the UPS outlets. 19

20 4 UPS software In order to monitor the UPS parameters and manage the automatic shutdown of the computer powered by the UPS itself, it is possible to download the UPS Communicator software (Windows only) from the website Legrand in the software section. For additional information download and read the UPS Communicator manual on the web site. Connect Indicators & Alarm Table for Operation 5 Signals and control Condition Blue led Red led Buzzer Line mode Always on OFF OFF Battery mode - normal battery voltage Battery mode - low battery Blinks every 10 seconds Blinks every 1 seconds OFF ON 1 Beep every 10 seconds 1 Beep every second Fault mode OFF ON Continuous beep Alarm for over temperature protection OFF Blinks every 1 second NO 20

21 KEOR MULTIPLUG 600, 800 VA 6 Battery replacement OFF EN 21
22 6 Battery replacement 22 CAUTION - Servicing of Batteries Should be Performed or Supervised by Trained Personnel with Knowledge of Batteries and the Required Precautions - Do Not Dispose of Battery or Batteries in an open fire. The Battery May Explode. - Do not open or mutilate the batteries. The electrolyte from the batteries is toxic and harmful to the skin and eyes. - Risk of Electric Shock the Battery Circuit is not isolated from AC, hazardous Voltage may exist between battery terminals and ground. Test before touching with bare hands. - A Battery can present a Risk of Electrical Shock and High Short Circuit Current. The Following Precaution Should be Observed When Working on Batteries: A. Remove watches, rings, or other metal objects. B. Use tools with insulated handles. C. Wear rubber gloves and boots. D. Do not lay tools or metal parts on top of batteries. E. Disconnect charging source prior to connecting or disconnecting battery
23 KEOR MULTIPLUG 600, 800 VA 7 Possible malfunctioning Problem Possible Cause Solutions Low battery. Charge the UPS at least 8 hours. No LED display on the front panel. Battery fault. Replace the battery with the same type of battery. The UPS is not turned on. Press the power switch again to turn on the UPS. Alarm continuously sounds when the mains is normal. The UPS is overload. Remove some loads first. Before reconnecting equipment, please verify that the load matches the UPS capability specified in the specs. EN UPS fault Return the unit to the service center. Alarm sounds every 2 seconds when the mains is normal. Battery defect. Charging board is damaged. Replace the battery with the same type of battery. Return the unit to the service center. The UPS is overload. Remove some critical load. When power fails, back-up time is shorten. Battery voltage is too low. Battery defect. It might be due to high temperature operation environment, or improper operation to battery. Charge the UPS at least 8 hours. Replace the battery with the same type of battery. The mains is normal but LED is flashing. Power cord is loose. Reconnect the power cord properly. 23
24 Technical features Power Power Rating (Va) 600VA 800VA Power Rating (W) 360W 480W Power Factor 0,6 Input Nominal Voltage 230Vac ( Vac) Nominal Current 3.4A 4.5A Low voltage detection (Line mode to battery mode) 180Vac ± 5% Low voltage recover (battery mode to line mode) 190Vac ± 5% High voltage detection (Line mode to battery mode) 270Vac ± 5% High voltage recover (battery mode to line mode) 260Vac ± 5% Nominal frequency 50Hz/60Hz Frequency low/come back (Line mode to battery mode) 45/47Hz +/- 1Hz Frequency high/come back (battery mode to line mode) 55/53Hz +/- 1Hz Input connection Input cable Input cable 3x0.75mm 2 integrated with German/ French standard plug Output Line Mode Same as input Battery Mode Step wave Line Mode Frequency Same as input frequency Line Mode Voltage Same as input voltage Transient Response (10%->90% steady state) <150ms (Load take on, 100% load, 2uF/W) Battery Mode Voltage 230Vac +/- 10% Battery Mode Frequency 50Hz/60Hz Pure capacitance load 1.2uF Battery Mode Output peak voltage 230V < Vp<400V 24
25 KEOR MULTIPLUG 600, 800 VA Output connections Outlet Short circuit protection 6 X german/italian standard with battery back up and surge protection ( / ) 2X german/italian standard with surge protection ( / ) 6 X french standard with battery back up and surge protection ( / ) 2X french standard with surge protection ( / ) EN Line Mode Battery Mode Thermal protection Battery mode Efficiency 7A 250 Vac Fuse Turn off in 3 cycles converter > 130 ±5 degree, converter < 75±5 degree Line mode > 95% Battery mode >70% Audible noise Line mode Battery mode <40dB <45dB Transfer Transfer time 2~6ms Typical Battery Battery type 1x 12V/7Ah 1 x 12V/9Ah Floating voltage 13.7V+/- 0.25V Charging current Overcharge protection Cold start Output voltage/ frequency About 0.5A,max 1A >14.5 V +/- 0.25V charger stop 230V/50Hz 25
26 Recharge Time Battery leakage Back up time Communication Interface port Power on Start Other function Tvss surge protection Surge suppressor Surge protection ac Surge protection rj11/rj45 Environment Technical features hours max (Recharge to 90% Capacity) 200uA maximum 10 min - Battery back up calculated with one typical workstation USB Power button RJ11/RJ45 158J 312 joules 19,8 joules Operating temperature 0 C to 40 C Storage temperature -15 C to 50 C Operating humidity 0-90% Altitudes m Dimensions and weight Unit dimension (d x wx h) (mm) 229x250x97,5 Unit weight (kg) 3,8 4,1 26
27 KEOR MULTIPLUG 600, 800 VA Indice 1 Introduzione 28 2 Condizioni d uso 28 3 Installazione 28 4 Software UPS 32 5 Segnali e controllo 32 6 Sostituzione batterie 33 7 Possibili malfunzionamenti 35 8 Caratteristiche tecniche 36 IT 27
28 28 1 Introduzione Keor Multiplug è un gruppo di continuità (UPS) progettato per la casa e per applicazioni commerciali. Questo manuale contiene le informazioni per l utente relative ai modelli Keor Multiplug, 600 e 800 VA. Si consiglia di leggere attentamente questo manuale e le istruzioni di sicurezza incluse nell imballo prima di procedere all installazione del gruppo di continuità, attenendosi scrupolosamente a quanto di seguito riportato. In caso di problemi con l UPS, si consiglia di leggere questo manuale prima di contattare il servizio di assistenza tecnica. Si prega di scaricare l ultima versione del manuale dal sito: 2 Condizioni d uso L UPS è stato progettato per alimentare apparecchiature per elaborazione dati, il carico applicato non deve superare quello indicato sull etichetta posteriore dell UPS. Accertarsi che la tensione di ingresso dell UPS corrisponda alla tensione di alimentazione della rete. Utilizzare un cavo di alimentazione in ingresso certificato con spine e prese adeguate in base al sistema di tensione. Il pulsante ON/OFF dell UPS non isola elettricamente le parti interne. Per isolare l UPS, scollegarlo dalla presa di alimentazione di rete. Non aprire il contenitore dell UPS, perché all interno vi possono essere parti a tensione pericolosa, anche con spina di rete scollegata; comunque all interno non sono presenti parti riparabili dall utente. Il pannello di controllo frontale è previsto per operazioni manuali; non premere sul pannello con oggetti affilati o appuntiti. Gli UPS Keor Multiplug sono stati progettati per funzionare in ambienti chiusi, puliti, privi di liquidi infiammabili e di sostanze corrosive e non eccessivamente umidi. Non posizionare vicino ad apparecchiature che generano forti campi elettromagnetici e/o ad apparecchiature sensibili ai campi elettromagnetici (motori, floppy disk, altoparlanti, trasformatori, monitor, video, ecc...). Non versare liquidi sopra o all interno dell UPS. Non posizionare l UPS in ambienti umidi o in prossimità di liquidi quali: acqua, soluzioni chimiche, ecc. Evitare di esporre l UPS alla luce diretta del sole o in vicinanza di fonti di calore. Installare in luogo privo di eccessiva polvere, con temperatura ambiente e umidità secondo i limiti specificati. Non posizionare l UPS in ambienti polverosi o corrosivi o in prossimità di oggetti infiammabili. L UPS non è progettato per il funzionamento all esterno. Non appoggiare nulla sull UPS per evitarne il surriscaldamento. Mantenere una distanza di almeno 20 cm tra l UPS e altri oggetti o ostruzioni. Collegare l UPS a impianto provvisto di conduttore di terra. Accertarsi che l alimentazione elettrica AC sia provvista di adeguata messa a terra. Installare l UPS in prossimità della presa di rete dalla quale riceve alimentazione. La presa deve essere facilmente accessibile. Quando viene riposizionata l UPS, accertarsi sempre di spegnere l UPS e scollegare le batterie. Ricordare che, anche se disconnesse, le batterie cariche comportano un potenziale rischio di scarica elettrica. L UPS deve essere ricaricato ogni 2-3 mesi se non viene utilizzato. Quando vengono installate e utilizzate, le batterie si ricaricano automaticamente.
29 xxxxxx?????? 03/ GF KEOR MULTIPLUG 600, 800 VA 3 Installazione mm 200 mm 200 mm 8 Hours ore 100% IT SCANNER - + LASER 29
30 180 mm 3 Installazione IN OUT 30
31 2 180 mm 180 mm KEOR MULTIPLUG 600, 800 VA mm ATTENZIONE Non collegare stampanti laser e scanner alle uscite dell UPS in considerazione della loro elevata corrente di avvio. ATTENZIONE Non collegare alle uscite dell UPS apparecchi elettrici domestici, quali per esempio asciugacapelli, aria condizionata, frigorifero. IT 31
32 4 Software UPS Per controllare i parametri dell UPS e gestire l arresto automatico dei computer alimentati dall UPS stesso, è possibile scaricare il software UPS Communicator (solo per Windows) dal sito di Legrand accedendo alla sezione relativa ai software. Per ulteriori informazioni scaricare dal sito e consultare il manuale dell UPS Communicator. Collegamento Indicatori e Tabella degli Allarmi in Attività 5 Segnali e controllo Condizione LED blu LED rosso Buzzer Modalità in Linea Sempre acceso OFF OFF Modalità batteria - livello batteria normale Modalità batteria - livello batteria basso Lampeggia ogni 10 secondi Lampeggia ogni secondo OFF ON 1 beep ogni 10 secondi 1 beep ogni secondo Modalità Errore OFF ON Beep continuo Allarme per protezione temperatura troppo elevata OFF Lampeggia ogni secondo NO 32
33 KEOR MULTIPLUG 600, 800 VA 6 Sostituzione batterie OFF IT 33
34 6 Sostituzione batterie 34 ATTENZIONE - La manutenzione delle batterie deve essere effettuata o supervisionata da personale appositamente formato con adeguata conoscenza delle batterie e dei requisiti di sicurezza. - Non gettare la batteria o le batterie su fiamme accese perché potrebbero esplodere. - Non aprire o rompere le batterie. Gli elettroliti delle batterie sono tossici e pericolosi per la pelle e per gli occhi. - Rischio di scarica elettrica in quanto il circuito della batteria non è isolato da corrente AC, pertanto potrebbe esserci il rischio di corrente tra i terminali della batteria e la terra. Verificare prima di toccare a mani nude. - La batteria può rappresentare un rischio di scarica elettrica ed elevata corrente di corto circuito. Osservare le seguenti precauzioni quando di lavora sulle batterie: A. Togliere orologi, anelli o altri oggetti metallici. B. Utilizzare strumenti con impugnature isolate. C. Indossare guanti in gomma e stivali. D. Non lasciare strumenti o parti metalliche in cima alle batterie. E. Scollegare la fonte di alimentazione prima di collegare o scollegare la batteria
35 7 Possibili malfunzionamenti KEOR MULTIPLUG 600, 800 VA Problema Possibile causa Soluzioni Batteria bassa. Caricare l UPS per almeno 8 ore. Nessun LED sul pannello frontale Batteria guasta. Sostituire la batteria con lo stesso tipo di batteria. L UPS non è acceso. Premere nuovamente il tasto di accensione per accendere l UPS. L allarme suona continuamente se la rete è normale. L UPS è sovraccarico. Togliere prima una parte del carico. Prima di ricollegare l apparecchio, verificare che il carico corrisponda alla capacità dell UPS secondo quanto descritto nelle specifiche. UPS guasto. Riportare l unità al centro servizi. L allarme suona ogni 2 secondi se la rete è normale. Batteria difettosa. Il pannello di carico è danneggiato. Sostituire la batteria con lo stesso tipo di batteria. Riportare l unità al centro servizi. IT L UPS è sovraccarico. Togliere una parte del carico critico. Quando manca la corrente, il tempo di back-up è ridotto. La tensione della batteria è troppo bassa. Batteria difettosa. Potrebbe essere dovuto a un ambiente operativo con temperatura troppo elevata o operazioni non corrette alla batteria. Caricare l UPS per almeno 8 ore. Sostituire la batteria con lo stesso tipo di batteria. La rete è normale ma il LED lampeggia. Il cordone di alimentazione è allentato. Ricollegare correttamente il cordone di alimentazione. 35
36 8 Caratteristiche tecniche Potenza Potenza nominale (VA) 600 VA 800 VA Potenza nominale (W) 360 W 480 W Fattore di potenza 0,6 Ingresso Tensione nominale 230 Vac ( Vac) Corrente nominale 3,4A 4,5A Rilevamento bassa tensione (da modalità in linea a modalità batteria) 180 Vac ± 5% Ripristino bassa tensione (da modalità batteria a modalità in linea) 190 Vac ± 5% Rilevamento alta tensione (da modalità in linea a modalità batteria) 270 Vac ± 5% Ripristino alta tensione (da modalità batteria a modalità in linea) 260 Vac ± 5% Frequenza nominale 50Hz/ 60Hz Bassa frequenza/ritorno (da modalità in linea a modalità batteria) 45/47Hz +/- 1Hz Alta frequenza/ritorno (da modalità batteria a modalità in linea) 55/53Hz +/- 1Hz Collegamento ingresso Cavo di ingresso Cavo di ingresso 3x0,75mm 2 integrato con spina standard tedesco/francese Uscita Modalità in linea Come l ingresso Modalità batteria Step wave (pseudosinusoidale) Frequenza modalità in linea Come frequenza di ingresso Tensione modalità in linea Come tensione di ingresso Risposta transitoria (10%->90% regime permanente) <150ms (Assunzione di carico, 00% carico, 2uF/W) Tensione modalità batteria 230 Vac +/- 10% Frequenza modalità batteria Capacitanza di carico Picco di tensione uscita modalità batteria 50Hz/ 60Hz 1,2uF 230V < Vp<400V 36
37 KEOR MULTIPLUG 600, 800 VA Collegamenti uscite Uscita Protezione cortocircuiti Modalità in Linea Modalità batteria Protezione termica Modalità batteria Efficienza X standard tedesco/italiano con back up batteria e protezione contro sovratensioni ( / ) 2 X standard tedesco/italiano con protezione contro sovratensioni ( / ) 6 X standard francese con back up batteria e protezione contro sovratensioni ( / ) 2 X standard francese con protezione contro sovratensioni ( / ) Spegnimento in 3 cicli Fusibile 7 A 250 Vac Attivo al trasformatore > 130 ±5 gradi ripristino al trasformatore < 75±5 gradi Modalità in Linea > 95% Modalità batteria >70% Rumore acustico Modalità in Linea <40dB Modalità batteria <45dB Trasferimento Tempo di trasferimento 2~6ms Tipico Batterie Tipo batterie 1x 12V/7Ah 1 x 12V/9Ah Tensione corrente 13,7 V +/- 0,25 V Corrente di ricarica Circa 0,5A, 1A max. Protezione sovraccarico >14,5 V +/- 0,25V arresto caricatore Tensione/frequenza uscita partenza a freddo 230V/ 50Hz IT 37
03/2013. Mod: WOKI-60IP/TR. Production code: DTWIC 6000
 03/2013 Mod: WOKI-60IP/TR Production code: DTWIC 6000 ENCASTRABLE INDUCTION DROP IN INDUCTION 11/2011 TECHNICAL FEATURES DOCUMENTATION S.A.V. Notice d utilisation : FX00326-A Guide d intervention : ---
Comfort Duett. TV-kit. www.comfortaudio.com. USA: English/Français/Español. Comfort Duett
 Comfort Duett TV-kit USA: English/Français/Español www.comfortaudio.com Comfort Duett 1 English The television kit makes it possible to amplify the sound from the TV via the charger unit. As soon as Comfort
Nova AVR 500 Nova AVR 625 Nova AVR 1250
 www.eaton.com Nova AVR 625 Nova AVR 1250 Battery back-up UPS Onduleur - ASI Installation and User Manual Manuel d installation et d utilisation IMPORTANT SAFETY INSTRUCTIONS Read before installing product.
 3.2.6.1. Câblage type 3.2.6.2. Autres câblages RC1 : Sélection des courbes de charge SW1 : Sélection de la fonction BOOST RC1 SW1 Montage de 2 chargeurs en parallèle : NF EN 61000-6-1: Compatibilité
GIGABIT PCI DESKTOP ADAPTER DGE-530T. Quick Installation Guide+ Guide d installation+
 GIGABIT PCI DESKTOP ADAPTER Quick Installation Guide+ Guide d installation+ Check Your Package Contents Quick Installation Guide Gigabit Ethernet PCI Adapter CD with Manual and Drivers DO NOT insert the
ENGLISH 4 FRANÇAIS 6 ESPAÑOL 8
 SY ENGLISH 4 FRANÇAIS 6 ESPAÑOL 8 ENGLISH How to lubricate the sewing machine Warning! Always switch off the machine and disconnect it from the power supply before lubricating the sewing machine. 1 Always
Notice Technique / Technical Manual
 Contrôle d accès Access control Encodeur USB Mifare ENCOD-USB-AI Notice Technique / Technical Manual SOMMAIRE p.2/10 Sommaire Remerciements... 3 Informations et recommandations... 4 Caractéristiques techniques...
Garage Door Monitor Model 829LM
 Garage Door Monitor Model 829LM To prevent possible SERIOUS INJURY or DEATH from a closing garage door: NEVER permit children to operate or play with door control push buttons or remote control transmitters.
Thank you for choosing the Mobile Broadband USB Stick. With your USB Stick, you can access a wireless network at high speed.
 Thank you for choosing the Mobile Broadband USB Stick. With your USB Stick, you can access a wireless network at high speed. Note: This manual describes the appearance of the USB Stick, as well as the
Fabricant. 2 terminals
 Specifications Fabricant Nominal torque (Nm) 65 Minimal torque (Nm) 0,63 Coil resistance - 20 C (ohms) 20 Rated current DC (A) 1 Rotor inertia (kg.m 2 ) 2.10-3 Weight (kg) 7,20 Heat dissipation continuous
Package Contents. System Requirements. Before You Begin
 Package Contents DWA-125 Wireless 150 USB Adapter CD-ROM (contains software, drivers, and manual) Cradle If any of the above items are missing, please contact your reseller. System Requirements A computer
TECHNICAL MANUAL FT GEN 17
 IT MANUALE TECNICO EN TECHNICAL MANUAL FR MANUEL TECHNIQUE FT GEN 7 3 4 5 6 Schede opzionali Art. 5733 e Art. 5734 per Monitor serie Bravo Optional cards Art. 5733 and Art. 5734 for Bravo series Monitor
Quick start guide. www.philips.com/support HTL1170B
 For product support, visit Para obtener asistencia técnica, visite Pour en savoir plus sur l assistance sur les produits, visitez le site www.philips.com/support HTL1170B Quick start guide P&F USA, Inc.
Italiano - English - Français
 Italiano - English - Français Soluzioni di automazione flessibili al servizio della sezionatura Flexible automation for panel sizing Solutions d automatisation flexibles pour la sciage Cella di sezionatura
DX400E-FR / DX600E-FR / DX800E-FR Manuel d utilisation
 DX400E-FR / DX600E-FR / DX800E-FR Manuel d utilisation K01-0000084-00 PRÉCAUTION DE SÉCURITÉ Ce manuel contient d importantes instructions de sécurité. Veuillez lire et suivre scrupuleusement toutes les
Paxton. ins-20605. Net2 desktop reader USB
 Paxton ins-20605 Net2 desktop reader USB 1 3 2 4 1 2 Desktop Reader The desktop reader is designed to sit next to the PC. It is used for adding tokens to a Net2 system and also for identifying lost cards.
ASSEMBLY INSTRUCTIONS DIRECTIVES POUR L'ASSEMBLAGE ombre pendant lamp lampe suspendue à tons dégradés, chocolat
 ASSEMBLY INSTRUCTIONS DIRECTIVES POUR L'ASSEMBLAGE ombre pendant lamp lampe suspendue à tons dégradés, chocolat SKU 2728089 INSTRUCTIONAL MANUAL MANUEL D'INSTRUCTIONS 270/2707 COMPONENT LIST LISTE DES
ASSEMBLY INSTRUCTIONS DIRECTIVES POUR L'ASSEMBLAGE luster chandelier lamp chandelier à trois branches en verre lustré
 ASSEMBLY INSTRUCTIONS DIRECTIVES POUR L'ASSEMBLAGE luster chandelier lamp chandelier à trois branches en verre lustré SKU 2711592 INSTRUCTIONAL MANUAL MANUEL D'INSTRUCTIONS 270/2707 COMPONENT LIST LISTE
FRENCH INSTALLATION DES BATTERIES FIXATION DU CHARGEUR CHARGER LE CHARGEUR ACTIVER LE CHARGEUR
 FRENCH INSTALLATION DES BATTERIES 1. Retirez le boulon qui maintient la porte de la batterie. 2. Retirez le support de la batterie. 3. Installez les batteries en accord avec la signalisation de polarité
Software and Hardware Datasheet / Fiche technique du logiciel et du matériel
 Software and Hardware Datasheet / Fiche technique du logiciel et du matériel 1 System requirements Windows Windows 98, ME, 2000, XP, Vista 32/64, Seven 1 Ghz CPU 512 MB RAM 150 MB free disk space 1 CD
ZEUS UPS 300 VA 165 W
 R ZEUS UPS 300 VA 165 W Onduleur Zeus 300 VA 165 W Instructions for use Mode d emploi Modo de empleo - UPS300FR - ENGLISH UPS USER GUIDE : Feature: 2 power outlets for battery backup and surge protection.
Wireless G USB Network Adapter Adaptateur réseau G sans fil USB Adaptador de red USB Wireless G
 Wireless G USB Network Adapter Adaptateur réseau G sans fil USB Adaptador de red USB Wireless G www.ativasupport.com Ativa Tech Support US: 1-866-91-ATIVA (1-866-912-8482) 2006 Ativa. All rights reserved.
Guide d'installation rapide TFM-560X YO.13
 Guide d'installation rapide TFM-560X YO.13 Table of Contents Français 1 1. Avant de commencer 1 2. Procéder à l'installation 2 Troubleshooting 6 Version 06.08.2011 16. Select Install the software automatically
Contents Windows 8.1... 2
 Workaround: Installation of IRIS Devices on Windows 8 Contents Windows 8.1... 2 English Français Windows 8... 13 English Français Windows 8.1 1. English Before installing an I.R.I.S. Device, we need to
SA-32 / SA-62 INSTRUCTION MANUAL - MANUEL D INSTRUCTIONS
 SA-32 / SA-62 INSTRUCTION MANUAL - MANUEL D INSTRUCTIONS 4 5 6 7 4 5 6 7 1. Telephone Paging Volume Control 1. Contrôle de volume Paging Téléphone 2. Microphone Volume Control 2. Contrôle volume du microphone
Logitech Tablet Keyboard for Windows 8, Windows RT and Android 3.0+ Setup Guide Guide d installation
 Logitech Tablet Keyboard for Windows 8, Windows RT and Android 3.0+ Setup Guide Guide d installation English.......................................... 3 Français.........................................
MAGNESIUM ENGLISH FRANÇAIS ESPAÑOL
 MAGNESIUM ENGLISH ESPAÑOL ENGLISH INSTALLATION INSTRUCTIONS CAUTION: Before starting, turn off power at main circuit panel. IMPORTANT SAFETY INSTRUCTIONS When installing or using the lighting system, basic
AMARICAM JUNIOR 100M FRANCAIS ENGLISH DEUTSCH ITALIANO ESPANOL NEDERLANDS PORTUGUESES MANUEL UTILISATEUR USER S GUIDE BENUTZERHANDBUCH
 AMARICAM JUNIOR 100M MANUEL UTILISATEUR USER S GUIDE BENUTZERHANDBUCH GUIDA PER L UTENTE GUIA DEL USUARIO GEBRUIKERSGIDS MANUAL DO USUARIO FRANCAIS ENGLISH DEUTSCH ITALIANO ESPANOL NEDERLANDS PORTUGUESES
Contrôle d'accès Access control. Notice technique / Technical Manual
 p.1/18 Contrôle d'accès Access control INFX V2-AI Notice technique / Technical Manual p.2/18 Sommaire / Contents Remerciements... 3 Informations et recommandations... 4 Caractéristiques techniques... 5
Trim Kit Installation Instruction
 Trim Kit Installation Instruction Instrucciones para la Instalación del Kit de Molduras Instructions pour l'installation du Kit d'encastrement m If any hardware or parts are damaged or missing, contact
Important information. New SIMATIC HMI Panels. Migration made easy start now. SIMATIC HMI Panels. siemens.com/simatic-panels
 Important information New SIMATIC HMI Panels Migration made easy start now SIMATIC HMI Panels siemens.com/simatic-panels Totally Integrated Automation Portal (TIA Portal) est l environnement d ingénierie
User guide 3 Notice d utilisation 20
 800/1000/1500/2000/2500/3000/3500 VA User guide 3 Notice d utilisation 20 English Version 2 User guide 1. SAFETY INSTRUCTIONS Security IMPORTANT! Installing and connecting UPSs in a way that does not comply
Dichiarazione di Conformità CE ( Dichiarazione del costruttore )
") CODICE MODELLO DATA 230 / 024 27.03.2009 Dichiarazione di Conformità CE ( Dichiarazione del costruttore ) Il costruttore: DICHIARA CHE IL SEGUENTE APPARATO: Nome dell' apparato Tipo di apparato Rilevatore
CODICE MODELLO DATA 230 / 024 27.03.2009 Dichiarazione di Conformità CE ( Dichiarazione del costruttore ) Il costruttore: DICHIARA CHE IL SEGUENTE APPARATO: Nome dell' apparato Tipo di apparato Rilevatore
IMPORTANT. Always connect the batteries first. Use for 12V battery system only 12V (36 cells) solar panel array.
 solar panel array.") Manual Manuel EN FR IMPORTANT Always connect the batteries first. Use for 12V battery system only 12V (36 cells) solar panel array. Use for 24V battery system only 24V (72 cells) solar panel array. BlueSolar
Manual Manuel EN FR IMPORTANT Always connect the batteries first. Use for 12V battery system only 12V (36 cells) solar panel array. Use for 24V battery system only 24V (72 cells) solar panel array. BlueSolar
User guide Conference phone Konftel 100
 User guide Conference phone Konftel 100 English I Español I Conference phones for every situation Cet emballage contient: 1 x Guide de l utilisateur 1 x Téléphone pour conférences 1 x Transformateur secteur
Quick Installation Guide TEW-AO12O
 Quick Installation Guide TEW-AO12O Table of of Contents Contents Français... 1 1. Avant de commencer... 1 2. Installation du matériel... 2 3. Montage... 4 Troubleshooting... 6 Version 10.04.2007 1. Avant
Instructions pour mettre à jour un HFFv2 v1.x.yy v2.0.00
 Instructions pour mettre à jour un HFFv2 v1.x.yy v2.0.00 HFFv2 1. OBJET L accroissement de la taille de code sur la version 2.0.00 a nécessité une évolution du mapping de la flash. La conséquence de ce
33 inch open & closed storage Rangement à espace fermé et ouvert de 33po (83.7cm) 33 pulgadas almacenaje abierto y cerra
 33 pulgadas almacenaje abierto y cerra") 33 inch open & closed storage 33 pulgadas almacenaje abierto y cerra! o not throw away packaging materials until assembly is complete.! Assemble this item on a soft surface, such as cardboard or carpet,
33 inch open & closed storage 33 pulgadas almacenaje abierto y cerra! o not throw away packaging materials until assembly is complete.! Assemble this item on a soft surface, such as cardboard or carpet,
fullprotect inside EOLE SPEie RS E-SPEie 0.5-12-5V-0.6A-RS 1.0 revision Protection environnement Datasheet édition française
 Protection environnement Datasheet édition française 1.0 revision R-D-CO-D-27112011-1.0-C fullprotect inside SPEi Protection environnement interne SPEe Protection environnement externe SPEc Contrôle de
Stainless Steel Solar Wall Light
 V 2.9 Stainless Steel Solar Wall Light User Manual Please read and understand all instructions before use.retain this manual for future reference. V 2.9 Stainless Steel Solar Wall Light SPECIFICATIONS
Logitech Speaker System Z553 Setup Guide Guide d installation
 Logitech Speaker System Z553 Setup Guide Guide d installation Logitech Speaker System Z553 English................. 3 Français................ 10 www.logitech.com/support...19 2 Package contents Logitech
Folio Case User s Guide
 Fujitsu America, Inc. Folio Case User s Guide I N S T R U C T I O N S This Folio Case is a stylish, lightweight case for protecting your Tablet PC. Elastic Strap Pen Holder Card Holders/ Easel Stops Figure
CAR STEREO SPEAKER CS-AR500 CS-AR680 CS-AR650 CS-AR690 INSTRUCTION MANUAL MODE D EMPLOI MANUAL DE INSTRUCCIONES
 CAR STEREO SPEAKER HAUT-PARLEURS AUTO STEREO ALTAVOCES ESTEREOFONICOS PARA AUTOMOVIL CS-AR500 CS-AR680 CS-AR650 CS-AR690 INSTRUCTION MANUAL MODE D EMPLOI MANUAL DE INSTRUCCIONES LVT1744-001A Thank you
SERIE TS-770 SYSTEME CONFERENCE
 SERIE TS-770 SYSTEME CONFERENCE Le système de conférence à fils de TOA installation, utilisation et extension faciles, Avec la participation à distance via IP ou téléphone. Système de conférence compact,
MODULES ÉLECTRIQUES. - systèmes électriques DC - onduleurs - convertisseurs - interrupteurs statiques. Notre alimentation Votre confiance
 MODULES ÉLECTRIQUES - systèmes électriques DC - onduleurs - convertisseurs - interrupteurs statiques Notre alimentation Votre confiance Système Power 1UDC+ Jusqu à 38 redresseurs et un contrôleur, 1266A
WiFi Security Camera Quick Start Guide. Guide de départ rapide Caméra de surveillance Wi-Fi (P5)
") #45 #46 WiFi Security Camera Quick Start Guide Guide de départ rapide Caméra de surveillance Wi-Fi (P5) #47 Start Here 1 Is this you? TECH SUPPORT CTRL ALT DEL 2 If yes, turn to page three 1 3 If not,
#45 #46 WiFi Security Camera Quick Start Guide Guide de départ rapide Caméra de surveillance Wi-Fi (P5) #47 Start Here 1 Is this you? TECH SUPPORT CTRL ALT DEL 2 If yes, turn to page three 1 3 If not,
Le No.1 de l économie d énergie pour patinoires.
 Le No.1 de l économie d énergie pour patinoires. Partner of REALice system Economie d énergie et une meilleure qualité de glace La 2ème génération améliorée du système REALice bien connu, est livré en
Instructions Mozilla Thunderbird Page 1
 Instructions Mozilla Thunderbird Page 1 Instructions Mozilla Thunderbird Ce manuel est écrit pour les utilisateurs qui font déjà configurer un compte de courrier électronique dans Mozilla Thunderbird et
irx 8 conectores / irx 8 outlets / irx 8 prises SNMP KW/H Amps Breaker Email Acabado: Finition : Embalaje: Emballage : Finish: Packaging: General
 105 Series En la actualidad, el aumento de instalaciones con aplicaciones y equipos de alta densidad, hacen de la gestión y control de la energía una parte muy importante en el momento de diseñar y optimizar
Logitech Wireless Performance Combo MX800 Setup Guide Guide d installation
 Logitech Wireless Performance Combo MX800 Setup Guide Guide d installation Logitech Wireless Performance Combo MX800 Setup Guide Guide d installation Important information Safety, compliance, and warranty
Quick Installation Guide TBW-106UB H/W: V1
 Quick Installation Guide TBW-106UB H/W: V1 Table of Contents... 1. Avant de commencer... 2. Procéder à l'installation... 3. Configuration de l'adaptateur Bluetooth... Troubleshooting... 1 1 2 5 7 Version
Utiliser une WebCam. Micro-ordinateurs, informations, idées, trucs et astuces
 Micro-ordinateurs, informations, idées, trucs et astuces Utiliser une WebCam Auteur : François CHAUSSON Date : 8 février 2008 Référence : utiliser une WebCam.doc Préambule Voici quelques informations utiles
Cucina a legna aria. Gaia
 Cucina a legna aria Tutto il sapore della tradizione in questa gamma di cucine economiche, smaltate con focolare in refrattario o ghisa e fornio in acciaio inox. Gaia cm 85x55x85 h peso: 110 kg Potenza
Quick Installation Guide TW100-BRV304
 Quick Installation Guide TW100-BRV304 Table of of Contents Contents Français... 1. Avant de commencer... 2. Installation du matériel... 3. Configuration du routeur... 1 1 2 3 Troubleshooting... 5 Version
Lavatory Faucet. Instruction Manual. Questions? 1-866-661-9606 customerservice@artikaworld.com
 Lavatory Faucet Instruction Manual rev. 19-01-2015 Installation Manual You will need Adjustable Wrench Adjustable Pliers Plumber s Tape Hardware list (included) Allen Key Socket wrench tool Important Follow
Once the installation is complete, you can delete the temporary Zip files..
 Sommaire Installation... 2 After the download... 2 From a CD... 2 Access codes... 2 DirectX Compatibility... 2 Using the program... 2 Structure... 4 Lier une structure à une autre... 4 Personnaliser une
Master4Light. Caractérisation Optique et Electrique des Sources Lumineuses. Equipement 2-en-1 : source de courant et spectrophotomètre
 DSF-M4L-Rev2.0-04/12 Master4Light Equipement 2-en-1 : source de courant et spectrophotomètre Interface graphique logicielle, connexion USB Configuration personnalisable : laboratoire et in-situ http://www.majantys.com
Quick Start Guide This guide is intended to get you started with Rational ClearCase or Rational ClearCase MultiSite.
 Rational ClearCase or ClearCase MultiSite Version 7.0.1 Quick Start Guide This guide is intended to get you started with Rational ClearCase or Rational ClearCase MultiSite. Product Overview IBM Rational
TABLE DES MATIERES A OBJET PROCEDURE DE CONNEXION
 1 12 rue Denis Papin 37300 JOUE LES TOURS Tel: 02.47.68.34.00 Fax: 02.47.68.35.48 www.herve consultants.net contacts@herve consultants.net TABLE DES MATIERES A Objet...1 B Les équipements et pré-requis...2
MANUEL D INSTRUCTION
 MANUEL D INSTRUCTION ---------- Régulateur de Charge Solaire pour deux batteries, Pour Caravanes, Camping-Cars & Bateaux Courant (12V or 12/24V automatique) NOTES: Utilisable seulement avec des panneaux
PRESENTATION REMOTE TÉLÉCOMMANDE DE PRÉSENTATION. User Guide Manuel de l utilisateur
 PRESENTATION REMOTE TÉLÉCOMMANDE DE PRÉSENTATION User Guide Manuel de l utilisateur Targus Presentation Remote Introduction Thank you for your purchase of the Targus Presentation Remote. This cordless
7.5 WATT FOLDING SOLAR CHARGER
 7.5 WATT FOLDING SOLAR CHARGER User s Manual Congratulations on your Coleman Products Purchase. This product is designed to the highest technical specifications and standards. It will supply years of maintenance
Nice HSRE12. Home security radio receiver. EN - Installation instructions. IT - Istruzioni per l installazione. FR - Instructions pour l installation
 EN - Installation instructions IT - Istruzioni per l installazione FR - Instructions pour l installation ES - Instrucciones para la instalación DE - Anleitungen für die Installation Nice HSRE12 Home security
ARP-090G / ARP-090K NOTICE D'EMPLOI INSTRUCTION MANUAL
 2 7 NOTICE D'EMPLOI INSTRUCTION MANUAL ARP-090G / ARP-090K Lire attentivement la notice avant d utiliser l appareil Before operating this product, please read user manual completely FRANCAIS EMPLACEMENT
GE Security. KILSEN série NK700 Centrale de détection et d alarme Incendie conventionelle. Manuel d utilisation
 GE Security KILSEN série NK700 Centrale de détection et d alarme Incendie conventionelle Manuel d utilisation g ination imag at work Kilsen is a brand name of GE Security. www.gesecurity.net COPYRIGHT
Monitor LRD. Table des matières
 Folio :1/6 Table des matières 1.Installation du logiciel... 3 2.Utilisation du logiciel... 3 2.1.Description de la fenêtre de commande... 3 2.1.1.Réglage des paramètres de communication... 4 2.1.2.Boutons
SIMATIC. SIMATIC STEP 7 PID Professional V12. Welcome Tour. Totally Integrated Automation www.siemens.com/tia-portal-welcometour PORTAL
 SIMATIC STEP 7 PID Professional V12 Welcome Tour Totally Integrated Automation www.siemens.com/tia-portal-welcometour Totally Integrated Automation PORTAL www.siemens.com/tia-portal SIMATIC Siemens Aktiengesellschaft
SPEZZATRICE AUTOMATICA PRESSABURRO ITALIAN BAKERIES MACHINERY AUTOMATIC BUTTER PRESSING MACHINE MACHINE AUTOMATIQUE PRESSE-BEURRE LA PÂTE
 SPEZZATRICE AUTOMATICA PRESSABURRO ITALIAN BAKERIES MACHINERY AUTOMATIC BUTTER PRESSING MACHINE MACHINE AUTOMATIQUE PRESSE-BEURRE LA PÂTE ITALIAN BAKERIES MACHINERY PRESSABURRO VERNICIATA BUTTER PRESSING
NEW Fin Fan / Air cooled condenser cleaning
 Air cooled Condensers ( ACC ) Cleaning Air Cooled heat exchangers ( Finfan) Cleaning Cleaning Services Permanente installation NEW Fin Fan / Air cooled condenser cleaning New and revolutionnary high pressure
Nice HSRE12. Home security radio receiver. EN - Installation instructions. IT - Istruzioni per l installazione. FR - Instructions pour l installation
 EN - Installation instructions IT - Istruzioni per l installazione FR - Instructions pour l installation ES - Instrucciones para la instalación DE - Anleitungen für die Installation Nice HSRE12 Home security
Warning: Failure to follow these warnings could result in property damage, or personal injury.
 Western Steel & Tube 1 Storage Locker Extended Storage Locker Storage Cabinet Assembly And Use Instructions Warning: Failure to follow these warnings could result in property damage, or personal injury.
PERFORMER Silver. 22 1 2 inch (57 cm) Meijer.com
 Meijer.com") PERFORMER Silver CHARCOAL GRILL Read owner s guide before using the barbecue. Lea la Guía del propietario antes de utilizar la barbacoa. Lisez le guide d'utilisation avant d'utiliser le barbecue. 22 1
PERFORMER Silver CHARCOAL GRILL Read owner s guide before using the barbecue. Lea la Guía del propietario antes de utilizar la barbacoa. Lisez le guide d'utilisation avant d'utiliser le barbecue. 22 1
Contrôle d accès Access control MOD-TCPIP-AI. Notice technique / Technical Manual
 Contrôle d accès Access control MOD-TCPIP-AI Notice technique / Technical Manual Notice technique Mod-TCPIP-AI 9 septembre 2008 v.1.0 p.2/16 Sommaire / Contents Sommaire / Contents...2 Remerciements...3
Quick Installation Guide TV-IP400 TV-IP400W
 Quick Installation Guide TV-IP400 TV-IP400W Table of of Contents Contents Français... 1. Avant de commencer... 2. Installation du matériel... 3. Configuration de la Webcam... Troubleshooting... 1 1 2 3
DOCUMENTATION - FRANCAIS... 2
 DOCUMENTATION MODULE CATEGORIESTOPMENU MODULE CREE PAR PRESTACREA INDEX : DOCUMENTATION - FRANCAIS... 2 INSTALLATION... 2 CONFIGURATION... 2 LICENCE ET COPYRIGHT... 3 SUPPORT TECHNIQUE ET MISES A JOUR...
Application Form/ Formulaire de demande
 Application Form/ Formulaire de demande Ecosystem Approaches to Health: Summer Workshop and Field school Approches écosystémiques de la santé: Atelier intensif et stage d été Please submit your application
User Manual Guide d utilisation
 Home Theater Battery Backup with AVR Technology Batterie de secours avec technologie AVR pour cinéma maison User Manual Guide d utilisation AP30800fc10-BLK Table of Contents Page Belkin PureAV Battery
Quick Installation Guide TE100-P1P
 Quick Installation Guide TE100-P1P Table of of Contents Contents... 1 1. Avant de commencer... 1 2. Procéder à l'installation... 2 3. Configuration du serveur d'impression... 3 4. Ajout de l'imprimante
TRAITEMENT DE DONNÉES
 Local Area Net works (LAN) SERVEURS CENTRES DE TRAITEMENT DE DONNÉES DISPOSITIFS POUR LES TÉLÉCOMMU- NICATIONS e-business (Parcs de serveurs, ISP/ASP/POP) API INDUSTRIELS DISPOSITIFS ÉLECTRO- MÉDICAUX
DOCUMENTATION - FRANCAIS... 2
 DOCUMENTATION MODULE SHOPDECORATION MODULE PRESTASHOP CREE PAR PRESTACREA INDEX : DOCUMENTATION - FRANCAIS... 2 INSTALLATION... 2 Installation automatique... 2 Installation manuelle... 2 Résolution des
AUTO ER ADAPT ER SPECIAL USE WARNING
 POWER SPECIALISTS FOR MOBILE COMPUTING AUTO ER ADAPT ER The Lind Automobile Power Adapter is designed to power your laptop computer and to charge its internal battery from an appropriate DC voltage power
Spécial Catégorie 6 Patch Cords
 Spécial Catégorie 6 Patch Cords Patent Pending Sommaire 1 - Préliminaires... 2 2 Qu est ce qu apporte la catégorie 6... 3 3 Qu est ce que l interopérabilité...3 4 Ce que PatchSee annonçait en septembre
Quick Installation Guide TEW-MP1U
 Quick Installation Guide TEW-MP1U Table of Contents...... 1. Avant de commencer... 2. Procéder à l'installation... 3. Configuration du serveur d'impression... 4. Impression... 5. Faxer... 6. Scannage...
DIGITAL TEMPERATURE HUMIDITY MONITOR
 DTH03A USER S MANUAL DIGITAL TEMPERATURE HUMIDITY MONITOR Please read and follow the manual carefully. INTRODUCTION This unit measures temperature and humidity. It can display time and date, and determine
Start. Quick. Best Better Good. Installation. Installation. Instalación
 If you have any questions, please visit our website at www. magnavox.com/support Quick Start Need help connecting this LCD? Call us at 1-866-341-3738 Vous avez besoin d aide pour connecter ce téléviseur
SERVEUR DÉDIÉ DOCUMENTATION
 SERVEUR DÉDIÉ DOCUMENTATION Release 5.0.6.0 19 Juillet 2013 Copyright 2013 GIANTS Software GmbH, All Rights Reserved. 1/9 CHANGE LOG Correction de bug divers (5.0.6.0) Ajout d une option de relance automatique
CLIM/GTP/27/8 ANNEX III/ANNEXE III. Category 1 New indications/ 1 re catégorie Nouvelles indications
 ANNEX III/ANNEXE III PROPOSALS FOR CHANGES TO THE NINTH EDITION OF THE NICE CLASSIFICATION CONCERNING AMUSEMENT APPARATUS OR APPARATUS FOR GAMES/ PROPOSITIONS DE CHANGEMENTS À APPORTER À LA NEUVIÈME ÉDITION
Fontaine à eau. Manuel d utilisation Modèle : X-16 lg-x52 A. Type de distributeur d eau chaude et froide. Compresseur avec réfrigération.
 Fontaine à eau Manuel d utilisation Modèle : X-16 lg-x52 A Type de distributeur d eau chaude et froide. Compresseur avec réfrigération. Nous vous remercions d avoir acheté notre distributeur d eau. Lisez
POLICY: FREE MILK PROGRAM CODE: CS-4
 POLICY: FREE MILK PROGRAM CODE: CS-4 Origin: Authority: Reference(s): Community Services Department Cafeteria Services and Nutrition Education Division Resolution #86-02-26-15B.1 POLICY STATEMENT All elementary
Principe de TrueCrypt. Créer un volume pour TrueCrypt
 Sommaire : Principe de TrueCrypt...1 Créer un volume pour TrueCrypt...1 Premier montage...6 Réglages...8 Save Currently Mounted Volumes as Favorite...8 Settings > Preferences...9 TrueCrypt Traveller pour
PVCHECK Rel. 2.02 09/11/12
 Metel: HV000PVC Pag 1 of 5 Multifunction instrument for safety, functionality and performance verifications on a PV plant The multifunction instrument PVCHECK performs prompt and safe electrical checks
Start Here Point de départ
 Start Here Point de départ Epson Stylus C88+ Please read these instructions before using the printer. Lisez ces instructions avant d utiliser l imprimante. Install Ink Cartridges Installez les cartouches
Series. ipower Distribution Units
 Series ipower Distribution Units Series P D U ower istribution nits En la actualidad, el aumento de instalaciones con aplicaciones y equipos de alta densidad, hacen de la gestión y control de la energía
Mesure. Multimètre écologique J2. Réf : 251 055. Français p 1. Version : 0110
 Français p 1 Version : 0110 Sommaire 1 Présentation... 2 1.1 Description... 2 1.2 Type d alimentation... 3 1.2.1 Alimentation par générateur... 3 1.2.2 Alimentation par piles... 3 2 Sécurité... 3 2.1 Signalétique
Duplicateur et Station d Accueil pour Disque Dur USB 3.0 vers SATA
 Duplicateur et Station d Accueil pour Disque Dur USB 3.0 vers SATA SATDOCK22RU3 / SATDOC2RU3GB / SATDOC2RU3EU *Le produit actuel peut varier des photos DE: Bedienungsanleitung - de.startech.com FR: Guide
How to Login to Career Page
 How to Login to Career Page BASF Canada July 2013 To view this instruction manual in French, please scroll down to page 16 1 Job Postings How to Login/Create your Profile/Sign Up for Job Posting Notifications
3615 SELFIE. http://graffitiresearchlab.fr HOW-TO / GUIDE D'UTILISATION
 3615 SELFIE http://graffitiresearchlab.fr HOW-TO / GUIDE D'UTILISATION Hardware : Minitel Computer DIN FM545 45 connector (http://www.gotronic.fr/art-fiche-din-fm545-4747.htm) Cable Arduino compatible
MODE D EMPLOI USER MANUAL
 notice_cd 853:notice 9/01/08 15:08 Page 1 CAFETIÈRE À DOSETTES Coffee pad machine CD 853 GIACOMO MODE D EMPLOI USER MANUAL notice_cd 853:notice 9/01/08 15:08 Page 2 FRANÇAIS WHITE & BROWN vous félicite
Guide pour l Installation des Disques Durs SATA et Configuration RAID
 Guide pour l Installation des Disques Durs SATA et Configuration RAID 1. Guide pour l Installation des Disques Durs SATA.. 2 1.1 Installation de disques durs Série ATA (SATA).. 2 1.2 Créer une disquette