Aspirateur Sans Sac MODE D EMPLOI TC90
|
|
|
- Jean-Sébastien Ledoux
- il y a 8 ans
- Total affichages :
Transcription
1 Aspirateur Sans Sac MODE D EMPLOI TC90

2
3
4 1. CONSEILS DE SECURITE Lire attentivement ce mode d'emploi avant d'utiliser pour la première fois l'aspirateur. Utiliser l aspirateur seulement sur des surfaces d intérieures et sèches. Avant de brancher le cordon secteur, vérifiez que l interrupteur est bien sur la position éteinte. Vous devez toujours éteindre l'appareil et le débrancher de l'alimentation secteur avant de procéder au nettoyage ou à l'entretien de l'appareil. Surveillez les enfants afin qu ils ne jouent pas avec l appareil. Si le cordon d'alimentation est endommagé, cessez IMMEDIATEMENT d'utiliser l'appareil : pour éviter les risques de danger, seul un technicien agrée est autorisé à remplacer le cordon. Garder l appareil hors de portée de personnes (y compris d enfants) dont les capacités physiques, sensorielles ou mentales ou dont le manque d expérience ou de connaissances les empêchent assurer un usage sûr des appareils, s ils n ont pas été surveillés ou initiés au préalable. Cet aspirateur doit être utilisé uniquement pour un nettoyage domestique tel que décrit dans ce mode d'emploi. Utiliser seulement les accessoires recommandés par le fabricant. N utilisez pas l aspirateur si il est tombé, endommagé, ou immergé. Ne jamais débrancher la prise en tirant sur le cordon. Ne pas porter l aspirateur par le cordon. Garder le cordon toujours éloigné des sources chaudes. Ne pas faire rouler l'appareil sur le cordon d'alimentation lors de l'utilisation. Ne pas manipuler l aspirateur avec des mains mouillées. Ne pas utiliser l'appareil à l'extérieur, sur des surfaces mouillées. Ne pas boucher le conduit d aspiration. Si cela arrive, éteindre d abord l appareil avant de le manipuler. Veillez à ne pas diriger l embout d aspiration en direction de personnes ou animaux tout particulièrement en direction des yeux, des cheveux ou des oreilles. Ne pas utiliser l appareil pour aspirer des allumettes, des objets pointus, cigarettes, mégots ou tout autre corps incandescent. Ne pas utiliser l appareil sur des surfaces couvertes de ciment ou autres substances trop fines et/ou toxiques (Javel, Ammoniac, etc). IMPORTANT : Pour assurer le fonctionnement optimal de votre appareil, laver les filtres HEPA. Remettre les filtres uniquement lorsqu ils sont totalement secs. Utiliser l'appareil uniquement pour des usages domestiques. IMPORTANT Un disjoncteur thermique coupe l'appareil pour éviter la surchauffe en cas d'utilisation prolongée. Si cela se produit, il faut éteindre l'aspirateur, le débrancher, et attendre environ 1 heure avant de remettre l aspirateur en marche, afin de le laisser refroidir. Le disjoncteur se réinitialisera automatiquement

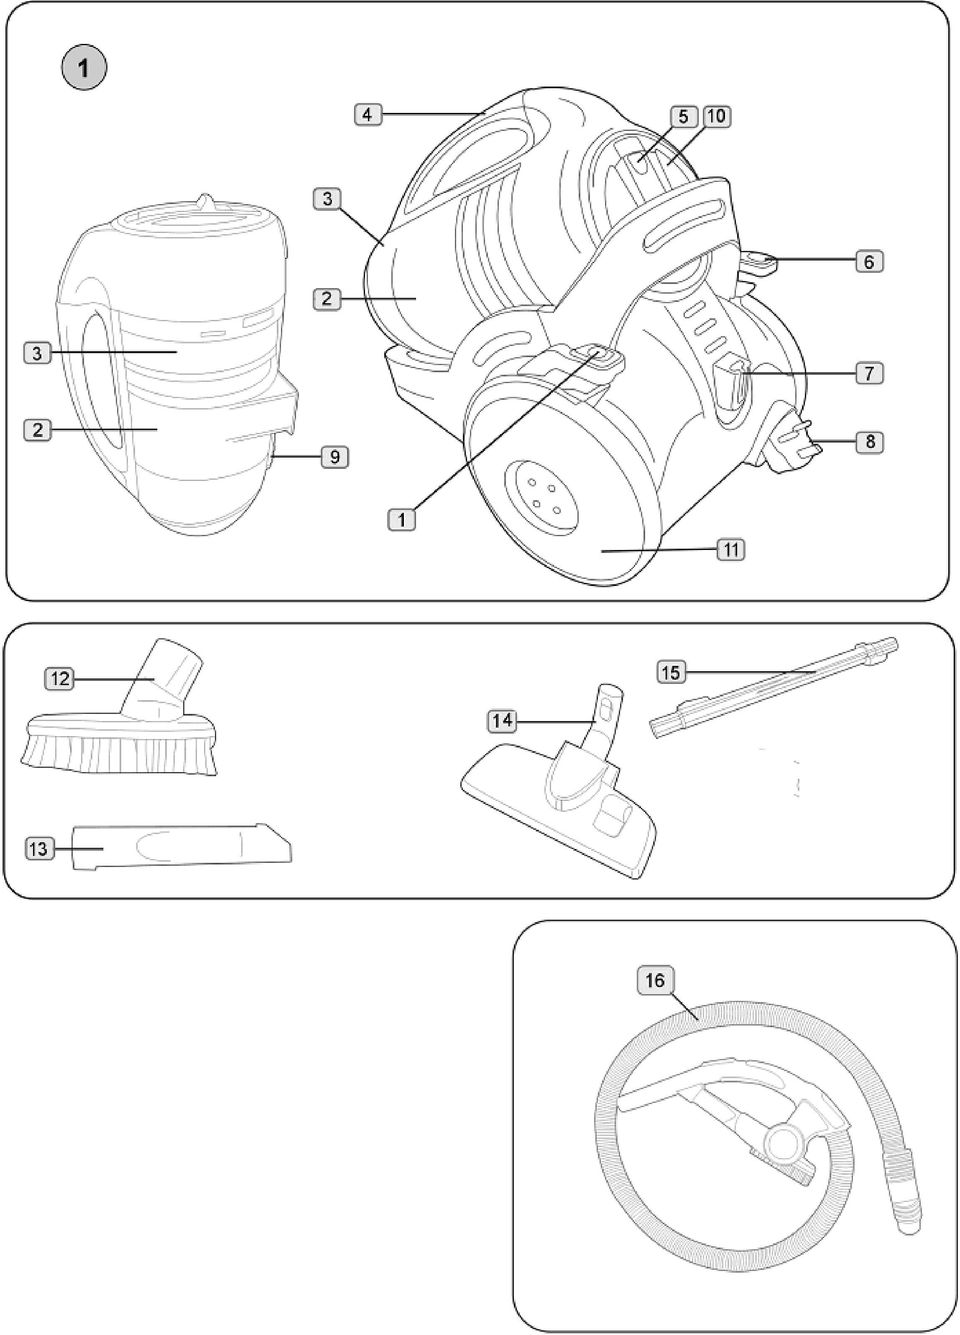
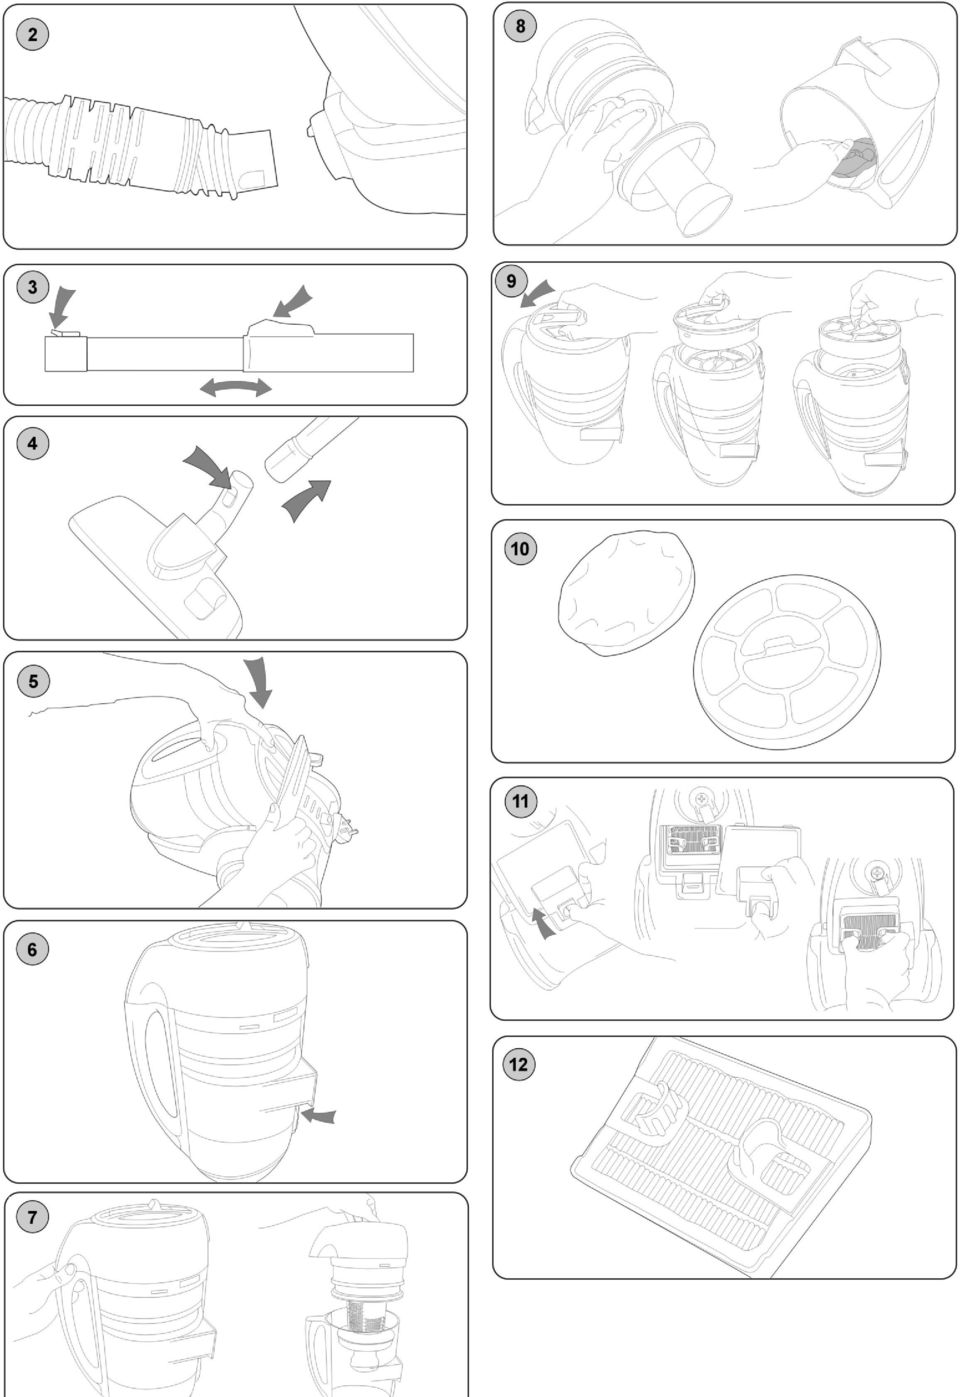
5 2. ACCESSOIRES ET DESCRIPTION Aspirateur Accessoires 1. Bouton Marche/Arrêt 12. Brosse meuble 2. Cassette cyclonique 13. Suceur 3. Séparateur cyclonique 14. Brosse parquet 4. Poignée de transport 15. Tube télescopique 5. Bouton d ouverture de la cassette cyclonique 16. Flexible 6. Bouton enrouleur de cordon 7. Logement du tube 8. Prise secteur 9. Bouton d ouverture du couvercle de la cassette cyclonique 10. Filtre de protection du moteur 11. Roue Veillez à ce que l appareil ne soit pas branché avant l assemblage Introduire l extrémité du tuyau dans l ouverture d aspiration située au dessus de l appareil jusqu au déclic indiquant le blocage (fig 2). Assembler le tube télescopique et le flexible. Régler le tube à la longueur désiré en poussant sur le manchon coulissant vers le bas (fig 3). Fixez les accessoires tels que le suceur ou la brosse parquet a l extrémité du tube télescopique (fig 4). 3. UTILISATION DE L APPAREIL Lorsque votre appareil est assemblé, sortez le cordon de l appareil et branchez le. Réglez la longueur de cordon : la marque jaune vous indique que vous avez déroulé la quasi totalité du cordon, la marque rouge est la limite maximale à ne pas dépasser. Mise en marche Une fois l appareil branché sur secteur, actionnez le bouton Marche/Arrêt. Pour arrêter l'appareil, appuyez de nouveau sur l interrupteur. Enrouleur du câble Appuyez sur le bouton enrouleur de câble qui enroulera le cordon automatiquement. Afin de prévenir tout danger, guidez le cordon à l aide de votre main. Poignée de transport Utilisez la poignée située sur la cassette cyclonique pour porter ou déplacer l aspirateur. Rangement du tube Situé à l arrière de l aspirateur. 4. ACCESSOIRES Les accessoires peuvent se fixer sur le flexible ou sur le tube télescopique. Brosse parquet Cette brosse est équipée d une pédale basculante qui vous permet de l adapter au type de sol à nettoyer : - position sols lisses (carrelages, parquets ) : faites descendre la brosse en appuyant sur la pédale - position tapis ou moquettes : faites remonter la brosse en basculant la pédale Brosse meuble Utilisez cet accessoire pour les canapés, les lampes, les étagères Suceur Recommandé pour les coins

6 Le symbole figurant sur cet appareil indique qu'il ne peut pas être jeté avec les ordures ménagères. Il doit être déposé à un point de collecte approprié pour le recyclage des équipements électriques et électroniques. Cet appareil est marqué conformément à la Directive européenne 2002/96/CE relative aux déchets d'équipements électriques et électroniques (WEEE). L'élimination correcte de cet appareil évite les conséquences négatives possibles sur l'environnement et la santé humaine susceptibles d'être causées par la manipulation de ce produit en cas d'élimination incorrecte. L'élimination doit être effectuée conformément à la réglementation locale en vigueur sur l'élimination des déchets. Pour plus d'informations détaillées sur le traitement, la récupération et le recyclage de cet appareil, contactez la 5. NETTOYAGE ET ENTRETIEN Il est conseillé de nettoyer les filtres chaque fois que votre réservoir à poussière est vidé. Eteignez et débranchez toujours l appareil avant de le nettoyer. Ne pas utiliser l aspirateur sans avoir remis tous les filtres à leur place. Pour vider le réservoir à poussière, appuyez sur le bouton d ouverture du réservoir (fig 5) placé sur le dessus de l aspirateur. Saisissez le réservoir à poussière par sa poignée et sortez-le de l appareil. Maintenez le réservoir à poussière au dessus d une poubelle et appuyez sur le bouton d ouverture. Dès que le réservoir à poussière est vidé, refermez le couvercle. Un «clic» confirmera la bonne fermeture. Replacez ensuite le réservoir à poussière dans l aspirateur. Nettoyage du séparateur cyclonique Retirez le réservoir à poussière de l aspirateur, avant de nettoyer le séparateur cyclonique. Tournez le couvercle du réservoir à poussière dans le sens inverse des aiguilles d une montre afin de le détacher du séparateur cyclonique. Le séparateur doit être nettoyé à l aide d une petite brosse ou d un chiffon humide. Le réservoir à poussière peut être essuyé (fig.8). Ne pas immerger le réservoir à poussière dans l eau. Une fois le séparateur cyclonique complètement sec, remettez le dans son logement et replacez le réservoir à poussière dans l appareil Nettoyage du filtre de protection du moteur Il est placé dans le couvercle du réservoir à poussière N utilisez pas de savon, de liquide vaisselle, ni autres détergents Déverrouillez le filtre de protection du moteur en tournant le couvercle dans le sens des aiguilles d une montre. Soulever le couvercle afin d atteindre le filtre moteur. Séparez le filtre en mousse de son logement en plastique. Secouez le filtre au-dessus d une poubelle pour en retirer la poussière. Vous pouvez le rincer à l eau froide. Laissez sécher au moins 24 heures avant de le replacer dans son compartiment. Une fois complètement sec, remettez le filtre dans son compartiment et refermez le couvercle du récupérateur de poussière. 6. MAINTENANCE Rangez toujours votre aspirateur dans un endroit sec, propre et éloigné des sources de chaleur (tel que les cheminées ou chauffages centrales) et ne l exposez pas aux intempéries (tels que la pluie, les rayons du soleil, etc.). Pour nettoyer l extérieur de votre appareil, utilisez un chiffon doux et évitez les agents abrasifs. 7. ENVIRONNEMENT

7 Garantie : Les conditions de garantie de cet appareil sont définies par le distributeur. Le remplacement de pièces qui nécessitent l ouverture du compartiment électrique, doit être faite uniquement par un technicien agrée. Le non respect des consignes de ce manuel annule la garantie du constructeur. 8. SPECIFICATIONS Voltage (V): Voir sur la plaque signalétique Consommation (W): Voir sur la plaque signalétique. Poids (kg) : 6 Ce produit est certifie CE. POUR EVITER TOUT DANGER DE SUFFOCATON, NE PAS LAISSER LES SACS PLASTIQUES ENTRE LES MAINS DES ENFANTS. LES SACS NE SONT PAS DES JOUETS.
: Voir sur la plaque signalétique Consommation (W): Voir sur la plaque signalétique.")
8 1. SAFETY INFORMATION When using the vacuum cleaner, basic safety precautions should always be observed, including the following: Only use the vacuum cleaner indoors on dry surfaces. Turn off the vacuum cleaner controls before connecting or disconnecting from the mains supply. Always unplug the vacuum cleaner before connecting or disconnecting the vacuum hose and accessories. Children should be supervised to ensure that they do not play with the appliance. If the supply cord is damaged, it must be replaced by the manufacturer, its service agent or similarly qualified persons in order to avoid a hazard. This appliance is not intended for use by persons (including children) with reduced physical, sensory --or mental capabilities, or lack of experience and knowledge, unless they have been given supervision or instruction concerning use of the appliance by a person responsible for their safety. Use only as described in this manual. Use only the manufacturer s recommended attachments. Do not use the vacuum cleaner if it has been dropped, damaged, left outdoors or dropped into water. --Do not use the vacuum cleaner with a damaged cord or plug. If the supply cord or plug is damaged, return the vacuum cleaner to a Authorised Service Agent or suitably qualified person for examination, repair or adjustment. Do not pull or carry by the cord. Do not use the cord as a handle, close a door on the cord or pull the -- cord around sharp edges or corners. Do not run the vacuum cleaner over the cord. Keep the cord away from heated surfaces. Do not handle the plug or vacuum cleaner with wet hands. Do not use outdoors or on wet surfaces. -- Do not put any objects into openings. Do not use with any openings blocked and do not restrict air --flow. Keep all openings free of dust, lint, hair or anything that may reduce airflow. Keep hair, loose clothing, fingers and all parts of the body away from openings and moving parts. Do not pick up hot coals, cigarette butts, matches or any hot, smoking or burning objects. Do not pick up flammable or combustible materials (lighter fluid, petrol, kerosene, etc) or use in the -- presence of explosive liquids or vapours. Do not vacuum up harmful or toxic material (chlorine bleach, ammonia, drain cleaner, etc). Washing filters improves vacuum performance. Make sure all the filters are completely dry before inserting back into the vacuum cleaner This vacuum cleaner is intended for household use only and not for commercial or industrial use. The motor is equipped with thermal cut-out. If for any reason, the vacuum cleaner should overheat, the thermostat will automatically turn the unit off. Should this occur, unplug the vacuum cleaner from the electrical outlet and turn off the switch. Remove the dirt container and empty. Clean the filters. Allow the cleaner to cool for approximately one (1) hour. To re-start, plug into an electrical outlet and switch back on

9 2. ACCESSORIES AND PARTS OVERVIEW Vacuum cleaner Accessories 1 - on/off button 12-2-in-1 tool 2 - dirt container 13 - crevice tool 3 - cyclone separator 14 - Combination floor head 4 - dirt container & carry handle 15 - telescopic tube 5 -dirt bin release button 16 - Hose 6 -auto cord rewind 7 -floor tool parking slot 8 - plug 9 -dirt bin quick release button 10 -pre-motor filter cover 11 - wheel o Always unplug the vacuum cleaner before connecting or disconnecting the vacuum hose and accessories. Remove all packaging material and take out the vacuum cleaner and accessories. Insert the flexible hose (fig. 2) into the inlet on main body of the vacuum cleaner. Making sure the projected parts on the hose are aligned. Turn the hose to the right until it clicks into lock position. Push the telescopic extension tube on to the end of he handle (fig. 3). The telescopic tube can be lengthened or shortened by pushing the button in and sliding the tube apart or together as required (fig. 3). Fit the combination floor head by pushing onto the extension tube (fig. 4). 3. HOW TO OPERATE Cord release Fully unwind the power cord. A yellow mark on the power cord indicates the recommended cord length. Do not exceed the cord length beyond the red mark. On / off button Insert the plug into the electrical outlet. Press the on/off switch (fig. 1/1) located on the top of the vacuum cleaner, to switch on the vacuum cleaner and press the button again to turn the vacuum cleaner off. Carpet cleaning For carpet and rug cleaning, press the rocker switch on the combination floor head to raise the brushes (fig. 1/17). Hard Floor Cleaning For hard floor cleaning, press the rocker switch (fig. 1/17) on the combination floor head to lower the brushes. For more efficient cleaning of hard floors, you can use a separate floor tool (fig. 1/14). Cord rewind To rewind the power cord, press the cord rewind button, located on the top of the vacuum cleaner, and guide the power cord with one hand. This will prevent the cord from whipping which could cause damage or injury. Carry handle Use the carry handle located on the dirt bin container to move the vacuum cleaner from room to room. Hose Storage For convenience there is a parking slot located at the rear of the vacuum cleaner where the floor tool, turbo tool, telescopic tool and hose can be parked for carrying and storage. Please insert the accessories (upholstery tool and crevice tool) onto the holder on the hose s handle.
 into the inlet on main body of the vacuum cleaner. Making sure the projected parts on the hose are aligned.")
10 4. ACCESSORIES The accessories can be attached directly to the handle by removing the telescopic tubes and pushing in the desired accessory. The accessories can also be attached to the telescopic extension tube for extra reach. Remove the combination floor head and push on the desired accessory. 5. DIRT CONTAINER & FILTERS: REMOVAL & REPLACEMENT It is recommended to clean the filters every time dirt container is emptied for consistent performance of your machine Always unplug the vacuum cleaner from the electrical outlet before removing the dirt container. Do NOT use the vacuum cleaner without ALL of the filters in place Emptying the dirt container Press the dirt bin release button (fig. 5) on the top of the dirt container. The dust container can be lifted and removed off the unit. Hold the dirt container over a bin and press the quick release button as directed to empty the container. When all the dirt has fallen, close the dirt container flap, a click will be heard when closed. Then replace the dirt container. For health safety reasons, it is recommended to empty the dirt container outside living areas. Cleaning the cyclone separator Remove the dirt container from the unit as directed above and dispose of dirt inside the container before cleaning. Rotate the lid of the dirt container anti-clockwise to remove the dirt container off the cyclonic separator (fig. 7). The separator should be cleaned with a soft brush and wiped with a damp cloth. The dirt container can be wiped clean. The cyclonic separator should not be submerged in water. Do NOT use any detergents or boiling water to wash the filters. It is recommended to wash the filter every time you empty the dust container When the cyclone separator has been cleaned and has dried completely, re-attach the dirt container to the lid of the separator and return the dirt container to the unit. Please ensure proper functioning of bearing surfaces and sealing elements. Cleaning the pre-motor filter This is located inside the lid of the dirt bin container. Release the pre-motor filter cover by rotating the lid counter-clockwise. Lift off the filter cover to gain access to the filter. Remove the filter by pulling the tab towards you (fig. 9). Separate the foam filter from the fabric cassette. Each filter can be tapped against the side of a dust bin to remove the excess dirt and dust (fig. 10). The pre-motor filters may be rinsed in warm water (max. 40 0C). Allow to air dry for 24 hours before replacing. Do NOT use any detergents or boiling water to wash the filters. It is recommended to wash the filter every time you empty the dust container. 4. Once completely dry, return the pre-motor filters and cassette to the vacuum cleaner. Replace the pre-motor filter cover before restarting the vacuum cleaner. Please ensure proper functioning of bearing surfaces and sealing elements. Cleaning the post-motor filter This is located on the rear of the vacuum cleaner.

11 The filter can be tapped against the side of a dust bin to remove the excess dirt and dust. The post-motor filter may be rinsed in warm water (max 40 0C). Allow it to dry for 24 hours before replacing. Do not use any detergents or boiling water to wash the filters. Once completely dry, return the post-motor filter to the vacuum cleaner. Replace the post-motor filter cover before restarting the vacuum cleaner. 6. MAINTENANCE Please always store the vacuum cleaner in a dry place well away from heat sources (such as fireplace, stove or heat register) and keep it out of weather exposure (such as rain, sunlight, etc.). To clean the vacuum cleaner surface, please use a soft cloth and avoid using abrasive and harsh agents! 7. ENVIRONMENT The symbols of materials used for the production of packaging, parts and accessories are printed on each piece along with the recycling symbols provided that the dimensions are sufficient. Symbols that are present on the product or in the accompanying literature mean that used electric or electronic equipment may not be disposed of together with common household waste. To ensure a safe disposal, please bring your product to a dedicated collection center where it will be taken over free of charge. By a correct disposal, you will help to preserve valuable natural resources as well as to eliminate potential negative impacts on the environment and human health which might arose out of wrong waste disposal. Under the national regulations, wrong disposal of this type of waste may lead to imposing penalties. If the equipment is to be completely discarded, it is recommended to unplug the power cord first and then cut it off to make the equipment unworkable. The replacement of parts that requires opening the equipment s electric cabinet may only be performed by an authorized service! Failure to comply with the manufacturer instructions voids warranty! 8. SPECIFICATIONS Voltage (V): see the equipment production label Power consumption (W): see the equipment production label Approximate weight (kg) : 6 The product has received EC certification. TO AVOID DANGER OF SUFFOCATION, KEEP THIS PLASTIC BAG AWAY FROM BABIES AND CHILDREN. THIS BAG IS NOT A TOY. Fabriqué pour et importé par : Adeva European Import 8 rue Marc Seguin Mitry Mory FRANCE contact@adeva-import.com
 and keep it out of weather exposure (such as rain, sunlight,")
3M HEPA Vacuum 497AJK. User s Guide
 3M HEPA Vacuum 497AJK User s Guide Table of Contents Section Page Safety Instructions...3 Grounding Instructions...5 Specifications...7 To Operate...7 To Replace Filter...8 Parts List...9 Regulatory Statements...9
MODE D EMPLOI USER MANUAL
 notice_cd 853:notice 9/01/08 15:08 Page 1 CAFETIÈRE À DOSETTES Coffee pad machine CD 853 GIACOMO MODE D EMPLOI USER MANUAL notice_cd 853:notice 9/01/08 15:08 Page 2 FRANÇAIS WHITE & BROWN vous félicite
ASSEMBLY INSTRUCTIONS DIRECTIVES POUR L'ASSEMBLAGE ombre pendant lamp lampe suspendue à tons dégradés, chocolat
 ASSEMBLY INSTRUCTIONS DIRECTIVES POUR L'ASSEMBLAGE ombre pendant lamp lampe suspendue à tons dégradés, chocolat SKU 2728089 INSTRUCTIONAL MANUAL MANUEL D'INSTRUCTIONS 270/2707 COMPONENT LIST LISTE DES
ASSEMBLY INSTRUCTIONS DIRECTIVES POUR L'ASSEMBLAGE luster chandelier lamp chandelier à trois branches en verre lustré
 ASSEMBLY INSTRUCTIONS DIRECTIVES POUR L'ASSEMBLAGE luster chandelier lamp chandelier à trois branches en verre lustré SKU 2711592 INSTRUCTIONAL MANUAL MANUEL D'INSTRUCTIONS 270/2707 COMPONENT LIST LISTE
Folio Case User s Guide
 Fujitsu America, Inc. Folio Case User s Guide I N S T R U C T I O N S This Folio Case is a stylish, lightweight case for protecting your Tablet PC. Elastic Strap Pen Holder Card Holders/ Easel Stops Figure
Thank you for choosing the Mobile Broadband USB Stick. With your USB Stick, you can access a wireless network at high speed.
 Thank you for choosing the Mobile Broadband USB Stick. With your USB Stick, you can access a wireless network at high speed. Note: This manual describes the appearance of the USB Stick, as well as the
GUIDE DE L'UTILISATEUR USER GUIDE BOLT ION REACH PROFESSIONAL 1318 SERIES SÉRIE 1318
 BOLT ION REACH PROFESSIONAL GUIDE DE L'UTILISATEUR SÉRIE 1318 BOLT ION REACH PROFESSIONAL USER GUIDE 1318 SERIES IMPORTANT SAFETY INSTRUCTIONS READ ALL INSTRUCTIONS BEFORE USING YOUR HAND VACUUM. Always
ARP-090G / ARP-090K NOTICE D'EMPLOI INSTRUCTION MANUAL
 2 7 NOTICE D'EMPLOI INSTRUCTION MANUAL ARP-090G / ARP-090K Lire attentivement la notice avant d utiliser l appareil Before operating this product, please read user manual completely FRANCAIS EMPLACEMENT
MANUEL D'UTILISATION
 CAFETIERE MANUEL D'UTILISATION Modèle : KF12 Merci de lire attentivement ce document avant la première utilisation de l'appareil CONSIGNES DE SECURITE Lors de l'utilisation d'appareils électriques, des
Thank you for choosing the Mobile Broadband USB Stick. With your USB Stick, you can access a wireless network at high speed.
 Thank you for choosing the Mobile Broadband USB Stick. With your USB Stick, you can access a wireless network at high speed. Note: This manual describes the appearance of the USB Stick, as well as the
Cafetière. Mode d Emploi. 1Notice cafetière v1.0
 Cafetière Mode d Emploi 1Notice cafetière v1.0 SOMMAIRE 1 CONSIGNES DE SÉCURITÉ... 3 2INSTALLATION DE L APPAREIL EN TOUTE SÉCURITÉ...4 3PRECAUTION CONCERNANT L UTILISATION DE L APPAREIL...5 4DESCRIPTION
Garage Door Monitor Model 829LM
 Garage Door Monitor Model 829LM To prevent possible SERIOUS INJURY or DEATH from a closing garage door: NEVER permit children to operate or play with door control push buttons or remote control transmitters.
Lavatory Faucet. Instruction Manual. Questions? 1-866-661-9606 customerservice@artikaworld.com
 Lavatory Faucet Instruction Manual rev. 19-01-2015 Installation Manual You will need Adjustable Wrench Adjustable Pliers Plumber s Tape Hardware list (included) Allen Key Socket wrench tool Important Follow
MANUEL D UTILISATION. 48008014-02GlobeManual 1-15_41.indd 1 21/08/2013 14.57.52
 MANUEL D UTILISATION 48008014-02GlobeManual 1-15_41.indd 1 21/08/2013 14.57.52 REMARQUES IMPORTANTES CONCERNANT LA SÉCURITÉ Manuel d utilisation - Cet aspirateur doit être utilisé uniquement pour son usage
Stainless Steel Deep Fryer HF 1030
 TM Stainless Steel Deep Fryer Friteuse en acier inoxydable 2012, HFEF-CAN US FR UK -10/12 1 Year Limited Warranty Un An De Garantie Limitée Thank you for purchasing the innovative Heaven Fresh Stainless
GIGABIT PCI DESKTOP ADAPTER DGE-530T. Quick Installation Guide+ Guide d installation+
 GIGABIT PCI DESKTOP ADAPTER Quick Installation Guide+ Guide d installation+ Check Your Package Contents Quick Installation Guide Gigabit Ethernet PCI Adapter CD with Manual and Drivers DO NOT insert the
Notice d utilisation Cafetère isotherme programmable CL-ISPR12X - 938896 FR-1. Version 2013.08.27
 Notice d utilisation Cafetère isotherme programmable CL-ISPR12X - 938896 FR-1 Version 2013.08.27 INSTRUCTIONS DE SÉCURITÉ Cet appareil peut être utilisé par des enfants à partir de 8 ans et par des personnes
MANUEL D UTILISATION COFFNTEA
 MANUEL D UTILISATION COFFNTEA UD 888 Lisez attentivement ce mode d'emploi avant d'utiliser l'appareil et conservezle pour un usage ultérieur POUR USAGE DOMESTIQUE UNIQUEMENT Description générale 1. TOUCHE
Le No.1 de l économie d énergie pour patinoires.
 Le No.1 de l économie d énergie pour patinoires. Partner of REALice system Economie d énergie et une meilleure qualité de glace La 2ème génération améliorée du système REALice bien connu, est livré en
03/2013. Mod: WOKI-60IP/TR. Production code: DTWIC 6000
 03/2013 Mod: WOKI-60IP/TR Production code: DTWIC 6000 ENCASTRABLE INDUCTION DROP IN INDUCTION 11/2011 TECHNICAL FEATURES DOCUMENTATION S.A.V. Notice d utilisation : FX00326-A Guide d intervention : ---
OPERATING MANUAL GUIDE D UTILISATION ASSEMBLY ASSEMBLAGE. REGISTER TODAY 3 easy ways to register your 5 year warranty.
 OPERATING MANUAL GUIDE D UTILISATION ASSEMBLY ASSEMBLAGE clik clik clik 1 2 REGISTER TODAY 3 easy ways to register your 5 year warranty. ENREGISTREMENT 3 façons faciles de vous enregistrer pour bénéficier
User Instructions ENGLISH FRANÇAIS DEUTSCH ITALIANO NEDERLANDS PORTUGUES ESPAÑOL SVENSKA GR RU PL CZ SL ÅËËÇÍÉÊÁ PYССКИЙ POLSKI ÈESKY SLOVENÈINA
 User Instructions ENGLISH FRANÇAIS DEUTSCH ITALIANO NEDERLANDS PORTUGUES ESPAÑOL DANSK NORSK SVENSKA SUOMI ÅËËÇÍÉÊÁ PYССКИЙ POLSKI ÈESKY SLOVENÈINA GB FR DE IT NL PT ES DK NO SE FI GR RU PL CZ SL FR MODE
Paxton. ins-20605. Net2 desktop reader USB
 Paxton ins-20605 Net2 desktop reader USB 1 3 2 4 1 2 Desktop Reader The desktop reader is designed to sit next to the PC. It is used for adding tokens to a Net2 system and also for identifying lost cards.
Stainless Steel Solar Wall Light
 V 2.9 Stainless Steel Solar Wall Light User Manual Please read and understand all instructions before use.retain this manual for future reference. V 2.9 Stainless Steel Solar Wall Light SPECIFICATIONS
Notice Technique / Technical Manual
 Contrôle d accès Access control Encodeur USB Mifare ENCOD-USB-AI Notice Technique / Technical Manual SOMMAIRE p.2/10 Sommaire Remerciements... 3 Informations et recommandations... 4 Caractéristiques techniques...
Instructions Mozilla Thunderbird Page 1
 Instructions Mozilla Thunderbird Page 1 Instructions Mozilla Thunderbird Ce manuel est écrit pour les utilisateurs qui font déjà configurer un compte de courrier électronique dans Mozilla Thunderbird et
MANUEL D UTILISATION
 MANUEL D UTILISATION Table des matières Sécurité du produit 3 Mesures de précautions 4 Exigences électriques 5 Dépannage 5 Caractéristiques de My Rotisserie 6 Caractéristiques de My Rotisserie 7 Diagramme
ENGLISH 4 FRANÇAIS 6 ESPAÑOL 8
 SY ENGLISH 4 FRANÇAIS 6 ESPAÑOL 8 ENGLISH How to lubricate the sewing machine Warning! Always switch off the machine and disconnect it from the power supply before lubricating the sewing machine. 1 Always
NOTICE D UTILISATION
 CAFETIERE ELECTRIQUE 1.25L REF CM4229 230V - 800W - 50Hz NOTICE D UTILISATION LIRE ATTENTIVEMENT LES INSTRUCTIONS SUIVANTES AVANT TOUTE PREMIERE UTILISATION Appareil garanti 1 an sur présentation du ticket
Contents Windows 8.1... 2
 Workaround: Installation of IRIS Devices on Windows 8 Contents Windows 8.1... 2 English Français Windows 8... 13 English Français Windows 8.1 1. English Before installing an I.R.I.S. Device, we need to
WINTER BOAT STORAGE SYSTEM SYSTÈME DE REMISAGE HIVERNAL POUR BATEAU
 MANUAL / MANUEL VIDEO WINTER BOAT STORAGE SYSTEM SYSTÈME DE REMISAGE HIVERNAL POUR BATEAU ASSEMBLY INSTRUCTIONS GUIDE D ASSEMBLAGE NAVIGLOO 14-18½ ft/pi FISHING BOAT! RUNABOUT! PONTOON BOAT! SAILBOAT (SAILBOAT
Warning: Failure to follow these warnings could result in property damage, or personal injury.
 Western Steel & Tube 1 Storage Locker Extended Storage Locker Storage Cabinet Assembly And Use Instructions Warning: Failure to follow these warnings could result in property damage, or personal injury.
Contrôle d'accès Access control. Notice technique / Technical Manual
 p.1/18 Contrôle d'accès Access control INFX V2-AI Notice technique / Technical Manual p.2/18 Sommaire / Contents Remerciements... 3 Informations et recommandations... 4 Caractéristiques techniques... 5
R.V. Table Mounting Instructions
 PTSS165 ACCESSORY MOUNTING INSTRUCTIONS Use these instructions in conjunction with your main manual to properly assemble your gas grill. Refer to the main manual for safety, operating, cleaning and maintenance
POLICY: FREE MILK PROGRAM CODE: CS-4
 POLICY: FREE MILK PROGRAM CODE: CS-4 Origin: Authority: Reference(s): Community Services Department Cafeteria Services and Nutrition Education Division Resolution #86-02-26-15B.1 POLICY STATEMENT All elementary
Guide d'installation rapide TFM-560X YO.13
 Guide d'installation rapide TFM-560X YO.13 Table of Contents Français 1 1. Avant de commencer 1 2. Procéder à l'installation 2 Troubleshooting 6 Version 06.08.2011 16. Select Install the software automatically
Using a Walker. 2. Move your injured or weak leg toward the walker first. If you have had surgery on both legs, use either leg to begin walking.
 Using a Walker Walking with a Walker 1. Lift the walker and place it at a comfortable distance in front of you with all four of its legs on the floor. This distance is often equal to an arm s length. 2.
MC1-F www.primo-elektro.be
 NOTICE D UTILISATION CAFETIÈRE MUG ISOTHERME www.primo-elektro.be WWW.PRIMO-ELEKTRO.BE 2 WWW.PRIMO-ELEKTRO.BE Lisez toutes les instructions Conservez-les pour consultation ultérieure 1. CONDITIONS DE GARANTIE
GUIDE DE L'UTILISATEUR USER GUIDE POWERGLIDE TM PROFESSIONAL AVEC LA TECHNOLOGIE LIFT-OFF WITH LIFT-OFF TECHNOLOGY 9182 SERIES SÉRIES 9182
 *Les images du produit peuvent varier POWERGLIDE TM PROFESSIONAL AVEC LA TECHNOLOGIE LIFT-OFF GUIDE DE L'UTILISATEUR SÉRIES 9182 POWERGLIDE TM PROFESSIONAL WITH LIFT-OFF TECHNOLOGY USER GUIDE 9182 SERIES
WiFi Security Camera Quick Start Guide. Guide de départ rapide Caméra de surveillance Wi-Fi (P5)
") #45 #46 WiFi Security Camera Quick Start Guide Guide de départ rapide Caméra de surveillance Wi-Fi (P5) #47 Start Here 1 Is this you? TECH SUPPORT CTRL ALT DEL 2 If yes, turn to page three 1 3 If not,
#45 #46 WiFi Security Camera Quick Start Guide Guide de départ rapide Caméra de surveillance Wi-Fi (P5) #47 Start Here 1 Is this you? TECH SUPPORT CTRL ALT DEL 2 If yes, turn to page three 1 3 If not,
How to Login to Career Page
 How to Login to Career Page BASF Canada July 2013 To view this instruction manual in French, please scroll down to page 16 1 Job Postings How to Login/Create your Profile/Sign Up for Job Posting Notifications
Sécurité relative aux sièges auto et aux rehausseurs
 Sécurité relative aux sièges auto et aux rehausseurs Safety with Car Seats and Booster Seats Car crashes are the main cause of accidental death and serious injury of children. Correctly using a car or
PRECAUTIONS IMPORTANTES
 D90 Mode d emploi Ne mettez l appareil en marche qu après avoir pris connaissance de ce mode d emploi et des conseils de sécuritémentionnés en pages 3 et 4! PRECAUTIONS IMPORTANTES Lors de l utilisation
Description. Consignes de sécurité
 2 3 Description a Couvercle b Réservoir à eau c Verseuse verre ou pot isotherme (selon modèle) d Niveau d eau e Volet pivotant f Porte-filtre g Bouton d ouverture du volet h Sélecteur d arôme Modèles programmables
Once the installation is complete, you can delete the temporary Zip files..
 Sommaire Installation... 2 After the download... 2 From a CD... 2 Access codes... 2 DirectX Compatibility... 2 Using the program... 2 Structure... 4 Lier une structure à une autre... 4 Personnaliser une
COMPOSANTS DE LA MACHINE
 FR COMPOSANTS DE LA MACHINE Voyant vapeur prête Interrupteur vapeur Interrupteur de distribution de café Voyant café prêt Couvercle du réservoir à eau Figure A Bouton de distribution vapeur et eau chaude
MODE D EMPLOI CAFETIERE KZ8F WWW.PRIMO-ELEKTRO.BE
 MODE D EMPLOI CAFETIERE KZ8F WWW.PRIMO-ELEKTRO.BE KZ8F WWW.PRIMO-ELEKTRO.BE CARTE DE GARANTIE Chère cliente, cher client, Nos produits sont soumis à des contrôles de qualité rigoureux. Si malgré ces contrôles,
OPERATING MANUAL GUIDE D UTILISATION ASSEMBLY ASSEMBLAGE. REGISTER TODAY 3 easy ways to register your 2 year warranty.
 OPERATING MANUAL GUIDE D UTILISATION ASSEMBLY ASSEMBLAGE WASH FILTER Wash filter with cold water at least every month. LAVER LE FILTRE Laver le filtre à l eau froide une fois par mois minimum. REGISTER
WEB page builder and server for SCADA applications usable from a WEB navigator
 Générateur de pages WEB et serveur pour supervision accessible à partir d un navigateur WEB WEB page builder and server for SCADA applications usable from a WEB navigator opyright 2007 IRAI Manual Manuel
3 Service Vacuum and Vacuum in a Tool Case Operating Instructions Aspirateur d entretien et aspirateur dans le coffre à outils Mode d emploi
 3 Service Vacuum and Vacuum in a Tool Case Operating Instructions Aspirateur d entretien et aspirateur dans le coffre à outils Mode d emploi 3M June 1999 3M Service Vacuum and 3M Vacuum in a Tool Case
OPERATING MANUAL GUIDE D UTILISATION ASSEMBLY ASSEMBLAGE. REGISTER TODAY 3 easy ways to register your 2 Year Limited Warranty
 OPERATING MANUAL GUIDE D UTILISATION ASSEMBLY ASSEMBLAGE 1 clik clik 2 Charging Charge en cours WASH FILTER Wash filter with cold water at least every month. LAVER LE FILTRE Laver le filtre à l eau froide
Quick Installation Guide TW100-BRV304
 Quick Installation Guide TW100-BRV304 Table of of Contents Contents Français... 1. Avant de commencer... 2. Installation du matériel... 3. Configuration du routeur... 1 1 2 3 Troubleshooting... 5 Version
DOCUMENTATION - FRANCAIS... 2
 DOCUMENTATION MODULE SHOPDECORATION MODULE PRESTASHOP CREE PAR PRESTACREA INDEX : DOCUMENTATION - FRANCAIS... 2 INSTALLATION... 2 Installation automatique... 2 Installation manuelle... 2 Résolution des
APPENDIX 6 BONUS RING FORMAT
 #4 EN FRANÇAIS CI-DESSOUS Preamble and Justification This motion is being presented to the membership as an alternative format for clubs to use to encourage increased entries, both in areas where the exhibitor
Fabricant. 2 terminals
 Specifications Fabricant Nominal torque (Nm) 65 Minimal torque (Nm) 0,63 Coil resistance - 20 C (ohms) 20 Rated current DC (A) 1 Rotor inertia (kg.m 2 ) 2.10-3 Weight (kg) 7,20 Heat dissipation continuous
PRESENTATION REMOTE TÉLÉCOMMANDE DE PRÉSENTATION. User Guide Manuel de l utilisateur
 PRESENTATION REMOTE TÉLÉCOMMANDE DE PRÉSENTATION User Guide Manuel de l utilisateur Targus Presentation Remote Introduction Thank you for your purchase of the Targus Presentation Remote. This cordless
Destructeur de documents à coupe transversale X7CD
 Destructeur de documents à coupe transversale X7CD Guide d'utilisation 91607 Veuillez lire attentivement le manuel avant toute utilisation. Tenez particulièrement compte des consignes de sécurité suivantes.
Fontaine à eau. Manuel d utilisation Modèle : X-16 lg-x52 A. Type de distributeur d eau chaude et froide. Compresseur avec réfrigération.
 Fontaine à eau Manuel d utilisation Modèle : X-16 lg-x52 A Type de distributeur d eau chaude et froide. Compresseur avec réfrigération. Nous vous remercions d avoir acheté notre distributeur d eau. Lisez
Notice d utilisation
 Notice d utilisation Prise en main rapide 2 Sortez votre machine de son carton et débarrassez-la de ses emballages plastiques. Rincez le réservoir avec de l eau du robinet, remplissez-le et remettez-le
Aspirateur eau et poussière compact avec filtre de nettoyage et fonctionnalités simples
 L'AERO est un aspirateur compact Eau & Poussière pour des applications professionnelles. Il est facile à transporter, il a une cuve résistante et légère. Grandes performances pour un design compact. Il
Propriétés de la matière. Material properties. Sonde de pression Pressure probe. Ref : 242 013. Français p 1. English p 3.
 Propriétés de la matière Material properties Français p 1 English p 3 Sonde de pression Pressure probe Version : 6010 Propriétés de la matière Sonde de pression 1 Principe et description 1.1 Principe La
User Manual Notice d'utilisation
 EH1576 12" (30 cm) Desk Fan Ventilateur 30cm 3 Vitesses, Inclinable 3 Speed, Adjustable User Manual Notice d'utilisation 1 IMPORTANT Installer and Users please note: These instructions should be read carefully
NEW Fin Fan / Air cooled condenser cleaning
 Air cooled Condensers ( ACC ) Cleaning Air Cooled heat exchangers ( Finfan) Cleaning Cleaning Services Permanente installation NEW Fin Fan / Air cooled condenser cleaning New and revolutionnary high pressure
Stérilisation / Sterilization
 CONTENEURS Ecoster ecoster CONTAINERS Stérilisation / Sterilization Les conteneurs Ecoster aluminium sont prévus pour contenir des instruments et/ou des tissus pendant toute la durée de la stérilisation
English... 2 Français...9
 840115300 Ev01.qxd 4/17/03 1:30 PM Page 1 Thank you for buying a Hamilton Beach Commercial coffeemaker. You have made an excellent choice! All of our coffeemakers are manufactured to the highest levels
Instructions pour mettre à jour un HFFv2 v1.x.yy v2.0.00
 Instructions pour mettre à jour un HFFv2 v1.x.yy v2.0.00 HFFv2 1. OBJET L accroissement de la taille de code sur la version 2.0.00 a nécessité une évolution du mapping de la flash. La conséquence de ce
SA-32 / SA-62 INSTRUCTION MANUAL - MANUEL D INSTRUCTIONS
 SA-32 / SA-62 INSTRUCTION MANUAL - MANUEL D INSTRUCTIONS 4 5 6 7 4 5 6 7 1. Telephone Paging Volume Control 1. Contrôle de volume Paging Téléphone 2. Microphone Volume Control 2. Contrôle volume du microphone
direct serve EN DE NI ES PT CZ SK www.moulinex.com
 FR direct serve EN DE NI ES PT CZ SK www.moulinex.com 4 3 2 1 71mm 5 6 7 1 2 3 4 5 6 OK Click NO 7 8 9 150ml 10 Nous vous remercions d avoir choisi un appareil de la gamme Moulinex. CONSIGNES DE SECURITE
Free filter reminders! Sign up online at: santevia.com/filterease. need help? Contact Santevia! 1-866-943-9220 help@santevia.com.
 Free filter reminders! Sign up online at: need help? Contact Santevia! -866-9-90 help@santevia.com Shower Filter English about our santevia Shower Filter Prevent leaks This shower filter employs NMC leading
AMENDMENT TO BILL 32 AMENDEMENT AU PROJET DE LOI 32
 THAT the proposed clause 6(1), as set out in Clause 6(1) of the Bill, be replaced with the following: Trustee to respond promptly 6(1) A trustee shall respond to a request as promptly as required in the
Quick Installation Guide TEW-AO12O
 Quick Installation Guide TEW-AO12O Table of of Contents Contents Français... 1 1. Avant de commencer... 1 2. Installation du matériel... 2 3. Montage... 4 Troubleshooting... 6 Version 10.04.2007 1. Avant
Logitech Tablet Keyboard for Windows 8, Windows RT and Android 3.0+ Setup Guide Guide d installation
 Logitech Tablet Keyboard for Windows 8, Windows RT and Android 3.0+ Setup Guide Guide d installation English.......................................... 3 Français.........................................
i.fresh Compact NCCO Air Sanitizing System for Car / Desktop Model: WS908 USER MANUAL
 i.fresh Compact NCCO Air Sanitizing System for Car / Desktop Model: WS908 USER MANUAL voitures / desktop à technologie NCCO FR Modèle: WS908 MANUEL DE L UTILISATEUR TABLE DES MATIERES Informations Importantes
SYSTÈME JETS D AIR WISH WISH AIR JETS SYSTEM Système de massage à jets d air pour bains en polymère - Air jet massage system for polymer bathtubs
 SYSTME JETS D AIR WISH WISH AIR JETS SYSTEM Système de massage à jets d air pour bains en polymère - Air jet massage system for polymer bathtubs Manuel d installation - Installation manual 6835, RUE PICARD
Kenwood Limited, New Lane, Havant, Hampshire PO9 2NH, UK www.kenwoodworld.com
 Kenwood Limited, New Lane, Havant, Hampshire PO9 2NH, UK www.kenwoodworld.com 57774/1 ESP100 series i ii UNFOLD Français Veuillez déplier les illustrations de la première page avant d utiliser votre appareil
Lecteur éditeur de chèques. i2200. Manuel utilisateur. Solutions de transactions et de paiement sécurisées
 Manuel utilisateur Lecteur éditeur de chèques i2200 Solutions de transactions et de paiement sécurisées Ingenico 2200 Avant Propos Merci d avoir choisi le Lecteur Editeur de chèque nouvelle génération
TRUCK COFFEE MAKER. User s manual. Check our website www.quintezz.com for more languages
 TRUCK COFFEE MAKER User s manual GB NL D E Check our website www.quintezz.com for more languages INTRODUCTION Cher client, Vous avez acheté le QUINTEZZ Truck Coffee Maker. Nous vous remercions pour cet
APPENDIX 2. Provisions to be included in the contract between the Provider and the. Holder
 Page 1 APPENDIX 2 Provisions to be included in the contract between the Provider and the Obligations and rights of the Applicant / Holder Holder 1. The Applicant or Licensee acknowledges that it has read
Règlement sur le télémarketing et les centres d'appel. Call Centres Telemarketing Sales Regulation
 THE CONSUMER PROTECTION ACT (C.C.S.M. c. C200) Call Centres Telemarketing Sales Regulation LOI SUR LA PROTECTION DU CONSOMMATEUR (c. C200 de la C.P.L.M.) Règlement sur le télémarketing et les centres d'appel
TABLE DES MATIERES A OBJET PROCEDURE DE CONNEXION
 1 12 rue Denis Papin 37300 JOUE LES TOURS Tel: 02.47.68.34.00 Fax: 02.47.68.35.48 www.herve consultants.net contacts@herve consultants.net TABLE DES MATIERES A Objet...1 B Les équipements et pré-requis...2
33 inch open & closed storage Rangement à espace fermé et ouvert de 33po (83.7cm) 33 pulgadas almacenaje abierto y cerra
 33 pulgadas almacenaje abierto y cerra") 33 inch open & closed storage 33 pulgadas almacenaje abierto y cerra! o not throw away packaging materials until assembly is complete.! Assemble this item on a soft surface, such as cardboard or carpet,
33 inch open & closed storage 33 pulgadas almacenaje abierto y cerra! o not throw away packaging materials until assembly is complete.! Assemble this item on a soft surface, such as cardboard or carpet,
Quick Installation Guide TBW-106UB H/W: V1
 Quick Installation Guide TBW-106UB H/W: V1 Table of Contents... 1. Avant de commencer... 2. Procéder à l'installation... 3. Configuration de l'adaptateur Bluetooth... Troubleshooting... 1 1 2 5 7 Version
Archived Content. Contenu archivé
 ARCHIVED - Archiving Content ARCHIVÉE - Contenu archivé Archived Content Contenu archivé Information identified as archived is provided for reference, research or recordkeeping purposes. It is not subject
Quick Installation Guide TEW-P21G
 Quick Installation Guide TEW-P21G Table of of Contents Contents... 1. Avant de commencer... 2. Comment effectuer les connexions... 3. Utilisation du serveur d'impression... 1 1 2 3 Troubleshooting... 7
M A N U E L D I N S T R U C T I O N S
 M A N U E L D I N S T R U C T I O N S FR RÈGLES GÉNÉRALES POUR L UTILISATION DE LA MACHINE SOMMAIRE Lire attentivement le manuel d instructions et les limitations de la garantie. La machine doit être branchée
Deadline(s): Assignment: in week 8 of block C Exam: in week 7 (oral exam) and in the exam week (written exam) of block D
: Assignment: in week 8 of block C Exam: in week 7 (oral exam) and in the exam week (written exam) of block D") ICM STUDENT MANUAL French 2 JIC-FRE2.2V-12 Module Change Management and Media Research Study Year 2 1. Course overview Books: Français.com, niveau intermédiaire, livre d élève+ dvd- rom, 2ième édition,
ICM STUDENT MANUAL French 2 JIC-FRE2.2V-12 Module Change Management and Media Research Study Year 2 1. Course overview Books: Français.com, niveau intermédiaire, livre d élève+ dvd- rom, 2ième édition,
Guide Fix Mini Boîtier ONT - Septembre 2012
 SFR S.A. au capital de 3.423.265.598,40 - Siège social : 42 avenue de Friedland 75008 Paris RCS PARIS 343.059.564 Guide Fix Mini Boîtier ONT - Septembre 2012 G u i d e D i n s ta l l at i o n D U M I N
Manuel d utilisation. Mini Market éducatif. 2011 VTech Imprimé en Chine 91-002606-001
 Manuel d utilisation Mini Market éducatif 2011 VTech Imprimé en Chine 91-002606-001 Chers parents, Chez VTech, nous sommes conscients que les enfants sont notre avenir. C est pourquoi tous nos jeux sont
Z-Axis Compliance Device Compliance en z
 Compensation for different vertical positions Collision recognition in Z-direction Protection of parts and work pieces Monitoring of the insertion forces during assembly operations Monitoring of the picking
Cafetière à thermoverseuse de 4 tasses
 CONSERVER LE PRÉSENT GUIDE D UTILISATION ET D ENTRETIEN. Cafetière à thermoverseuse de 4 tasses? Au DES QUESTIONS? Prière de nous téléphoner SANS FRAIS! Aux É.-U. : 1 800 231-9786 Canada : 1 800 465-6070
Manuel d instruction Cafetière filtre. art.n 7174.101 19. 90
 Manuel d instruction Cafetière filtre art.n 7174.101 19. 90 Félicitations En achetant cet appareil vous venez d acquérir un appareil de qualité, fabriqué avec soin. Bien entre-tenu, cet appareil vous rendra
MODE D EMPLOI PLAQUE DE CUISSON À INDUCTION POSABLE PC 491 - PC
 notice PC 491-492: notice PC 481/482 3/10/11 9:09 Page 1 MODE D EMPLOI PLAQUE DE CUISSON À INDUCTION POSABLE PC 491 - PC 492 PC 491 PC 492 notice PC 491-492: notice PC 481/482 3/10/11 9:09 Page 2 FRANÇAIS
Monitor LRD. Table des matières
 Folio :1/6 Table des matières 1.Installation du logiciel... 3 2.Utilisation du logiciel... 3 2.1.Description de la fenêtre de commande... 3 2.1.1.Réglage des paramètres de communication... 4 2.1.2.Boutons
Cheque Holding Policy Disclosure (Banks) Regulations. Règlement sur la communication de la politique de retenue de chèques (banques) CONSOLIDATION
 Regulations. Règlement sur la communication de la politique de retenue de chèques (banques) CONSOLIDATION") CANADA CONSOLIDATION CODIFICATION Cheque Holding Policy Disclosure (Banks) Regulations Règlement sur la communication de la politique de retenue de chèques (banques) SOR/2002-39 DORS/2002-39 Current to
CANADA CONSOLIDATION CODIFICATION Cheque Holding Policy Disclosure (Banks) Regulations Règlement sur la communication de la politique de retenue de chèques (banques) SOR/2002-39 DORS/2002-39 Current to
owners manual Système central d aspiration Manuel du propriétaire
 Central Vacuum System owners manual Système central d aspiration Manuel du propriétaire #460409 IMPORTANT SAFEGUARDS When using an electric appliance, basic precautions should always be followed, including
STIHL SE 61. Instruction Manual Notice d emploi
 { STIHL SE 61 Instruction Manual otice d emploi G Instruction Manual 1-16 F otice d emploi 17-32 English Contents Original Instruction Manual Printed on chlorine-free paper Printing inks contain vegetable
Principe de TrueCrypt. Créer un volume pour TrueCrypt
 Sommaire : Principe de TrueCrypt...1 Créer un volume pour TrueCrypt...1 Premier montage...6 Réglages...8 Save Currently Mounted Volumes as Favorite...8 Settings > Preferences...9 TrueCrypt Traveller pour
Manuel d utilisation MA TABLETTE MAGIQUE 3-6. ans. 2014 VTech Imprimé en Chine 91-009669-006 FR. Disney Visitez le site DisneyJunior.
 Manuel d utilisation MA TABLETTE MAGIQUE 3-6 ans Disney Visitez le site DisneyJunior.com 2014 VTech Imprimé en Chine 91-009669-006 FR INTRODUCTION Vous venez d acquérir Ma tablette magique de VTech. Félicitations!
Quick Installation Guide TV-IP400 TV-IP400W
 Quick Installation Guide TV-IP400 TV-IP400W Table of of Contents Contents Français... 1. Avant de commencer... 2. Installation du matériel... 3. Configuration de la Webcam... Troubleshooting... 1 1 2 3
Guide d installation Deco Drain inc. DD200
 Guide d installation Deco Drain inc. DD200 Pour plus informations et pour télécharger les guides d installation en couleur, visitez notre site web. www.decodrain.com Soutien technique : Composez le : 514-946-8901