FSM1610 / FSM
|
|
|
- Brigitte Samson
- il y a 10 ans
- Total affichages :
Transcription
1 FSM1610 / FSM1620

2 A B C D E 2 F

3 G H I 3

4 ENGLISH (Original instructions) Intended use Your Black & Decker steam mop has been designed for sanitising and cleaning sealed hardwood, sealed laminate, linoleum, vinyl, ceramic tile, stone and marble floors and for refreshing carpets. This appliance is intended for indoor household use only. Warning! Read all safety warnings and all instructions. Failure to follow the warnings and instructions listed below may result in electric shock, fire and/or serious injury. Warning! When using mains-powered appliances, basic safety precautions, including the following, should always be followed to reduce the risk of fire, electric shock, personal injury and material damage. u Read all of this manual carefully before using the appliance. u The intended use is described in this manual. The use of any accessory or attachment or the performance of any operation with this appliance other than those recommended in this instruction manual may present a risk of personal injury. u Retain this manual for future reference. Using your appliance u Do not direct steam at people, animals, electrical appliances or electrical outlets. u Do not expose to rain. u Do not immerse the appliance in water. u Do not leave the appliance unattended. u Do not leave the appliance connected to an electrical outlet when not in use. u Never pull the power lead to disconnect the appliance from the socket. Keep the appliance lead away from heat, oil and sharp edges. u Do not handle steam cleaner with wet hands. u Do not pull or carry by cord, use cord as a handle, close door on cord, pull cord around sharp corners or expose cord to heated surfaces. u Do not use appliance in an enclosed space filled with vapour given off by oil-base paint thinner, some mothproofing substances, flammable dust, or other explosive or toxic vapours. u Check the type of floor with the manufacturer. u Do not use on leather, wax polished furniture or floors, synthetic fabrics, velvet or other delicate, steam-sensitive materials. Warning! Do not use on unsealed wood or unsealed laminate floors. On surfaces that been treated with wax or some no wax floors, the sheen may be removed by the heat and steam action. It is always recommended to test an isolated area of the surface to be cleaned before proceeding. We also recommend that you check the use and care instructions from the floor manufacturer. u Never put descaling, aromatic, alcoholic or detergent products into the steam cleaner, as this may damage it or make it unsafe for use. u If the home circuit breaker activates while using the steam function, discontinue product use immediately and contact the customer support centre. (Beware of the risk of electrical shock.) u The appliance emits very hot steam to sanitize the area of use. This means that the steam head, cleaning pads and carpet attachment get very hot during use. u Caution! Always wear suitable shoes when using your steam mop and when changing the accessories on your steam mop. Do not wear slippers or open toed footwear. u The lid may become hot during use. u Steam may escape from the appliance during use. u Care should be taken when using this appliance. DO NOT touch any parts which may become hot during use. u Switch the appliance off and return the handle to the upright position before removing the water tank. u For floor use only; do not use the unit upside down. This appliance is intended for indoor household use only. After use u Unplug the appliance and allow to cool before cleaning. u When not in use, the appliance should be stored in a dry place. u Children should not have access to stored appliances. Inspection and repairs u Unplug the appliance and allow to cool before performing any maintenance or repairs. u Before use, check the appliance for damaged or defective parts. Check for breakage of parts, damage to switches and any other conditions that may affect its operation. u Regularly check the power lead for damage. u Do not use the appliance if any part is damaged or defective. u Have any damaged or defective parts repaired or replaced by an authorized repair agent. u Never attempt to remove or replace any parts other than those specified in this manual. 4

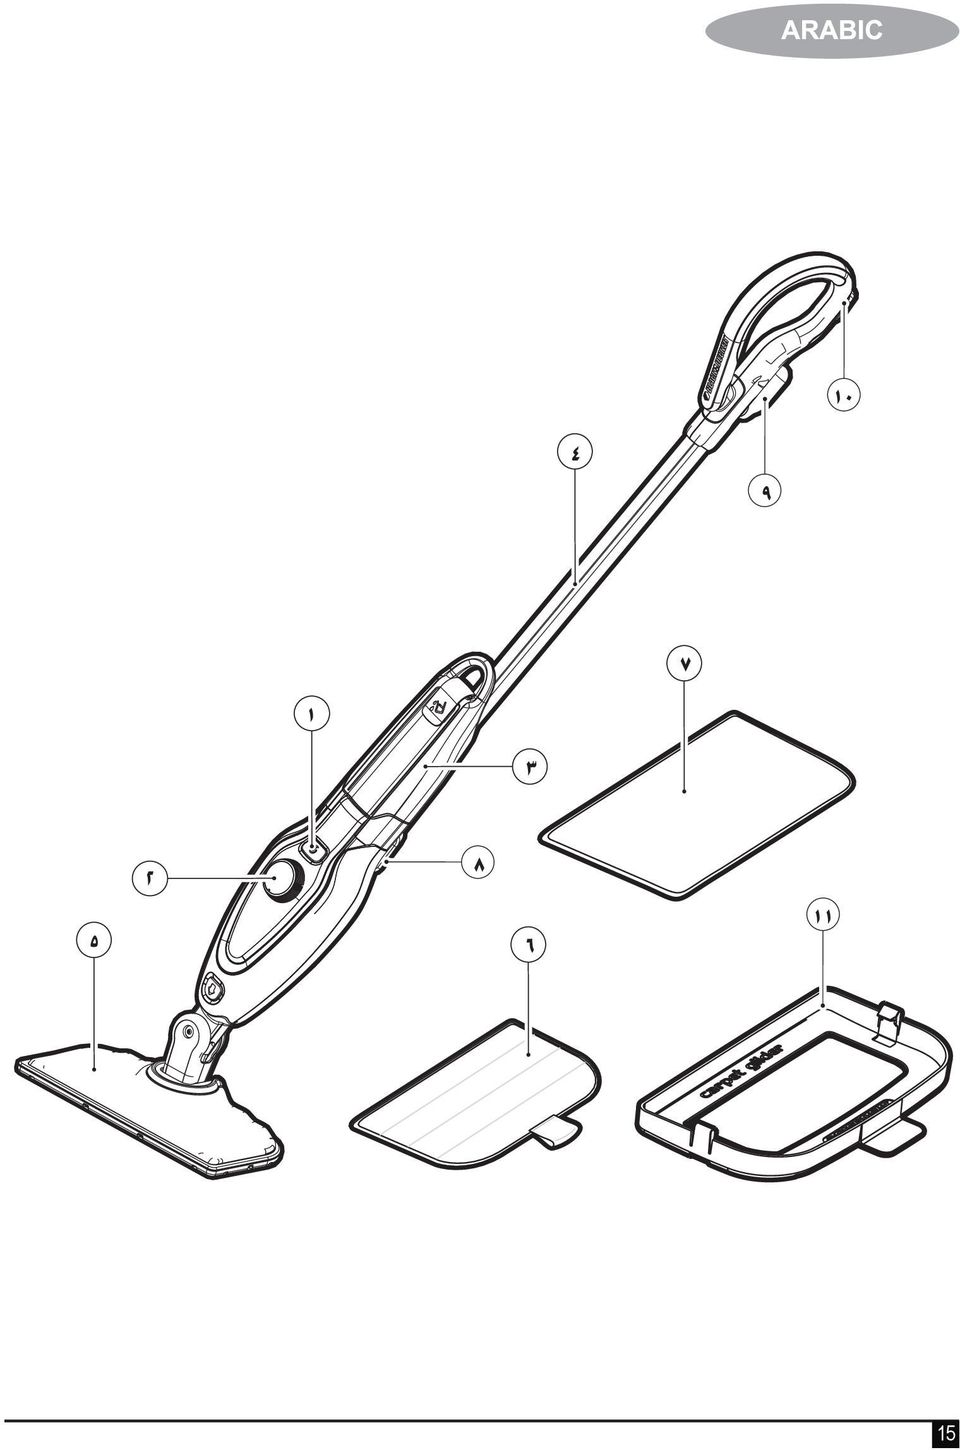
5 (Original instructions) ENGLISH Safety of others u This appliance is not intended for use by persons (including children) with reduced physical, sensory or mental capabilities, or lack of experience and knowledge, unless they have been given supervision or instruction concerning the use of the appliance by a person responsible for their safety. u Children should be supervised to ensure that they do not play with the appliance. Residual risks. Additional residual risks may arise when using the tool which may not be included in the enclosed safety warnings. These risks can arise from misuse, prolonged use etc. Even with the application of the relevant safety regulations and the implementation of safety devices, certain residual risks can not be avoided. These include: u Injuries caused by touching any moving parts. u Injuries caused by touching any hot parts. u Injuries caused when changing any parts or accessories. u Injuries caused by prolonged use of the appliance. When using any appliance for prolonged periods ensure you take regular breaks. Electrical Warning! This product must be earthed. Always check that the power supply corresponds to the voltage on the rating plate. Power plugs must match the outlet. Never modify the plug in any way. Unmodified plugs and matching outlets will reduce risk of electric shock. u If the supply cord is damaged, it must be replaced by the manufacturer or an authorised Black & Decker Service Centre in order to avoid a hazard. Extension cables & Class 1 product u A 3-core cable must be used as your appliance is earthed and of Class 1 construction. u Up to 30m (100 ft) can be used without loss of power. Labels on the appliance The following pictograms are shown on the tool: Features This appliance includes some or all of the following features. 1. ON/Off switch 2. Autoselect TM dial 3. Removable water tank 4. Handle 5. Steam head 6. Steam head cleaning pad 7. Resting mat 8. Bottom cable tidy hook 9. Top cable tidy hook 10. Cable management clip 11. Carpet Glider (FSM1620 Only) Assembly Warning! Before attempting any of the following operations, make sure that the appliance is switched off and unplugged and that the appliance is cold and does not contain any water. Attaching the handle (Fig. A) u Slide the bottom end of the handle (4) into the top end of the steam mop body (12) until it clicks into place. Attaching the steam head (Fig. B) u Slide the bottom end of the steam mop body (12) onto the steam head (5) until it clicks into place. u The steam head can be removed from the Steam mop body by pressing the steam head release button (13) and pulling the steam mop body (12) off the steam head (5). Attaching the water jug (Fig. C) u Clip the water jug (3) onto the handle (4). u Slide the water jug (3) down into the Steam mop body (12), ensure that the water jug is firmly seated. Attaching a cleaning pad (Fig. D) Replacement cleaning pads are available from your Black & Decker dealer:- (cat. no. FSMP20-XJ). u Place a cleaning pad (6) on the floor with the hook & loop side facing up. u Lightly press the steam mop down onto the cleaning pad (6). Caution! Always place your steam mop on the resting mat (7) with the handle (4) in the upright position when stationary and make sure the steam mop is turned off when not in use. Warning! To reduce the risk of injury, the user must read the instruction manual. Warning! Danger of scalding. 5

6 ENGLISH (Original instructions) Removing a cleaning pad (Fig. E) Caution! Always wear suitable shoes when changing the cleaning pad on your steam mop. Do not wear slippers or open toed footwear. u Return the handle (4) to the upright position and turn the steam mop OFF. u Place the steam mop on the resting mat and wait until it cools down. (approximately five minutes) u Place the front of your shoe onto the cleaning pad removal tab (14) and press down firmly. u Lift the steam mop up off the cleaning pad. Caution! Always place the steam mop on the resting mat (7) with the handle (4) in the upright position when stationary and make sure the steam mop is turned off when not in use. Attaching the carpet glider (Fig. F) (FSM1620 Only) u Place carpet glider on the floor. u Lightly press the steam mop down onto the carpet glider (11) until it clicks into place. Caution! Always place the steam mop on the resting mat (8) with the handle (4) in the upright position when stationary and make sure the steam mop is turned off when not in use. Removing the carpet glider (Fig. F) (FSM1620 Only) Caution! Always wear suitable shoes when changing the carpet glider on your steam mop. Do not wear slippers or open toed footwear. u Return the handle (4) to the upright position and turn the steam mop OFF. u Place the steam mop on the resting mat and wait until it cools down. (approximately five minutes) u Place the front of your shoe onto the carpet glider removal tab (15) and press down firmly. u Lift the steam mop up off the carpet glider (9). Caution! Always place the steam mop on the resting mat (8) with the handle (4) in the upright position when stationary and make sure the steam mop is turned off when not in use. Filling the water tank (Fig. G) The watertank on your steam mop is removable for convienient and easy filling. This Steam Mop incorporates an anti-calc system to help prolong the life of the system. Note: Fill the water tank with clean tap water. Note: In areas of very hard water, the use of de-ionised water is recommended. u Remove the water tank (3). u Open the filler cap (16) by lifting it up. u Fill the water tank (3) with water. Warning! Your water tank has a 0.5 litre capacity. Do not over fill the tank. u Re-fit the filler cap (14). u Re-fit the water tank (3). Note: Ensure the filler cap is firmly secured. Use Important! This unit will kill 99.9% of bacteria & germs when used in accordance with this manual and with the micro fibre pad fitted and a continuous run time of 90 seconds. Switching on and off u To switch the appliance on, press the ON/OFF button (1). It takes approximately 15 seconds for the steam mop to heat up. Note: When the steam mop is first turned on the water reservoir will glow red. Once the steam mop is ready to use the water reservoir will glow blue. u To switch the appliance off, press the ON/OFF button (1). Caution! Never leave the steam mop in one spot on any surface for any period of time. Always place the steam mop on the resting mat (7) with the handle (4) in the upright position when stationary and make sure the steam mop is turned off when not in use. Caution! Always empty the steam mop after use. Autoselect TM Technology This steam mop is fitted with an Autoselect TM dial (2) which shows various cleaning applications. They are used to select the correct operating mode for your particular cleaning operation. Using the Autoselect TM dial (2), choose from one of the following applications: Wood/Laminate Stone/Marble Tiles/Vinyl The steam mop will select the correct volume of steam required for your particular cleaning operation. Note: Always check you are using the correct setting before using your steam mop. 6
 with the handle (4) in the upright position when stationary and make sure the steam mop is turned off when not in use.")
7 (Original instructions) ENGLISH Hints for optimum use General Caution! Never use the steam mop without first attaching a cleaning pad. u During use you can use the cable mamagement clip (10) to keep your cable out of the way of the work area.. u Always vacuum or sweep the floor before using the steam mop. u The easiest way to use the machine is to tilt the handle to a 45 angle and clean slowly, covering a small area at a time. u Do not use chemical cleaners with your steam mop. To remove stubborn stains from vinyl or linoleum floors, you can pre-treat with a mild detergent and some water before using the steam mop. Steam cleaning u Place a cleaning pad (6) on the floor with the hook & loop side facing up. u Raise the steam mop off the resting mat (7) and lightly press it down onto the cleaning pad (6). u Place the steam mop on the resting mat. u Connect the steam mop to the mains. u Turn the Autoselect TM dial (2) to the required setting. u Press the ON/OFF button (1). It takes approximately 15 seconds for the steam mop to heat up. u Pulling the handle (4) back will activate the steam pump. After a few seconds steam will start to come out of the steam head. u It takes a few seconds for steam to enter the cleaning pad. The steam mop will now glide easily over the surface to be sanitised/cleaned. u Push and pull the steam mop slowly across the floor to thoroughly steam clean each section. Note: During use you may turn off the steam pump by returning the handle to the upright position, this convenient feature will allow you to place the steam mop on the resting mat for a short time so that you may move items of furniture, then continue cleaning without the need to switch the appliance off. u When you have finished using the steam mop, return the handle (4) to the upright position and turn it OFF, place it on the resting mat (7) and wait until the steam mop cools down. (approximately five minutes) Caution! It is important to monitor the water level in the water tank. To refill the water tank and continue to sanitise/clean, return the handle (4) to the upright position and turn the steam mop OFF. Unplug the unit from the electrical wall outlet, remove and refill the water tank (3). Caution! Never leave the steam mop in one spot on any surface for any period of time. Always place the steam mop on the resting mat (7) with the handle (4) in the upright position when stationary and make sure the steam mop is turned off when not in use. After use (Fig. H & I) u Return the handle (4) to the upright position and turn the steam mop OFF, u Place the steam mop on the resting mat (7) and wait until the steam mop cools down. (approximately five minutes) u Unplug the steam mop from the electrical wall outlet. u Empty the water tank (3). u Remove the cleaning pad (6) and wash it ready for next use. (Take care to follow the wash care instructions printed on the cleaning pad). u Wrap the supply cable around the cable tidy hooks (8 & 9). Note: The top cable tidy hook (9) rotates to easily release the cable ready for next use. u Clip the supply cable onto itself using the cable tidy clip (17) close to the plug. u Place steam mop on the resting mat (7) for storage. Note: With the handle (4) in the upright position, the cable neatly wrapped around the cable tidy hooks (8 & 9) and secured with the cable tidy clip (17) your steam mop will stand on its own for storage. Alternatively there is a hanging bracket (18) built into the hand grip (19) which will allow your steam mop to be hung from a suitable hook on the wall. Always ensure that your wall hook is capable of supporting the weight of the steam mop safely. Maintenance and cleaning Your Black & Decker corded appliance has been designed to operate over a long period of time with a minimum of maintenance. Continuous satisfactory operation depends upon proper appliance care and regular cleaning. Warning! Before performing any maintenance or cleaning on corded appliances switch off and unplug the appliance. u Wipe your appliance over using a soft damp cloth. u For stubborn marks you can use a mild solution of soap and water to dampen your cloth. Care of the cleaning pads Wash care instructions - No fabric conditioner - Allow to dry fully before re-use. Caution! Follow the cleaning instructions printed on the label of the cleaning pad. Mains plug replacement (U.K. & Ireland only) If a new mains plug needs to be fitted: u Safely dispose of the old plug. 7

8

9 (Traduction des instructions initiales) FRANÇAIS Utilisation Votre balai vapeur Black & Decker a été conçu pour désinfecter et nettoyer les planchers vernis, les sols en bois lamellés vernis, en lino, en vinyle, en carrelage, en pierre et en marbre. Il convient également au rafraîchissement des moquettes. Il est destiné à une utilisation à l intérieur et exclusivement domestique. Consignes Attention! Lisez avec attention tous les avertissements et toutes les instructions. Le non-respect de cette consigne peut entraîner une électrocution, un incendie et/ou de graves blessures. Attention! De simples précautions sont à prendre pour l utilisation d appareil branché à l alimentation principale. Les conseils suivants - duire le risque d incendie, les chocs électriques, les blessures et les dommages matériels. Lisez attentivement et entièrement le manuel avant d utiliser l appareil. Ce manuel décrit la manière d utiliser cet outil. L utilisation dans ce manuel d instruction peut présenter un risque de blessures. Gardez ce manuel pour référence ultérieure. Utilisation de votre appareil N orientez pas la vapeur vers des personnes, des animaux, des appareils électriques ou des prises. Ne laissez pas l appareil sous la pluie. Ne plongez pas l appareil dans l eau. Ne laissez pas l appareil sans surveillance. Ne laissez pas l appareil branché à une prise s il ne doit pas être utilisé. chaleur, de zones graisseuses et de bords tranchants. N'utilisez pas le balai vapeur avec les mains humides. doit pas être coincé par une porte, glisser sur des coins anguleux ou approcher de surfaces chaudes. N utilisez pas l appareil dans un espace restreint où se dégage de la vapeur provenant d'un diluant chimique, cerou autres vapeurs explosives ou toxiques. N utilisez pas sur du cuir, des meubles ou des sols cirés, des tissues synthétiques, des velours ou autres tissues délicats, des matériaux ne résistant pas à la Attention! N utilisez pas sur des sols en bois ou en bois lamellé non vernis. Sur les surfaces traitées avec de la cire ou sur certains sols non cirés, la chaleur et les vapeurs peuvent faire disparaître la brillance. Il est toujours recommandé de tester sur une zone de la surface à nettoyer avant de commencer. Nous recommandons précautions du fabricant du sol. Ne jamais utiliser de détartrant, de produit parfumé, d alcool ou de détergents dans le balai vapeur, ceci aurait pour effet de l endommager, voire même d être dangereux. Si le disjoncteur se déclenche pendant l utilisation du balai vapeur, arrêtez immédiatement de l utiliser et contactez le service client (ne pas oublier qu il y a risque d électrocution). L appareil diffuse de la vapeur à très haute température embouts deviennent extrêmement chauds. Attention! Portez toujours des chaussures adaptées pour utiliser le balai vapeur ainsi que pour changer d'accessoire. Ne portez pas de chaussons ou de sandalettes. Le couvercle peut devenir chaud peut pendant l utilisation. La vapeur peut s échapper de l appareil pendant l utilisation. Toutes les précautions doivent être prises pour utiliser l appareil. NE TOUCHEZ AUCUNE PIÈCE qui pourrait devenir chaude. Mettez l appareil hors tension et placez le manche en position verticale avant de retirer le réservoir d eau. Ne doit être utilisé que si posé au sol ; ne pas retourner l'appareil pour l'utiliser. Il est destiné à une utilisation à l intérieur et exclusivement domestique. Après l utilisation Débranchez l appareil et laissez-le refroidir avant de le nettoyer. Quand il n est pas utilisé, l appareil doit être rangé dans un endroit sec. Les enfants ne doivent pas avoir accès aux appareils rangés. Avant toutes opérations d'entretien ou réparations, débranchez l appareil et laissez-le refroidir. 9

10 FRANÇAIS (Traduction des instructions initiales) ou si aucune pièce ne manque. Recherchez des pièces cassées, des boutons endommagés et d'autres anomalies susceptibles de nuire au bon fonctionnement de l appareil. N utilisez pas l appareil si une pièce est endommagée ou défectueuse. Faites réparer ou remplacer les pièces défectueuses ou endommagées par un réparateur agréé. Ne tentez jamais de retirer ou de remplacer des pièces autres que celles citées dans ce manuel. Sécurité des personnes Cet appareil ne doit pas être utilisé par des personnes Rallonges et produit de Classe 1 Un câble tripolaire doit être utilisé quand l appareil est relié à la terre et de Classe 1. Une longueur de 30 m peut être utilisée sans perte de puissance. Étiquettes sur l appareil Les pictogrammes ci-dessous se trouvent sur l appareil : Attention! Pour réduire le risque de blessures, l utilisateur doit lire le manuel d instructions. mentales ou sensorielles. Cette consigne s applique aussi aux personnes manquant d'expérience et de connaissance du matériel, à moins que celles-ci n aient reçu les instructions appropriées ou qu elles ne soient encadrées par une personne responsable de leur sécurité pour utiliser l appareil. Ne laissez jamais les enfants sans surveillance pour éviter qu'ils ne jouent avec cet outil. Risques résiduels. L'utilisation d'un outil non mentionné dans les consignes de sécurité données peut entraîner des risques résiduels supplémentaires. Ces risques peuvent survenir si la machine est mal utilisée, si l'utilisation est prolongée, etc. Malgré l'application des normes de sécurité requises et la présence de dispositifs de sécurité, certains risques résiduels ne peuvent être évités. Notamment : Les blessures dues au contact avec une pièce mobile. Les blessures dues au contact avec des pièces brûlantes. Les blessures survenues en changeant des pièces ou des accessoires. Les blessures dues à l'utilisation prolongée de l'appareil. Une utilisation prolongée de l appareil nécessite des pauses régulières. Sécurité Attention! Cet appareil doit être relié à la sur la plaque signalétique de l'outil correspond bien à la tension présente sur le lieu. consignes réduit le risque de choc électrique. Si le câble d'alimentation est endommagé, il doit être remplacé par le fabricant ou par un centre de réparation agréé Black & Decker pour éviter tout risque. - Attention! Risque de brûlures. Éléments Cet appareil présente la totalité ou une partie des caractéristiques suivantes : 1. Bouton marche/arrêt 2. Sélecteur Auto Select TM 3. Réservoir d eau démontable 4. Manche 5. Embout vapeur 6. Tampon de nettoyage à la vapeur 7. Support 8. Crochet pour câble en bas 9. Crochet pour câble en haut 10. Dispositif de rangement de câble 11. Accessoire moquette (FSM1620 uniquement) Assemblage Attention! Avant d exécuter ce qui suit, assurez-vous que l appareil est éteint, débranché et que l appareil est froid et ne contient pas d eau. Glissez l'extrémité du manche (4) en haut du boîtier du balai vapeur (12) jusqu à ce qu elle soit enclenchée. Glissez l extrémité inférieure du boîtier du balai vapeur (12) sur l embout vapeur (5) Jusqu'à ce qu'elle soit enclenchée. L embout vapeur peut être retiré du boîtier du balai vapeur en appuyant sur le bouton de dégagement (13) sur le manche et en dégageant le boîtier du balai vapeur (12) de l embout vapeur (5). 10

11 (Traduction des instructions initiales) FRANÇAIS Accrochez le récipient d'eau (3) sur le manche (4). Glissez le récipient d'eau (3) sur le boîtier du balai vapeur Vous trouverez des tampons nettoyeurs chez votre revendeur Black & Decker (cat. n FSMP20-XJ). Placez un tampon nettoyeur (6) au sol avec le système "hook & loop" vers le haut. Appuyez légèrement le balai vapeur sur le tampon nettoyeur (6). Attention! À l arrêt, placez toujours le balai nettoyeur sur le support (7) avec le manche (4) en position verticale et assurez-vous qu il est éteint quand il n est pas utilisé. Attention! Portez toujours des chaussures adaptées pour changer le tampon nettoyeur du balai vapeur. Ne portez pas de chaussons ou de sandalettes. Placez le manche (4) en position verticale et éteignez le balai vapeur. Placez le balai vapeur sur le support et attendez qu il refroidisse (environ cinq minutes) Placez l avant de votre chaussure sur la languette de dégagement du patin nettoyeur (14) et appuyez fermement dessus. Soulevez le balai vapeur pour dégager le tampon nettoyeur.. Attention! À l arrêt, placez toujours le balai nettoyeur sur le support (7) avec le manche (4) en position verticale et assurez-vous que le balai vapeur est éteint quand il n est pas utilisé. (FSM1620 uniquement) Placez l accessoire moquette sur le sol. Appuyez légèrement le balai vapeur sur l accessoire moquette (11) jusqu à ce qu il soit enclenché. Attention! À l arrêt, placez toujours le balai nettoyeur sur le support (8) avec le manche (4) en position verticale et assurez-vous que le balai vapeur est éteint quand il n est pas utilisé. (FSM1620 uniquement) Attention! Portez toujours des chaussures adaptées pour changer l accessoire moquette du balai vapeur. Ne portez pas de chaussons ou de sandalettes. Placez le manche (4) en position verticale et éteignez le balai vapeur. Placez le balai vapeur sur le support et attendez qu il refroidisse (environ cinq minutes) Placez l avant de votre chaussure sur la languette de dégagement de l accessoire moquette (15) et appuyez dessus fermement. Soulevez le balai vapeur pour dégager l accessoire moquette (9). Attention! À l arrêt, placez toujours le balai nettoyeur sur le support (8) avec le manche (4) en position verticale et assurez-vous que le balai vapeur est éteint quand il n est pas utilisé. Le réservoir d'eau sur le balai à vapeur peut être retiré pour faciliter le remplissage. Ce balai vapeur est doté d un système anti-calcaire qui permet de prolonger la durée de vie du système. Remarque : Remplissez le réservoir avec de l eau du robinet. Remarque : Dans les zones où l eau est très calcaire, l utilisation d eau distillée est recommandée. Retirez le réservoir d eau (3). Ouvrez le couvercle de remplissage (16) en le soulevant. Remplissez le réservoir d'eau (3) avec de l eau. Attention! La capacité du réservoir d'eau est de 0.5 L. Ne remplissez pas trop le réservoir. Ré-installez le couvercle de remplissage (14). Réinstallez le réservoir d eau (3). Remarque : - sage. Utilisation Important! Cette unité va tuer 99,9% des bactéries et des germes lorsqu'il est utilisé conformément au présent manuel de 90 secondes. Mise en marche et arrêt Pour mettre l appareil en marche, appuyez sur le bouton marche/arrêt (1). Le balai vapeur prend environ 15 secondes pour chauffer. Remarque : Quand le balai vapeur est mis en marche, le réservoir d eau s allume en rouge. Quand il est prêt à être utilisé, le réservoir d eau s allume en bleu. Pour éteindre l appareil, appuyez sur le bouton marche/ arrêt (1). Attention! Ne laissez jamais longtemps le balai vapeur au même endroit. À l arrêt, placez toujours le balai nettoyeur sur le support (7) avec le manche (4) en position verticale et assurez-vous que le balai vapeur est éteint quand il n est pas utilisé. Attention! Videz toujours le balai vapeur après l utilisation. 11
 avec le manche (4) en position verticale et assurez-vous qu il est éteint quand il n est pas utilisé. Attention!")
12 FRANÇAIS (Traduction des instructions initiales) Technologie Autoselect TM Ce balai vapeur est doté d un sélecteur Autoselect TM (2) qui permet différentes applications de nettoyage. Elles permettent de sélectionner le mode de fonctionnement approprié au nettoyage que vous souhaitez. Avec le sélecteur Autoselect TM (2), choisissez une des applications suivantes : Bois/Lamellé Pierre/Marbre Carrelage/Vinyle Le balai vapeur sélectionne le volume de vapeur approprié au nettoyage choisi. Remarque : balai à vapeur. Conseils pour une utilisation optimale Généralités Attention! N utilisez jamais le balai vapeur sans avoir d abord Vous pouvez utiliser le dispositif de rangement de câble (10) pour éviter de laisser trop de câble à l'extérieur dans la zone de travail. Aspirez toujours ou balayez le sol avant d utiliser le balai nettoyeur. Le moyen le plus simple d utiliser l appareil est d incliner le manche de 45 et de nettoyer lentement par petites zones. N'utilisez pas de nettoyants chimiques avec le balai vapeur. Pour éliminer les taches qui résistent sur des sols en vinyle ou en lino, vous pouvez prétraiter avec un mélange détergent doux et eau avant d utiliser le balai vapeur. Nettoyage à la vapeur Placez un tampon nettoyeur (6) au sol avec le système "hook & loop" vers le haut. Levez le balai vapeur du support (7) et installez-le sans forcer sur le patin nettoyeur (6). Placez le balai vapeur sur le support. Branchez le balai vapeur au secteur. Tournez le sélecteur Autoselect TM (2) à la position désirée. Appuyez sur le bouton marche/arrêt (1). Le balai vapeur prend environ 15 secondes pour chauffer. En tirant sur le manche (4), la pompe à vapeur s active. Après quelques secondes, la vapeur se forme et est évacuée de l embout. 12 La vapeur prend quelques secondes pour atteindre le patin nettoyeur. Le balai vapeur peut alors glisser facilement sur la surface à désinfecter/nettoyer. Poussez lentement d avant en arrière le balai vapeur sur le sol pour nettoyer à fond. Remarque : Pendant le nettoyage, vous pouvez arrêter la pompe à vapeur en replaçant le manche en position verticale. Vous pourrez ainsi placer le balai vapeur sur le support continuer à nettoyer sans avoir à éteindre l'appareil. Une fois terminé, placez le manche (4) en position verticale et éteignez l appareil. Placez-le sur le support (7) et attendez jusqu à ce que le balai vapeur soit refroidi. (environ cinq minutes) Attention! Il est important de surveiller le niveau d eau dans le réservoir. Pour remplir d eau et continuer à nettoyer/désinfecter, placez le manche (4) en position verticale et éteignez le balai vapeur. Débranchez l appareil de la prise, retirez le réservoir d'eau (3) pour le remplir. Attention! Ne laissez jamais longtemps le balai vapeur au même endroit. À l arrêt, placez toujours le balai nettoyeur sur le support (7) avec le manche (4) en position verticale et assurez-vous que le balai vapeur est éteint quand il n est pas utilisé. Retournez le manche (4) en position verticale et éteignez le balai vapeur. Placez le balai vapeur sur le support (7) et attendez qu il refroidisse (environ cinq minutes) Débranchez le balai vapeur de la prise murale. Videz le réservoir (3). Retirez le patin nettoyeur (6) et lavez-le pour le trouver propre à la prochaine utilisation (prenez soin de suivre les instructions de nettoyage imprimées sur le patin nettoyeur). Remarque : Le crochet du haut (9) pivote pour dégager du récipient. Pour le ranger, placez le balai vapeur (7) sur le support. Remarque : enroulé correctement autour des crochets (8 et 9) et accroché sur la pince (17), votre balai vapeur est prêt à être rangé. Il existe aussi un crochet (18) sur la poignée (19) qui permet de crochet mural peut supporter le poids du balai vapeur.

13

14 FRANÇAIS (Traduction des instructions initiales) Garantie Black & Decker vous offre une garantie très élargie ainsi que - ment supplémentaire et ne peut en aucun cas se substituer à vos droits légaux. La garantie est valable sur tout le territoire des États Membres de l'union Européenne et de la Zone de Libre Échange Européenne. Si un produit Black & Decker s'avère défectueux en raison de matériaux en mauvaises conditions, d'une erreur humaine, ou d'un manque de conformité dans les 24 mois suivant la date d'achat, Black & Decker garantit le remplacement des pièces défectueuses, la réparation des produits usés ou cassés ou remplace ces produits à la convenance du client, sauf dans les circonstances suivantes : Le produit a été utilisé dans un but commercial, professionnel, ou a été loué; Le produit a été mal utilisé ou utilisé avec négligence; Le produit a subi des dommages à cause d'objets étrangers, de substances ou à cause d'accidents; Des réparations ont été tentées par des techniciens ne faisant pas partie du service technique de Black & Decker. Pour avoir recours à la garantie, il est nécessaire de fournir une preuve d'achat au vendeur ou à un réparateur agréé. Pour connaître l'adresse du réparateur agréé le plus proche de chez vous, contactez le bureau Black & Decker à l'adresse indiquée dans ce manuel. Vous pourrez aussi trouver une liste de réparateurs agréés Black & Decker et de plus amples détails sur notre service après-vente sur le site Internet à l'adresse suivante : Visitez notre site Web pour enregistrer votre nouveau produit Black & Decker et être informé des nouveaux produits et des offres spéciales. Pour plus d'informations concernant la marque Black & Decker et notre gamme de produits, consultez notre site fr 14

15 15
16 17 16

17 19 18

18 21 20

19 23 22

20 25 24
21 26
22
23 REV-1 10/2012
ASSEMBLY INSTRUCTIONS DIRECTIVES POUR L'ASSEMBLAGE ombre pendant lamp lampe suspendue à tons dégradés, chocolat
 ASSEMBLY INSTRUCTIONS DIRECTIVES POUR L'ASSEMBLAGE ombre pendant lamp lampe suspendue à tons dégradés, chocolat SKU 2728089 INSTRUCTIONAL MANUAL MANUEL D'INSTRUCTIONS 270/2707 COMPONENT LIST LISTE DES
ASSEMBLY INSTRUCTIONS DIRECTIVES POUR L'ASSEMBLAGE luster chandelier lamp chandelier à trois branches en verre lustré
 ASSEMBLY INSTRUCTIONS DIRECTIVES POUR L'ASSEMBLAGE luster chandelier lamp chandelier à trois branches en verre lustré SKU 2711592 INSTRUCTIONAL MANUAL MANUEL D'INSTRUCTIONS 270/2707 COMPONENT LIST LISTE
R.V. Table Mounting Instructions
 PTSS165 ACCESSORY MOUNTING INSTRUCTIONS Use these instructions in conjunction with your main manual to properly assemble your gas grill. Refer to the main manual for safety, operating, cleaning and maintenance
MODE D EMPLOI USER MANUAL
 notice_cd 853:notice 9/01/08 15:08 Page 1 CAFETIÈRE À DOSETTES Coffee pad machine CD 853 GIACOMO MODE D EMPLOI USER MANUAL notice_cd 853:notice 9/01/08 15:08 Page 2 FRANÇAIS WHITE & BROWN vous félicite
Thank you for choosing the Mobile Broadband USB Stick. With your USB Stick, you can access a wireless network at high speed.
 Thank you for choosing the Mobile Broadband USB Stick. With your USB Stick, you can access a wireless network at high speed. Note: This manual describes the appearance of the USB Stick, as well as the
NOTICE D UTILISATION
 CAFETIERE ELECTRIQUE 1.25L REF CM4229 230V - 800W - 50Hz NOTICE D UTILISATION LIRE ATTENTIVEMENT LES INSTRUCTIONS SUIVANTES AVANT TOUTE PREMIERE UTILISATION Appareil garanti 1 an sur présentation du ticket
Cafetière. Mode d Emploi. 1Notice cafetière v1.0
 Cafetière Mode d Emploi 1Notice cafetière v1.0 SOMMAIRE 1 CONSIGNES DE SÉCURITÉ... 3 2INSTALLATION DE L APPAREIL EN TOUTE SÉCURITÉ...4 3PRECAUTION CONCERNANT L UTILISATION DE L APPAREIL...5 4DESCRIPTION
Notice Technique / Technical Manual
 Contrôle d accès Access control Encodeur USB Mifare ENCOD-USB-AI Notice Technique / Technical Manual SOMMAIRE p.2/10 Sommaire Remerciements... 3 Informations et recommandations... 4 Caractéristiques techniques...
WINTER BOAT STORAGE SYSTEM SYSTÈME DE REMISAGE HIVERNAL POUR BATEAU
 MANUAL / MANUEL VIDEO WINTER BOAT STORAGE SYSTEM SYSTÈME DE REMISAGE HIVERNAL POUR BATEAU ASSEMBLY INSTRUCTIONS GUIDE D ASSEMBLAGE NAVIGLOO 14-18½ ft/pi FISHING BOAT! RUNABOUT! PONTOON BOAT! SAILBOAT (SAILBOAT
Thank you for choosing the Mobile Broadband USB Stick. With your USB Stick, you can access a wireless network at high speed.
 Thank you for choosing the Mobile Broadband USB Stick. With your USB Stick, you can access a wireless network at high speed. Note: This manual describes the appearance of the USB Stick, as well as the
GIGABIT PCI DESKTOP ADAPTER DGE-530T. Quick Installation Guide+ Guide d installation+
 GIGABIT PCI DESKTOP ADAPTER Quick Installation Guide+ Guide d installation+ Check Your Package Contents Quick Installation Guide Gigabit Ethernet PCI Adapter CD with Manual and Drivers DO NOT insert the
MANUEL D UTILISATION COFFNTEA
 MANUEL D UTILISATION COFFNTEA UD 888 Lisez attentivement ce mode d'emploi avant d'utiliser l'appareil et conservezle pour un usage ultérieur POUR USAGE DOMESTIQUE UNIQUEMENT Description générale 1. TOUCHE
MANUEL D'UTILISATION
 CAFETIERE MANUEL D'UTILISATION Modèle : KF12 Merci de lire attentivement ce document avant la première utilisation de l'appareil CONSIGNES DE SECURITE Lors de l'utilisation d'appareils électriques, des
Instructions Mozilla Thunderbird Page 1
 Instructions Mozilla Thunderbird Page 1 Instructions Mozilla Thunderbird Ce manuel est écrit pour les utilisateurs qui font déjà configurer un compte de courrier électronique dans Mozilla Thunderbird et
Lavatory Faucet. Instruction Manual. Questions? 1-866-661-9606 [email protected]
 Lavatory Faucet Instruction Manual rev. 19-01-2015 Installation Manual You will need Adjustable Wrench Adjustable Pliers Plumber s Tape Hardware list (included) Allen Key Socket wrench tool Important Follow
Stainless Steel Deep Fryer HF 1030
 TM Stainless Steel Deep Fryer Friteuse en acier inoxydable 2012, HFEF-CAN US FR UK -10/12 1 Year Limited Warranty Un An De Garantie Limitée Thank you for purchasing the innovative Heaven Fresh Stainless
Warning: Failure to follow these warnings could result in property damage, or personal injury.
 Western Steel & Tube 1 Storage Locker Extended Storage Locker Storage Cabinet Assembly And Use Instructions Warning: Failure to follow these warnings could result in property damage, or personal injury.
Guide d'installation rapide TFM-560X YO.13
 Guide d'installation rapide TFM-560X YO.13 Table of Contents Français 1 1. Avant de commencer 1 2. Procéder à l'installation 2 Troubleshooting 6 Version 06.08.2011 16. Select Install the software automatically
Folio Case User s Guide
 Fujitsu America, Inc. Folio Case User s Guide I N S T R U C T I O N S This Folio Case is a stylish, lightweight case for protecting your Tablet PC. Elastic Strap Pen Holder Card Holders/ Easel Stops Figure
Guide d installation Deco Drain inc. DD200
 Guide d installation Deco Drain inc. DD200 Pour plus informations et pour télécharger les guides d installation en couleur, visitez notre site web. www.decodrain.com Soutien technique : Composez le : 514-946-8901
Garage Door Monitor Model 829LM
 Garage Door Monitor Model 829LM To prevent possible SERIOUS INJURY or DEATH from a closing garage door: NEVER permit children to operate or play with door control push buttons or remote control transmitters.
Contrôle d'accès Access control. Notice technique / Technical Manual
 p.1/18 Contrôle d'accès Access control INFX V2-AI Notice technique / Technical Manual p.2/18 Sommaire / Contents Remerciements... 3 Informations et recommandations... 4 Caractéristiques techniques... 5
03/2013. Mod: WOKI-60IP/TR. Production code: DTWIC 6000
 03/2013 Mod: WOKI-60IP/TR Production code: DTWIC 6000 ENCASTRABLE INDUCTION DROP IN INDUCTION 11/2011 TECHNICAL FEATURES DOCUMENTATION S.A.V. Notice d utilisation : FX00326-A Guide d intervention : ---
WiFi Security Camera Quick Start Guide. Guide de départ rapide Caméra de surveillance Wi-Fi (P5)
") #45 #46 WiFi Security Camera Quick Start Guide Guide de départ rapide Caméra de surveillance Wi-Fi (P5) #47 Start Here 1 Is this you? TECH SUPPORT CTRL ALT DEL 2 If yes, turn to page three 1 3 If not,
#45 #46 WiFi Security Camera Quick Start Guide Guide de départ rapide Caméra de surveillance Wi-Fi (P5) #47 Start Here 1 Is this you? TECH SUPPORT CTRL ALT DEL 2 If yes, turn to page three 1 3 If not,
Sécurité relative aux sièges auto et aux rehausseurs
 Sécurité relative aux sièges auto et aux rehausseurs Safety with Car Seats and Booster Seats Car crashes are the main cause of accidental death and serious injury of children. Correctly using a car or
Paxton. ins-20605. Net2 desktop reader USB
 Paxton ins-20605 Net2 desktop reader USB 1 3 2 4 1 2 Desktop Reader The desktop reader is designed to sit next to the PC. It is used for adding tokens to a Net2 system and also for identifying lost cards.
Once the installation is complete, you can delete the temporary Zip files..
 Sommaire Installation... 2 After the download... 2 From a CD... 2 Access codes... 2 DirectX Compatibility... 2 Using the program... 2 Structure... 4 Lier une structure à une autre... 4 Personnaliser une
MC1-F www.primo-elektro.be
 NOTICE D UTILISATION CAFETIÈRE MUG ISOTHERME www.primo-elektro.be WWW.PRIMO-ELEKTRO.BE 2 WWW.PRIMO-ELEKTRO.BE Lisez toutes les instructions Conservez-les pour consultation ultérieure 1. CONDITIONS DE GARANTIE
Contents Windows 8.1... 2
 Workaround: Installation of IRIS Devices on Windows 8 Contents Windows 8.1... 2 English Français Windows 8... 13 English Français Windows 8.1 1. English Before installing an I.R.I.S. Device, we need to
Logitech Tablet Keyboard for Windows 8, Windows RT and Android 3.0+ Setup Guide Guide d installation
 Logitech Tablet Keyboard for Windows 8, Windows RT and Android 3.0+ Setup Guide Guide d installation English.......................................... 3 Français.........................................
Le No.1 de l économie d énergie pour patinoires.
 Le No.1 de l économie d énergie pour patinoires. Partner of REALice system Economie d énergie et une meilleure qualité de glace La 2ème génération améliorée du système REALice bien connu, est livré en
Stainless Steel Solar Wall Light
 V 2.9 Stainless Steel Solar Wall Light User Manual Please read and understand all instructions before use.retain this manual for future reference. V 2.9 Stainless Steel Solar Wall Light SPECIFICATIONS
PRECAUTIONS IMPORTANTES
 D90 Mode d emploi Ne mettez l appareil en marche qu après avoir pris connaissance de ce mode d emploi et des conseils de sécuritémentionnés en pages 3 et 4! PRECAUTIONS IMPORTANTES Lors de l utilisation
MODE D EMPLOI CAFETIERE KZ8F WWW.PRIMO-ELEKTRO.BE
 MODE D EMPLOI CAFETIERE KZ8F WWW.PRIMO-ELEKTRO.BE KZ8F WWW.PRIMO-ELEKTRO.BE CARTE DE GARANTIE Chère cliente, cher client, Nos produits sont soumis à des contrôles de qualité rigoureux. Si malgré ces contrôles,
MANUEL D UTILISATION
 MANUEL D UTILISATION Table des matières Sécurité du produit 3 Mesures de précautions 4 Exigences électriques 5 Dépannage 5 Caractéristiques de My Rotisserie 6 Caractéristiques de My Rotisserie 7 Diagramme
Règlement sur le télémarketing et les centres d'appel. Call Centres Telemarketing Sales Regulation
 THE CONSUMER PROTECTION ACT (C.C.S.M. c. C200) Call Centres Telemarketing Sales Regulation LOI SUR LA PROTECTION DU CONSOMMATEUR (c. C200 de la C.P.L.M.) Règlement sur le télémarketing et les centres d'appel
Kenwood Limited, New Lane, Havant, Hampshire PO9 2NH, UK www.kenwoodworld.com
 Kenwood Limited, New Lane, Havant, Hampshire PO9 2NH, UK www.kenwoodworld.com 57774/1 ESP100 series i ii UNFOLD Français Veuillez déplier les illustrations de la première page avant d utiliser votre appareil
Using a Walker. 2. Move your injured or weak leg toward the walker first. If you have had surgery on both legs, use either leg to begin walking.
 Using a Walker Walking with a Walker 1. Lift the walker and place it at a comfortable distance in front of you with all four of its legs on the floor. This distance is often equal to an arm s length. 2.
TABLE DES MATIERES A OBJET PROCEDURE DE CONNEXION
 1 12 rue Denis Papin 37300 JOUE LES TOURS Tel: 02.47.68.34.00 Fax: 02.47.68.35.48 www.herve consultants.net contacts@herve consultants.net TABLE DES MATIERES A Objet...1 B Les équipements et pré-requis...2
DOCUMENTATION - FRANCAIS... 2
 DOCUMENTATION MODULE SHOPDECORATION MODULE PRESTASHOP CREE PAR PRESTACREA INDEX : DOCUMENTATION - FRANCAIS... 2 INSTALLATION... 2 Installation automatique... 2 Installation manuelle... 2 Résolution des
How to Login to Career Page
 How to Login to Career Page BASF Canada July 2013 To view this instruction manual in French, please scroll down to page 16 1 Job Postings How to Login/Create your Profile/Sign Up for Job Posting Notifications
Fabricant. 2 terminals
 Specifications Fabricant Nominal torque (Nm) 65 Minimal torque (Nm) 0,63 Coil resistance - 20 C (ohms) 20 Rated current DC (A) 1 Rotor inertia (kg.m 2 ) 2.10-3 Weight (kg) 7,20 Heat dissipation continuous
Notice d utilisation Cafetère isotherme programmable CL-ISPR12X - 938896 FR-1. Version 2013.08.27
 Notice d utilisation Cafetère isotherme programmable CL-ISPR12X - 938896 FR-1 Version 2013.08.27 INSTRUCTIONS DE SÉCURITÉ Cet appareil peut être utilisé par des enfants à partir de 8 ans et par des personnes
Instructions pour mettre à jour un HFFv2 v1.x.yy v2.0.00
 Instructions pour mettre à jour un HFFv2 v1.x.yy v2.0.00 HFFv2 1. OBJET L accroissement de la taille de code sur la version 2.0.00 a nécessité une évolution du mapping de la flash. La conséquence de ce
POLICY: FREE MILK PROGRAM CODE: CS-4
 POLICY: FREE MILK PROGRAM CODE: CS-4 Origin: Authority: Reference(s): Community Services Department Cafeteria Services and Nutrition Education Division Resolution #86-02-26-15B.1 POLICY STATEMENT All elementary
3615 SELFIE. http://graffitiresearchlab.fr HOW-TO / GUIDE D'UTILISATION
 3615 SELFIE http://graffitiresearchlab.fr HOW-TO / GUIDE D'UTILISATION Hardware : Minitel Computer DIN FM545 45 connector (http://www.gotronic.fr/art-fiche-din-fm545-4747.htm) Cable Arduino compatible
Manuel d instruction Cafetière filtre. art.n 7174.101 19. 90
 Manuel d instruction Cafetière filtre art.n 7174.101 19. 90 Félicitations En achetant cet appareil vous venez d acquérir un appareil de qualité, fabriqué avec soin. Bien entre-tenu, cet appareil vous rendra
3M HEPA Vacuum 497AJK. User s Guide
 3M HEPA Vacuum 497AJK User s Guide Table of Contents Section Page Safety Instructions...3 Grounding Instructions...5 Specifications...7 To Operate...7 To Replace Filter...8 Parts List...9 Regulatory Statements...9
NEW Fin Fan / Air cooled condenser cleaning
 Air cooled Condensers ( ACC ) Cleaning Air Cooled heat exchangers ( Finfan) Cleaning Cleaning Services Permanente installation NEW Fin Fan / Air cooled condenser cleaning New and revolutionnary high pressure
WEB page builder and server for SCADA applications usable from a WEB navigator
 Générateur de pages WEB et serveur pour supervision accessible à partir d un navigateur WEB WEB page builder and server for SCADA applications usable from a WEB navigator opyright 2007 IRAI Manual Manuel
Principe de TrueCrypt. Créer un volume pour TrueCrypt
 Sommaire : Principe de TrueCrypt...1 Créer un volume pour TrueCrypt...1 Premier montage...6 Réglages...8 Save Currently Mounted Volumes as Favorite...8 Settings > Preferences...9 TrueCrypt Traveller pour
ENGLISH 4 FRANÇAIS 6 ESPAÑOL 8
 SY ENGLISH 4 FRANÇAIS 6 ESPAÑOL 8 ENGLISH How to lubricate the sewing machine Warning! Always switch off the machine and disconnect it from the power supply before lubricating the sewing machine. 1 Always
Cafetière à thermoverseuse de 4 tasses
 CONSERVER LE PRÉSENT GUIDE D UTILISATION ET D ENTRETIEN. Cafetière à thermoverseuse de 4 tasses? Au DES QUESTIONS? Prière de nous téléphoner SANS FRAIS! Aux É.-U. : 1 800 231-9786 Canada : 1 800 465-6070
DOCUMENTATION - FRANCAIS... 2
 DOCUMENTATION MODULE CATEGORIESTOPMENU MODULE CREE PAR PRESTACREA INDEX : DOCUMENTATION - FRANCAIS... 2 INSTALLATION... 2 CONFIGURATION... 2 LICENCE ET COPYRIGHT... 3 SUPPORT TECHNIQUE ET MISES A JOUR...
Monitor LRD. Table des matières
 Folio :1/6 Table des matières 1.Installation du logiciel... 3 2.Utilisation du logiciel... 3 2.1.Description de la fenêtre de commande... 3 2.1.1.Réglage des paramètres de communication... 4 2.1.2.Boutons
33 inch open & closed storage Rangement à espace fermé et ouvert de 33po (83.7cm) 33 pulgadas almacenaje abierto y cerra
 33 pulgadas almacenaje abierto y cerra") 33 inch open & closed storage 33 pulgadas almacenaje abierto y cerra! o not throw away packaging materials until assembly is complete.! Assemble this item on a soft surface, such as cardboard or carpet,
33 inch open & closed storage 33 pulgadas almacenaje abierto y cerra! o not throw away packaging materials until assembly is complete.! Assemble this item on a soft surface, such as cardboard or carpet,
Vanilla : Virtual Box
 Vanilla : Virtual Box Installation Guide for Virtual Box appliance Guide d'installation de l'application VirtualBox Vanilla Charles Martin et Patrick Beaucamp BPM Conseil Contact : [email protected],
Mesure chimique. Chemical measurement. Sonde de température Pt 1000 Inox Pt 1000 stainless steel. Ref : 703 262. Français p 1.
 Mesure chimique Chemical measurement Français p 1 English p 3 Sonde de température Pt 1000 Inox Pt 1000 stainless steel Version : 6010 Mesure chimique Sonde de température Pt 1000 Inox 1 Description La
GAME CONTENTS CONTENU DU JEU OBJECT OF THE GAME BUT DU JEU
 GAME CONTENTS 3 wooden animals: an elephant, a Polar bear and an African lion 1 Playing Board with two tree stumps, one red and one blue 1 Command Board double sided for two game levels (Green for normal
that the child(ren) was/were in need of protection under Part III of the Child and Family Services Act, and the court made an order on
 was/were in need of protection under Part III of the Child and Family Services Act, and the court made an order on") ONTARIO Court File Number at (Name of court) Court office address Applicant(s) (In most cases, the applicant will be a children s aid society.) Full legal name & address for service street & number, municipality,
ONTARIO Court File Number at (Name of court) Court office address Applicant(s) (In most cases, the applicant will be a children s aid society.) Full legal name & address for service street & number, municipality,
APPENDIX 6 BONUS RING FORMAT
 #4 EN FRANÇAIS CI-DESSOUS Preamble and Justification This motion is being presented to the membership as an alternative format for clubs to use to encourage increased entries, both in areas where the exhibitor
accidents and repairs:
 accidents and repairs: putting the pieces together accidents et réparations : réunir le tout nobody can repair your Toyota like Toyota Unfortunately, accidents do happen. And the best way to restore your
STEAMY MINI. Nous vous félicitons pour l acquisition de l appareil «STEAMY - MINI», un appareil de grande qualité.
 REITEL Feinwerktechnik GmbH Senfdamm 20 D 49152 Bad Essen Allemagne Tel. (++49) 5472/94 32-0 Fax: (++49) 5472/9432-40 Mode d emploi STEAMY MINI Cher client, Nous vous félicitons pour l acquisition de l
Description. Consignes de sécurité
 2 3 Description a Couvercle b Réservoir à eau c Verseuse verre ou pot isotherme (selon modèle) d Niveau d eau e Volet pivotant f Porte-filtre g Bouton d ouverture du volet h Sélecteur d arôme Modèles programmables
AND / ET USER GUIDE UK HARDWIRED CONTROL PANEL UK GUIDE UTILISATEUR CENTRALE D ALARME FILAIRE F 496572 1
 AND / ET UK USER GUIDE HARDWIRED CONTROL PANEL UK F GUIDE UTILISATEUR CENTRALE D ALARME FILAIRE 496572 1 English UK Operator Controls and Displays On both control panel and remote keypad the LEDs display
CONSIGNES D'UTILISATION ET D'ENTRE TIEN VEUILLEZ LIRE ATTENTIVEMENT LES CONSIGNES DE CE DOCUMENT AVANT D UTILISER VOTRE MACHINE À ESPRESSO.
 The Else CONSIGNES D'UTILISATION ET D'ENTRE TIEN VEUILLEZ LIRE ATTENTIVEMENT LES CONSIGNES DE CE DOCUMENT AVANT D UTILISER VOTRE MACHINE À ESPRESSO. www.adrianos.ch Hey! Ces consignes contiennent toutes
Quick Setup Guide Guide de configuration rapide. Tablet Device SGPT12 Series Tablette électronique Série SGPT12
 Quick Setup Guide Guide de configuration rapide Tablet Device SGPT12 Series Tablette électronique Série SGPT12 Welcome / Bienvenue Congratulations on your purchase of this Xperia Tablet S. This Quick Setup
Z-Axis Compliance Device Compliance en z
 Compensation for different vertical positions Collision recognition in Z-direction Protection of parts and work pieces Monitoring of the insertion forces during assembly operations Monitoring of the picking
7 bis impasse Denis Dulac - 94700 Maisons-Alfort FRANCE Tél. : 01 43 68 06 13 / Fax : 01 43 68 66 09 @ : [email protected] www.promattex.
 7 bis impasse Denis Dulac - 94700 Maisons-Alfort FRANCE Tél. : 01 43 68 06 13 / Fax : 01 43 68 66 09 @ : [email protected] www.promattex.com NOTICE DB-30 Ce manuel de montage contient les éléments
OWNER S MANUAL 4 US GALLONS (15.1 LITERS) OUTPUT PER DAY WARM MOISTURE HUMIDIFIER 3 US GALLONS (11.3 LITERS) OUTPUT PER DAY WARM MOISTURE HUMIDIFIERS
 OUTPUT PER DAY WARM MOISTURE HUMIDIFIER 3 US GALLONS (11.3 LITERS) OUTPUT PER DAY WARM MOISTURE HUMIDIFIERS") QuickSteam_OM_04-25-06.qxd 4/25/06 4:53 PM Page 1 OWNER S MANUAL 3 US GALLONS (11.3 LITERS) OUTPUT PER DAY WARM MOISTURE HUMIDIFIERS Models: HWM-330 HWM-331 HWM-335 4 US GALLONS (15.1 LITERS) OUTPUT PER
QuickSteam_OM_04-25-06.qxd 4/25/06 4:53 PM Page 1 OWNER S MANUAL 3 US GALLONS (11.3 LITERS) OUTPUT PER DAY WARM MOISTURE HUMIDIFIERS Models: HWM-330 HWM-331 HWM-335 4 US GALLONS (15.1 LITERS) OUTPUT PER
PRESENTATION REMOTE TÉLÉCOMMANDE DE PRÉSENTATION. User Guide Manuel de l utilisateur
 PRESENTATION REMOTE TÉLÉCOMMANDE DE PRÉSENTATION User Guide Manuel de l utilisateur Targus Presentation Remote Introduction Thank you for your purchase of the Targus Presentation Remote. This cordless
Free filter reminders! Sign up online at: santevia.com/filterease. need help? Contact Santevia! 1-866-943-9220 [email protected].
 Free filter reminders! Sign up online at: need help? Contact Santevia! -866-9-90 [email protected] Shower Filter English about our santevia Shower Filter Prevent leaks This shower filter employs NMC leading
Nouveautés printemps 2013
 » English Se désinscrire de la liste Nouveautés printemps 2013 19 mars 2013 Dans ce Flash Info, vous trouverez une description des nouveautés et mises à jour des produits La Capitale pour le printemps
Contrôle d accès Access control MOD-TCPIP-AI. Notice technique / Technical Manual
 Contrôle d accès Access control MOD-TCPIP-AI Notice technique / Technical Manual Notice technique Mod-TCPIP-AI 9 septembre 2008 v.1.0 p.2/16 Sommaire / Contents Sommaire / Contents...2 Remerciements...3
Start Here Point de départ
 Start Here Point de départ Epson Stylus C88+ Please read these instructions before using the printer. Lisez ces instructions avant d utiliser l imprimante. Install Ink Cartridges Installez les cartouches
COMPOSANTS DE LA MACHINE
 FR COMPOSANTS DE LA MACHINE Voyant vapeur prête Interrupteur vapeur Interrupteur de distribution de café Voyant café prêt Couvercle du réservoir à eau Figure A Bouton de distribution vapeur et eau chaude
i.fresh Compact NCCO Air Sanitizing System for Car / Desktop Model: WS908 USER MANUAL
 i.fresh Compact NCCO Air Sanitizing System for Car / Desktop Model: WS908 USER MANUAL voitures / desktop à technologie NCCO FR Modèle: WS908 MANUEL DE L UTILISATEUR TABLE DES MATIERES Informations Importantes
TRUCK COFFEE MAKER. User s manual. Check our website www.quintezz.com for more languages
 TRUCK COFFEE MAKER User s manual GB NL D E Check our website www.quintezz.com for more languages INTRODUCTION Cher client, Vous avez acheté le QUINTEZZ Truck Coffee Maker. Nous vous remercions pour cet
GASKET FOR TONER COLLECTION BOTTLE
 Technical Service Bulletin PRODUCT CREATED DATE MODIFIED DATE FILE ALL PRINTERS 08/07/2011 201108 REV A GASKET FOR TONER COLLECTION BOTTLE Voir version française dans la section suivante. Due to a manufacturing
Le passé composé. C'est le passé! Tout ça c'est du passé! That's the past! All that's in the past!
 > Le passé composé le passé composé C'est le passé! Tout ça c'est du passé! That's the past! All that's in the past! «Je suis vieux maintenant, et ma femme est vieille aussi. Nous n'avons pas eu d'enfants.
direct serve EN DE NI ES PT CZ SK www.moulinex.com
 FR direct serve EN DE NI ES PT CZ SK www.moulinex.com 4 3 2 1 71mm 5 6 7 1 2 3 4 5 6 OK Click NO 7 8 9 150ml 10 Nous vous remercions d avoir choisi un appareil de la gamme Moulinex. CONSIGNES DE SECURITE
lundi 3 août 2009 Choose your language What is Document Connection for Mac? Communautés Numériques L informatique à la portée du Grand Public
 Communautés Numériques L informatique à la portée du Grand Public Initiation et perfectionnement à l utilisation de la micro-informatique Microsoft Document Connection pour Mac. Microsoft Document Connection
Fontaine à eau. Manuel d utilisation Modèle : X-16 lg-x52 A. Type de distributeur d eau chaude et froide. Compresseur avec réfrigération.
 Fontaine à eau Manuel d utilisation Modèle : X-16 lg-x52 A Type de distributeur d eau chaude et froide. Compresseur avec réfrigération. Nous vous remercions d avoir acheté notre distributeur d eau. Lisez
AMENDMENT TO BILL 32 AMENDEMENT AU PROJET DE LOI 32
 THAT the proposed clause 6(1), as set out in Clause 6(1) of the Bill, be replaced with the following: Trustee to respond promptly 6(1) A trustee shall respond to a request as promptly as required in the
Stéphane Lefebvre. CAE s Chief Financial Officer. CAE announces Government of Canada participation in Project Innovate.
 Stéphane Lefebvre CAE s Chief Financial Officer CAE announces Government of Canada participation in Project Innovate Montreal, Canada, February 27, 2014 Monsieur le ministre Lebel, Mesdames et messieurs,
RAPID 3.34 - Prenez le contrôle sur vos données
 RAPID 3.34 - Prenez le contrôle sur vos données Parmi les fonctions les plus demandées par nos utilisateurs, la navigation au clavier et la possibilité de disposer de champs supplémentaires arrivent aux
Micro-ordinateurs, informations, idées, trucs et astuces utiliser le Bureau à distance
 Micro-ordinateurs, informations, idées, trucs et astuces utiliser le Bureau à distance Auteur : François CHAUSSON Date : 8 février 2008 Référence : utiliser le Bureau a distance.doc Préambule Voici quelques
Archived Content. Contenu archivé
 ARCHIVED - Archiving Content ARCHIVÉE - Contenu archivé Archived Content Contenu archivé Information identified as archived is provided for reference, research or recordkeeping purposes. It is not subject
Utiliser une WebCam. Micro-ordinateurs, informations, idées, trucs et astuces
 Micro-ordinateurs, informations, idées, trucs et astuces Utiliser une WebCam Auteur : François CHAUSSON Date : 8 février 2008 Référence : utiliser une WebCam.doc Préambule Voici quelques informations utiles
English... 2 Français...9
 840115300 Ev01.qxd 4/17/03 1:30 PM Page 1 Thank you for buying a Hamilton Beach Commercial coffeemaker. You have made an excellent choice! All of our coffeemakers are manufactured to the highest levels
SA-32 / SA-62 INSTRUCTION MANUAL - MANUEL D INSTRUCTIONS
 SA-32 / SA-62 INSTRUCTION MANUAL - MANUEL D INSTRUCTIONS 4 5 6 7 4 5 6 7 1. Telephone Paging Volume Control 1. Contrôle de volume Paging Téléphone 2. Microphone Volume Control 2. Contrôle volume du microphone
Exceptional Brew HOUSEHOLD USE ONLY. 8-cup thermal carafe coffee maker Model: BV1800TH
 Exceptional Brew 8-cup thermal carafe coffee maker Model: BV1800TH Customer assistant line: USA 1-855- 664-1252 Thank you for purchasing this Bonavita appliance. HOUSEHOLD USE ONLY 2 year limited warranty
Gestion des prestations Volontaire
 Gestion des prestations Volontaire Qu estce que l Income Management (Gestion des prestations)? La gestion des prestations est un moyen de vous aider à gérer votre argent pour couvrir vos nécessités et
Notice d utilisation
 Notice d utilisation Prise en main rapide 2 Sortez votre machine de son carton et débarrassez-la de ses emballages plastiques. Rincez le réservoir avec de l eau du robinet, remplissez-le et remettez-le
SERVEUR DÉDIÉ DOCUMENTATION
 SERVEUR DÉDIÉ DOCUMENTATION Release 5.0.6.0 19 Juillet 2013 Copyright 2013 GIANTS Software GmbH, All Rights Reserved. 1/9 CHANGE LOG Correction de bug divers (5.0.6.0) Ajout d une option de relance automatique
MODE D EMPLOI PLAQUE DE CUISSON À INDUCTION POSABLE PC 491 - PC
 notice PC 491-492: notice PC 481/482 3/10/11 9:09 Page 1 MODE D EMPLOI PLAQUE DE CUISSON À INDUCTION POSABLE PC 491 - PC 492 PC 491 PC 492 notice PC 491-492: notice PC 481/482 3/10/11 9:09 Page 2 FRANÇAIS
Mechanical, pop-up, and fl ip drain
 Installation de votre nouveau robinet : Renvoi mécanique, poussoir et pivotant Installing your new faucet: Mechanical, pop-up, and fl ip drain JL22.01 30 Conseils, astuces et précautions avant de commencer
Curve. Innover pour simplifier! Mistral signe les fontaines High Tech à hauteur adaptable. Mistral signs the High Tech coolers with adaptable height
 Innover pour simplifier! Ligne Professionnelle Professional Line Fontaines Réseau Drinking fountains Curve Mistral signe les fontaines High Tech à hauteur adaptable Mistral signs the High Tech coolers
PARIS ROISSY CHARLES DE GAULLE
 GPS 2 34 1 E 49 0 46 N GPS* 2 56 56 E 49 0 12 N Votre contact / Your contact: et / and: Accueil : Cabines téléphoniques publiques Reception: Public telephone kiosks Navette Shuttle AÉROPORT DE TT CAR TRANSIT
calls.paris-neuroscience.fr Tutoriel pour Candidatures en ligne *** Online Applications Tutorial
 calls.paris-neuroscience.fr Tutoriel pour Candidatures en ligne Online Applications Tutorial 1/4 Pour postuler aux Appels d Offres de l ENP, vous devez aller sur la plateforme : calls.parisneuroscience.fr.