User Manual. Ology. Original user manual
|
|
|
- Alexis Normandin
- il y a 8 ans
- Total affichages :
Transcription
1

2 User Manual Ology Original user manual BA_Ology _EN_02_2014
3 Table of contents 1 General instructions 1.1 About the Ology product series About this user manual Explanations of symbols and notices Exclusion of liability Basic safety instructions 2.1 Intended use Non-intended use Safety regulations Users with limitations Product description 3.1 Desk Electrical components Factory settings at delivery Components Desk overview Operator panel - intuitive Operator panel - programmable (optional) Electrical height adjustment Transport and storage 4.1 Safety guidelines Intermediate storage Installation, assembly, dismantling 5.1 Safety guidelines Power supply connections Installation, assembly and setting up Height compensation Disposal of the packaging material Dismantling Disposing of the desk Operation and settings 6.1 Safety guidelines Optimal desk height BA_Ology _EN_02_

4 6.3 Variant - Basic Variant - facility manager Variant - user crank Variants - Lift 1 and Lift Operator panel - intuitive Manual reset, operator panel intuitive Adjusting the desktop height with the intuitive operator panel Operator panel - programmable (optional) Manual reset, operator panel - programmable Adjusting desktop height with the operator panel - programmable Changing the display between centimetres and inches Setting the memory position Calling up a memory position Sliding desktop Errors and faults 7.1 Safety regulations Error messages on the display of the programmable operator panel Maintenance 8.1 Safety regulations Function checks Functional Check Table Maintenance tasks Cleaning and care Customer service 9.1 Delivery, setup, instruction Repairs and spare parts BA_Ology _EN_02_

5 General instructions 1 General instructions 1.1 About the Ology product series The Ology office furniture product line from Steelcase is subject to constant quality control in its manufacturing and sales. Thus fault-free functionality is ensured. The products have been designed and manufactured in accordance with the state of the technology (in Germany at the time of construction) and the recognized technical rules, nevertheless hazards can occur. Comply with the respective safety instructions in this regard! Faults that can impair safety must be corrected immediately. We reserve the right to make technical changes to the products for technical reasons. Steelcase uses a quality management system that satisfies the requirements specified in DIN EN ISO Steelcase is entitled to use the GS mark for its Ology product series. Moreover Steelcase affixes the Öko-Audit-Siegel (ECO-Audit-Seal) for the "EC system for environmental management and environmental business management". The electric height adjustment unit type plate is located on the controller housing and on the columns, and under the tabletop. Product information BA_Ology _EN_02_

6 General instructions 1.2 About this user manual This user manual provides information about the components, the function, use and maintenance of the Ology desk and its components. If there are malfunctions it serves as an aid for troubleshooting and fault rectification. The safety instructions help to avoid personal injury and material damage. The users of the Ology desk are obligated to take note of these safety instructions and to always comply with them. Purpose of the user manual Steelcase accepts no liability and offers no guarantee for damage and malfunctions that occur due to failure to comply with the instructions in the user manual. This user manual is a component of the Ology desk. It is only valid as a complete document. If the desk is resold, this user manual is part of the scope of delivery. Steelcase makes this user manual available on the Internet, at the following address: Excerpts or copies must not be forwarded to third parties or used in any other published form without prior written consent from Steelcase. This user manual, provided as part of the technical documentation, is subject to German copyright law. Copyright BA_Ology _EN_02_

7 General instructions 1.3 Explanations of symbols and notices The symbols listed below are used in this user manual and have the following meanings: DANGER Imminent danger! Injury is possible! Failure to comply with the instructions can result in serious health impairment or death. WARNING Potentially hazardous situation! Failure to comply with the instructions can result in serious bodily injury. CAUTION Failure to comply with the instructions can result in minor injury, material damage or malfunction. Tips and important information Typographic emphasis: Listing Handling instruction BA_Ology _EN_02_

8 General instructions 1.4 Exclusion of liability Under one or more of the following conditions Steelcase can be excluded from all liability: Non-intended use of the product; Use of the product beyond its intended purpose as office furniture; Use of the product with defective or malfunctioning safety and protection devices; Improper assembly by unauthorised persons; Use of components and adaptations not supplied by Steelcase. If parts are purchased externally, we cannot guarantee that they are designed and manufactured in a manner suitable for the stress and safety requirements; Strategies by third-party suppliers that demonstrably result in misuse of the product; Unapproved changes to the product with regard to its design and implementation; Product loads exceeding the maximum loads specified by the manufacturer; Improper maintenance, maintenance by third parties or maintenance by unqualified persons; Inadequate monitoring of the product components (functional checks); In the event of improper disposal and recycling of the product or of the packaging in the material recycling system; Resale to third parties if the user manual is not supplied; Catastrophes caused by the influence of foreign objects or force majeure. Check all of the components regularly and, if damage occurs, contact authorised and qualified technicians or our service hotline (see 9.2 Repairs and spare parts). Extensive assembly, maintenance and disposal activities must only be performed by technicians who are qualified to perform these tasks. More extensive information and recommendations can be found in later sections of this user manual. BA_Ology _EN_02_

9 Basic safety instructions 2 Basic safety instructions 2.1 Intended use The Ology desk is exclusively designed to be used as office furniture. Any other use or use beyond that cited above is non-intended use. In the event of non-intended use, Steelcase shall assume no liability for any damage caused and no guarantee for trouble-free and functional operation of the components. Intended use Intended use also includes compliance with all instructions in the user manual. 2.2 Non-intended use If the product is not used as intended, dangers to life and limb, as well as material damage can occur. For this reason, non-intended use is prohibited. In the event of non-intended use, Steelcase shall assume no liability for any damage caused and no guarantee for trouble-free and functional operation of the components. Non-intended use includes: Load lifting Use as a climbing aid Permanent storage surface for objects with a total weight of more than approx. 75 kg Outdoor use Use in damp rooms Prohibited use 2.3 Safety regulations The Ology desk may only be used and operated when in a technically perfect condition and in compliance with the user manual. The user of the Ology desk is obligated to always comply with the safety regulations and warnings in this user manual. In supplementation to the user manual, the generally valid, as well as local regulations, concerning accident prevention and environmental protection must be provided and complied with. Comply with the safety regulations 2.4 Users with limitations This desk can be used by children 8 years of age and older, as well as by persons with reduced physical, sensory, or mental capabilities, or lack of experience and knowledge, if they are supervised, or have been instructed in the safe use of the desk, and understand the dangers associated with use of the desk. Children must not play with the desk. Cleaning and user maintenance must not be executed by children without supervision. BA_Ology _EN_02_

10 Product description 3 Product description 3.1 Desk Ology Lift 1 / Lift 2 Dimensions: Weight: (See delivery ticket) (See delivery ticket) 3.2 Electrical components Controller and drive Temperature range at installation site: +5 C to +35 C Relative humidity: 5% to 80% (non-condensing) Rated voltage: 230 V AC ± 10% Rated frequency: Maximum load capacity: Maximum switch-on duration: Protection class (with ground connection) Maximum power consumption for the lift process: - 2 telescopic columns per desk - 3 telescopic columns per desk Power consumption in standby mode: Maximum adjustment range: - Single telescope - Double telescope Operator panel - intuitive Operator panel - programmable Noise emission: 50 Hz Approx. 75 kg / 750 N 2 min ON / 18 min OFF I 300 W 380 W 0.3 W 680 mm to 1180 mm 650 mm to 1250 mm Standard optional < 60 db(a) Type plates are on the controller housing, on the columns and under the desktop. 3.3 Factory settings at delivery At delivery, the desktop reference height is: Variant - Basic: 740 mm Variant - Telescopic: 740 mm Variant - Crank: 740 mm Variant - Lift 1: 680 mm Variant - Lift 2: 650 mm With the Telescopic, Crank and Lift variants, you can change these settings according to your requirements. You will find the corresponding descriptions in Chapter 6. BA_Ology _EN_02_

11 Product description 3.4 Components The Ology desk is essentially comprised of the following components (you can find the variant descriptions in the respective chapters): Desktop with plastic parts for desktop fastening Columns with sheet steel skids (see variants fix, FM, Crank, Lift 1, Lift 2), welded, including adjustment screw for compensating floor unevenness. Top cantilever left/right Horizontal structural tube Cable duct (optional) Manual height adjustment (telescopic or crank) Electrical height adjustment element: Lift 1: Electric motor ( ), in column Lift 2: Electric motor ( ), in column Control system for lift height adjustment, including software-supported stopping device Optional: Sensor Standard: Operator panel - intuitive Optional: Operator panel with display of height; programming functions for three desktop heights All available components, are in the separate technical description and in the price list. A wide range of accessories is available in various materials, surface treatments and dimensions. Please follow the instructions for using the components and accessories (see Chapter 6 Operation and settings). Accessories Please contact our Customer Service for detailed information on available system components and for additional orders and subsequent deliveries (see Chapter 9 Customer service). BA_Ology _EN_02_
 Manual height adjustment (telescopic or crank) Electrical height adjustment element: Lift 1: Electric motor (680.")
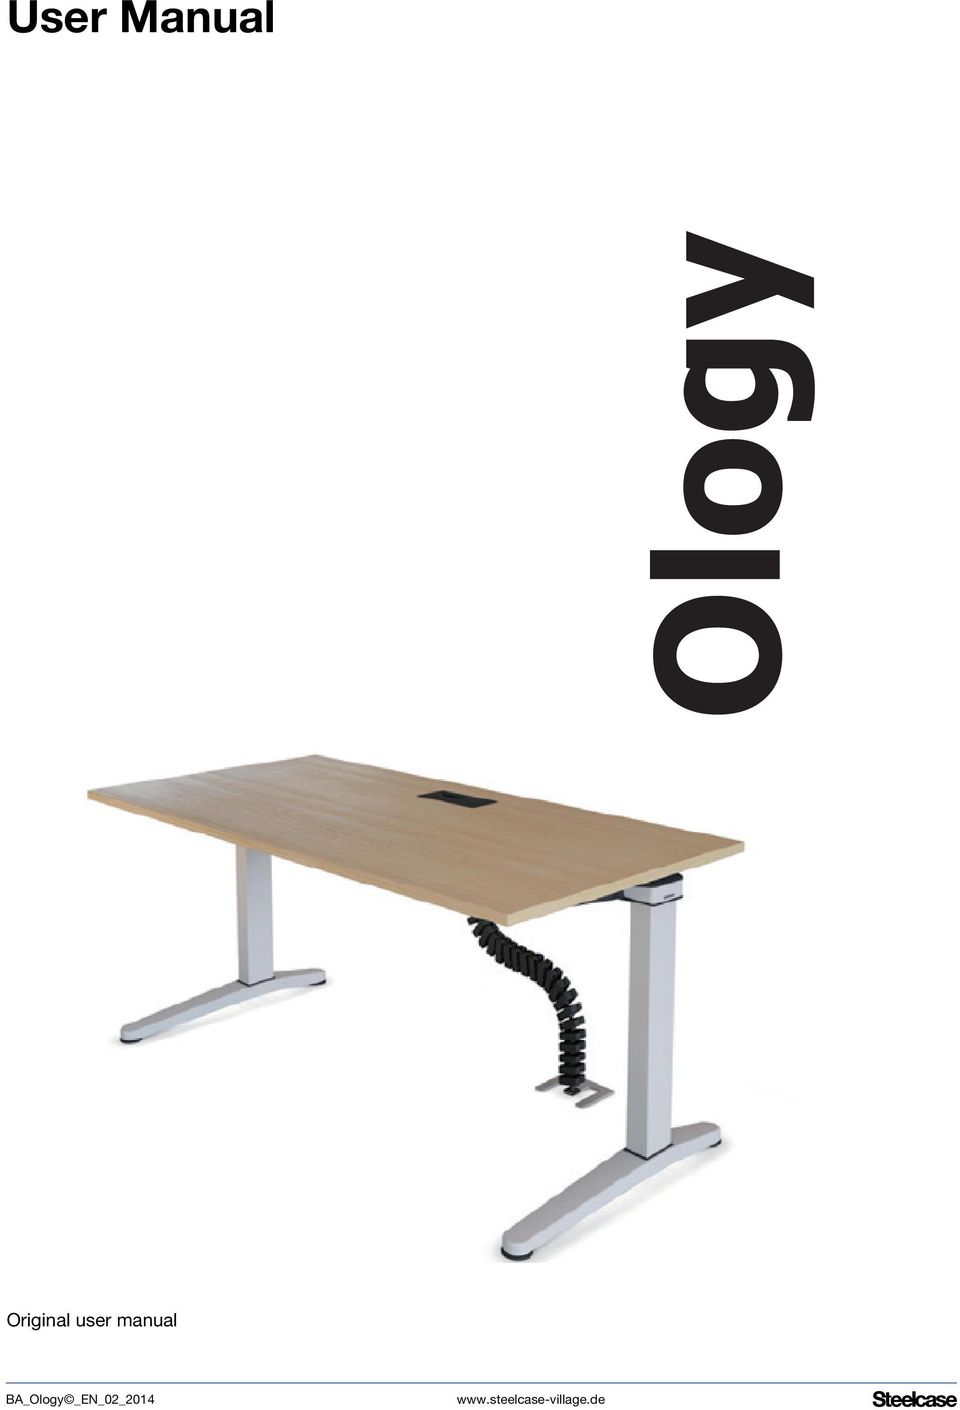
12 Product description 3.5 Desk overview Each of the illustrations shows one of the many design variants of the Ology desk. They are provided merely to illustrate the desk components. Figure 3 1 Variant - Basic Sliding desktop (closed) 2 Cable duct 3 Cantilever 4 Column 5 Runner 6 Adjusting screw for height compensation Figure 3 2 Variant - facility manager Sliding desktop (closed) can only be operated by qualified personnel 2 Cantilever 3 Column 4 Runner 5 Adjusting screw for height compensation Desk height adjustment is described in Chapter 6. BA_Ology _EN_02_
 can only be operated by qualified personnel 2 Cantilever 3 Column 4 Runner 5")
13 Product description Figure 3 3 Variant - user crank Desktop (closed), can be operated by each user 2 Support cantilever 3 Cantilever 4 Crank 5 Telescopic column 6 Runner 7 Sliding desktop opening latch 8 Adjusting screw for height compensation Desk height adjustment is described in Chapter 6. Figure 3 4 Variant - Lift Telescopic column 2 Lift column 3 Runner 4 Adjusting screw for height compensation Desk height adjustment is described in Chapter 6. BA_Ology _EN_02_

14 Product description Figure 3 5 Variant - Lift Telescopic column 2 Lift column 3 Runner 4 Adjusting screw for height compensation Desk height adjustment is described in Chapter 6. BA_Ology _EN_02_

15 Product description 3.6 Operator panel - intuitive The Operator panel with "up" and "down" functions is usually located on the right, on the underside of the desktop. Figure 3 6 Operator panel - intuitive Operator panel 2 "Up"' button 3 "Down" button BA_Ology _EN_02_

16 Product description 3.7 Operator panel - programmable (optional) Three different memory positions can be entered via the programmable operator panel. Memory position setting is described in Chapter 6. Figure Operator panel - programmable "Down" button 2 "Up"' button 3 Display 4 "STORE" button 5 Keypad "MEMORY 1 / 2 / 3 + calibration mode The cable of the operator panel in connected to the controller. It is located below the desk. Information concerning the motor controller is in the user manual, COMPACT_eco Firmware version 1.9 at BA_Ology _EN_02_

17 Product description 3.8 Electrical height adjustment Operation of the electrical height adjustment unit is described in Chapter 6. The electrical height adjustment unit allows three optimal desk heights (seated height and standing height) to be set and permanently programmed. Essentially it consists of the following components: Lift 1: Electric motor Lift 2: Electric motor Operator panel Control system for lift height adjustment, including software-supported stopping device The stopping device is an extension module for desk height adjustment. It responds as soon as desk travel is disturbed by an object, e.g. when an open window enters the travel range. Desk travel is stopped, the travel direction is reversed and the desk moves approx. 2 cm out of the area where there is a jam. The stopping device does not respond to relatively soft objects. The mechanical lift movement is executed via an electronic controller. The electronic controller is in a plastic housing under the desktop. BA_Ology _EN_02_

18 Transport and storage 4 Transport and storage 4.1 Safety guidelines WARNING Risk of injury or damage! When lifting the desktop or the attached components, the attachment screws may tear. When transporting or moving the desk, only grasp the desk on the upper frame or on the side frame. CAUTION Values stored in the controller do not agree with the settings of a different desk. Risk of damaging the lifting mechanism! After dismantling the desk, e.g. for transport reasons: Always reattach the two side frames to the associated desktop cross member of the same desk. Comply with the separate assembly instructions in this regard. 4.2 Intermediate storage If the desk must be temporarily stored before installation, the following conditions must be fulfilled: The transport packaging must be intact The floor must have sufficient load-bearing capacity Dry floor Level set-up surface Temperature range +5 C to +40 C Max. rel. humidity: 80% BA_Ology _EN_02_

19 Installation, assembly, dismantling 5 Installation, assembly, dismantling 5.1 Safety guidelines WARNING Danger of crushing and shearing! Maintain a sufficient lateral distance (at least 2.5 cm) from all surrounding objects, walls, etc. within the entire lift range. WARNING Danger of injury and damage! Set up the desk so that sufficient space is ensured for lifting and for maintenance. WARNING Risk of injury or damage! When lifting the desktop or the attached components, the attachment screws may tear. When transporting or moving the desk, only grasp it on the under-frame. 5.2 Power supply connections Supply connections must only be executed by technicians who are qualified and authorized to perform this task. The electrical equipment for the desk must be checked. Loose connections and damaged cables must be repaired immediately. Only plug in or unplug plug-and-socket-connections when the electrical equipment is de-energised. The power plug of the desk must be accessible at all times. Information concerning the connections for the motor control system is provided in the operating manual COMPACT_eco, firmware version 1.9 at Installation, assembly and setting up Setup and use of the product requires detailed planning. For this Steelcase offers the services of a separate planning department. The partially-assembled units for the Ology desk are generally supplied via retailers or directly from the manufacturer. After unpacking, check the product immediately for damage sustained during transportation and completeness; if necessary, inform the manufacturer of any damage as soon as possible. The installation site must meet the following conditions: The floor must have sufficient load-bearing capacity Level set-up surface Temperature range +5 C to +40 C Max. rel. humidity: 80% Steelcase recommends having the installation performed by the retailer or by a qualified installation company. Delivery verification Setting up Assembly BA_Ology _EN_02_

20 Installation, assembly, dismantling 5.4 Height compensation To compensate for floor unevenness, you can elevate each foot by as much as 1.0 cm with an adjusting screw. The following applies for a desk that has already been set up: Before performing the height compensation, remove any objects from the desktop. Figure 5 1 Height compensation 1 1 Adjusting screw Turn the adjusting screw until the height is compensated. BA_Ology _EN_02_

21 Installation, assembly, dismantling 5.5 Disposal of the packaging material The packaging includes the following: Outer cardboard packaging Shrink film of polyethylene (PE) Bubble wrap of Polyethylene (PE) Edge guards of cardboard or polyethylene (PE) Corner guards of polyethylene (PE) These materials are recyclable. With assembly by Steelcase or an assembly company authorized by Steelcase, the packaging will be disposed of by the manufacturer. If you assemble the desk yourself, then ensure correctly sorted separation and recycling in the material recycling system. Disposing of packaging material 5.6 Dismantling Dismantling must be carried out by qualified personnel. For subsequent set-up, see 5.3 Installation, assembly and setting up. CAUTION Values stored in the controller do not agree with the settings of a different desk. Risk of damaging the lifting mechanism! After dismantling the desk, e.g. for transport reasons: Always reattach the two side frames to the associated desktop cross member of the same desk. Comply with the separate assembly instructions in this regard. 5.7 Disposing of the desk If the Ology desk must be definitively dismantled and disposed of, Disconnect the desk from the supply connections: Dismantle the desk into its various components; Sort the dismantled parts by Reusable components; The material groups to be disposed of (wood, metal, plastic, electrical parts) And ensure recycling in the material recycling system. The national regulations must be complied with. BA_Ology _EN_02_
22 Operation and settings 6 Operation and settings 6.1 Safety guidelines The Ology desk must only be used when in a technically perfect condition and in compliance with the user manual. Before changing the height of the desk, ensure: That the desktop is level (if the floor is uneven, align via the adjusting screws on the feet); That no persons or objects (e.g. open doors or windows, are in the lift range, or protrude into the lift range; That no one is on the desk; The maximum permissible desk load-carrying capacity is not exceeded. DANGER Contact with electrical voltage can cause serious injury and death by electrocution! Only unplug or plug-in plug connections when the desk is de-energised Do not attempt to open the housing of the following components: Controller Columns Operator panel DANGER Contact with electrical voltage can cause serious injury and death! The metal parts of the desk can become energised if live cables and connections are damaged. Do not earth electrical devices to the desk frame! WARNING Danger of crushing and shearing! Maintain a sufficient lateral distance (at least 2.5 cm) from all surrounding objects, walls, etc. over the entire lift range. WARNING Danger of injury and damage! Set up the desk so that sufficient space is ensured for lift movements and for maintenance. WARNING Danger of injury and damage! When lifting the desktop or the attached components, the fastening screws may tear. When transporting or moving the desk, only grasp the desk on the under-frame. BA_Ology _EN_02_
23 Operation and settings WARNING Danger of injury and damage! When loading the CPU holder with weight that is higher than the approved weight, the fastening screws can tear. Comply with the permissible weight! Ensure that the connecting cables for the devices on the desk are long enough. 6.2 Optimal desk height Optimal desk height adjustment (seated height) is crucial for sitting correctly at the workstation. The desk height to be set for the workstation is provided in the workstation analysis (e.g. in accordance with the German occupational Health and Safety Act, ordinance governing VDU workstations (accident prevention regulations). 6.3 Variant - Basic The desk has a height of 74 cm. If the floor is uneven, a height adjustment of up to 1.0 cm can be executed with an adjustment screw on each of the feet of the desk. Figure 6 1 Height compensation 1 1 Adjusting screw Remove all objects from the desk Turn the adjusting screw to the desired position BA_Ology _EN_02_
24 Operation and settings 6.4 Variant - facility manager The desk can be adjusted to a height between 620 mm and 900 mm with an adjusting wheel. Figure 6 2 Adjust the height of the desk 1 Adjusting the desk height Display desk height 2 Adjustment wheel 3 Maximum desk height 4 Average desk height Remove all objects from the desk 1 Loosen the adjustment wheel. 2 Pull up or slide down the telescopic column to the desired length (see scale). In this process firmly hold the desktop! Do not position yourself under the desk when performing the height adjustment! 3 Tighten the adjustment wheel. Adjust all columns to the same height. BA_Ology _EN_02_
25 Operation and settings 6.5 Variant - user crank The desk can be variably adjusted to a height between 620 mm and 900 mm: Figure 6 3 Adjusting the desk height Adjusting the desk height Crank in park position 2 Crank in working position 3 Maximum desk height Average desk height Remove all objects from the desk. 1 Pull crank out of the park position. 2 Crank the telescopic columns up or down to the desired length (see scale). All of the columns are moved simultaneously. Do not lift the desktop during the cranking procedure! 3 Slide the crank back into park position If the crank remains in its working position, there is danger of impact! BA_Ology _EN_02_
26 Operation and settings 6.6 Variants - Lift 1 and Lift 2 The desk can be variably set at a height between 650 mm and 1250 mm (variant - Lift 1) or between 680 mm and 1180 mm (variant - Lift 2). Before placing the desk in service, ensure that the desk has been properly assembled, that the controller is connected to the motor via cable, that the operator panel is connected to the controller. that all safety regulations have been complied with. You can now connect the power supply: Plug the mains plug into a 220 V/230 V power outlet Placing the desk in service Prior to placing the desk in service it is necessary to execute a reset process. The instructions in this regard are in the description of the appropriate operator panel. BA_Ology _EN_02_
27 Operation and settings 6.7 Operator panel - intuitive The operator panel is located on the left or right on the underside of the desktop. Figure "Up" button 2 "Down" button 3 Desktop CAUTION Risk of damaging the operator panel! Do not place any loads on the operator panel Do not lay any objects on the operator panel Do not pour any liquids onto the operator panel BA_Ology _EN_02_
28 Operation and settings Manual reset, operator panel intuitive An end position calibration of the lowest desktop position must be executed: Prior to placing the desk in service If the actual desktop position no longer agrees with the displayed desktop position. If a previously configured motor controller is used in a different electrically height adjustable workstation of the same design. WARNING Danger of crushing and shearing! During the reset movement, and for the end position calibration, the software-supported stop device is not active., Press the "Down" button and keep it depressed until the lower end position (programmed desktop position) is reached. Release the "Down" button. Again, press the "Down" button and keep it depressed for approx. 5 s. The desktop moves into the lower end position. Release the "Down" button. The system is now ready for operation. If the button is released before the process is completely concluded, the manual reset process will be interrupted and must be restarted. In the event that the reset process could not be successfully executed, proceed as follows: Faulty manual reset Press the "Up" and "Down" buttons simultaneously and keep them depressed for at least 5 seconds. Restart the manual reset process as described above BA_Ology _EN_02_
29 Operation and settings Adjusting the desktop height with the intuitive operator panel Before performing the height adjustment, you must ensure: That there are no people or objects (e.g. open doors or windows) in the lift area or that protrude into the lift range, That there are no objects in the lift range of the lift column, That no one is on the desk, That the maximum permissible load-carrying capacity of the desk is not exceeded (see Technical data), That there are no heavy loads on the desk. Any such loads will hinder height the adjustment, That the desktop is horizontal. If the floor is uneven, align the desktop via the adjustment screws on the feet. Ensure that the connecting cables for the devices on the desk are long enough. Press the "Up" or "Down" button A lift movement only occurs As long as the corresponding button is pressed As long as the maximum load (approx. 75 kg) is not exceeded. The desk starts up! The desk moves at a speed of approx. 4 cm/s. CAUTION. RISK OF DAMAGING THE DESK If the desktop only moves on one side, or if desktop movement is not uniform: Release the button immediately so that the movement stops! Determine the cause in accordance with the troubleshooting table (see 7.2 Error messages on the display of the programmable operator panel on page 36). If necessary request a service technician. BA_Ology _EN_02_
30 Operation and settings 6.8 Operator panel - programmable (optional) Prior to placing the desk in service it is necessary to execute a reset process. Figure Operator panel - programmable "Down" button 2 "Up"' button 3 Display 4 "STORE" button 5 Keypad "MEMORY 1 / 2 / 3 + calibration mode BA_Ology _EN_02_
31 Operation and settings Manual reset, operator panel - programmable WARNING Danger of crushing and shearing! During the reset movement, and for the end position calibration, the software-supported stop device is not active. Press the "Down" button and keep it depressed until the lower end position (programmed desktop position) is reached. Release the "Down" button. Again, press the "Down" button and keep it depressed for approx. 5 s. The desktop moves into the lower end position. Release the "Down" button. The system is now ready for operation. If the button is released before the process is completely concluded, the manual reset process will be interrupted and must be restarted. BA_Ology _EN_02_
32 Operation and settings Adjusting desktop height with the operator panel - programmable Before performing the height adjustment, you must ensure that No error message is shown on the display of the operator panel (see 7.2 Error messages on the display of the programmable operator panel on Page 36), That there are no people or objects (e.g. open doors or windows) in the lift area or that protrude into the lift range, That there are no objects in the lift range of the lift column, That no one is on the desk, That the maximum permissible load-carrying capacity of the desk is not exceeded (see Technical data), That there are no heavy loads on the desk. Any such loads will hinder height the adjustment, That the desktop is horizontal. If the floor is uneven, align the desktop via the adjustment screws on the feet. Ensure that the connecting cables for the devices on the desk are long enough. Press the "Up" or "Down" button Control panel - programmable A lift movement only occurs As long as the corresponding button is pressed As long as the maximum load (approx. 75 kg) is not exceeded. The desk starts up! The desk moves at a speed of approx. 4 cm/s. CAUTION. CAUTION Risk of damaging the desk If the desktop only moves on one side, or if desktop movement is not uniform: Release the button immediately so that the movement stops! Determine the cause in accordance with the troubleshooting table (see 7.2 Error messages on the display of the programmable operator panel on page 36). If necessary request a service technician. BA_Ology _EN_02_
33 Operation and settings Changing the display between centimetres and inches You can select between displaying the height in centimetres [cm] or in inches [inches]. Changing this function does not change the desk height. To change the display, proceed as indicated in the following table: + Simultaneously press the memory position buttons 1, 2 and the desktop up button. Keep this button combination depressed for approx. 3 s. Release the buttons. On the display S and a number, e.g. S 7, will be shown on the display. Press the desktop up button until S 5 is shown on the display. S 5 is shown on the display. Press the memory button If the display was previously set to cm, it will now be switched over to inches. If the display was previously set to inches, it will now be switched over to cm. BA_Ology _EN_02_
34 Operation and settings Setting the memory position This function stores a defined desktop height. A desktop height can be stored for each memory position button. A maximum of three memory positions can be entered. To store a desktop position, proceed as follows: Move the desktop to the desktop position you desire. This desktop position will be shown on the display, e.g. 73 cm. Press the memory button. S will be shown on the display. Press the desired memory position button, e.g. 2. S 2 will be shown on the display. The set desktop position will now be stored under the selected memory position button. A double click will sound, after approx. 2 seconds the saved desktop position will be displayed. BA_Ology _EN_02_
35 Operation and settings Calling up a memory position With this function you can set a stored desktop position. To set a stored desktop position, proceed as follows: Press the desired memory position button, e.g. 2, and keep it depressed. The desktop moves until the stored desktop position is reached. If you release the button before reaching the stored desktop position, the desktop will stop and the stored desktop position will not be reached. The desktop has reached the stored desktop position. Now release the memory position button. The current desktop position will be shown on the display, e.g. 73 cm. Always move the desk up or down until the desired or programmed height is reached and the desk stops. This ensures that the desk is aligned evenly (horizontally) if there is a load on one side. BA_Ology _EN_02_
36 Operation and settings 6.9 Sliding desktop The Ology desk is supplied with a sliding desktop (except for the 600 depth). The sliding top allows you to reach the cable duct even if the rear of the desk is not accessible. Ensure that the connecting cables for the devices on the desk are long enough. WARNING Danger of crushing! Keep your hands and fingers away from the guides! WARNING Danger of injury! If the pulled out sliding desktop is under load, the desk can tip over! Do not put any weight on the pulled out desktop! CAUTION There is a risk of damaging the desk and objects. Keep the travel path clear! Figure 6 6 Sliding desktop opened Cable duct 2 Guides 3 Desktop locking mechanism, operation by authorized technicians (standard) 4 Handle of the desktop locking mechanism, operation by the user (optional) Release the desktop locking mechanisms on both sides. Pull the desktop out to the stop. Opening the desktop CAUTION You can damage the sliding desktop if the sliding desktop locking mechanisms are closed! To close the sliding desktop, the sliding desktop locking mechanisms must be open BA_Ology _EN_02_
37 Operation and settings Slide the sliding desktop in to the limit stop on the safety block. Unlock the safety block. Close the desktop locking mechanisms on both sides. Closing the sliding desktop BA_Ology _EN_02_
38 Errors and faults 7 Errors and faults 7.1 Safety regulations For troubleshooting, the following always applies: DANGER Contact with electrical voltage can cause serious injury and death by electrocution. Only unplug or plug-in plug connections when the desk is de-energised. Do not attempt to open the housing of the following components: Controller Columns Operator panel CAUTION Risk of damaging the electrical equipment! Do not pull on the power cord to unplug the plug from the power outlet. 7.2 Error messages on the display of the programmable operator panel If faults occur during operation of the Ology desk, please check whether it is operated in accordance with the user manual. In most cases, this manual will help you to locate and correct the errors. Any errors that occur will be shown on the display of the programmable operator panel. The "Error" segment flashes. The table below should help you to identify the cause and to correct the error. Display Error description / cause Measure Display shows an E and an error number: The motor controller COMPACT ECO is equipped with an overheating protection circuit. Due to overheating, this overheating protection circuit has been activated. An internal error is present on the COMPACT ECO motor controller. Wait until the motor controller has cooled, and the message HOT no longer appears on the display. Then the COMPACT ECO motor controller is again ready for operation. Proceed as specified in the following error list. 00 Internal error channel 1 Switch off the motor controller. Contact Customer Service. 01 Internal error channel 2 02 Internal error channel 3 12 Defect - channel 1 Unplug the motor controller. 13 Defect - channel 2 14 Defect - channel 3 Repair the external short circuit. Or: Plug the correct motor into the socket in question. Start up the motor controller again. BA_Ology _EN_02_
39 Errors and faults Display Error description / cause Measure Over current - motor M1 Overcurrent motor M2 Remove the objects that are jammed in the travel area. 26 Overcurrent M3 Desk overloaded --> remove the load from the desktop. 48 Overcurrent motor group 1 Contact Customer Service. 49 Overcurrent motor group 2 60 Collision protection 62 Overcurrent - controller 36 Plug detection on motor socket M1 37 Plug detection on motor socket M2 Plug the correct motor into the socket in question. Execute a reset. 38 Plug detection on motor socket M3 61 Motor swapped 55 Synchronization of motor group 1 not possible 56 Synchronization of motor group 2 is not possible. Remove the load from the desk. Execute a reset. If the error is still displayed after the reset, contact Customer Service. 67 Excessive voltage Unplug the power supply cable and contact Customer Service. 70 Change in the drive configuration 71 Change in the anti-pinch configuration Contact Customer Service. Contact Customer Service. 81 Internal error Execute a reset. Unplug the power supply cable and plug it back in after a few seconds. If this error occurs regularly, unplug the power supply cable and contact Customer Service. BA_Ology _EN_02_
40 Maintenance 8 Maintenance 8.1 Safety regulations All maintenance and repair tasks must only be performed by appropriately qualified and authorised technicians. Only use tools appropriate for these activities. 8.2 Function checks The Ology desk components should be checked for functionality at regular intervals. Particular attention should be devoted to the electrical connections: The electrical equipment for the desk must be checked at regular interval. Loose connections and damaged cables must be repaired immediately. Only plug in or unplug plug-and-socket-connections when the electrical equipment is de-energised. The power plug of the desk must be accessible at all times. BA_Ology _EN_02_
41 Maintenance 8.3 Functional Check Table Interval Inspection point Function check Permitted value Measure if required Upon assembly Frame parts Position desktop brace Desktop traverse completely inserted in the guides and firmly bolted Loosen the screws, insert the desktop brace correctly and firmly tighten the screws Prior to every height adjustment Direct vicinity of the desk Check safety clearances No objects in the lift range Remove objects Desktop Check for horizontal alignment Horizontal Align using the adjustment screws on the feet Regularly Connections of the electrical supply lines (cables) Check the insulation for damage No damage Replace connections Insulation of the electrical supply lines (cable) Check the insulation for damage No damage Replace the cables Surroundings of the electrical supply lines (cables) Check for distance to hot objects (e.g. radiators) Sufficient distance Establish distance BA_Ology _EN_02_
42 Maintenance 8.4 Maintenance tasks Maintenance tasks may only be carried out by authorised and qualified personnel. For more information, please contact our Customer Service Department (see 9.2 Repairs and spare parts on page 43). Prior to the adjusting the height of the desk you must ensure that the desktop is horizontal. If the floor is uneven, align the desktop via the adjustment screws on the feet. Ensure that there are no objects in the movement range of the lift column! DANGER Contact with electrical voltage can cause serious injury and death by electrocution. Only unplug or plug-in plug connections when the desk is de-energised. Do not attempt to open the housing of the following components: Controller Columns Operator panel WARNING Unintentional lifting or lowering of the desktop can cause bodily injury! For maintenance and repair tasks on all non-electric components of the desk, disconnect the electrical connection of the height adjustment element from the mains supply. BA_Ology _EN_02_
43 Maintenance WARNING Risk of injury or damage! When lifting the desktop or the attached components, the attachment screws may tear. When transporting or moving the desk, only grasp the desk on the under-frame. CAUTION Values stored in the controller do not agree with the settings of a different desk. Risk of damaging the lifting mechanism! After dismantling the desk, e.g. for transport reasons: Always reattach the two side frames to the associated desktop cross member of the same desk. Comply with the separate assembly instructions in this regard. CAUTION The desk may be damaged by the use of unauthorised spare parts! Only components provided by Steelcase Werndl AG may be used as spare parts. Installation of other parts must be coordinated with Steelcase. The specified maintenance and inspection intervals must be complied with. Steelcase Werndl AG shall assume no liability and will provide no guarantee in the following cases (see 1.4 Exclusion of liability on page 6): Inadequate monitoring of the product components (functional checks) Improper maintenance Maintenance performed by third parties Maintenance performed by unqualified and unauthorised persons Use of components and adaptations not supplied by Steelcase. Unapproved changes to the product with regard to its construction and implementation Deliberate misuse Improper use. Exclusion of liability BA_Ology _EN_02_
44 Maintenance 8.5 Cleaning and care CAUTION Humidity may damage the operator panel and the control system. Keep the operator panel free of moisture and liquids. Keep the controller free of moisture and liquids. For cleaning the surfaces of the desk off-the-shelf cleaning agents can be used. Ensure that only care and cleaning agents are used that are suitable for the respective materials (wood, plastic, metal, etc.). BA_Ology _EN_02_
45 Customer service 9 Customer service 9.1 Delivery, setup, instruction The desk is normally delivered, assembled, and set up by the manufacturer or by the retailer. The users are instructed in the operation of the device by the manufacturer or the retailer. 9.2 Repairs and spare parts Original spare parts and accessories can be obtained from the manufacturer. If any errors or defects cannot be corrected, please contact the Customer Service department. Steelcase Werndl AG Hotline: Georg-Aicher-Strasse 7 telephone:+49 (0) D Rosenheim Fax: +49 (0) support@steelcase.com Service hotline Country Customer Service Hotline France +33 (0) Great Britain +44 (0) Spain Italy +39 (051) The Netherlands Belgium Luxembourg Scandinavia The Baltics Poland The Czech Republic Slovakia other +33 (0) BA_Ology _EN_02_
46 Betriebsanleitung Ology Originalbetriebsanleitung BA_Ology _D_02_2014
47 Inhalt 1 Allgemeine Hinweise 1.1 Zur Produktreihe Ology Zu dieser Betriebsanleitung Symbol- und Hinweiserklärungen Haftungsausschluß Grundlegende Sicherheitshinweise 2.1 Bestimmungsgemäße Verwendung Bestimmungswidrige Verwendung Sicherheitsvorschriften Benutzer mit Einschränkungen Produktbeschreibung 3.1 Schreibtisch Elektrische Komponenten Werkseitige Einstellungen bei Lieferung Komponenten Schreibtisch im Überblick Bedienpaneel intuitive Bedienpaneel programmable (optional) Elektrische Höhenverstellung Transport und Lagerung 4.1 Sicherheitsvorschriften Zwischenlagerung Aufstellung, Montage, Demontage 5.1 Sicherheitsvorschriften Versorgungsanschlüsse Aufstellung, Montage und Einrichten Höhenausgleich Entsorgung des Verpackungsmaterials Demontage Schreibtisch entsorgen Bedienung und Einstellungen 6.1 Sicherheitsvorschriften Optimale Schreibtischhöhe BA_Ology _D_02_2014 Inhalt
48 6.3 Variante Basis Variante facility manager Variante user crank Varianten Lift 1 und Lift Bedienpaneel intuitive Manueller Reset Bedienpaneel intuitive Schreibtischhöhe verstellen mit Bedienpaneel intuitive Bedienpaneel programmable (optional) Manueller Reset Bedienpaneel programmable Schreibtischhöhe verstellen mit Bedienpaneel programmable Anzeige zwischen Zentimeter und inch wechseln Speicherposition einstellen Speicherposition aufrufen Schiebeplatte Fehler und Störungen 7.1 Sicherheitsvorschriften Fehlermeldungen auf dem Display des Bedienpaneels programmable Instandhaltung 8.1 Sicherheitsvorschriften Funktionskontrollen Tabelle Funktionskontrollen Wartungsarbeiten Reinigung und Pflege Kundendienst 9.1 Lieferung, Aufstellung, Einweisung Reparaturen und Ersatzteile BA_Ology _D_02_2014 Inhalt
49 Allgemeine Hinweise 1 Allgemeine Hinweise 1.1 Zur Produktreihe Ology Das Büromöbelprogramm Ology von Steelcase unterliegt in seiner Fertigung und in seinem Vertrieb einer ständigen Qualitätskontrolle. Somit wird die fehlerfreie Funktionalität gewährleistet. Die Produkte sind nach dem Stand der Technik (in Deutschland zum Zeitpunkt der Konstruktion) und den anerkannten sicherheitstechnischen Regeln konstruiert und gefertigt, trotzdem können Gefahren entstehen. Beachten Sie hierzu die jeweiligen Sicherheitshinweise! Störungen, die die Sicherheit beeinträchtigen können, sind umgehend zu beseitigen. Änderungen an den Produkten aus technischen Gründen behalten wir uns vor. Steelcase wendet ein Qualitätsmanagement-System an, das die Forderungen der DIN EN ISO 9001 erfüllt. Steelcase hat das Recht, für die Produktreihe Ology das GS-Zeichen zu führen. Desweiteren führt Steelcase das Öko-Audit-Siegel für das EG-System für das Umweltmanagement und die Umweltbetriebsführung. Das Typenschild der elektrischen Höhenverstellung befindet sich am Gehäuse der Steuerung, an den Säulen und unter der Tischplatte. Produktinformationen BA_Ology _D_02_
50 Allgemeine Hinweise 1.2 Zu dieser Betriebsanleitung Die vorliegende Betriebsanleitung informiert über Komponenten, Funktion, Bedienung und Instandhaltung des Schreibtisches Ology und seiner Komponenten. Bei Funktionsstörungen dient sie als Hilfestellung bei der Fehlersuche und -behebung. Die Sicherheitshinweise dienen der Vermeidung von Personenschäden und Sachschäden. Die Benutzer des Schreibtisches Ology sind verpflichtet, diese Sicherheitshinweise zur Kenntnis zu nehmen und stets zu beachten. Zweck der Betriebsanleitung Für Schäden und Betriebsstörungen, die sich aus der Nichtbeachtung der Betriebsanleitung ergeben, übernimmt Steelcase keine Haftung und keine Garantie! Diese Betriebsanleitung ist Bestandteil des Schreibtisches Ology. Sie ist nur als komplette Unterlage gültig. Auch bei einem Weiterverkauf des Schreibtisches gehört diese Betriebsanleitung zum Lieferumfang. Steelcase stellt diese Betriebsanleitung im Internet zur Verfügung unter folgender Adresse: Auszüge oder Kopien dürfen ohne vorherige schriftliche Genehmigung von Steelcase nicht an Dritte weitergegeben oder in einer anderen publizistischen Form verwendet werden. Als Teil einer technischen Dokumentation unterliegt sie dem in Deutschland gültigen Urheberrecht. Copyright BA_Ology _D_02_
51 Allgemeine Hinweise 1.3 Symbol- und Hinweiserklärungen Die nachfolgend aufgeführten Symbole werden in dieser Betriebsanleitung verwendet und haben folgende Bedeutungen: GEFAHR Unmittelbare Gefahr! Verletzung möglich! Nichtbeachtung des Hinweises kann schwere Gesundheitsschäden oder Tod zur Folge haben. WARNUNG Möglicherweise gefährliche Situation! Nichtbeachtung des Hinweises kann schwere Körperverletzungen zur Folge haben. VORSICHT Nichtbeachtung kann leichte Personenschäden, Sachschäden oder Fehlfunktion zur Folge haben. Tips und wichtige Informationen Typographische Hervorhebungen: Aufzählung Handlungsanweisung BA_Ology _D_02_
52 Allgemeine Hinweise 1.4 Haftungsausschluß Unter einer oder mehreren der folgenden Bedingungen kann es zu einem Haftungsausschluß der Firma Steelcase kommen: bei bestimmungswidrigem Gebrauch des Produktes; bei Einsatz des Produktes, der über das Maß einer sinnvollen Zweckbestimmung als Büromöbel geht; bei Betreiben des Produktes mit defekten oder funktionsuntüchtigen Sicherheits- und Schutzvorrichtungen; bei unsachgemäßer Montage durch nicht autorisiertes Fachpersonal; bei Verwendung von Bauteilen und Adaptionen, die nicht von Steelcase stammen. Bei fremdbezogenen Teilen ist nicht gewährleistet, dass sie beanspruchungs- und sicherheitsgerecht konstruiert und gefertigt sind; bei Planungen von Drittanbietern, die nachweislich zu einem Fehlgebrauch des Produktes führen; bei nicht genehmigten Änderungen des Produktes in seiner Konstruktion und Ausführungsweise; bei Belastungen des Produktes, die über die vom Hersteller angegebenen Belastungsgrenzen gehen; bei unsachgemäßer Wartung, Wartung durch Dritte sowie Wartung von nicht qualifiziertem Fachpersonal; bei mangelhafter Überwachung der Produktkomponenten (Funktionskontrollen); bei unsachgemäßer Entsorgung und Rückführung des Produktes oder der Verpackung in den Wertstoffkreislauf; beim Weiterverkauf an Dritte, wenn diesem/diesen die Betriebsanleitung nicht mitgeliefert wird; bei Katastrophenfällen durch Fremdkörpereinwirkung und höhere Gewalt. Prüfen Sie regelmäßig alle Bauteile und wenden Sie sich bei Beschädigungen unbedingt an autorisiertes Fachpersonal oder unsere Service-Hotline (siehe 9.2 Reparaturen und Ersatzteile). Bei umfangreichen Montage-, Wartungs- und Entsorgungstätigkeiten ist unbedingt für diese Aufgaben qualifiziertes Fachpersonal heranzuziehen. Weitere Informationen und Hinweise finden Sie unter den jeweiligen Themen in den weiteren Kapiteln dieser Betriebsanleitung. BA_Ology _D_02_
53 Grundlegende Sicherheitshinweise 2 Grundlegende Sicherheitshinweise 2.1 Bestimmungsgemäße Verwendung Der Schreibtisch Ology ist ausschließlich für den Einsatz als Büromöbel konzipiert. Eine andere oder darüber hinausgehende Benutzung gilt als nicht bestimmungsgemäß. Bei nicht bestimmungsgemäßer Verwendung übernimmt Steelcase keine Haftung für eventuell auftretende Schäden und keine Garantie für einwandfreies und funktionsgemäßes Arbeiten der Komponenten. Zur bestimmungsgemäßen Verwendung gehört auch das Beachten aller Hinweise aus der Betriebsanleitung. Bestimmungsgemäße Verwendung 2.2 Bestimmungswidrige Verwendung Bei bestimmungswidriger Verwendung des Produktes können sowohl Gefahren für Leib und Leben als auch Sachbeschädigungen auftreten. Aus diesem Grunde ist eine bestimmungswidrige Verwendung untersagt. Bei nicht bestimmungsgemäßer Verwendung übernimmt Steelcase keine Haftung für eventuell auftretende Schäden und keine Garantie für einwandfreies und funktionsgemäßes Arbeiten der Komponenten. Mögliche bestimmungswidrige Verwendungen: Heben von Lasten Verwendung als Aufstiegshilfe Dauernde Ablagefläche für Gegenstände mit einem Gesamtgewicht von mehr als ca. 75 kg Verwendung im Außenbereich Verwendung in Feuchträumen Untersagte Verwendung 2.3 Sicherheitsvorschriften Der Schreibtisch Ology darf nur in technisch einwandfreiem Zustand und unter Beachtung der Betriebsanleitung benutzt und bedient werden. Der Benutzer des Schreibtisches Ology verpflichtet sich, die Sicherheitsvorschriften und Warnhinweise in dieser Betriebsanleitung stets zu beachten. Ergänzend zur Betriebsanleitung sind die allgemeingültigen sowie die örtlichen Regelungen zur Unfallverhütung und zum Umweltschutz bereitzustellen und zu beachten. Sicherheitsvorschriften beachten 2.4 Benutzer mit Einschränkungen Dieser Schreibtisch kann von Kindern ab 8 Jahren und darüber sowie von Personen mit verringerten physischen, sensorischen oder mentalen Fähigkeiten oder Mangel an Erfahrung und Wissen benutzt werden, wenn sie beaufsichtigt oder bezüglich des sicheren Gebrauchs des Schreibtisches unterwiesen wurden und die daraus resultierenden Gefahren verstehen. Kinder dürfen nicht mit dem Schreibtisch spielen. Reinigung und Benutzer-Wartung dürfen nicht von Kindern ohne Beaufsichtigung durchgeführt werden. BA_Ology _D_02_
54 Produktbeschreibung 3 Produktbeschreibung 3.1 Schreibtisch Ology Lift 1 / Lift 2 Abmessungen: Gewicht: (siehe Lieferschein) (siehe Lieferschein) 3.2 Elektrische Komponenten Steuerung und Antrieb Temperaturbereich Aufstellort: +5 C bis +35 C Relative Luftfeuchtigkeit: 5 % bis 80 % (nicht kondensierend) Nennspannung: 230 V AC ± 10 % Nennfrequenz: Maximale Nutzlast: Maximale Einschaltdauer: Schutzklasse (mit Erdungsanschluss) Maximale Leistungsaufnahme beim Hubvorgang: - 2 Teleskopsäulen pro Schreibtisch - 3 Teleskopsäulen pro Schreibtisch Stromaufnahme im Stand-by-Betrieb: Maximaler Verstellbereich: - Einfachteleskop - Zweifachteleskop Bedienpaneel intuitive Bedienpaneel programmable Lärmemissionen: 50 Hz ca. 75 kg / 750 N 2 min ON / 18 min OFF I 300 W 380 W 0,3 W 680 mm bis 1180 mm 650 mm bis 1250 mm standard optional < 60 db(a) Typenschilder befinden sich am Gehäuse der Steuerung, an den Säulen und an der Unterseite der Schreibtischplatte. 3.3 Werkseitige Einstellungen bei Lieferung Die Schreibtischbezugshöhe beträgt bei Anlieferung: Variante Basis 740 mm Variante Teleskop 740 mm Variante Kurbel 740 mm Variante Lift 1: 680 mm Variante Lift 2: 650 mm Bei den Varianten Teleskop, Kurbel und Lift können Sie diese Einstellungen nach Ihren Bedürfnissen ändern. Die entsprechenden Beschreibungen finden Sie in Kapitel 6. BA_Ology _D_02_
55 Produktbeschreibung 3.4 Komponenten Der Schreibtisch Ology besteht im wesentlichen aus folgenden Bauteilen (die Beschreibung der Varianten finden Sie unter dem jeweiligen Kapitel): Tischplatte mit Kunststoffteilen für die Plattenbefestigung Säulen mit Kufe aus Stahlblech (siehe Varianten fix, FM, Kurbel, Lift 1, Lift 2), verschweißt, inklusive Stellschraube zum Ausgleich von Bodenunebenheiten Kragarm oben links/rechts horizontales Strukturrohr Kabelkanal (optional) Höheneinstellung manuell (Teleskop oder Kurbel) Elektrische Höhenverstellung: Lift 1: Elektromotor ( ), in Säule Lift 2: Elektromotor ( ), in Säule Steuerung für Lifthöhen-Verstellung inklusive softwareunterstützter Stoppvorrichtung Optional: Sensor Standard: Bedienpaneel intuitive Optional: Bedienpaneel mit Display zur Höhenanzeige; Programmierfunktion für drei Schreibtischhöhen Alle verfügbaren Bauteile finden Sie in der separaten Technischen Beschreibung sowie in der Preisliste. Es ist umfangreiches Zubehör in verschiedenen Materialien, Oberflächen und Abmessungen erhältlich. Bitte beachten Sie die Hinweise zum Gebrauch der Komponenten und des Zubehörs (siehe Kapitel 6 Bedienung und Einstellungen). Zubehör Für detaillierte Informationen zu den erhältlichen Systemkomponenten und für zusätzliche Bestellungen und Nachlieferungen wenden Sie sich an unseren Customer Service (siehe Kapitel 9 Kundendienst). BA_Ology _D_02_
56 Produktbeschreibung 3.5 Schreibtisch im Überblick Die Abbildungen zeigen jeweils eine von vielen Ausführungsvarianten des Schreibtisches Ology. Sie dienen lediglich zur Veranschaulichung der Schreibtischkomponenten. Bild 3 1 Variante Basis Schiebeplatte (geschlossen) 2 Kabelkanal 3 Kragarm 4 Säule 5 Kufe 6 Stellschraube für Höhenausgleich Bild 3 2 Variante facility mananger Schiebeplatte (geschlossen), nur von Fachpersonal bedienbar 2 Kragarm 3 Säule 4 Kufe 5 Stellschraube für Höhenausgleich Das Einstellen der Schreibtischhöhe ist in Kapitel 6 beschrieben. BA_Ology _D_02_
57 Produktbeschreibung Bild 3 3 Variante user crank Schiebeplatte (geschlossen), von jedem Benutzer bedienbar 2 Unterstützungs-Kragarm 3 Kragarm 4 Kurbel 5 Teleskopsäule 6 Kufe 7 Öffner für Schiebeplatte 8 Stellschraube für Höhenausgleich Das Einstellen der Schreibtischhöhe ist in Kapitel 6 beschrieben. Bild 3 4 Variante Lift Teleskopsäule 2 Liftsäule 3 Kufe 4 Stellschraube für Höhenausgleich Das Einstellen der Schreibtischhöhe ist in Kapitel 6 beschrieben. BA_Ology _D_02_
58 Produktbeschreibung Bild 3 5 Variante Lift Teleskopsäule 2 Liftsäule 3 Kufe 4 Stellschraube für Höhenausgleich Das Einstellen der Schreibtischhöhe ist in Kapitel 6 beschrieben. BA_Ology _D_02_
59 Produktbeschreibung 3.6 Bedienpaneel intuitive Das Bedienpaneel mit den Funktionen auf und ab befindet sich meist rechts an der Schreibtischplatten-Unterseite. Bild 3 6 Bedienpaneel intuitive Bedienpaneel 2 Taster auf 3 Taster ab BA_Ology _D_02_
60 Produktbeschreibung 3.7 Bedienpaneel programmable (optional) Mit dem Bedienpaneel programmable können drei verschiedene Speicherpositionen eingegeben werden. Das Einstellen der Speicherpositionen ist in Kapitel 6 beschrieben. Bild 3 7 Bedienpaneel programmable Taster ab 2 Taster auf 3 Display 4 Taster STORE 5 Tastenfeld MEMORY 1 / 2 / 3 + collaboration mode Das Kabel des Bedienpaneels ist mit der Steuerung verbunden. Diese befindet sich unter dem Schreibtisch. Informationen zur Motorsteuerung finden Sie in der Bedienungsanleitung COMPACT_eco Firmware-Version 1.9 unter BA_Ology _D_02_
61 Produktbeschreibung 3.8 Elektrische Höhenverstellung Die Bedienung der elektrischen Höhenverstellung wird in Kapitel 6 beschrieben. Die elektrische Höhenverstellung ermöglicht die Einstellung und feste Programmierung von drei optimalen Schreibtischhöhen (Sitz- und Stehhöhe). Sie besteht im wesentlichen aus folgenden Komponenten: Lift 1: Elektromotor Lift 2: Elektromotor Bedienpaneel Steuerung für Lifthöhen-Verstellung inklusive softwareunterstützter Stoppvorrichtung Die Stoppvorrichtung ist ein Erweiterungsmodul der Schreibtischhöhenverstellung. Sie spricht an, sobald die Fahrt des Schreibtisches durch einen Gegenstand gestört wird, wenn z. B. ein offenes Fenster in den Fahrbereich ragt. Die Fahrt des Schreibtisches wird gestoppt, die Fahrtrichtung umgekehrt und der Schreibtisch ca. 2 cm aus dem Klemmbereich bewegt. Bei relativ weichen Gegenständen spricht die Stoppvorrichtung nicht an. Die mechanische Hubbewegung erfolgt über eine elektronische Steuerung. Diese befindet sich in einem Kunststoffgehäuse unter der Schreibtischplatte. BA_Ology _D_02_
62 Transport und Lagerung 4 Transport und Lagerung 4.1 Sicherheitsvorschriften WARNUNG Verletzungen und Beschädigungen möglich! Beim Anheben an der Schreibtischplatte oder an den angebauten Komponenten können die Befestigungsschrauben reißen. Beim Transport oder Verschieben des Schreibtisches diesen ausschließlich am Untergestell anfassen. VORSICHT Gespeicherte Werte in der Steuerung stimmen mit den Einstellungen eines anderen Schreibtisches nicht überein. Beschädigung der Hubmechanik möglich! Nach dem Zerlegen des Schreibtisches z. B. aus Transportgründen: Die beiden Seitenrahmen stets wieder mit der dazugehörigen Plattentraverse des selben Schreibtisches zusammenbauen. Beachten Sie hierzu die separate Montageanleitung. 4.2 Zwischenlagerung Soll der Schreibtisch vor dem Aufstellen zwischengelagert werden, sind folgende Bedingungen zu erfüllen: Unverletzte Transportverpackung Ausreichende Tragfähigkeit des Bodens Trockener Boden Ebene Abstellfläche Temperaturbereich +5 C bis +40 C Max. rel. Luftfeuchtigkeit 80 % BA_Ology _D_02_
63 Aufstellung, Montage, Demontage 5 Aufstellung, Montage, Demontage 5.1 Sicherheitsvorschriften WARNUNG Quetsch- und Schergefahr! Im gesamten Hubbereich ausreichenden seitlichen Abstand (mindestens 2,5 cm) zu allen umgebenden Gegenständen, Wänden etc. einhalten. WARNUNG Gefahr von Verletzungen und Beschädigungen! Den Schreibtisch so aufstellen, dass ausreichend Platz für die Hubbewegungen sowie für die Instandhaltung gewährleistet ist. WARNUNG Verletzungen und Beschädigungen möglich! Beim Anheben an der Schreibtischplatte oder an den angebauten Komponenten können die Befestigungsschrauben reißen. Beim Transport oder Verschieben des Schreibtisches diesen ausschließlich am Untergestell anfassen. 5.2 Versorgungsanschlüsse Versorgungsanschlüsse dürfen nur von hierfür qualifiziertem und autorisiertem Fachpersonal ausgeführt werden. Die elektrische Ausrüstung des Schreibtisches ist zu überprüfen. Lose Verbindungen und beschädigte Kabel sind sofort zu beseitigen. Steckverbindungen nur in spannungslosem Zustand lösen bzw. stecken. Der Stecker des Schreibtisches muss jederzeit leicht zugänglich sein. Informationen zu den Anschlüssen für die Motorsteuerung finden Sie in der Bedienungsanleitung COMPACT_eco Firmware-Version 1.9 unter Aufstellung, Montage und Einrichten Die Aufstellung und die Verwendung des Produktes bedarf einer ausführlichen Planung. Hierfür bietet Steelcase eine eigene Planungsabteilung an. Die teilmontierten Baugruppen des Schreibtisches Ology werden in der Regel über den Fachhandel oder direkt vom Hersteller angeliefert. Nach dem Auspacken ist das Produkt sofort auf Transportschäden und auf Vollständigkeit zu überprüfen und ggf. ein Schaden dem Hersteller schnellstmöglich zu melden. Der Aufstellungsort hat folgende Voraussetzungen zu erfüllen: Ausreichende Tragfähigkeit des Bodens Ebene Abstellfläche Temperaturbereich +5 C bis +40 C Max. rel. Luftfeuchtigkeit 80 % Prüfen der Lieferung Aufstellen BA_Ology _D_02_
64 Aufstellung, Montage, Demontage Steelcase empfiehlt, die Installation durch den Fachhandel bzw. durch ein Montageunternehmen durchführen zu lassen. Montage 5.4 Höhenausgleich Um Bodenunebenheiten auszugleichen, können Sie jeden Fuß mit einer Stellschraube um bis zu 1,0 cm erhöhen. Für einen bereits aufgestellten Schreibtisch gilt: Bevor Sie den Höhenausgleich durchführen, entfernen Sie alle ggf. vorhandenen Gegenstände von der Scheibtischplatte. Bild 5 1 Höhenausgleich 1 1 Stellschraube Stellschraube drehen, bis der Höhenausgleich erfolgt ist. BA_Ology _D_02_
65 Aufstellung, Montage, Demontage 5.5 Entsorgung des Verpackungsmaterials Die Verpackung besteht aus folgenden Materialien: Umverpackung aus Karton Schrumpffolie aus Polyethylen (PE) Bläschenfolie aus Polyethylen (PE) Kantenschützer aus Karton oder Polyethylen (PE) Eckenschützer aus Polyethylen (PE) Diese Materialien sind recyclingfähig. Bei Montage durch Steelcase oder eines durch Steelcase autorisierten Montageunternehmens wird die Verpackung durch den Hersteller entsorgt. Sollten Sie selbst montieren, so sorgen Sie bitte für sortenreine Trennung und Rückführung in den Wertstoffkreislauf. Verpakkungsmaterial entsorgen 5.6 Demontage Die Demontage soll von hierzu qualifiziertem Fachpersonal durchgeführt werden. Für den Wiederaufbau siehe 5.3 Aufstellung, Montage und Einrichten. VORSICHT Gespeicherte Werte in der Steuerung stimmen mit den Einstellungen eines anderen Schreibtisches nicht überein. Beschädigung der Hubmechanik möglich! Nach dem Zerlegen des Schreibtisches z. B. aus Transportgründen: Die beiden Seitenrahmen stets wieder mit der dazugehörigen Plattentraverse des selben Schreibtisches zusammenbauen. Beachten Sie hierzu die separate Montageanleitung. 5.7 Schreibtisch entsorgen Soll der Schreibtisch Ology endgültig demontiert und entsorgt werden, trennen Sie den Schreibtisch von den Versorgungsanschlüssen; zerlegen Sie den Schreibtisch in seine Komponenten; trennen Sie die entstehenden Teile nach wiederverwendbaren Bauteilen; zu entsorgenden Materialgruppen (Holz, Metall, Kunststoff, Elektroteile) und sorgen Sie für die Rückführung in den Wertstoffkreislauf. Die nationalen Vorschriften sind zu beachten. BA_Ology _D_02_
66 Bedienung und Einstellungen 6 Bedienung und Einstellungen 6.1 Sicherheitsvorschriften Der Schreibtisch Ology darf nur in technisch einwandfreiem Zustand und unter Beachtung der Betriebsanleitung benutzt und bedient werden. Bevor Sie die Schreibtischhöhe verändern, stellen Sie sicher: dass die Schreibtischplatte waagerecht ist (bei Bodenunebenheiten über die Stellschrauben an den Füßen ausrichten); dass sich keine Personen und keine Gegenstände (z. B. offene Türen oder Fenster) im Hubbereich befinden bzw. dort hineinragen; dass sich keine Personen auf dem Schreibtisch befinden; dass die maximal zulässige Tragfähigkeit des Schreibtisches nicht überschritten wird. GEFAHR Kontakt mit elektrischer Spannung kann zu schweren Verletzungen und zum Tod durch Stromschlag führen! Steckverbindungen nur in spannungslosem Zustand lösen bzw. stecken. Versuchen Sie nicht, die Gehäuse von folgenden Komponenten zu öffnen: Steuerung Säulen Bedienpaneel GEFAHR Kontakt mit elektrischer Spannung kann zu schweren Verletzungen und zum Tod führen! Metallteile des Schreibtisches können unter Spannung stehen bei Schäden an stromführenden Kabeln und Verbindungen. Elektrische Geräte nicht am Schreibtischgestell erden! WARNUNG Quetsch- und Schergefahr! Im gesamten Hubbereich ausreichenden seitlichen Abstand (mindestens 2,5 cm) zu allen umgebenden Gegenständen, Wänden etc. einhalten. WARNUNG Gefahr von Verletzungen und Beschädigungen! Den Schreibtisch so aufstellen, dass ausreichend Platz für die Hubbewegungen sowie für die Instandhaltung gewährleistet ist. WARNUNG Gefahr von Verletzungen und Beschädigungen! Beim Anheben an der Schreibtischplatte oder an den angebauten Komponenten können die Befestigungsschrauben reißen. Beim Transport oder Verschieben des Schreibtisches diesen ausschließlich am Untergestell anfassen. BA_Ology _D_02_
67 Bedienung und Einstellungen WARNUNG Gefahr von Verletzungen und Beschädigungen! Beim Belasten des CPU-Halters mit höherem als dem zugelassenen Gewicht können die Befestigungsschrauben reißen. Zulässiges Gewicht beachten! Achten Sie auf ausreichende Länge aller Anschlusskabel von Geräten auf dem Schreibtisch. 6.2 Optimale Schreibtischhöhe Die Einstellung der optimalen Schreibtischhöhe (Sitzhöhe) ist entscheidend für das richtige Sitzen am Arbeitsplatz. Die für den Arbeitsplatz einzustellende Schreibtischhöhe ist der Arbeitsplatzanalyse zu entnehmen (z. B. gemäß Arbeitsschutzgesetz, Bildschirmarbeitsverordnung, Unfallverhütungsvorschriften). 6.3 Variante Basis Der Schreibtisch hat eine Höhe von 74 cm. Mit einer Stellschraube an jedem Schreibtischfuß kann eine Höhenanpassung um maximal 1,0 cm bei Bodenunebenheiten durchgeführt werden. Bild 6 1 Höhenausgleich 1 1 Stellschraube Alle Gegenstände vom Schreibtisch entfernen Stellschraube drehen bis auf gewünschte Position BA_Ology _D_02_
68 Bedienung und Einstellungen 6.4 Variante facility manager Der Schreibtisch kann mit einem Stellrad auf eine Höhe zwischen 620 mm und 900 mm eingestellt werden. Bild 6 2 Schreibtischhöhe einstellen 1 Schreibtischhöhe einstellen Anzeige Tischhöhe 2 Stellrad 3 Maximale Schreibtischhöhe 4 Mittlere Schreibtischhöhe Alle Gegenstände vom Schreibtisch entfernen 1 Stellrad lösen. 2 Teleskopsäule um gewünschte Länge hinaufziehen oder hinuntergleiten lassen (siehe Skala). Halten Sie die Schreibtischplatte dabei fest! Halten Sie sich während der Höheneinstellung nicht unter dem Schreibtisch auf! 3 Stelllrad wieder festziehen. Alle Säulen auf die gleiche Höhe einstellen. BA_Ology _D_02_
69 Bedienung und Einstellungen 6.5 Variante user crank Der Schreibtisch kann stufenlos auf eine Höhe zwischen 620 mm und 900 mm eingestellt werden: Bild 6 3 Schreibtischhöhe einstellen Schreibtischhöhe einstellen Kurbel in Parkposition 2 Kurbel in Arbeitsposition 3 Maximale Schreibtischhöhe Mittlere Schreibtischhöhe Alle Gegenstände vom Schreibtisch entfernen. 1 Kurbel aus der Parkposition ziehen. 2 Teleskopsäulen um gewünschte Höhe hinauf- oder hinunterkurbeln (siehe Skala). Alle Säulen werden gleichzeitig bewegt. Die Tischplatte während des Kurbelvorganges nicht anheben! 3 Kurbel wieder in Parkposition schieben. Bleibt die Kurbel in Arbeitsposition, besteht Stoßgefahr! BA_Ology _D_02_
70 Bedienung und Einstellungen 6.6 Varianten Lift 1 und Lift 2 Der Schreibtisch kann elektromotorisch stufenlos auf eine Höhe zwischen 650 mm und 1250 mm (Variante Lift 1) oder zwischen 680 mm und 1180 mm (Variante Lift 2) eingestellt werden. Stellen Sie vor der ersten Inbetriebnahme sicher, dass der Schreibtisch fachgerecht montiert worden ist, dass die Steuerung über Kabel mit dem Motor verbunden ist, dass das Bedienpaneel mit der Steuerung verbunden ist, dass alle Sicherheitsvorschriften beachtet werden. Nun können Sie die Stromversorgung herstellen: Netzstecker in eine 220/230-V-Steckdose stecken Erstinbetriebnahme Vor der Erstinbetriebnahme ist es erforderlich, einen manuellen Reset durchzuführen. Die Anleitung hierzu finden Sie im Anschluss bei der Beschreibung des entsprechenden Bedienpaneels. BA_Ology _D_02_
71 Bedienung und Einstellungen 6.7 Bedienpaneel intuitive Das Bedienpaneel befindet sich links oder rechts an der Schreibtischplatten-Unterseite. Bild Taster auf 2 Taster ab 3 Schreibtischplatte VORSICHT Beschädigung des Bedienpaneels möglich! Nicht auf dem Bedienpaneel abstützen Keine Gegenstände auf dem Bedienpaneel ablegen Keine Flüssigkeiten über das Bedienpaneel schütten BA_Ology _D_02_
72 Bedienung und Einstellungen Manueller Reset Bedienpaneel intuitive Ein Endlagenabgleich der untersten Tischplattenposition muss durchgeführt werden: Vor der Erstinbetriebnahme Wenn die wirkliche Tischplattenposition nicht mehr mit der angezeigten Tischplattenposition übereinstimmt. Wenn eine bereits konfigurierte Motorsteuerung an einem anderen baugleichen elektrisch höhenverstellbaren Arbeitsplatz verwendet wird. WARNUNG Quetsch- und Schergefahr! Während der Resetfahrt und beim Endlagenabgleich ist die softwareunterstützte Stoppvorrichtung nicht aktiv., Taste abwärts drücken und halten, bis untere Endlage (programmierte Tischplattenposition) erreicht ist. Taste abwärts loslassen. Taste abwärts nochmals ca. 5 sec. drücken und halten. Die Tischplatte fährt in die untere Endlage. Taste abwärts wieder loslassen. Das System ist nun wieder betriebsbereit. Wird die Taste losgelassen, bevor der Vorgang komplett abgeschlossen ist, wird der manuelle Reset unterbrochen und muss neu begonnen werden. Für den Fall, dass der manuelle Reset nicht erfolgreich durchgeführt werden konnte, verfahren Sie wie folgt: Fehlerhafter manueller Reset Tasten aufwärts und abwärts gleichzeitig drücken und mindestens 5 Sekunden halten. Manuellen Reset erneut starten wie oben beschrieben. BA_Ology _D_02_
73 Bedienung und Einstellungen Schreibtischhöhe verstellen mit Bedienpaneel intuitive Vor der Höhenverstellung des Schreibtisches müssen Sie sicherstellen, dass sich keine Personen und keine Gegenstände (z. B. offene Türen oder Fenster) im Hubbereich befinden bzw. dort hineinragen, dass sich im Bewegungsbereich der Hubsäule keine Gegenstände befinden, dass sich auf dem Schreibtisch keine Personen befinden, dass die maximal zulässige Tragfähigkeit des Schreibtisches nicht überschritten wird (siehe Technische Daten), dass sich auf der Schreibtischplatte keinen großen Lasten befinden. Diese erschweren die Höhenverstellung, dass die Schreibtischplatte waagerecht ist. Bei Bodenunebenheiten richten Sie die Schreibtischplatte über die Stellschrauben an den Füßen aus. Achten Sie auf ausreichende Länge aller Anschlusskabel von Geräten auf dem Schreibtisch. Tasten aufwärts oder abwärts drücken Eine Hubbewegung erfolgt nur solange die entsprechende Taste gedrückt ist solange die maximale Belastung (ca. 75 kg) nicht überschritten ist. Der Schreibtisch fährt an! Der Schreibtisch bewegt sich mit einer Geschwindigkeit von ca. 4 cm/s. VORSICHT. BESCHÄDIGUNG DES SCHREIBTISCHES MÖGLICH Bewegt sich die Schreibtischplatte nur einseitig oder ungleichmäßig: Taste sofort loslassen, damit die Bewegung stoppt! Ursache gemäß Fehlersuchtabelle ermitteln (siehe 7.2 Fehlermeldungen auf dem Display des Bedienpaneels programmable auf Seite 35). ggf. Service-Techniker anfordern. BA_Ology _D_02_
74 Bedienung und Einstellungen 6.8 Bedienpaneel programmable (optional) Vor der Erstinbetriebnahme ist es erforderlich, einen manuellen Reset durchzuführen. Bild 6 5 Bedienpaneel programmable Taster ab 2 Taster auf 3 Display 4 Taster STORE 5 Tastenfeld MEMORY 1 / 2 / 3 + callaboration mode Manueller Reset Bedienpaneel programmable WARNUNG Quetsch- und Schergefahr! Während der Resetfahrt und beim Endlagenabgleich ist die softwareunterstützte Stoppvorrichtung nicht aktiv. Taste abwärts drücken und halten, bis untere Endlage (programmierte Tischplattenposition) erreicht ist. Taste abwärts loslassen. Taste abwärts nochmals ca. 5 sec. drücken und halten. Die Tischplatte fährt in die untere Endlage. Taste abwärts wieder loslassen. Das System ist nun wieder betriebsbereit. Wird die Taste losgelassen, bevor der Vorgang komplett abgeschlossen ist, wird der manuelle Reset unterbrochen und muss neu begonnen werden. BA_Ology _D_02_

75 Bedienung und Einstellungen Schreibtischhöhe verstellen mit Bedienpaneel programmable Vor der Höhenverstellung des Schreibtisches ist sicherzustellen, dass keine Fehlermeldung auf dem Display des Bedienpaneels angezeigt wird (siehe ggf. 7.2 Fehlermeldungen auf dem Display des Bedienpaneels programmable auf Seite 35), dass sich keine Personen und keine Gegenstände (z. B. offene Türen oder Fenster) im Hubbereich befinden bzw. dort hineinragen, dass sich im Bewegungsbereich der Hubsäule keine Gegenstände befinden, dass sich auf dem Schreibtisch keine Personen befinden, dass die maximal zulässige Tragfähigkeit des Schreibtisches nicht überschritten wird (siehe Technische Daten), dass sich auf der Schreibtischplatte keinen großen Lasten befinden. Diese erschweren die Höhenverstellung, dass die Schreibtischplatte waagerecht ist. Bei Bodenunebenheiten richten Sie die Schreibtischplatte über die Stellschrauben an den Füßen aus. Achten Sie auf ausreichende Länge aller Anschlusskabel von Geräten auf dem Schreibtisch. Tasten aufwärts oder abwärts drücken Bedienpaneel programmable Eine Hubbewegung erfolgt nur solange die entsprechende Taste gedrückt ist solange die maximale Belastung (ca. 75 kg) nicht überschritten ist. Der Schreibtisch fährt an! Der Schreibtisch bewegt sich mit einer Geschwindigkeit von ca. 4 cm/s. VORSICHT. VORSICHT Beschädigung des Schreibtisches möglich Bewegt sich die Schreibtischplatte nur einseitig oder ungleichmäßig: Taste sofort loslassen, damit die Bewegung stoppt! Ursache gemäß Fehlersuchtabelle ermitteln (siehe 7.2 Fehlermeldungen auf dem Display des Bedienpaneels programmable auf Seite 35). ggf. Service-Techniker anfordern. BA_Ology _D_02_
Paxton. ins-20605. Net2 desktop reader USB
 Paxton ins-20605 Net2 desktop reader USB 1 3 2 4 1 2 Desktop Reader The desktop reader is designed to sit next to the PC. It is used for adding tokens to a Net2 system and also for identifying lost cards.
03/2013. Mod: WOKI-60IP/TR. Production code: DTWIC 6000
 03/2013 Mod: WOKI-60IP/TR Production code: DTWIC 6000 ENCASTRABLE INDUCTION DROP IN INDUCTION 11/2011 TECHNICAL FEATURES DOCUMENTATION S.A.V. Notice d utilisation : FX00326-A Guide d intervention : ---
Notice Technique / Technical Manual
 Contrôle d accès Access control Encodeur USB Mifare ENCOD-USB-AI Notice Technique / Technical Manual SOMMAIRE p.2/10 Sommaire Remerciements... 3 Informations et recommandations... 4 Caractéristiques techniques...
Garage Door Monitor Model 829LM
 Garage Door Monitor Model 829LM To prevent possible SERIOUS INJURY or DEATH from a closing garage door: NEVER permit children to operate or play with door control push buttons or remote control transmitters.
Fabricant. 2 terminals
 Specifications Fabricant Nominal torque (Nm) 65 Minimal torque (Nm) 0,63 Coil resistance - 20 C (ohms) 20 Rated current DC (A) 1 Rotor inertia (kg.m 2 ) 2.10-3 Weight (kg) 7,20 Heat dissipation continuous
Warning: Failure to follow these warnings could result in property damage, or personal injury.
 Western Steel & Tube 1 Storage Locker Extended Storage Locker Storage Cabinet Assembly And Use Instructions Warning: Failure to follow these warnings could result in property damage, or personal injury.
GIGABIT PCI DESKTOP ADAPTER DGE-530T. Quick Installation Guide+ Guide d installation+
 GIGABIT PCI DESKTOP ADAPTER Quick Installation Guide+ Guide d installation+ Check Your Package Contents Quick Installation Guide Gigabit Ethernet PCI Adapter CD with Manual and Drivers DO NOT insert the
Lavatory Faucet. Instruction Manual. Questions? 1-866-661-9606 customerservice@artikaworld.com
 Lavatory Faucet Instruction Manual rev. 19-01-2015 Installation Manual You will need Adjustable Wrench Adjustable Pliers Plumber s Tape Hardware list (included) Allen Key Socket wrench tool Important Follow
Instructions Mozilla Thunderbird Page 1
 Instructions Mozilla Thunderbird Page 1 Instructions Mozilla Thunderbird Ce manuel est écrit pour les utilisateurs qui font déjà configurer un compte de courrier électronique dans Mozilla Thunderbird et
Contrôle d'accès Access control. Notice technique / Technical Manual
 p.1/18 Contrôle d'accès Access control INFX V2-AI Notice technique / Technical Manual p.2/18 Sommaire / Contents Remerciements... 3 Informations et recommandations... 4 Caractéristiques techniques... 5
Thank you for choosing the Mobile Broadband USB Stick. With your USB Stick, you can access a wireless network at high speed.
 Thank you for choosing the Mobile Broadband USB Stick. With your USB Stick, you can access a wireless network at high speed. Note: This manual describes the appearance of the USB Stick, as well as the
Guide d'installation rapide TFM-560X YO.13
 Guide d'installation rapide TFM-560X YO.13 Table of Contents Français 1 1. Avant de commencer 1 2. Procéder à l'installation 2 Troubleshooting 6 Version 06.08.2011 16. Select Install the software automatically
TABLE DES MATIERES A OBJET PROCEDURE DE CONNEXION
 1 12 rue Denis Papin 37300 JOUE LES TOURS Tel: 02.47.68.34.00 Fax: 02.47.68.35.48 www.herve consultants.net contacts@herve consultants.net TABLE DES MATIERES A Objet...1 B Les équipements et pré-requis...2
Thank you for choosing the Mobile Broadband USB Stick. With your USB Stick, you can access a wireless network at high speed.
 Thank you for choosing the Mobile Broadband USB Stick. With your USB Stick, you can access a wireless network at high speed. Note: This manual describes the appearance of the USB Stick, as well as the
Règlement sur le télémarketing et les centres d'appel. Call Centres Telemarketing Sales Regulation
 THE CONSUMER PROTECTION ACT (C.C.S.M. c. C200) Call Centres Telemarketing Sales Regulation LOI SUR LA PROTECTION DU CONSOMMATEUR (c. C200 de la C.P.L.M.) Règlement sur le télémarketing et les centres d'appel
Contents Windows 8.1... 2
 Workaround: Installation of IRIS Devices on Windows 8 Contents Windows 8.1... 2 English Français Windows 8... 13 English Français Windows 8.1 1. English Before installing an I.R.I.S. Device, we need to
ASSEMBLY INSTRUCTIONS DIRECTIVES POUR L'ASSEMBLAGE ombre pendant lamp lampe suspendue à tons dégradés, chocolat
 ASSEMBLY INSTRUCTIONS DIRECTIVES POUR L'ASSEMBLAGE ombre pendant lamp lampe suspendue à tons dégradés, chocolat SKU 2728089 INSTRUCTIONAL MANUAL MANUEL D'INSTRUCTIONS 270/2707 COMPONENT LIST LISTE DES
ASSEMBLY INSTRUCTIONS DIRECTIVES POUR L'ASSEMBLAGE luster chandelier lamp chandelier à trois branches en verre lustré
 ASSEMBLY INSTRUCTIONS DIRECTIVES POUR L'ASSEMBLAGE luster chandelier lamp chandelier à trois branches en verre lustré SKU 2711592 INSTRUCTIONAL MANUAL MANUEL D'INSTRUCTIONS 270/2707 COMPONENT LIST LISTE
Cheque Holding Policy Disclosure (Banks) Regulations. Règlement sur la communication de la politique de retenue de chèques (banques) CONSOLIDATION
 Regulations. Règlement sur la communication de la politique de retenue de chèques (banques) CONSOLIDATION") CANADA CONSOLIDATION CODIFICATION Cheque Holding Policy Disclosure (Banks) Regulations Règlement sur la communication de la politique de retenue de chèques (banques) SOR/2002-39 DORS/2002-39 Current to
CANADA CONSOLIDATION CODIFICATION Cheque Holding Policy Disclosure (Banks) Regulations Règlement sur la communication de la politique de retenue de chèques (banques) SOR/2002-39 DORS/2002-39 Current to
Z-Axis Compliance Device Compliance en z
 Compensation for different vertical positions Collision recognition in Z-direction Protection of parts and work pieces Monitoring of the insertion forces during assembly operations Monitoring of the picking
Sécurité relative aux sièges auto et aux rehausseurs
 Sécurité relative aux sièges auto et aux rehausseurs Safety with Car Seats and Booster Seats Car crashes are the main cause of accidental death and serious injury of children. Correctly using a car or
First Nations Assessment Inspection Regulations. Règlement sur l inspection aux fins d évaluation foncière des premières nations CONSOLIDATION
 CANADA CONSOLIDATION CODIFICATION First Nations Assessment Inspection Regulations Règlement sur l inspection aux fins d évaluation foncière des premières nations SOR/2007-242 DORS/2007-242 Current to September
DOCUMENTATION - FRANCAIS... 2
 DOCUMENTATION MODULE SHOPDECORATION MODULE PRESTASHOP CREE PAR PRESTACREA INDEX : DOCUMENTATION - FRANCAIS... 2 INSTALLATION... 2 Installation automatique... 2 Installation manuelle... 2 Résolution des
R.V. Table Mounting Instructions
 PTSS165 ACCESSORY MOUNTING INSTRUCTIONS Use these instructions in conjunction with your main manual to properly assemble your gas grill. Refer to the main manual for safety, operating, cleaning and maintenance
Folio Case User s Guide
 Fujitsu America, Inc. Folio Case User s Guide I N S T R U C T I O N S This Folio Case is a stylish, lightweight case for protecting your Tablet PC. Elastic Strap Pen Holder Card Holders/ Easel Stops Figure
Instructions pour mettre à jour un HFFv2 v1.x.yy v2.0.00
 Instructions pour mettre à jour un HFFv2 v1.x.yy v2.0.00 HFFv2 1. OBJET L accroissement de la taille de code sur la version 2.0.00 a nécessité une évolution du mapping de la flash. La conséquence de ce
The new consumables catalogue from Medisoft is now updated. Please discover this full overview of all our consumables available to you.
 General information 120426_CCD_EN_FR Dear Partner, The new consumables catalogue from Medisoft is now updated. Please discover this full overview of all our consumables available to you. To assist navigation
WiFi Security Camera Quick Start Guide. Guide de départ rapide Caméra de surveillance Wi-Fi (P5)
") #45 #46 WiFi Security Camera Quick Start Guide Guide de départ rapide Caméra de surveillance Wi-Fi (P5) #47 Start Here 1 Is this you? TECH SUPPORT CTRL ALT DEL 2 If yes, turn to page three 1 3 If not,
#45 #46 WiFi Security Camera Quick Start Guide Guide de départ rapide Caméra de surveillance Wi-Fi (P5) #47 Start Here 1 Is this you? TECH SUPPORT CTRL ALT DEL 2 If yes, turn to page three 1 3 If not,
SA-32 / SA-62 INSTRUCTION MANUAL - MANUEL D INSTRUCTIONS
 SA-32 / SA-62 INSTRUCTION MANUAL - MANUEL D INSTRUCTIONS 4 5 6 7 4 5 6 7 1. Telephone Paging Volume Control 1. Contrôle de volume Paging Téléphone 2. Microphone Volume Control 2. Contrôle volume du microphone
AUDIT COMMITTEE: TERMS OF REFERENCE
 AUDIT COMMITTEE: TERMS OF REFERENCE PURPOSE The Audit Committee (the Committee), assists the Board of Trustees to fulfill its oversight responsibilities to the Crown, as shareholder, for the following
How to Login to Career Page
 How to Login to Career Page BASF Canada July 2013 To view this instruction manual in French, please scroll down to page 16 1 Job Postings How to Login/Create your Profile/Sign Up for Job Posting Notifications
APPENDIX 6 BONUS RING FORMAT
 #4 EN FRANÇAIS CI-DESSOUS Preamble and Justification This motion is being presented to the membership as an alternative format for clubs to use to encourage increased entries, both in areas where the exhibitor
APPENDIX 2. Provisions to be included in the contract between the Provider and the. Holder
 Page 1 APPENDIX 2 Provisions to be included in the contract between the Provider and the Obligations and rights of the Applicant / Holder Holder 1. The Applicant or Licensee acknowledges that it has read
Package Contents. System Requirements. Before You Begin
 Package Contents DWA-125 Wireless 150 USB Adapter CD-ROM (contains software, drivers, and manual) Cradle If any of the above items are missing, please contact your reseller. System Requirements A computer
Mesure chimique. Chemical measurement. Sonde de température Pt 1000 Inox Pt 1000 stainless steel. Ref : 703 262. Français p 1.
 Mesure chimique Chemical measurement Français p 1 English p 3 Sonde de température Pt 1000 Inox Pt 1000 stainless steel Version : 6010 Mesure chimique Sonde de température Pt 1000 Inox 1 Description La
POLICY: FREE MILK PROGRAM CODE: CS-4
 POLICY: FREE MILK PROGRAM CODE: CS-4 Origin: Authority: Reference(s): Community Services Department Cafeteria Services and Nutrition Education Division Resolution #86-02-26-15B.1 POLICY STATEMENT All elementary
SERVEUR DÉDIÉ DOCUMENTATION
 SERVEUR DÉDIÉ DOCUMENTATION Release 5.0.6.0 19 Juillet 2013 Copyright 2013 GIANTS Software GmbH, All Rights Reserved. 1/9 CHANGE LOG Correction de bug divers (5.0.6.0) Ajout d une option de relance automatique
NORME INTERNATIONALE INTERNATIONAL STANDARD. Dispositifs à semiconducteurs Dispositifs discrets. Semiconductor devices Discrete devices
 NORME INTERNATIONALE INTERNATIONAL STANDARD CEI IEC 747-6-3 QC 750113 Première édition First edition 1993-11 Dispositifs à semiconducteurs Dispositifs discrets Partie 6: Thyristors Section trois Spécification
AMENDMENT TO BILL 32 AMENDEMENT AU PROJET DE LOI 32
 THAT the proposed clause 6(1), as set out in Clause 6(1) of the Bill, be replaced with the following: Trustee to respond promptly 6(1) A trustee shall respond to a request as promptly as required in the
Le No.1 de l économie d énergie pour patinoires.
 Le No.1 de l économie d énergie pour patinoires. Partner of REALice system Economie d énergie et une meilleure qualité de glace La 2ème génération améliorée du système REALice bien connu, est livré en
AND / ET USER GUIDE UK HARDWIRED CONTROL PANEL UK GUIDE UTILISATEUR CENTRALE D ALARME FILAIRE F 496572 1
 AND / ET UK USER GUIDE HARDWIRED CONTROL PANEL UK F GUIDE UTILISATEUR CENTRALE D ALARME FILAIRE 496572 1 English UK Operator Controls and Displays On both control panel and remote keypad the LEDs display
Principe de TrueCrypt. Créer un volume pour TrueCrypt
 Sommaire : Principe de TrueCrypt...1 Créer un volume pour TrueCrypt...1 Premier montage...6 Réglages...8 Save Currently Mounted Volumes as Favorite...8 Settings > Preferences...9 TrueCrypt Traveller pour
This is a preview - click here to buy the full publication NORME INTERNATIONALE INTERNATIONAL STAN DARD. Telecontrol equipment and systems
 NORME INTERNATIONALE INTERNATIONAL STAN DARD CEI IEC 870-3 Première édition First edition 1989-03 Matériels et systèmes de téléconduite Troisième partie: Interfaces (caractéristiques électriques) Telecontrol
DOCUMENTATION - FRANCAIS... 2
 DOCUMENTATION MODULE CATEGORIESTOPMENU MODULE CREE PAR PRESTACREA INDEX : DOCUMENTATION - FRANCAIS... 2 INSTALLATION... 2 CONFIGURATION... 2 LICENCE ET COPYRIGHT... 3 SUPPORT TECHNIQUE ET MISES A JOUR...
WEB page builder and server for SCADA applications usable from a WEB navigator
 Générateur de pages WEB et serveur pour supervision accessible à partir d un navigateur WEB WEB page builder and server for SCADA applications usable from a WEB navigator opyright 2007 IRAI Manual Manuel
that the child(ren) was/were in need of protection under Part III of the Child and Family Services Act, and the court made an order on
 was/were in need of protection under Part III of the Child and Family Services Act, and the court made an order on") ONTARIO Court File Number at (Name of court) Court office address Applicant(s) (In most cases, the applicant will be a children s aid society.) Full legal name & address for service street & number, municipality,
ONTARIO Court File Number at (Name of court) Court office address Applicant(s) (In most cases, the applicant will be a children s aid society.) Full legal name & address for service street & number, municipality,
Using a Walker. 2. Move your injured or weak leg toward the walker first. If you have had surgery on both legs, use either leg to begin walking.
 Using a Walker Walking with a Walker 1. Lift the walker and place it at a comfortable distance in front of you with all four of its legs on the floor. This distance is often equal to an arm s length. 2.
Archived Content. Contenu archivé
 ARCHIVED - Archiving Content ARCHIVÉE - Contenu archivé Archived Content Contenu archivé Information identified as archived is provided for reference, research or recordkeeping purposes. It is not subject
Support Orders and Support Provisions (Banks and Authorized Foreign Banks) Regulations
 Regulations") CANADA CONSOLIDATION CODIFICATION Support Orders and Support Provisions (Banks and Authorized Foreign Banks) Regulations Règlement sur les ordonnances alimentaires et les dispositions alimentaires (banques
CANADA CONSOLIDATION CODIFICATION Support Orders and Support Provisions (Banks and Authorized Foreign Banks) Regulations Règlement sur les ordonnances alimentaires et les dispositions alimentaires (banques
Export Permit (Steel Monitoring) Regulations. Règlement sur les licences d exportation (surveillance de l acier) CONSOLIDATION CODIFICATION
 Regulations. Règlement sur les licences d exportation (surveillance de l acier) CONSOLIDATION CODIFICATION") CANADA CONSOLIDATION CODIFICATION Export Permit (Steel Monitoring) Regulations Règlement sur les licences d exportation (surveillance de l acier) SOR/87-321 DORS/87-321 Current to August 4, 2015 À jour
CANADA CONSOLIDATION CODIFICATION Export Permit (Steel Monitoring) Regulations Règlement sur les licences d exportation (surveillance de l acier) SOR/87-321 DORS/87-321 Current to August 4, 2015 À jour
Quick Installation Guide TW100-BRV304
 Quick Installation Guide TW100-BRV304 Table of of Contents Contents Français... 1. Avant de commencer... 2. Installation du matériel... 3. Configuration du routeur... 1 1 2 3 Troubleshooting... 5 Version
RULE 5 - SERVICE OF DOCUMENTS RÈGLE 5 SIGNIFICATION DE DOCUMENTS. Rule 5 / Règle 5
 RULE 5 - SERVICE OF DOCUMENTS General Rules for Manner of Service Notices of Application and Other Documents 5.01 (1) A notice of application or other document may be served personally, or by an alternative
Contrôle d accès Access control MOD-TCPIP-AI. Notice technique / Technical Manual
 Contrôle d accès Access control MOD-TCPIP-AI Notice technique / Technical Manual Notice technique Mod-TCPIP-AI 9 septembre 2008 v.1.0 p.2/16 Sommaire / Contents Sommaire / Contents...2 Remerciements...3
INDIVIDUALS AND LEGAL ENTITIES: If the dividends have not been paid yet, you may be eligible for the simplified procedure.
 Recipient s name 5001-EN For use by the foreign tax authority CALCULATION OF WITHHOLDING TAX ON DIVIDENDS Attachment to Form 5000 12816*01 INDIVIDUALS AND LEGAL ENTITIES: If the dividends have not been
Monitor LRD. Table des matières
 Folio :1/6 Table des matières 1.Installation du logiciel... 3 2.Utilisation du logiciel... 3 2.1.Description de la fenêtre de commande... 3 2.1.1.Réglage des paramètres de communication... 4 2.1.2.Boutons
PVCHECK Rel. 2.02 09/11/12
 Metel: HV000PVC Pag 1 of 5 Multifunction instrument for safety, functionality and performance verifications on a PV plant The multifunction instrument PVCHECK performs prompt and safe electrical checks
Nouveautés printemps 2013
 » English Se désinscrire de la liste Nouveautés printemps 2013 19 mars 2013 Dans ce Flash Info, vous trouverez une description des nouveautés et mises à jour des produits La Capitale pour le printemps
WINTER BOAT STORAGE SYSTEM SYSTÈME DE REMISAGE HIVERNAL POUR BATEAU
 MANUAL / MANUEL VIDEO WINTER BOAT STORAGE SYSTEM SYSTÈME DE REMISAGE HIVERNAL POUR BATEAU ASSEMBLY INSTRUCTIONS GUIDE D ASSEMBLAGE NAVIGLOO 14-18½ ft/pi FISHING BOAT! RUNABOUT! PONTOON BOAT! SAILBOAT (SAILBOAT
PROJET DE LOI. An Act to Amend the Employment Standards Act. Loi modifiant la Loi sur les normes d emploi
 2nd Session, 57th Legislature New Brunswick 60-61 Elizabeth II, 2011-2012 2 e session, 57 e législature Nouveau-Brunswick 60-61 Elizabeth II, 2011-2012 BILL PROJET DE LOI 7 7 An Act to Amend the Employment
THE LAW SOCIETY OF UPPER CANADA BY-LAW 19 [HANDLING OF MONEY AND OTHER PROPERTY] MOTION TO BE MOVED AT THE MEETING OF CONVOCATION ON JANUARY 24, 2002
![THE LAW SOCIETY OF UPPER CANADA BY-LAW 19 [HANDLING OF MONEY AND OTHER PROPERTY] MOTION TO BE MOVED AT THE MEETING OF CONVOCATION ON JANUARY 24, 2002](/thumbs/19/276456.jpg "THE LAW SOCIETY OF UPPER CANADA BY-LAW 19 [HANDLING OF MONEY AND OTHER PROPERTY] MOTION TO BE MOVED AT THE MEETING OF CONVOCATION ON JANUARY 24, 2002") 2-aes THE LAW SOCIETY OF UPPER CANADA BY-LAW 19 [HANDLING OF MONEY AND OTHER PROPERTY] MOTION TO BE MOVED AT THE MEETING OF CONVOCATION ON JANUARY 24, 2002 MOVED BY SECONDED BY THAT By-Law 19 [Handling
2-aes THE LAW SOCIETY OF UPPER CANADA BY-LAW 19 [HANDLING OF MONEY AND OTHER PROPERTY] MOTION TO BE MOVED AT THE MEETING OF CONVOCATION ON JANUARY 24, 2002 MOVED BY SECONDED BY THAT By-Law 19 [Handling
CEPF FINAL PROJECT COMPLETION REPORT
 CEPF FINAL PROJECT COMPLETION REPORT I. BASIC DATA Organization Legal Name: Conservation International Madagascar Project Title (as stated in the grant agreement): Knowledge Management: Information & Monitoring.
Credit Note and Debit Note Information (GST/ HST) Regulations
 Regulations") CANADA CONSOLIDATION CODIFICATION Credit Note and Debit Note Information (GST/ HST) Regulations Règlement sur les renseignements à inclure dans les notes de crédit et les notes de débit (TPS/ TVH) SOR/91-44
CANADA CONSOLIDATION CODIFICATION Credit Note and Debit Note Information (GST/ HST) Regulations Règlement sur les renseignements à inclure dans les notes de crédit et les notes de débit (TPS/ TVH) SOR/91-44
Le Cloud Computing est-il l ennemi de la Sécurité?
 Le Cloud Computing est-il l ennemi de la Sécurité? Eric DOMAGE Program manager IDC WE Security products & Solutions Copyright IDC. Reproduction is forbidden unless authorized. All rights reserved. Quelques
Quick Installation Guide TEW-P21G
 Quick Installation Guide TEW-P21G Table of of Contents Contents... 1. Avant de commencer... 2. Comment effectuer les connexions... 3. Utilisation du serveur d'impression... 1 1 2 3 Troubleshooting... 7
Frequently Asked Questions
 GS1 Canada-1WorldSync Partnership Frequently Asked Questions 1. What is the nature of the GS1 Canada-1WorldSync partnership? GS1 Canada has entered into a partnership agreement with 1WorldSync for the
Logitech Speaker System Z553 Setup Guide Guide d installation
 Logitech Speaker System Z553 Setup Guide Guide d installation Logitech Speaker System Z553 English................. 3 Français................ 10 www.logitech.com/support...19 2 Package contents Logitech
Utiliser une WebCam. Micro-ordinateurs, informations, idées, trucs et astuces
 Micro-ordinateurs, informations, idées, trucs et astuces Utiliser une WebCam Auteur : François CHAUSSON Date : 8 février 2008 Référence : utiliser une WebCam.doc Préambule Voici quelques informations utiles
LOGICIEL D'ADMINISTRATION POUR E4000 & G4000 MANAGEMENT SOFTWARE FOR E4000 & G4000
 LOGICIEL D'ADMINISTRATION POUR E4000 & G4000 MANAGEMENT SOFTWARE FOR E4000 & G4000 TABLE DES MATIÈRES TITRE PAGE Présentation - - - - - - - - - - - - - - - - - - - - - - - - - - - - - - - - - - - -4 Le
LOI SUR LE RÉGIME D ASSURANCE COLLECTIVE DE LA FONCTION PUBLIQUE PUBLIC SERVICE GROUP INSURANCE BENEFIT PLAN ACT
 PUBLIC SERVICE GROUP INSURANCE BENEFIT PLAN ACT LOI SUR LE RÉGIME D ASSURANCE COLLECTIVE DE LA FONCTION PUBLIQUE Application of this Act 1(1) This Act applies to the following (a) persons employed by the
NOM ENTREPRISE. Document : Plan Qualité Spécifique du Projet / Project Specific Quality Plan
 Document : Plan Qualité Spécifique du Projet Project Specific Quality Plan Référence Reference : QP-3130-Rev 01 Date Date : 12022008 Nombre de Pages Number of Pages : 6 Projet Project : JR 100 Rédacteur
GAME CONTENTS CONTENU DU JEU OBJECT OF THE GAME BUT DU JEU
 GAME CONTENTS 3 wooden animals: an elephant, a Polar bear and an African lion 1 Playing Board with two tree stumps, one red and one blue 1 Command Board double sided for two game levels (Green for normal
accidents and repairs:
 accidents and repairs: putting the pieces together accidents et réparations : réunir le tout nobody can repair your Toyota like Toyota Unfortunately, accidents do happen. And the best way to restore your
ETABLISSEMENT D ENSEIGNEMENT OU ORGANISME DE FORMATION / UNIVERSITY OR COLLEGE:
 8. Tripartite internship agreement La présente convention a pour objet de définir les conditions dans lesquelles le stagiaire ci-après nommé sera accueilli dans l entreprise. This contract defines the
MELTING POTES, LA SECTION INTERNATIONALE DU BELLASSO (Association étudiante de lʼensaparis-belleville) PRESENTE :
 PRESENTE :") MELTING POTES, LA SECTION INTERNATIONALE DU BELLASSO (Association étudiante de lʼensaparis-belleville) PRESENTE : Housing system est un service gratuit, qui vous propose de vous mettre en relation avec
MELTING POTES, LA SECTION INTERNATIONALE DU BELLASSO (Association étudiante de lʼensaparis-belleville) PRESENTE : Housing system est un service gratuit, qui vous propose de vous mettre en relation avec
22/09/2014 sur la base de 55,03 euros par action
 CORPORATE EVENT NOTICE: Amortissement d'orane Reprise de cotation PUBLICIS GROUPE S.A. PLACE: Paris AVIS N : PAR_20140902_06559_EUR DATE: 02/09/2014 MARCHE: EURONEXT PARIS Amortissement en titres et en
DOCUMENTATION MODULE BLOCKCATEGORIESCUSTOM Module crée par Prestacrea - Version : 2.0
 DOCUMENTATION MODULE BLOCKCATEGORIESCUSTOM Module crée par Prestacrea - Version : 2.0 INDEX : DOCUMENTATION - FRANCAIS... 2 1. INSTALLATION... 2 2. CONFIGURATION... 2 3. LICENCE ET COPYRIGHT... 3 4. MISES
BILL 203 PROJET DE LOI 203
 Bill 203 Private Member's Bill Projet de loi 203 Projet de loi d'un député 4 th Session, 40 th Legislature, Manitoba, 63 Elizabeth II, 2014 4 e session, 40 e législature, Manitoba, 63 Elizabeth II, 2014
Quick Installation Guide TEW-AO12O
 Quick Installation Guide TEW-AO12O Table of of Contents Contents Français... 1 1. Avant de commencer... 1 2. Installation du matériel... 2 3. Montage... 4 Troubleshooting... 6 Version 10.04.2007 1. Avant
Interest Rate for Customs Purposes Regulations. Règlement sur le taux d intérêt aux fins des douanes CONSOLIDATION CODIFICATION
 CANADA CONSOLIDATION CODIFICATION Interest Rate for Customs Purposes Regulations Règlement sur le taux d intérêt aux fins des douanes SOR/86-1121 DORS/86-1121 Current to August 4, 2015 À jour au 4 août
Quick Installation Guide TV-IP400 TV-IP400W
 Quick Installation Guide TV-IP400 TV-IP400W Table of of Contents Contents Français... 1. Avant de commencer... 2. Installation du matériel... 3. Configuration de la Webcam... Troubleshooting... 1 1 2 3
Ships Elevator Regulations. Règlement sur les ascenseurs de navires CODIFICATION CONSOLIDATION. C.R.C., c. 1482 C.R.C., ch. 1482
 CANADA CONSOLIDATION CODIFICATION Ships Elevator Regulations Règlement sur les ascenseurs de navires C.R.C., c. 1482 C.R.C., ch. 1482 Current to September 10, 2015 À jour au 10 septembre 2015 Last amended
Règlement sur l usage en commun de poteaux. Joint Use of Poles Regulations CODIFICATION CONSOLIDATION. C.R.C., c. 1185 C.R.C., ch.
 CANADA CONSOLIDATION CODIFICATION Joint Use of Poles Regulations Règlement sur l usage en commun de poteaux C.R.C., c. 1185 C.R.C., ch. 1185 Current to June 9, 2015 À jour au 9 juin 2015 Published by the
Règlement relatif à l examen fait conformément à la Déclaration canadienne des droits. Canadian Bill of Rights Examination Regulations CODIFICATION
 CANADA CONSOLIDATION CODIFICATION Canadian Bill of Rights Examination Regulations Règlement relatif à l examen fait conformément à la Déclaration canadienne des droits C.R.C., c. 394 C.R.C., ch. 394 Current
3615 SELFIE. http://graffitiresearchlab.fr HOW-TO / GUIDE D'UTILISATION
 3615 SELFIE http://graffitiresearchlab.fr HOW-TO / GUIDE D'UTILISATION Hardware : Minitel Computer DIN FM545 45 connector (http://www.gotronic.fr/art-fiche-din-fm545-4747.htm) Cable Arduino compatible
RAPID 3.34 - Prenez le contrôle sur vos données
 RAPID 3.34 - Prenez le contrôle sur vos données Parmi les fonctions les plus demandées par nos utilisateurs, la navigation au clavier et la possibilité de disposer de champs supplémentaires arrivent aux
Application Form/ Formulaire de demande
 Application Form/ Formulaire de demande Ecosystem Approaches to Health: Summer Workshop and Field school Approches écosystémiques de la santé: Atelier intensif et stage d été Please submit your application
MODE D EMPLOI USER MANUAL
 notice_cd 853:notice 9/01/08 15:08 Page 1 CAFETIÈRE À DOSETTES Coffee pad machine CD 853 GIACOMO MODE D EMPLOI USER MANUAL notice_cd 853:notice 9/01/08 15:08 Page 2 FRANÇAIS WHITE & BROWN vous félicite
Don't put socks on the Hippopotamus. Bill BELT Emmanuel DE RYCKEL
 Don't put socks on the Hippopotamus Bill BELT Emmanuel DE RYCKEL BEECHFIELD ASSOCIATES 2009 or you will screw up your Supply Chain. BEECHFIELD ASSOCIATES 2009 HIPPO ATTITUDE - inappropriate behavior -
IPSAS 32 «Service concession arrangements» (SCA) Marie-Pierre Cordier Baudouin Griton, IPSAS Board
 Marie-Pierre Cordier Baudouin Griton, IPSAS Board") IPSAS 32 «Service concession arrangements» (SCA) Marie-Pierre Cordier Baudouin Griton, IPSAS Board 1 L élaboration de la norme IPSAS 32 Objectif : traitement comptable des «service concession arrangements»
IPSAS 32 «Service concession arrangements» (SCA) Marie-Pierre Cordier Baudouin Griton, IPSAS Board 1 L élaboration de la norme IPSAS 32 Objectif : traitement comptable des «service concession arrangements»
UML : Unified Modeling Language
 UML : Unified Modeling Language Recommended: UML distilled A brief guide to the standard Object Modeling Language Addison Wesley based on Frank Maurer lecture, Univ. of Calgary in french : uml.free.fr/index.html
CONVENTION DE STAGE TYPE STANDART TRAINING CONTRACT
 CONVENTION DE STAGE TYPE STANDART TRAINING CONTRACT La présente convention a pour objet de définir les conditions dans lesquelles le stagiaire ci-après nommé sera accueilli dans l entreprise. This contract
LG Electronics, Inc. Display Limited Warranty - USA
 LG Electronics, Inc. Display Limited Warranty - USA Your LG Display will be repaired or replaced in accordance with the terms of this warranty, at LGE s option, if it proves to be defective in material
1. Raison de la modification
 T Service Documentation Technicocommerciale Information Technique Rubrique F Les régulations Nouvelle version de programme de la carte SU : F1.4 P5253 JS F 67580 Mertzwiller N ITOE0117 26/09/2011 FR 1.
INSTITUT MARITIME DE PREVENTION. For improvement in health and security at work. Created in 1992 Under the aegis of State and the ENIM
 INSTITUT MARITIME DE PREVENTION For improvement in health and security at work Created in 1992 Under the aegis of State and the ENIM Maritime fishing Shellfish-farming Sea transport 2005 Le pilier social
F1 Security Requirement Check List (SRCL)
") F1 Security Requirement Check List (SRCL) Liste de vérification des exigences relatives à la sécurité (LVERS) Cyber Protection Supply Arrangement (CPSA) Arrangement en matière d approvisionnement en cyberprotection
F1 Security Requirement Check List (SRCL) Liste de vérification des exigences relatives à la sécurité (LVERS) Cyber Protection Supply Arrangement (CPSA) Arrangement en matière d approvisionnement en cyberprotection
Improving the breakdown of the Central Credit Register data by category of enterprises
 Improving the breakdown of the Central Credit Register data by category of enterprises Workshop on Integrated management of micro-databases Deepening business intelligence within central banks statistical
Lean approach on production lines Oct 9, 2014
 Oct 9, 2014 Dassault Mérignac 1 Emmanuel Théret Since sept. 2013 : Falcon 5X FAL production engineer 2011-2013 : chief project of 1st lean integration in Merignac plant 2010 : Falcon 7X FAL production
NEW Fin Fan / Air cooled condenser cleaning
 Air cooled Condensers ( ACC ) Cleaning Air Cooled heat exchangers ( Finfan) Cleaning Cleaning Services Permanente installation NEW Fin Fan / Air cooled condenser cleaning New and revolutionnary high pressure
Deadline(s): Assignment: in week 8 of block C Exam: in week 7 (oral exam) and in the exam week (written exam) of block D
: Assignment: in week 8 of block C Exam: in week 7 (oral exam) and in the exam week (written exam) of block D") ICM STUDENT MANUAL French 2 JIC-FRE2.2V-12 Module Change Management and Media Research Study Year 2 1. Course overview Books: Français.com, niveau intermédiaire, livre d élève+ dvd- rom, 2ième édition,
ICM STUDENT MANUAL French 2 JIC-FRE2.2V-12 Module Change Management and Media Research Study Year 2 1. Course overview Books: Français.com, niveau intermédiaire, livre d élève+ dvd- rom, 2ième édition,
Logitech Tablet Keyboard for Windows 8, Windows RT and Android 3.0+ Setup Guide Guide d installation
 Logitech Tablet Keyboard for Windows 8, Windows RT and Android 3.0+ Setup Guide Guide d installation English.......................................... 3 Français.........................................