U.S.A./CANADA/AUSTRALIA. EN Instructions for use Instrucciones de uso Notice d emploi. duette sw
|
|
|
- Daniel Morin
- il y a 8 ans
- Total affichages :
Transcription
1 U.S../CND/USTRLI EN Instructions for use ES FR Instrucciones de uso Notice d emploi duette sw

2 C

3 4 C 5 6

4 7 8 OK NO 9 C C

5 C

6 13 14 C 15

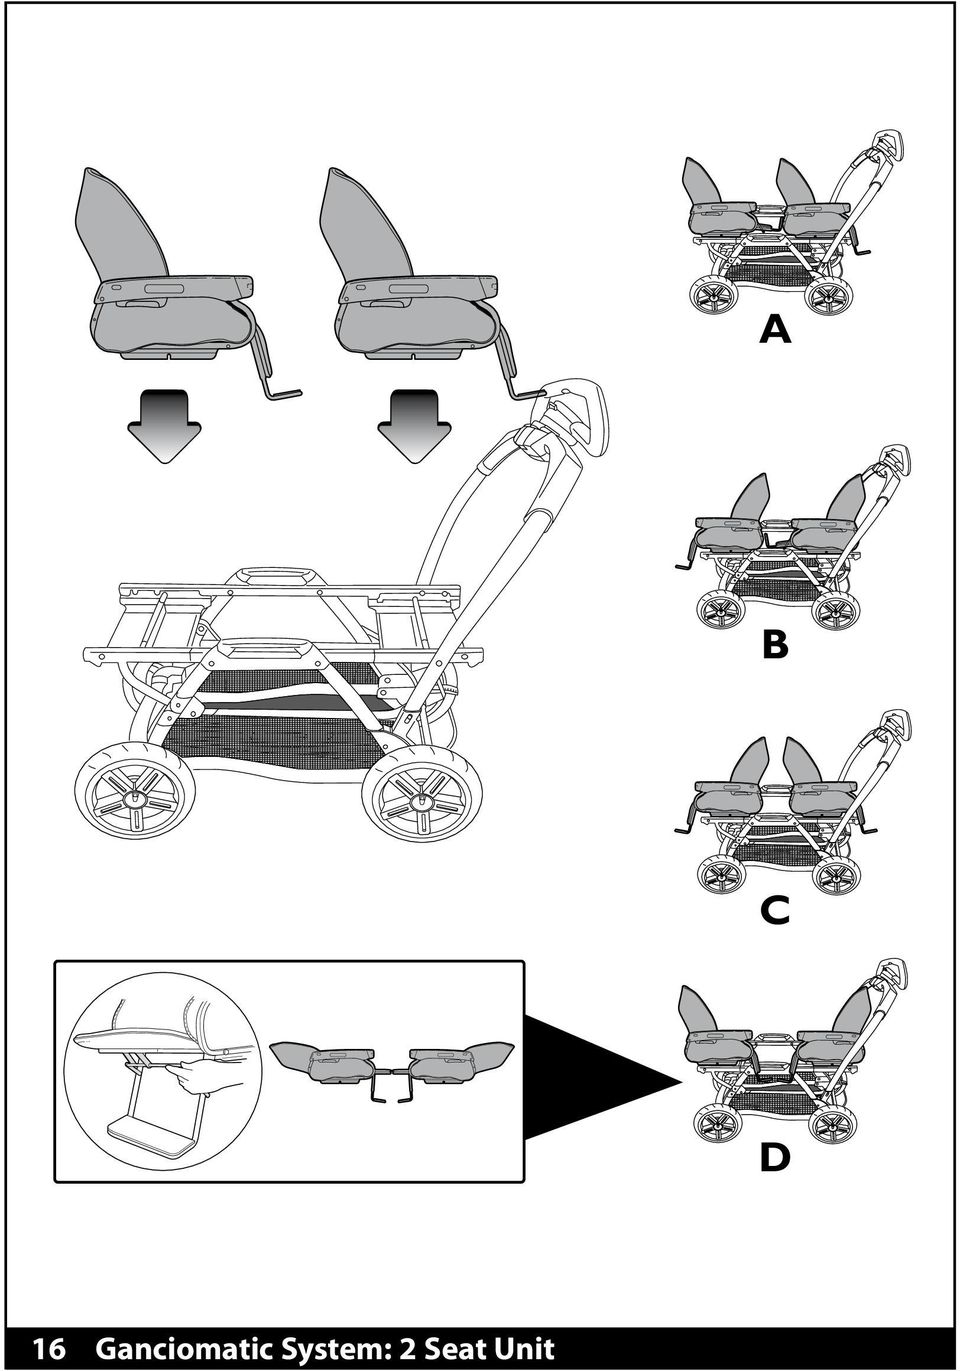
7 C D 16 Ganciomatic System: 2 Seat Unit
8 17 Ganciomatic System: 2 Primo Viaggio SIP 18 Ganciomatic System: Seat Unit + Primo Viaggio SIP

9 Duette SW ) SPST5981GR 2) RPI0372NGR 3) SPST5971N 4) ERSHDS* 5) SPI0096L65N 6) SPI0097L65N 7) SPST5968N EN Spare parts available in different colours to be specified when ordering. ES Repuestos disponibles en otros colores que se especificarán en el pedido. FR Pièces de rechange disponibles en plusieurs couleurs à spécifier dans la demande

10 EN_English Thank you for choosing a Peg-Pérego product. WRNING _ IMPORTNT: RED THE INSTRUCTIONS CREFULLY EFORE USE ND KEEP THEM FOR FUTURE REFERENCE. THE CHILD MY E HURT IF YOU DO NOT FOLLOW THESE INSTRUCTIONS. _ THIS PRODUCT IS DESIGNED FOR CHILDREN WHOSE MXIMUM WEIGHT IS 45 POUNDS (20 KG) ND WHOSE MXIMUM HEIGHT IS 43 INCHES (110 CM). THIS SHOPPER SKET IS DESIGNED TO CRRY MXIMUM WEIGHT OF 11 POUNDS (5 KG). NY POCH OR POCKET PROVIDED WITH THIS UNIT IS DESIGNED TO CRRY MXIMUM WEIGHT OF 0.44 POUNDS (0.2 KG). _ FILURE TO FOLLOW MNUFCTURER S SPECIFICTIONS OR USE OF CCESSORIES OTHER THN THOSE PPROVED Y THE MNUFCTURER MY CUSE THE UNIT TO ECOME UNSTLE. _ VOID SERIOUS INJURY FROM FLLING OR SLIDING OUT. LWYS USE COMPLETE 5 POINT SET ELT. _ NEVER LEVE YOUR CHILD UNTTENDED. _ LWYS USE LL THE RKES WHENEVER PRKED. _ TO VOID SERIOUS INJURY, WHEN MKING DJUSTMENTS ENSURE THE CHILD S ODY IS CLER OF LL MOVING PRTS. _ LL OPERTING ND SSEMLY PROCEDURES SHOULD E PERFORMED Y N DULT. _ DO NOT LIFT THE STROLLER Y GRIPPING THE FRONT R. THE FRONT R IS NOT DESIGNED TO WITHSTND LODS _ ENSURE THT THE STROLLER IS OPENED CORRECTLY ND LOCKED IN POSITION OF USE. _ CHECK TO MKE SURE THT THE CR SET OR THE Y CRRIGE IS CORRECTLY FSTENED TO THE STROLLER (WHERE PPLICLE). _ DO NOT DRIVE THIS PRODUCT ROUND STIRS OR STEPS; CRE MUST E TKEN IF UNIT IS USED ON STIRS OR ESCLTORS. _ DO NOT USE THE PRODUCT IF IT HS ROKEN OR MISSING PRTS. _ DO NOT USE NER FIRE OR EXPOSED FLME. _ CHILD MY SLIP INTO LEG OPENINGS ND STRNGLE, NEVER USE IN RECLINE CRRIGE POSITION UNLESS FOOTREST ENCLOSURE IS FULLY INSTLLED/IMPLEMENTED (SEE MNUL INSTRUCTIONS FOR CORRECT USE). NOTICE THIS RTICLE MEETS OR EXCEEDS LL REQUIREMENTS COVERED IN STM F833 STNDRD ND LTEST REVISIONS. INSTRUCTIONS 1 FITTING THE WHEELS: remove the four protective caps, (two round and two square) from the folded chassis, as in the figure. 2 WRNING: distinguish the front wheels (Fig. ) from the rear wheels (Fig. ), as in the figure. 3 Fit the front wheels, which are shown in Figure, while the base is closed. It is necessary to push the locking lever down (fig. ) and at the same time push the hub onto the pin (fig. C). Check that the wheels are properly attached by pulling them in opposite directions. 4 To fit the rear wheels, repeat the action carried out for the front wheels (sequence and C). The rear wheels can be identified by the black teeth, as shown in figure. Check that the wheels are properly attached by pulling them in opposite directions. 5 RKE: to activate the brake on the chassis, push down with your foot on the brake bar

11 located on the rear wheels, as shown by the arrows in the figure. 6 OPENING: activate the brake on the folded chassis. Unfasten the tab, as in the figure. 7 Lift the handlebar in the direction of the arrow (Fig. ). Press the handlebar downwards until the final click (Fig. ). 8 Check that the opening is correct, as in the figure. 9 SKET: fasten the basket on the chassis base, as shown in the figure, at six specific points. ttach the four buttons, to the front and rear, as in figures and ; then attach the two Velcro strips to the chassis tube, as in figure C. 10 STEERING WHEEL: to guarantee good grip, the steering wheel may adopt four different positions. To adjust them, press the button as in the figure. 11 STEERLE WHEELS: the practical steering wheel allows you to steer the front wheels. To steer, move the lever on the steering wheel to the right, as in figure. To fix the wheels, move the lever to the left, as in figure. 12 EXTERNL HNDLERS: the complete chassis may be lifted using the central external handles (Fig. ) and the rear handlebar (Fig. ). The chassis must be lifted by two people. Figure C shows the correct way to lift it. 13 WHEEL REMOVL: press down on the lever at the centre of the wheel, as shown by the arrow in figure, and simultaneously pull the wheel towards you (Fig. ). 14 FOLDING: activate the brake and release the seats. To fold the chassis, lift the lever on the handlebar (Fig. ), thus detaching the handlebar, and move it slightly forwards (Fig. ). Push down on the safety lever with your left foot (Fig. C) to release the handlebar. 15 Rotate the handlebar downwards (Fig. ). Fold the chassis, attaching the tab to the handlebar fastener (Fig. ). GNCIOMTIC SYSTEM Ganciomatic is a fast and practical system that allows you to attach the Primo Giro carrying chair, the Primo Viaggio SIP car seat (sold separately) to the Ganciomatic ase in one step. Place the item on the Ganciomatic ase and push down with both hands until you hear a click. lways activate the chassis or stroller brake before attaching or removing products (refer to the respective instruction manuals). Follow the instructions for the product combinations. 16 DUETTE + 2 CRRYING CHIRS WRNING: to maintain product stability, always attach both carrying chairs. If for any reason Duette SW is used for only one child, fit both carrying chairs anyway and ensure that they are properly attached. Figures,, C and D show the attachment options for the chairs. Figure D shows the cot position, obtained by reclining the backrests and lifting the footboards, as in the figure. 17 DUETTE + 2 PRIMO VIGGIO SIP CR SETS Figure shows how to attach the product (facing the person pushing). 18 DUETTE + 1 PRIMO VIGGIO SIP CR SET ND 1 CRRYING CHIR WRNING: to maintain product stability always attach the carrying chair. If for any reason Duette SW is used for only one child, fit the carrying chair anyway and ensure that it is properly attached. Figures and show how to attach the products. CLENING ND MINTENNCE PRODUCT MINTENNCE: protect from the weather: water, rain, or snow; prolonged and continuous exposure to bright sunlight may give rise to colour changes of various different materials; store this product in a dry place. CLENING THE CHSSIS: periodically clean all plastic parts with a damp cloth. Do not use solvent or similar cleaning products; keep all metal parts dry to prevent rusting; keep moving parts clean (adjustment mechanisms, locking mechanisms, wheels,...) and free of dust and sand and, if necessary, lubricate with light machine oil. PEG-PÉREGO S.p.. Peg Pérego can make changes at any time to the models described in this publication for technical or commercial reasons. PEG-PÉREGO FTER-SLES SERVICE If any parts of the item get lost or damaged, only use genuine Peg Pérego spare parts. For any repairs, replacements, information on the products and sales of genuine spare parts and accessories, contact the Peg

12 Pérego ssistance Service and state the serial number of the product, if present. US: tel fax: call us toll free: web site: CND tel fax call us toll free website Peg-Perego reserves the right to make any necessary changes or improvements to the products shown at any time without notice ES_Español Le agradecemos haber elegido un producto Peg-Pérego. DVERTENCI _ IMPORTNTE: LÉSE TENTMENTE ESTS INSTRUCCIONES Y CONSÉRVELS PR FUTURS CONSULTS. L SEGURIDD DEL NIÑO PODRÍ ESTR EN PELIGRO SI NO SE LEEN DICHS INSTRUCCIONES. _ ESTE PRODUCTO H SIDO DISEÑDO PR NIÑOS CON UN PESO MÁXIMO DE 20 KG Y UN LTUR MÁXIM DE 110 CM. L CESTILL H SIDO RELIZD PR SOPORTR UN PESO MÁXIMO DE 5 KG. CULQUIER OLS ENTREGD JUNTO L PRODUCTO ESTÁ RELIZD PR SOPORTR UN PESO MÁXIMO DE 0,2 KG. _ SI NO SE RESPETN LS INDICCIONES ESPECIFICDS O SI SE USN CCESORIOS DIFERENTES DE LOS HOMOLOGDOS POR EL FRICNTE, EL PRODUCTO PUEDE SER INESTLE. _ PR EVITR LESIONES GRVES POR CÍDS O SI ESCP EL NIÑO DE L SILL DE PSEO, USR SIEMPRE UN CINTURÓN DE SEGURIDD DE 5 PUNTOS COMPLETO. _ NO DEJR NUNC L NIÑO SIN VIGILNCI. _ USR SIEMPRE TODOS LOS DISPOSITIVOS DE LOQUEO CD VEZ QUE L SILL DE PSEO NO ESTÉ EN MOVIMIENTO. _ PR EVITR LESIONES GRVES, SEGURRSE DE QUE EL NIÑO NO PUED MOVERSE PELIGROSMENTE MIENTRS SE REGUL EL PRODUCTO. _ TODS LS OPERCIONES DE ENSMLJE DEE RELIZRLS SOLO UN DULTO. _ NO LEVNTR L SILL DE PSEO COGIÉNDOL POR L RR

13 FRONTL. L RR FRONTL NO H SIDO CONCEID PR SOPORTR PESOS. _ SEGURRSE DE QUE L SILL DE PSEO ESTÉ IERT CORRECTMENTE Y LOQUED EN L POSICIÓN CORRECT PR SU UTILIZCIÓN. _ SEGURRSE DE QUE L SILL DE UTO O EL COCHECITO ESTÉN ENGNCHDOS CORRECTMENTE L SILL DE PSEO. _ NO USR L SILL DE PSEO CERC DE ESCLERS O ESCLONES; PRESTR TENCIÓN CUNDO SE UTILIZ EN ESCLERS O ESCLERS MECÁNICS. _ NO UTILIZR EL PRODUCTO SI PRESENT PRTES DÑDS O SI FLT LGUN PRTE. _ NO USR EN PRESENCI DE LLMS O FUENTES DE CLOR. _ EL NIÑO PODRÍ RESLRSE POR LS PERTURS DE LS PIERNS Y ESTRNGULRSE, POR LO QUE NO UTILIZR NUNC EL COCHECITO EN POSICIÓN INCLIND SI EL REPOSPIÉS NO ESTÁ COMPLETMENTE INSTLDO/PLICDO (VER EL MNUL DE INSTRUCCIONES PR UN USO CORRECTO). VISO ESTE PRODUCTO CUMPLE SUFICIENTEMENTE CON TODOS LOS REQUISITOS ESTLECIDOS POR L NORM STM F833 Y ULTERIORES REVISIONES. INSTRUCCIONES DE USO 1 MONTJE DE LS RUEDS: quitar los cuatro tapones de protección (dos redondos y dos cuadrados) del carrito aún cerrado como muestra la figura. 2 TENCIÓN: distinguir las ruedas delanteras (Fig. ) de las traseras (Fig. ) como muestra la figura. 3 Con el carrito cerrado, montar las ruedas delanteras que se muestran en la figura Presionar sobre la palanquita de enganche (fig. ) hacia abajo y simultáneamente encajar el cojinete en el eje (fig. C). Controlar el correcto enganche tirando de las ruedas en dirección opuesta. 4 Para montar las ruedas traseras, que se distinguen por los dientes negros tal y como en la figura, repetir la misma operación anterior con las ruedas delanteras (secuencia y C). Controlar el correcto enganche tirando de las ruedas hacia la dirección opuesta. 5 FRENO: para frenar el carrito bajar con el pie la barra de freno dispuesta en las ruedas traseras como indican las flechas en la figura. 6 PERTUR: accionar el freno del carrito estando cerrado. Desenganchar la lengüeta como en la figura. 7 lzar el manillar en el sentido indicado por la flecha (Fig. ). Presionar el manillar hacia abajo y bloquearlo hasta oír el clic final (Fig. ). 8 Comprobar que la apertura sea correcta tal y como muestra la figura. 9 CEST: la cesta se coloca en la base del carrito en seis puntos específicos, como indica la figura. brochar los cuatro botones como se indica en las figuras y en la parte delantera y trasera y, después, unir los dos velcros al bastidor del carrito como indica la figura C. 10 VOLNTE: el volante puede ponerse en cuatro posiciones diferentes presionando el botón como indica la figura con objeto de asirlo siempre correctamente. 11 RUEDS DE DIRECCIÓN: gracias al práctico volante puede elegir girar las ruedas delanteras. Para girar las ruedas delanteras, hay que desplazar hacia la derecha la palanquita que hay en el volante, como indica la figura. Para que las ruedas queden fijas, mover la palanquita hacia la izquierda, como indica la figura. 12 EMPUÑDURS EXTERIORES: se puede levantar el carrito completo por las empuñaduras centrales exteriores (Fig. ) y por el manillar posterior (Fig. ). El carrito debe levantarse entre dos personas. La figura C muestra cómo hacerse de forma correcta. 13 PR QUITR LS RUEDS: presionar la palanquita que hay en el centro de la rueda como indica la flecha de la figura y al mismo tiempo tirar de la rueda hacia sí (Fig. ). 14 CIERRE: accionar el freno y quitar las sillitas. Para cerrar el carrito levantar la palanquita que hay en el manillar, como indica la figura (Fig. ), y desengancharlo moviéndolo un poco hacia delante (Fig ). Para desbloquear el manillar, presionar con el pie izquierdo

14 la palanca de seguridad hacia abajo, como indica la figura (Fig. C). 15 Girar el manillar hacia abajo (Fig. ). Cerrar el carrito, enganchando la palanquita de cierre al gancho del manillar (Fig. ). GNCIOMTIC SYSTEM Ganciomatic system es el sistema práctico y veloz que permite con un único gesto enganchar a la ase Ganciomatic del carrito la sillita extraíble Primo Giro, la silla de auto Primo Viaggio SIP (artículos en venta por separado). poyar cada producto a la ase Ganciomatic y presionar sobre él con ambas manos hasta oír el clic final. ccionar siempre el freno del chasis o de la silla de paseo antes de enganchar o desenganchar cada producto (consultar el correspondiente manual de instrucciones). Deben respetarse las indicaciones para las combinaciones de los productos. 16 DUETTE + 2 SILLITS EXTRÍLES DVERTENCI: para mantener el producto estable se recomienda instalar siempre las dos sillas extraíbles. Si por algún motivo se utiliza Duette SW con un solo ocupante, se aconseja enganchar las dos sillas extraíbles y asegurarse de que estén bien ancladas. Las figuras,, C y D muestran las posibilidades de enganche de las sillas extraíbles. La figura D, muestra la posición camita, bajando los respaldos y subiendo los reposapiés de los peldaños como muestra la figura. 17 DUETTE + 2 SILLS DE UTO PRIMO VIGGIO SIP La figura muestra cómo acoplar el producto (girado hacia mamá). 18 DUETTE + 1 SILL DE UTO PRIMO VIGGIO SIP Y 1 SILL EXTRÍLE DVERTENCI: para mantener el producto estable se recomienda instalar siempre la silla extraíble. Si por algún motivo se utiliza Duette SW con un solo ocupante, se recomienda de todas formas enganchar la silla extraíble y asegurarse de que esté bien enganchada. Las figuras y muestran cómo enganchar los productos. LIMPIEZ Y MNTENIMIENTO MNTENIMIENTO DEL PRODUCTO: proteger contra agentes atmosféricos (agua, lluvia o nieve). Una exposición contínua y prolongada al sol podría causar cambios de color de muchos materiales. Conservar este producto en un lugar seco. LIMPIEZ DEL CHSIS: Limpiar periódicamente las partes de plástico con un paño húmedo sin usar solventes u otros productos similares. Mantener secas todas las partes de metal para prevenir la oxidación. Mantener limpias todas las partes móviles (dispositivo de regulación, de enganche, ruedas...) quitando el polvo o la arena y, en caso necessario, engrasarlas con aceites ligeros. PEG-PÉREGO S.p. Peg-Pérego podrá aportar en cualquier momento modificaciones a los modelos que se describen en el presente manual por razones técnicas o comerciales. SERVICIO DE SISTENCI PEG-PÉREGO Si se pierden o dañan algunas partes del modelo, utilizar únicamente repuestos originales Peg Pérego. Para cualquier reparación, sustitución, información acerca de los productos, venta de repuestos originales y accesorios, contactar al Servicio al Cliente Peg Pérego indicando, en caso fuere presente, el número de serie del producto. US: tel.: (Español) fax: Número de teléfono gratis: (Español) sito internet: Peg-Perego se reserva el derecho para hacer cambios necesarios o mejorar los productos al cualquier tiempo sin notificación
. poyar cada producto a la ase Ganciomatic y presionar sobre él con ambas manos hasta oír el clic final.")
15 FR_Français Merci d avoir choisi un produit Peg-Pérego. VERTISSEMENT _ IMPORTNT : LIRE CES INSTRUCTIONS VEC TTENTION ET LES CONSERVER POUR TOUTE RÉFÉRENCE FUTURE. L SÉCURITÉ DE L ENFNT POURRIT ÊTRE MENCÉE SI CES INSTRUCTIONS NE SONT PS SUIVIES. _ CE PRODUIT ETE CONÇU POUR DES ENFNTS DONT LE POIDS N EXCEDE PS 20 KG (45 LIVRES) ET L TILLE NE DEPSSE PS 110 CM (43 POUCES). LE PNIER ETE CONÇU POUR SUPPORTER DES CHRGES MXIMLES DE 5 KG (11 LIVRES). LES POCHETTES OU SCS FOURNIS VEC CE PRODUIT ONT ETE CONÇUS POUR SUPPORTER DES CHRGES MXIMLES DE 0,2 KG (0,44 LIVRES). _ LE DEFUT D OSERVTION DES SPECIFICTIONS DU FRICNT OU L EMPLOI D CCESSOIRES NON PPROUVES PR LE FRICNT PEUT FFECTER L STILITE DU PRODUIT. _ POUR ÉVITER DE GRVES LESSURES SUITE À L CHUTE OU U GLISSEMENT DE L ENFNT DU PRODUIT, TOUJOURS UTILISER UNE CEINTURE DE SÉCURITÉ À 5 POINTS COMPLÈTE. _ NE JMIS LISSER L ENFNT SNS SURVEILLNCE. _ TOUJOURS CTIONNER LES FREINS LORSQUE LE PRODUIT EST L RRET. _ POUR ÉVITER DE GRVES LESSURES LORS DU RÉGLGE DU PRODUIT, S SSURER QUE LES MEMRES DE L ENFNT NE SONT PS EN CONTCT VEC DES PIÈCES EN MOUVEMENT. _ L ENSEMLE DES PROCÉDURES DE MONTGE ET D UTILISTION DOIT ÊTRE EFFECTUÉ PR UN DULTE. _ NE PS SOULEVER L POUSSETTE PR L RRE FRONTLE. ELLE N PS ÉTÉ CONÇUE POUR SUPPORTER DES CHRGES. _ S SSURER QUE L POUSSETTE EST CORRECTEMENT OUVERTE EST LOQUÉE DNS L POSITION CONVENNT À SON UTILISTION. _ CONTRÔLER QUE LE SIÈGE ENFNT OU LE LNDU EST CORRECTEMENT CCROCHÉ À L POUSSETTE. _ NE PS UTILISER CE PRODUIT À PROXIMITÉ DE MRCHES OU D ESCLIERS; PRÊTER TTENTION À L MNIPULTION DU PRODUIT DNS DES ESCLIERS OU DES ESCLTORS. _ NE PS UTILISER LE PRODUIT SI DES PIÈCES SONT MNQUNTES OU CSSÉES. _ NE PS UTILISER PRÈS DU FEU OU D UNE FLMME DIRECTE. _ L ENFNT POURRIT GLISSER À TRVERS LES PSSGES DE JMES ET S ÉTRNGLER; NE JMIS UTILISER DNS L POSITION LNDU INCLINÉE À MOINS QUE LE SYSTÈME DE REPOSE- PIED NE SOIT COMPLÈTEMENT INSTLLÉ/EN PLCE (SE REPORTER U MNUEL D INSTRUCTIONS POUR UNE UTILISTION CORRECTE). REMRQUE CET RTICLE REMPLIT LES CONDITIONS REQUISES PR L NORME STM F833 ET RÉVISIONS RÉCENTES OU STISFIT À DES CONDITIONS PLUS SÉVÈRES. INSTRUCTIONS D UTILISTION 1 MONTGE DES ROUES : retirer les quatre embouts de protection (deux ronds et deux carrés) du châssis encore fermé, comme indiqué sur la figure. 2 TTENTION : distinguer les roues avant (fig. ) des roues arrière (fig. ) en se reportant à la figure. 3 Monter les roues avant (voir figure ) sur le châssis fermé. La languette de fixation doit être poussée vers le bas (fig. ). Dans le même
.")
16 temps, insérer le moyeu sur l axe (fig. C). Contrôler que le montage a été correctement effectué en tirant les roues dans la direction opposée. 4 Pour monter les roues arrière, caractérisées par des dents noires (fig. ), répéter l opération précédemment réalisée avec les roues avant (séquences et C). Contrôler que le montage a été correctement effectué en tirant les roues dans la direction opposée. 5 FREIN : pour immobiliser le châssis, abaisser avec le pied la barre de frein située au-dessus des roues arrière, comme l indiquent les flèches sur la figure. 6 OUVERTURE : actionner le frein du châssis encore fermé. Décrocher la languette, comme indiqué sur la figure. 7 Relever la poignée arrière dans le sens indiqué par la flèche (fig. ). Pousser la poignée vers le bas et la bloquer en veillant à entendre le déclic final (fig. ). 8 Vérifier que l ouverture a été effectuée correctement en se reportant à la figure. 9 PNIER : positionner le panier à la base du châssis, comme indiqué sur la figure, en respectant les six points spécifiques. outonner les quatre boutons à l avant et à l arrière, comme indiqué sur les détails et ; attacher ensuite les deux petits rubans à scratch au montant du châssis, comme indiqué sur le détail C. 10 VOLNT : le volant peut être réglé en quatre positions différentes en appuyant sur le bouton indiqué sur la figure, afin de toujours garantir une bonne prise. 11 ROUES PIVOTNTES : grâce au volant, il est possible de rendre les roues avant pivotantes. Pour rendre les roues avant pivotantes, déplacer vers la droite le petit levier situé sur le volant, comme indiqué sur la figure. Pour mettre en position fixe, déplacer vers la gauche le petit levier, comme sur la figure. 12 POIGNÉES LTÉRLES :Le châssis peut se transporter grâce aux poignées latérales (fig. ) et par la poignée arrière (fig. ). Deux personnes sont nécessaires pour le soulever. La figure C indique comment soulever correctement le châssis. 13 ENLEVER LES ROUES : tirer vers le bas la languette située au centre de la roue, comme l indique la flèche de la figure, et, dans le même temps, tirer la roue vers soi (fig. ). 14 FERMETURE : actionner le frein et décrocher les blocs poussettes. Pour refermer le châssis, relever le petit levier situé sur la poignée centrale (fig. ) ; la poignée sera ainsi débloquée et basculera légèrement en avant (fig. ). ppuyer du pied gauche sur le levier de sécurité (fig. C) pour débloquer la poignée. 15 Faire basculer la poignée vers le bas (fig. ). Refermer le châssis en accrochant la languette de fermeture au crochet de la poignée (fig. ). SYSTÈME GNCIOMTIC Pratique et rapide, le Système Ganciomatic permet d accrocher en un seul geste le bloc poussette Primo Giro, le siège-auto Primo Viaggio SIP (vendus séparément) à la ase Ganciomatic du châssis. Les poser sur la ase Ganciomatic et appuyer des deux mains jusqu au déclic. Toujours actionner le frein du châssis avant d accrocher ou de décrocher les produits (consulter le manuel d instructions de chaque produit). Suivre les indications relatives aux combinaisons de produits. 16 DUETTE + 2 LOCS POUSSETTES VERTISSEMENT : pour maintenir la stabilité du produit, il est recommandé de toujours installer les deux blocs poussettes. Si, pour une raison particulière, Duette SW, edevait être utilisée pour un seul enfant, il est recommandé d accrocher tout de même les deux blocs poussettes et de s assurer qu ils sont bien fixés. Les figures,, C et D montrent les possibilités d installation des blocs poussettes. La figure D montre la position allongée, obtenue en abaissant les dossiers et en relevant les repose-pieds des marchepieds, comme indiqué sur la figure. 17 DUETTE + 2 SIÈGES UTO PRIMO VIGGIO SIP La figure montre comment accrocher les sièges auto (tournés vers les parents) 18 DUETTE + 1 SIÈGE-UTO PRIMO VIGGIO SIP ET 1 LOC POUSSETTE VERTISSEMENT : pour maintenir la stabilité du produit, il est recommandé de toujours installer bloc poussette. Si, pour une raison particulière, Duette SW devait être utilisée avec un seul enfant,, il est recommandé d accrocher tout de même le siège amovible et de s assurer qu il est bien fixé. Les figures et montrent comment accrocher les produits.

17 NETTOYGE ET ENTRETIEN ENTRETIEN DE L RTICLE: protéger l article des agents atmosphériques (eau, pluie ou neige); une exposition continue et prolongée au soleil pourrait entraîner un changement de couleur de nombreux matériaux; ranger cet article dans un lieu sec. NETTOYGE DU CHÂSSIS: nettoyer régulièrement les pièces en plastique à l aide d un linge humide; ne pas utiliser de solvants ou autres produits similaires. Veiller à ce que toutes les pièces métalliques restent sèches pour prévenir la formation de rouille. Maintenir le bon état de propreté de toutes les pièces mobiles (mécanismes de réglage, mécanismes de fixation, roues, etc.) en enlevant poussière ou sable; graisser avec une huile légère si nécessaire. PEG-PÉREGO S.p. Peg-Pérego podrá aportar en cualquier momento modificaciones a los modelos que se describen en el presente manual por razones técnicas o comerciales. SERVICIO DE SISTENCI PEG-PÉREGO En cas de perte de pièces ou de rupture de l'une d'elles, utiliser exclusivement des pièces de rechange originales Peg-Pérego. Pour toute réparation, remplacement, informations sur les produits, vente de pièces détachées d origine et accessoires, contactez le service après-vente Peg Pérego en indiquant, si présent, le numéro de série du produit. CND: tel.: fax: numéro sans frais: site internet: Peg-Pérego se réserve le droit d apporter à tout moment des modifications aux modèles décrits dans le présent ouvrage, pour des raisons de nature technique ou commerciale

18 - 18 -

19 - 19 -

20 PEG PEREGO S.p.. VI DE GSPERI RCORE MI ITLI tel fax / Servizio Post Vendita - fter Sale: tel fax: PEG PEREGO U.S.. Inc INDEPENDENCE DRIVE FORT WYNE INDIN phone fax Call us toll free: PEG PEREGO CND Inc. 585 GRNITE COURT PICKERING ONTRIO CND L1W3K1 phone fax Call us toll free: Conforms to STM F833 Safety Standards WRNING VOID SERIOUS INJURY FROM FLLING OR SLIDING OUT. LWYS USE COMPLETE 5 POINT SET ELT. DVERTENCI EVITE LESIÓNES DE CIDS O DESLIZMIENTOS HCI FUER. SIEMPRE UTILIZE EL CINTURON COMPLETO DE 5 PUNTOS. VERTISSEMENT EVITER UNE LESSURE SÉRIEUSE DUE À UNE CHUTE OU À UN GLISSEMENT. TOUJOURS UTILISER L CEINTURE DE SÉCURITÉ À 5 POINTS COMPLÈTE. duette sw FIN1001I63 02/11/2010

ENGLISH 4 FRANÇAIS 6 ESPAÑOL 8
 SY ENGLISH 4 FRANÇAIS 6 ESPAÑOL 8 ENGLISH How to lubricate the sewing machine Warning! Always switch off the machine and disconnect it from the power supply before lubricating the sewing machine. 1 Always
33 inch open & closed storage Rangement à espace fermé et ouvert de 33po (83.7cm) 33 pulgadas almacenaje abierto y cerra
 33 pulgadas almacenaje abierto y cerra") 33 inch open & closed storage 33 pulgadas almacenaje abierto y cerra! o not throw away packaging materials until assembly is complete.! Assemble this item on a soft surface, such as cardboard or carpet,
33 inch open & closed storage 33 pulgadas almacenaje abierto y cerra! o not throw away packaging materials until assembly is complete.! Assemble this item on a soft surface, such as cardboard or carpet,
Sécurité relative aux sièges auto et aux rehausseurs
 Sécurité relative aux sièges auto et aux rehausseurs Safety with Car Seats and Booster Seats Car crashes are the main cause of accidental death and serious injury of children. Correctly using a car or
Quick start guide. www.philips.com/support HTL1170B
 For product support, visit Para obtener asistencia técnica, visite Pour en savoir plus sur l assistance sur les produits, visitez le site www.philips.com/support HTL1170B Quick start guide P&F USA, Inc.
Trim Kit Installation Instruction
 Trim Kit Installation Instruction Instrucciones para la Instalación del Kit de Molduras Instructions pour l'installation du Kit d'encastrement m If any hardware or parts are damaged or missing, contact
Folio Case User s Guide
 Fujitsu America, Inc. Folio Case User s Guide I N S T R U C T I O N S This Folio Case is a stylish, lightweight case for protecting your Tablet PC. Elastic Strap Pen Holder Card Holders/ Easel Stops Figure
GIGABIT PCI DESKTOP ADAPTER DGE-530T. Quick Installation Guide+ Guide d installation+
 GIGABIT PCI DESKTOP ADAPTER Quick Installation Guide+ Guide d installation+ Check Your Package Contents Quick Installation Guide Gigabit Ethernet PCI Adapter CD with Manual and Drivers DO NOT insert the
Using a Walker. 2. Move your injured or weak leg toward the walker first. If you have had surgery on both legs, use either leg to begin walking.
 Using a Walker Walking with a Walker 1. Lift the walker and place it at a comfortable distance in front of you with all four of its legs on the floor. This distance is often equal to an arm s length. 2.
ASSEMBLY INSTRUCTIONS DIRECTIVES POUR L'ASSEMBLAGE ombre pendant lamp lampe suspendue à tons dégradés, chocolat
 ASSEMBLY INSTRUCTIONS DIRECTIVES POUR L'ASSEMBLAGE ombre pendant lamp lampe suspendue à tons dégradés, chocolat SKU 2728089 INSTRUCTIONAL MANUAL MANUEL D'INSTRUCTIONS 270/2707 COMPONENT LIST LISTE DES
ASSEMBLY INSTRUCTIONS DIRECTIVES POUR L'ASSEMBLAGE luster chandelier lamp chandelier à trois branches en verre lustré
 ASSEMBLY INSTRUCTIONS DIRECTIVES POUR L'ASSEMBLAGE luster chandelier lamp chandelier à trois branches en verre lustré SKU 2711592 INSTRUCTIONAL MANUAL MANUEL D'INSTRUCTIONS 270/2707 COMPONENT LIST LISTE
Comfort Duett. TV-kit. www.comfortaudio.com. USA: English/Français/Español. Comfort Duett
 Comfort Duett TV-kit USA: English/Français/Español www.comfortaudio.com Comfort Duett 1 English The television kit makes it possible to amplify the sound from the TV via the charger unit. As soon as Comfort
Instructions for Use Instrucciones de uso Mode d emploi
 Polly Instructions for Use Instrucciones de uso Mode d emploi Please save these instructions for future use. Por favor conserve estas instrucciones para uso futuro. Veuillez conserver ce mode d emploi
MONTEGO 3 PERSON CUSHION GARDEN SWING WITH CANOPY ASSEMBLY INSTRUCTIONS ITEM# SC-177-2GS
 MONTEGO 3 PERSON CUSHION GARDEN SWING WITH CANOPY ASSEMBLY INSTRUCTIONS ITEM# SC-177-2GS QUESTIONS, PROBLEMS, MISSING PARTS WITH THIS PRODUCT? DO NOT RETURN TO YOUR RETAILER, PLEASE CALL OUR CUSTOMER SERVICE
PRIMO VIAGGIO SIP. Side Impact Protection
 O W N E R S M A N U A L CANADA Instructions for use EN (IMMI) PRIMO VIAGGIO SIP Side Impact Protection WARNING: Do not install or use this Infant restraint until you read and understand all instructions
R.V. Table Mounting Instructions
 PTSS165 ACCESSORY MOUNTING INSTRUCTIONS Use these instructions in conjunction with your main manual to properly assemble your gas grill. Refer to the main manual for safety, operating, cleaning and maintenance
WINTER BOAT STORAGE SYSTEM SYSTÈME DE REMISAGE HIVERNAL POUR BATEAU
 MANUAL / MANUEL VIDEO WINTER BOAT STORAGE SYSTEM SYSTÈME DE REMISAGE HIVERNAL POUR BATEAU ASSEMBLY INSTRUCTIONS GUIDE D ASSEMBLAGE NAVIGLOO 14-18½ ft/pi FISHING BOAT! RUNABOUT! PONTOON BOAT! SAILBOAT (SAILBOAT
PERFORMER Silver. 22 1 2 inch (57 cm) Meijer.com
 Meijer.com") PERFORMER Silver CHARCOAL GRILL Read owner s guide before using the barbecue. Lea la Guía del propietario antes de utilizar la barbacoa. Lisez le guide d'utilisation avant d'utiliser le barbecue. 22 1
PERFORMER Silver CHARCOAL GRILL Read owner s guide before using the barbecue. Lea la Guía del propietario antes de utilizar la barbacoa. Lisez le guide d'utilisation avant d'utiliser le barbecue. 22 1
WEB page builder and server for SCADA applications usable from a WEB navigator
 Générateur de pages WEB et serveur pour supervision accessible à partir d un navigateur WEB WEB page builder and server for SCADA applications usable from a WEB navigator opyright 2007 IRAI Manual Manuel
DOCUMENTATION - FRANCAIS... 2
 DOCUMENTATION MODULE CATEGORIESTOPMENU MODULE CREE PAR PRESTACREA INDEX : DOCUMENTATION - FRANCAIS... 2 INSTALLATION... 2 CONFIGURATION... 2 LICENCE ET COPYRIGHT... 3 SUPPORT TECHNIQUE ET MISES A JOUR...
Garage Door Monitor Model 829LM
 Garage Door Monitor Model 829LM To prevent possible SERIOUS INJURY or DEATH from a closing garage door: NEVER permit children to operate or play with door control push buttons or remote control transmitters.
Guide d'installation rapide TFM-560X YO.13
 Guide d'installation rapide TFM-560X YO.13 Table of Contents Français 1 1. Avant de commencer 1 2. Procéder à l'installation 2 Troubleshooting 6 Version 06.08.2011 16. Select Install the software automatically
Thank you for choosing the Mobile Broadband USB Stick. With your USB Stick, you can access a wireless network at high speed.
 Thank you for choosing the Mobile Broadband USB Stick. With your USB Stick, you can access a wireless network at high speed. Note: This manual describes the appearance of the USB Stick, as well as the
Gestion des prestations Volontaire
 Gestion des prestations Volontaire Qu estce que l Income Management (Gestion des prestations)? La gestion des prestations est un moyen de vous aider à gérer votre argent pour couvrir vos nécessités et
Installation Guide. Ceramic Oval Handle Trim Kit
 Installation Guide Ceramic Oval Handle Trim Kit K-251, K-253, K-258, K-260, K-262, K-264, K-273, K-274 M product numbers are for Mexico (i.e. K-12345M) Los números de productos seguidos de M corresponden
Monitor LRD. Table des matières
 Folio :1/6 Table des matières 1.Installation du logiciel... 3 2.Utilisation du logiciel... 3 2.1.Description de la fenêtre de commande... 3 2.1.1.Réglage des paramètres de communication... 4 2.1.2.Boutons
Lavatory Faucet. Instruction Manual. Questions? 1-866-661-9606 customerservice@artikaworld.com
 Lavatory Faucet Instruction Manual rev. 19-01-2015 Installation Manual You will need Adjustable Wrench Adjustable Pliers Plumber s Tape Hardware list (included) Allen Key Socket wrench tool Important Follow
Le No.1 de l économie d énergie pour patinoires.
 Le No.1 de l économie d énergie pour patinoires. Partner of REALice system Economie d énergie et une meilleure qualité de glace La 2ème génération améliorée du système REALice bien connu, est livré en
DOCUMENTATION - FRANCAIS... 2
 DOCUMENTATION MODULE SHOPDECORATION MODULE PRESTASHOP CREE PAR PRESTACREA INDEX : DOCUMENTATION - FRANCAIS... 2 INSTALLATION... 2 Installation automatique... 2 Installation manuelle... 2 Résolution des
Fabricant. 2 terminals
 Specifications Fabricant Nominal torque (Nm) 65 Minimal torque (Nm) 0,63 Coil resistance - 20 C (ohms) 20 Rated current DC (A) 1 Rotor inertia (kg.m 2 ) 2.10-3 Weight (kg) 7,20 Heat dissipation continuous
DOCUMENTATION MODULE BLOCKCATEGORIESCUSTOM Module crée par Prestacrea - Version : 2.0
 DOCUMENTATION MODULE BLOCKCATEGORIESCUSTOM Module crée par Prestacrea - Version : 2.0 INDEX : DOCUMENTATION - FRANCAIS... 2 1. INSTALLATION... 2 2. CONFIGURATION... 2 3. LICENCE ET COPYRIGHT... 3 4. MISES
Notice Technique / Technical Manual
 Contrôle d accès Access control Encodeur USB Mifare ENCOD-USB-AI Notice Technique / Technical Manual SOMMAIRE p.2/10 Sommaire Remerciements... 3 Informations et recommandations... 4 Caractéristiques techniques...
Package Contents. System Requirements. Before You Begin
 Package Contents DWA-125 Wireless 150 USB Adapter CD-ROM (contains software, drivers, and manual) Cradle If any of the above items are missing, please contact your reseller. System Requirements A computer
J6669. www.fisher-price.com
 J6669 www.fisher-price.com 1 WARNING Prevent serious injury from falls or sliding out: ALWAYS use the front seat restraint system. The child tray is not designed to restrain the child in the stroller.
Once the installation is complete, you can delete the temporary Zip files..
 Sommaire Installation... 2 After the download... 2 From a CD... 2 Access codes... 2 DirectX Compatibility... 2 Using the program... 2 Structure... 4 Lier une structure à une autre... 4 Personnaliser une
Instructions Mozilla Thunderbird Page 1
 Instructions Mozilla Thunderbird Page 1 Instructions Mozilla Thunderbird Ce manuel est écrit pour les utilisateurs qui font déjà configurer un compte de courrier électronique dans Mozilla Thunderbird et
Warning: Failure to follow these warnings could result in property damage, or personal injury.
 Western Steel & Tube 1 Storage Locker Extended Storage Locker Storage Cabinet Assembly And Use Instructions Warning: Failure to follow these warnings could result in property damage, or personal injury.
Règlement sur le télémarketing et les centres d'appel. Call Centres Telemarketing Sales Regulation
 THE CONSUMER PROTECTION ACT (C.C.S.M. c. C200) Call Centres Telemarketing Sales Regulation LOI SUR LA PROTECTION DU CONSOMMATEUR (c. C200 de la C.P.L.M.) Règlement sur le télémarketing et les centres d'appel
Wireless G USB Network Adapter Adaptateur réseau G sans fil USB Adaptador de red USB Wireless G
 Wireless G USB Network Adapter Adaptateur réseau G sans fil USB Adaptador de red USB Wireless G www.ativasupport.com Ativa Tech Support US: 1-866-91-ATIVA (1-866-912-8482) 2006 Ativa. All rights reserved.
Contents Windows 8.1... 2
 Workaround: Installation of IRIS Devices on Windows 8 Contents Windows 8.1... 2 English Français Windows 8... 13 English Français Windows 8.1 1. English Before installing an I.R.I.S. Device, we need to
34 Desk + Monitor Shelf Escritorio 0,86m + Estante para monitor Bureau 0,86m + Étagère écran
 34 Desk + Monitor Shelf Escritorio 0,86m + Estante para monitor Bureau 0,86m + Étagère écran www.legarefurniture.com Assembly Montaje Assemblage Assembly Montaje Assemblage OR O OU Care & Finishing Thank
Quick Installation Guide TEW-AO12O
 Quick Installation Guide TEW-AO12O Table of of Contents Contents Français... 1 1. Avant de commencer... 1 2. Installation du matériel... 2 3. Montage... 4 Troubleshooting... 6 Version 10.04.2007 1. Avant
RÈGLEMENT SUR LES CEINTURES DE SÉCURITÉ ET LES ENSEMBLES DE RETENUE POUR ENFANTS R.R.T.N.-O. 1990, ch. M-35
 MOTOR VEHICLES ACT SEAT BELT ASSEMBLY AND CHILD RESTRAINT SYSTEM REGULATIONS R.R.N.W.T. 1990,c.M-35 LOI SUR LES VÉHICULES AUTOMOBILES RÈGLEMENT SUR LES CEINTURES DE SÉCURITÉ ET LES ENSEMBLES DE RETENUE
Stérilisation / Sterilization
 CONTENEURS Ecoster ecoster CONTAINERS Stérilisation / Sterilization Les conteneurs Ecoster aluminium sont prévus pour contenir des instruments et/ou des tissus pendant toute la durée de la stérilisation
How to Login to Career Page
 How to Login to Career Page BASF Canada July 2013 To view this instruction manual in French, please scroll down to page 16 1 Job Postings How to Login/Create your Profile/Sign Up for Job Posting Notifications
Embases pour raccordement G1/8 - G1/4
 Embases pour raccordement - Manifolds for spool valves Informations générales General information Embases modulaires pour distributeurs et Multiple sub-bases for and spool valves Embases monobloc pour
Cheque Holding Policy Disclosure (Banks) Regulations. Règlement sur la communication de la politique de retenue de chèques (banques) CONSOLIDATION
 Regulations. Règlement sur la communication de la politique de retenue de chèques (banques) CONSOLIDATION") CANADA CONSOLIDATION CODIFICATION Cheque Holding Policy Disclosure (Banks) Regulations Règlement sur la communication de la politique de retenue de chèques (banques) SOR/2002-39 DORS/2002-39 Current to
CANADA CONSOLIDATION CODIFICATION Cheque Holding Policy Disclosure (Banks) Regulations Règlement sur la communication de la politique de retenue de chèques (banques) SOR/2002-39 DORS/2002-39 Current to
3615 SELFIE. http://graffitiresearchlab.fr HOW-TO / GUIDE D'UTILISATION
 3615 SELFIE http://graffitiresearchlab.fr HOW-TO / GUIDE D'UTILISATION Hardware : Minitel Computer DIN FM545 45 connector (http://www.gotronic.fr/art-fiche-din-fm545-4747.htm) Cable Arduino compatible
Instructions pour mettre à jour un HFFv2 v1.x.yy v2.0.00
 Instructions pour mettre à jour un HFFv2 v1.x.yy v2.0.00 HFFv2 1. OBJET L accroissement de la taille de code sur la version 2.0.00 a nécessité une évolution du mapping de la flash. La conséquence de ce
igo instruction manual
 igo instruction manual 18 16 1 2 17 14 5 4 7 13 11 12 10 3 15 5 6 8 12 19 9 l h i m n j k o s1 s2 p 3 4 3 5 q 5 6 6 r t v1 5 w click! x1 u1 x2 v1 y z1 z2 US I I n s t r u c t i o n m a n u a l M u t s
MAGNESIUM ENGLISH FRANÇAIS ESPAÑOL
 MAGNESIUM ENGLISH ESPAÑOL ENGLISH INSTALLATION INSTRUCTIONS CAUTION: Before starting, turn off power at main circuit panel. IMPORTANT SAFETY INSTRUCTIONS When installing or using the lighting system, basic
Mesure chimique. Chemical measurement. Sonde de température Pt 1000 Inox Pt 1000 stainless steel. Ref : 703 262. Français p 1.
 Mesure chimique Chemical measurement Français p 1 English p 3 Sonde de température Pt 1000 Inox Pt 1000 stainless steel Version : 6010 Mesure chimique Sonde de température Pt 1000 Inox 1 Description La
Improving the breakdown of the Central Credit Register data by category of enterprises
 Improving the breakdown of the Central Credit Register data by category of enterprises Workshop on Integrated management of micro-databases Deepening business intelligence within central banks statistical
Contrôle d'accès Access control. Notice technique / Technical Manual
 p.1/18 Contrôle d'accès Access control INFX V2-AI Notice technique / Technical Manual p.2/18 Sommaire / Contents Remerciements... 3 Informations et recommandations... 4 Caractéristiques techniques... 5
POLICY: FREE MILK PROGRAM CODE: CS-4
 POLICY: FREE MILK PROGRAM CODE: CS-4 Origin: Authority: Reference(s): Community Services Department Cafeteria Services and Nutrition Education Division Resolution #86-02-26-15B.1 POLICY STATEMENT All elementary
lundi 3 août 2009 Choose your language What is Document Connection for Mac? Communautés Numériques L informatique à la portée du Grand Public
 Communautés Numériques L informatique à la portée du Grand Public Initiation et perfectionnement à l utilisation de la micro-informatique Microsoft Document Connection pour Mac. Microsoft Document Connection
SA-32 / SA-62 INSTRUCTION MANUAL - MANUEL D INSTRUCTIONS
 SA-32 / SA-62 INSTRUCTION MANUAL - MANUEL D INSTRUCTIONS 4 5 6 7 4 5 6 7 1. Telephone Paging Volume Control 1. Contrôle de volume Paging Téléphone 2. Microphone Volume Control 2. Contrôle volume du microphone
Thank you for choosing the Mobile Broadband USB Stick. With your USB Stick, you can access a wireless network at high speed.
 Thank you for choosing the Mobile Broadband USB Stick. With your USB Stick, you can access a wireless network at high speed. Note: This manual describes the appearance of the USB Stick, as well as the
APPENDIX 6 BONUS RING FORMAT
 #4 EN FRANÇAIS CI-DESSOUS Preamble and Justification This motion is being presented to the membership as an alternative format for clubs to use to encourage increased entries, both in areas where the exhibitor
WARNING: CA Instructions for use EN. Weight limits in rear-facing mode: 2.3-20.4 kg (5-45 lbs) Maximum height: 119 cm (47 inches)
 Maximum height: 119 cm (47 inches)") CA Instructions for use EN FICA1301I141 65 WARNING: Do not install or use this child restraint until you read and understand all instructions in this manual. To avoid serious injuries to your child, follow
CA Instructions for use EN FICA1301I141 65 WARNING: Do not install or use this child restraint until you read and understand all instructions in this manual. To avoid serious injuries to your child, follow
Paxton. ins-20605. Net2 desktop reader USB
 Paxton ins-20605 Net2 desktop reader USB 1 3 2 4 1 2 Desktop Reader The desktop reader is designed to sit next to the PC. It is used for adding tokens to a Net2 system and also for identifying lost cards.
accidents and repairs:
 accidents and repairs: putting the pieces together accidents et réparations : réunir le tout nobody can repair your Toyota like Toyota Unfortunately, accidents do happen. And the best way to restore your
calls.paris-neuroscience.fr Tutoriel pour Candidatures en ligne *** Online Applications Tutorial
 calls.paris-neuroscience.fr Tutoriel pour Candidatures en ligne Online Applications Tutorial 1/4 Pour postuler aux Appels d Offres de l ENP, vous devez aller sur la plateforme : calls.parisneuroscience.fr.
Propriétés de la matière. Material properties. Sonde de pression Pressure probe. Ref : 242 013. Français p 1. English p 3.
 Propriétés de la matière Material properties Français p 1 English p 3 Sonde de pression Pressure probe Version : 6010 Propriétés de la matière Sonde de pression 1 Principe et description 1.1 Principe La
RAPID 3.34 - Prenez le contrôle sur vos données
 RAPID 3.34 - Prenez le contrôle sur vos données Parmi les fonctions les plus demandées par nos utilisateurs, la navigation au clavier et la possibilité de disposer de champs supplémentaires arrivent aux
Compléter le formulaire «Demande de participation» et l envoyer aux bureaux de SGC* à l adresse suivante :
 FOIRE AUX QUESTIONS COMMENT ADHÉRER? Compléter le formulaire «Demande de participation» et l envoyer aux bureaux de SGC* à l adresse suivante : 275, boul des Braves Bureau 310 Terrebonne (Qc) J6W 3H6 La
Micro-ordinateurs, informations, idées, trucs et astuces utiliser le Bureau à distance
 Micro-ordinateurs, informations, idées, trucs et astuces utiliser le Bureau à distance Auteur : François CHAUSSON Date : 8 février 2008 Référence : utiliser le Bureau a distance.doc Préambule Voici quelques
Z-Axis Compliance Device Compliance en z
 Compensation for different vertical positions Collision recognition in Z-direction Protection of parts and work pieces Monitoring of the insertion forces during assembly operations Monitoring of the picking
Table des matières. Repose pieds. Montage de la plaque de siege 1:1 6:1. Garde boue Kit de transport
 Table des matières Edition 1 2009 06 01 EN 1201-1 Montage de la plaque de siege 1:1 Repose pieds 6:1 Reglage en profondeur Inclinaison du siege Reglage de l angle des poignees Positions des roues Roues
DOCUMENTATION - FRANCAIS... 2
 DOCUMENTATION MODULE PRETTYSLIDER MODULE PRESTASHOP CREE PAR PRESTACREA INDEX : DOCUMENTATION - FRANCAIS... 2 INSTALLATION... 2 Installation automatique... 2 Installation manuelle... 2 Résolution des problèmes...
MODE D EMPLOI USER MANUAL
 notice_cd 853:notice 9/01/08 15:08 Page 1 CAFETIÈRE À DOSETTES Coffee pad machine CD 853 GIACOMO MODE D EMPLOI USER MANUAL notice_cd 853:notice 9/01/08 15:08 Page 2 FRANÇAIS WHITE & BROWN vous félicite
Sit N Stand Double STOP ALTO ARRÊT. Instruction Manual Manual de Instrucciones Manuel d instruction
 Read all instructions BEFORE assembly and USE of product. KEEP INSTRUCTIONS FOR FUTURE USE. Lea todas las instrucciones ANTES de armar y USAR el producto. CONSERVE LAS INSTRUCCIONES PARA USO FUTURO. Lisez
Tutoriel de formation SurveyMonkey
 Tutoriel de formation SurveyMonkey SurveyMonkey est un service de sondage en ligne. SurveyMonkey vous permet de créer vos sondages rapidement et facilement. SurveyMonkey est disponible à l adresse suivante
AirCard 503 MODEM QUICK START GUIDE GUIDE DE DÉMARRAGE RAPIDE GUÍA DE INICIO RÁPIDO. www.sierrawireless.com
 AirCard 503 MODEM QUICK START GUIDE GUIDE DE DÉMARRAGE RAPIDE GUÍA DE INICIO RÁPIDO www.sierrawireless.com 1 English Windows Operating Systems This modem is TRU -Install enabled and does not require a
Guide d installation Deco Drain inc. DD200
 Guide d installation Deco Drain inc. DD200 Pour plus informations et pour télécharger les guides d installation en couleur, visitez notre site web. www.decodrain.com Soutien technique : Composez le : 514-946-8901
Confirmation du titulaire de la carte en cas de contestation de transaction(s) Cardholder s Certification of Disputed Transactions
 Cardholder s Certification of Disputed Transactions") Confirmation du titulaire de la carte en cas de contestation de transaction(s) Cardholder s Certification of Disputed Transactions Informations personnelles Nom/Prénom Name / Firstname Numéro de la carte
Confirmation du titulaire de la carte en cas de contestation de transaction(s) Cardholder s Certification of Disputed Transactions Informations personnelles Nom/Prénom Name / Firstname Numéro de la carte
that the child(ren) was/were in need of protection under Part III of the Child and Family Services Act, and the court made an order on
 was/were in need of protection under Part III of the Child and Family Services Act, and the court made an order on") ONTARIO Court File Number at (Name of court) Court office address Applicant(s) (In most cases, the applicant will be a children s aid society.) Full legal name & address for service street & number, municipality,
ONTARIO Court File Number at (Name of court) Court office address Applicant(s) (In most cases, the applicant will be a children s aid society.) Full legal name & address for service street & number, municipality,
Exemple PLS avec SAS
 Exemple PLS avec SAS This example, from Umetrics (1995), demonstrates different ways to examine a PLS model. The data come from the field of drug discovery. New drugs are developed from chemicals that
WILSON & FISHER BAYVIEW 40 INCH SQUARE PRINTED GLASS TOP TABLE
 WILSON & FISHER AYVIEW 40 INCH SQUARE PRINTED GLASS TOP TALE 1 GLASS TALE TOP 4 LEG FRAME 1 LEG SUPPORT M6 20 M6 15 4 8 12 ALLEN HEAD SCREW ALLEN HEAD SCREW SCREW CAPS 12 WASHERS 1 ALLEN WRENCH STEP 1
PARIS ROISSY CHARLES DE GAULLE
 GPS 2 34 1 E 49 0 46 N GPS* 2 56 56 E 49 0 12 N Votre contact / Your contact: et / and: Accueil : Cabines téléphoniques publiques Reception: Public telephone kiosks Navette Shuttle AÉROPORT DE TT CAR TRANSIT
city mini GT www.babyjogger.com
 city mini GT Assembly Instructions Instructions pour l'assemblage INSTRUCCIONES DEL ENSAMBLAJE IMPORTANT - Keep these instructions for future reference. Read these instructions carefully before use. Your
AssEMbly INsTRucTIONs INsTRucTIONs POuR l'assemblage INsTRuccIONEs DEl ENsAMblAJE IMPORTANT IMPORTANT IMPORTANTE www.babyjogger.
 city ELITE Assembly Instructions Instructions pour l'assemblage INSTRUCCIONES DEL ENSAMBLAJE IMPORTANT - Keep these instructions for future reference. Read these instructions carefully before use. Your
Manuel d utilisation MA TABLETTE MAGIQUE 3-6. ans. 2014 VTech Imprimé en Chine 91-009669-006 FR. Disney Visitez le site DisneyJunior.
 Manuel d utilisation MA TABLETTE MAGIQUE 3-6 ans Disney Visitez le site DisneyJunior.com 2014 VTech Imprimé en Chine 91-009669-006 FR INTRODUCTION Vous venez d acquérir Ma tablette magique de VTech. Félicitations!
LE FORMAT DES RAPPORTS DU PERSONNEL DES COMMISSIONS DE DISTRICT D AMENAGEMENT FORMAT OF DISTRICT PLANNING COMMISSION STAFF REPORTS
 FORMAT OF DISTRICT PLANNING COMMISSION STAFF REPORTS LE FORMAT DES RAPPORTS DU PERSONNEL DES COMMISSIONS DE DISTRICT D AMENAGEMENT A Guideline on the Format of District Planning Commission Staff Reports
MELTING POTES, LA SECTION INTERNATIONALE DU BELLASSO (Association étudiante de lʼensaparis-belleville) PRESENTE :
 PRESENTE :") MELTING POTES, LA SECTION INTERNATIONALE DU BELLASSO (Association étudiante de lʼensaparis-belleville) PRESENTE : Housing system est un service gratuit, qui vous propose de vous mettre en relation avec
MELTING POTES, LA SECTION INTERNATIONALE DU BELLASSO (Association étudiante de lʼensaparis-belleville) PRESENTE : Housing system est un service gratuit, qui vous propose de vous mettre en relation avec
Logitech Tablet Keyboard for Windows 8, Windows RT and Android 3.0+ Setup Guide Guide d installation
 Logitech Tablet Keyboard for Windows 8, Windows RT and Android 3.0+ Setup Guide Guide d installation English.......................................... 3 Français.........................................
Support Orders and Support Provisions (Banks and Authorized Foreign Banks) Regulations
 Regulations") CANADA CONSOLIDATION CODIFICATION Support Orders and Support Provisions (Banks and Authorized Foreign Banks) Regulations Règlement sur les ordonnances alimentaires et les dispositions alimentaires (banques
CANADA CONSOLIDATION CODIFICATION Support Orders and Support Provisions (Banks and Authorized Foreign Banks) Regulations Règlement sur les ordonnances alimentaires et les dispositions alimentaires (banques
APPENDIX 2. Provisions to be included in the contract between the Provider and the. Holder
 Page 1 APPENDIX 2 Provisions to be included in the contract between the Provider and the Obligations and rights of the Applicant / Holder Holder 1. The Applicant or Licensee acknowledges that it has read
Stainless Steel Solar Wall Light
 V 2.9 Stainless Steel Solar Wall Light User Manual Please read and understand all instructions before use.retain this manual for future reference. V 2.9 Stainless Steel Solar Wall Light SPECIFICATIONS
city mini www.babyjogger.com
 city mini Assembly Instructions Instructions pour l'assemblage INSTRUCCIONES DEL ENSAMBLAJE IMPORTANT - Keep these instructions for future reference. Read these instructions carefully before use. Your
RULE 5 - SERVICE OF DOCUMENTS RÈGLE 5 SIGNIFICATION DE DOCUMENTS. Rule 5 / Règle 5
 RULE 5 - SERVICE OF DOCUMENTS General Rules for Manner of Service Notices of Application and Other Documents 5.01 (1) A notice of application or other document may be served personally, or by an alternative
WiFi Security Camera Quick Start Guide. Guide de départ rapide Caméra de surveillance Wi-Fi (P5)
") #45 #46 WiFi Security Camera Quick Start Guide Guide de départ rapide Caméra de surveillance Wi-Fi (P5) #47 Start Here 1 Is this you? TECH SUPPORT CTRL ALT DEL 2 If yes, turn to page three 1 3 If not,
#45 #46 WiFi Security Camera Quick Start Guide Guide de départ rapide Caméra de surveillance Wi-Fi (P5) #47 Start Here 1 Is this you? TECH SUPPORT CTRL ALT DEL 2 If yes, turn to page three 1 3 If not,
Principe de TrueCrypt. Créer un volume pour TrueCrypt
 Sommaire : Principe de TrueCrypt...1 Créer un volume pour TrueCrypt...1 Premier montage...6 Réglages...8 Save Currently Mounted Volumes as Favorite...8 Settings > Preferences...9 TrueCrypt Traveller pour
Quick Setup Guide Guide de configuration rapide. Tablet Device SGPT12 Series Tablette électronique Série SGPT12
 Quick Setup Guide Guide de configuration rapide Tablet Device SGPT12 Series Tablette électronique Série SGPT12 Welcome / Bienvenue Congratulations on your purchase of this Xperia Tablet S. This Quick Setup
LOGICIEL D'ADMINISTRATION POUR E4000 & G4000 MANAGEMENT SOFTWARE FOR E4000 & G4000
 LOGICIEL D'ADMINISTRATION POUR E4000 & G4000 MANAGEMENT SOFTWARE FOR E4000 & G4000 TABLE DES MATIÈRES TITRE PAGE Présentation - - - - - - - - - - - - - - - - - - - - - - - - - - - - - - - - - - - -4 Le
Serrures Locksets LAGUNE. Serrures et paumelles Locksets and hinges. LES + PRODUITS The + product. Design Certifié TUV Nombreuses versions.
 Serrures Locksets LAGUNE Caractéristiques techniques générales Montage sur encoche A Réversible À cylindre européen panneton DIN (norme DIN 1) Rappel du pêne à la clé Pour porte en verre trempé de et mm
Insérer des images dans Base
 Insérer des images dans Base Version 1.0 du 30.05.2006 Réalisé avec : OOo 2.0.2 Plate-forme / Os : Toutes Distribué par le projet fr.openoffice.org Sommaire 1 Présentation...3 2 Quelques notions initiales...3
THE LAW SOCIETY OF UPPER CANADA BY-LAW 19 [HANDLING OF MONEY AND OTHER PROPERTY] MOTION TO BE MOVED AT THE MEETING OF CONVOCATION ON JANUARY 24, 2002
![THE LAW SOCIETY OF UPPER CANADA BY-LAW 19 [HANDLING OF MONEY AND OTHER PROPERTY] MOTION TO BE MOVED AT THE MEETING OF CONVOCATION ON JANUARY 24, 2002](/thumbs/19/276456.jpg "THE LAW SOCIETY OF UPPER CANADA BY-LAW 19 [HANDLING OF MONEY AND OTHER PROPERTY] MOTION TO BE MOVED AT THE MEETING OF CONVOCATION ON JANUARY 24, 2002") 2-aes THE LAW SOCIETY OF UPPER CANADA BY-LAW 19 [HANDLING OF MONEY AND OTHER PROPERTY] MOTION TO BE MOVED AT THE MEETING OF CONVOCATION ON JANUARY 24, 2002 MOVED BY SECONDED BY THAT By-Law 19 [Handling
2-aes THE LAW SOCIETY OF UPPER CANADA BY-LAW 19 [HANDLING OF MONEY AND OTHER PROPERTY] MOTION TO BE MOVED AT THE MEETING OF CONVOCATION ON JANUARY 24, 2002 MOVED BY SECONDED BY THAT By-Law 19 [Handling
Institut français des sciences et technologies des transports, de l aménagement
 Institut français des sciences et technologies des transports, de l aménagement et des réseaux Session 3 Big Data and IT in Transport: Applications, Implications, Limitations Jacques Ehrlich/IFSTTAR h/ifsttar
Parts List Lista de Piezas Liste de pi ces
 Parts List Lista de Piezas Liste de pi ces - AUTO + Line/L nea/line 5 /10 Stitches / Puntos / Points - AUTO + Line/L nea/line 6 / 12 / 20 / Stitches / Puntos / Points A registered trademark of The Singer
Utiliser une WebCam. Micro-ordinateurs, informations, idées, trucs et astuces
 Micro-ordinateurs, informations, idées, trucs et astuces Utiliser une WebCam Auteur : François CHAUSSON Date : 8 février 2008 Référence : utiliser une WebCam.doc Préambule Voici quelques informations utiles