HemoCue Plasma/Low Hb Operating manual Manual de funcionamiento Manuel d utilisation
|
|
|
- Henriette Fradette
- il y a 10 ans
- Total affichages :
Transcription
1 HemoCue Plasma/Low Hb Operating manual Manual de funcionamiento Manuel d utilisation

2

3 GB/US Table of Contents HemoCue Plasma/Low Hb system...5 Components...6 Start up...8 Measuring Sample material...10 Maintenance...14 Troubleshooting Guide...16 Specifications...25 ES Tabla de contenido Sistema HemoCue Plasma/Low Hb...5 Componentes...6 Activación...8 Medición Tipo de muestra...10 Mantenimiento...14 Guía de resolución de problemas...19 Especificaciones...36

4 FR Table des matières Système HemoCue Plasma/Low Hb...5 Composants...6 Démarrage...8 Mesure Échantillons...10 Maintenance...14 Guide de dépannage...22 Caractéristiques techniques...47

5 HemoCue Plasma/Low Hb system Sistema HemoCue Plasma/Low Hb Système HemoCue Plasma/Low Hb GB/US ES FR Thank you for choosing the HemoCue Plasma/Low Hb system. The system is used for quantative determination of low levels of hemoglobin in plasma and serum specimens, aqueous solutions, or stored or banked erythrocytes using a specially designed photometer, the HemoCue Plasma/Low Hb Photometer and specially designed microcuvettes, the HemoCue Plasma/Low Hb Microcuvettes. The HemoCue Plasma/Low Hb Photometer is only to be used with HemoCue Plasma/Low Hb Microcuvettes. The HemoCue Plasma/Low Hb Microcuvettes are for In-Vitro diagnostic use only. All system components are designed and manufactured to provide maximum safety. Any other use of the system may impair the safety. Gracias por elegir el sistema HemoCue Plasma/Low Hb. El sistema se utiliza para la determinación cuantitativa de bajas concentraciones de hemoglobina en muestras de plasma y suero, soluciones acuosas o eritrocitos conservados o procedentes de un banco de sangre, utilizando un fotómetro diseñado especialmente para ello, el HemoCue Plasma/Low Hb Photometer, y unas microcubetas especialmente diseñadas, las HemoCue Plasma/Low Hb Microcuvettes. El HemoCue Plasma/Low Hb Photometer sólo debe usarse con las HemoCue Plasma/Low Hb Microcuvettes. Las HemoCue Plasma/Low Hb Microcuvettes están destinadas únicamente para el diagnóstico in vitro. Todos los componentes del sistema han sido diseñados y fabricados para proporcionar la máxima seguridad. Cualquier otro uso del sistema puede poner en riesgo la seguridad. Merci d avoir choisi le système HemoCue Plasma/Low Hb. Ce système est utilisé pour la détermination quantitative de faibles taux d hémoglobine dans les échantillons de plasma et de sérum, dans les solutions aqueuses ou des solutions d érythrocytes conservées ou stockées, en utilisant le photomètre HemoCue Plasma/Low Hb Photometer et les consommables HemoCue Plasma/Low Hb Microcuvettes spécialement conçus à cet effet. Le HemoCue Plasma/Low Hb Photometer ne doit être utilisé qu avec le consommable HemoCue Plasma/Low Hb Microcuvettes. Les consommables HemoCue Plasma/Low Hb Microcuvettes ne peuvent être utilisés que pour le diagnostic in vitro. Tous les composants du système sont conçus et fabriqués pour offrir une sécurité maximale. Toute autre utilisation du système peut compromettre la sécurité. 5


6 Components Componentes Composants

7 GB/US 1. HemoCue Plasma/Low Hb Photometer* 2. AC adapter** 3. 5 alkaline type AA batteries*** 4. A vial of HemoCue Plasma/Low Hb Microcuvettes*** 5. HemoCue Plasma/Low Hb Operating Manual 6. HemoCue Cleaner Open the carton and lift out the photo-meter and accessories. If no AC power is available, use 5 alkaline type AA batteries. On the bottom of the photometer there is a lid covering the battery compartment. Press the flap to remove the lid. Place the batteries in the battery compartment and replace the lid. Consult local environmental authorities for proper disposal of batteries. * Do not open the cover of the photometer. Note: The warranty is void if the cover of the photometer has been opened. ** Only use AC adapters listed under specifications. *** Not included. For infomation about HemoCue Plasma/ Low Hb Microcuvettes please contact your HemoCue distributor. ES 1. HemoCue Plasma/Low Hb Photometer* 2. Adaptador de CA** 3. 5 pilas alcalinas AA*** 4. 1 contenedor de HemoCue Plasma/ Low Hb Microcuvettes*** 5. Manual de funcionamiento de HemoCue Plasma/Low Hb 6. HemoCue Cleaner Abra la caja y extraiga el fotómetro y los accesorios. Si no dispone de corriente alterna, use 5 pilas alcalinas AA. En la base del fotómetro hay una tapa para el compartimento de las pilas. Presione la lengüeta para extraerla. Coloque las pilas en el compartimento y vuelva a colocar la tapa. Deseche las pilas gastadas conforme a la normativa medioambiental vigente. * No abra el fotómetro. Nota: la garantía quedará anulada si se ha abierto el fotómetro. ** Use solo los adaptadores de CA que figuran en las especificaciones. *** No se incluyen. Para obtener más información acerca de las microcubetas HemoCue Plasma/Low Hb Microcuvettes, consulte al distribuidor local de HemoCue. FR 1. HemoCue Plasma/Low Hb Photometer* 2. Adaptateur secteur** 3. 5 piles de type AA*** 4. Un flacon de consommables HemoCue Plasma/Low Hb Microcuvettes*** 5. Manuel d utilisation HemoCue Plasma/Low Hb 6. Tampon HemoCue Cleaner Ouvrir l emballage cartonné et sortir le photomètre et les accessoires. Si l alimentation secteur n est pas disponible, utiliser 5 piles alcalines de type AA. À l arrière du photomètre, un couvercle ferme le compartiment à piles. Appuyer sur le volet pour retirer le couvercle. Placer les piles dans le compartiment à piles et replacer le couvercle. Pour l élimination des piles usagées, consulter les autorités locales compétentes. * Ne pas ouvrir le boîtier du photomètre Remarque : La garantie devient caduque dès l ouverture du photomètre. ** Utiliser uniquement les adaptateurs secteur mentionnés dans la liste des caractéristiques. *** Non fournies. Pour plus d informations sur les consommables HemoCue Plasma/Low Hb Microcuvettes, contacter le distributeur HemoCue. 7

8 Start up Activación Démarrage 1 3a 4 2 3b 5 3c 8

9 GB/US Make sure the photometer is placed horizontally and on a stable surface. Only use AC adapters approved by HemoCue, as listed under Technical Specifications. 1. If AC power is available, use the AC adapter. 2. If no power is available, insert 5 alkaline type AA batteries. 3. Turn the switch to the ON position. All symbols appear on the display, and after approximately 10 seconds the letter LHb will be displayed. 4. Pull out the cuvette holder to its loading position. This point, which should not be exceeded, is easily established by paying attention to a distinct stop. 5. After approximately 15 seconds the indication READY appears on the display together with three flashing dashes. The photometer is ready for measurement. Turn the photometer off by switching power switch to the OFF position. ES Asegúrese de que el fotómetro está en posición horizontal y en una superficie estable. Utilice solo los adaptadores de CA aprobados por HemoCue y que se recogen en "Especificaciones técnicas". 1. Si dispone de corriente alterna, utilice el adaptador de CA. 2. Si no dispone de corriente, introduzca 5 pilas alcalinas AA. 3. Ponga el interruptor en posición "ON". En la pantalla aparecen todos los símbolos, y tras unos 10 segundos se mostrarán las letras "LHb". 4. Extraiga el soporte de la cubeta hasta la posición de carga. Esta posición no debe sobrepasarse y se puede reconocer fácilmente si se está atento a una detención perceptible. 5. Tras unos 15 segundos, aparece en la pantalla la indicación "READY" junto con tres líneas intermitentes. El fotómetro está listo para la medición. Apague el fotómetro poniendo el interruptor en posición "OFF". FR Vérifier que le photomètre est bien placé à l horizontale sur une surface stable. N utiliser que les adaptateurs secteur agréés par HemoCue, conformément à la section «Caractéristiques techniques». 1. Si l alimentation secteur est disponible, utiliser l adaptateur secteur. 2. Si l alimentation secteur n est pas disponible, utiliser 5 piles alcalines de type AA. 3. Placer l interrupteur sur «ON». Tous les symboles s affichent sur l écran, puis après environ 10 secondes, les lettres «LHb» apparaissent. 4. Retirer lentement le support de cuvette en position de charge. Ce point ne doit pas être dépassé. Il se repère facilement par un arrêt distinct. 5. Après environ 15 secondes l indication «READY» (prêt) s affiche sur l écran avec trois tirets clignotants. Le photomètre est prêt à effectuer une mesure. Pour éteindre le photomètre, placer l interrupteur sur «OFF». 9

10 Measuring Sample material Medición Mesure Tipo de muestra Échantillons

11 GB/US Note: Always handle blood specimens with care, as they might be infectious. Always wear protective gloves when handling blood specimens. 1. To perform a test, the cuvette holder should be in its loading position. The display will show three flashing dashes and READY. Remove a HemoCue Plasma/Low Hb Microcuvette from the vial. 2. Place a drop of well mixed sample onto a hydrophobic surface using a suitable transfer device. 3. Fill the microcuvette in one continuous process. Do NOT refill. 4. Wipe off excess sample from the outside of the microcuvette with a clean, lintfree wipe. Do not touch the filling end of the microcuvette. If a second sample is to be taken, fill a new microcuvette from a new drop of sample. This should not be done until the measurement of the first sample is completed. 5. Look for air bubbles in the filled microcuvette. If present, discard it and fill a new microcuvette from a new drop of sample. Small bubbles around the edge can be ignored. ES Nota: manipule las muestras de sangre con cuidado, ya que pueden ser infecciosas. Lleve siempre guantes protectores al manipular muestras de sangre. 1. Para realizar una prueba, el soporte de la cubeta debe encontrarse en la posición de carga. En la pantalla aparecerán tres líneas intermitentes y "READY". Extraiga una microcubeta HemoCue Plasma/Low Hb Microcuvette del contenedor. 2. Coloque una gota de la muestra bien mezclada en una superficie hidrofóbica utilizando un instrumento de traslado adecuado. 3. Llene la microcubeta en un único proceso continuo. No la rellene! 4. Limpie la muestra sobrante del exterior de la microcubeta con un paño absorbente y sin pelusa. No toque el extremo de llenado de la microcubeta. En caso de que deba tomarse una segunda muestra, llene una nueva microcubeta con una nueva gota de la muestra. Esto no debe realizarse hasta que haya finalizado la medición de la primera muestra. 5. Compruebe si hay burbujas de aire en la microcubeta que se ha llenado. Si las hubiera, deséchela y llene una nueva microcubeta con una nueva gota de la muestra. No tenga en cuenta las pequeñas burbujas alrededor del borde. FR Remarque : Pour éviter tout risque de contamination, il est recommandé de manipuler les échantillons de sang avec la plus grande précaution. Toujours mettre des gants de protection avant de manipuler des échantillons de sang. 1. Pour effectuer un test, le support de cuvette doit se trouver en position de charge. Trois tirets clignotants et l indication «READY» apparaissent à l écran. Retirer le consommable HemoCue Plasma/Low Hb Microcuvette du flacon. 2. À l aide d une pipette ou d un autre dispositif de transfert, placer une goutte d échantillon bien mélangé sur une surface hydrophobe. 3. Remplir la microcuvette d un seul trait. Ne JAMAIS la remplir une deuxième fois! 4. Nettoyer la surface externe de la microcuvette pour en éliminer toute trace de sang, à l aide d un chiffon propre et non pelucheux. Ne pas toucher l extrémité de remplissage de la microcuvette. Si un deuxième échantillon doit être prélevé, remplir une nouvelle microcuvette avec une nouvelle goutte d échantillon. Cette opération ne doit pas être effectuée avant que l analyse du premier échantillon soit terminée. 5. Vérifier que la microcuvette remplie ne contient pas de bulles d air. S il y en a, jeter la microcuvette et remplir une nouvelle microcuvette avec une nouvelle goutte d échantillon. De petites bulles d air en périphérie peuvent être ignorées. 11

12

13 GB/US Note: Visually turbid samples should be filtered before analysis using a 0.2 µm filter. 6. Place the microcuvette into the cuvette holder and start measurement as soon as possible but no later than 60 seconds after filling the microcuvette by gently pushing the cuvette holder to its measuring position. Note: Slamming the cuvette holder into place with undue force will cause splashing of the sample material onto the optical surfaces. 7. During measurement MEASURING and three fixed dashes will be shown. 8. After approximately seconds, the hemoglobin value is displayed. The result will remain on the display as long as the cuvette holder is in its measuring position. Do not remeasure the microcuvette. 9. Always handle blood specimens with care, as they might be infectious. Consult local environmental authorities for proper disposal. ES Nota: las muestras turbias deben filtrarse antes del análisis usando un filtro de 0,2 µm. 6. Coloque la microcubeta en el soporte de la cubeta y empiece la medición cuanto antes, como muy tarde 60 segundos después de llenar la microcubeta, empujando con cuidado el soporte de la cubeta hasta la posición de medición. Nota: volver a poner la cubeta en su sitio con una fuerza excesiva provocará que el material de la muestra salpique a las superficies ópticas. 7. Durante la medición aparecerá "MEASURING" y tres líneas fijas. 8. Tras aproximadamente segundos, se mostrará el valor de hemoglobina. El resultado permanecerá en la pantalla mientras el soporte de la cubeta esté en la posición de medición. No debe repetirse la medición de la microcubeta. 9. Manipule las muestras de sangre con cuidado, ya que pueden ser infecciosas. Consulte a las autoridades medioambientales locales respecto a la forma correcta de desecharlas. FR Remarque : Les échantillons visiblement turbides doivent être filtrés avant analyse à l aide d un filtre de 0,2 µm. 6. Placer la microcuvette dans le support de cuvette puis commencer la mesure le plus rapidement possible et au plus tard dans les 60 secondes suivant le remplissage de la microcuvette, en poussant délicatement le support de cuvette en position de mesure. Remarque : Pousser brutalement le support de cuvette fera gicler des gouttes d échantillon sur les surfaces optiques. 7. Pendant la mesure, l indication «MEASURING» (mesure) et trois tirets fixes s affichent sur l écran. 8. Au bout de 15 à 60 secondes, le taux d hémoglobine s affiche. Le résultat reste affiché tant que le support de microcuvette est maintenu en position de mesure. Ne pas effectuer de nouvelle mesure avec la microcuvette. 9. Pour éviter tout risque de contamination, il est recommandé de manipuler les échantillons de sang avec la plus grande précaution. Consulter les autorités locales compétentes en matière d environnement pour une élimination appropriée. 13

14 Maintenance Mantenimiento Maintenance
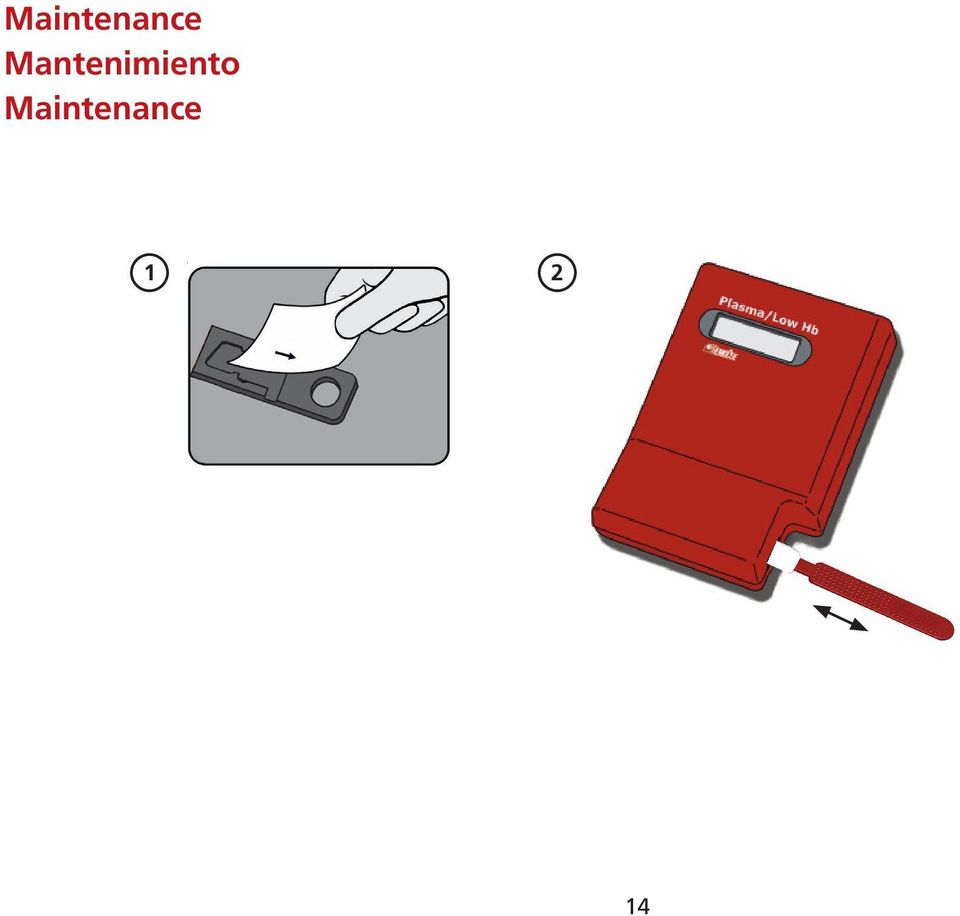
15 GB/US The cuvette holder should be cleaned after each day of use. Make sure that the photometer is turned off and that the display is blank. 1. Pull the cuvette holder completely out. Clean the cuvette holder with alcohol (20 70 %) or mild detergent. The cuvette holder can also be autoclaved.the cover may be cleaned with alcohol (20 70 %) or a mild detergent. 2. If the optical parts becomes dirty, an error code will be displayed. Before cleaning the optical parts, the cuvette holder should be completely removed according to section 1 above. To clean the optical parts inside the analyzer, push a HemoCue Cleaner swab into the opening of optic unit, but only as far as until the white part of the cleaner swab is inside the optic unit (Do not push the cleaner further than this for optimal cleaning). Move the cleaner back and fourth 5 10 times. If the cleaner swab becomes stained, repeat with a new cleaner. Wait 15 minutes before replacing the cuvette holder. ES El soporte de la cubeta debe limpiarse todos los días después de su uso. Compruebe que el fotómetro esté apagado y la pantalla desactivada. 1. Extraiga completamente el soporte de la cubeta y límpielo con alcohol (20-70 %) o con un detergente suave. El soporte de la cubeta también se puede esterilizar en autoclave. La tapa se puede limpiar con alcohol (20-70 %) o con un detergente suave. 2. Si se ensucian las piezas ópticas, aparecerá un código de error. Antes de limpiar las piezas ópticas, debe extraerse completamente el soporte de la cubeta según lo indicado en el apartado 1. Para limpiar las piezas ópticas del interior del fotómetro, introduzca un bastoncillo HemoCue Cleaner en la apertura de la unidad óptica, pero solo hasta que la parte blanca del bastoncillo limpiador esté dentro de la unidad óptica (para una limpieza óptima, no intente introducirlo más). Mueva el limpiador adelante y atrás entre 5 y 10 veces. Si el bastoncillo limpiador se mancha, repita el procedimiento con uno nuevo. Espere 15 minutos antes de volver a colocar el soporte de la cubeta. FR Le support de cuvette doit être nettoyé tous les jours. S assurer que le photomètre est éteint et que l écran est inactivé. 1. Retirer complètement le support de cuvette. Nettoyer le support de cuvette à l alcool (20 à 70 %) ou avec un détergent doux. Le support de cuvette peut aussi passer à l autoclave. L extérieur peut être nettoyé avec de l alcool (de 20 à 70 %) ou un détergent doux. 2. Si des pièces optiques se salissent, un code erreur s affiche. Avant de procéder au nettoyage de toute pièce optique, le support de cuvette doit être entièrement retiré comme indiqué en section 1 ci-dessus. Pour nettoyer les pièces optiques à l intérieur du photomètre, introduire un tampon HemoCue Cleaner dans l ouverture de l unité optique, mais uniquement jusqu à ce que la partie blanche du tampon (Pour un nettoyage optimal, ne pas introduire le tampon au-delà de cette limite). Faire glisser le tampon d avant en arrière de 5 à 10 fois. Si le tampon est taché, recommencer l opération avec un nouveau tampon. Attendre 15 minutes avant de remettre le support de cuvette en place. 15

16 GB/US Symptom Explanation Action The photometer shows an error code. May be a temporary fault. Turn off the photometer and turn it on again after 30 seconds. Take a new microcuvette and repeat the measurement. If the problem continues, see specific error code below. ERROR 900 No stable endpoint of the measurement is found within the time range. 1. The microcuvette is faulty. 2. The circuit board is out of order. ERROR Disturbances on main power supply. 2. The optronic unit is out of order. ERROR Dirty optical parts or faulty electronics or optronic unit. ERROR Unstable blank value. The photometer might be cold. 1a. Check the expiration date for the microcuvettes. 1b. Take a new microcuvette and repeat the measurement. 2. The photometer needs service. Contact your distributor. 1 Change the wall socket or use battery power. 2. The photometer needs service. Contact your distributor. 1a. Turn off the photometer and clean the optical parts as descriped in the Maintance section. 1b. The photometer needs service. Contact your distributor. 1. Turn off the photometer and allow it to reach room temperature. If the problem continues, the photometer needs service. Contact your distributor. ERROR The battery power is too low. 1a. The batteries need to be replaced. Turn off the photometer and replace the batteries, 5 alkaline type AA. 1b. Use the AC adapter. ERROR 908 Troubleshooting Guide If you are unable to resolve the problem by following this Troubleshooting Guide, please contact your local HemoCue distributor or HemoCue AB. The photometer should be cleaned as recommended under Maintenance prior to service or disposal. Consult local environmental authorities for proper disposal. The photometer has no serviceable parts. Do not open the cover of the photometer. Note: The warranty is void if the cover of the photometer has been opened. The absorbance is too high. 1. Light blocking item in the cuvette holder 1a. Check that the photometer and microcuvettes are used according to the HemoCue Plasma/Low Hb operating manual and package insert. 1b. The photometer needs service. Contact your distributor. ERROR 916 High turbidity sample Filter visually turbid sample before analysis. ERROR 918 Hardware or internal error The photometer needs service. Contact your distributor. 16

17 Symptom Explanation Action HHH 1. Measured value exceeds 30.0 g/l (3.00 g/dl, 3,000 mg/dl, 1.90 mmol/l). No characters on the display. 1. The photometer is not receiving power. 2. If on battery power, the batteries need to be replaced. 3. The display is out of order. The display contains erroneous characters. 1. The display is out of order. 2. The microprocessor is out of order. The display shows LOWBAT. 1. The batteries need to be replaced. 2. If on AC power, the AC adapter or the circuit board is out of order. The display does not switch from LHb to READY or from READY to MEASURING. 1a. Check expiry dates of the microcuvettes. 1b. For sample above 30.0 g/l (3.00 g/dl, 3,000 mg/dl, 1.90 mmol/l) use the HemoCue system. 1a. Check that the AC adapter is connected to the photometer and the AC power supply. 1b. Check that the cable is not damaged. 2. Turn off the photometer and replace the batteries, 5 alkaline type AA. 3. The photometer needs service. Contact your distributor. 1. The photometer needs service. Contact your distributor. 2. The photometer needs service. Contact your distributor. 1. Turn off the photometer and replace the batteries, 5 alkaline type AA. 2a. Check that the AC adapter is properly connected and working. 2b. The photometer needs service. Contact your distributor. 1. The cuvette holder sensor is out of order. 1. The photometer needs service. Contact your distributor. 17

18 Symptom Explanation Action Measurement on control materials are out of range either too high or too low. Measurement on samples are higher or lower than antipicipated. 1. The microcuvettes are beyond their expiry date, damaged or have been improperly stored. 2. The optical eye of the microcuvette is contaminated. 3. The controls are beyond their expiry dates or have been improperly stored. 4. The control has not been mixed properly and/or is not at room temperature. 5. The microcuvette has not been placed in the photometer within 60 seconds of filling. 6. Air bubbles in the microcuvette. 7. The optical parts are dirty. 8. The control is not suitable for use with the HemoCue Plasma/Low Hb system. 9. The calibration of the photometer has been changed. 1. Improper sampling technique. 2. The microcuvettes are beyond their expiry date, damaged or have been improperly stored. 3. The optical eye of the microcuvette is contaminated. 4. The sample has not been mixed properly. 5. Air bubbles in the microcuvette. 6. The optical parts are dirty. 7. The calibration of the photometer has been changed. 1. Check the expiry date and the storage conditions of the microcuvettes. 2. Remeasure the control with a new microcuvette. 3. Check the expiry date and the storage conditions of the control. Remeasure the control with a new microcuvette. If the problem continues, contact the manufacturer of the control. 4. Make sure that the control is mixed properly and at room temperature. If the problem continues, contact the manufacturer of the control. 5. Remeasure the control with a new microcuvette. 6. Check the microcuvette for air bubbles. Remeasure the control with a new microcuvette. 7. Clean the optical parts as described in the Maintance section. 8. Contact your distributor for control information. 9. The photometer needs service. Contact your distributor. 1. See the Measuring section in this manual. 2. Check the expiry date and the storage conditions of the microcuvettes. 3. Remeasure the sample with a new microcuvette. 4. Make sure the sample is properly mixed. 5. Check the microcuvette for air bubbles. Remeasure the sample with a new microcuvette. 6. Clean the optical parts as described in the maintance section. 7. The photometer needs service. Contact your distributor. 18

19 Indicio Explicación Medida El fotómetro muestra un código de error. Puede ser un fallo temporal. Apague el fotómetro y vuelva a encenderlo después de 30 segundos. Repita la medición con una nueva microcubeta. Si el problema persiste, consulte el código de error específico más abajo. ERROR 900 No se encuentra una variable estable de la medición dentro del intervalo temporal. 1. La microcubeta es defectuosa. 2. La placa base está averiada. ERROR Interrupciones en el suministro principal de corriente. 2. La unidad de electrónica óptica está averiada. ERROR Piezas ópticas sucias o unidad electrónica o electrónica óptica defectuosa. ERROR Valor en blanco inestable. Puede que el fotómetro esté frío. 19 1a. Compruebe la fecha de caducidad de las microcubetas. 1b. Repita la medición con una nueva microcubeta. 2. El fotómetro necesita ser reparado. Contacte con su distribuidor. 1 Cambie el enchufe o use pilas. 2. El fotómetro necesita ser reparado. Contacte con su distribuidor. 1a. Apague el fotómetro y limpie las piezas ópticas tal como se describe en el apartado Mantenimiento. 1b. El fotómetro necesita ser reparado. Contacte con su distribuidor. 1. Apague el fotómetro hasta que alcance la temperatura ambiente. Si el problema persiste, el fotómetro necesita ser reparado. Contacte con su distribuidor. ERROR La carga de las pilas es demasiado baja. 1a. Deben cambiarse las pilas. Apague el fotómetro y cambie las pilas: 5 pilas alcalinas AA. 1b. Utilice el adaptador de CA. ERROR 908 Guía de resolución de problemas ES Si no consigue resolver un problema con la ayuda de esta guía, póngase en contacto con el distribuidor local de HemoCue o con HemoCue AB. Antes de reparar o desechar el fotómetro, debe limpiarse siguiendo las recomendaciones del apartado Mantenimiento. Consulte a las autoridades medioambientales locales respecto a la forma correcta de desecharlas. El fotómetro no contiene piezas que puedan ser reparadas. No abra el fotómetro. Nota: La garantía quedará anulada si se ha abierto el fotómetro. Absorbancia demasiado alta. 1. Hay un objeto que bloquea la luz en el soporte para la cubeta. 1a. Compruebe que el fotómetro y las microcubetas se utilicen conforme al manual de funcionamiento y el prospecto del HemoCue Plasma/Low Hb. 1b. El fotómetro necesita ser reparado. Contacte con su distribuidor.

20 Indicio Explicación Medida ERROR 916 Muestra con una turbiedad alta. Filtre las muestras turbias antes de analizarlas. ERROR 918 Error de hardware o interno. El fotómetro necesita ser reparado. Contacte con su distribuidor. HHH 1. El valor medido supera los 30,0 g/l (3,00 g/dl, mg/dl, 1,90 mmol/l). No hay caracteres en la pantalla. La pantalla contiene caracteres erróneos. La pantalla muestra "LOWBAT". La pantalla no cambia de "LHb" a "READY" o de "READY" a "MEASURING". 1. El fotómetro no recibe corriente. 2. Si funciona con pilas, deben sustituirse por unas nuevas. 3. La pantalla está averiada. 1. La pantalla está averiada. 2. El microprocesador está averiado. 1. Deben cambiarse las pilas. 2. Si funciona con CA, el adaptador de CA o la placa base están averiados. 1. El sensor del soporte de la cubeta está averiado. 1a. Ver las fechas de caducidad de las microcubetas. 1b. Para las muestras con más de 30,0 g/l (3,00 g/dl, mg/dl, 1,90 mmol/l), utilice el sistema HemoCue a. Compruebe que el adaptador de CA esté enchufado al fotómetro y a la toma de CA. 1b. Compruebe que el cable no esté dañado. 2. Apague el fotómetro y cambie las pilas: 5 pilas alcalinas AA. 3. El fotómetro necesita ser reparado. Contacte con su distribuidor. 1. El fotómetro necesita ser reparado. Contacte con su distribuidor. 2. El fotómetro necesita ser reparado. Contacte con su distribuidor. 1. Apague el fotómetro y cambie las pilas: 5 pilas alcalinas AA. 2a. Compruebe que el adaptador de CA esté bien conectado y que funcione. 2b. El fotómetro necesita ser reparado. Contacte con su distribuidor. 1. El fotómetro necesita ser reparado. Contacte con su distribuidor. 20

21 Indicio Explicación Medida Las mediciones del material de control están fuera del intervalo: son demasiado altas o demasiado bajas. Las mediciones de muestras son más altas o más bajas de lo previsto. 1. Las cubetas han caducado, están dañadas o han sido guardadas de forma inadecuada. 2. El ojo óptico de la microcubeta está contaminado. 3. Los controles han caducado o han sido guardados de forma inadecuada. 4. El control no está bien mezclado o no está a la temperatura ambiente. 5. La microcubeta no se ha colocado en el fotómetro en los 60 segundos siguientes al llenado. 6. Hay burbujas de aire en la microcubeta. 7. Las piezas ópticas están sucias. 8. El control no es adecuado para utilizarse con el sistema HemoCue Plasma/Low Hb. 9. Se ha cambiado la calibración del fotómetro. 1. La técnica de muestreo es inadecuada. 2. Las cubetas han caducado, están dañadas o han sido guardadas de forma inadecuada. 3. El ojo óptico de la microcubeta está contaminado. 4. La muestra no se ha mezclado de forma adecuada. 5. Hay burbujas de aire en la microcubeta. 6. Las piezas ópticas están sucias. 7. Se ha cambiado la calibración del fotómetro. 1. Compruebe la fecha de caducidad y las condiciones de almacenaje de las microcubetas. 2. Vuelva a medir el control con una microcubeta nueva. 3. Compruebe la fecha de caducidad y las condiciones de almacenamiento del control. Vuelva a medir el control con una microcubeta nueva. Si el problema persiste, póngase en contacto con el fabricante del control. 4. Asegúrese de que el control está bien mezclado y a temperatura ambiente. Si el problema persiste, póngase en contacto con el fabricante del control. 5. Vuelva a medir el control con una microcubeta nueva. 6. Compruebe si hay burbujas de aire en la microcubeta. Vuelva a medir el control con una microcubeta nueva. 7. Limpie las piezas ópticas tal y como se describe en el apartado Mantenimiento. 8. Para obtener información del control, póngase en contacto con su distribuidor local. 9. El fotómetro necesita ser reparado. Contacte con su distribuidor. 1. Consulte el apartado Medición de este manual. 2. Compruebe la fecha de caducidad y las condiciones de almacenaje de las microcubetas. 3. Volver a medir la muestra con una cubeta nueva. 4. Asegúrese de que la muestra está mezclada de forma adecuada. 5. Compruebe si hay burbujas de aire en la microcubeta. Volver a medir la muestra con una cubeta nueva. 6. Limpie las piezas ópticas tal y como se describe en el apartado Mantenimiento. 7. El fotómetro necesita ser reparado. Contacte con su distribuidor. 21
22 Symptômes Causes Solutions possibles Le photomètre affiche un code d erreur. Il peut s agir d un problème temporaire. Éteindre le photomètre et le rallumer après 30 secondes. Prendre une nouvelle microcuvette et refaire la mesure. Si le problème persiste, consulter la liste des codes erreur ci-dessous. ERREUR 900 Aucun point final de mesure stable n a été trouvé dans le délai imparti. 1. La cuvette est défectueuse. 2. Le circuit imprimé est en panne. ERREUR Des perturbations affectent l alimentation principale. 2. L unité optique ne fonctionne pas. ERREUR Pièces optiques sales ou problème dans l unité optique ou l unité électronique ERREUR Valeur à vide instable. La température du photomètre peut être trop basse. 22 1a. Vérifier la date de péremption des micocuvettes. 1b. Prendre une nouvelle microcuvette et refaire la mesure. 2. Une révision du photomètre est nécessaire. Contacter le distributeur local. 1 Changer la prise murale ou utiliser des piles. 2. Une révision du photomètre est nécessaire. Contacter le distributeur local. 1a. Éteindre le photomètre et nettoyer les pièces optiques tel que décrit dans la section Maintenance. 1b. Une révision du photomètre est nécessaire. Contacter le distributeur local. 1. Éteindre le photomètre et le laisser atteindre la température ambiante. Si le problème persiste, une révision du photomètre est nécessaire. Contacter le distributeur local. ERREUR Piles trop faibles. 1a. Les piles doivent être remplacées. Éteindre le photomètre et remplacer les piles, soit 5 piles alcalines de type AA. 1b. Utiliser l adaptateur secteur. ERREUR 908 Guide de dépannage FR Si vous ne pouvez pas résoudre un problème en suivant ce Guide de dépannage, veuillez consulter votre distributeur local HemoCue France ou HemoCue AB. Avant toute réparation ou élimination, nettoyer le photomètre conformément aux instructions de la section Maintenance. Consulter les autorités locales compétentes en matière d environnement pour une élimination appropriée. Le photomètre ne contient aucune pièce dont l usager pourra assurer l entretien. Ne pas ouvrir le boîtier du photomètre. Remarque : La garantie devient caduque dès l ouverture du photomètre. Absorbance trop élevée. 1. Obstacle à la lumière dans le support de microcuvette. 1a. Vérifier que le photomètre et les microcuvettes sont utilisés conformément au manuel d utilisation HemoCue Plasma/Low Hb et à la notice concernant les microcuvettes. 1b. Une révision du photomètre est nécessaire. Contacter le distributeur local.
23 Symptômes Causes Solutions possibles ERREUR 916 Échantillon à turbidité élevée Avant analyse, filtrer les échantillons visiblement turbides. ERREUR 918 Erreur matérielle ou interne Une révision du photomètre est nécessaire. Contacter le distributeur local. HHH 1. La valeur mesurée est supérieure à 30,0 g/l (3,00 g/dl, mg/dl, 1,90 mmol/l). L écran est vide. 1. Le photomètre n est pas alimenté. 2. Si l appareil fonctionne sur piles, celles-ci doivent être remplacées. 3. L écran ne fonctionne pas. L écran affiche des caractères erronés. L écran affiche le message «LOWBAT». L affichage ne passe pas de «LHb» à «READY» ou de «READY» à «MEASURING». 1. L écran ne fonctionne pas. 2. Le microprocesseur est en panne. 1. Les piles doivent être remplacées. 2. En cas d alimentation sur secteur, l adaptateur secteur ou le circuit imprimé est en panne. 1. Le capteur du support de cuvette est en panne. 1a. Vérifier la date de péremption des microcuvettes. 1b. Par exemple, au-delà de 30,0 g/l (3,00 g/dl, mg/dl, 1,90 mmol/l) utiliser le système HemoCue a. Vérifier que l adaptateur secteur est connecté au photomètre et branché sur la prise murale. 1b. Vérifier que le câble n est pas endommagé. 2. Éteindre le photomètre et remplacer les piles, soit 5 piles alcalines de type AA. 3. Une révision du photomètre est nécessaire. Contacter le distributeur local. 1. Une révision du photomètre est nécessaire. Contacter le distributeur local. 2. Une révision du photomètre est nécessaire. Contacter le distributeur local. 1. Éteindre le photomètre et remplacer les piles, soit 5 piles alcalines de type AA. 2a. Vérifier que l adaptateur secteur est correctement branché et fonctionne. 2b. Une révision du photomètre est nécessaire. Contacter le distributeur local. 1. Une révision du photomètre est nécessaire. Contacter le distributeur local. 23
24 Symptômes Causes Solutions possibles Les mesures sur solution de contrôle sont hors plage (trop élevés ou trop faibles). Les résultats des échantillons sont plus élevés ou plus bas que prévu. 1. Microcuvettes ayant dépassé leur date de péremption, endommagées ou conservées dans de mauvaises conditions. 2. L œil optique de la microcuvette est souillé. 3. La date de péremption des solutions de contrôle est dépassé ou les solutions ont été mal conservées. 4. La solution de contrôle a été mal mélangée et/ou n est pas à la température ambiante. 5. La microcuvette n a pas été placé dans le photomètre dans les 60 secondes suivant le remplissage. 6. Bulles d air dans la microcuvette. 7. Les pièces optiques sont souillées. 8. La solution de contrôle ne doit pas être utilisée avec le système HemoCue Plasma/ Low Hb. 9. L étalonnage du photomètre a été modifié. 1. Technique d échantillonnage incorrecte. 2. Microcuvettes ayant dépassé leur date de péremption, endommagées ou conservées dans de mauvaises conditions. 3. L œil optique de la microcuvette est souillé. 4. L échantillon n a pas été correctement mélangé. 5. Bulles d air dans la microcuvette. 6. Les pièces optiques sont souillées. 7. L étalonnage du photomètre a été modifié Vérifier la date de péremption et les conditions de stockage des microcuvettes. 2. Mesurer l échantillon une deuxième fois avec une nouvelle microcuvette. 3. Vérifier la date de péremption et les conditions de stockage de la solution. Mesurer l échantillon une deuxième fois avec une nouvelle microcuvette. Si le problème persiste, contacter le fabricant de la solution de contrôle. 4. S assurer que la solution de contrôle est bien mélangée et qu elle est à température ambiante. Si le problème persiste, contacter le fabricant de la solution de contrôle. 5. Mesurer l échantillon une deuxième fois avec une nouvelle microcuvette. 6. S assurer qu il n y a pas de bulles d air dans la cuvette. Mesurer l échantillon une deuxième fois avec une nouvelle microcuvette. 7. Nettoyer les pièces optiques comme indiqué dans la section Maintenance. 8. Contacter votre distributeur pour de plus amples informations. 9. Une révision du photomètre est nécessaire. Contacter le distributeur local. 1. Voir la section Mesure de ce manuel. 2. Vérifier la date de péremption et les conditions de stockage des microcuvettes. 3. Mesurer l échantillon une deuxième fois avec une nouvelle microcuvette. 4. S assurer que l échantillon est correctement mélangé. 5. S assurer qu il n y a pas de bulles d air dans la cuvette. Mesurer l échantillon une deuxième fois avec une nouvelle microcuvette. 6. Nettoyer les pièces optiques comme indiqué dans la section Maintenance. 7. Une révision du photomètre est nécessaire. Contacter le distributeur local.
25 GB/US Specifications Intended Purpose/Intended Use The HemoCue Plasma/Low Hb system is used for quantitative determination of low levels of hemoglobin in plasma and serum specimens, aqueous solutions, or stored or banked erythrocytes using a specially designed photometer, the HemoCue Plasma/Low Hb Photometer and specially designed microcuvettes, the HemoCue Plasma/Low Hb Microcuvettes. The HemoCue Plasma/Low Hb Microcuvettes are for In Vitro Diagnostic use only. The HemoCue Plasma/Low Hb Photometer is only to be used with HemoCue Plasma/ Low Hb Microcuvettes. IVD Medical Device Directive The HemoCue Plasma/Low Hb system complies with the IVD Medical Device Directive 98/79/EC and carry the CE mark. Principle of the method/procedure Principle of the method The reaction in the microcuvette is a modified azidemethemoglobin reaction. The erythrocytes are hemolyzed to release the hemoglobin. The hemoglobin is converted to methemoglobin and then combined with azide to form azidemethemoglobin. The measurement takes place in the photometer in which the transmittance is measured and the absorbance and hemoglobin level is calculated. The absorbance is directly proportional to the hemoglobin concentration. Principle of the procedure The system consists of an photometer together with microcuvettes. The microcuvette serves both as a pipette and as a measuring cuvette and is for single-use only. A sample of approximately 20 μl is drawn into the cavity by capillary action. The photometer measures at two wavelengths in order to compensate for a certain degree of turbidity, and the hemoglobin level is calculated and presented (limitations apply as described in Limitation of the procedure ). The HemoCue Plasma/Low Hb system is calibrated against the international reference method for hemoglobin determination, ICSH and needs no further calibration. Warning and precautions The microcuvettes are for In Vitro Diagnostic use only. Nonlaboratory personnel should receive adequate training before using this system for the first time. Always handle blood specimens with care as they may be infectious. Consult local environmental authorities for proper disposal. Storage and handling Operating temperature for the system is C (59 86 F). The system should not be operated at < 5 % or > 90 % non-condensing humidity. HemoCue Plasma/Low Hb Microcuvettes The microcuvettes are to be stored at C (59 86 F). Do not refrigerate. Use the microcuvettes prior to the expiration date that is printed on the package. Once the seal of the vial is broken, the microcuvettes are stable for three months. Keep the vial properly closed. All unused microcuvettes should remain in the original package. HemoCue Plasma/Low Hb Photometer The photometer can be stored and transported in temperatures between 0 50 C ( F). Allow the photometer to reach ambient temperature before use. The photometer should not be stored at < 5 % or > 90 % non-condensing humidity. Specimen collection and preparation Plasma/serum specimens and aqueous solutions containing hemoglobin, such as irrigating fluid from surgical procedures, may be used. Mix the specimen thoroughly before use. Supernatant from erythrocyte suspensions may be used. Carefully separate the supernatant from the erythrocytes using accepted laboratory procedure. 25
26 Materials required HemoCue Plasma/Low Hb Photometer HemoCue Plasma/Low Hb Microcuvettes Pipette or other transfer device Disposable pipette tips Lint-free wipe (non-fraying) Hydrophobic surface Quality Control Two levels of liquid control is recommended to be run on the day of use, or follow local guidelines regarding quaiity controi procedures. Only use controis recommended by HemoCue, see relevant package insert for more information. Measuring range The system is linear from between g/l ( g/dl, 30 3,000 mg/dl, mmol/l). Caution should be taken when evaluating instrument readings between 0 and 0.3 g/l ( g/dl, 0 30 mg/dl, mmol/l). Limitations of the procedure a) If HHH is displayed, the result exceeds the measuring range of the system. b) For values above 30.0 g/l (3.00 g/dl, 3,000 mg/dl, 1.90 mmol/l) use a suitable laboratory method or the HemoCue Hb 201 system. c) Sulfhemoglobin is not measured with this method. d) Levels of bilirubin up to 340 μmol/l (20 mg/dl) do not influence the assay. e) The presence of lipid may interfere with the hemoglobin determination. Therefore, samples which are visibly turbid should be filtered (pore size 0.2 μm). If the user feels uncertain about the degree of turbidity, we recommend filtering the sample. f) The performance characteristics of this system have not been determined using samples obtained from uremic patients. Results The measured hemoglobin value is read directly from the HemoCue Plasma/Low Hb Photometer. No calculations are necessary. Applications sheets for use in determining blood loss and for calculating the amount of free hemoglobin in salvaged or stored blood are available from HemoCue AB. 26
27 Specific performance characteristics The results given below are from a HemoCue Plasma/Low Hb Photometer standardized against the HiCN-(ICSH) 2 method. Within-run precision Within-run precision was determined on 5 photometers and by using within house prepared aqueous and plasma solutions. Hemoglobin in 0.9 % NaCl. Solution Mean SD CV Number % Low Mean High Hemoglobin in heparinized plasma. Solution Mean SD CV % Number Low Mean High Between-run precision Between-run precision was determined by using within house prepared solutions. The sample were analyzed on 20 consecutive working days, twice a day, in duplicate. Hemoglobin in 0.9 % NaCl. Solution Mean SD CV Number % Low Mean High Hemoglobin in heparinized plasma. Solution Mean SD CV % Number Low Mean High
28 Correlation study 1) Aqueous samples from surgical procedures, analyzed on the HemoCue Plasma/Low Hb system with the HiCN-(ICSH) method as reference. 2) Erythrocyte suspensions, analyzed on the HemoCue Plasma/Low Hb system with the HiCN-(ICSH) method as reference. 3) Erythrocyte suspensions, analyzed on the HemoCue Plasma/Low Hb system with the HiCN-(ICSH) method as reference. Reference Group N Mean Min Max SD HemoCue Mean Min Max SD The regression line and the coefficient of correlation Group N Regression line The coefficient of correlation Range Photometers x ICSH x ICSH x ICSH
29 Technical Specifications Dimensions: 160 x 210 x 90 mm (6.29 x 8.26 x 3.54 inches) Weight: 1,000 g (2.20 pounds) 5 alkaline type AA batteries Power adapter: CE marked Only use adapters, as listed under Adapters. Pollution degree: 2 Overvoltage category: II Atmospheric pressure: 800 hpa to 1060 hpa. Equipment not suitable for use in the presence of flammable mixtures. The instrument is tested according to IEC , Second edition: 2001 and EN : 2001, IEC/EN : 2002, IEC : 2005 and EN : 2006, IEC , First edition: 2005 and EN : 2006, IEC , Third edition: 2007 and EN : 2007 and complies with the IVD Medical Device Directive 98/79/EC. The instrument is made for continuos mode. Essential Performance The essential performance is quantitative determination of hemoglobin in plasma and serum specimens, aquenous solutions, or stored banked erythrocytes. AC adapters Country: EU/US/GB Type: 12 V Friwo FW7333SM/12 V HCA01 Input: 100 V~-240 V~/50 60 Hz/ 200 ma Recommended separation distance between Portable and mobile RF communications equipment and HemoCue Plasma/Low Hb Photometer The HemoCue systems are intended for use in an electromagnetic environment in which radiated RF disturbances are controlled. The customer or the user of HemoCue systems can help prevent electromagnetic interference by maintaining a minimum distance between portable and RF communications equipment (transmitters) and HemoCue systems as recommended below, according to the maximum output power of the communications equipment. Rated maximum output power of transmitter (W) Separation distance according to frequency of transmitter (m) 150 khz to 80 MHz d = 1.2 P 80 MHz to 800 MHz d = 1.2 P MHz to 2.5 GHz d = 2.3 P For transmitters rated at maximum output power not listed above, the recommended separation distances (d) in meters (m) can be estimated using the equation applicable to the frequency of the transmitter, where (P) is the maximum output power rating of the transmitter in watts (W) according to transmitter manufacturer. NOTE 1 NOTE 2 At 80 MHz and 800 MHz, the separation distance for the higher frequencyrange applies. These guidelines may not apply in all situations. Electromagnetic propagation is affected by absorption and reflection from structures, objects and people. 29
30 Guidance and manufacturer s declaration Electromagnetic immunity The HemoCue systems are intended for use in the electromagnetic environment specified below. The customer or user of the HemoCue systems should assure that it is used in such an environment. Immunity test IEC test level Compliance level Electromagnetic environment guidance Electrostatic discharge (ESD) IEC ±6 kv contact ±8 kv air ±6 kv contact ±8 kv air Floors should be wood, concrete or ceramic tile. If floors are covered with synthetic material, the relative humidity should be at least 30 %. Electrical fast transient/burst IEC Surge IEC Voltage dips, short interruptions and voltage variations on power supply lines IEC ±2 kv for power supply lines 2 kv for power supply lines ±1 kv for input/output lines ±1 kv for input/ output lines ±1 kv differential mode ±1 kv differential mode < 5 % U (> 95 % dip in U) for a 0.5 cycle 40 % U (60 % dip in U) for 5 cycles 70 % U (30 % dip in U) for 25 cycles < 5 %U (> 95 % dip in U) for a 0.5 cycle 40 % U (60 % dip in U) for 5 cycles 70 % U (30 % dip in U) for 25 cycles Mains power quality should be that of a typical commercial or hospital environment. Mains power quality should be that of a typical commercial or hospital environment. Mains power quality should be that of a typical commercial or hospital environment. If the user of the HemoCue systems requires continued operation during power mains interruptions, it is recommended that the HemoCue systems be powered from an uninterruptible power supply or a battery. < 5 % U (> 95 % dip in U) for 5 seconds < 5 % U (> 95 % dip in U) for 5 seconds For explanation of U see NOTE 1 30
31 Immunity test IEC test level Compliance level Electromagnetic environment guidance Conducted RF IEC Radiated RF IEC Vrms 150 khz to 80 MHz 3 V/m 80 MHz to 2.5 GHz See NOTE 2 and NOTE 3 3 Vrms 3 V/m Portable and mobile RF communications equipment should be used no closer to any part of the HemoCue systems, including cables, than the recommended separation distance calculated from the equation applicable to the frequency of the transmitter. Recommended separation distance d = 1.2 P d = 1.2 P 80 MHz to 800 MHz d = 2.3 P 800 MHz to 2.5 GHz Where (P) is the maximum output power rating of the transmitter in watts (W) according to the transmitter manufacturer and (d) is the recommended separation distance in meters (m). Field strengths from fixed RF transmitters, as determined by an electromagnetic site survey (a), should be less than the compliance level in each frequency range (b). Interference may occur in the vicinity of equipment marked with the following symbol. 31
32 NOTE 1 NOTE 2 NOTE 3 U is the a.c. mains voltage prior to application of the test level. At 80 MHz and 800 MHz, the separation distance for the higher frequency range applies. These guidelines may not apply in all situations. Electromagnetic propagation is affected by absorption and reflection from structures, objects and people. a) Field strengths from fixed transmitters, such as base stations for radio (cellular/cordless) telephones and land mobile radios, amateur radio, AM and FM radio broadcast and TV broadcast cannot be predicted theoretically with accuracy. To assess the electromagnetic environment due to fixed RF transmitters, an electromagnetic site survey should be considered. If the measured field strength in the location in which the HemoCue systems are used exceeds the applicable RF compliance level above, the HemoCue systems should be observed to verify normal operation. If abnormal performance is observed, additional measures may be necessary, such as re-orienting or relocating the systems. b) Over the frequency range 150 khz to 80 MHz, field strength should be less than 3 V/m. 32
33 Technical specifications (EMC-RF) Use only cables with the following specification: USB shielded maximum 2 m Serial shielded maximum 1.5 m Guidance and manufacturer s declaration electromagnetic emissions The HemoCue systems are intended for use in the electromagnetic environment specified below. The customer or the user of the HemoCue systems should assure that it is used in such an environment. Emission test Compliance Electromagnetic environment guidance RF emissions Group 1 The HemoCue systems uses RF energy only for its internal function. Therefore, its RF emissions are very low and not likely to cause any interference in nearby electronic equipment. RF emissions Class B The HemoCue systems are suitable for use in all establishments, including domestic establishments and those Harmonic emissions IEC Voltage fluctuations/flicker emissions IEC Class A Complies directly connected to the public low-voltage power supply network that supplies buildings used for domestic purposes. NOTE 1 NOTE 2 It is the manufacturer s responsibility to provide equipment electromagnetic compatibility information to the customer or user. It is the user s responsibility to ensure that a compatible electromagnetic environment for the equipment can be maintained in order that the device will perform as intended. 33
34 Warranty The photometer carries a 24-month warranty from the day of receipt. After the expiration date of the warranty, maintenance and repairs are offered at a fixed price. Any other use of the system than recommended by the manufacturer will void the warranty. Service and disposal The photometer should be cleaned as recommended under Maintenance prior to service or disposal. Consult local environmental authorities for proper disposal. Spare parts and accessories: The following accessories and spare parts are available: Power adapter Battery lid Cuvette holder HemoCue Cleaners 34
35 Symbols used 5! Caution 90 CE mark Class II equipment Only valid within the European Community. Indicates seperate collection for waste of electrical and electronic equipment. Temperature limitation Efficiency Level Relative humidity, non-condensing Consult instructions for use To maintain safety use only adapter marked HCA01 DC inlet OFF (power) ON (power) Biological risks References 1. HemoCue Plasma/Low Hb package insert. 2. Reference and Selected Procedures for the Quantitative Determination of Hemoglobin in Blood; Approved Standard NCCLS Document H15-A 3. ICSH Standard EP6/4: 1995, J Clin. Pathol. 1996; 49: Manufacturer HemoCue AB Box 1204 SE Ängelholm Sweden Phone: Fax: [email protected] HemoCue Distributor USA HemoCue Inc Valley View Street, Cypress, CA USA Phone (general): Orders: Technical support: Fax (cust. service): [email protected] 35
36 ES Especificaciones Aplicaciones El sistema HemoCue Plasma/Low Hb se utiliza para la determinación cuantitativa de bajas concentraciones de hemoglobina en muestras de plasma y suero, soluciones acuosas o eritrocitos conservados o procedentes de un banco de sangre, utilizando un fotómetro diseñado especialmente para ello, el HemoCue Plasma/Low Hb Photometer, y unas microcubetas especialmente diseñadas, las HemoCue Plasma/Low Hb Microcuvettes. Las HemoCue Plasma/Low Hb Microcuvettes están destinadas únicamente para el diagnóstico in vitro. El HemoCue Plasma/Low Hb Photometer sólo debe usarse con las HemoCue Plasma/Low Hb Microcuvettes. Directiva relativa a dispositivos médicos IVD (diagnóstico in vitro). El sistema HemoCue Plasma/Low Hb cumple con las disposiciones de la directiva 98/79/CE relativa a dispositivos médicos IVD y tiene la marca CE de conformidad. Fundamento del método y del procedimiento Fundamento del método La reacción en la microcubeta es una reacción de metahemoglobina azídica modificada. Los eritrocitos se hemolizan para liberar la hemoglobina. La hemoglobina se transforma en metahemoglobina y luego se combina con azida para dar lugar a la metahemoglobina azídica. La medición tiene lugar en el fotómetro en el que se mide la transmitancia y se calcula la absorbancia y el nivel de hemoglobina. La absorbancia es directamente proporcional a la concentración de hemoglobina. Fundamento del procedimiento El sistema consta de un fotómetro y de microcubetas. La microcubeta sirve como pipeta y como cubeta de medición y es de un solo uso. La cavidad se llena con la muestra de sangre, de aproximadamente 20 μl, por acción capilar. El fotómetro mide a dos longitudes de onda para compensar posibles efectos de turbiedad y calcula y muestra el nivel de hemoglobina (las limitaciones son las descritas en "Limitaciones del procedimiento"). El sistema HemoCue Plasma/ Low Hb se ha calibrado según el método de referencia internacional para la determinación de la hemoglobina, ICSH y no necesita calibraciones adicionales. Advertencias y precauciones Las microcubetas solo deben utilizarse para diagnóstico in vitro. El personal ajeno al laboratorio debe recibir la formación adecuada antes de utilizar este sistema por primera vez. Manipule siempre las muestras de sangre con cuidado ya que podrían ser infecciosas. Consulte a las autoridades medioambientales locales respecto a la forma correcta de desecharlas. Almacenaje y manipulación La temperatura de funcionamiento del sistema es de entre 15 y 30 C. El sistema no debe funcionar cuando la humedad sin condensación es < 5 % o > 90 %. HemoCue Plasma/Low Hb Microcuvettes Las microcubetas deben conservarse a una temperatura de entre 15 y 30 C. No las refrigere. Utilice las microcubetas antes de la fecha de caducidad impresa en cada envase. Una vez se haya roto el sello del vial, las microcubetas son estables durante tres meses. Mantenga cerrado el vial de manera adecuada. Las microcubetas que no se hayan utilizado deben guardarse en el envase original. Fotómetro HemoCue Plasma/Low Hb El fotómetro se puede almacenar y transportar a temperaturas de entre 0 y 50 C. Deje que el fotómetro alcance la temperatura ambiente antes de usarlo. El fotómetro no debe almacenarse cuando la humedad sin condensación es < 5 % o > 90 %. Obtención y preparación de muestras Pueden utilizarse muestras de plasma/suero y soluciones acuosas que contengan hemoglobina, como el irrigador de intervenciones quirúrgicas. Mezcle bien la muestra antes de usarla. Puede utilizarse el sobrenadante de las suspensiones de eritrocitos. Separar con cuidado el sobrenadante de los eritrocitos utilizando un procedimiento de laboratorio aceptado de forma general. 36
37 Materiales necesarios HemoCue Plasma/Low Hb Photometer HemoCue Plasma/Low Hb Microcuvettes Pipeta u otro dispositivo de transferencia Boquillas de pipeta desechables Papel absorbente (que no suelte pelusa) Superficie hidrofóbica Control de calidad El día de la utilización se recomienda realizar dos niveles de control de líquido o seguir las directrices locales referentes a los procedimientos de control de calidad. Utilice solo los controles recomendados por HemoCue; consulte el prospecto pertinente para más información. Intervalo de medición El sistema es lineal entre 0,3 y 30,0 g/l (0,03-3,00 g/dl, mg/dl, 0,02-1,90 mmol/l). Debe tenerse precaución al evaluar las lecturas de los instrumentos entre 0 y 0,3 g/l (0 0,03 g/dl, 0-30 mg/dl, 0-0,02 mmol/l). Limitaciones del procedimiento a) Si se visualiza "HHH" en la pantalla, el resultado supera el intervalo de medición del sistema. b) Para valores superiores a 30,0 g/l (3,00 g/dl, mg/dl, 1,90 mmol/l) utilice un método de laboratorio adecuado o el sistema HemoCue Hb 201. c) No se mide la sulfahemoglobina con este método. d) Los niveles de bilirrubina de hasta 340 µmol/l (20 mg/dl) no influyen en el ensayo. e) La presencia de lípidos puede interferir con la determinación de la hemoglobina. Por tanto, las muestras que son visiblemente turbias deben filtrarse (tamaño del poro 0,2 µm). Si el usuario no está seguro del grado de turbiedad, se recomienda el filtrado de la muestra. f) Las características de rendimiento de este sistema no se han determinado utilizando muestras obtenidas de pacientes urémicos. Resultados El valor de hemoglobina medido se lee directamente del HemoCue Plasma/Low Hb Photometer. No es necesario hacer cálculos. Las plantillas de solicitud utilizadas en la determinación de hemorragias y en el cálculo de la cantidad de hemoglobina libre en la sangre recuperada o conservada están disponibles en HemoCue AB. 37
38 Características de rendimiento específico Los resultados proporcionados más adelante proceden del HemoCue Plasma/Low Hb Photometer normalizado según el método HiCN-(ICSH) 2. Precisión intra-ensayo La precisión intra-ensayo (repetibilidad) se calculó en 5 fotómetros y mediante el uso de soluciones plasmáticas y acuosas preparadas a nivel interno. Hemoglobina en 0,9 % de NaCl. Solución Media SD CV % Número Inferior 1,59 0,06 3,6 20 Media 16,30 0,14 0,8 20 Superior 25,30 0,16 0,6 20 Hemoglobina en plasma heparinizado. Solución Media SD CV % Número Inferior 1,95 0,08 4,2 20 Media 15,30 0,11 0,7 20 Superior 25,50 0,22 0,9 20 Precisión inter-ensayo La precisión inter-ensayo (reproducibilidad) se calculó mediante el uso de soluciones preparadas a nivel interno. Las muestras se analizaron durante 20 días laborables consecutivos, dos veces al día, por duplicado. Hemoglobina en 0,9 % de NaCl. Solución Media SD CV % Número Inferior 1,43 0,06 4,3 20 Media 14,80 0,17 1,2 20 Superior 24,80 0,25 1,0 20 Hemoglobina en plasma heparinizado. Solución Media SD CV % Número Inferior 1,78 0,09 5,0 20 Media 14,80 0,21 1,4 20 Superior 24,50 0,25 1,
39 Estudio de correlación 1) Muestras acuosas procedentes de intervenciones quirúrgicas, analizadas en el sistema HemoCue Plasma/Low Hb con el método HiCN-(ICSH) como referencia. 2) Suspensiones de eritrocitos, analizadas en el sistema HemoCue Plasma/Low Hb con el método HiCN-(ICSH) como referencia. 3) Suspensiones de eritrocitos, analizadas en el sistema HemoCue Plasma/Low Hb con el método HiCN-(ICSH) como referencia. Referencia Grupo N Media Mín. Máx. SD HemoCue Media Mín. Máx. SD ,04 0,94 15,18 0,047 4,05 0,84 15,64 0, ,47 0,65 2,49 0,066 1,66 0,70 2,75 0, ,54 0,40 6,45 0,122 2,65 0,40 6,70 0,084 La línea de regresión y el coeficiente de correlación Grupo N Línea de regresión Coeficiente de correlación Intervalo Fotómetros ,039 x ICSH-0,150 0,9997 0,94-15, ,149 x ICSH-0,024 0,9913 0,65-2, ,015 x ICSH-0,078 0,9981 0,40-6,
40 Especificaciones técnicas Dimensiones: 160 x 210 x 90 mm Peso: g 5 pilas alcalinas AA Adaptador de alimentación: con marca CE Utilice sólo los adaptadores que figuran en el apartado Adaptadores. Grado de contaminación: 2 Clase de sobrevoltaje: II Presión atmosférica: de 800 hpa a hpa. Este equipo no es adecuado para utilizarse en presencia de compuestos inflamables. El instrumento se ha probado de conformidad con las normas IEC , segunda edición: 2001 y EN : 2001, IEC/EN : 2002, IEC : 2005 y EN : 2006, IEC , Primera edición: 2005 y EN : 2006, IEC , tercera edición: 2007 y EN : 2007 y cumple la directiva 98/79/CE relativa a dispositivos médicos para diagnóstico in vitro. El instrumento se ha diseñado para modo continuo. Función básica El rendimiento esencial es la determinación cuantitativa de la hemoglobina en muestras de plasma y suero, soluciones acuosas o eritrocitos conservados en bancos de sangre. Adaptadores de CA País: U.E./EE. UU./Reino Unido Tipo: 12 V Friwo FW7333SM/12 V HCA01 Entrada: 100 V~-240 V~/50-60 Hz/ 200 ma Separación recomendada entre equipos portátiles y móviles de comunicaciones por radiofrecuencia y HemoCue Plasma/Low Hb Photometer. Los sistemas HemoCue están destinados al uso en entornos electromagnéticos con control de las alteraciones producidas por radiofrecuencias radiadas. El cliente o el usuario de los sistemas HemoCue puede contribuir a evitar las interferencias electromagnéticas manteniendo entre los equipos portátiles y móviles de comunicaciones por radiofrecuencia (transmisores) y los sistemas HemoCue la distancia mínima que se recomienda a continuación según la potencia de salida máxima de los equipos de comunicaciones. Potencia máxima nominal del transmisor (W) Distancia de separación según la frecuencia del transmisor (m) De 150 khz a 80 MHz d = 1,2 P De 80 MHz a 800 MHz d = 1,2 P 0,01 0,12 0,12 0,23 0,1 0,38 0,38 0,73 1 1,2 1,2 2,3 10 3,8 3,8 7, de 800 MHz a 2,5 GHz d = 2,3 P En el caso de los transmisores con una potencia de salida máxima nominal no especificada, la distancia de separación recomendada (d) en metros (m) puede calcularse mediante la ecuación aplicable a la frecuencia del transmisor, donde P es la potencia de salida máxima nominal del transmisor en vatios (W) según el fabricante. NOTA 1 NOTA 2 A 80 MHz y 800 MHz, debe aplicarse la distancia de separación correspondiente al intervalo de frecuencias más alto. Estas directrices pueden no ser aplicables en todas las situaciones. La propagación electromagnética se ve afectada por la absorción y la reflexión de estructuras, objetos y personas. 40
41 Guía y declaración del fabricante: inmunidad electromagnética Los sistemas HemoCue están diseñados para el uso en el entorno electromagnético especificado a continuación. El cliente o el usuario de los sistemas HemoCue debe asegurarse de que se utiliza en dicho entorno. Prueba de inmunidad Descarga electrostática IEC Oscilación eléctrica momentánea Nivel de la prueba (IEC 60601) ± 6 kv en contacto ± 8 kv en suspensión ± 2 kv para líneas de suministro de red Nivel de homologación ± 6 kv en contacto ± 8 kv en suspensión 2 kv para líneas de suministro de red Entorno electromagnético: guía El suelo debe ser de madera, hormigón o baldosas de cerámica. Si los suelos están cubiertos con material sintético, la humedad relativa debe ser de un mínimo del 30 %. La calidad del suministro eléctrico debe ser la indicada para entornos comerciales u hospitalarios. IEC Sobretensión IEC Bajadas, breves cortes y variaciones de tensión en líneas de suministro eléctrico IEC ± 1 kv para líneas de entrada y salida ± 1 kv para líneas de entrada y salida ± 1 kv en modo diferencial ± 1 kv en modo diferencial < 5 % U (> 95 % bajada de U) para 0,5 ciclos 40 % U (60 % bajada de U) para 5 ciclos 70 % U (30 % bajada de U) para 25 ciclos < 5 % U (> 95 % bajada de U) para 5 segundos < 5 % U (> 95 % bajada de U) para 0,5 ciclos 40 % U (60 % bajada de U) para 5 ciclos 70 % U (30 % bajada de U) para 25 ciclos La calidad del suministro eléctrico debe ser la indicada para entornos comerciales u hospitalarios. La calidad del suministro eléctrico debe ser la indicada para entornos comerciales u hospitalarios. Se recomienda conectar el sistema HemoCue a una fuente de alimentación ininterrumpida o batería cuando el usuario necesite que el sistema siga funcionando durante interrupciones del suministro. Véase la NOTA 1 para obtener la explicación de U < 5 % U (> 95 % bajada de U) para 5 segundos 41
42 Prueba de inmunidad Nivel de la prueba (IEC 60601) Nivel de homologación 3 Vrms Entorno electromagnético: guía Radiofrecuencia conducida IEC Radiofrecuencia radiada IEC Vrms de 150 khz a 80 MHz 3 V/m de 80 MHz a 2,5 GHz Véase la NOTA 2 y la NOTA 3 3 V/m Los equipos portátiles y móviles de comunicaciones por radiofrecuencia deben utilizarse alejados de todos los componentes de los sistemas HemoCue, incluidos los cables, a la distancia de separación mínima recomendada calculada a partir de la ecuación aplicable a la frecuencia del transmisor. Distancia de separación recomendada d = 1,2 P d = 1,2 P de 80 MHz a 800 MHz d = 2,3 P de 800 MHz a 2,5 GHz Donde P es la potencia de salida máxima nominal del transmisor en vatios (W) según el fabricante y d es la distancia de separación recomendada en metros (m). Las intensidades de los campos generados por transmisores de radiofrecuencia fijos, determinadas por un estudio de lugares electromagnéticos (a) deben ser inferiores al nivel de homologación de cada intervalo de frecuencias (b). Pueden producirse interferencias cerca de los equipos marcados con el siguiente símbolo: 42
43 NOTA 1 NOTA 2 NOTA 3 U corresponde al voltaje de la red de corriente alterna antes de la aplicación del nivel de la prueba. A 80 MHz y 800 MHz, debe aplicarse la separación correspondiente al intervalo de frecuencias más alto. Estas directrices pueden no ser aplicables en todas las situaciones. La propagación electromagnética se ve afectada por la absorción y la reflexión de estructuras, objetos y personas. a) Las intensidades de campo de los transmisores fijos, como estaciones base de radioteléfonos (móviles o inalámbricos), radios móviles terrestres, equipos de radioaficionados, emisiones de radio AM y FM o emisiones de televisión no pueden predecirse, en teoría, con precisión. Para determinar el entorno electromagnético debido a transmisores de radiofrecuencia fijos, debe plantearse la posibilidad de realizar un estudio electromagnético del lugar. Si la intensidad de campo medida en el punto en el que se utilizan los sistemas HemoCue supera el nivel de homologación de radiofrecuencia antes especificado, es necesario comprobar que los sistemas HemoCue funcionen sin problemas. Si se observa un funcionamiento anómalo, es posible que haya que tomar otras medidas, como cambiar la orientación o ubicación de los sistemas. b) En el intervalo de frecuencias de 150 khz a 80 MHz, las intensidades de campo deben ser inferiores a 3 V/m. 43
44 Especificaciones técnicas (EMC-RF) Utilice solo cables que cumplan las especificaciones siguientes: USB protegido de 2 m como máximo Serie protegido de 1,5 m como máximo Guía y declaración del fabricante: emisiones electromagnéticas Los sistemas HemoCue están diseñados para el uso en el entorno electromagnético especificado a continuación. El cliente o el usuario de los sistemas HemoCue debe asegurarse de que se emplea en dicho entorno. Prueba de emisiones Homologación Entorno electromagnético: guía Emisiones de radiofrecuencias Grupo 1 Los sistemas HemoCue solo usan energía de radiofrecuencia para su funcionamiento interno. Por lo tanto, sus emisiones de radiofrecuencias son muy bajas y no es probable que produzcan interferencias en equipos electrónicos próximos. Emisiones de corriente armónica IEC Fluctuaciones del voltaje o emisiones de fluctuaciones IEC Clase A Homologado Emisiones de radiofrecuencias Clase B Los sistemas HemoCue pueden utilizarse en todo tipo de establecimientos, incluidos los domésticos y los conectados directamente a la red pública de suministro eléctrico de bajo voltaje para edificios residenciales. NOTA 1 NOTA 2 El fabricante tiene la responsabilidad de proporcionar información sobre la compatibilidad electromagnética del equipo al cliente o usuario. El usuario tiene la responsabilidad de asegurar un entorno electromagnético compatible con el equipo para que el dispositivo funcione correctamente. 44
45 Garantía El fotómetro tiene una garantía de 24 meses a partir de la fecha de recepción. Después de la fecha de caducidad de la garantía, se ofrecen servicios de mantenimiento y reparación a un precio establecido. Cualquier otro uso del sistema distinto del recomendado por el fabricante anulará la garantía. Reparación y retirada Antes de reparar o desechar el fotómetro, debe limpiarse siguiendo las recomendaciones del apartado Mantenimiento. Consulte a las autoridades medioambientales locales respecto a la forma correcta de desecharlas. Repuestos y accesorios: Las piezas de repuesto y accesorios siguientes se encuentran disponibles: Adaptador de alimentación Tapa de las pilas Soporte para la cubeta HemoCue Cleaners 45
46 Símbolos utilizados 5! Precaución 90 Marca CE Equipo de clase II Solo válido en la Comunidad Europea. Indica la recogida selectiva de los residuos de aparatos eléctricos y electrónicos. Limitaciones de temperatura Nivel de eficiencia Humedad relativa, sin condensación Riesgos biológicos Referencias 1. Prospecto de HemoCue Plasma/Low Hb. 2. Reference and Selected Procedures for the Quantitative Determination of Hemoglobin in Blood; Approved Standard NCCLS Document H15-A 3. ICSH Standard EP6/4: 1995, J Clin. Pathol. 1996; 49: Fabricante HemoCue AB Box 1204 SE Ängelholm Suecia Teléfono: Fax: Correo electrónico: [email protected] Consulte las instrucciones de uso Para un funcionamiento seguro, utilícese únicamente el adaptador con el distintivo HCA01 Toma de CC "OFF" (corriente) "ON" (corriente) 46
47 FR Caractéristiques techniques Cadre d utilisation Le système HemoCue Plasma/Low Hb est utilisé pour la détermination quantitative de faibles taux d hémoglobine dans les échantillons de plasma et de sérum, dans les solutions aqueuses ou des solutions d érythrocytes conservées ou stockées, en utilisant le photomètre HemoCue Plasma/Low Hb Photometer et les consommables HemoCue Plasma/Low Hb Microcuvettes spécialement conçus à cet effet. Les consommables HemoCue Plasma/Low Hb Microcuvettes ne peuvent être utilisés que pour le diagnostic in vitro. Le HemoCue Plasma/ Low Hb Photometer ne doit être utilisé qu avec le consommable HemoCue Plasma/Low Hb Microcuvettes. Directive sur les dispositifs médicaux de diagnostic in vitro Le système HemoCue Plasma/Low Hb est conforme à la directive 98/79/CE sur les dispositifs médicaux de diagnostic in vitro et porte le marquage CE. Principes de la méthode/procédure Principe de la méthode La réaction dans la microcuvette est une réaction de méthémoglobinazide modifiée. Les érythrocytes sont hémolysés pour libérer l hémoglobine. L hémoglobine se convertit en méthémoglobine, puis se combine avec de l azide pour former de la méthémoglobinazide. La mesure se fait dans le photomètre qui mesure la transmittance, puis calcule l absorbance et le taux d hémoglobine. L absorbance est directement proportionnelle à la concentration en hémoglobine. Principe de la procédure Le système se compose d un photomètre et de microcuvettes. Les microcuvettes servent à la fois de pipettes et de cuvettes de mesure. Elles sont à usage unique. Un échantillon d environ 20 µl est aspiré dans la cavité par capillarité. Le photomètre effectue les mesures à deux longueurs d onde pour compenser un certain degré de turbidité puis le taux d hémoglobine est calculé puis affiché (les restrictions s appliquent comme indiqué dans le chapitre «Restrictions de la procédure»). Le système HemoCue Plasma/Low Hb est paramétré suivant la méthode de référence internationale de détermination de l hémoglobine ICSH et n a pas besoin d être calibré. Avertissements et précautions Les microcuvettes sont destinées au diagnostic in vitro uniquement. Le personnel extérieur au laboratoire devra recevoir une formation adaptée avant d utiliser ce système pour la première fois. Pour éviter tout risque de contamination, il est recommandé de manipuler les échantillons de sang avec la plus grande précaution. Consulter les autorités locales compétentes en matière d environnement pour une élimination appropriée. Stockage et manipulation Température de fonctionnement du système : C (59-86 F). Le système ne doit pas être utilisé dans des conditions d humidité sans condensation, inférieures à 5 % ou supérieures à 90 %. HemoCue Plasma/Low Hb Microcuvettes Les microcuvettes doivent être stockées à C (59-86 F). Ne pas stocker au réfrigérateur. Utiliser les microcuvettes avant la date de péremption indiquée sur l emballage. Après ouverture du flacon, les microcuvettes sont stables pendant trois mois. Veiller à ce que le flacon soit bien fermé. Toute microcuvette non utilisée doit rester dans l emballage d origine. HemoCue Plasma/Low Hb Photometer Le photomètre peut être conservé et transporté à des températures comprises entre 0 C et 50 C (32 F à 122 F). Laisser le photomètre atteindre la température ambiante avant de l utiliser. Le photomètre ne doit pas être stocké dans des conditions d humidité sans condensation inférieures à 5 % ou supérieures à 90 %. Recueil et préparation des échantillons Les échantillons de plasma et de sérum et les solutions aqueuses contenant de l hémoglobine, telles que le liquide d irrigation des interventions chirurgicales, peuvent être utilisés. Mélanger consciencieusement l échantillon avant utilisation. Le surnageant des suspensions d érythrocytes peut être utilisé. Séparer avec précaution le surnageant des érythrocytes en suivant la procédure de laboratoire validée. 47
48 Matériel requis HemoCue Plasma/Low Hb Photometer HemoCue Plasma/Low Hb Microcuvettes Pipette ou autre dispositif de transfert Embouts de pipette jetables Chiffon absorbant non pelucheux Surface hydrophobe Contrôle qualité Il est recommandé de réaliser deux niveaux de solution de contrôle le jour de l utilisation ou de se conformer aux directives locales concernant les procédures de contrôle de qualité. Utiliser uniquement les solutions de contrôle recommandées par HemoCue. Pour plus d informations, voir la notice du consommable concerné. Plage de mesure Le système est linéaire entre 0,3-30,0 g/l (0,03-3,00 g/dl, mg/dl, 0,02-1,90 mmol/l). Faire très attention lors de l interprétation des lectures de l instrument entre 0 et 0,3 g/l (0 0,03 g/dl, 0-30 mg/dl, 0-0,02 mmol/l). Limites de la procédure a) Si le message «HHH» s affiche, les résultats sont en dehors de la plage de mesure du système. b) Pour les valeurs supérieures à 30,0 g/l (3,00 g/dl, mg/dl, 1,90 mmol/l), utiliser une méthode de laboratoire adaptée ou le système HemoCue Hb 201. c) Cette méthode ne permet pas de mesurer la sulfhémoglobine. d) Les taux de bilirubine inférieurs à 340 µmol/l (20 mg/dl) n influencent pas le dosage. e) La présence de lipides peut interférer avec la détermination de l hémoglobine. Pour cette raison, les échantillons visiblement turbides doivent être filtrés (dimension des pores : 0,2 µm). Si l utilisateur n est pas certain du degré de turbidité, nous lui recommandons de filtrer l échantillon. f) Les performances de ce système n ont pas été définies avec des échantillons provenant de patients urémiques. Résultats La valeur d hémoglobine mesurée est directement lue par l appareil HemoCue Plasma/Low Hb Photometer. Aucun calcul n est nécessaire. Les feuilles d applications utilisées pour déterminer les pertes sanguines et calculer la quantité d hémoglobine libre dans le sang réutilisé ou stocké sont disponibles auprès de HemoCue AB. 48
49 Caractéristiques spécifiques de performance Les résultats donnés ci-dessous proviennent d une comparaison entre le HemoCue Plasma/Low Hb Photometer standardisé et la méthode HiCN-(ICSH) 2. Précision intra-série La précision intra-série a été définie sur 5 photomètres grâce à des solutions plasma et aqueuses préparées sur site. Hémoglobine dans NaCl 0,9 %. Solution Moyen SD CV Nombre % Faible 1,59 0,06 3,6 20 Moyenne 16,30 0,14 0,8 20 Élevée 25,30 0,16 0,6 20 Hémoglobine dans plasma hépariné. Solution Moyen SD CV % Nombre Faible 1,95 0,08 4,2 20 Moyenne 15,30 0,11 0,7 20 Élevée 25,50 0,22 0,9 20 Précision inter-séries La précision inter-séries a été définie grâce à des solutions préparées sur site. Les échantillons ont été analysés au cours de 20 jours ouvrés consécutifs, deux fois par jour, en deux exemplaires. Hémoglobine dans NaCl 0,9 %. Solution Moyen SD CV Nombre % Faible 1,43 0,06 4,3 20 Moyenne 14,80 0,17 1,2 20 Élevée 24,80 0,25 1,0 20 Hémoglobine dans plasma hépariné. Solution Moyen SD CV % Nombre Faible 1,78 0,09 5,0 20 Moyenne 14,80 0,21 1,4 20 Élevée 24,50 0,25 1,
50 Études de corrélation 1) Échantillons aqueux d interventions chirurgicales, analysés avec le système HemoCue Plasma/Low Hb et avec la méthode HiCN- (ICSH) comme référence. 2) Suspensions d érythrocytes, analysées avec le système HemoCue Plasma/Low Hb et avec la méthode HiCN-(ICSH) comme référence. 3) Suspensions d érythrocytes, analysées avec le système HemoCue Plasma/Low Hb et avec la méthode HiCN-(ICSH) comme référence. Références Groupe N Moyen Min Max SD HemoCue Moyen Min Max SD ,04 0,94 15,18 0,047 4,05 0,84 15,64 0, ,47 0,65 2,49 0,066 1,66 0,70 2,75 0, ,54 0,40 6,45 0,122 2,65 0,40 6,70 0,084 La droite de régression et le coefficient de corrélation Groupe N Ligne de régression Le coefficient de corrélation Plage Photomètres ,039 x ICSH-0,150 0,9997 0,94-15, ,149 x ICSH-0,024 0,9913 0,65-2, ,015 x ICSH-0,078 0,9981 0,40-6,
51 Caractéristiques techniques Dimensions : 160 x 210 x 90 mm (6,29 x 8,26 x 3,54 pouces) Poids : g (2,20 livres) 5 piles alcalines de type AA*** Adaptateur secteur : Marquage CE Utiliser uniquement les adaptateurs mentionnés dans la section Adaptateurs agréés. Degré de pollution : 2 Catégorie de surtension : II Pression atmosphérique : 800 hpa à 1060 hpa. L instrument n est pas adapté à une utilisation en présence de mélanges inflammables. L instrument a été contrôlé selon la norme CEI , deuxième édition : 2001 et EN : 2001, CEI/EN : 2002, CEI : 2005 et EN : 2006, CEI : Première édition : 2005 et EN : 2006, CEI , troisième édition : 2007 et EN : 2007 et est conforme à la Directive 98/79/CE sur les dispositifs médicaux de diagnostic in vitro. L instrument est destiné à un mode continu. Performances essentielles Les performances essentielles sont la détermination quantitative du taux d hémoglobine dans des échantillons de plasma et de sérum, des solutions aqueuses ou des solutions d érythrocytes conservées ou stockées. Adaptateurs secteur Pays : EU/US/UK Type : 12 V Friwo FW7333SM/12 V HCA01 Entrée : 100 V~-240 V~/50-60 Hz/ 200 ma Distance de séparation recommandée entre les appareils de communication par radiofréquences mobiles ou portatifs et le photomètre HemoCue Plasma/Low Hb Photometer Les systèmes HemoCue sont conçus pour être utilisés dans un environnement électromagnétique où les perturbations radioélectriques rayonnées sont contrôlées. Le client ou l utilisateur des systèmes HemoCue peut réduire les risques d interférences électromagnétiques en respectant la distance minimum entre les appareils (émetteurs) de communication par radiofréquences mobiles ou portatifs et les systèmes HemoCue indiquée ci-dessous, selon la puissance maximum de sortie des appareils de communication concernés. Puissance nominale de sortie maximum de l émetteur (W) Distance de séparation en fonction de la fréquence de l émetteur (m) 150 khz to 80 MHz d = 1,2 P 80 MHz to 800 MHz d = 1,2 P 0,01 0,12 0,12 0,23 0,1 0,38 0,38 0,73 1 1,2 1,2 2,3 10 3,8 3,8 7, MHz à 2,5 GHz d = 2,3 P Pour les émetteurs dont la puissance nominale de sortie maximum ne figure pas dans le tableau ci-dessus, il est possible de calculer les distances de séparation recommandées (d) en mètres (m) à l aide de l équation applicable à la fréquence de l émetteur, (P) correspondant à la puissance nominale de sortie maximum de l émetteur en watts (W) indiquée par le fabricant. REMARQUE 1 REMARQUE 2 À 80 MHz et 800 MHz, la distance de séparation s applique pour la plage de fréquences la plus élevée. Ces recommandations peuvent être incorrectes dans certains cas. La propagation électromagnétique dépend de l absorption et de la réflexion des structures, des objets et des personnes. 51
52 Recommandations et déclaration du fabricant concernant l immunité électromagnétique Les systèmes HemoCue sont conçus pour une utilisation dans l environnement électromagnétique défini ci-dessous. Le client ou l utilisateur du système HemoCue doit s assurer qu il est utilisé dans un tel environnement. Essai d immunité Décharges électrostatiques (ESD) CEI Transitoires électriques rapides en salve CEI Chocs de tension CEI Creux, coupures brèves et variations de la tension d alimentation sur les lignes d alimentation CEI Niveau d essai selon la norme CEI ± 6 kv par contact ± 8 kv dans l air ± 2 kv pour les lignes d alimentation ± 1 kv pour les lignes d entrée/sortie Niveau de conformité ± 6 kv par contact ± 8 kv dans l air ± 2 kv pour les lignes d alimentation ± 1 kv pour les lignes d entrée/sortie ± 1 kv mode différentiel ± 1 kv mode différentiel < 5 % U (baisse de plus de 95 % de U) pendant 0,5 cycle 40 % U (baisse de 60 % de U) pendant 5 cycles 70 % U (baisse de 30 % de U) pendant 25 cycles < 5 % U (baisse de plus de 95 % de U) pendant 5 secondes Pour plus de détails sur U, voir la REMARQUE 1 < 5 % U (baisse de plus de 95 % de U) pendant 0,5 cycle 40 % U (baisse de 60 % de U) pendant 5 cycles 70 % U (baisse de 30 % de U) pendant 25 cycles < 5 % U (baisse de plus de 95 % de U) pendant 5 secondes Conseils en matière d environnement électromagnétique Le revêtement de sol devra être de préférence en bois, en béton ou en carreaux de céramique. Si les sols sont recouverts de matériaux synthétiques, une humidité relative d au moins 30 % doit être maintenue. La qualité de l alimentation principale doit être celle d un environnement commercial ou hospitalier typique. La qualité de l alimentation principale doit être celle d un environnement commercial ou hospitalier typique. La qualité de l alimentation principale doit être celle d un environnement commercial ou hospitalier typique. Pour garantir le fonctionnement du système Hemo- Cue en cas de panne de secteur, il est recommandé de relier le système HemoCue à un système d alimentation sans coupure ou à une batterie. 52
53 Essai d immunité Niveau d essai selon la norme CEI Niveau de conformité Conseils en matière d environnement électromagnétique RF conduites CEI RF rayonnées CEI Veff 150 khz à 80 MHz 3 V/m 80 MHz à 2,5 GHz Voir REMARQUE 2 et REMARQUE 3 3 Veff 3 V/m Lorsque des appareils de communication par radiofréquences mobiles ou portatifs sont utilisés à proximité des systèmes HemoCue (câbles compris), respecter la distance de séparation recommandée, calculée selon l équation applicable, suivant la fréquence de l émetteur. Distance de séparation recommandée d = 1,2 P d = 1,2 P 80 MHz à 800 MHz d = 2,3 P 800 MHz à 2,5 GHz (P) correspondant à la puissance nominale de sortie maximum de l émetteur en watts (W) indiquée par le fabricant et (d) à la distance de séparation recommandée en mètres (m). L intensité du champ des émetteurs de radiofréquences fixes, déterminée lors d une étude électromagnétique sur site (a), doit être inférieure au niveau de conformité dans chaque plage de fréquences (b). Des interférences peuvent se produire à proximité des équipements marqués du symbole suivant : 53
54 REMARQUE 1 U est la tension secteur CA avant application du niveau de test. REMARQUE 2 À 80 MHz et 800 MHz, la distance de séparation s applique pour la plage de fréquences la plus élevée. REMARQUE 3 Ces recommandations peuvent être incorrectes dans certains cas. La propagation électromagnétique dépend de l absorption et de la réflexion des structures, des objets et des personnes. a) Aucune méthode théorique ne permet de calculer avec précision l intensité du champ induit par les émetteurs tels que les stations de base pour téléphones cellulaires/sans fil et installations radio mobiles, les radios amateur, les stations de radio AM ou FM et la télévision hertzienne. Seule une étude électromagnétique sur site permet d évaluer l environnement électromagnétique engendré par les émetteurs de radiofréquences. Si l intensité du champ au point d utilisation du système HemoCue dépasse le niveau de conformité RF applicable (voir ci-dessus), contrôler le bon fonctionnement du système HemoCue. En cas de dysfonctionnement, des mesures supplémentaires peuvent s imposer (déplacement ou réorientation des systèmes, par exemple). b) Dans la plage de fréquences comprise entre 150 khz et 80 MHz, l intensité de champ doit être inférieure à 3 V/m. 54
55 Caractéristiques techniques (EMC-RF) Utiliser uniquement des câbles présentant les caractéristiques suivantes : USB, blindé, longueur maximum 2 m Série, blindé, maximum 1,5 m Recommandations et déclaration du fabrication concernant les émissions électromagnétiques Les systèmes HemoCue sont conçus pour une utilisation dans l environnement électromagnétique défini ci-dessous. Le client ou l utilisateur du système HemoCue doit s assurer qu il est utilisé dans un tel environnement. Test d émission Conformité Conseils en matière d environnement électromagnétique Émissions RF Groupe 1 Les systèmes HemoCue n utilisent les radiofréquences que pour leur fonctionnement interne. Il émet donc très peu de radiofréquences et ne devrait pas interférer avec les équipements électroniques proches. Émissions RF Classe B Le système HemoCue peut être utilisé dans n importe quel établissement, y compris un établissement privé ou Émissions harmoniques CEI Fluctuations de tension/papillotement CEI Classe A Conforme directement connecté au réseau public d alimentation électrique basse tension qui équipe les bâtiments à usage privé. REMARQUE 1 Le fabricant est tenu de fournir au client ou à l utilisateur toutes les informations concernant la compatibilité électromagnétique de l équipement. REMARQUE 2 L utilisateur est tenu de maintenir un environnement électromagnétique compatible pour l équipement afin de garantir le bon fonctionnement de l appareil. 55
56 Garantie Le photomètre est garanti pour une période de 24 mois à compter de la date de réception. Après l expiration de la garantie, la maintenance et les réparations sont proposées à un tarif fixe. Toute utilisation du système autre que celle recommandée par le fabricant annulera la garantie. Réparation et élimination Avant toute réparation ou élimination, nettoyer le photomètre conformément aux instructions de la section Maintenance. Consulter les autorités locales compétentes en matière d environnement pour une élimination appropriée. Pièces de rechange et accessoires : Les pièces détachées et accessoires suivants sont disponibles : Adaptateur secteur Couvercle du compartiment à piles Support de cuvette Tampons HemoCue Cleaner 56
57 Symboles utilisés! Attention Marquage CE Équipement de Classe II Valable uniquement dans l Union européenne. Séparer les déchets électriques et équipements électroniques. Risques biologiques Références 1. Notice HemoCue Plasma/Low Hb. 2. Reference and Selected Procedures for the Quantitative Determination of Hemoglobin in Blood ; Approved Standard NCCLS Document H15-A 3. ICSH Standard EP6/4 : 1995, J Clin. Pathol ; 49 : Température minimum/maximum Niveau d efficacité Humidité relative, sans condensation Fabricant HemoCue AB Box 1204 SE Ängelholm Suède Téléphone : Fax : [email protected] Se reporter au mode d emploi Pour garantir votre sécurité, utiliser exclusivement un adaptateur marqué HCA01 Alimentation en courant continu «OFF» (alimentation) «ON» (alimentation) 57
58 HemoCue AB, Box 1204, SE Ängelholm, Sweden. Phone Fax GB/US/ES/FR BERGSTENS, HBG
Notice Technique / Technical Manual
 Contrôle d accès Access control Encodeur USB Mifare ENCOD-USB-AI Notice Technique / Technical Manual SOMMAIRE p.2/10 Sommaire Remerciements... 3 Informations et recommandations... 4 Caractéristiques techniques...
ENGLISH 4 FRANÇAIS 6 ESPAÑOL 8
 SY ENGLISH 4 FRANÇAIS 6 ESPAÑOL 8 ENGLISH How to lubricate the sewing machine Warning! Always switch off the machine and disconnect it from the power supply before lubricating the sewing machine. 1 Always
Thank you for choosing the Mobile Broadband USB Stick. With your USB Stick, you can access a wireless network at high speed.
 Thank you for choosing the Mobile Broadband USB Stick. With your USB Stick, you can access a wireless network at high speed. Note: This manual describes the appearance of the USB Stick, as well as the
Contrôle d'accès Access control. Notice technique / Technical Manual
 p.1/18 Contrôle d'accès Access control INFX V2-AI Notice technique / Technical Manual p.2/18 Sommaire / Contents Remerciements... 3 Informations et recommandations... 4 Caractéristiques techniques... 5
Paxton. ins-20605. Net2 desktop reader USB
 Paxton ins-20605 Net2 desktop reader USB 1 3 2 4 1 2 Desktop Reader The desktop reader is designed to sit next to the PC. It is used for adding tokens to a Net2 system and also for identifying lost cards.
03/2013. Mod: WOKI-60IP/TR. Production code: DTWIC 6000
 03/2013 Mod: WOKI-60IP/TR Production code: DTWIC 6000 ENCASTRABLE INDUCTION DROP IN INDUCTION 11/2011 TECHNICAL FEATURES DOCUMENTATION S.A.V. Notice d utilisation : FX00326-A Guide d intervention : ---
HemoCue Hb 201 + Operating Manual Manuel d'utilisation
 HemoCue Hb 201 + Operating Manual Manuel d'utilisation HemoCue Hb 201 + Operating Manual HemoCue Hb 201 + Manuel d'utilisation US The HemoCue Hb 201 + analyzer provides determination of hemoglobin quickly,
Instructions pour mettre à jour un HFFv2 v1.x.yy v2.0.00
 Instructions pour mettre à jour un HFFv2 v1.x.yy v2.0.00 HFFv2 1. OBJET L accroissement de la taille de code sur la version 2.0.00 a nécessité une évolution du mapping de la flash. La conséquence de ce
PVCHECK Rel. 2.02 09/11/12
 Metel: HV000PVC Pag 1 of 5 Multifunction instrument for safety, functionality and performance verifications on a PV plant The multifunction instrument PVCHECK performs prompt and safe electrical checks
Thank you for choosing the Mobile Broadband USB Stick. With your USB Stick, you can access a wireless network at high speed.
 Thank you for choosing the Mobile Broadband USB Stick. With your USB Stick, you can access a wireless network at high speed. Note: This manual describes the appearance of the USB Stick, as well as the
33 inch open & closed storage Rangement à espace fermé et ouvert de 33po (83.7cm) 33 pulgadas almacenaje abierto y cerra
 33 pulgadas almacenaje abierto y cerra") 33 inch open & closed storage 33 pulgadas almacenaje abierto y cerra! o not throw away packaging materials until assembly is complete.! Assemble this item on a soft surface, such as cardboard or carpet,
33 inch open & closed storage 33 pulgadas almacenaje abierto y cerra! o not throw away packaging materials until assembly is complete.! Assemble this item on a soft surface, such as cardboard or carpet,
GIGABIT PCI DESKTOP ADAPTER DGE-530T. Quick Installation Guide+ Guide d installation+
 GIGABIT PCI DESKTOP ADAPTER Quick Installation Guide+ Guide d installation+ Check Your Package Contents Quick Installation Guide Gigabit Ethernet PCI Adapter CD with Manual and Drivers DO NOT insert the
ARP-090G / ARP-090K NOTICE D'EMPLOI INSTRUCTION MANUAL
 2 7 NOTICE D'EMPLOI INSTRUCTION MANUAL ARP-090G / ARP-090K Lire attentivement la notice avant d utiliser l appareil Before operating this product, please read user manual completely FRANCAIS EMPLACEMENT
Le No.1 de l économie d énergie pour patinoires.
 Le No.1 de l économie d énergie pour patinoires. Partner of REALice system Economie d énergie et une meilleure qualité de glace La 2ème génération améliorée du système REALice bien connu, est livré en
Lavatory Faucet. Instruction Manual. Questions? 1-866-661-9606 [email protected]
 Lavatory Faucet Instruction Manual rev. 19-01-2015 Installation Manual You will need Adjustable Wrench Adjustable Pliers Plumber s Tape Hardware list (included) Allen Key Socket wrench tool Important Follow
The new consumables catalogue from Medisoft is now updated. Please discover this full overview of all our consumables available to you.
 General information 120426_CCD_EN_FR Dear Partner, The new consumables catalogue from Medisoft is now updated. Please discover this full overview of all our consumables available to you. To assist navigation
NORME INTERNATIONALE INTERNATIONAL STANDARD. Dispositifs à semiconducteurs Dispositifs discrets. Semiconductor devices Discrete devices
 NORME INTERNATIONALE INTERNATIONAL STANDARD CEI IEC 747-6-3 QC 750113 Première édition First edition 1993-11 Dispositifs à semiconducteurs Dispositifs discrets Partie 6: Thyristors Section trois Spécification
Comfort Duett. TV-kit. www.comfortaudio.com. USA: English/Français/Español. Comfort Duett
 Comfort Duett TV-kit USA: English/Français/Español www.comfortaudio.com Comfort Duett 1 English The television kit makes it possible to amplify the sound from the TV via the charger unit. As soon as Comfort
Instructions Mozilla Thunderbird Page 1
 Instructions Mozilla Thunderbird Page 1 Instructions Mozilla Thunderbird Ce manuel est écrit pour les utilisateurs qui font déjà configurer un compte de courrier électronique dans Mozilla Thunderbird et
Package Contents. System Requirements. Before You Begin
 Package Contents DWA-125 Wireless 150 USB Adapter CD-ROM (contains software, drivers, and manual) Cradle If any of the above items are missing, please contact your reseller. System Requirements A computer
Folio Case User s Guide
 Fujitsu America, Inc. Folio Case User s Guide I N S T R U C T I O N S This Folio Case is a stylish, lightweight case for protecting your Tablet PC. Elastic Strap Pen Holder Card Holders/ Easel Stops Figure
ASSEMBLY INSTRUCTIONS DIRECTIVES POUR L'ASSEMBLAGE ombre pendant lamp lampe suspendue à tons dégradés, chocolat
 ASSEMBLY INSTRUCTIONS DIRECTIVES POUR L'ASSEMBLAGE ombre pendant lamp lampe suspendue à tons dégradés, chocolat SKU 2728089 INSTRUCTIONAL MANUAL MANUEL D'INSTRUCTIONS 270/2707 COMPONENT LIST LISTE DES
ASSEMBLY INSTRUCTIONS DIRECTIVES POUR L'ASSEMBLAGE luster chandelier lamp chandelier à trois branches en verre lustré
 ASSEMBLY INSTRUCTIONS DIRECTIVES POUR L'ASSEMBLAGE luster chandelier lamp chandelier à trois branches en verre lustré SKU 2711592 INSTRUCTIONAL MANUAL MANUEL D'INSTRUCTIONS 270/2707 COMPONENT LIST LISTE
Fabricant. 2 terminals
 Specifications Fabricant Nominal torque (Nm) 65 Minimal torque (Nm) 0,63 Coil resistance - 20 C (ohms) 20 Rated current DC (A) 1 Rotor inertia (kg.m 2 ) 2.10-3 Weight (kg) 7,20 Heat dissipation continuous
Guide d'installation rapide TFM-560X YO.13
 Guide d'installation rapide TFM-560X YO.13 Table of Contents Français 1 1. Avant de commencer 1 2. Procéder à l'installation 2 Troubleshooting 6 Version 06.08.2011 16. Select Install the software automatically
that the child(ren) was/were in need of protection under Part III of the Child and Family Services Act, and the court made an order on
 was/were in need of protection under Part III of the Child and Family Services Act, and the court made an order on") ONTARIO Court File Number at (Name of court) Court office address Applicant(s) (In most cases, the applicant will be a children s aid society.) Full legal name & address for service street & number, municipality,
ONTARIO Court File Number at (Name of court) Court office address Applicant(s) (In most cases, the applicant will be a children s aid society.) Full legal name & address for service street & number, municipality,
APPENDIX 6 BONUS RING FORMAT
 #4 EN FRANÇAIS CI-DESSOUS Preamble and Justification This motion is being presented to the membership as an alternative format for clubs to use to encourage increased entries, both in areas where the exhibitor
Quick start guide. www.philips.com/support HTL1170B
 For product support, visit Para obtener asistencia técnica, visite Pour en savoir plus sur l assistance sur les produits, visitez le site www.philips.com/support HTL1170B Quick start guide P&F USA, Inc.
Garage Door Monitor Model 829LM
 Garage Door Monitor Model 829LM To prevent possible SERIOUS INJURY or DEATH from a closing garage door: NEVER permit children to operate or play with door control push buttons or remote control transmitters.
Quick Installation Guide TBW-106UB H/W: V1
 Quick Installation Guide TBW-106UB H/W: V1 Table of Contents... 1. Avant de commencer... 2. Procéder à l'installation... 3. Configuration de l'adaptateur Bluetooth... Troubleshooting... 1 1 2 5 7 Version
POLICY: FREE MILK PROGRAM CODE: CS-4
 POLICY: FREE MILK PROGRAM CODE: CS-4 Origin: Authority: Reference(s): Community Services Department Cafeteria Services and Nutrition Education Division Resolution #86-02-26-15B.1 POLICY STATEMENT All elementary
Trim Kit Installation Instruction
 Trim Kit Installation Instruction Instrucciones para la Instalación del Kit de Molduras Instructions pour l'installation du Kit d'encastrement m If any hardware or parts are damaged or missing, contact
TABLE DES MATIERES A OBJET PROCEDURE DE CONNEXION
 1 12 rue Denis Papin 37300 JOUE LES TOURS Tel: 02.47.68.34.00 Fax: 02.47.68.35.48 www.herve consultants.net contacts@herve consultants.net TABLE DES MATIERES A Objet...1 B Les équipements et pré-requis...2
SA-32 / SA-62 INSTRUCTION MANUAL - MANUEL D INSTRUCTIONS
 SA-32 / SA-62 INSTRUCTION MANUAL - MANUEL D INSTRUCTIONS 4 5 6 7 4 5 6 7 1. Telephone Paging Volume Control 1. Contrôle de volume Paging Téléphone 2. Microphone Volume Control 2. Contrôle volume du microphone
Quick Installation Guide TEW-AO12O
 Quick Installation Guide TEW-AO12O Table of of Contents Contents Français... 1 1. Avant de commencer... 1 2. Installation du matériel... 2 3. Montage... 4 Troubleshooting... 6 Version 10.04.2007 1. Avant
How to Login to Career Page
 How to Login to Career Page BASF Canada July 2013 To view this instruction manual in French, please scroll down to page 16 1 Job Postings How to Login/Create your Profile/Sign Up for Job Posting Notifications
APPENDIX 2. Provisions to be included in the contract between the Provider and the. Holder
 Page 1 APPENDIX 2 Provisions to be included in the contract between the Provider and the Obligations and rights of the Applicant / Holder Holder 1. The Applicant or Licensee acknowledges that it has read
PRESENTATION REMOTE TÉLÉCOMMANDE DE PRÉSENTATION. User Guide Manuel de l utilisateur
 PRESENTATION REMOTE TÉLÉCOMMANDE DE PRÉSENTATION User Guide Manuel de l utilisateur Targus Presentation Remote Introduction Thank you for your purchase of the Targus Presentation Remote. This cordless
Guide d installation Deco Drain inc. DD200
 Guide d installation Deco Drain inc. DD200 Pour plus informations et pour télécharger les guides d installation en couleur, visitez notre site web. www.decodrain.com Soutien technique : Composez le : 514-946-8901
Mesure chimique. Chemical measurement. Sonde de température Pt 1000 Inox Pt 1000 stainless steel. Ref : 703 262. Français p 1.
 Mesure chimique Chemical measurement Français p 1 English p 3 Sonde de température Pt 1000 Inox Pt 1000 stainless steel Version : 6010 Mesure chimique Sonde de température Pt 1000 Inox 1 Description La
INVESTMENT REGULATIONS R-090-2001 In force October 1, 2001. RÈGLEMENT SUR LES INVESTISSEMENTS R-090-2001 En vigueur le 1 er octobre 2001
 FINANCIAL ADMINISTRATION ACT INVESTMENT REGULATIONS R-090-2001 In force October 1, 2001 LOI SUR LA GESTION DES FINANCES PUBLIQUES RÈGLEMENT SUR LES INVESTISSEMENTS R-090-2001 En vigueur le 1 er octobre
WINTER BOAT STORAGE SYSTEM SYSTÈME DE REMISAGE HIVERNAL POUR BATEAU
 MANUAL / MANUEL VIDEO WINTER BOAT STORAGE SYSTEM SYSTÈME DE REMISAGE HIVERNAL POUR BATEAU ASSEMBLY INSTRUCTIONS GUIDE D ASSEMBLAGE NAVIGLOO 14-18½ ft/pi FISHING BOAT! RUNABOUT! PONTOON BOAT! SAILBOAT (SAILBOAT
Support Orders and Support Provisions (Banks and Authorized Foreign Banks) Regulations
 Regulations") CANADA CONSOLIDATION CODIFICATION Support Orders and Support Provisions (Banks and Authorized Foreign Banks) Regulations Règlement sur les ordonnances alimentaires et les dispositions alimentaires (banques
CANADA CONSOLIDATION CODIFICATION Support Orders and Support Provisions (Banks and Authorized Foreign Banks) Regulations Règlement sur les ordonnances alimentaires et les dispositions alimentaires (banques
Cheque Holding Policy Disclosure (Banks) Regulations. Règlement sur la communication de la politique de retenue de chèques (banques) CONSOLIDATION
 Regulations. Règlement sur la communication de la politique de retenue de chèques (banques) CONSOLIDATION") CANADA CONSOLIDATION CODIFICATION Cheque Holding Policy Disclosure (Banks) Regulations Règlement sur la communication de la politique de retenue de chèques (banques) SOR/2002-39 DORS/2002-39 Current to
CANADA CONSOLIDATION CODIFICATION Cheque Holding Policy Disclosure (Banks) Regulations Règlement sur la communication de la politique de retenue de chèques (banques) SOR/2002-39 DORS/2002-39 Current to
3615 SELFIE. http://graffitiresearchlab.fr HOW-TO / GUIDE D'UTILISATION
 3615 SELFIE http://graffitiresearchlab.fr HOW-TO / GUIDE D'UTILISATION Hardware : Minitel Computer DIN FM545 45 connector (http://www.gotronic.fr/art-fiche-din-fm545-4747.htm) Cable Arduino compatible
This is a preview - click here to buy the full publication NORME INTERNATIONALE INTERNATIONAL STAN DARD. Telecontrol equipment and systems
 NORME INTERNATIONALE INTERNATIONAL STAN DARD CEI IEC 870-3 Première édition First edition 1989-03 Matériels et systèmes de téléconduite Troisième partie: Interfaces (caractéristiques électriques) Telecontrol
Spécial Catégorie 6 Patch Cords
 Spécial Catégorie 6 Patch Cords Patent Pending Sommaire 1 - Préliminaires... 2 2 Qu est ce qu apporte la catégorie 6... 3 3 Qu est ce que l interopérabilité...3 4 Ce que PatchSee annonçait en septembre
AMENDMENT TO BILL 32 AMENDEMENT AU PROJET DE LOI 32
 THAT the proposed clause 6(1), as set out in Clause 6(1) of the Bill, be replaced with the following: Trustee to respond promptly 6(1) A trustee shall respond to a request as promptly as required in the
Application Form/ Formulaire de demande
 Application Form/ Formulaire de demande Ecosystem Approaches to Health: Summer Workshop and Field school Approches écosystémiques de la santé: Atelier intensif et stage d été Please submit your application
CLASSIFICATION REPORT OF REACTION TO FIRE PERFORMANCE IN ACCORDANCE WITH EN 13501-1: 2007
 1 Introduction This classification report defines the classification assigned to «Paintable wall covering VELIO : Exclusive Florentine Authentique Easypaint Clean Air Mold X» (as described by the sponsor)
ETABLISSEMENT D ENSEIGNEMENT OU ORGANISME DE FORMATION / UNIVERSITY OR COLLEGE:
 8. Tripartite internship agreement La présente convention a pour objet de définir les conditions dans lesquelles le stagiaire ci-après nommé sera accueilli dans l entreprise. This contract defines the
Critères à l attention des fabricants et des fournisseurs de biens ou de services : dispositifs mécaniques pour bingo
 Alcohol and Gaming Commission des alcools Commission of Ontario et des jeux de l'ontario Gaming Registration & Lotteries Inscription pour les jeux et loteries 90 Sheppard Avenue East 90, avenue Sheppard
Lesson Plan Physical Descriptions. belle vieille grande petite grosse laide mignonne jolie. beau vieux grand petit gros laid mignon
 Lesson Plan Physical Descriptions Objective: Students will comprehend and describe the physical appearance of others. Vocabulary: Elle est Il est Elle/Il est Elle/Il a les cheveux belle vieille grande
PROJET DE LOI. An Act to Amend the Employment Standards Act. Loi modifiant la Loi sur les normes d emploi
 2nd Session, 57th Legislature New Brunswick 60-61 Elizabeth II, 2011-2012 2 e session, 57 e législature Nouveau-Brunswick 60-61 Elizabeth II, 2011-2012 BILL PROJET DE LOI 7 7 An Act to Amend the Employment
SERVEUR DÉDIÉ DOCUMENTATION
 SERVEUR DÉDIÉ DOCUMENTATION Release 5.0.6.0 19 Juillet 2013 Copyright 2013 GIANTS Software GmbH, All Rights Reserved. 1/9 CHANGE LOG Correction de bug divers (5.0.6.0) Ajout d une option de relance automatique
Quick Installation Guide TW100-BRV304
 Quick Installation Guide TW100-BRV304 Table of of Contents Contents Français... 1. Avant de commencer... 2. Installation du matériel... 3. Configuration du routeur... 1 1 2 3 Troubleshooting... 5 Version
CLASSIFICATION REPORT OF REACTION TO FIRE PERFORMANCE IN ACCORDANCE WITH EN 13501-1: 2007
 1 Introduction This classification report defines the classification assigned to «Paintable wall covering EKOTEX : Exclusief Ecologisch Sprint Excellent Schone Lucht Hygiëne» (as described by the sponsor)
THE LAW SOCIETY OF UPPER CANADA BY-LAW 19 [HANDLING OF MONEY AND OTHER PROPERTY] MOTION TO BE MOVED AT THE MEETING OF CONVOCATION ON JANUARY 24, 2002
![THE LAW SOCIETY OF UPPER CANADA BY-LAW 19 [HANDLING OF MONEY AND OTHER PROPERTY] MOTION TO BE MOVED AT THE MEETING OF CONVOCATION ON JANUARY 24, 2002](/thumbs/19/276456.jpg "THE LAW SOCIETY OF UPPER CANADA BY-LAW 19 [HANDLING OF MONEY AND OTHER PROPERTY] MOTION TO BE MOVED AT THE MEETING OF CONVOCATION ON JANUARY 24, 2002") 2-aes THE LAW SOCIETY OF UPPER CANADA BY-LAW 19 [HANDLING OF MONEY AND OTHER PROPERTY] MOTION TO BE MOVED AT THE MEETING OF CONVOCATION ON JANUARY 24, 2002 MOVED BY SECONDED BY THAT By-Law 19 [Handling
2-aes THE LAW SOCIETY OF UPPER CANADA BY-LAW 19 [HANDLING OF MONEY AND OTHER PROPERTY] MOTION TO BE MOVED AT THE MEETING OF CONVOCATION ON JANUARY 24, 2002 MOVED BY SECONDED BY THAT By-Law 19 [Handling
Z-Axis Compliance Device Compliance en z
 Compensation for different vertical positions Collision recognition in Z-direction Protection of parts and work pieces Monitoring of the insertion forces during assembly operations Monitoring of the picking
Contrôle d accès Access control MOD-TCPIP-AI. Notice technique / Technical Manual
 Contrôle d accès Access control MOD-TCPIP-AI Notice technique / Technical Manual Notice technique Mod-TCPIP-AI 9 septembre 2008 v.1.0 p.2/16 Sommaire / Contents Sommaire / Contents...2 Remerciements...3
DOCUMENTATION - FRANCAIS... 2
 DOCUMENTATION MODULE SHOPDECORATION MODULE PRESTASHOP CREE PAR PRESTACREA INDEX : DOCUMENTATION - FRANCAIS... 2 INSTALLATION... 2 Installation automatique... 2 Installation manuelle... 2 Résolution des
First Nations Assessment Inspection Regulations. Règlement sur l inspection aux fins d évaluation foncière des premières nations CONSOLIDATION
 CANADA CONSOLIDATION CODIFICATION First Nations Assessment Inspection Regulations Règlement sur l inspection aux fins d évaluation foncière des premières nations SOR/2007-242 DORS/2007-242 Current to September
AirCard 503 MODEM QUICK START GUIDE GUIDE DE DÉMARRAGE RAPIDE GUÍA DE INICIO RÁPIDO. www.sierrawireless.com
 AirCard 503 MODEM QUICK START GUIDE GUIDE DE DÉMARRAGE RAPIDE GUÍA DE INICIO RÁPIDO www.sierrawireless.com 1 English Windows Operating Systems This modem is TRU -Install enabled and does not require a
FCM 2015 ANNUAL CONFERENCE AND TRADE SHOW Terms and Conditions for Delegates and Companions Shaw Convention Centre, Edmonton, AB June 5 8, 2015
 FCM 2015 ANNUAL CONFERENCE AND TRADE SHOW Terms and Conditions for Delegates and Companions Shaw Convention Centre, Edmonton, AB June 5 8, 2015 Early-bird registration Early-bird registration ends April
Règlement sur le télémarketing et les centres d'appel. Call Centres Telemarketing Sales Regulation
 THE CONSUMER PROTECTION ACT (C.C.S.M. c. C200) Call Centres Telemarketing Sales Regulation LOI SUR LA PROTECTION DU CONSOMMATEUR (c. C200 de la C.P.L.M.) Règlement sur le télémarketing et les centres d'appel
Warning: Failure to follow these warnings could result in property damage, or personal injury.
 Western Steel & Tube 1 Storage Locker Extended Storage Locker Storage Cabinet Assembly And Use Instructions Warning: Failure to follow these warnings could result in property damage, or personal injury.
BILL 203 PROJET DE LOI 203
 Bill 203 Private Member's Bill Projet de loi 203 Projet de loi d'un député 4 th Session, 40 th Legislature, Manitoba, 63 Elizabeth II, 2014 4 e session, 40 e législature, Manitoba, 63 Elizabeth II, 2014
Deadline(s): Assignment: in week 8 of block C Exam: in week 7 (oral exam) and in the exam week (written exam) of block D
: Assignment: in week 8 of block C Exam: in week 7 (oral exam) and in the exam week (written exam) of block D") ICM STUDENT MANUAL French 2 JIC-FRE2.2V-12 Module Change Management and Media Research Study Year 2 1. Course overview Books: Français.com, niveau intermédiaire, livre d élève+ dvd- rom, 2ième édition,
ICM STUDENT MANUAL French 2 JIC-FRE2.2V-12 Module Change Management and Media Research Study Year 2 1. Course overview Books: Français.com, niveau intermédiaire, livre d élève+ dvd- rom, 2ième édition,
WEB page builder and server for SCADA applications usable from a WEB navigator
 Générateur de pages WEB et serveur pour supervision accessible à partir d un navigateur WEB WEB page builder and server for SCADA applications usable from a WEB navigator opyright 2007 IRAI Manual Manuel
MODE D EMPLOI USER MANUAL
 notice_cd 853:notice 9/01/08 15:08 Page 1 CAFETIÈRE À DOSETTES Coffee pad machine CD 853 GIACOMO MODE D EMPLOI USER MANUAL notice_cd 853:notice 9/01/08 15:08 Page 2 FRANÇAIS WHITE & BROWN vous félicite
Laboratory accredited by the French Home Office (official gazette date February 5 th, 1959, modified) Valid five years from August 27 th, 2013
 Valid five years from August 27 th, 2013") CLASSIFICATION REPORT OF REACTION TO FIRE PERFORMANCE IN ACCORDANCE WITH THE EUROPEAN STANDARD EN 350-+A: 203 and in compliance with the French Home Office Regulation dated November 2 st, 2002 concerning
CLASSIFICATION REPORT OF REACTION TO FIRE PERFORMANCE IN ACCORDANCE WITH THE EUROPEAN STANDARD EN 350-+A: 203 and in compliance with the French Home Office Regulation dated November 2 st, 2002 concerning
Contents Windows 8.1... 2
 Workaround: Installation of IRIS Devices on Windows 8 Contents Windows 8.1... 2 English Français Windows 8... 13 English Français Windows 8.1 1. English Before installing an I.R.I.S. Device, we need to
Logitech Tablet Keyboard for Windows 8, Windows RT and Android 3.0+ Setup Guide Guide d installation
 Logitech Tablet Keyboard for Windows 8, Windows RT and Android 3.0+ Setup Guide Guide d installation English.......................................... 3 Français.........................................
INDIVIDUALS AND LEGAL ENTITIES: If the dividends have not been paid yet, you may be eligible for the simplified procedure.
 Recipient s name 5001-EN For use by the foreign tax authority CALCULATION OF WITHHOLDING TAX ON DIVIDENDS Attachment to Form 5000 12816*01 INDIVIDUALS AND LEGAL ENTITIES: If the dividends have not been
CLIM/GTP/27/8 ANNEX III/ANNEXE III. Category 1 New indications/ 1 re catégorie Nouvelles indications
 ANNEX III/ANNEXE III PROPOSALS FOR CHANGES TO THE NINTH EDITION OF THE NICE CLASSIFICATION CONCERNING AMUSEMENT APPARATUS OR APPARATUS FOR GAMES/ PROPOSITIONS DE CHANGEMENTS À APPORTER À LA NEUVIÈME ÉDITION
Interest Rate for Customs Purposes Regulations. Règlement sur le taux d intérêt aux fins des douanes CONSOLIDATION CODIFICATION
 CANADA CONSOLIDATION CODIFICATION Interest Rate for Customs Purposes Regulations Règlement sur le taux d intérêt aux fins des douanes SOR/86-1121 DORS/86-1121 Current to August 4, 2015 À jour au 4 août
PARIS ROISSY CHARLES DE GAULLE
 GPS 2 34 1 E 49 0 46 N GPS* 2 56 56 E 49 0 12 N Votre contact / Your contact: et / and: Accueil : Cabines téléphoniques publiques Reception: Public telephone kiosks Navette Shuttle AÉROPORT DE TT CAR TRANSIT
AUDIT COMMITTEE: TERMS OF REFERENCE
 AUDIT COMMITTEE: TERMS OF REFERENCE PURPOSE The Audit Committee (the Committee), assists the Board of Trustees to fulfill its oversight responsibilities to the Crown, as shareholder, for the following
Utiliser une WebCam. Micro-ordinateurs, informations, idées, trucs et astuces
 Micro-ordinateurs, informations, idées, trucs et astuces Utiliser une WebCam Auteur : François CHAUSSON Date : 8 février 2008 Référence : utiliser une WebCam.doc Préambule Voici quelques informations utiles
Stainless Steel Solar Wall Light
 V 2.9 Stainless Steel Solar Wall Light User Manual Please read and understand all instructions before use.retain this manual for future reference. V 2.9 Stainless Steel Solar Wall Light SPECIFICATIONS
Nouveautés printemps 2013
 » English Se désinscrire de la liste Nouveautés printemps 2013 19 mars 2013 Dans ce Flash Info, vous trouverez une description des nouveautés et mises à jour des produits La Capitale pour le printemps
I. COORDONNÉES PERSONNELLES / PERSONAL DATA
 DOSSIER DE CANDIDATUREAPPLICATION FORM 2012 Please tick the admission session of your choice FévrierFebruary SeptembreSeptember MASTER OF ART (Mention the subject) MASTER OF SCIENCE (Mention the subject)
Logitech Speaker System Z553 Setup Guide Guide d installation
 Logitech Speaker System Z553 Setup Guide Guide d installation Logitech Speaker System Z553 English................. 3 Français................ 10 www.logitech.com/support...19 2 Package contents Logitech
DOCUMENTATION - FRANCAIS... 2
 DOCUMENTATION MODULE CATEGORIESTOPMENU MODULE CREE PAR PRESTACREA INDEX : DOCUMENTATION - FRANCAIS... 2 INSTALLATION... 2 CONFIGURATION... 2 LICENCE ET COPYRIGHT... 3 SUPPORT TECHNIQUE ET MISES A JOUR...
Compléter le formulaire «Demande de participation» et l envoyer aux bureaux de SGC* à l adresse suivante :
 FOIRE AUX QUESTIONS COMMENT ADHÉRER? Compléter le formulaire «Demande de participation» et l envoyer aux bureaux de SGC* à l adresse suivante : 275, boul des Braves Bureau 310 Terrebonne (Qc) J6W 3H6 La
MELTING POTES, LA SECTION INTERNATIONALE DU BELLASSO (Association étudiante de lʼensaparis-belleville) PRESENTE :
 PRESENTE :") MELTING POTES, LA SECTION INTERNATIONALE DU BELLASSO (Association étudiante de lʼensaparis-belleville) PRESENTE : Housing system est un service gratuit, qui vous propose de vous mettre en relation avec
MELTING POTES, LA SECTION INTERNATIONALE DU BELLASSO (Association étudiante de lʼensaparis-belleville) PRESENTE : Housing system est un service gratuit, qui vous propose de vous mettre en relation avec
Mesure chimique Conductimétrie. Chemical measurement Conductimetry. Conductimètre CTM Initio. Initio CTM conductimeter. Ref : 701 327.
 Mesure chimique Conductimétrie Chemical measurement Conductimetry Français p 1 English p 5 Version : 7001 Conductimètre CTM Initio Initio CTM conductimeter Mesure chimique Conductimètre CTM Initio 1 Description
Once the installation is complete, you can delete the temporary Zip files..
 Sommaire Installation... 2 After the download... 2 From a CD... 2 Access codes... 2 DirectX Compatibility... 2 Using the program... 2 Structure... 4 Lier une structure à une autre... 4 Personnaliser une
sur le réseau de distribution
 EDF-R&D Département MIRE et Département EFESE 1, avenue du Général de Gaulle 92141 Clamart Impact qualité du site photovoltaïque "Association Soleil Marguerite" sur le réseau de distribution Responsable
Monitor LRD. Table des matières
 Folio :1/6 Table des matières 1.Installation du logiciel... 3 2.Utilisation du logiciel... 3 2.1.Description de la fenêtre de commande... 3 2.1.1.Réglage des paramètres de communication... 4 2.1.2.Boutons
Maximum Capacity / Capacité maximal: 10 kg/min
 Consumer and Corporate Affairs Consommation et Corporations Canada Legal Metrology Métrologie légale Supercedes Conditional Approval T Dated 1992/12/08 NOTICE OF APPROVAL Issued by statutory authority
Principe de TrueCrypt. Créer un volume pour TrueCrypt
 Sommaire : Principe de TrueCrypt...1 Créer un volume pour TrueCrypt...1 Premier montage...6 Réglages...8 Save Currently Mounted Volumes as Favorite...8 Settings > Preferences...9 TrueCrypt Traveller pour
Fédération Internationale de Handball. b) Règlement du but
 Règlement du but") Fédération Internationale de Handball b) Règlement du but Edition: Septembre 2007 Table des matières Page 1. Généralités 3 2. Caractéristiques techniques des buts de handball 3 3. Dimensions et schéma
Fédération Internationale de Handball b) Règlement du but Edition: Septembre 2007 Table des matières Page 1. Généralités 3 2. Caractéristiques techniques des buts de handball 3 3. Dimensions et schéma
Quick Installation Guide TV-IP400 TV-IP400W
 Quick Installation Guide TV-IP400 TV-IP400W Table of of Contents Contents Français... 1. Avant de commencer... 2. Installation du matériel... 3. Configuration de la Webcam... Troubleshooting... 1 1 2 3
Natixis Asset Management Response to the European Commission Green Paper on shadow banking
 European Commission DG MARKT Unit 02 Rue de Spa, 2 1049 Brussels Belgium [email protected] 14 th June 2012 Natixis Asset Management Response to the European Commission Green
Quick Setup Guide Guide de configuration rapide. Tablet Device SGPT12 Series Tablette électronique Série SGPT12
 Quick Setup Guide Guide de configuration rapide Tablet Device SGPT12 Series Tablette électronique Série SGPT12 Welcome / Bienvenue Congratulations on your purchase of this Xperia Tablet S. This Quick Setup
accidents and repairs:
 accidents and repairs: putting the pieces together accidents et réparations : réunir le tout nobody can repair your Toyota like Toyota Unfortunately, accidents do happen. And the best way to restore your
COPYRIGHT Danish Standards. NOT FOR COMMERCIAL USE OR REPRODUCTION. DS/EN 61303:1997
 COPYRIGHT Danish Standards. NOT FOR COMMERCIAL USE OR REPRODUCTION. DS/EN 61303:1997 COPYRIGHT Danish Standards. NOT FOR COMMERCIAL USE OR REPRODUCTION. DS/EN 61303:1997 COPYRIGHT Danish Standards. NOT
User guide Conference phone Konftel 100
 User guide Conference phone Konftel 100 English I Español I Conference phones for every situation Cet emballage contient: 1 x Guide de l utilisateur 1 x Téléphone pour conférences 1 x Transformateur secteur
CEPF FINAL PROJECT COMPLETION REPORT
 CEPF FINAL PROJECT COMPLETION REPORT I. BASIC DATA Organization Legal Name: Conservation International Madagascar Project Title (as stated in the grant agreement): Knowledge Management: Information & Monitoring.