(FUUJOH TUBSUFE XJUI -PHJUFDI 8JSFMFTT $PNCP.,
|
|
|
- Agathe Briand
- il y a 9 ans
- Total affichages :
Transcription
1
2

3 Logitech Wireless Combo MK520 Contents English Setup, 4 Features and troubleshooting, 9 Deutsch Einrichtung, 4 Funktionen und Fehlerbehebung, 17 Français Installation, 4 Fonctions et dépannage, 25 Italiano Installazione, 4 Funzioni e risoluzione dei problemi,


4 Logitech Wireless Combo MK520 4

5 Logitech Wireless Combo MK


6 Logitech Wireless Combo MK520 2 Deutsch ZIEHEN Français TIRER Italiano TIRARE Pull 6


7 Logitech Wireless Combo MK520 3 Deutsch ZIEHEN Français TIRER Italiano TIRARE 7

8 Logitech Wireless Combo MK520 English Your Keyboard and mouse are now ready for use. You can download the Logitech SetPoint Software if you want to customize your keyboard keys. Français Votre ensemble clavier et souris est maintenant prêt à l emploi. Vous pouvez télécharger le logiciel Logitech SetPoint si vous souhaitez personnaliser les touches de votre clavier. Deutsch Die Tastatur und Maus sind jetzt betriebsbereit. Sie können die Logitech -Software SetPoint herunterladen, wenn Sie die Tasten der Tastatur anpassen möchten. Italiano La tastiera e il mouse sono pronti per essere utilizzati. Per personalizzare i tasti della tastiera, è possibile scaricare il software Logitech SetPoint. 8

9 Logitech Wireless Combo MK520 Keyboard features: F-key usage User-friendly enhanced F-keys let you launch applications easily. To use the enhanced functions (yellow icons), first press and hold the key; second, press the F-key you want to use. Tip In the software settings, you can invert the FN mode if you prefer to access directly the enhanced functions without having to press the FN key. 2nd - Press an F-key 1st - Press and hold the FN key English 9

10 Getting started with Keyboard features English

11 Logitech Wireless Combo MK520 Keyboard features Multimedia navigation Volume adjustment Application zone + F1 Launches Internet browser + F2 Launches application + F3 Launches Windows Search* + F4 Launches media player Convenience zone + F9 My Computer + F10 Locks PC + F11 Puts PC in standby mode + F12 Keyboard battery status check Battery status indicator Keyboard power switch 4. Windows view controls + F5 Flip + F6 Shows Desktop + F7 Minimizes window + F8 Restores minimized windows 8. Internet navigation Internet back & forward navigation Internet favorites Launches calculator * One Touch Search if the SetSpoint software is installed. Application Switcher if the SetSpoint software is installed. English 11

12 Getting started with Mouse features Battery LED 2. Vertical scrolling 3. On/Off slider 4. Battery-door release 5. Unifying receiver storage 12 English

13 OFF ON Logitech Wireless Combo MK520 Battery management Your keyboard has up to three years of battery life and your mouse has up to one.* Battery sleep mode Did you know that your keyboard and mouse go into sleep mode after you stop using them for a few minutes? This feature helps limit battery usage and eliminates the need to keep switching your devices on and off. Both your keyboard and mouse are up and running immediately once you begin using them again. How to check the battery level for the keyboard Press and hold the FN key, then press the F12 key: If the LED glows green, the batteries are good. If the LED glows red, the battery level has dropped to 10% and you have only a few days of battery power left. You can also turn the keyboard off then back on using the On/Off switch on top of the keyboard. Battery status indicator How to check the battery level for the mouse Turn the mouse off then back on using the On/Off switch on the mouse bottom. If the LED on top of the mouse glows green for 10 seconds, the batteries are good. If the LED blinks red, the battery level has dropped to 10% and you have only a few days of battery power left. Mouse bottom On/Off switch Mouse top LED * Battery life varies with usage and computing conditions. Heavy usage usually results in shorter battery life. English 13

14 Getting started with Plug it. Forget it. Add to it. You ve got a Logitech Unifying receiver. Now add a compatible wireless keyboard or mouse that uses the same receiver. It s easy. Just start the Logitech Unifying software* and follow the onscreen instructions. For more information and to download the software, visit *Go to Start / All Programs / Logitech / Unifying / Logitech Unifying Software 14 English

15 Logitech Wireless Combo MK520 Troubleshooting Keyboard and mouse are not working Check the USB connection. Also, try changing USB ports. Move closer? Try moving the keyboard and mouse closer to the Unifying receiver, or plug the Unifying receiver into the receiver extender cable to bring it closer to the keyboard and mouse. Check battery installation. Also check the battery power of each device. (See Battery management for more information.) On the mouse bottom, slide the On/Off switch right to turn on the mouse. The Battery LED on the mouse top case should light green for 10 seconds. (See Battery management for more information.) Mouse bottom On/Off switch English 15
 On the mouse bottom, slide the On/Off switch right to turn on the mouse. The Battery LED on the mouse top case should light green for 10 seconds.")
16 Getting started with Troubleshooting Are you experiencing slow or jerky cursor movement? Try the mouse on a different surface (e.g., deep, dark surfaces may affect how the cursor moves on the computer screen). Is the keyboard turned on? Slide the keyboard Off/On switch to the On position, as shown in the image below. The keyboard Status icons should light up. OFF ON Re-establish the connection. Use the Unifying software to reset the connection between the keyboard/mouse and Unifying receiver. Refer to the Unifying section in this guide for more information (p. 15). For additional help, refer to the Customer Support telephone numbers on page 42. Also visit for more information about using your product, and for ergonomics. 16 English

17 Logitech Wireless Combo MK520 Tastaturfunktionen: F-Tasten Mit den erweiterten F-Tasten können Sie Anwendungen ganz einfach per Tastendruck starten. Um die erweiterte Funktion einer F-Taste (gelbes Symbol) zu aktivieren, halten Sie zuerst die -Taste gedrückt und drücken Sie dann die gewünschte F-Taste. Tipp Sie können den FN-Modus in der Software umkehren, wenn Sie es vorziehen, direkt auf die erweiterten Funktionen zuzugreifen, ohne die FN-Taste drücken zu müssen. 2. Drücken Sie eine F-Taste. 1. Halten Sie die FN-Taste gedrückt. Deutsch 17

18 Erste Schritte Tastaturfunktionen Deutsch
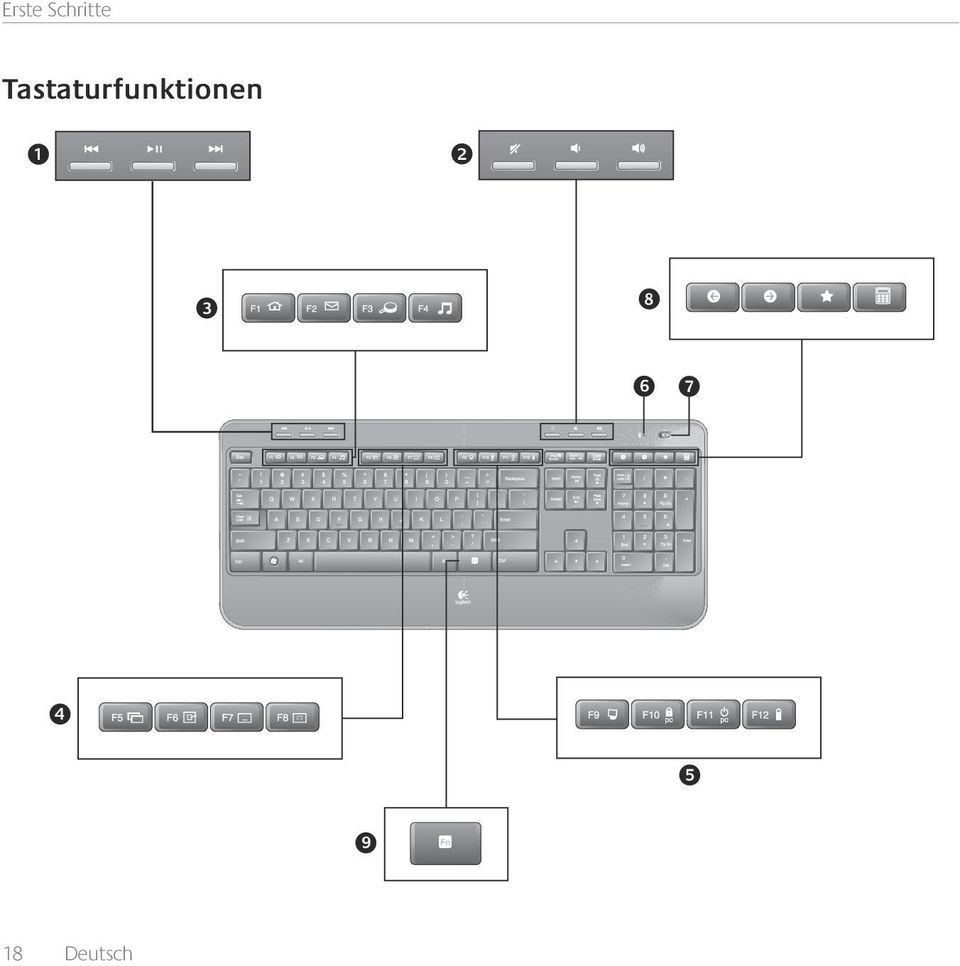
19 Logitech Wireless Combo MK520 Tastaturfunktionen Multimedia-Navigation Lautstärkeeinstellung Programme + F1: Startet den Internet-Browser + F2: Startet die -Anwendung + F3: Startet die Windows-Suche* + F4: Startet den Multimedia-Player Fensteransicht + F5: Wechselt zwischen Fenstern + F6: Zeigt Desktop an + F7: Minimiert Fenster + F8: Stellt minimierte Fenster wieder her Komfortfunktionen + F9: Arbeitsplatz + F10: Sperrt PC + F11: Versetzt PC in den Standby-Modus + F12: Prüft den Ladezustand der Tastaturbatterien Batteriestandsanzeige Ein-/Ausschalter der Tastatur Internet-Tasten Internet-Vor- und Zurück-Tasten Internetfavoriten Startet den Rechner * One Touch Search-Funktion, wenn SetPoint installiert ist. Programmumschalter, wenn SetPoint installiert ist. Deutsch 19

20 Erste Schritte Mausfunktionen Batterie-LED 2. Vertikaler Bildlauf 3. Ein-/Ausschalter 4. Batteriefachdeckel-Entriegelung 5. Unifying-Empfängerfach 20 Deutsch

21 OFF ON Logitech Wireless Combo MK520 Batterie Die Batterielebensdauer beträgt bei der Tastatur bis zu drei Jahre und bei der Maus bis zu ein Jahr.* Standby-Modus der Batterien Wussten Sie, dass Tastatur und Maus in den Standby-Modus schalten, wenn sie einige Minuten lang nicht benutzt werden? Dadurch werden die Batterien geschont und Sie müssen die Geräte bei Pausen nicht extra ein- oder ausschalten. Maus und Tastatur sind sofort einsatzbereit, sobald Sie wieder eine Taste drücken bzw. die Maus bewegen. So prüfen Sie den Ladezustand der Tastaturbatterien Halten Sie die FN-Taste gedrückt und drücken Sie die F12-Taste: Wenn die LED grün leuchtet, sind die Batterien funktionstüchtig. Wenn die LED rot leuchtet, ist der Ladezustand der Batterien auf 10% gesunken. Die Batterien reichen nur noch für wenige Tage. Sie können auch die Tastatur mithilfe des Ein-/Ausschalters oben auf der Tastatur aus- und wieder einschalten. Batteriestandsanzeige So prüfen Sie den Ladezustand der Mausbatterie Schalten Sie die Maus aus und wieder ein, indem Sie den Ein-/Ausschalter an der Unterseite der Maus bewegen. Wenn die LED auf der Oberseite der Maus 10 Sekunden lang grün leuchtet, ist die Batterie funktionstüchtig. Wenn die LED rot blinkt, ist der Ladezustand der Batterie auf 10% gesunken. Die Batterie reicht nur noch für wenige Tage. Unterseite der Maus Ein-/Ausschalter Oberseite der Maus LED * Die Batterielebensdauer ist von Nutzungs- und Umgebungsbedingungen abhängig. Kontinuierlicher Einsatz verkürzt die Lebensdauer. Deutsch 21
22 Erste Schritte Empfänger anschließen. Eingesteckt lassen. Geräte hinzufügen. Am Computer ist ein Logitech Unifying-Empfänger angeschlossen. Verbinden Sie nun eine kompatible kabellose Tastatur oder Maus mit dem Empfänger. Es ist ganz einfach. Sie müssen nur die Logitech Unifying-Software* starten und dann den Anweisungen auf dem Bildschirm folgen. Weitere Informationen und die Software zum Herunterladen erhalten Sie unter * Wählen Sie Start/Programme/Logitech/Unifying/Logitech Unifying Software. 22 Deutsch
23 Logitech Wireless Combo MK520 Fehlerbehebung Tastatur und Maus funktionieren nicht Prüfen Sie die USB-Verbindung. Schließen Sie die Geräte an einem anderen USB-Port an. Verringern Sie den Abstand. Rücken Sie Ihre Geräte näher an den Unifying-Empfänger heran. Ist dies nicht möglich, bringen Sie den Unifying-Empfänger mithilfe des Verlängerungskabels in die Nähe von Maus und Tastatur. Überprüfen Sie, ob die Batterien richtig eingelegt sind. Prüfen Sie außerdem den Ladezustand der Batterien. (Weitere Informationen finden Sie unter Batterie.) Schieben Sie den Schalter auf der Unterseite der Maus nach rechts, um diese einzuschalten. Die Batterie-LED auf der Oberseite der Maus sollte 10 Sekunden lang grün leuchten. (Weitere Informationen finden Sie unter Batterie.) Unterseite der Maus Ein-/Ausschalter Deutsch 23
24 Erste Schritte Fehlerbehebung Der Mauszeiger bewegt sich langsam oder ruckartig? Verwenden Sie eine andere Unterlage (z. B. können dunkle Oberflächen die Abtastung beeinträchtigen). Ist die Tastatur eingeschaltet? Schieben Sie den Ein-/Ausschalter auf On (Ein), um die Tastatur einzuschalten (siehe Abbildung unten). Die Symbole für die Statusanzeige sollten aufleuchten. OFF ON Stellen Sie die Verbindung wieder her. Verwenden Sie die Unifying-Software, um die Verbindung zwischen Tastatur/Maus und Unifying-Empfänger wiederherzustellen. Weitere Informationen dazu finden Sie in diesem Handbuch im Abschnitt zum Unifying- Empfänger (S. 23). Wenn Sie weitere Hilfe benötigen, erreichen Sie unseren Kundendienst unter der auf Seite 42 angegebenen Telefonnummer. Auf der Logitech-Website finden Sie unter Informationen zur körpergerechten Nutzung der Produkte. 24 Deutsch
25 Logitech Wireless Combo MK520 Fonctions du clavier : utilisation des touches de fonctions (F) Les touches F conviviales et leur mode avancé vous permettent de lancer facilement des applications. Pour profiter des fonctions avancées (icônes jaunes), appuyez sur la touche sans la relâcher, puis sur la touche F de votre choix. Conseil: pour accéder aux fonctions avancées sans avoir à appuyer sur la touche FN, vous pouvez inverser le mode FN dans les paramètres du logiciel. 2 - Appuyez sur une touche F 1 - Appuyez sur la touche FN et maintenez-la enfoncée Français 25
26 Première utilisation Fonctions du clavier Français
27 Logitech Wireless Combo MK520 Fonctions du clavier Navigation multimédia Réglage du volume Zone d'applications + F1 Lance le navigateur Internet + F2 Lance l'application de courrier électronique + F3 Lance le service Recherche Windows* + F4 Lance le lecteur multimédia Zone Fonctions pratiques + F9 Poste de travail + F10 Verrouillage de l'ordinateur + F11 Mise en veille de l'ordinateur + F12 Vérification du niveau de charge des piles du clavier Témoin de charge des piles Bouton d'alimentation du clavier 4. Contrôles d'affichage Windows + F5 Basculer + F6 Affiche le Bureau + F7 Réduit la fenêtre + F8 Restaure les fenêtres réduites 8. Navigation Internet Pages Précédente & Suivante sur Internet Favoris Internet Lance la calculatrice * Fonction One Touch Search si le logiciel SetSpoint est installé. Changer d'application si le logiciel SetSpoint est installé. Français 27
28 Première utilisation Fonctions de la souris Témoin lumineux de charge 2. Défilement vertical Commutateur Marche/Arrêt Bouton d'ouverture du compartiment des piles 5. Rangement du récepteur Unifying 28 Français
29 OFF ON Logitech Wireless Combo MK520 Gestion de l'alimentation La longévité des piles du clavier est de trois ans, celle des piles de la souris est d'un an maximum.* Mode de veille Saviez-vous que le clavier et la souris se mettent en mode veille après quelques minutes d'inactivité? Cette fonctionnalité a pour but d'économiser les piles sans que vous ayez à éteindre et rallumer sans cesse vos périphériques. Le mode veille des deux périphériques est désactivé dès que vous recommencez à les utiliser. Comment vérifier le niveau de charge des piles du clavier? Appuyez sur la touche FN et maintenez-la enfoncée et appuyez sur la touche F12 : si le témoin lumineux s'allume en vert, le niveau de charge des piles est satisfaisant. S'il s'allume en rouge, le niveau de charge des piles a atteint 10% et il ne vous reste plus que quelques jours de charge. Vous pouvez également mettre le clavier hors tension, puis à nouveau sous tension, au moyen du commutateur Marche/Arrêt situé sur le clavier. Témoin de charge des piles Comment vérifier le niveau de charge des piles de la souris? Mettez la souris hors tension, puis à nouveau sous tension en utilisant le commutateur Marche/Arrêt situé sous la souris. Si le témoin lumineux situé sur la partie supérieure de la souris s'allume en vert pendant 10 secondes, le niveau de charge des piles est correct. S'il clignote en rouge, le niveau de charge des piles a atteint 10% et il ne vous reste plus que quelques jours de charge. Dessous de la souris Commutateur Marche/Arrêt Dessus de la souris Témoin lumineux * La durée de vie des piles est susceptible de varier en fonction de l'environnement et du mode d'utilisation. Une utilisation quotidienne prolongée a pour effet d'écourter la durée de vie des piles. Français 29
30 Première utilisation Branchez-le. Oubliez-le. Ajoutez d'autres périphériques. Vous possédez un récepteur Logitech Unifying. Ajoutez un clavier ou une souris sans fil compatible qui utilise le même récepteur. C'est facile! Démarrez simplement le logiciel Logitech Unifying* et suivez les instructions à l'écran. Pour en savoir plus et pour télécharger le logiciel, rendez-vous sur *Cliquez sur Démarrer / Tous les programmes / Logitech / Unifying / Logiciel Logitech Unifying 30 Français
31 Logitech Wireless Combo MK520 Dépannage Le clavier et la souris ne fonctionnent pas Vérifiez la connexion USB. Essayez également de changer de ports USB. Problème de distance? Essayez de rapprocher le clavier et la souris du récepteur Unifying ou, inversement, utilisez la rallonge du récepteur Unifying pour rapprocher ce dernier des périphériques. Vérifiez que les piles sont bien installées. Vérifiez également le niveau de charge de chaque périphérique (voir Gestion de l'alimentation pour plus d'informations). Sous la souris, déplacez le commutateur Marche/Arrêt vers la droite pour mettre la souris sous tension. Le témoin lumineux situé sur la souris doit s'allumer en vert pendant 10 secondes (voir Gestion de l'alimentation pour plus d'informations). Dessous de la souris Commutateur Marche/Arrêt Français 31
32 Première utilisation Dépannage Le mouvement du curseur est lent ou irrégulier. Essayez la souris sur une surface différente (les surfaces très foncées ne sont pas les plus adaptées). Le clavier est-il sous tension? Faites glisser le commutateur Marche/Arrêt du clavier en position On, comme illustré ci-dessous. Les témoins d'état du clavier doivent s'allumer. OFF ON Rétablissez la connexion. Utilisez le logiciel Unifying pour réinitialiser la connexion entre l'ensemble clavier/souris et le récepteur Unifying. Pour en savoir plus, reportez-vous à la section Unifying de ce guide (p. 31). Pour obtenir une aide supplémentaire, reportez-vous aux numéros de téléphone du service clientèle à la page 42. Visitez également le site Web pour en savoir plus sur l'utilisation des produits et leur confort. 32 Français
33 Logitech Wireless Combo MK520 Caratteristiche della tastiera: utilizzo dei tasti funzione I tasti funzione intuitivi consentono di avviare con facilità le applicazioni. Per utilizzare le funzioni avanzate (icone di colore giallo), tenere premuto il tasto e premere il tasto funzione desiderato. Suggerimento: se si preferisce accedere direttamente alle funzioni avanzate senza premere il tasto FN, è possibile invertire il funzionamento del tasto FN tramite le impostazioni software. 2 - Premere un tasto funzione 1 - Tenere premuto il tasto FN Italiano 33
34 Introduzione Caratteristiche della tastiera Italiano
35 Logitech Wireless Combo MK520 Caratteristiche della tastiera Navigazione multimediale Regolazione volume Area applicazioni + F1 Avvia il browser Internet + F2 Avvia l'applicazione di posta elettronica + F3 Avvia la ricerca in Windows* + F4 Avvia il lettore multimediale Area praticità + F9 Risorse del computer + F10 Blocca il PC + F11 Attiva la modalità standby per il PC + F12 Verifica il livello di carica delle batterie Indicatore di stato delle batterie Pulsante di accensione della tastiera 4. Controlli di visualizzazione Windows + F5 Capovolgi + F6 Mostra il desktop + F7 Riduce a icona la finestra + F8 Ripristina le finestre ridotte a icona 8. Navigazione in Internet Navigazione Internet avanti e indietro Preferiti di Internet Avvio calcolatrice * Funzionalità One-Touch Search se è installato il software SetSpoint. Funzionalità per il passaggio da un'applicazione all'altra se è installato il software SetSpoint. Italiano 35
36 Introduzione Caratteristiche del mouse LED delle batterie 2. Scorrimento verticale Interruttore di accensione Rilascio del coperchio del vano batteria 5. Alloggiamento ricevitore Unifying 36 Italiano
37 OFF ON Logitech Wireless Combo MK520 Gestione delle batterie Le batterie della tastiera durano fino a 3 anni e quelle del mouse fino a 1 anno.* Modalità di sospensione per risparmio batterie Sia il mouse che la tastiera attivano la modalità di sospensione se non vengono utilizzati per alcuni minuti. Questa funzionalità consente di limitare il consumo delle batterie ed elimina la necessità di accendere e spegnere continuamente i dispositivi. Quando vengono utilizzati di nuovo, entrambi i dispositivi riprendono a funzionare immediatamente. Verifica del livello di carica delle batterie della tastiera Tenere premuto il tasto FN, quindi premere F12: se il LED si accende di colore verde, il livello di carica delle batterie è buono, se invece è di colore rosso, le batterie hanno un livello di carica inferiore al 10% e devono essere sostituite entro pochi giorni. Inoltre, è possibile spegnere la tastiera e riaccenderla tramite l'interruttore posto nella parte superiore della stessa. Indicatore di stato delle batterie Verifica del livello di carica delle batterie del mouse Spegnere il mouse e riaccenderlo utilizzando l'interruttore di accensione posto nella parte inferiore del mouse. Se il LED nella parte superiore del mouse si accende di colore verde per 10 secondi, il livello di carica delle batterie è buono; se invece lampeggia di colore rosso, le batterie hanno un livello di carica inferiore al 10% e devono essere sostituite entro pochi giorni. Parte inferiore del mouse Pulsante di accensione/ spegnimento Parte superiore del mouse LED luminoso * La durata delle batterie varia a seconda della frequenza e del tipo di utilizzo. Un utilizzo intenso riduce di norma la durata. Italiano 37
38 Introduzione Collega. Dimentica. Aggiungi. Hai un ricevitore Logitech Unifying. Adesso aggiungi una tastiera o un mouse senza fili compatibile che utilizza lo stesso ricevitore. È semplicissimo: avvia il software Logitech Unifying* e segui le istruzioni visualizzate. Per ulteriori informazioni e per il download del software, visita il sito Web all'indirizzo *Accedere a Start > Programmi > Logitech > Unifying > Logitech Unifying Software 38 Italiano
39 Logitech Wireless Combo MK520 Risoluzione dei problemi Il mouse e la tastiera non funzionano Controllare il collegamento USB. Provare anche a utilizzare un'altra porta USB. Avvicinare il dispositivo. Provare ad avvicinare la tastiera e il mouse al ricevitore Unifying o collegare il ricevitore Unifying alla prolunga in modo da avvicinarlo alla tastiera e al mouse. Verificare che la batteria sia stata inserita correttamente. Controllare inoltre il livello di carica delle batterie di ciascun dispositivo (per ulteriori informazioni, vedere Gestione della batteria). Accendere il mouse facendo scorrere verso destra l'interruttore di accensione posto nella parte inferiore del mouse. Il LED del livello di carica delle batterie posto nella parte superiore del mouse dovrebbe accendersi di colore verde per 10 secondi (per ulteriori informazioni vedere Gestione delle batterie). Parte inferiore del mouse Pulsante di accensione/ spegnimento Italiano 39
40 Introduzione Risoluzione dei problemi Il cursore si muove lentamente o a scatti? Provare a utilizzare il mouse su una superficie differente (ad esempio, le superfici di colore molto scuro potrebbero influenzare il movimento del cursore sullo schermo). Controllare che la tastiera sia accesa. Fare scorrere l'interruttore di accensione/spegnimento nella posizione On, come illustrato nell'immagine sottostante. Le icone di stato della tastiera dovrebbero accendersi. OFF ON Ristabilire la comunicazione. Utilizzare il software Unifying per ripristinare la connessione tra la tastiera/il mouse e il ricevitore Unifying. Per ulteriori informazioni, fare riferimento alla sezione Unifying, in questo documento (p. 39). Per ulteriore assistenza, vedere i numeri di telefono del Servizio di assistenza a pagina 42. Per ulteriori informazioni relative al comfort e all'utilizzo del prodotto, visitare il sito 40 Italiano
41 Logitech Wireless Combo MK520 Česká republika Россия Ελληνική Δημοκρατία 41
42 Logitech Wireless Combo MK520 42
43
44 Logitech. All rights reserved. Logitech, the Logitech logo, and other Logitech marks are owned by Logitech and may be registered. All other trademarks are the property of their respective owners. Logitech assumes no responsibility for any errors that may appear in this manual. Information contained herein is subject to change without notice
Logitech Wireless Performance Combo MX800 Setup Guide Guide d installation
 Logitech Wireless Performance Combo MX800 Setup Guide Guide d installation Logitech Wireless Performance Combo MX800 Setup Guide Guide d installation Important information Safety, compliance, and warranty
Logitech Tablet Keyboard for Windows 8, Windows RT and Android 3.0+ Setup Guide Guide d installation
 Logitech Tablet Keyboard for Windows 8, Windows RT and Android 3.0+ Setup Guide Guide d installation English.......................................... 3 Français.........................................
Logitech Speaker System Z553 Setup Guide Guide d installation
 Logitech Speaker System Z553 Setup Guide Guide d installation Logitech Speaker System Z553 English................. 3 Français................ 10 www.logitech.com/support...19 2 Package contents Logitech
Logitech Illuminated Living-Room Keyboard K830 Setup Guide Guide d installation
 Logitech Illuminated Living-Room Keyboard K830 Setup Guide Guide d installation Logitech Illuminated Living-Room Keyboard K830 English................... 3 Français.................. 11 www.logitech.com/support..............................
Contents Windows 8.1... 2
 Workaround: Installation of IRIS Devices on Windows 8 Contents Windows 8.1... 2 English Français Windows 8... 13 English Français Windows 8.1 1. English Before installing an I.R.I.S. Device, we need to
Your Pirelli VDSL router has been preconfigured with the following settings:
 Important Information & Installation Instructions VDSL (Analog) Dear Netstream customer Your Pirelli VDSL router has been preconfigured with the following settings: LAN IP Adress of the Pirelli router:
Guide d'installation rapide TFM-560X YO.13
 Guide d'installation rapide TFM-560X YO.13 Table of Contents Français 1 1. Avant de commencer 1 2. Procéder à l'installation 2 Troubleshooting 6 Version 06.08.2011 16. Select Install the software automatically
3615 SELFIE. http://graffitiresearchlab.fr HOW-TO / GUIDE D'UTILISATION
 3615 SELFIE http://graffitiresearchlab.fr HOW-TO / GUIDE D'UTILISATION Hardware : Minitel Computer DIN FM545 45 connector (http://www.gotronic.fr/art-fiche-din-fm545-4747.htm) Cable Arduino compatible
Instructions Mozilla Thunderbird Page 1
 Instructions Mozilla Thunderbird Page 1 Instructions Mozilla Thunderbird Ce manuel est écrit pour les utilisateurs qui font déjà configurer un compte de courrier électronique dans Mozilla Thunderbird et
Once the installation is complete, you can delete the temporary Zip files..
 Sommaire Installation... 2 After the download... 2 From a CD... 2 Access codes... 2 DirectX Compatibility... 2 Using the program... 2 Structure... 4 Lier une structure à une autre... 4 Personnaliser une
Thank you for choosing the Mobile Broadband USB Stick. With your USB Stick, you can access a wireless network at high speed.
 Thank you for choosing the Mobile Broadband USB Stick. With your USB Stick, you can access a wireless network at high speed. Note: This manual describes the appearance of the USB Stick, as well as the
WiFi Security Camera Quick Start Guide. Guide de départ rapide Caméra de surveillance Wi-Fi (P5)
") #45 #46 WiFi Security Camera Quick Start Guide Guide de départ rapide Caméra de surveillance Wi-Fi (P5) #47 Start Here 1 Is this you? TECH SUPPORT CTRL ALT DEL 2 If yes, turn to page three 1 3 If not,
#45 #46 WiFi Security Camera Quick Start Guide Guide de départ rapide Caméra de surveillance Wi-Fi (P5) #47 Start Here 1 Is this you? TECH SUPPORT CTRL ALT DEL 2 If yes, turn to page three 1 3 If not,
Harmony Smart Keyboard Add-on. Setup Guide Guide d installation
 Harmony Smart Keyboard Add-on Setup Guide Guide d installation Contents / Sommaire English................. 3 Français................. 9 support.myharmony.com/smart-keyboard-add-on 2 E Ch Pg Package contents
GIGABIT PCI DESKTOP ADAPTER DGE-530T. Quick Installation Guide+ Guide d installation+
 GIGABIT PCI DESKTOP ADAPTER Quick Installation Guide+ Guide d installation+ Check Your Package Contents Quick Installation Guide Gigabit Ethernet PCI Adapter CD with Manual and Drivers DO NOT insert the
Package Contents. System Requirements. Before You Begin
 Package Contents DWA-125 Wireless 150 USB Adapter CD-ROM (contains software, drivers, and manual) Cradle If any of the above items are missing, please contact your reseller. System Requirements A computer
Quick Setup Guide Guide de configuration rapide. Tablet Device SGPT12 Series Tablette électronique Série SGPT12
 Quick Setup Guide Guide de configuration rapide Tablet Device SGPT12 Series Tablette électronique Série SGPT12 Welcome / Bienvenue Congratulations on your purchase of this Xperia Tablet S. This Quick Setup
Thank you for choosing the Mobile Broadband USB Stick. With your USB Stick, you can access a wireless network at high speed.
 Thank you for choosing the Mobile Broadband USB Stick. With your USB Stick, you can access a wireless network at high speed. Note: This manual describes the appearance of the USB Stick, as well as the
SIMATIC. SIMATIC STEP 7 PID Professional V12. Welcome Tour. Totally Integrated Automation www.siemens.com/tia-portal-welcometour PORTAL
 SIMATIC STEP 7 PID Professional V12 Welcome Tour Totally Integrated Automation www.siemens.com/tia-portal-welcometour Totally Integrated Automation PORTAL www.siemens.com/tia-portal SIMATIC Siemens Aktiengesellschaft
FAQ pour tablette Windows 8 (NS-15MS0832 et NS-15MS0832B) Avril 2015
 Avril 2015") FAQ pour tablette Windows 8 (NS-15MS0832 et NS-15MS0832B) Avril 2015 Navigation... 2 Question 1 : À quoi servent les icônes?... 2 Question 2 : Comment naviguer à l'aide d'une souris ou d'un pavé tactile?...
FAQ pour tablette Windows 8 (NS-15MS0832 et NS-15MS0832B) Avril 2015 Navigation... 2 Question 1 : À quoi servent les icônes?... 2 Question 2 : Comment naviguer à l'aide d'une souris ou d'un pavé tactile?...
Sun Type 7 Keyboard and Mouse Installation Guide
 Sun Type 7 Keyboard and Mouse Installation Guide Guide d installation du clavier et de la souris Sun Type 7 Sun Type 7-Tastatur Installationshandbuch Guida all installazione della tastiera e del mouse
How to Login to Career Page
 How to Login to Career Page BASF Canada July 2013 To view this instruction manual in French, please scroll down to page 16 1 Job Postings How to Login/Create your Profile/Sign Up for Job Posting Notifications
USB 598. Quick Start Guide (Windows) Guide de démarrage rapide (Windows) USB Modem. Modem USB. www.sierrawireless.com
 Guide de démarrage rapide (Windows) USB Modem. Modem USB. www.sierrawireless.com") USB 598 With Avec USB Modem Quick Start Guide (Windows) Modem USB Guide de démarrage rapide (Windows) www.sierrawireless.com This guide provides installation instructions for users of: Windows Vista Windows
USB 598 With Avec USB Modem Quick Start Guide (Windows) Modem USB Guide de démarrage rapide (Windows) www.sierrawireless.com This guide provides installation instructions for users of: Windows Vista Windows
PRIMER WIRELESS STEREO HEADSET QUICK START GUIDE
 PRIMER WIRELESS STEREO HEADSET QUICK START GUIDE ! WARNING! BEFORE USING THIS PRODUCT, READ THE MANUALS FOR THIS ACCESSORY AND THE XBOX 360 CONSOLE (AND ANY OTHER APPLICABLE MANUALS) FOR IMPORTANT SAFETY
Garage Door Monitor Model 829LM
 Garage Door Monitor Model 829LM To prevent possible SERIOUS INJURY or DEATH from a closing garage door: NEVER permit children to operate or play with door control push buttons or remote control transmitters.
WEB page builder and server for SCADA applications usable from a WEB navigator
 Générateur de pages WEB et serveur pour supervision accessible à partir d un navigateur WEB WEB page builder and server for SCADA applications usable from a WEB navigator opyright 2007 IRAI Manual Manuel
Getting started with Logitech Wireless Solar Keyboard K760
 Getting started with Logitech Wireless Solar Keyboard K760 English................. 3 Deutsch.................13 Français................ 23 Italiano.................33 www.logitech.com/support...........................
Folio Case User s Guide
 Fujitsu America, Inc. Folio Case User s Guide I N S T R U C T I O N S This Folio Case is a stylish, lightweight case for protecting your Tablet PC. Elastic Strap Pen Holder Card Holders/ Easel Stops Figure
Quick-Manual. Comfort VS1
 Quick-Manual Comfort VS1 Inhalt Contenu Contenuto 1. So legen Sie die SIM-Karte ein 3 2. So laden Sie den Akku auf 4 3. Und wozu sind all die Tasten da? 5 4. Wie speichern Sie neue Kontakte in Ihrem Telefonbuch?
Notice Technique / Technical Manual
 Contrôle d accès Access control Encodeur USB Mifare ENCOD-USB-AI Notice Technique / Technical Manual SOMMAIRE p.2/10 Sommaire Remerciements... 3 Informations et recommandations... 4 Caractéristiques techniques...
Jabra CLEAR. Jabra MODE D EMPLOI
 Jabra CLEAR Jabra MODE D EMPLOI TABLE DES MATIÈRES MERCI...2 À PROPOS DE VOTRE...2 FONCTIONNALITÉS DE VOTRE OREILLETTE....3 MISE EN ROUTE...4 CHARGEMENT DE VOTRE OREILLETTE....4 MISE EN MARCHE ET ARRÊT
Logitech G502 Proteus Core Setup Guide Guide d installation
 Logitech G502 Proteus Core Setup Guide Guide d installation English.................. 3 Français................. 13 www.logitech.com/support............................23 2 1 On 3 2 USB Your G502 is ready
lundi 3 août 2009 Choose your language What is Document Connection for Mac? Communautés Numériques L informatique à la portée du Grand Public
 Communautés Numériques L informatique à la portée du Grand Public Initiation et perfectionnement à l utilisation de la micro-informatique Microsoft Document Connection pour Mac. Microsoft Document Connection
Mediacast Setup. Mediacasting from UPnP compatible devices
 Models: dgimd13 Mediacast Setup Mediacasting from UPnP compatible devices Please read these instructions carefully prior to installation Important Note: This procedure was written in conjunction with an
Summary / Sommaire. 1 Install DRIVER SR2 USB01 Windows seven 64 bits / Installation du DRIVER SR2 USB01 Windows seven 64 bits 2
 Summary / Sommaire 1 Install DRIVER SR2 USB01 Windows seven 64 bits / Installation du DRIVER SR2 USB01 Windows seven 64 bits 2 1.1 Driver Installation SR2 USB01 Windows Seven 64 bits (english) 2 1.1.1
Setup Guide Guide d installation
 Setup Guide Guide d installation Languages English................. 3 Français.................15 2 English Package contents 1 2 3 4 5 1. Home Control remote 2. Home Hub Controls devices via IR, Bluetooth,
1. Raison de la modification
 T Service Documentation Technicocommerciale Information Technique Rubrique F Les régulations Nouvelle version de programme de la carte SU : F1.4 P5253 JS F 67580 Mertzwiller N ITOE0117 26/09/2011 FR 1.
TABLE DES MATIERES A OBJET PROCEDURE DE CONNEXION
 1 12 rue Denis Papin 37300 JOUE LES TOURS Tel: 02.47.68.34.00 Fax: 02.47.68.35.48 www.herve consultants.net contacts@herve consultants.net TABLE DES MATIERES A Objet...1 B Les équipements et pré-requis...2
Utiliser une WebCam. Micro-ordinateurs, informations, idées, trucs et astuces
 Micro-ordinateurs, informations, idées, trucs et astuces Utiliser une WebCam Auteur : François CHAUSSON Date : 8 février 2008 Référence : utiliser une WebCam.doc Préambule Voici quelques informations utiles
Paxton. ins-20605. Net2 desktop reader USB
 Paxton ins-20605 Net2 desktop reader USB 1 3 2 4 1 2 Desktop Reader The desktop reader is designed to sit next to the PC. It is used for adding tokens to a Net2 system and also for identifying lost cards.
WLAN einrichten Installer WLAN Installare WLAN Install WLAN
 Swisscom (Schweiz) AG Contact Center CH-3050 Bern 10010868 01/2013 www.swisscom.ch WLAN einrichten Installer WLAN Installare WLAN Install WLAN Centro grande Inhaltsverzeichnis Table des matières Indice
VTP. LAN Switching and Wireless Chapitre 4
 VTP LAN Switching and Wireless Chapitre 4 ITE I Chapter 6 2006 Cisco Systems, Inc. All rights reserved. Cisco Public 1 Pourquoi VTP? Le défi de la gestion VLAN La complexité de gestion des VLANs et des
Quick Start Guide This guide is intended to get you started with Rational ClearCase or Rational ClearCase MultiSite.
 Rational ClearCase or ClearCase MultiSite Version 7.0.1 Quick Start Guide This guide is intended to get you started with Rational ClearCase or Rational ClearCase MultiSite. Product Overview IBM Rational
Board (Tablette) Manuel de l utilisateur. Windows 7 / XP / Vista
 Manuel de l utilisateur. Windows 7 / XP / Vista") Board (Tablette) Manuel de l utilisateur Windows 7 / XP / Vista *Il se peut que le pilote ait déjà été mis à jour sur une version plus récente avant/après l emballage. Si votre écran d installation ne
Board (Tablette) Manuel de l utilisateur Windows 7 / XP / Vista *Il se peut que le pilote ait déjà été mis à jour sur une version plus récente avant/après l emballage. Si votre écran d installation ne
INSTALLING THE DRIVER (WINDOWS 7)
") INSTALLING THE DRIVER (WINDOWS 7) Download the K8101_setup file here: http://www.velleman.eu/downloads/files/downloads/k8101_setup.zip Unpack the download and install the software. The driver for the K8101
INSTALLING THE DRIVER (WINDOWS 7) Download the K8101_setup file here: http://www.velleman.eu/downloads/files/downloads/k8101_setup.zip Unpack the download and install the software. The driver for the K8101
Router einrichten Installer le routeur Installare il router Router setup
 Swisscom (Schweiz) AG Contact Center CH-3050 Bern www.swisscom.ch 10010869 12/2014 IP Router einrichten Installer le routeur Installare il router Router setup Centro piccolo Wireless Ethernet 4 Internet
DOCUMENTATION - FRANCAIS... 2
 DOCUMENTATION MODULE SHOPDECORATION MODULE PRESTASHOP CREE PAR PRESTACREA INDEX : DOCUMENTATION - FRANCAIS... 2 INSTALLATION... 2 Installation automatique... 2 Installation manuelle... 2 Résolution des
Guide de l'utilisateur. Linksys AE1000 Adaptateur USB sans fil - N hautes performances
 Guide de l'utilisateur Linksys AE1000 Adaptateur USB sans fil - N hautes performances Table des matières Table des matières Chapitre 1 : Présentation du produit 1 Voyant 1 Chapitre 2 : Installation 2 Installation
Instructions pour mettre à jour un HFFv2 v1.x.yy v2.0.00
 Instructions pour mettre à jour un HFFv2 v1.x.yy v2.0.00 HFFv2 1. OBJET L accroissement de la taille de code sur la version 2.0.00 a nécessité une évolution du mapping de la flash. La conséquence de ce
Start Here Point de départ
 Start Here Point de départ Epson Stylus C88+ Please read these instructions before using the printer. Lisez ces instructions avant d utiliser l imprimante. Install Ink Cartridges Installez les cartouches
Utiliser le Notebook GIGABYTE pour la première fois
 Félicitations pour l'achat de votre Notebook GIGABYTE Ce manuel vous aidera à démarrer avec l'installation de votre notebook. La configuration du produit final dépend du modèle acheté. GIGABYTE se réserve
Phone Manager Soutien de l'application OCTOBER 2014 DOCUMENT RELEASE 4.1 SOUTIEN DE L'APPLICATION
 Phone Manager Soutien de l'application OCTOBER 2014 DOCUMENT RELEASE 4.1 SOUTIEN DE L'APPLICATION Sage CRM NOTICE The information contained in this document is believed to be accurate in all respects but
Bluetooth pour Windows
 Bluetooth pour Windows Mise en route 2006 Hewlett-Packard Development Company, L.P. Microsoft et Windows sont des marques déposées de Microsoft Corporation aux Etats-Unis. Bluetooth est une marque détenue
Micro-ordinateurs, informations, idées, trucs et astuces utiliser le Bureau à distance
 Micro-ordinateurs, informations, idées, trucs et astuces utiliser le Bureau à distance Auteur : François CHAUSSON Date : 8 février 2008 Référence : utiliser le Bureau a distance.doc Préambule Voici quelques
Guide d installation logicielle
 Guide d installation logicielle Drivers USB pour Windows XP/2000 X-Edit Editor/Librarian pour Windows XP/2000 Nous tenons à vous remercier d avoir choisi ce processeur DigiTech USB. Ce guide d installation
Table of Contents. Product Overview. Troubleshooting. Setting Up Your EA-Series Router. Specifications. Linksys EA-Series.
 User Guide EA6350 Linksys EA-Series Table of Contents Table of Contents Product Overview EA6350.....................................1 Setting Up Your EA-Series Router Where to find more help.........................
DOCUMENTATION - FRANCAIS... 2
 DOCUMENTATION MODULE CATEGORIESTOPMENU MODULE CREE PAR PRESTACREA INDEX : DOCUMENTATION - FRANCAIS... 2 INSTALLATION... 2 CONFIGURATION... 2 LICENCE ET COPYRIGHT... 3 SUPPORT TECHNIQUE ET MISES A JOUR...
Boîtier pour disque dur externe 3,5" (8,89cm) USB 2.0
 USB 2.0") Boîtier pour disque dur externe 3,5" (8,89cm) USB 2.0 Guide d'utilisation DA-71051 Avant-propos Nous tenons à vous féliciter d'avoir choisi l'un de nos produits! Nous allons vous montrer un nouveau concept
Boîtier pour disque dur externe 3,5" (8,89cm) USB 2.0 Guide d'utilisation DA-71051 Avant-propos Nous tenons à vous féliciter d'avoir choisi l'un de nos produits! Nous allons vous montrer un nouveau concept
Contrôle d'accès Access control. Notice technique / Technical Manual
 p.1/18 Contrôle d'accès Access control INFX V2-AI Notice technique / Technical Manual p.2/18 Sommaire / Contents Remerciements... 3 Informations et recommandations... 4 Caractéristiques techniques... 5
10170220 06/2013 IP libero / TDM > VoIP. Swisscom (Schweiz) AG Contact Center CH-3050 Bern
 AG Contact Center CH-3050 Bern") Swisscom (Schweiz) AG Contact Center CH-3050 Bern www.swisscom.ch 10170220 06/2013 IP libero / TDM VoIP Festnetzanschluss (IP) einrichten Installer le raccordement fixe (IP) Installare il collegamento
Swisscom (Schweiz) AG Contact Center CH-3050 Bern www.swisscom.ch 10170220 06/2013 IP libero / TDM VoIP Festnetzanschluss (IP) einrichten Installer le raccordement fixe (IP) Installare il collegamento
Manuel d installation et de maintenance (serrures LR128 E)
") Manuel d installation et de maintenance (serrures LR128 E) Manuel comprenant : Installation de la gâche GV et GVR :............................................ page 2 Position et réglage du shunt - Cales
Manuel d installation et de maintenance (serrures LR128 E) Manuel comprenant : Installation de la gâche GV et GVR :............................................ page 2 Position et réglage du shunt - Cales
Tutoriel de formation SurveyMonkey
 Tutoriel de formation SurveyMonkey SurveyMonkey est un service de sondage en ligne. SurveyMonkey vous permet de créer vos sondages rapidement et facilement. SurveyMonkey est disponible à l adresse suivante
GAME CONTENTS CONTENU DU JEU OBJECT OF THE GAME BUT DU JEU
 GAME CONTENTS 3 wooden animals: an elephant, a Polar bear and an African lion 1 Playing Board with two tree stumps, one red and one blue 1 Command Board double sided for two game levels (Green for normal
INSTALLING THE DRIVER (WINDOWS 7)
") INSTALLING THE DRIVER (WINDOWS 7) Download the CubeAnimator 1.0 for Windows packet here: http://www.velleman.eu/support/downloads/?code=mk193 Unpack the download and install the software. The driver for
INSTALLING THE DRIVER (WINDOWS 7) Download the CubeAnimator 1.0 for Windows packet here: http://www.velleman.eu/support/downloads/?code=mk193 Unpack the download and install the software. The driver for
AMARICAM JUNIOR 100M FRANCAIS ENGLISH DEUTSCH ITALIANO ESPANOL NEDERLANDS PORTUGUESES MANUEL UTILISATEUR USER S GUIDE BENUTZERHANDBUCH
 AMARICAM JUNIOR 100M MANUEL UTILISATEUR USER S GUIDE BENUTZERHANDBUCH GUIDA PER L UTENTE GUIA DEL USUARIO GEBRUIKERSGIDS MANUAL DO USUARIO FRANCAIS ENGLISH DEUTSCH ITALIANO ESPANOL NEDERLANDS PORTUGUESES
Quick Installation Guide. SwitchView IP. Attaching the host computer to the SwitchView IP device
 Quick Installation Guide The following instructions will help you connect your device. Should you require further assistance, please To connect a remote access device to a computer consult your installer/user
Important information. New SIMATIC HMI Panels. Migration made easy start now. SIMATIC HMI Panels. siemens.com/simatic-panels
 Important information New SIMATIC HMI Panels Migration made easy start now SIMATIC HMI Panels siemens.com/simatic-panels Totally Integrated Automation Portal (TIA Portal) est l environnement d ingénierie
GUIDE UTILISATEUR SYSTEMES CCTV
 GUIDE UTILISATEUR SYSTEMES CCTV 2SECURE 3 chemin des mules 13124 PEYPIN www.2secure.fr - 1 - SOMMAIRE : 1 ACCEDER / SORTIR D UN MENU :...3 2 VISUALISER UN ENREGISTREMENT SUR LE DVR :...3 3 SAUVEGARDER
PRESENTATION REMOTE TÉLÉCOMMANDE DE PRÉSENTATION. User Guide Manuel de l utilisateur
 PRESENTATION REMOTE TÉLÉCOMMANDE DE PRÉSENTATION User Guide Manuel de l utilisateur Targus Presentation Remote Introduction Thank you for your purchase of the Targus Presentation Remote. This cordless
Die Fotografie als Lebensgefühl, mit all ihren Facetten und Ausdrucksmöglichkeiten,
 PORTFOLIO Claus Rose Photography as a way of living, with all its aspects and opportunities for expression, became my passion at an early stage. In particular the magic of nude photography, which lends
Guide de mise à niveau pas à pas vers Windows 8 CONFIDENTIEL 1/53
 Guide de pas à pas vers Windows 8 CONFIDENTIEL 1/53 Contenu 1. 1. Procédure de configuration de Windows 8 2. Configuration requise 3. Préparatifs 2. 3. 4. 5. 6. 1. Personnaliser 2. Sans fil 3. personnalisés
Parrot 3200LS-Color 3400LS-GPS - - - - - -
 - - - - - - Procédure de mise à jour soft Parrot 3200LS-Color 3400LS-GPS - - - - - - Ce document vous guidera pour la mise à jour de votre kit mains libres par Bluetooth. Une mise à jour est nécessaire
Vanilla : Virtual Box
 Vanilla : Virtual Box Installation Guide for Virtual Box appliance Guide d'installation de l'application VirtualBox Vanilla Charles Martin et Patrick Beaucamp BPM Conseil Contact : charles.martin@bpm-conseil.com,
Quick Installation Guide
 Quick Installation Guide PowerLine AV+ Wireless N Mini Extender Version 1.10(NA) February 18, 2013 Wi-Fi Configuration Note Package Contents PowerLine AV+ Wireless N Mini Extender ENGLISH CAT5 Ethernet
Monitor LRD. Table des matières
 Folio :1/6 Table des matières 1.Installation du logiciel... 3 2.Utilisation du logiciel... 3 2.1.Description de la fenêtre de commande... 3 2.1.1.Réglage des paramètres de communication... 4 2.1.2.Boutons
APPENDIX 6 BONUS RING FORMAT
 #4 EN FRANÇAIS CI-DESSOUS Preamble and Justification This motion is being presented to the membership as an alternative format for clubs to use to encourage increased entries, both in areas where the exhibitor
Start Here Point de départ Epson Stylus
 Start Here Point de départ Epson Stylus C120 Series Please read these instructions before using the printer. Lisez ces instructions avant d utiliser l imprimante. 1 Unpack Déballez l imprimante Caution:
Guide de récupération de Windows Server 2003 R2 pour serveurs Sun x64
 Guide de récupération de Windows Server 2003 R2 pour serveurs Sun x64 Sommaire Introduction 1 Procédure de réinstallation 1 Documentation associée 5 Vos commentaires nous sont utiles 5 Introduction Ce
Routeur Wi-Fi N300 (N300R)
") Easy, Reliable & Secure Guide d'installation Routeur Wi-Fi N300 (N300R) Marques commerciales Les marques et noms de produits sont des marques commerciales ou des marques déposées de leurs détenteurs respectifs.
Easy, Reliable & Secure Guide d'installation Routeur Wi-Fi N300 (N300R) Marques commerciales Les marques et noms de produits sont des marques commerciales ou des marques déposées de leurs détenteurs respectifs.
Jabra SPORT. Mode d'emploi. www.jabra.com
 Jabra SPORT Mode d'emploi www.jabra.com Table des matières remerciment...2 À propos de...3 Quelles sont les FONCTIONS de votre micro-casque...3 MISE EN ROUTE...5 RECHARGE DE VOTRE JABRA SPORT...5 MISE
Guide pour l Installation des Disques Durs SATA et Configuration RAID
 Guide pour l Installation des Disques Durs SATA et Configuration RAID 1. Guide pour l Installation des Disques Durs SATA.. 2 1.1 Installation de disques durs Série ATA (SATA).. 2 1.2 Créer une disquette
JABRA DRIVE MANUEL DE L UTILISATEUR
 JABRA DRIVE MANUEL DE L UTILISATEUR Table des matières MERCI...2 À PROPOS DE VOTRE JABRA DRIVE....2 CE QUE VOTRE JABRA DRIVE PEUT FAIRE...3 COMMENT APPUYER SUR LES TOUCHES....4 SIGNIFICATION DES VOYANTS
LOGICIEL D'ADMINISTRATION POUR E4000 & G4000 MANAGEMENT SOFTWARE FOR E4000 & G4000
 LOGICIEL D'ADMINISTRATION POUR E4000 & G4000 MANAGEMENT SOFTWARE FOR E4000 & G4000 TABLE DES MATIÈRES TITRE PAGE Présentation - - - - - - - - - - - - - - - - - - - - - - - - - - - - - - - - - - - -4 Le
DOCUMENTATION MODULE BLOCKCATEGORIESCUSTOM Module crée par Prestacrea - Version : 2.0
 DOCUMENTATION MODULE BLOCKCATEGORIESCUSTOM Module crée par Prestacrea - Version : 2.0 INDEX : DOCUMENTATION - FRANCAIS... 2 1. INSTALLATION... 2 2. CONFIGURATION... 2 3. LICENCE ET COPYRIGHT... 3 4. MISES
L'univers simple des appareils intelligents
 L'univers simple des appareils intelligents Merci d'avoir choisi le HUAWEI Mobile WiFi Les fonctions prises en charge et l'apparence dépendent du modèle que vous avez acheté. Les illustrations suivantes
Hotspot Mobile 4G HUAWEI E5776. Guide de démarrage rapide
 Hotspot Mobile 4G HUAWEI E5776 Guide de démarrage rapide Merci d'avoir choisi le Hotspot Mobile 4G Huawei E5776 Ce guide décrit brièvement les fonctions de votre Hotspot Mobile 4G. Pour obtenir des informations
PARIS ROISSY CHARLES DE GAULLE
 GPS 2 34 1 E 49 0 46 N GPS* 2 56 56 E 49 0 12 N Votre contact / Your contact: et / and: Accueil : Cabines téléphoniques publiques Reception: Public telephone kiosks Navette Shuttle AÉROPORT DE TT CAR TRANSIT
Réserve Personnelle. Persönliche Reserve. Emprunter et épargner en fonction de vos besoins. Leihen und sparen je nach Bedarf
 crédit épargne Réserve Personnelle Emprunter et épargner en fonction de vos besoins Persönliche Reserve Leihen und sparen je nach Bedarf Réserve Personnelle Vous voulez disposer à tout moment des moyens
Phone Manager Soutien de l'application OCTOBER 2014 DOCUMENT RELEASE 4.1 SOUTIEN DE L'APPLICATION
 Phone Manager Soutien de l'application OCTOBER 2014 DOCUMENT RELEASE 4.1 SOUTIEN DE L'APPLICATION Salesforce NOTICE The information contained in this document is believed to be accurate in all respects
Démarrage rapide. Contenu de l'emballage. Modem/routeur WiFi VDSL/ADSL Nighthawk AC1900 Modèle D7000
 Assistance Nous vous remercions pour l'achat de ce produit NETGEAR. Après l'installation de votre appareil, notez le numéro de série inscrit sur l'étiquette. Il vous sera nécessaire pour enregistrer votre
Quick Installation Guide TEW-P21G
 Quick Installation Guide TEW-P21G Table of of Contents Contents... 1. Avant de commencer... 2. Comment effectuer les connexions... 3. Utilisation du serveur d'impression... 1 1 2 3 Troubleshooting... 7
RAPID 3.34 - Prenez le contrôle sur vos données
 RAPID 3.34 - Prenez le contrôle sur vos données Parmi les fonctions les plus demandées par nos utilisateurs, la navigation au clavier et la possibilité de disposer de champs supplémentaires arrivent aux
185/55R15 1,4i 16V (74 kw) OE: Schrader 3007 21-5-21A/KE-17. Interio: ASC / ASS / CUS / Huf 2.4 / Huf 3.4 / SEC / SES / TTS / TTC
 OE: Schrader 3007 21-5-21A/KE-17. Interio: ASC / ASS / CUS / Huf 2.4 / Huf 3.4 / SEC / SES / TTS / TTC") 500 / 500C 09/07-312 FL 515009 500 / 500C CHF 104,00 ET 40 185/55R15 1,4i 16V (74 kw) 21-5-21A/KE-17 500 / 500C 312 Seismo SO 605 35 4 98 lichtsilber-lackiert Interio IN 605 35 4 98 lichtsilber-lackiert
500 / 500C 09/07-312 FL 515009 500 / 500C CHF 104,00 ET 40 185/55R15 1,4i 16V (74 kw) 21-5-21A/KE-17 500 / 500C 312 Seismo SO 605 35 4 98 lichtsilber-lackiert Interio IN 605 35 4 98 lichtsilber-lackiert
WLAN Magic-Box einrichten S. 2 Installer WLAN Magic-Box p. 10 Installare WLAN Magic-Box p. 18 WLAN Magic-Box setup p. 26
 Swisscom (Schweiz) AG Contact Center CH-3050 Bern 07/2012 www.swisscom.ch WLAN einrichten S. 2 Installer WLAN p. 10 Installare WLAN p. 18 WLAN setup p. 26 YM.AP.4742.UM.SW.D00 WLAN On/Off WLAN On/Off Nous
 3.2.6.1. Câblage type 3.2.6.2. Autres câblages RC1 : Sélection des courbes de charge SW1 : Sélection de la fonction BOOST RC1 SW1 Montage de 2 chargeurs en parallèle : NF EN 61000-6-1: Compatibilité
www.sierrawireless.com Sierra Wireless AirCard 763S Mobile Hotspot QUICK START GUIDE GUIDE DE DÉMARRAGE RAPIDE
 Sierra Wireless AirCard 763S Mobile Hotspot QUICK START GUIDE GUIDE DE DÉMARRAGE RAPIDE www.sierrawireless.com Get to Know Your Device Power key Navigation key WPS button LCD screen External RF antenna
Connexion de Votre Imprimante Multifonction à votre Réseau pour la Première Fois
 Suivant >> Connexion de Votre Imprimante Multifonction à votre Réseau pour la Première Fois PIXMA MX350 / PIXMA MX870 Mac OS 1 > Conseils de Navigation pour des utilisateurs de Macintosh
Guide d'utilisateur. Câble adaptateur USB2.0 vers IDE et SATA. Modèle : DA-70202
 Guide d'utilisateur Câble adaptateur USB2.0 vers IDE et SATA Modèle : DA-70202 I. Avant-propos Nous vous remercions d'avoir acheté notre produit! Nous avons voulu innover dans le stockage tout en offrant
Mise en route de PRTG Network Monitor 9 2011 Paessler AG
 Mise en route de PRTG Network Monitor 9 2011 Paessler AG All rights reserved. No parts of this work may be reproduced in any form or by any means graphic, electronic, or mechanical, including photocopying,
Wobe. www.lea-networks.com
 Wobe www.lea-networks.com Wobe Le Hotspot 3G/WiFi de poche Wobe est le premier routeur mobile 3G/WiFi autonome permettant de connecter à internet ses terminaux WiFi (PC, tablette tactile, console de jeux
Mobile Connect. Essai gratuit inclus. Welcome Pack. Mobile Broadband
 Mobile Connect Welcome Pack Mobile Broadband Essai gratuit inclus Bienvenue dans HP Mobile Connect Votre carte SIM HP Mobile Connect est préinstallée dans votre appareil HP Mobile Connect est un service