Fire-Safe Owner s Manual
|
|
|
- Isaac Gascon
- il y a 8 ans
- Total affichages :
Transcription
1 Fire-Safe Owner s Manual
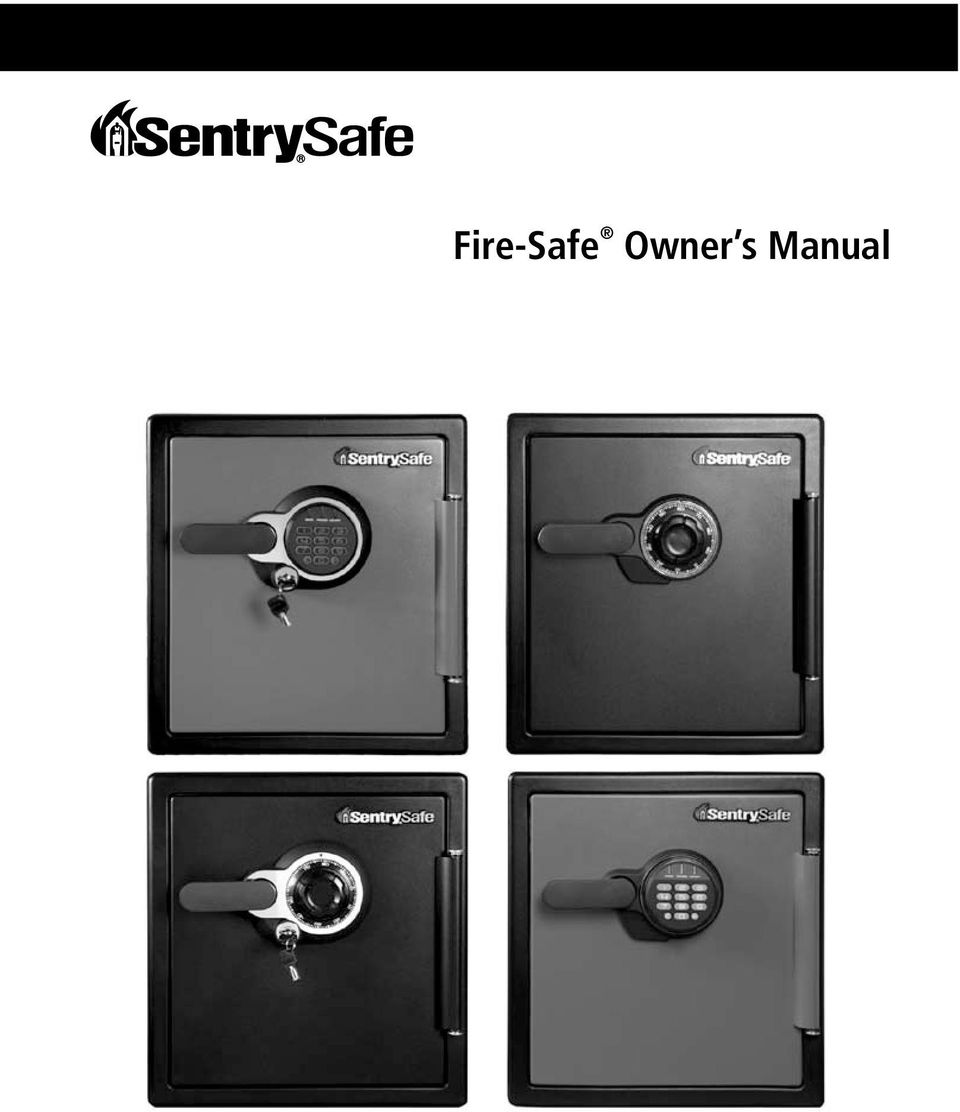
2 Warnings Table of Contents WARNING Gun warning: This product is not intended for the secure storage of all materials. Items such as firearms, other weapons, combustible materials, or medication should NOT be stored in this unit. WARNING DO NOT store delicate items directly in your safe. SentrySafe products which offer fire protection have a proprietary insulation that has a high moisture content. In addition the SentrySafe advanced safes close airtight to offer water resistance, which may also cause moisture to accumulate inside your safe. The desiccant packet included in your safe during shipment, should be left in your safe. DO NOT DISCARD IT. It is intended to help absorb moisture which may accumulate inside your safe. Please open your unit once every two weeks to avoid moisture accumulation. If you choose to store delicate items such as jewelry with working parts, watches, stamps, or photos in your safe, we recommend putting them in an air-tight container, prior to placing them in the safe for storage. NOTE: Sentry Group will not be responsible for any damage or loss of items placed in the unit due to moisture. WARNING DO NOT store pearls in this safe unit. In the event of a fire, potential damage to delicate pearls occurs at temperatures much lower than the 50 F interior performance measure which the UL classification performance standard indicated guarantees. Therefore, DO NOT store pearls in your SentrySafe product. WARNING No computer disks, audio-visual media or photo negatives. This product is not intended to protect computer floppy or diskettes, cartridges and tapes, audio or video cassettes or photo negatives. For fire-resistant storage of these materials, ask your retailer for the SentrySafe Fire-Safe Media storage products. Français... 7 Español... English Warnings... Registration... Mechanical Combination Lock Programmable Electronic Lock Operating the Light...0 Bolting Down Your Safe...- Troubleshooting... Customer Service...4 Guarantees & Fire Specifications...5 IMPORTANT If you experience any problems or challenges with your safe, please contact us. Many issues can be resolved quickly without the product being returned. Registration: Reasons to register By registering your SentrySafe product you can easily retrieve forgotten codes and combinations, which would otherwise require a notary letter and payment. By registering your SentrySafe product you can be sure that in the unfortunate circumstance of a fire you will be guaranteed your replacement safe (provided official paperwork). WARNING YOUR SAFE IS ONLY PART OF YOUR TOTAL SECURITY PROTECTION. Sentrysafe recommends that you store your safe in closets, offices, basements, bedrooms and any other locations that are convenient for you but out of direct line of sight from prying eyes. The location of the safe does not affect the safes ability to protect your valuables inside.

3 Mechanical Combination Lock NOTE: Store combination (and keys if equipped) in a secure location (other than in the safe). NOTE: Combination can not be changed. Preparing your safe for first time use NOTE: SentrySafe offers a secure online location for the entry and retrieval of your combination. Go to and register your safe. 4 5 Rotate the dial to the right (clockwise), stop when you reach the third number in your combination. Rotate the handle downward to open the door. This may take a limited amount of force if you have a water resistant safe. M00TEST SN00TEST0* 0-- RLR 075 Ensure any shipping screws have been removed. Located on the inside of the door. Find your combination on the back of this owner s manual. Warning: Test your combination several times before putting valuables inside. NOTE: Make sure the handle is in the horizontal position when unlocking the safe. NOTE: If the door does not open easily, repeat steps -5. NOTE: If you exert too much force on the handle, the handle will move without moving the bolts. When this happens, you will hear a click. DO NOT be alarmed. This feature is designed to protect the bolts from being over powered by force. If this occurs, simply exert force in the opposite direction (lifting up) until the handles clicks back into place and repeat steps -5 to open your safe. Locking your safe Unlocking your safe Close the door and pull the handle upward until the handle is horizontal. FOR DUAL KEY/COMBINATION LOCKS ONLY, insert key into the lock, turn to the unlocked position, then remove the key. This is a secondary locking feature not an override key. Without the key you will not be able to open your safe. For water resistant units, additional pressure to the front, left side of the door may need to be applied prior to rotating the handle. Spin the dial at least x to the right (clockwise). Rotate dial to 0, then rotate right (clockwise) passing 0 three times, continue rotating until you reach the first number in your combination. Rotate dial to the left (counterclockwise). Go PAST the second number of your combination ONCE and stop the SECOND time the dial reaches the number. FOR DUAL KEY/COMBINATION LOCKS ONLY, insert key into the lock, turn to the locked position, then remove the key. 4 5

4 Programmable Electronic Lock NOTE: Store code (and keys if equipped) in a secure location (other than in the safe). NOTE: SentrySafe offers a secure online location for the entry and retrieval of your code. Go to and register your safe. Rotate the handle downward to open the door. This may take a limited amount of force if you have a water resistant safe. Preparing your safe for first time use Ensure any shipping screws have been removed. Located on the inside of the door. NOTE: Make sure the handle is in the horizontal position when unlocking the safe. NOTE: If you exert too much force on the handle, the handle will move without moving the bolts. When this happens, you will hear a click. DO NOT be alarmed. This feature is designed to protect the bolts from being over powered by force. If this occurs, simply exert force in the opposite direction (lifting up) until the handles clicks back into place and repeat steps - to open your safe. A Slide out the battery drawer on the side of the keypad. B Insert 4 AAA alkaline batteries (do not use rechargeable batteries or other types of non-alkaline batteries). Locking your safe Close the door and pull the handle upward until the handle is horizontal. l M00TEST SN00TEST0* 45 C Slide battery drawer back into keypad. Find your code on the back of this owner s manual. For water resistant units, additional pressure to the front, left side of the door may need to be applied prior to rotating the handle. FOR DUAL KEY/ELECTRONIC LOCKS ONLY, insert key into the lock, turn to the locked position, then remove the key. Warning: Test your code several times before putting valuables inside. Unlocking your safe FOR DUAL KEY/ELECTRONIC LOCKS ONLY, insert key into the lock, turn to the unlocked position, then remove the key. This is a secondary locking feature not an override key. Without the key you will not be able to open your safe. NOTE: The 5 digit factory code cannot be deleted. However, you may add and delete additional codes. NOTE: If your safe does not appear to be working properly, please check to make sure you are using NEW alkaline batteries before contacting SentrySafe Customer Service. A Enter the 5 digit factory code on the back of the owner s manual. B A green light will indicate the code is correct. You will have 4 seconds to turn the handle to unlock your safe. 6 7

5 Programmable Electronic Lock Programming information Three code options: Factory code: The safe will ALWAYS unlock using this 5 digit code (found on the back of the owner s manual). This code cannot be deleted. User code: A 5 digit programmable code of your choosing that can be changed or deleted. Secondary code: A 5 digit programmable code of your choosing that can be changed or deleted. Can only be programmed after a user code has been activated. NOTE: The C key is a clear key. This can be used at anytime to clear the system and return to standby mode unless you are in delay mode ( consecutive invalid entries). Programming the user code Only user code can be programmed at a time. To ADD a user code: Press the P key. Programming the secondary code Only secondary code can be programmed at a time. To ADD a secondary code: Press the P key two times. Enter the 5 digit user code. The light will flash green and then you will have five seconds to enter your own personal secondary code. To DELETE a secondary code: Press the P key two times. Enter the 5 digit user code. Enter 0,0,0,0,0. NOTE: The electronic lock will NOT indicate that it has deleted the secondary code please test the code to make sure it has been deleted. NOTE: Delay mode will occur if three consecutive invalid entries have been tried. This will cause the system to shutdown for two minutes. Do NOT remove the batteries to restart the system it will only increase the length of time for the system shutdown. Enter the 5 digit factory code. The light will flash green and then you will have five seconds to enter your own personal user code. To DELETE a user code: Press the P key. Enter the 5 digit factory code. Enter 0,0,0,0,0. NOTE: The electronic lock will NOT indicate that it has deleted the user code please test the code to make sure it has been deleted. 8 9
.")
6 Operating the Light Bolting Down Your Safe How to operate the light The safe you have purchased may include a light. This is a long-lasting LED light. Not all safes include a light. To turn the light off: Press the 0 button. Press the P button. Press the button. To turn the light on for 0 seconds: Press the 0 button. Press the P button. Press the 4 button. To turn the light on for 60 seconds: Press the 0 button. Press the P button. Press the 5 button. The batteries that operate the keypad are the same batteries that operate the light. If the light in your unit does not turn on, please change your batteries. Refer to page 6 to change the batteries. The light will turn on every time you enter your code and will remain on for 0 seconds. The light duration has three options off, 0 seconds, and 60* seconds. Bolt down instructions Warning: DO NOT drill through bolt cups. Warning: DO NOT bolt through the walls. Warning: Do NOT drill from any location inside the safe. Bolt down kit contents (in select models only): lag screws. washers. masonry anchors. Tools needed to bolt safe to the floor: Drill. Wrench. 7 6 ( mm) drill bit for drilling into the safe. 9 (7. mm) drill bit for drilling into a wood floor. 8 (9.5 mm) drill bit for drilling into a masonry floor. Close the door. Tip the safe onto its left side (door hinges horizontal with the floor). Look to the bottom of the safe for two indentations on the feet in opposite corners. Using the 7 6 ( mm) bit; drill a hole through each indentation perpendicular to the bottom of the safe. Do NOT drill from any location inside the safe. *If the light duration is 60 seconds, the battery life will lessen at a faster rate. Tip the safe upright, place the safe in the desired location and open the door. 4 Use a screw or pencil to mark the floor through both holes. For products that do not come with a bolt down kits. Go to to find recommended hardware and instructions. 0

7 Bolting Down Your Safe Troubleshooting Bolt down instructions continued 5 Move the safe aside to clear both marked spots for drilling Drill into the floor: A For wood: Using the 9 drill bit, drill a hole (64 mm) deep in each marked spot. B For masonry: Using the 8 drill bit, drill a hole (64 mm) deep in each marked spot. Install a masonry anchor in each hole. Replace the safe in the desired position, with the holes in the safe aligned with those in the floor. Securing the safe: A For wood: Pass each lag screw through a washer, then through the safe and into a hole. Tighten with the wrench. The Problem: Why it is Happening: The Solution: The door will not lock Shipping screw is in place Remove the screw on the back inside of the door The handle is not in the horizontal position when the safe is locked Cannot open door after inputting the electronic code Red indicator light blinks three times and there are three beeps Red indicator light blinks five times and there are five beeps The clutch mechanism has been engaged Safes doors equipped with a water resistant gasket may initially be tight An incorrect code has been entered Rotate the handle up or down until it clicks into the horizontal position Hold the handle up while inputting the code and then pull down when the green light comes on Verify code and re-enter Please call our Customer Service center F F F B For masonry: Pass each lag screw through a washer, then through the safe and into a masonry anchor. Tighten with the wrench. Place masonry anchors into the holes in the floor. NOTE: The safe should not be bolted to a wall, this will compromise the fire rating. Drill holes through the feet only. Do not drill through the back or sides. Red indicator light blinks once and there is one beep Red indicator light is blinking Program button is pressed out of sequence. -or- 5 seconds has lapsed between button entries An incorrect code has been entered three times Start over Wait two minutes and start over NOTE: Bolting/unbolting the unit is at the consumer s expense and discretion. NOTE: Sentry Group is not responsible for any costs incurred if the unit is to be replaced. Yellow indicator light is on Battery power is low. The handle will not open with this light on Replace batteries For products that do not come with a bolt down kits. Go to to find recommended hardware and instructions. The dial does not turn The handle does not rotate Ensure the handle is in the horizontal position Ensure the keylock is in the unlocked position

8 Customer Service Guarantees & Fire Specifications Customer Service Customer Service: Fax: Linden Avenue / Rochester, New York / USA How to get replacement key/combo Please go to our website to find the necessary replacement form. If you are unable to use a computer please call the number above or fax us for a copy of replacement form. Find your safe s serial number and model number. The serial number and model number are printed on the small label on the right side and on the door near the hinge. Please fill out the form in its entirety. 4 Send the following to Sentry Group: Check or money order and replacement form. For current pricing please go to If you are unable to use a computer please call the number above or fax us. 5 Mail to: Sentry Group, Dept. 00, 88 Linden Avenue, Rochester, NY , USA-OR- Fax statement (notary seal must be legible) to Paying by credit card: Payment may also be made using your VISA or Mastercard credit card by phone only. Call to make credit card payment. Do not fax credit card information. NOTE: Prices subject to change without prior notification. NOTE: Key and combination orders may be placed on a Saturday or Sunday, however, those orders will not be processed until the following work day. Our customer service center is open Monday thru Friday, 8 AM until 6 PM. How to order accessories Guarantees LIFETIME AFTER-FIRE REPLACEMENT GUARANTEE If this SentrySafe product is damaged by fire at any time while still owned by you (the original owner), SentrySafe will ship a replacement free of charge. Include your name and address, the model number, a photo of the burned unit, a description of the fire, along with a copy of the fire department, insurance or police report. Please send the following information to: Sentry Group 88 Linden Avenue Rochester, New York USA Fire specifications Fire Endurance: (UL classified protection) Subjected to temperatures up to 700 F for a duration of hour, the safe interior will remain below 50 F. This enables your safe to withstand even high temperature exposure, as the hottest part of a fire moves through a building. Explosion Hazard: (UL classified protection) Subjected to a flash fire in a 000 F furnace for 0 minutes the unit will not explode or rupture. Fire Impact: (ETL verified) After being heated to 550 F the safe is dropped 5 feet onto rubble, then cooled, inverted and reheated to 550 F for 0 minutes. Data Protection: (ETL verified) hour fire protection of CDs, DVDs, memory sticks and USB drives up to 700 F. This product is NOT intended to protect computer floppy or 4 diskettes, cartridges, tapes, audio or video cassettes, or photo negatives. For fire-resistant storage of these materials, ask your retailer for the SentrySafe Fire-Safe media storage products. To optimize your safes organization consider purchasing SentrySafe accessories for your safe. Accessories include a locking drawer, tray, shelf, and file rack. For more items please go to our website or call our customer service number

9 6 Fire-Safe Manuel Du Propriétaire
10 Avertissements Table des Matières AVERTISSEMENT Avertissement concernant les armes à feu : Ce produit n est pas conçu pour l entreposage sécuritaire de tous les types de matériaux. N entreposez PAS d articles tels que des armes, à feu ou autres, des matériaux combustibles ou des médicaments dans ce coffre. AVERTISSEMENT NE déposez PAS des articles délicats directement dans le coffre-fort. Les produits SentrySafe offrant une protection contre l incendie sont pourvus d un isolant exclusif à haute teneur en humidité. De plus, le coffre-fort avancé SentrySafe se ferme hermétiquement afin de garantir l étanchéité et éviter ainsi l accumulation d humidité à l intérieur de votre coffre. Un sachet de dessiccatif est placé dans votre coffre-fort pour le transport et il est préférable de le laisser à l intérieur du coffre. NE LE JETEZ PAS. Il est conçu pour aider à absorber l humidité pouvant s accumuler dans votre coffre-fort. N oubliez pas d ouvrir le coffre toutes les deux semaines pour éviter l accumulation d humidité. Si vous décidez d entreposer des articles délicats, comme des bijoux avec des pièces mobiles, des montres, des timbres ou des photographies dans ce coffre-fort, nous vous recommandons de les déposer d abord dans un contenant hermétique avant de les placer dans le coffre-fort. REMARQUE : Sentry Group ne pourra pas être tenu responsable de tout dommage subi par les articles placés dans le coffre à cause de l humidité ni de la perte desdits articles. AVERTISSEMENT NE placez PAS de perles dans le coffre. Lors d un incendie, les perles risquent d être endommagées par des températures bien inférieures à la catégorie de performance UL garantie et indiquée pour ce coffre, soit 77 C (50 F). Par conséquent, ÉVITEZ de ranger des perles dans votre coffre SentrySafe. AVERTISSEMENT Ne placez PAS de disques informatiques, de médias audio-visuels ni de négatifs de photos dans le coffre. Ce produit n est pas conçu pour protéger les disques et disquettes informatiques, les cartouches, les cassettes audio ou vidéo ou les négatifs de photos. Pour un entreposage de ce matériel à l abri du feu, demandez à votre détaillant de vous présenter la gamme de produits d entreposage ignifugés pour médias numériques de SentrySafe. AVERTISSEMENT VOTRE COFFRE-FORT N EST QU UNE PARTIE DE VOTRE PROTECTION COMPLÈTE. SentrySafe vous recommande d entreposer votre coffre-fort dans un garde-robe, un bureau, un sous-sol, une chambre à coucher ou tout autre endroit qui vous convient et qui est à l abri des regards indiscrets. L emplacement du coffre-fort n affecte en aucun cas sa capacité à protéger les objets de valeur qu il contient. Avertissements...8 Enregistrement...9 Serrure à Combinaison Mécanique...0- Serrure Électronique Programmable...-5 Fonctionnement de l Éclairage...6 Fixation de Votre Coffre-fort Dépannage...9 Service à la Clientèle...0 Garanties et Normes D incendie... IMPORTANT Si vous avez quelque problème que ce soit avec votre coffre, n hésitez pas à communiquer avec nous. Bon nombre de problèmes peuvent être résolus rapidement sans que le produit ne soit retourné. Enregistrement : Raisons pour enregistrer le produit En enregistrant votre produit SentrySafe, vous pourrez facilement récupérer vos combinaisons oubliées pour lesquelles vous devriez autrement fournir une lettre notariée et débourser des frais. En enregistrant votre produit SentrySafe, vous pourrez être certain que dans le cas malheureux d un incendie, votre coffre-fort sera remplacé (à condition de fournir les documents officiels). 8 9

11 Serrure à Combinaison Mécanique REMARQUE : Entreposez la combinaison et les clés (le cas échéant) dans un endroit sécuritaire (autre que dans le coffre-fort). REMARQUE : La combinaison ne peut pas être changée. REMARQUE : SentrySafe offre un emplacement sécurisé en ligne pour y déposer votre combinaison et la récupérer. Allez sur et enregistrez votre coffre-fort. Préparation de votre coffre-fort pour sa première utilisation 4 5 Tournez le cadran vers la droite (en sens horaire) et arrêtez-vous lorsque le cadran atteint le troisième chiffre de votre combinaison. Tournez la poignée vers le bas pour ouvrir la porte. Il faut une certaine force pour y arriver si vous avez un coffre-fort étanche. M00TEST SN00TEST0* 0-- RLR 075 Déverrouillage de votre coffre-fort Assurez-vous que toutes les vis de manutention ont été retirées. Elles sont placées à l intérieur de la porte. Votre combinaison se trouve au dos du manuel du propriétaire. Avertissement : Vérifiez votre combinaison plusieurs fois avant de déposer des objets de valeur dans le coffre. REMARQUE : Assurez-vous que la poignée est en position horizontale lorsque vous déverrouillez le coffre-fort. REMARQUE : Si la porte ne s ouvre pas facilement, répétez les étapes à 5. REMARQUE : Si vous exercez trop de force sur la poignée, celle-ci bougera sans faire bouger les pênes. Lorsque cela se produit, vous entendez un «clic». NE vous inquiétez PAS. Cette caractéristique est conçue pour éviter que les pênes ne soient endommagés par une force excessive. Si cela se produit, utilisez simplement la même force en sens inverse sur la poignée (en la levant) jusqu à ce qu elle se remette en place en faisant un «clic». Répétez ensuite les étapes à 5. Verrouillage de votre coffre-fort POUR LES SERRURES DOUBLES À COMBINAISON ET À CLÉ SEULEMENT, insérez la clé dans la serrure, tournez-la en position «déverrouillé», puis retirez-la. La clé fait partie du mécanisme de verrouillage et n est pas une clé de surpassement. Vous ne pouvez pas ouvrir votre coffre-fort sans la clé. Tournez le cadran jusqu à «0» et ensuite à droite (dans le sens horaire) pour passer le «0» trois fois, continuez à tourner jusqu à ce que vous arriviez au premier chiffre de votre combinaison. Fermez la porte et levez la poignée jusqu à ce qu elle soit en position horizontale. Dans le cas d un coffre étanche, il peut être nécessaire d appliquer une pression supplémentaire sur la section avant gauche de la porte avant de tourner la poignée. Faites tourner le cadran au moins deux fois vers la droite (en sens horaire). Tournez le cadran vers la gauche (en sens antihoraire). DÉPAS- SEZ UNE FOIS le deuxième chiffre de votre combinaison et arrêtez-vous la DEUXIÈME fois que le cadran atteint le chiffre. POUR LES SERRURES DOUBLES À COMBINAISON ET À CLÉ SEULEMENT, insérez la clé dans la serrure, tournez-la en position «verrouillé», puis retirez-la. 0
 et arrêtez-vous lorsque le cadran atteint le troisième chiffre de votre")
12 Serrure Électronique Programmable REMARQUE : Entreposez la combinaison (et les clés, s il y a lieu) dans un endroit sécuritaire (autre que dans le coffre-fort). REMARQUE : SentrySafe offre un emplacement sécurisé en ligne pour y déposer votre combinaison et la récupérer. Allez sur et enregistrez votre coffre-fort. Tournez la poignée vers le bas pour ouvrir la porte. Il faut une certaine force pour y arriver si vous avez un coffre-fort étanche. Préparation de votre coffre-fort pour sa première utilisation l M00TEST SN00TEST0* 45 Déverrouillage de votre coffre-fort Assurez-vous que toutes les vis de manutention ont été retirées. Elles sont placées à l intérieur de la porte. A Retirez le compartiment à piles, situé sur le côté du pavé numérique. B Insérez 4 piles alcalines AAA (n utilisez pas de piles rechargeables ni de piles non alcalines). C Réinsérez le compartiment à piles dans le pavé numérique. Votre combinaison se trouve au dos du manuel du propriétaire. Avertissement : Vérifiez votre combinaison plusieurs fois avant de déposer des objets de valeur dans le coffre. REMARQUE : Assurez-vous que la poignée est en position horizontale lorsque vous déverrouillez le coffre-fort. REMARQUE : Si vous exercez trop de force sur la poignée, celle-ci bougera sans faire bouger les pênes. Lorsque cela se produit, vous entendez un «clic». NE vous inquiétez PAS. Cette caractéristique est conçue pour éviter que les pênes ne soient endommagés par une force excessive. Si cela se produit, utilisez simplement la même force en sens inverse sur la poignée (en la levant) jusqu à ce qu elle se remette en place en faisant un «clic». Répétez ensuite les étapes à. Verrouillage de votre coffre-fort Fermez la porte et levez la poignée jusqu à ce qu elle soit en position horizontale. Dans le cas d un coffre étanche, il peut être nécessaire d appliquer une pression supplémentaire sur la section avant gauche de la porte avant de tourner la poignée. POUR LES SERRURES DOUBLES À COMBINAISON ET À CLÉ SEULEMENT, insérez la clé dans la serrure, tournez-la en position «verrouillé», puis retirez-la. POUR LES SERRURES DOUBLES À COMBINAISON ET À CLÉ SEULEMENT, insérez la clé dans la serrure, tournez-la en position «déverrouillé», puis retirez-la. La clé fait partie du mécanisme de verrouillage et n est pas une clé de surpassement. Vous ne pouvez pas ouvrir votre coffre-fort sans la clé. A Saisissez la combinaison d usine à 5 chiffres indiquée au dos du manuel du propriétaire. B Un témoin lumineux vert indique que la combinaison est bonne. Vous avez alors 4 secondes pour tourner la poignée afin de déverrouiller votre coffre-fort. REMARQUE : La combinaison d usine à 5 chiffres ne peut pas être effacée. Par contre, vous pouvez ajouter et effacer des combinaisons supplémentaires. REMARQUE : Si votre coffre-fort ne semble pas fonctionner adéquatement, veuillez vérifier que vous utilisez des piles alcalines NEUVES avant de communiquer avec le service à la clientèle de SentrySafe.

13 Serrure Électronique Programmable Information pour la programmation Trois options de combinaison : Combinaison d usine : Le coffre-fort pourra TOUJOURS être déverrouillé avec cette combinaison à 5 chiffres (indiquée au dos du manuel du propriétaire). Cette combinaison ne peut pas être effacée. Combinaison d utilisateur : Une combinaison programmable à 5 chiffres que vous choisissez et qui peut être modifiée ou effacée. Combinaison secondaire : Une combinaison programmable à 5 chiffres que vous choisissez et qui peut être modifiée ou effacée. Cette combinaison ne peut être programmée qu après l activation d une combinaison d utilisateur. Remarque: La touche «C» est une touche d effacement. Elle peut être utilisée n importe quand pour vider le système et revenir au mode de veille, à moins que vous ne soyez en mode délai ( saisies invalides consécutives). Programmation de la combinaison d utilisateur Programmation de la combinaison secondaire Une seule combinaison secondaire peut être programmée à la fois. Pour AJOUTER une combinaison secondaire : Appuyez sur la touche «P» deux fois. Saisissez la combinaison d utilisateur à 5 chiffres. Le témoin lumineux clignote vert et vous avez cinq secondes pour saisir votre combinaison secondaire. Pour EFFACER une combinaison secondaire : Appuyez sur la touche «P» deux fois. Saisissez la combinaison d utilisateur à 5 chiffres. Saisissez 0, 0, 0, 0, 0. REMARQUE : La serrure électronique n indique PAS que la combinaison secondaire a été effacée - veuillez tester la combinaison pour vous assurer qu elle a été effacée. REMARQUE : Le système passe en mode délai si vous saisissez trois combinaisons invalides de suite. Cela occasionne l arrêt du système pendant deux minutes. Ne retirez PAS les piles pour faire redémarrer le système. Cela ne fait qu augmenter le temps d arrêt du système. Une seule combinaison d utilisateur peut être programmée à la fois. Pour AJOUTER une combinaison d utilisateur : Appuyez sur la touche «P». Saisissez la combinaison d usine à 5 chiffres. Le témoin lumineux clignote en vert et vous avez cinq secondes pour saisir votre combinaison d utilisateur. Pour EFFACER une combinaison d utilisateur : Appuyez sur la touche «P». Saisissez la combinaison d usine à 5 chiffres. Saisissez 0, 0, 0, 0, 0. REMARQUE : La serrure électronique n indique PAS que la combinaison d utilisateur a été effacée - veuillez tester la combinaison pour vous assurer qu elle a été effacée. 4 5

14 Fonctionnement de L éclairage Fixation de Votre Coffre-fort Comment régler l éclairage Le coffre-fort que vous avez acheté peut être muni d un éclairage. Il s agit d un éclairage à DEL longue durée. Certains coffres-forts sont munis d un éclairage. Pour désactiver l éclairage : Appuyez sur la touche «0». Appuyez sur la touche «P». Appuyez sur la touche. Les piles qui alimentent le pavé numérique alimentent également l éclairage. Si l éclairage de votre unité ne s allume pas, veuillez changer vos piles. Consultez la page pour en savoir plus sur le remplacement des piles. L éclairage s allume chaque fois que vous saisissez votre combinaison et reste allumé pendant 0 secondes. Il y a trois options pour la durée d éclairage : éteint, 0 secondes et 60* secondes. Instructions de fixation Avertissement : NE percez PAS les orifices des pênes. Avertissement : Ne fixez PAS le coffre-fort à un mur. Avertissement : NE percez PAS depuis l intérieur du coffre-fort. Contenu de la trousse de fixation (avec les modèles sélectionnés seulement) : tirefonds. rondelles. ancrages de maçonnerie. Outils nécessaires pour fixer le coffre-fort sur le plancher : Perceuse. Clé. Foret de perceuse de 7 6 po ( mm) pour percer dans le coffre-fort. Foret de perceuse de 9 po (7, mm) pour percer dans un plancher de bois. Foret de perceuse de 8 po (9,5 mm) pour percer dans un plancher en maçonnerie. Pour activer l éclairage pendant 0 secondes : Appuyez sur la touche «0». Appuyez sur la touche «P». Appuyez sur la touche «4». Pour activer l éclairage pendant 60 secondes : Appuyez sur la touche «0». Appuyez sur la touche «P». Appuyez sur la touche «5». *Si l éclairage est activé pendant 60 secondes, la charge des piles diminue plus rapidement. 4 Fermez la porte. Basculez le coffre-fort sur le côté gauche (les charnières de la porte se retrouvent à l horizontale par rapport au plancher). Regardez le dessous du coffre-fort pour trouver deux indentations sur les pieds dans des coins opposés. Prenez le foret de 7 6 po ( mm) et percez un trou dans chaque indentation perpendiculairement au dessous du coffre-fort. NE percez PAS depuis l intérieur du coffre-fort. Remettez le coffre-fort en position droite, placez-le à l emplacement voulu et ouvrez la porte. Utilisez une vis ou un crayon pour marquer le plancher par les deux trous. Pour les produits qui ne sont pas vendus avec une trousse de fixation : Allez sur pour vous procurer la quincaillerie recommandée et les instructions. 6 7

15 Fixation de Votre Coffre-fort Dépannage Instructions de fixation (suite) Le Problème : Pourquoi cela se Produit : La Solution : 5 Déplacez le coffre-fort afin de dégager les deux endroits marqués et percer. 6 Percez dans le plancher : A Pour un plancher de bois : Utilisez le foret de perceuse de 9 po (7, mm) et percez un trou d une profondeur de po (64 mm) dans chaque marque. La porte ne se verrouille pas La poignée n est pas en position horizontale lorsque le coffrefort est verrouillé La vis de manutention est en place L embrayage a été engagé Retirez la vis au dos de la porte Tournez la poignée vers le haut ou le bas jusqu à ce qu elle s enclenche en position horizontale 7 8 A Pour un plancher de maçonnerie : Utilisez le foret de perceuse de 8 po (9,5 mm) et percez un trou d une profondeur de po (64 mm) dans chaque marque. Insérez un ancrage de maçonnerie dans chaque trou. Remettez le coffre-fort à l endroit voulu tout en alignant les trous du coffre-fort avec les trous du plancher. F F F Fixer le coffre-fort : A Pour un plancher de bois : Passez chaque tirefond dans une rondelle, dans un trou du coffre-fort, puis dans un trou du plancher. Serrez avec la clé. B Pour un plancher de maçonnerie : Passez chaque tirefond dans une rondelle, dans un trou du coffre-fort, puis dans un ancrage de maçonnerie. Serrez avec la clé. Insérez des ancrages de maçonnerie dans les trous du plancher. Remarque : Le coffre-fort ne doit pas être fixé au mur, car cela affecte la résistance au feu. Ne percez des trous que dans les pieds. Ne percez jamais le fond ou les côtés du coffre. Remarque : La fixation et le déboulonnage de l unité se font aux dépens et selon la volonté du consommateur. Remarque : Sentry Group ne peut être tenu responsable pour tout coût encouru si l unité doit être remplacée. Je ne peux pas ouvrir la porte après avoir saisi la combinaison électronique Le témoin lumineux rouge clignote trois fois et on entend trois signaux sonores Le témoin lumineux rouge clignote cinq fois et on entend cinq signaux sonores Le témoin lumineux rouge clignote une fois et on entend un signal sonore Le témoin lumineux rouge clignote Le témoin lumineux jaune est allumé Les portes des coffres-forts munis d un joint d étanchéité peuvent être difficiles au début Une combinaison invalide a été saisie J ai appuyé sur les touches sans suivre la séquence -ou- 5 secondes se sont écoulées entre deux saisies. Une combinaison invalide a été saisie trois fois. Les piles sont faibles. La poignée ne permet pas d ouvrir le coffre lorsque ce témoin est allumé Tenez la poignée vers le haut en saisissant la combinaison puis abaissezla quand le témoin passe au vert Vérifiez la combinaison et saisissez-la de nouveau Veuillez communiquer avec le Service à la Clientèle au Recommencez Attendez deux minutes et recommencez Remplacez les piles Pour les produits qui ne sont pas vendus avec une trousse de fixation : Allez sur pour vous procurer la quincaillerie recommandée et les instructions. Le cadran ne permet pas d ouvrir le coffre La poignée ne tourne pas Assurez-vous que la poignée est en position horizontale Assurez-vous que la serrure à clé est en position «déverrouillé» 8 9
 et percez")
16 Service à la Clientèle Garanties et Normes D incendie Service à la clientèle Service à la clientèle : Fax: Linden Avenue / Rochester, New York / USA Comment obtenir une clé de remplacement ou une combinaison. Veuillez visiter notre site Web au pour obtenir le formulaire de remplacement nécessaire. Si vous n avez pas accès à un ordinateur, veuillez téléphoner au numéro ci-dessus ou nous envoyer une demande de copie du formulaire de remplacement par télécopieur. Trouvez le numéro de série et le numéro du modèle de votre coffre-fort. Le numéro de série et le numéro du modèle sont imprimés sur la petite étiquette sur le côté droit et sur la porte près de la charnière. Veuillez remplir le formulaire complètement. 4 Envoyez le paiement suivant à Sentry Group : Un chèque ou un mandate et le formulaire de replacement nécessaire. Pour les prix actuels s il vous plaît aller à Si vous ne pouvez pa utiliser un ordinateur s il vous plaît appelez le numéro ci-dessus ou envoyez nous un fax. 5 Postez à : Sentry Group, Dept. 00, 88 Linden Avenue, Rochester, NY , USA -OU- envoyez une déclaration par télécopieur (le sceau du notaire doit être lisible) au Paiement avec une carte de crédit : Le paiement peut également être fait avec une carte de crédit VISA ou Mastercard, par téléphone seulement. Téléphonez au pour payer avec une carte de crédit. N envoyez pas les renseignements de votre carte de crédit par télécopieur. REMARQUE :Les prix peuvent changer sans avis. REMARQUE : Les commandes de clé et de combinaison peuvent être placées le samedi et le dimanche, mais ces commandes ne seront traitées que le jour ouvrable suivant. Notre centre de service à la clientèle est ouvert du lundi au vendredi, de 8 heures à 8 heures. Garanties GARANTIE À VIE DE REMPLACEMENT APRÈS UN INCENDIE Si ce produit SentrySafe est endommagé par le feu alors qu il est toujours en votre possession (vous, le propriétaire initial), SentrySafe vous enverra une unité de remplacement sans frais. Indiquez votre nom, votre adresse, le numéro du modèle, une photo de l unité brûlée, une description de l incendie, ainsi qu une copie du rapport du service de pompiers, de l assurance ou de la police. Veuillez envoyer ces renseignements à : Sentry Group 88 Linden Avenue Rochester, New York USA Spécifications de résistance au feu Résistance au feu : (UL classified protection) (Protection selon la classification UL) Lorsque soumis à des températures pouvant atteindre 97 C pendant heure, la température à l intérieur du coffre-fort demeure inférieure à 77 C. Ceci permet à votre coffre-fort de résister à une exposition à des températures élevées pendant que le foyer de l incendie se déplace dans un édifice. Risque d explosion : (Protection selon la classification UL) Lorsque soumis à un feu à inflammation instantanée dans un four chauffé à 09 C pendant 0 minutes, le coffre-fort n explose pas et ne se fissure pas. Résistance au feu et aux impacts : (Homologation ETL) Après avoir été chauffé à 84 C, le coffre-fort fait une chute de 4,57 m sur des débris, avant d être refroidi, puis chauffé de nouveau à 84 C pendant 0 minutes. Protection des données : (Homologation ETL) Protection pendant une heure des CD, DVD, cartes mémoire et clés USB contre un feu pouvant atteindre 97 C. Ce produit n est PAS conçu pour protéger des disquettes, des cartouches, des cassettes audio ou vidéo et des négatifs de photo. Pour un entreposage de ce matériel à l abri du feu, demandez à votre détaillant de vous présenter la gamme de produits d entreposage ignifugés pour médias numériques de SentrySafe. Comment commander des accessoires Afin d optimiser l organisation de votre coffre-fort, pensez à acheter des accessoires SentrySafe. Les accessoires comprennent un tiroir verrouillable, un plateau, une tablette et un support à dossiers. Pour d autres articles, veuillez visiter notre site Web au ou téléphonez à notre service à la clientèle au

17 Fire-Safe MANUAL DEL DUEÑO

18 Advertencias Índice ADVERTENCIA Advertencia de armas de fuego: Este producto no está diseñado para el almacenamiento seguro de todos los materiales. Los artículos tales como armas de fuego, otras armas, materiales combustibles o medicamentos NO deben guardarse en esta unidad. ADVERTENCIA NO guarde artículos delicados directamente dentro de su caja fuerte. Los productos SentrySafe que ofrecen protección contra incendios están dotados de un aislante patentado con elevado contenido de humedad. Adicionalmente, las cajas fuertes avanzadas SentrySafe se cierran herméticamente para ofrecer resistencia al agua, lo que también podría ocasionar la acumulación de humedad dentro de su caja fuerte. El paquete de desecante incluido en su caja fuerte durante el embarque debe dejarse dentro de la caja fuerte. NO LO DESECHE ya que tiene por finalidad ayudar a absorber humedad que puede acumularse dentro de su caja fuerte. Abra su unidad una vez cada dos semanas para evitar la acumulación de humedad. Si elige guardar artículos delicados, por ejemplo, joyería con piezas funcionales, relojes, estampillas o fotografíalas dentro de su caja fuerte, recomendamos colocarlos en un envase hermético, antes de colocarlos dentro de la caja fuerte para almacenamiento. NOTA: Sentry Group no será responsable por daños o pérdida de artículos colocados dentro de la unidad debido a humedad. ADVERTENCIA NO GUARDE perlas dentro de esta unidad de caja fuerte. En caso de un incendio, las perlas delicadas pueden sufrir daños a temperaturas mucho más bajas que el parámetro de desempeño interior de 50 F garantizado por la norma de desempeño de clasificación UL indicada. En consecuencia NO guarde perlas en su producto SentrySafe. Advertencias...4 Registración...5 Cerradura Mecánica de Esfera Cerradura Electrónica Programable Operación de la Luz...4 Apernado de su Caja Fuerte Identificación y Resolución de Problemas...45 Servicio a Clientes...46 Garantías y Especificaciones...47 IMPORTANTE Si experimenta problemas o dificultades con su caja fuerte, comuníquese con nosotros. Muchos asuntos pueden resolver rápidamente sin devolver el producto. Registración Motivos de registrar Al registrar su producto SentrySafe usted puede recuperar fácilmente códigos y combinaciones olvidadas, que de otra manera necesitarían una carta notariada y un pago. Al registrar su producto SentrySafe usted puede estar seguro que en la lamentable circunstancia de un incendio, se le garantizará su caja fuerte de reemplazo (provista con documentación oficial). ADVERTENCIA No guarde discos de computadora, medios audiovisuales o negativos fotográficos. Este producto no está diseñado para proteger disquetes flexibles de computadora, cartuchos y cintas, casetes de audio o vídeo o negativas fotográficas. Para el almacenamiento resistente a fuego de estos materiales, pida a su minorista productos de almacenamiento de medios SentrySafe Fire-Safe. ADVERTENCIA SU CAJA FUERTE SÓLO FORMA PARTE DE SU PROTECCIÓN DE SEGURIDAD TOTAL SentrySafe recomienda que guarde su caja fuete dentro de un armario, oficina, sótano, habitación o cualquier otro lugar conveniente para usted pero fuera de la línea de vista directa de los ojos curiosos. El lugar de su caja fuerte no afecta la capacidad de la caja de proteger los artículos de valor que contiene. 4 5

19 Cerradura Mecánica de Esfera NOTA: Guarde la combinación y las llaves (en su caso) en un lugar seguro (que no sea la caja fuerte). NOTA: La combinación no puede cambiarse. NOTA: SentrySafe ofrece un lugar protegido en línea para la entrada y recuperación de su combinación. Visite y registre su caja fuerte. Preparación de su caja fuerte para uso por primera vez. 4 5 Gire la esfera hacia la derecha (en sentido del reloj), pare cuando llegue al tercer número de su combinación. Gire la manija hacia abajo para abrir la puerta. Esto puede necesitar cierta cantidad de fuerza si tiene una caja fuerte resistente a agua. M00TEST SN00TEST0* 0-- RLR 075 Cómo desbloquear y abrir su caja fuerte. Asegúrese que se haya quitado los tornillos de embarque. Situados en el interior de la puerta. Busque su combinación en la contraportada de este manual del dueño. Advertencia: Pruebe su combinación varias veces antes de colocar artículos de valor adentro. PARA CERRADURAS DOBLES DE LLAVE/COMBINACIÓN SOLAMENTE, inserte la llave dentro de la cerradura, gírela hasta la posición abierta, luego quite la llave. La cerradura es una característica de cierre secundaria, no una llave de anulación. Sin la llave no podrá abrir su caja fuerte. Gire la esfera hasta 0, luego gírela hacia la derecha (en sentido del reloj) pasando 0 tres veces, siga girando hasta que llegue al primer número de su combinación. NOTA: Cerciórese de que la manija se encuentre en la posición horizontal al abrir la caja fuerte. NOTA: Si la puerta no se abre fácilmente, repita los pasos al 5. NOTA: Si ejerce demasiada fuerza en la manija, la manija se moverá sin mover los pernos. Cuando esto sucede, escuchará un chasquido. NO se preocupe. Esta característica está diseñada para proteger la anulación de los pernos por fuerza. Si esto ocurre, simplemente aplique fuerza en el sentido contrario (levantando) hasta que la manija se enganche de nuevo en posición y repita los pasos -5. Para cerrar su caja fuerte Cierre la puerta y hale la manija hacia arriba hasta que esté en posición horizontal. Para las unidades resistentes al agua, puede ser necesario aplicar presión adicional al lado izquierdo delantero de la puerta antes de girar la manija. Gire la esfera por lo menos veces hacia la derecha (en sentido del reloj). Gire la esfera hacia la izquierda (en sentido contrario al reloj). PASE al segundo número de su combinación UNA VEZ y pare la SEGUNDA VEZ que la esfera llegue al número. PARA CERRADURAS DOBLES DE LLAVE/COMBINACIÓN SOLAMENTE, inserte la llave en la cerradura, gire hasta la posición cerrada, y luego quite la llave. 6 7

20 Cerradura Electrónica Programable NOTA: Guarde el código (y las llaves, en su caso) en un lugar seguro (que no sea dentro de la caja fuerte). NOTA: SentrySafe ofrece un lugar protegido en línea para la entrada y recuperación de su combinación. Visite y registre su caja fuerte. Gire la manija hacia abajo para abrir la puerta. Esto puede necesitar una cantidad limitada de fuerza si tiene una caja fuerte resistente al agua. Preparación de su caja fuerte para uso por primera vez. Asegúrese que se haya quitado los tornillos de embarque. Situados en el interior de la puerta. NOTA: Asegúrese que la manija se encuentre en la posición horizontal al abrir la caja fuerte. NOTA: Si ejerce demasiada fuerza en la manija, la manija se moverá sin mover los pernos. Cuando esto sucede, escuchará un chasquido. NO se preocupe. Esta característica está diseñada para proteger la anulación de los pernos por fuerza. Si esto ocurre, simplemente aplique fuerza en el sentido contrario (levantando) hasta que la manija se enganche de nuevo en posición y repita los pasos -. M00TEST SN00TEST0* 45 A Deslice hacia fuera la bandeja de pilas en el lado del teclado. B Inserte 4 pilas alcalinas AAA (no use pilas recargables u otros tipos de pilas no alcalinas). C Deslice la bandeja de pilas de nuevo dentro del teclado. Busque su codigo en la contraportada de este manual del dueño. Advertencia: Pruebe su combinación varias veces antes de colocar artículos de valor adentro. Para cerrar su caja fuerte Cierre la puerta y hale la manija hacia arriba hasta que esté en posición horizontal. Para las unidades resistentes al agua, puede ser necesario aplicar presión adicional al lado izquierdo delantero de la puerta antes de girar la manija. PARA CERRADURAS DOBLES DE LLAVE/COMBINACIÓN SOLAMENTE, inserte la llave en la cerradura, gire hasta la posición cerrada, y luego quite la llave. Cómo desbloquear y abrir su caja fuerte. PARA CERRADURAS DOBLES DE LLAVE/COMBINACIÓN SOLAMENTE, inserte la llave dentro de la cerradura, gírela hasta la posición abierta, luego quite la llave. La cerradura es una característica de cierre secundaria, no una llave de anulación. Sin la llave no podrá abrir su caja fuerte. A Entre el código de fábrica de 5 dígitos indicado en la contraportada del manual del dueño. B Una luz verde indicará que el código es correcto. Usted tendrá 4 segundos para girar la manija para abrir su caja fuerte. NOTA: El código de fábrica de 5 dígitos no puede borrarse. No obstante, usted puede añadir y borrar códigos adicionales. NOTA: Si su caja fuerte no parece estar funcionando bien, asegúrese que esté usando pilas alcalinas NUEVAS antes de comunicarse con Servicio a Clientes de SentrySafe. 8 9

21 Cerradura Electrónica Programable Información de programación Tres opciones de código: Código de fábrica: La caja fuerte SIEMPRE se abrirá usando este código de 5 dígitos (indicado en la contraportada del manual del dueño). Este código no puede borrarse. Código de usuario: Un código programable de 5 dígitos de su elección que puede cambiarse o borrarse. Código secundario: code: Un código programado de 5 dígitos de su elección que puede cambiarse o borrarse. Sólo puede programarse después de haberse activado un código de usuario. NOTA: La tecla C es una tecla de borrar. Esta tecla puede usarse en cualquier momento para depurar el sistema y regresar al modo de espera salvo que se encuentre en el modo de demora ( entradas inválidas consecutivas). Programación del código de usuario Programación del código secundario Sólo puede programarse código secundario a la vez. Para AÑADIR un código secundario: Oprima la tecla P dos veces. Entre el código de usuario de 5 dígitos. La luz verde parpadeará y luego usted tendrá cinco segundos para entrar su propio código secundario. Para BORRAR un código secundario: Oprima la tecla P dos veces. Entre el código de usuario de 5 dígitos. Entre 0,0,0,0,0. NOTA: La cerradura electrónica NO indicará que ha borrado el código secundario pruebe el código para asegurar que se haya borrado. NOTA: Ocurrirá el modo de demora si se ha intentado tres entradas inválidas consecutivas. Esto ocasionará el paro del sistema durante dos minutos. NO quite las pilas para rearrancar el sistema. Esto sólo prolongará el tiempo del paro del sistema. Sólo puede programarse código de usuario a la vez. Para AÑADIR un código de usuario: Oprima la tecla P. Entre el código de fábrica de 5 dígitos. La luz verde parpadeará y luego usted tendrá cinco segundos para entrar su propio código de usuario personal. Para BORRAR un código de usuario: Oprima la tecla P. Entre el código de fábrica de 5 dígitos. Entre 0,0,0,0,0. NOTA: La cerradura electrónica NO indicará que ha borrado el código de usuario pruebe el código para asegurar que se haya borrado. 40 4
22 Operación de la Luz Apernado de su Caja Fuerte Cómo operar la luz La caja fuerte que ha comprado puede incluir una luz LED de duración prolongada. No todas las cajas fuertes incluyen una luz. Para apagar la luz: Oprima el botón 0. Oprima el botón P. Oprima el botón. Para encender la luz durante 0 segundos: Oprima el botón 0. Oprima el botón P. Oprima el botón 4. Para encender la luz durante 60 segundos: Oprima el botón 0. Oprima el botón P. Oprima el botón 5. Las pilas que operan el teclado son las mismas pilas que operan la luz. Si la luz en su unidad no se enciende, cambie sus pilas. Consulte la página 8 para cambiar las pilas. La luz se encenderá cada vez que entre su código y permanecerá encendida durante 0 segundos. La duración de la luz tiene tres opciones apagada, 0 segundos y 60* segundos. Instrucciones de apernado Advertencia: NO taladre a través de los hoyos de perno. Advertencia: NO aperne a través de las paredes. Advertencia: NO taladre desde ningún lugar dentro de la caja fuerte. Contenido del conjunto de apernado (en modelos selectos solamente): tirafondos. arandelas. anclajes de mampostería. Herramientas necesarias para apernar la caja fuerte al piso: Taladro. Llave inglesa. Broca de 7 6 ( mm) para taladrar dentro de la caja. Broca de 9 (7. mm) para taladrar dentro de un piso de madera. Broca de 8 (0.5 mm) para taladrar dentro de un piso de mampostería. Cierre la puerta. Voltee la caja sobre el lado izquierdo (bisagras de la puerta horizontal al piso). Busque dos muescas en las patas del fondo de la caja fuerte en esquinas opuestas. Usando la broca de 7 6 ( mm), taladre un agujero a través de cada muesca, perpendiculares al fondo de la caja fuerte. NO taladre desde ningún lugar dentro de la caja. *Si la duración de la luz es 60 segundos, la vida de la pila se agotará más rápidamente. Voltee la caja fuerte en posición parada, colóquela en el lugar deseado y abra la puerta. 4 Use un tornillo o lápiz para marcar el piso a través de ambos agujeros. Para productos no dotados de conjuntos de apernar: Visite para buscar el herraje recomendado y las instrucciones. 4 4
Lavatory Faucet. Instruction Manual. Questions? 1-866-661-9606 customerservice@artikaworld.com
 Lavatory Faucet Instruction Manual rev. 19-01-2015 Installation Manual You will need Adjustable Wrench Adjustable Pliers Plumber s Tape Hardware list (included) Allen Key Socket wrench tool Important Follow
Thank you for choosing the Mobile Broadband USB Stick. With your USB Stick, you can access a wireless network at high speed.
 Thank you for choosing the Mobile Broadband USB Stick. With your USB Stick, you can access a wireless network at high speed. Note: This manual describes the appearance of the USB Stick, as well as the
Instructions Mozilla Thunderbird Page 1
 Instructions Mozilla Thunderbird Page 1 Instructions Mozilla Thunderbird Ce manuel est écrit pour les utilisateurs qui font déjà configurer un compte de courrier électronique dans Mozilla Thunderbird et
Guide d'installation rapide TFM-560X YO.13
 Guide d'installation rapide TFM-560X YO.13 Table of Contents Français 1 1. Avant de commencer 1 2. Procéder à l'installation 2 Troubleshooting 6 Version 06.08.2011 16. Select Install the software automatically
Contents Windows 8.1... 2
 Workaround: Installation of IRIS Devices on Windows 8 Contents Windows 8.1... 2 English Français Windows 8... 13 English Français Windows 8.1 1. English Before installing an I.R.I.S. Device, we need to
Trim Kit Installation Instruction
 Trim Kit Installation Instruction Instrucciones para la Instalación del Kit de Molduras Instructions pour l'installation du Kit d'encastrement m If any hardware or parts are damaged or missing, contact
Folio Case User s Guide
 Fujitsu America, Inc. Folio Case User s Guide I N S T R U C T I O N S This Folio Case is a stylish, lightweight case for protecting your Tablet PC. Elastic Strap Pen Holder Card Holders/ Easel Stops Figure
How to Login to Career Page
 How to Login to Career Page BASF Canada July 2013 To view this instruction manual in French, please scroll down to page 16 1 Job Postings How to Login/Create your Profile/Sign Up for Job Posting Notifications
FCM 2015 ANNUAL CONFERENCE AND TRADE SHOW Terms and Conditions for Delegates and Companions Shaw Convention Centre, Edmonton, AB June 5 8, 2015
 FCM 2015 ANNUAL CONFERENCE AND TRADE SHOW Terms and Conditions for Delegates and Companions Shaw Convention Centre, Edmonton, AB June 5 8, 2015 Early-bird registration Early-bird registration ends April
Notice Technique / Technical Manual
 Contrôle d accès Access control Encodeur USB Mifare ENCOD-USB-AI Notice Technique / Technical Manual SOMMAIRE p.2/10 Sommaire Remerciements... 3 Informations et recommandations... 4 Caractéristiques techniques...
Package Contents. System Requirements. Before You Begin
 Package Contents DWA-125 Wireless 150 USB Adapter CD-ROM (contains software, drivers, and manual) Cradle If any of the above items are missing, please contact your reseller. System Requirements A computer
Garage Door Monitor Model 829LM
 Garage Door Monitor Model 829LM To prevent possible SERIOUS INJURY or DEATH from a closing garage door: NEVER permit children to operate or play with door control push buttons or remote control transmitters.
ENGLISH 4 FRANÇAIS 6 ESPAÑOL 8
 SY ENGLISH 4 FRANÇAIS 6 ESPAÑOL 8 ENGLISH How to lubricate the sewing machine Warning! Always switch off the machine and disconnect it from the power supply before lubricating the sewing machine. 1 Always
Contrôle d'accès Access control. Notice technique / Technical Manual
 p.1/18 Contrôle d'accès Access control INFX V2-AI Notice technique / Technical Manual p.2/18 Sommaire / Contents Remerciements... 3 Informations et recommandations... 4 Caractéristiques techniques... 5
GIGABIT PCI DESKTOP ADAPTER DGE-530T. Quick Installation Guide+ Guide d installation+
 GIGABIT PCI DESKTOP ADAPTER Quick Installation Guide+ Guide d installation+ Check Your Package Contents Quick Installation Guide Gigabit Ethernet PCI Adapter CD with Manual and Drivers DO NOT insert the
Logitech Tablet Keyboard for Windows 8, Windows RT and Android 3.0+ Setup Guide Guide d installation
 Logitech Tablet Keyboard for Windows 8, Windows RT and Android 3.0+ Setup Guide Guide d installation English.......................................... 3 Français.........................................
Instructions pour mettre à jour un HFFv2 v1.x.yy v2.0.00
 Instructions pour mettre à jour un HFFv2 v1.x.yy v2.0.00 HFFv2 1. OBJET L accroissement de la taille de code sur la version 2.0.00 a nécessité une évolution du mapping de la flash. La conséquence de ce
Once the installation is complete, you can delete the temporary Zip files..
 Sommaire Installation... 2 After the download... 2 From a CD... 2 Access codes... 2 DirectX Compatibility... 2 Using the program... 2 Structure... 4 Lier une structure à une autre... 4 Personnaliser une
Règlement sur le télémarketing et les centres d'appel. Call Centres Telemarketing Sales Regulation
 THE CONSUMER PROTECTION ACT (C.C.S.M. c. C200) Call Centres Telemarketing Sales Regulation LOI SUR LA PROTECTION DU CONSOMMATEUR (c. C200 de la C.P.L.M.) Règlement sur le télémarketing et les centres d'appel
Warning: Failure to follow these warnings could result in property damage, or personal injury.
 Western Steel & Tube 1 Storage Locker Extended Storage Locker Storage Cabinet Assembly And Use Instructions Warning: Failure to follow these warnings could result in property damage, or personal injury.
GUN SAFE/EXECUTIVE SAFE OWNER S MANUAL MANUEL DE L UILISATEUR COFFRE-FORT D ARMES À FEU/DE DIRECTION
 GUN SFE/EXECUTIVE SFE OWNER S MNUL MNUEL DE L UILISTEUR COFFRE-FORT D RMES À FEU/DE DIRECTION MNUL DEL PROPIETRIO CJ FUERTE PR RMS DE FUEGO/CJ FUERTE EJECUTIV Thank you for purchasing this SentrySafe or
Compléter le formulaire «Demande de participation» et l envoyer aux bureaux de SGC* à l adresse suivante :
 FOIRE AUX QUESTIONS COMMENT ADHÉRER? Compléter le formulaire «Demande de participation» et l envoyer aux bureaux de SGC* à l adresse suivante : 275, boul des Braves Bureau 310 Terrebonne (Qc) J6W 3H6 La
Nouveautés printemps 2013
 » English Se désinscrire de la liste Nouveautés printemps 2013 19 mars 2013 Dans ce Flash Info, vous trouverez une description des nouveautés et mises à jour des produits La Capitale pour le printemps
33 inch open & closed storage Rangement à espace fermé et ouvert de 33po (83.7cm) 33 pulgadas almacenaje abierto y cerra
 33 pulgadas almacenaje abierto y cerra") 33 inch open & closed storage 33 pulgadas almacenaje abierto y cerra! o not throw away packaging materials until assembly is complete.! Assemble this item on a soft surface, such as cardboard or carpet,
33 inch open & closed storage 33 pulgadas almacenaje abierto y cerra! o not throw away packaging materials until assembly is complete.! Assemble this item on a soft surface, such as cardboard or carpet,
WiFi Security Camera Quick Start Guide. Guide de départ rapide Caméra de surveillance Wi-Fi (P5)
") #45 #46 WiFi Security Camera Quick Start Guide Guide de départ rapide Caméra de surveillance Wi-Fi (P5) #47 Start Here 1 Is this you? TECH SUPPORT CTRL ALT DEL 2 If yes, turn to page three 1 3 If not,
#45 #46 WiFi Security Camera Quick Start Guide Guide de départ rapide Caméra de surveillance Wi-Fi (P5) #47 Start Here 1 Is this you? TECH SUPPORT CTRL ALT DEL 2 If yes, turn to page three 1 3 If not,
Paxton. ins-20605. Net2 desktop reader USB
 Paxton ins-20605 Net2 desktop reader USB 1 3 2 4 1 2 Desktop Reader The desktop reader is designed to sit next to the PC. It is used for adding tokens to a Net2 system and also for identifying lost cards.
Gestion des prestations Volontaire
 Gestion des prestations Volontaire Qu estce que l Income Management (Gestion des prestations)? La gestion des prestations est un moyen de vous aider à gérer votre argent pour couvrir vos nécessités et
PARIS ROISSY CHARLES DE GAULLE
 GPS 2 34 1 E 49 0 46 N GPS* 2 56 56 E 49 0 12 N Votre contact / Your contact: et / and: Accueil : Cabines téléphoniques publiques Reception: Public telephone kiosks Navette Shuttle AÉROPORT DE TT CAR TRANSIT
Quick Installation Guide TEW-AO12O
 Quick Installation Guide TEW-AO12O Table of of Contents Contents Français... 1 1. Avant de commencer... 1 2. Installation du matériel... 2 3. Montage... 4 Troubleshooting... 6 Version 10.04.2007 1. Avant
Application Form/ Formulaire de demande
 Application Form/ Formulaire de demande Ecosystem Approaches to Health: Summer Workshop and Field school Approches écosystémiques de la santé: Atelier intensif et stage d été Please submit your application
WEB page builder and server for SCADA applications usable from a WEB navigator
 Générateur de pages WEB et serveur pour supervision accessible à partir d un navigateur WEB WEB page builder and server for SCADA applications usable from a WEB navigator opyright 2007 IRAI Manual Manuel
DOCUMENTATION - FRANCAIS... 2
 DOCUMENTATION MODULE SHOPDECORATION MODULE PRESTASHOP CREE PAR PRESTACREA INDEX : DOCUMENTATION - FRANCAIS... 2 INSTALLATION... 2 Installation automatique... 2 Installation manuelle... 2 Résolution des
APPENDIX 6 BONUS RING FORMAT
 #4 EN FRANÇAIS CI-DESSOUS Preamble and Justification This motion is being presented to the membership as an alternative format for clubs to use to encourage increased entries, both in areas where the exhibitor
Please kindly find below a synoptic table showing the various ways of transport from Mahe to La Digue, with a stop over on Praslin:
 Travel information: Island? Please kindly find below a synoptic table showing the various ways of transport from Mahe to La Digue, with a stop over on Praslin: From Mahé to Praslin From Praslin to La Digue
USER GUIDE GUIDE D UTILISATION
 USER GUIDE GUIDE D UTILISATION Before programming, install the lock on your door. Follow the instructions in the Installation Guide, on the reverse side of this manual. Avant la programmation, installez
LOGICIEL D'ADMINISTRATION POUR E4000 & G4000 MANAGEMENT SOFTWARE FOR E4000 & G4000
 LOGICIEL D'ADMINISTRATION POUR E4000 & G4000 MANAGEMENT SOFTWARE FOR E4000 & G4000 TABLE DES MATIÈRES TITRE PAGE Présentation - - - - - - - - - - - - - - - - - - - - - - - - - - - - - - - - - - - -4 Le
MELTING POTES, LA SECTION INTERNATIONALE DU BELLASSO (Association étudiante de lʼensaparis-belleville) PRESENTE :
 PRESENTE :") MELTING POTES, LA SECTION INTERNATIONALE DU BELLASSO (Association étudiante de lʼensaparis-belleville) PRESENTE : Housing system est un service gratuit, qui vous propose de vous mettre en relation avec
MELTING POTES, LA SECTION INTERNATIONALE DU BELLASSO (Association étudiante de lʼensaparis-belleville) PRESENTE : Housing system est un service gratuit, qui vous propose de vous mettre en relation avec
Guide d installation Deco Drain inc. DD200
 Guide d installation Deco Drain inc. DD200 Pour plus informations et pour télécharger les guides d installation en couleur, visitez notre site web. www.decodrain.com Soutien technique : Composez le : 514-946-8901
POLICY: FREE MILK PROGRAM CODE: CS-4
 POLICY: FREE MILK PROGRAM CODE: CS-4 Origin: Authority: Reference(s): Community Services Department Cafeteria Services and Nutrition Education Division Resolution #86-02-26-15B.1 POLICY STATEMENT All elementary
Utiliser une WebCam. Micro-ordinateurs, informations, idées, trucs et astuces
 Micro-ordinateurs, informations, idées, trucs et astuces Utiliser une WebCam Auteur : François CHAUSSON Date : 8 février 2008 Référence : utiliser une WebCam.doc Préambule Voici quelques informations utiles
Quick start guide. www.philips.com/support HTL1170B
 For product support, visit Para obtener asistencia técnica, visite Pour en savoir plus sur l assistance sur les produits, visitez le site www.philips.com/support HTL1170B Quick start guide P&F USA, Inc.
AND / ET USER GUIDE UK HARDWIRED CONTROL PANEL UK GUIDE UTILISATEUR CENTRALE D ALARME FILAIRE F 496572 1
 AND / ET UK USER GUIDE HARDWIRED CONTROL PANEL UK F GUIDE UTILISATEUR CENTRALE D ALARME FILAIRE 496572 1 English UK Operator Controls and Displays On both control panel and remote keypad the LEDs display
calls.paris-neuroscience.fr Tutoriel pour Candidatures en ligne *** Online Applications Tutorial
 calls.paris-neuroscience.fr Tutoriel pour Candidatures en ligne Online Applications Tutorial 1/4 Pour postuler aux Appels d Offres de l ENP, vous devez aller sur la plateforme : calls.parisneuroscience.fr.
La création et la mise à jour de votre profil de fournisseur d Accenture
 ACCENTURE FRANCE GUIDE DU FOURNISSEUR POUR LA FACTURATION A ACCENTURE (french) Cher fournisseur, Nous vous remercions de l intérêt que vous portez à Accenture. Afin de vous aider, vous trouverez dans ce
R.V. Table Mounting Instructions
 PTSS165 ACCESSORY MOUNTING INSTRUCTIONS Use these instructions in conjunction with your main manual to properly assemble your gas grill. Refer to the main manual for safety, operating, cleaning and maintenance
3615 SELFIE. http://graffitiresearchlab.fr HOW-TO / GUIDE D'UTILISATION
 3615 SELFIE http://graffitiresearchlab.fr HOW-TO / GUIDE D'UTILISATION Hardware : Minitel Computer DIN FM545 45 connector (http://www.gotronic.fr/art-fiche-din-fm545-4747.htm) Cable Arduino compatible
Fabricant. 2 terminals
 Specifications Fabricant Nominal torque (Nm) 65 Minimal torque (Nm) 0,63 Coil resistance - 20 C (ohms) 20 Rated current DC (A) 1 Rotor inertia (kg.m 2 ) 2.10-3 Weight (kg) 7,20 Heat dissipation continuous
GAME CONTENTS CONTENU DU JEU OBJECT OF THE GAME BUT DU JEU
 GAME CONTENTS 3 wooden animals: an elephant, a Polar bear and an African lion 1 Playing Board with two tree stumps, one red and one blue 1 Command Board double sided for two game levels (Green for normal
Quick Installation Guide TW100-BRV304
 Quick Installation Guide TW100-BRV304 Table of of Contents Contents Français... 1. Avant de commencer... 2. Installation du matériel... 3. Configuration du routeur... 1 1 2 3 Troubleshooting... 5 Version
À l'approche du festival MUTEK 2015, nous vous contactons pour vous faire part de quelques informations importantes.
 (English will follow) Cher détenteur de PASSE WEEK-END MUTEK 2015, À l'approche du festival MUTEK 2015, nous vous contactons pour vous faire part de quelques informations importantes. En tant que détenteur
Quick Installation Guide TBW-106UB H/W: V1
 Quick Installation Guide TBW-106UB H/W: V1 Table of Contents... 1. Avant de commencer... 2. Procéder à l'installation... 3. Configuration de l'adaptateur Bluetooth... Troubleshooting... 1 1 2 5 7 Version
Le No.1 de l économie d énergie pour patinoires.
 Le No.1 de l économie d énergie pour patinoires. Partner of REALice system Economie d énergie et une meilleure qualité de glace La 2ème génération améliorée du système REALice bien connu, est livré en
Using a Walker. 2. Move your injured or weak leg toward the walker first. If you have had surgery on both legs, use either leg to begin walking.
 Using a Walker Walking with a Walker 1. Lift the walker and place it at a comfortable distance in front of you with all four of its legs on the floor. This distance is often equal to an arm s length. 2.
DOCUMENTATION - FRANCAIS... 2
 DOCUMENTATION MODULE CATEGORIESTOPMENU MODULE CREE PAR PRESTACREA INDEX : DOCUMENTATION - FRANCAIS... 2 INSTALLATION... 2 CONFIGURATION... 2 LICENCE ET COPYRIGHT... 3 SUPPORT TECHNIQUE ET MISES A JOUR...
Owner s Manual Models: HD4100L and HD2100L
 Owner s Manual Models: HD4100L and HD2100L Index IMPORTANT MAKE SENTRYSAFE YOUR FIRST CALL If you experience any difficulties with your safe or have any questions, including the replacement of keys to
WINTER BOAT STORAGE SYSTEM SYSTÈME DE REMISAGE HIVERNAL POUR BATEAU
 MANUAL / MANUEL VIDEO WINTER BOAT STORAGE SYSTEM SYSTÈME DE REMISAGE HIVERNAL POUR BATEAU ASSEMBLY INSTRUCTIONS GUIDE D ASSEMBLAGE NAVIGLOO 14-18½ ft/pi FISHING BOAT! RUNABOUT! PONTOON BOAT! SAILBOAT (SAILBOAT
that the child(ren) was/were in need of protection under Part III of the Child and Family Services Act, and the court made an order on
 was/were in need of protection under Part III of the Child and Family Services Act, and the court made an order on") ONTARIO Court File Number at (Name of court) Court office address Applicant(s) (In most cases, the applicant will be a children s aid society.) Full legal name & address for service street & number, municipality,
ONTARIO Court File Number at (Name of court) Court office address Applicant(s) (In most cases, the applicant will be a children s aid society.) Full legal name & address for service street & number, municipality,
PAR RINOX INC BY RINOX INC PROGRAMME D INSTALLATEUR INSTALLER PROGRAM
 PAR RINOX INC BY RINOX INC PROGRAMME D INSTALLATEUR INSTALLER PROGRAM DEVENEZ UN RINOXPERT DÈS AUJOURD HUI! BECOME A RINOXPERT NOW OPTIMISER VOS VENTES INCREASE YOUR SALES VISIBILITÉ & AVANTAGES VISIBILITY
Logitech Speaker System Z553 Setup Guide Guide d installation
 Logitech Speaker System Z553 Setup Guide Guide d installation Logitech Speaker System Z553 English................. 3 Français................ 10 www.logitech.com/support...19 2 Package contents Logitech
Installation Guide. Ceramic Oval Handle Trim Kit
 Installation Guide Ceramic Oval Handle Trim Kit K-251, K-253, K-258, K-260, K-262, K-264, K-273, K-274 M product numbers are for Mexico (i.e. K-12345M) Los números de productos seguidos de M corresponden
Start Here Point de départ
 Start Here Point de départ Epson Stylus C88+ Please read these instructions before using the printer. Lisez ces instructions avant d utiliser l imprimante. Install Ink Cartridges Installez les cartouches
Le passé composé. C'est le passé! Tout ça c'est du passé! That's the past! All that's in the past!
 > Le passé composé le passé composé C'est le passé! Tout ça c'est du passé! That's the past! All that's in the past! «Je suis vieux maintenant, et ma femme est vieille aussi. Nous n'avons pas eu d'enfants.
USB 598. Quick Start Guide (Windows) Guide de démarrage rapide (Windows) USB Modem. Modem USB. www.sierrawireless.com
 Guide de démarrage rapide (Windows) USB Modem. Modem USB. www.sierrawireless.com") USB 598 With Avec USB Modem Quick Start Guide (Windows) Modem USB Guide de démarrage rapide (Windows) www.sierrawireless.com This guide provides installation instructions for users of: Windows Vista Windows
USB 598 With Avec USB Modem Quick Start Guide (Windows) Modem USB Guide de démarrage rapide (Windows) www.sierrawireless.com This guide provides installation instructions for users of: Windows Vista Windows
Support Orders and Support Provisions (Banks and Authorized Foreign Banks) Regulations
 Regulations") CANADA CONSOLIDATION CODIFICATION Support Orders and Support Provisions (Banks and Authorized Foreign Banks) Regulations Règlement sur les ordonnances alimentaires et les dispositions alimentaires (banques
CANADA CONSOLIDATION CODIFICATION Support Orders and Support Provisions (Banks and Authorized Foreign Banks) Regulations Règlement sur les ordonnances alimentaires et les dispositions alimentaires (banques
Acce s aux applications informatiques Supply Chain Fournisseurs
 Acce s aux applications informatiques Supply Chain Fournisseurs Toujours plus de service pour vous ; rapide, pratique, sécurisé, écologique et gratuit! Vous vous connectez à notre site MESSIER BUGATTI
/MC Quick Install Guide Guide d installation rapide
 /MC Digital Postage Meter Compteur postal numérique Quick Install Guide Guide d installation rapide Canadian English Version Version canadienne française . Lock Class *#_ Funds GHI Menu ABC JKL PQRS DEF
First Nations Assessment Inspection Regulations. Règlement sur l inspection aux fins d évaluation foncière des premières nations CONSOLIDATION
 CANADA CONSOLIDATION CODIFICATION First Nations Assessment Inspection Regulations Règlement sur l inspection aux fins d évaluation foncière des premières nations SOR/2007-242 DORS/2007-242 Current to September
ABF Freight System Canada, Ltd. Your Official Trade Show Carrier
 ON SITE... ON TIME... DAMAGE-FREE Offering Complete Transportation Services At ABF, we know that precision planning is the key to successful trade shows. We are committed to providing the on-time, damage-free
lundi 3 août 2009 Choose your language What is Document Connection for Mac? Communautés Numériques L informatique à la portée du Grand Public
 Communautés Numériques L informatique à la portée du Grand Public Initiation et perfectionnement à l utilisation de la micro-informatique Microsoft Document Connection pour Mac. Microsoft Document Connection
The new consumables catalogue from Medisoft is now updated. Please discover this full overview of all our consumables available to you.
 General information 120426_CCD_EN_FR Dear Partner, The new consumables catalogue from Medisoft is now updated. Please discover this full overview of all our consumables available to you. To assist navigation
Guide pour l Installation des Disques Durs SATA et Configuration RAID
 Guide pour l Installation des Disques Durs SATA et Configuration RAID 1. Guide pour l Installation des Disques Durs SATA.. 2 1.1 Installation de disques durs Série ATA (SATA).. 2 1.2 Créer une disquette
Quick Setup Guide Guide de configuration rapide. Tablet Device SGPT12 Series Tablette électronique Série SGPT12
 Quick Setup Guide Guide de configuration rapide Tablet Device SGPT12 Series Tablette électronique Série SGPT12 Welcome / Bienvenue Congratulations on your purchase of this Xperia Tablet S. This Quick Setup
Dans une agence de location immobilière...
 > Dans une agence de location immobilière... In a property rental agency... dans, pour et depuis vocabulaire: «une location» et «une situation» Si vous voulez séjourner à Lyon, vous pouvez louer un appartement.
Logitech Wireless Performance Combo MX800 Setup Guide Guide d installation
 Logitech Wireless Performance Combo MX800 Setup Guide Guide d installation Logitech Wireless Performance Combo MX800 Setup Guide Guide d installation Important information Safety, compliance, and warranty
English Q&A #1 Braille Services Requirement PPTC 144918. Q1. Would you like our proposal to be shipped or do you prefer an electronic submission?
 English Q&A #1 Braille Services Requirement PPTC 144918 Q1. Would you like our proposal to be shipped or do you prefer an electronic submission? A1. Passport Canada requests that bidders provide their
McGILL UNIVERSITY MARTLET CLASSIC UNIVERSITE McGILL CLASSIQUE MARTLET
 McGILL UNIVERSITY MARTLET CLASSIC UNIVERSITE McGILL CLASSIQUE MARTLET DATE DATE Sunday, November 30, 2014 Dimanche 30 Novembre 2014 TIME HEURE 9:30-5:00 9h30-17h00 TRACK PISTE 200m banked Mondo 6 couloirs
DGA. Self Contained Digicode Keypad Digicode avec électronique intégrée INSTALLATION MANUAL MANUEL D INSTALLATION. Group Company
 Self Contained Digicode Keypad Range: Digicode / Gamme: Digicode Group Company INSTALLATION MANUAL MANUEL D INSTALLATION INSTALLATION MANUAL Cast aluminium Digicode Self Contained 1] PRODUCT PREVIEW The
ASSEMBLY INSTRUCTIONS DIRECTIVES POUR L'ASSEMBLAGE ombre pendant lamp lampe suspendue à tons dégradés, chocolat
 ASSEMBLY INSTRUCTIONS DIRECTIVES POUR L'ASSEMBLAGE ombre pendant lamp lampe suspendue à tons dégradés, chocolat SKU 2728089 INSTRUCTIONAL MANUAL MANUEL D'INSTRUCTIONS 270/2707 COMPONENT LIST LISTE DES
ASSEMBLY INSTRUCTIONS DIRECTIVES POUR L'ASSEMBLAGE luster chandelier lamp chandelier à trois branches en verre lustré
 ASSEMBLY INSTRUCTIONS DIRECTIVES POUR L'ASSEMBLAGE luster chandelier lamp chandelier à trois branches en verre lustré SKU 2711592 INSTRUCTIONAL MANUAL MANUEL D'INSTRUCTIONS 270/2707 COMPONENT LIST LISTE
RULE 5 - SERVICE OF DOCUMENTS RÈGLE 5 SIGNIFICATION DE DOCUMENTS. Rule 5 / Règle 5
 RULE 5 - SERVICE OF DOCUMENTS General Rules for Manner of Service Notices of Application and Other Documents 5.01 (1) A notice of application or other document may be served personally, or by an alternative
SERVEUR DÉDIÉ DOCUMENTATION
 SERVEUR DÉDIÉ DOCUMENTATION Release 5.0.6.0 19 Juillet 2013 Copyright 2013 GIANTS Software GmbH, All Rights Reserved. 1/9 CHANGE LOG Correction de bug divers (5.0.6.0) Ajout d une option de relance automatique
2013 IIHF WORLD WOMEN S HOCKEY CHAMPIONSHIP
 2013 IIHF WORLD WOMEN S HOCKEY CHAMPIONSHIP Name Mailing address Phone Girl s Hockey Association 2011/ 12 Team Name Email TICKET PACKAGE Price/ Seat 100 Level (12 games, Lower Bowl) $ 289 200 Level (12
Cheque Holding Policy Disclosure (Banks) Regulations. Règlement sur la communication de la politique de retenue de chèques (banques) CONSOLIDATION
 Regulations. Règlement sur la communication de la politique de retenue de chèques (banques) CONSOLIDATION") CANADA CONSOLIDATION CODIFICATION Cheque Holding Policy Disclosure (Banks) Regulations Règlement sur la communication de la politique de retenue de chèques (banques) SOR/2002-39 DORS/2002-39 Current to
CANADA CONSOLIDATION CODIFICATION Cheque Holding Policy Disclosure (Banks) Regulations Règlement sur la communication de la politique de retenue de chèques (banques) SOR/2002-39 DORS/2002-39 Current to
Practice Direction. Class Proceedings
 Effective Date: 2010/07/01 Number: PD - 5 Title: Practice Direction Class Proceedings Summary: This Practice Direction describes the procedure for requesting the assignment of a judge in a proceeding under
Tutoriel de formation SurveyMonkey
 Tutoriel de formation SurveyMonkey SurveyMonkey est un service de sondage en ligne. SurveyMonkey vous permet de créer vos sondages rapidement et facilement. SurveyMonkey est disponible à l adresse suivante
Comfort Duett. TV-kit. www.comfortaudio.com. USA: English/Français/Español. Comfort Duett
 Comfort Duett TV-kit USA: English/Français/Español www.comfortaudio.com Comfort Duett 1 English The television kit makes it possible to amplify the sound from the TV via the charger unit. As soon as Comfort
SA-32 / SA-62 INSTRUCTION MANUAL - MANUEL D INSTRUCTIONS
 SA-32 / SA-62 INSTRUCTION MANUAL - MANUEL D INSTRUCTIONS 4 5 6 7 4 5 6 7 1. Telephone Paging Volume Control 1. Contrôle de volume Paging Téléphone 2. Microphone Volume Control 2. Contrôle volume du microphone
accidents and repairs:
 accidents and repairs: putting the pieces together accidents et réparations : réunir le tout nobody can repair your Toyota like Toyota Unfortunately, accidents do happen. And the best way to restore your
Confirmation du titulaire de la carte en cas de contestation de transaction(s) Cardholder s Certification of Disputed Transactions
 Cardholder s Certification of Disputed Transactions") Confirmation du titulaire de la carte en cas de contestation de transaction(s) Cardholder s Certification of Disputed Transactions Informations personnelles Nom/Prénom Name / Firstname Numéro de la carte
Confirmation du titulaire de la carte en cas de contestation de transaction(s) Cardholder s Certification of Disputed Transactions Informations personnelles Nom/Prénom Name / Firstname Numéro de la carte
THE LAW SOCIETY OF UPPER CANADA BY-LAW 19 [HANDLING OF MONEY AND OTHER PROPERTY] MOTION TO BE MOVED AT THE MEETING OF CONVOCATION ON JANUARY 24, 2002
![THE LAW SOCIETY OF UPPER CANADA BY-LAW 19 [HANDLING OF MONEY AND OTHER PROPERTY] MOTION TO BE MOVED AT THE MEETING OF CONVOCATION ON JANUARY 24, 2002](/thumbs/19/276456.jpg "THE LAW SOCIETY OF UPPER CANADA BY-LAW 19 [HANDLING OF MONEY AND OTHER PROPERTY] MOTION TO BE MOVED AT THE MEETING OF CONVOCATION ON JANUARY 24, 2002") 2-aes THE LAW SOCIETY OF UPPER CANADA BY-LAW 19 [HANDLING OF MONEY AND OTHER PROPERTY] MOTION TO BE MOVED AT THE MEETING OF CONVOCATION ON JANUARY 24, 2002 MOVED BY SECONDED BY THAT By-Law 19 [Handling
2-aes THE LAW SOCIETY OF UPPER CANADA BY-LAW 19 [HANDLING OF MONEY AND OTHER PROPERTY] MOTION TO BE MOVED AT THE MEETING OF CONVOCATION ON JANUARY 24, 2002 MOVED BY SECONDED BY THAT By-Law 19 [Handling
Mesure chimique. Chemical measurement. Sonde de température Pt 1000 Inox Pt 1000 stainless steel. Ref : 703 262. Français p 1.
 Mesure chimique Chemical measurement Français p 1 English p 3 Sonde de température Pt 1000 Inox Pt 1000 stainless steel Version : 6010 Mesure chimique Sonde de température Pt 1000 Inox 1 Description La
APPENDIX 2. Provisions to be included in the contract between the Provider and the. Holder
 Page 1 APPENDIX 2 Provisions to be included in the contract between the Provider and the Obligations and rights of the Applicant / Holder Holder 1. The Applicant or Licensee acknowledges that it has read
INDIVIDUALS AND LEGAL ENTITIES: If the dividends have not been paid yet, you may be eligible for the simplified procedure.
 Recipient s name 5001-EN For use by the foreign tax authority CALCULATION OF WITHHOLDING TAX ON DIVIDENDS Attachment to Form 5000 12816*01 INDIVIDUALS AND LEGAL ENTITIES: If the dividends have not been
ETABLISSEMENT D ENSEIGNEMENT OU ORGANISME DE FORMATION / UNIVERSITY OR COLLEGE:
 8. Tripartite internship agreement La présente convention a pour objet de définir les conditions dans lesquelles le stagiaire ci-après nommé sera accueilli dans l entreprise. This contract defines the
Vanilla : Virtual Box
 Vanilla : Virtual Box Installation Guide for Virtual Box appliance Guide d'installation de l'application VirtualBox Vanilla Charles Martin et Patrick Beaucamp BPM Conseil Contact : charles.martin@bpm-conseil.com,
JSIam Introduction talk. Philippe Gradt. Grenoble, March 6th 2015
 Introduction talk Philippe Gradt Grenoble, March 6th 2015 Introduction Invention Innovation Market validation is key. 1 Introduction Invention Innovation Market validation is key How to turn a product
8. Cours virtuel Enjeux nordiques / Online Class Northern Issues Formulaire de demande de bourse / Fellowship Application Form
 F-8a-v1 1 / 7 8. Cours virtuel Enjeux nordiques / Online Class Northern Issues Formulaire de demande de bourse / Fellowship Application Form Nom de famille du candidat Langue de correspondance Français
ONTARIO Court File Number. Form 17E: Trial Management Conference Brief. Date of trial management conference. Name of party filing this brief
 ONTARIO Court File Number at (Name of court) Court office address Form 17E: Trial Management Conference Brief Name of party filing this brief Date of trial management conference Applicant(s) Full legal
Manuel du propriétaire du coffre-fort de sécurité
 Fire-Safe RAND Security Safe Owner s Manual Manuel du propriétaire du coffre-fort de sécurité DE MARQUE Fire-Safe Manual del propietario de la caja fuerte de seguridad Fire-Safe MARCA TALE OF CONTENTS