IMPORTANT SAFETY INSTRUCTIONS. SAVE THESE INSTRUCTIONS This product is for household use, or equivalent.
|
|
|
- Oscar Leblanc
- il y a 10 ans
- Total affichages :
Transcription
1 WARNING- IMPORTANT SAFETY INSTRUCTIONS When using an electrical appliance, basic safety precautions should always be followed, including the following. Read all instructions before using this sewing machine. DANGER- - To reduce the risk of electric shock: 1. This sewing machine should never be left unattended when plugged in. Always unplug this sewing machine from the electric outlet immediately after using and before cleaning. 2. Always unplug before replacing light bulb. Replace bulb with same type rated DC 6.5 V 2.8 Watts. To reduce the risk of burns, fire, electric shock, or injury to persons: 1. Do not allow to be used as a toy. Close attention is necessary when this sewing machine is used by or near children. 2. Use this sewing machine only for its intended use as described in this manual. Use only attachments recommended by the manufacturer as contained in this manual. 3. Never operate this sewing machine if it has a damaged cord or plug, if it is not working properly, if it has been dropped or damaged, or dropped into water. Return the sewing machine to the nearest authorized dealer or service center for examination, repair, electrical or mechanical adjustment. 4. Never operate the sewing machine with any air openings blocked. Keep ventilation openings of the sewing machine and foot control free from the accumulation of lint, dust, and loose cloth. 5. Never drop or insert any object into any opening. 6. Do not use outdoors. 7. Do not operate where aerosol (spray) products are being used or where oxygen is being administered. 8. To disconnect, turn switch to the off ( 0 ) position, then remove plug from outlet. 9. Do not unplug by pulling on cord. To unplug, grasp the plug, not the cord. 10. Keep fingers away from all moving parts. Special care is required around the sewing machine needle. 11. Never sew with a damaged needle plate as this can cause needle to break. 12. Do not use bent needles. 13. Do not pull or push fabric while stitching. It may deflect the needle causing it to break. 14. Switch the sewing machine off ( 0 ) when making any adjustments in the needle area, such as threading needle, changing needle, threading bobbin, or changing presser foot, etc. 15. Always unplug sewing machine from the electrical outlet when removing covers, lubricating, or when making any other user servicing adjustments mentioned in the instruction manual. CAUTION- - Moving parts-to reduce risk of injury, switch off before servicing. Close cover before operating machine. SAVE THESE INSTRUCTIONS This product is for household use, or equivalent. FOOT CONTROL Use Yamamoto Electric, Model YC-485 EC with this sewing machine. This appliance complies with EEC Directive 2004/108/EC covering the electromagnetic compatibility. Please note that on disposal, this product must be safely recycled in accordance with relevant National legislation relating to electrical/ electronic products. If in doubt please contact your retailer for guidance. SINGER is a registered trademark of The Singer Company Limited or its affiliates The Singer Company Limited or its affiliates. All rights reserved. 1

2 «MESURES DE SÉCURITÉ IMPORTANTES» «Lorsqu un appareil électrique est en usage, il faut toujours observer certaines mesures élémentaires de sécurité y compris les suivantes.» «Lire les instructions en entier avant d utiliser cette machine à coudre.» «DANGER- - Pour réduire le risque de décharge électrique:» 1. «Un appareil ne devrait jamais être laissé sans surveillance lorsqu il est branché. Débranchez toujours l appareil de la prise externe de courant immédiatement après usage et avant le nettoyage.» «MISE EN GARDE- Pour réduire le risque de brûlures, de feu, de décharge électrique ou de blessures personnelles:» 1. «Cet appareil ne doit pas être utilisé comme un jouet. Une stricte surveillance doit être exercée lorsque l appareil est en usage par ou près des enfants.» 2. «N utilisez cet appareil qu aux fins mentionnées dans ce manuel. N utilisez que les accessoires recommandés par le manufacturier tel qu indiqué dans ce manuel.» 3. «N utilisez jamais cet appareil si le cordon ou la fiche sont endommagés, si l appareil fait défaut, s il a été échappé ou endommagé ou immergé. Retournez cet appareil au concessionnaire autorisé ou centre de réparations pour examen. Réparation, réglage électrique ou mécanique.» 4. «N utilisez jamais l appareil lorsque les évents sont obstrués. Retirez toutes traces de mousse, poussière ou tissu au niveau des évents de la machine à coudre et du rhéostat.» 5. «Gardez les doigts loin des pièces en mouvement spécialement autour de l aiguille de la machine à coudre.» 6. «Utilisez toujours la plaque à aiguille recommandée. Une plaque inappropriée peut causer le bris de l aiguille.» 7. «N utilisez jamais d aiguilles gauchies.» 8. «Ne tirez ni ne poussez le tissu pendant que vous cousez. Ceci peut faire dévier l aiguille et la briser.» 9. «Arrêtez («0») la machine à coudre lorsque vous faites des réglages à l aiguille, enfilage, changement ou enfilage de canette ou changement de pied presseur, etc.» 10. «Débranchez toujours la machine de la prise externe de courant lorsque vous retirez les couvercles, effectuez la lubrification ou tout autre entretien mentionné dans le manuel d instructions.» 11. «N insérez ni ne laissez tomber aucun objet dans aucune ouverture.» 12. «N utilisez pas en plein air.» 13. «N utilisez pas si des produits en aérosol sont utilisés ou s'il y a présence de réserve d oxygène.» 14. «Pour débrancher, tournez tous les réglages en position d arrêt («0»), puis débranchez la prise externe de courant.» 15. «Ne débranchez pas en tirant sur le cordon. Pour débrancher, saisissez la fiche, non pas le cordon.» «CONSERVEZ CES INSTRUCTIONS» «Cette machine à coudre est couçue pour usage domestique seulement.» RHÉOSTAT Avec cette machine à coudre, utilisez le modèle YC-485 EC de Yamamoto Electric. Cet appareil est conforme à la directive CEE 2004/108/EC concernant les normes électromagnétiques. Veuillez noter qu en cas de destruction, ce produit doit bénéficier d un recyclage sécurisé, conforme à la législation nationale applicable aux produits électriques/électroniques. En cas de doute, veuillez contacter votre distributeur agréé. 2 SINGER est une marque enregistrée de The Singer Company Limited ou de ses sociétés affiliées The Singer Company Limited ou ses sociétés affiliées. Tous droits réservés.

3 sı, DİKİŞ MAKİNENİZİ TANIYIN Makine tanimlamasi Aksesuarlar DİKİŞE BAŞLAMA Makinenin dengelenmesi Makinenizin kurulmasi Makara pimleri Masura sarma Masura ipliğinin takılması Üst ipliğin takılması Otomatik iğne takmanın kullanılması Masura ipliğinin alınması Kontrol panelı fonksıyonlari Dikiş uzunluğu ve genişliği hızlı başvuru tablosu Düz dikiş Dikişlerin düz tutulmasi, Kare bir köşeyi dönmek, Ters dikiş, Fermuar dikme ve biyeleme El görünümlü kapitone dikiş Otomatik bağlanti fonksiyonlu düz dikiş Zigzag dikiş Dikiş genişliğinin ve uzunluğunun ayarlanmasi, Saten dikiş, Desenlerin yerleştirilmesi Gizli dikiş, Kapaklı dikiş Çok dikişli zigzag, Fagot dikiş Streç dikişler Düz streç dikiş, Kenar bastırma dikişi, Rik rak dikiş, Tüy dikişi, Bal peteği dikişi, Eğik overlok dikişi, Battaniye dikişi, Türk dikişi, Dekoratif dikişi, Kuvvetlendirilmiş kenar bastırma dikişi, Patchwork, Sihirbaz dikişi, Çapraz dikiş, Rütbe dikişi, Nervür dikişi, Sürsleme dikiş, Merdiven dikişi, Çift overlok dikişi, Anahtar dikişi, Balık iskeleti dikişi, Dekoratif desenler Sürekli desenler Fantezi desenleri İÇİNDEKİLER Düğme dikme İlik yapma İlik açmaayağının kullanılması, Yöntem, Kordonlu ilikler Elle ilik açma NAKIŞ DİKİŞİ İÇİN HAZIRLIK Nakış ünitesini bağlamadan önce Nakış ayağını takma, Masura ipliğinin takılması, Üst ipliğin takılması, Masura ipliğinin alınması, Uzatma tablası, Transport dişlisi kontrolü Nakış ünitesini bağlama Nakış dikişi için hazırlık Malzemenin ve dengeleyicinin kullanılması Kasnağı takmadan önce makinenin hazırlanması Nakış kasnağının takılması ve çıkartılması Yazilimin kurulumu Nakış ünitesi bağlıyken çalıştırma düğmeleri Çalıştırma düğmeleri, İplik tansiyonu kontrolü Sorun giderme BİLMENİZ GEREKEN DİĞER HUSUSLAR Baskı ayağı kaldırma kolu Transport dişlisi kontrolü Serbest elle dikişe dönüştürme Üst iplik tansiyonunun ayari Baskı ayağının değiştirilmesi Çalıştırma düğmeleri İğne, iplik ve kumaş tablosu Performans kontrol listesi Çağanoz alanının ve transport dişlilerinin temizlenmesi Alin kapağinin yağlanmasi Özel aksesuarlar Faydali mesajlar Avrupa modeli için Dikiş makinesi Boyutlar: 428 mm 307 mm 294 mm Ekipman ağırlığı: 10 kg Nakış işleme ünitesi Boyutlar: mm mm 133 mm Ekipman ağırlığı: 2.26 kg Nominal Voltaj: 230V ~ Nominal Frekans: 50Hz Nominal giriş: 60W Nominal dış hava sıcaklığı: C Akustik gürültü seviyesi: 70 db den (A) daha az

4 TABLE OF CONTENTS 1. GETTING TO KNOW MACHINE Machine identification Accessories GETTING STARTED SEWING Leveling machine Setting up machine Spool pins Winding bobbin Inserting the bobbin Setting the top thread Automatic needle threader Picking up bobbin thread Control panel function Quick reference table of stitch length and width Straight stitching Keeping seams straight, Turning a square corner, Reverse stitch, Inserting zippers and piping Hand-look quilt stitch Straight stitch with auto tie-off function Zigzag stitching Adjusting stitch width and length, Satin stitch Placement of patterns Blind stitch, Shell stitch Multi-stitch zigzag, Fagoting Stretch stitches Straight stretch stitch, Overedge stitch, Ric-rac stitch, Feather stitch, Honeycomb stitch, Slant Overedge Stitch, blanket stitch, Turkish stitch, Slant pin stitch, Reinforced overedge stitch, Thorn stitch,wizard stitch, Crossed stitch, Chevron stitch, Pin stitch, Entredeux stitch, Ladder stitch, Criss-cross stitch, Greek key stitch, Fishbone stitch Decorative Stitching Continuous patterns Novelty patterns Sewing on a button Buttonhole making Using buttonhole foot, Procedure, Corded buttonholes Manual buttonhole PREPARATION FOR EMBROIDERY SEWING Before attaching embroidery unit Attaching embroidery foot, Inserting the bobbin, Setting top thread, Picking up bobbin thread, Extension table, Feed dog control Attaching embroidery unit Removing embroidery unit Securing material in embroidery hoop Using the material and stabilizer Preparing the machine before installing the hoop Attaching and removing embroidery hoop Installation of software Operation switches when embroidery unit is attached Operation switches, Thread tension control Troubleshooting OTHER THINGS YOU SHOULD KNOW Presser foot lifter Feed dog control Converting to free-arm sewing Adjusting top thread tension Changing presser foot Operation switches Needle, thread and fabric chart Performance checklist Cleaning hook area and feed dogs Oiling inside the face cover Special accessories Helpful messages For European version Sewing machine Dimensions: 428 mm 307 mm 294 mm Mass of the equipment: 10 kg Embroidery unit Dimensions: mm mm 133 mm Mass of the equipment: 2.26 kg Rated Voltage: 230V ~ Rated Frequency: 50Hz Rated input: 60W Rated ambient temperature: C Acoustic noise level: less than 70db(A)

5 TABLE DES MATIERES 1. VOTRE MACHINE À COUDRE Description de la machine Accessoires DÉBUT DE LA COUTURE Équilibrer la machine Préparation de la machine Porte-bobine Préparation de la canette Enfilage du fil de canette Enfilage du fil supérieur Utilisation de l enfileur de chas d aiguille Rappel du fil inférieur Fonctions du panneau de commande Tableau de référence rapide des longueurs et largeurs de points Point droit Pour garder la couture droite, Réalisation d un angle droit, Point arrière, Insérer une fermeture à glissière ou un biais (galonner) Exécution du point de matelassage Point droit avec fonction de nouage automatique Point zigzag Réglage de la largeur et de la longueur de point, Point bourdon, Positionnement des motifs Point invisible, Point de lingerie Zigzag multi-point, Point ajouré Points extensible Point droit extensible, Point surjet, Point ric rac, Point plume, Point nid d abeille, Surjet oblique, Point languette, Point turc, Point epingle oblique, Point surjet renforcé, Point d épine, Point sorcier, Point croisé, Point chevron, Point épingle, Point entredeux, Point d échelle, point entrecroisé, point grec, point d arrete Motifs décoratifs Motifs continuels Motifs spécials Pose de boutons Confection des boutonnières Utilisation du pied boutonnière, procédure, Boutonnières avec ganse (renforcees) Boutonnière manuelle PRÉPARATIFS POUR LA BRODERIE Avant de fixer l unité de broderie Fixation du pied broderie, Enfilage du fil de canette, Enfilage du fil supérieur, Rappel du fil inférieur, Plateau de rallonge, Abaisse-griffes d'entraînement Fixation de l unité de broderie Retrait de l unité de broderie Fixation du tissu dans le cerceau de broderie Utilisation du tissu et de l entoilage Préparation de la machine avant d installer le cerceau Fixation et retrait du cerceau de broderie Installation du logiciel Touches de fonctionnement lorsque l unité de broderie est fixée Touches de fonctionnement, Réglage tension du fil supérieur Dépannage D'AUTRES CHOSES QUE VOUS DEVRIEZ SAVOIR Levier du pied presseur Contrôle des griffes d entraînement Utilisation du bras libre Réglage de la tension du fil supérieur Remplacement du pied presseur Touches de fonctionnement Tableau des aiguilles, fiils et tissus Vérification des petits problèmes de couture Nettoyage des griffes et du crochet Graissage dans la plaque frontale Accessoires spéciales Messages d aide Version pour l Europe Machine à coudre Dimensions: 428 mm 307 mm 294 mm Poids de l équipement: 10 kg Unité de broderie Dimensions: 433,5 mm 269,5 mm 133 mm Poids de l équipement: 2,26 kg Tension nominale: 230 V ~ Fréquence nominale: 50 Hz Entrée nominale: 60 W Température ambiante nominale: C Niveau de bruit acoustique: moins de 70 db(a)

6 1. MAKİNENİZİ TANIMA MAKİNE TANIMLAMASI 1. İplik kılavuzu 2. İplik verici 3. İplik tansiyonu kontrolü 4. Yüz kapağı 5. İplik kesici 6. Uzatma tablası (Aksesuar kutusu) 7. Transport dişlisi kontrolü 8. Masura sarma ünitesi mili 9. Masura sarma ünitesi takozu 10. Çalıştırma düğmeleri 11. Desen başvuru kılavuzu 12. Yatay makara pimi 13. Tutamak 14. Volan 15. İplik kılavuzu direği 16. Dikey makara pimi 17. Güç/ışık düğmesi 18. Kordon soketi 19. Tanımlama plakası 20. Baskı ayağı kaldırma kolu 21. İlik açma kolu 22. Otomatik iğne ipliği takma elemanı 23. İplik kılavuzu 24. İplik kılavuzu 25. Baskı ayağı vidası 26. İğne 27. Masura kapağı plakası 28. İğne mili 29. İplik kesici 30. İğne kelepçesi vidası 31. Ayak bırakma düğmesi 32. Baskı ayağı 33. Transport dişlileri 34. İğne plakası 35. Masura kapağı bırakma düğmesi 36. Nakış işleme ünitesi 37. Plastik tornavida kılavuzlu kasnak sabitleme vidaları 38. Şaryo 39. Tutamak 40. Kasnak tutucuları 41. Bırakma kolu 42. Soket 43. Büyük kasnak 44. İç kasnak 45. Dış kasnak 46. Kasnak ayarlama vidası 47. Kasnak montaj plakası 48. Küçük kasnak 49. Elektrik kablosu 50. Ayak kumandası 51. USB kablosu 52. Kullanım kılavuzu NOT: Nakış dikişi yaparken USB kablosunu makinenize bağladığınızdan emin olun

7 1. GETTING TO KNOW MACHINE MACHINE IDENTIFICATION 1. Thread guide 2. Thread take-up 3. Thread tension control 4. Face cover 5. Thread cutter 6. Extension table (Accessory box) 7. Feed dog control 8. Bobbin winder shaft 9. Bobbin winder stop 10. Operation switches 11. Pattern reference guide 12. Horizontal spool pin 13. Handle 14. Hand wheel 15. Thread guide pole 16. Vertical spool pin 17. Power/light switch 18. Cord socket 19. Identification plate 20. Presser foot lifter 21. Buttonhole lever 22. Automatic needle threader 23. Thread guide 24. Thread guide 25. Presser foot screw 26. Needle 27. Bobbin cover plate 28. Needle bar 29. Thread cutter 30. Needle clamp screw 31. Foot release button 32. Presser foot 33. Feed dogs 34. Needle plate 35. Bobbin cover release button 36. Embroidery unit 37. Hoop securing screws with plastic screwdriver guides 38. Carriage 39. Handle 40. Hoop bracket 41. Release lever 42. Connector 43. Large hoop 44. Inner frame 45. Outer frame 46. Hoop adjusting screw 47. Hoop mounting plate 48. Small hoop 49. Power line cord 50. Foot control 51. USB cable 52. Instruction manual NOTE: Be sure to use the USB cable attached with your machine when doing embroidery sewing. 1. VOTRE MACHINE À COUDRE DESCRIPTION DE LA MACHINE 1. Guide-fil 2. Releveur de fil 3. Réglage tension du fil supérieur 4. Plaque frontale 5. Coupe-fil 6. Boîte à accessoires/table de rallonge 7. Abaisse-griffes d entraînement 8. Axe du bobineur 9. Butée d arrêt du bobinage 10. Touches de fonctionnement 11. Guide de référence des motifs 12. Porte-bobine horizontal 13. Poignée 14. Volant 15. Support guide-fils télescopique 16. Porte-bobine vertical 17. Interrupteur/Lumière 18. Prise de cordon 19. Plaque d identification 20. Levier du pied de biche 21. Levier-poussoir boutonnière 22. Enfileur de chas d aiguille 23. Guide-fil 24. Guide-fil 25. Vis du pied 26. Aiguille 27. Couvercle canette 28. Barre à aiguille 29. Coupe-fil 30. Vis de l aiguille 31. Levier de verrouillage du pied 32. Pied presseur zigzag 33. Griffe d entraînement 34. Plaque-aiguille 35. Bouton du couvercle canette 36. Unité de broderie 37. Vis de fixation de cerceau 38. Chariot 39. Poignée 40. Support de cerceau 41. Levier de déverrouillage 42. Connecteur 43. Grand cerceau 44. Cadre intérieur 45. Cadre extérieur 46. Vis de réglage de cerceau 47. Plaque de montage de cerceau 48. Petit cerceau 49. Cordon 50. Rhéostat 51. Câble USB 52. Manuel d instruction REMARQUE: Utiliser le cable USB fourni avec votre machine quand vous voulez faire de la broderie.

8 AKSESUARLAR DİKİŞ MAKİNESİ İÇİN 1. İğneler 2. Masuralar 3. Makara pimi kepi (küçük) 4. Makara pimi kepi (büyük) 5. İlik açıcı/fırça 6. İğne plakası tornavidası (büyük) 7. Tornavida (büyük) 8. Tornavida (küçük) 9. Fermuar ayağı 10. Düğme dikme ayağı 11. Gizli dikiş ayağı 12. İlik ayağı 13. Saten dikiş ayağı 14. İplik makarası ağı (uzun) 15. İplik makarası ağı (kısa) 16. Büyük iplik makarası için Dikiş makinenizle birlikte verilen ayağa Genel Amaçlı Ayak denir ve bu ayak ço-ğu dikişler için kullanılacaktır Saten Dikiş Ayağı (13) çok faydalı diğer bir ayaktır ve çoğu dekoratif dikişlerde kullanılmalıdır İlave masuralar satın aldığınızda, I5 J Sınıfı olduklarından emin olun NAKIŞ İŞLEMEK İÇİN 17. Vinil çanta 18. Masuralar 19. Makas 20. Nakış baskı ayağı 21. Nakış işleme yazılımı CD si FUTURA nakış, bir makine sistemi ve güçlü seçeneklerle beceriler sağlayan bir yazılımıdır. Yazılımı yüklemede daha fazla bilgi için lütfen CD ekine bakınız. 21 8
 çok faydalı diğer bir ayaktır ve çoğu dekoratif dikişlerde kullanılmalıdır. 9 10 11 12 İlave masuralar satın aldığınızda, I5 J Sınıfı olduklarından emin olun.")
9 ACCESSORIES FOR SEWING MACHINE 1. Needles 2. Bobbins 3. Spool pin cap (small) 4. Spool pin cap (large) 5. Buttonhole opener/brush 6. Screwdriver for needle plate (large) 7. Screwdriver (large) 8. Screwdriver (small) 9. Zipper foot 10. Button sewing foot 11. Blind stitch foot 12. Buttonhole foot 13. Satin stitch foot 14. Thread spool net (long) 15. Thread spool net (short) 16. Removable thread guide ACCESSOIRES POUR LA MACHINE À COURE 1. Aiguilles 2. Canettes 3. Chapeau pour petite bobine 4. Chapeau pour grande bobine 5. Découseur/Brosse 6. Tournevis pour plaque aiguille 7. Tournevis grand 8. Tournevis petit 9. Pied fermeture glissière 10. Pied pour boutons 11. Pied point invisible 12. Pied boutonnière 13. Pied pour point bourdon 14. Filet de bobine (long) 15. Filet de bobine (court) 16. Guide-fil amovible The Foot that comes on your Sewing machine is called the General Purpose Foot and will be used for the majority of your sewing. Le pied qui accompagne votre machine à coudre est appelé le pied universel et est utilisé pour la plus grande partie de vos travaux de couture. The Satin Foot (13) is another very useful foot and should be used for most decorative sewing. Le pied pour point bourdon (13) est un autre pied fort utile, et doit être utilisé pour la plupart des points décoratifs. When purchasing additional bobbins, be sure they are Class I5 J. Si vous achetez des canettes, chercher que la classe 15 J. FOR EMBROIDERY 17. Vinyl bag 18. Bobbins 19. Scissors 20. Embroidery presser foot 21. Embroidery software CD POUR LA BRODERIE 17. Sachet d accessoires 18. Canettes 19. Ciseaux 20. Pied de broderie 21. CD du logiciel de broderie FUTURA embroidery is a "system" of the machine and the software providing powerful options and capabilities. In order to install the software, please look into the CD insert for further information. Le broderie FUTURA est un système de machine et logiciel qui offre des options et des fonctions puissantes. Pour installer le logiciel, reportez-vous aux instructions sur l insertion du CD. 9
 15.")
10 2. DİKİŞE BAŞLAMA MAKİNENİN DENGELENMESİ KONTROL Makineyi düz bir masanın üstüne koyun. Makinenin dengesini kontrol edin. AYAR Makineyi her iki elinizle yumuşak ve dikkatli bir şekilde arkasına yatırın. Makinede ve tablada çizik yapmamaya dikkat edin. Makineyi düşürmemeye ve parmaklarınızın makineyle tabla arasına sıkışmamasına dikkat edin. Sürücüyü deliğe (1) sokun ve çevirerek ayarlayın. * Aksesuarlarla birlikte verilen tornavidayı (küçük) kullanın. Ayarlamadan sonra makinenin dengesini kontrol edin. (1) MAKİNENİZİN KURULMASI Makinenizi ilk defa kullanmadan önce iğne plakası alanındaki fazla yağı sildiğinizden emin olun. ELEKTRİK KABLOSU/AYAK KUMANDASI Gösterilen şekilde elektrik kablosunun fişini kordon soketine (1) ve duvar prizine (2) bağlayınız. Sadece dikiş makinesini kullanırken ayak kumandası fişini makine soketine (3) bağlayınız. NOT: Ayak kumandası bağlantısı ayrıldığı zaman makine çalışmayacaktır. Fişi duvar prizinden çıkartarak daima makineyi güç beslemesinden ayırınız. Güç/ıflık düğmesini OFF (kapalı) olarak ayarlayınız. Set power/light switch at OFF Mettez l interrupteur moteur/ lumière sur OFF. 3 Makine soketi machine socket Connecteur de la machine Uçlu fiş Pin Butée 2 1 GÜÇ/IŞIK DÜĞMESİ G ü ç / ı ş ı k d ü ğ m e s i a ç ı l ı n c a y a k a d a r m a k i n e n i z çalışmayacaktır. Aynı düğme, hem elektriği hem de ışığı kumanda eder. Makineye bakım yaparken veya iğneleri veya lambaları, vs. değiştirirken makine güç beslemesinden ayrılmalıdır. Elektrik kablosu Power line cord Cordon Ayak kumandası Foot control Rhéostat Güç/ıflık düğmesi OFF (kapalı) Power/light switch OFF Interrupteur moteur/lumière OFF Güç/ıflık düğmesi ON (açık) Power/light switch ON Interrupteur moteur/lumière ON 10
 kullanın. Ayarlamadan sonra makinenin dengesini kontrol edin.")
11 2. GETTING STARTED SEWING LEVELING MACHINE CHECKING Put the machine on a flat table. Check the balance of the machine. ADJUSTMENT Lay machine on its back gently and carefully with both hands. Be careful not to make scratches on both machine and table. Be careful not to drop the machine and not to have your fingers be caught between the machine and table. Insert the driver into the hole (1) and adjust by turning it. * Use screwdriver (small) included in the accessories. Check the balance of the machine after adjustment. 2. DÉBUT DE LA COUTURE ÉQUILIBRER LA MACHINE VERIFICATION Placez la machine sur une table plate. Assurez-vous que l équilibre de la machine soit parfait. RÉGLAGE Posez la machine doucement et soigneusement sur son dos avec les deux mains. Veillez à ne pas rayer la machine et la table. Veillez à ne pas laisser tomber la machine et à ne pas vous faire pincer les doigts entre la machine et la table. Introduisez le tournevis dans le trou (1) et effectuez le réglage en le tournant. * Utilisez le tournevis (petit) fourni comme accessoire. Une fois le réglage effectué, vérifiez le bon équilibre de la machine. SETTING UP MACHINE Be sure to wipe off any surplus oil from needle plate area before using your machine the first time. Power line cord/foot CONTROL Connect the plug of the power line cord into the cord socket (1) and your wall outlet (2) as illustrated. Connect the foot control plug into the machine socket (3), when using sewing machine only. NOTE: When foot control is disconnected, the machine will not operate. Always disconnect the machine from power supply by removing the plug from the walloutlet. PRÉPARATION DE LA MACHINE Avant d utiliser votre machine pour la première fois, bien essuyer tout excédent d huile sur la plaque de recouvrement et ses abords. CORDON D ALIMENTATION SECTEUR/RHÉOSTAT Connectez la fiche du cordon d alimentation secteur au connecteur de cordon (1) et à la prise murale (2) comme indiqué sur l illustration. Connectez la fiche du rhéostat au connecteur de la machine (3). Lorsque vous utilisez uniquement la machine. REMARQUE : la machine ne fonctionnera pas si le rhéostat n est pas branché. D é b r a n c h e z t o u j o u r s. L a m a c h i n e d e l alimentation électrique en retirant la fiche de la prise murale. POWER/LIGHT SWITCH Your machine will not operate until the power/light switch is turned on. The same switch controls both the power and the light. When servicing the machine, or changing needles or Iamps, etc., machine must be disconnected from the power supply. INTERRUPTEUR MOTEUR ET LUMIÈRE Votre machine ne fonctionnera que lorsque l interrupteur sera en position marche (1). Le même interrupteur contrôle à la fois le moteur et la lumière. Vous devez débrancher la machine du secteur lorsque vous voulez l entretenir, changer une aiguille, une ampoule, etc. 11

12 MAKARA PİMLERİ Normal iplik makarası için YATAY MAKARA PİMİ İplik makarasını pimin üzerine yerleştirin ve ipliğin pürüzsüz şekilde akmasını sağlamak için bir makara kepiyle sabitleyin. Makara pimi kepi Spool pin cap Couvre-fil Makara Spool Bobine Makara pimi Spool pin Porte-bobine Büyük iplik makarası için DİKEY MAKARA MİLİ 1. Şekilde gösterildiği gibi, çıkarılabilir iplik kılavuzunu yatay makara mili üzerine yerleştirin. 2. Makara milini aşağı doğru çekin ve iplik kılavuzunu çekerek yerine oturtun. 3. İplik makarasını makara mili üzerine yerleştirin ve iplik kılavuzu deliğinden, çıkarılabilir iplik kılavuzundan geçirin ve şekilde gösterildiği gibi iplik yolu boyunca uzatın. 1 2 Büyük iplik makarası için Removable thread guide Guide-fil amovible İplik kılavuzu direği Thread guide pole Support guide-fils télescopique Dikey makara pimi Vertical spool pin Porte-bobine vertical Çok büyük iplik makarası için For large thread spool Pour la grande bobine 3 12 Çıkarılabilir iplik kılavuzu For extra large thread spool Pour la très grande bobine

13 SPOOL PINS HORIZONTAL SPOOL PIN for normal thread spool Place thread spool on the pin and secure with a spool cap to ensure smooth flow of thread. PORTE-BOBINE PORTE-BOBINE HORIZONTAL pour la bobine standard Placez la bobine sur la tige et retenez-la avec l aide d un couvre-fil ceci assurera un débit de fil régulier. VERTICAL SPOOL PIN for large thread spool 1. Place removable thread guide on the horizontal spool pin as illustrated. 2. Pull down the spool pin and pull up thread guide pole in place. 3. Place thread spool on the spool pin and draw thread through the thread guide pole, the removable thread guide and further threading path from the spool as illustrated. PORTE-BOBINE VERTICAL pour grande bobine 1. Placez le guide de fil amovible sur la tige du porte-bobine horizontal tel qu illustré. 2. Abaissez le porte-bobine vertical et remontez le supportguide de fils télescopique pour le mettre en place. 3. Placez la bobine sur la tige verticale et tirez le fil en le faisant passer au travers du guide de la tige télescopique ainsi que dans le guide de fil amovible pour ensuite suivre le chemin pour le reste de l enfilage. 13

14 15 J Sınıfı masuraları kullandığınızdan emin olun
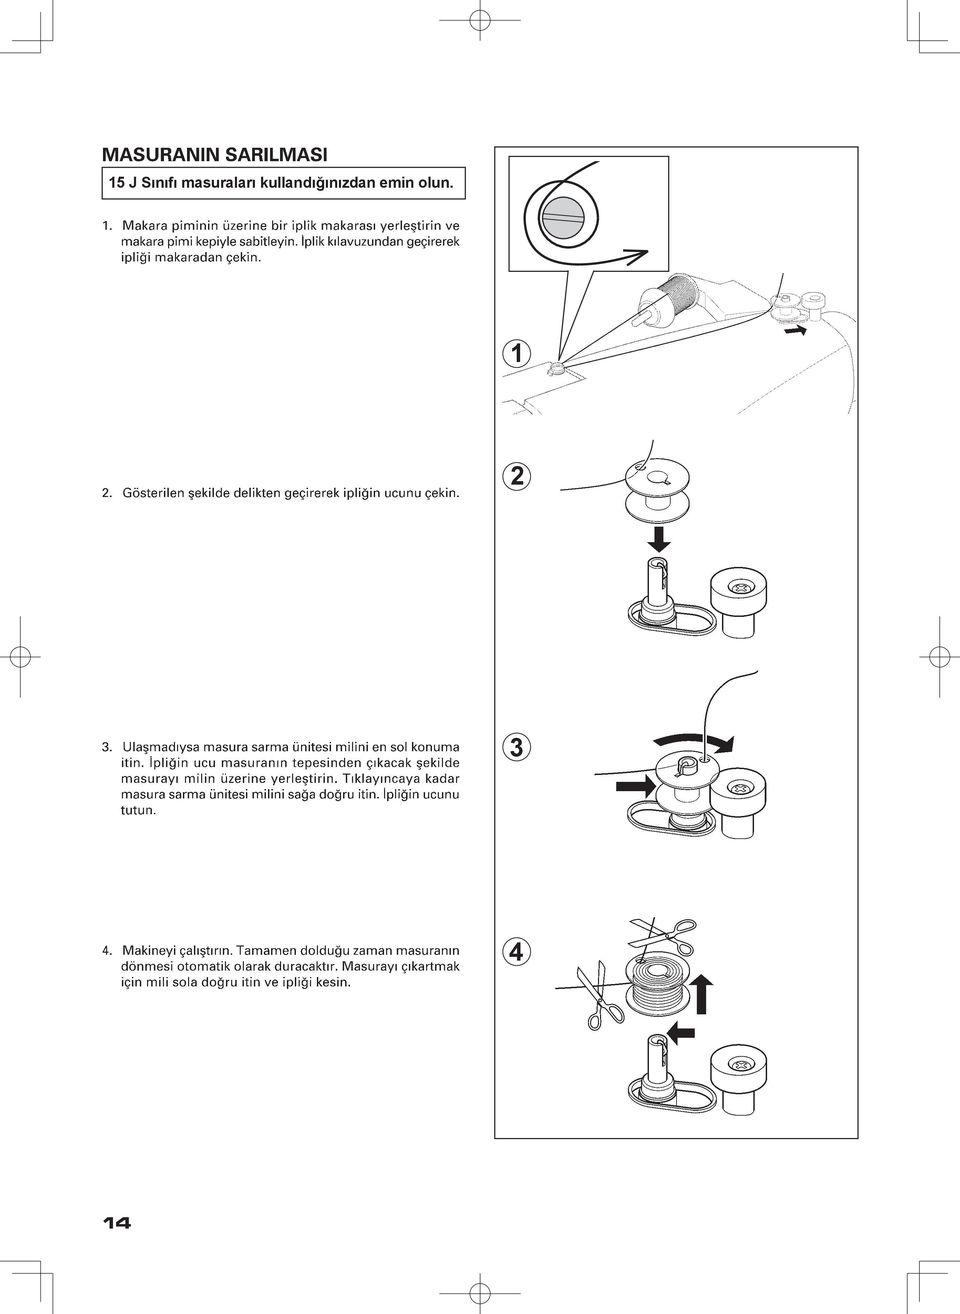
15 WINDING BOBBIN Be sure to use Class 15 J bobbins. PRÉPARATION DE LA CANETTE Utilisez que la canette 15 J. 1. Place a spool of thread on the spool pin, and secure it with the spool pin cap. Pull the thread out from the spool through thread guide. 1. Placez une bobine de fil sur le porte-bobine, et fixez-la à l aide du couvre-fil (petit). Tirez le fil hors de la bobine par le guide-fil. 2. Pull end of thread through hole in bobbin as shown. 2. lntroduire le fil dans un des trous de la canette. 3. Push bobbin winder shaft to the far left position, if it is not already there. Place bobbin onto shaft with end of thread coming from top of bobbin. Push bobbin winder shaft to the right until it clicks. Hold onto end of thread. 3. Pousser l axe du dévidoir vers la gauche, placer la canette sur cet axe. Pousser le tout vers la droite jusqu au déclic. Tenir le bout de fil à la verticale. 4. Start machine. Bobbin will automatically stop turning when completely filled. Push shaft to the left to remove bobbin and cut thread. 4. Mettre la machine en marche. La canette va se remplir. Tirer sur le bout de fil qui va se couper. Dès que la canette est pleine, elle s arrêtera de tourner. Arrêter la machine. Pousser l ensemble axe canette vers la gauche pour pouvoir enlever la canette pleine de l axe. Pendant la couture, l axe doit toujours rester à gauche. 15

16 A B A 16

17 INSERTING THE BOBBIN 1. Raise the needle to its highest position by rotating the hand wheel toward you. ENFILAGE DU FIL DE CANETTE 1. Relevez l aiguille en position haute en tournant manuellement le volant vers vous. 2. Remove the bobbin cover plate by pushing the release button to the right while pushing the left corner of plate. 2. Retirez la plaque de canette en poussant le bouton de libération vers la droite tout en appuyant sur le coin gauche de la plaque. 3. Insert the bobbin making sure the bobbin rotates counterclockwise. 3. Insérez la canette pleine en vérifiant qu elle tourne dans le sens contraire des aiguilles d une montre. 4. Pull thread through the slot (A) and then to the left. 4. Tirez le fil à travers la fente (A), puis vers la gauche. 5. With a finger held gently on top of the bobbin, pull thread through the slot (B) until you hear a clicking sound, and then leave about 6" (15 cm) of thread. 5. En le maintenant contre la canette, tirez le fil à travers la fente (B), jusqu au déclic sonore, et ensuite, laissez environ 15 cm de fil à l arrière. 6. Replace the bobbin cover plate onto the needle plate. 6. Replacez le couvercle de canette sur la plaque aiguille. 17

18 1 3 İplik verici Thread take-up Releveur de fil 4 Tırnak tab Languette

19 SETTING THE TOP THREAD A. Raise the presser foot lifter. Always be sure to raise the presser foot lifter before threading the top thread. (If the presser foot lifter is not raised, correct thread tension cannot be obtained.) ENFILAGE DU FIL SUPÉRIEUR A. Elevez le pied presseur. Veillez à toujours élever le releveur de pied presseur avant d enfiler le fil supérieur. (Si le releveur de pied presseur n est pas élevé, vous ne pourrez pas obtenir une tension de fil correcte.) B. Turn the hand wheel toward you until the needle is in its highest position and the thread take-up is visible. B. Tournez le volant vers vous jusqu à ce que l aiguille soit en position haute et que le releveur de fil soit visible. C. Thread the machine in the following order as illustrated. * Guide the thread through thread guide (1), and then pull it down along the groove. * Do a U-turn around the inside of the tab (2). * Pass the thread through the thread take-up (3) from right to left. * Insert the thread into the inside of the groove (4). * Guide the thread into the thread guide (5). * Pass the thread through the eye of the needle (6) from front to back. C. Enfilez le fil de la machine dans l ordre suivant, comme indiqué sur l illustration. * Faites passer le fil par le guide-fil (1), puis tirez-le vers le bas le long de la rainure. * Faites faire un demi-tour au fil autour de l intérieur de la languette (2). * Passez le fil par le releveur de fil (3) de droite à gauche. * Introduisez le fil dans l intérieur de la rainure (4) * Faites passer le fil par le guide-fil (5). * Faites passer le fil par l orifice du fil (6) de l avant vers l arrière. 19

20

21 AUTOMATIC NEEDLE THREADER Raise the needle to its highest position by rotating the hand wheel towards you. 1. Hook thread to thread guide as illustrated. UTILISATION DE L ENFILEUR DE CHAS D AIGUILLE Elever l'aiguille en position haute en toumant le volant vers vous. 1. Passer le fil dans le crochet de l enfileur. 2. Pull down threader lever until the hooked end passes through the needle eye. Guide thread into hooked end and pull it upward. 2. Pousser le levier complètement vers le bas et le crochet passera dans le chas de l aiguille. Passer le fil devant l aiguille et sous le crochet. 3. Release the threader lever and thread simultaneously, and needle will be threaded automatically. NOTE: For smooth threading, it is recommended that the machine be set for straight stitch (in center needle position) when using the automatic needle threader. 3. Libérez le levier et le fil simultanément; l aiguille sera alors enfilée automatiquement. NOTE: Pour un enfllage plus aisé il est recommandé de placer la sélecteur de point en position point droit (aiguille au centre) avant d utiliser l enfileur. 21
22
23 PICKING UP BOBBIN THREAD 1. Raise the presser foot lifter. RAPPEL DU FIL INFÉRIEUR 1. Relever le pied presseur. 2. Holding needle thread loosely with your left hand, turn hand wheel toward you with your right hand first lowering the needle and continuing until the needle comes to its highest position. 2. Tenir le fil de l aiguille et tourner le volant vers vous en faisant remonter l aiguille à sa position la plus haute. 3. Light pull the top thread to pick up the bobbin thread, which will then appear through the needle plate slot. 3. Faire remonter le fil inférieur en tirant légèrement sur le fil supérieur. 4. Pull both top and bobbin threads together toward the back of the machine under the presser foot, leaving about 6 (15 cm) clear. 4. Placer les deux fils sous le pied presseur vers l arrière en laissant environ 15 cm fil dépasser. 23
24 Rakamlı seçme tuşları Numerical selection buttons Touches de sélection numérique Numara göstergesi Number display Affichage numérique Doğrudan seçim düğmesi Direct selection button Touches de sélection directe Dikiş uzunluğu düğmesi Twin needle mode switch Commutateur de mode d aiguilles LED göstergesi LED indicator Témoin a diode Dikiş uzunluğu düğmesi Stitch length control Longueur de point Dikiş genişliği/iğne pozisyonu düğmesi Stitch width/needle position control Commande de largeur de point/position d aiguille *NOT: Uzunluk ve genişlik düğmeleri üzerindeki ölçekler ve numaralar sadece referans içindir ve gerçek dikiş uzunluğu ve genişliği parametrelerini temsil etmez. *NOTE: The provided scales and numbers on the length and width controls are for reference only and do not represent actual sewing parameters of length and width. *REMARQUE: les échelles et les nombres sur les commandes de longueur et de largeur ne sont fournis que pour référence et ne représentent pas les paramètres réels de longueur et de largeur. 24
25 CONTROL PANEL FUNCTIONS Direct selection buttons Frequently used patterns are available by the direct selection buttons. Turn on power switch and push a desired button until it is lit. FONCTIONS DU PANNEAU DE COMMANDE Touches de sélection directe Les motifs utilisés souvent peuvent être sélectionnés par les touches de sélection directe. Régler l interrupteur d alimentation sur la position de marche et appuyez sur une touche voulue jusqu à ce qu elle s allume. Numerical selection buttons Use the buttons located at left of number display to select left digit and the buttons at right to select right digit, referring to the pattern reference guide located at the bottom of machine. Touches de sélection numérique Utilisez les touches situés à gauche de l affichage numérique pour sélectionner le chiffre du coté gauche, et les touches à la droite pour le chiffre à la droite, en vous reportant au guide de référence des motifs situé en bas de la machine. 25
26 Dikiş uzunluğu ve genişliği/iğne pozisyonu düğmeleri * Otomatik/Varsayılan ayarlar Makineniz çoğu dikişlerinizi, Otomatik/Varsayılan Dikiş Uzunluğunda ve Genişliğinde yapacaktır. Bir desen seçildiğinde, makine otomatik olarak düz dikiş için varsayılan olarak belirlenmiş dikiş uzunluğu, genişliği ve iğne pozisyonu konumunda dikiş yapacaktır. Otomatik (ön programlı) varsayılan ayarlamalar, Dikiş Uzunluğ u ve Genişliği/İğne Pozisyonu Kontrol Düğmesi hareket ettirilerek kolayca belirlenebilir. Otomatik /Varsayılan konumunda olduğunuzu belirtmek için, Kontrol düğmesinin yanındaki LED lambası sürekli turuncu yanacak (yanıp sönmeden) ve bir uyarı sesi duyulacaktır. * Manuel ayarlar Otomatik /Varsayılan konumunu belirledikten sonra, dikiş uzunluğunu, genişliğini veya düz dikiş iğne pozisyonunu istediğ iz gibi elle değiştirebilirsiniz. Otomatik konumunda başlarken, istediğiniz ayarlamayı bulmak için kontrol düğmesini sola veya sağa doğru kaydırın. Her bir elle ayar noktasında, LED 3 defa yeşil yanıp sönecek ve bir uyarı sesi duyulacaktır. Ayar kapsamının dışına çıkıldığında LED kırmızı yanacaktır. NOTES: 1. Some patterns offer more opportunities for manual adjustments than others. 2. An alternate method of determining available adjustments is to move the control knobs while sewing slowly. *Desen referans kılavuzu Desenleri rakamlı seçim tuşları yla seçerken, desen referans kılavuzuna bakın. Lacivert desenler- dikiş uzunlu- ğu ve genişliği değiştirilebilir. Pembe desenler- dikiş uzunlu- ğu ve genişliği sabittir. Siyah desenler- ilikler. Yuvarlak içine alınmış numaralarla belirtilen desenler çift iğne ile dikilemez (opsiyonel). 26
27 Stitch length and width/needle position controls *Auto/Default settings Your sewing machine will produce most of your stitching requirements at an Auto/Default Stitch Length and Width. When a pattern is selected, it will automatically sew at default settings of stitch length, width and needle position for straight stitch. Auto (preprogrammed) default settings are easily determined by moving the Stitch Length and Width / Needle Position Control Knob. The LED Indicator next to the Control will light in orange without blinking and a beep will sound indicating you are at the Auto / Default Position. *Manual settings Once you have determined the Auto / Default position you can manually change the length, width or straight stitch needle postition according to your preference. Starting at the Auto position, slide the control knob left or right to locate each of the potential adjustments. At each manual adjustment point, the LED will blink 3 times in green and a beep will sound. The LED will light in red beyond the potential adjustment range. NOTES: 1. Some patterns offer more opportunities for manual adjustments than others. 2. An alternate method of determining available adjustments is to move the control knobs while sewing slowly. Commandes de longueur et de largeur de point/ position de l aiguille *Réglages Auto/Par défaut Votre machine à coudre exécute la plupart de vos nécessités de couture à une longueur et une largeur de point automatique/ par défaut. Lorsqu un motif a été sélectionné, la couture est automatiquement exécutée aux réglages par défaut de longueur et de largeur de point, de position d aiguille pour un point droit. Les réglages par défaut automatiques (préprogrammés) sont facilement déterminés en déplaçant le bouton de commande de longueur et de largeur du point/position de l aiguille. Le témoin à diode situé à côté de la commande s allume en orange sans clignoter et un bip est émis, indiquant que vous êtes à la position automatique/par défaut. *Réglages manuels Une fois que vous avez déterminé la position automatique/ par défaut, vous pouvez changer la longueur, la largeur ou la position de l aiguille pour le point droit manuellement en fonction de votre préférence. En commençant à la position automatique, faites coulisser le bouton de commande vers la gauche ou vers la droite pour localiser chacun des ajustements possibles. A chaque point d ajustement manuel, la diode clignote 3 fois et un bip est émis. La diode s allume en rouge au-delà des limites de la plage de réglage potentielle. REMARQUES: 1. Certains motifs possèdent plus de facilités pour des ajustements manuels que d autres. 2. Une autre manière de déterminer quels ajustements sont disponibles est de déplacer les boutons de commande tout effectuant la couture lentement. *Pattern reference guide Patterns in dark blue stitch length and width can be changed. Patterns in pink stitch length and width are fixed. Patterns in black buttonholes Patterns with circled numbers cannot be sewn with a twin needle (option). Guide de référence des motifs Motifs en bleu foncé - vous pouvez changer la longueur et la largeur de point. Motifs en rose - La longueur et la largeur de point sont fixes. Motifs en noir - boutonnières Il est impossible de coudre les motifs à numéro cerclé avec des aiguilles jumelées (en option). 27
28 ( ) Çift iğne modu düğmesi Twin needle mode switch Commutateur de mode d aiguilles 28
29 Twin needle mode switch ( ) Commutateur de mode d aiguilles jumelées ( ) When using twin needles, push the twin needle mode switch regardless of the stitch you selected. Doing so will reduce the stitch width automatically and save broken needles and possible damage to your machine. While the switch is pushed and lit red, patterns with circled numbers in the pattern reference guide are skipped and cannot be selected with the numerical selection buttons, and a beep will sound when selecting buttonhole pattern with the direct selection button. Helpful Hints: 1. Always select the Twin Needle Mode prior to selecting a pattern. This will preclude any possibility of the twin needle breaking. 2. Turning off the machine returns the machine to normal sewing mode. Twin Needle is only active when the Twin Needle Switch is lit red. Lorsque vous utilisez des aiguilles jumelées, appuyez sur le commutateur de mode d aiguilles jumelées quelque soit le point sélectionné. Ceci aura pour effet de réduire automatiquement la largeur du point, ce qui évitera les risques de rupture d aiguille et d endommagement de la machine. Lorsque le commutateur est enfoncé et qu il est allumé en rouge, les motifs à numéros cerclés mentionnés dans le guide de référence des motifs sont sautés et ne peuvent pas être sélectionnés avec les touches de sélection numériques, et un bip retentit lorsque vous sélectionnez un motif de boutonnière avec la touche de sélection directe. Suggestions utiles: 1. Sélectionnez toujours le mode Aiguille double avant de sélectionner un motif. Ceci évitera toute rupture de l aiguille double. 2. Lorsque vous éteignez la machine, celle-ci revient en mode de couture normale. L aiguille double est activée uniquement quand le commutateur d aiguille double est allumé en rouge. 29
30 QUICK REFERENCE TABLE OF STITCH LENGTH AND WIDTH TABLEAU DE RÉFÉRENCE RAPIDE DES LONGUEURS ET LARGEURS DE POINTS STITCH POINT No. No. No. AUTO AUTO LENGTH LONGUEUR (mm) MANUAL MANUEL AUTO AUTO NEEDLE POSITION POSITION D'AIGUILLE MANUAL MANUEL TWIN NEEDLE AIGUILLE DOUBLE CENTER CENTRE LEFT - RIGHT GAUCHE - DROIT STITCH POINT No. No. No. LENGTH LONGUEUR (mm) AUTO AUTO MANUAL MANUEL WIDTH LARGEUR (mm) AUTO AUTO MANUAL MANUEL TWIN NEEDLE AIGUILLE DOUBLE STITCH POINT No. No. No. LENGTH LONGUEUR (mm) AUTO AUTO MANUAL MANUEL WIDTH LARGEUR (mm) AUTO AUTO MANUAL MANUEL TWIN NEEDLE AIGUILLE DOUBLE , DÜZ DİKİŞ İĞNE POZİSYONU Düz dikiş dikerken iğnenin pozisyonu, Dikiş Genişliği Ayar düğmesi ile aşağıda gösterildiği gibi 13 fark-lı konumdan birisine ayarlanabilir. Adjusting needle position for straight stitch 13 needle positions are available for quilting, top stitching etc. Réglage de la position d aiguille pour le point droit 13 positions d aiguille sont utilisables pour le matelassage, surpiqure etc. Sola doğru Toward left Vers la gauche Sağa doğru Toward right Vers la droite Sola doğru Toward left Vers la gauche Sağa doğru Toward right Vers la droite Genişlik ayar düğmesi Width control Largeur 30
31 STITCH POINT No. No. No. LENGTH LONGUEUR (mm) AUTO AUTO MANUAL MANUEL WIDTH LARGEUR (mm) AUTO AUTO MANUAL MANUEL TWIN NEEDLE AIGUILLE DOUBLE STITCH POINT No. No. No. LENGTH LONGUEUR (mm) AUTO AUTO MANUAL MANUEL WIDTH LARGEUR (mm) AUTO AUTO MANUAL MANUEL TWIN NEEDLE AIGUILLE DOUBLE , , , ,
32 STITCH POINT No. No. No. LENGTH LONGUEUR (mm) AUTO AUTO MANUAL MANUEL WIDTH LARGEUR (mm) AUTO AUTO MANUAL MANUEL TWIN NEEDLE AIGUILLE DOUBLE STITCH POINT No. No. No. LENGTH LONGUEUR (mm) AUTO AUTO MANUAL MANUEL WIDTH LARGEUR (mm) AUTO AUTO MANUAL MANUEL TWIN NEEDLE AIGUILLE DOUBLE ,
33 STITCH POINT No. No. No. LENGTH LONGUEUR (mm) AUTO AUTO MANUAL MANUEL WIDTH LARGEUR (mm) AUTO AUTO MANUAL MANUEL TWIN NEEDLE AIGUILLE DOUBLE STITCH POINT No. No. No. LENGTH LONGUEUR (mm) AUTO AUTO MANUAL MANUEL WIDTH LARGEUR (mm) AUTO AUTO MANUAL MANUEL TWIN NEEDLE AIGUILLE DOUBLE , , , , , , , ,
34 DÜZ DİKİŞ Düz dikiş, dikiş dikmenin bütün çeşitlerinde kullanılır. Şimdi aşağıdaki adımları izleyerek nasıl dikiş dikileceğini öğrenelim. 1. AYARLAR Baskı ayağı Genel Amaçlı Ayak İplik tansiyonu kontrolü - S A. İplik tansiyonu kontrolü B. İğne kaldırma/indirme düğmesi C. Ters dikiş düğmesi D. Çalıştırma/durdurma düğmesi (Sadece nakış için) E. Transport dişlisi kontrolü F. Baskı ayağı kaldırma kolu G. Dikiş genişliği kumanda kolu H. Dikiş uzunluğu kumandası I. Güç/ışık düğmesi 1 B C D E 2 A F 4 H G I 2. İpliklerin her ikisini de baskı ayağının altından makinenin arkasına doğru yaklaşık 6 (15cm) bırakarak çekin. 3. Kumaşı baskı ayağının altına yerleştirin ve ayak kaldırma kolunu indirin. 4. İğne kumaşa girinceye kadar volanı kendinize doğru çevirin. 5. Makineyi çalıştırın. Elinizle kumaşı hafifçe yönlendirin. Malzemenin kenarına ulaşıldığı zaman dikiş makinesini durdurun Önce iğne en üst konumda oluncaya kadar volanı kendinize doğru çevirin, ardından baskı ayağını kaldırın, malzemeleri arkaya doğru çekin ve gösterilen şekilde yüz kapağının alt tarafında yer alan iplik kesicisi ile fazla ipliği kesin. 6 DİKİŞLERİN DÜZ TUTULMASI Dikişi düz tutmak için, iğne plakası üzerindeki numaralı kılavuz çizgilerden birisini kullanın. Bu numaralar, orta pozisyondaki iğneye olan mesafeyi belirtir. Masura kapağı plakası üzerindeki kılavuz çizgi, yorgan bloklarını birleştirmek ve oyuncak bebek kıyafetleri veya bebek giysilerinin vs. dar dikişleri için kullanılan 1/4" (6mm) dikiş kılavuz çizgisidir. 3/4" (19 mm) 5/8" (16 mm) 1/2" (13 mm) 3/8" ( 9 mm) 1/4" ( 6 mm) 34
35 STRAIGHT STITCHING The straight stitch is the stitch most frequently used. Let s set the machine for the basic straight stitch. 1. SETTINGS Presser foot - General Purpose Foot Thread tension control - S A. Thread tension control B. Needle stop position selector switch C. Reverse stitch switch D. Start/stop switch (For embroidery only) E. Feed dog control F. Presser foot lifter G. Stitch width control lever H. Stitch length control I. Power/light switch 2. Pull both threads under the presser foot toward the back of the machine, leaving about 6 (15cm) clear. 3. Place the fabric under the presser foot and lower the presser foot lifter. 4. Turn the hand wheel toward you until the needle enters the fabric. 5. Start the machine. Guide the fabric gently with your hands. When reaching the edge of the material, stop the sewing machine. POINT DROIT C est le point le plus utilisé pour toute genre de couture. Apprenez à vous servir correctement de votre machine, en suivant les étapes ci-dessous. 1. RÉGLAGES Pied de biche - Pied universel Réglage tension du fil supérieur - S A. Réglage tension du fil supérieur B. Touche de position d arrêt d aiguille C. Touche couture arrière D. Touche marche/arrêt (Pour la broderie seulement) E. Abaisse-griffes d entraînement F. Levier du pied presseur G. Largeur de point H. Longueur de point I. Interrupteur moteur/lumière 2. Tirez les deux fils sous le pied presseur vers l arrière de la machine, en laissant environ 15 cm de fil. 3. Placer le tissu sous le pied presseur et abaisser le pied. 4. Tourner le volant vers vous jusqu à ce que l aiguille pénètre dans le tissu. 5. Démarrez la machine. Guidez le tissu légèrement avec la main. Lorsque vous arrivez au bord du tissu, arrêtez la machine à coudre. 6. First turn the handwheel toward you until the needle is in its highest position, then raise the presser foot. Draw the fabric to the rear and cut off excess thread with the thread cutter located on the bottom of the face cover, as shown. 6. Tourner d abord le volant vers soi jusqu à ce que l aiguille arrive à sa position la plus haute, puis relever le pied presseur, tirer le tissu vers l arrière et couper la longueur de fil excessive au moyen du coupefil placé au bas de la plaque glissière, comme montré sur l illustration. KEEPING SEAMS STRAIGHT To keep the seam straight, use one of the numbered guide lines on the needle plate. The numbers indicate distance from the needle at its center position. The guide line on the bobbin cover plate is 1/4" (6mm) seam guide line which is used for piecing quilt blocks and also for narrow seams, such as those in doll clothes or baby garments. POUR GARDER LA COUTURE DROITE Pour piquer une ligne droite, utiliser les lignes de guide sur la plaque à aiguille. Le numéro indiqué est la distance entre l aiguille au centre et la ligne sur la plaque. Pour les coutures ¼ de pouce (8mm) pour le matelassé, le patchwork et les vêtements d enfants, suivez la ligne sur la plaque transparente de la bobine. 35
36 İğne kaldırma/indirme düğmesi Needle stop position selector switch Touche de position d arrêt d aiguille Köşe dönme kılavuzu Cornering guide Guide d angle Ters dikiş düğmesi Reverse stitch button Interrupteur couture arrière 36
37 TURNING A SQUARE CORNER 1. To turn a square corner 5/8" (16 mm) from the fabric edge, push the needle stop position selector switch to stop the needle to its lowest position. Start and stop the machine when reaching the cornering guide as shown. Raise the presser foot and turn fabric. RÉALISATION D UN ANGLE DROIT 1. Pour coudre un coin au 16 mm du bord du tissu, toucher la touche de position d arrêt de l aiguille pour ce que l aiguille est à la position basse. Cousez et arrêter quand vous arrivez au guide d angle comme illustrer. Lever le pied de biche et pivoter le tissu. 2. New stitching line will align with 5/8 (16 mm) seam guide on side of needle plate. Lower the presser foot and begin stitching in new direction. 2. La nouvelle ligne de piqûre s alignera avec le guide couture de 16 mm. Baissez le pied presseur et continuez la couture dans la nouvelle direction. REVERSE STITCH It is a good idea to begin or end seams with 3 to 5 stitches in reverse to reinforce the seams in order to prevent unraveling. As long as you are pushing the reverse stitch button, the machine will continue to feed the fabric backwards. POINT ARRIÈRE Il est conseillé de commencer et de terminer les coutures avec 3 à 5 points arrière pour renforcer les points et ainsi éviter qu ils s effilochent. Aussi longtemps que vous appuyez sur la touche pendant la couture, la machine continue à entraîner le tissu vers l arrière. 37
38 FERMUAR DİKME VE BİYELEME Fermuarın sol veya sol tarafını dikmek ya da kordona yakın dikiş yapmak için fermuar ayağını kullanın. FERMUARLARIN TAKILMASI Sağ tarafı dikmek için, iğnenin ayağın sol tarafındaki delikten geçmesi için, fermuar ayağının sol tarafını baskı ayağı tutucusuna takın. Sol tarafı dikmek için, ayağın sağ tarafını ayak tutucusuna takın. İğne ayağın sol tarafında Needle to left of foot Aiguille à gauche du pied presseur İğne ayağın sağ tarafında Needle to right of foot Aiguille à droite du pied presseur BİYELEME Yumuşak kumaşları biyelemek için, kordonu kumaşı n verevli bir parçası ile örtün ve bunu, kumaşın ana parçasına nervür veya punteriz dikişle dikin. İğnenin ayağın sağ tarafındaki delikten geçmesi için, fermuar ayağının sol tarafını ayak tutucusuna takın. Faydalı İpucu: Şeridin yakınında dikiş yapmak için, Dikiş Genişliği Ayar Düğmesi kullanı larak iğne pozisyonu hafif ayarlanabilir. EL GÖRÜNÜMLÜ KAPİTONE DİKİŞ Bu dikiş, el görünümlü üst dikiş veya kapitone dikiş yapmak için tasarlanmıştır. 1. Masuraya, istediğiniz üst dikiş renkli iplik sarın. Dikiş sırasında makine bu ipliği üste çekecektir. 2. Makineye, kumaşınızın rengine uygun, görünmeyen veya hafif iplik takın. Bu iplik görünmemelidir. 3. İstediğiniz görünümü elde edinceye kadar, her seferinde iplik gerginliğini biraz artırın. 4. Dikiş uzunluğunu 4 e (maksimum) ayarlayın. 5. Dikişe başlayın. NOT: Güzel bir görüntü için, farklı gerginlik ve dikiş uzunluğu kombinasyonlarıyla deneme yapın. OTOMATİK BAĞLANTI FONKSİYONLU DÜZ DİKİŞ 1. Ayak pedalına basın ve makine 4 ileri dikiş ve 4 geri dikiş yapacak ve ayak pedalı bırakılıncaya kadar ileri yönde dikiş yapmaya devam edecektir. 2. Geri dikiş düğmesine basın ve makine 4 geri dikiş yaptıktan sonra 4 ileri dikiş yapacak ve duracaktır. 38
39 INSERTING ZIPPERS AND PIPING Use the zipper foot to sew to the right or left of the zipper or to sew close to a cord. INSÉRER UNE FERMETURE À GLISSIÈRE OU UN BIAIS (GALONNER) Utilisez le pied fermeture glissière, au moyen duquel vous pouvez piquer aussi bien à gauche qu' à droite, ou aussi au plus près du cordonnet. INSERTING ZIPPERS To sew down the right side, attach left side of zipper foot to presser foot holder so that the needle passes through the opening on the left side of the foot. To sew down the left side, attach right side of foot to foot holder. PIPING Create a piping by covering a filler cord with a bias strip of fabric. Attach the right side of the zipper foot to the foot holder so that the needle passes through the right side of the zipper foot. Baste the seam allowances together, enclosing the filler cord, forming seam tape for the piping. Helpful Hint: Slight adjusting of the needle position to sew closer to the piping may be accomplished with the Stitch Width Control. INSERTION DE FERMETURES À GLISSIÈRE ORDINAIRES Pour piquer le côté droit, changez le pied et placez le pied à droite de l'aiguille, de facon à ce que celle-ci entre dans l'encoche prévue. Pour piquer le côté gauche, vous placez le pied à gauche de l'aiguille. GALONNER-BIAISER Placez le cordonnet dans la bande de biais et épinglez ou faufillez-la sur l'étoffe. Placez le pied fermeture glissière vers la gauche, de facon à ce que l'aiguille entre dans l'encoche située du côté droit du pied. Suggestion utile: À l aide de la commande de largeur de point, vous pouvez effectuer un léger ajustement de la position de l aiguille pour coudre plus près du biais. HAND-LOOK QUILT STITCH This stitch is designed to look like hand sewing for topstitching and quilting. 1. Thread bobbin with desired top stitching color. 2. Thread machine with invisible thread or same color thread, which matches fabric, so it doesn t show. 3. Increase thread tension toward 6 or higher until you achieve the desired appearance. 4. Set the stitich length at 4 (maximum). 5. Start to sew. NOTE: When the upper thread is loose, the machine may stop in the beginning. If the machine stops from the beginning, push the start switch again. EXÉCUTION DU POINT DE MATELASSAGE Ce point est conçu pour ressembler à un point cousu à la main pour la couture supérieure et le matelassage. 1. Enfilez la bobine en utilisant la couleur voulue pour la couture supérieure. 2. Enfilez la machine en utilisant un fil invisible ou de même couleur que le tissu et qui ne se verra pas. 3. Augmentez légèrement la tension du fil. 4. Réglez la longueur du point sur 4 (maximum). 5. Commencez à coudre. REMARQUE: Lorsque le fis supérieur est desserré, la machine peut s arrêter au début. Si la machine s arrête dès le départ, appuyez de nouveau sur l interrupteur de départ. STRAIGHT STITCH WITH AUTO TIE-OFF FUNCTION 1. Press the foot control and the machine will sew 4 stitches in forward and then 4 stitches in reverse and continue to sew in forward until the foot control is released. 2. Push the reverse switch and the machine will sew 4 stitches in reverse and then 4 stitches in forward and stop. POINT DROIT AVEC FONCTION DE NOUAGE AUTOMATIQUE 1. Appuyez sur la pédale; la machine coudra alors 4 points en marche avant puis 4 points en marche arrière, et continuera à coudre en marche avant jusqu à ce que vous relâchiez la pédale. 2. Appuyez sur l interrupteur de marche arrière; la machine coudra alors 4 points en marche arrière puis 4 points en marche avant, puis s arrêtera. 39
40 Alt taraf Under side Côté de dessous S - E Üst taraf Top side Côté de dessus DİKİŞ UZUNLUĞU STITCH LENGTH LONGUEUR DU POINT 0 DİKİŞ GENİŞLİĞİ STITCH WIDTH LARGEUR DU POINT mm Center position Position centrale Aguja posicionada en el centro 40
41 ZIGZAG STITCHING SETTINGS :Presser foot - General Purpose Foot :Thread tension control - S - E The top thread may appear on the bottom depending on the thread, fabric, type of stitch and sewing speed, but the bobbin thread must never appear on the top of the fabric. POINT ZIGZAG RÉGLAGES :Pied presseur - Pied universel :Réglage tension du fil supérieur - S - E Le fil supérieur peut paraître sur l envers, en fonction du fil, du tissu et de la vitesse de couture, mais le fil de la canette ne doit jamais paraître sur l endroit. ADJUSTING STITCH WIDTH AND LENGTH is values set automatically when pattern (No. 03) is set. The stitch length is 2 mm and the stitch width is about 5 mm. is the selection range when setting the value manually. RÉGLAGE DE LA LARGEUR ET DE LA LONGUEUR DE POINT sont les valeurs réglées automatiquement lorsque le motif (No 03) est établi. La longueur de point est de 2 mm et la largeur de point est de 5 mm environ. est la sélection lorsque vous réglez manuellement la valeur. SATIN STITCH This is a closely spaced attractive stitch for appliqué, bar-tacking, etc. Slightly loosen top thread tension for satin stitching. Set length between 0.5 and 2.0. Use a backing of stabilizer to help avoid stitches puckering the fabric. POINT BOURDON Des points zigzag serrés sont appelés point bourdon. C est un point décoratif qui sert pour les applíqués, les brides. Lorsque vous utilisez ce point, pensez à diminuer la tension supérieure. Régler la longueur de point entre 0.5 et 2.0. Plus le point est large, plus la tension doit être diminuée. Si vous voulez réaliser un point satin sur un tissu très fin, entoilez votre tissu en premier lieu. De cette manière, le tissu ne froncera pas et le fil inférieur ne sera pas apparent. Faire un essai sur un morceau de tissu que vous allez utiliser. PLACEMENT OF PATTERNS Stitch width of pattern increases from center needle position as illustrated. POSITIONNEMENT DES MOTIFS La largeur de point augmente selon la position de l aiguille centrale, comme indiqué sur l illustration. 41
42 Gizli dikiş ayağı 1 2 Orta-ağır kumaş Medium to heavyweight fabric Material de peso medio a pesado Alt taraf Under side Reverso 1 2 İnce kumaş Fine fabric Material fino Alt taraf Under side Reverso Alt taraf Under side Reverso 3 Alt taraf Under side Reverso A B NOT: Dar veya genifl gizli dikifl için, ilk önce elle uzunluk ve genifllik düşmelerini istedişiniz uzunluşa ve genifllişe ayarlayı n. Ardından, ayak üzerindeki kılavuzu ayarlayın. Kumaflı dikkatli bir flekilde kılavuz kenarı boyunca yönlendirerek yavaflça dikifl dikin. NOT: Gizli dikiflleri yapmak için pratik yapmanız gerekir. Her zaman, önce bir deneme dikifli yapın. 4 Üst taraf Top side Cara KAPAKLI DİKİŞ AYARLAR : Baskı ayaşı Genel Amaçlı Ayak : İplik tansiyonu kontrolü S - E Ham kenarın altından çevirin ve bastırın. Dikiflin zigzag kısmı katlanan kenarın üzerine gelerek kumaflı kapaklı bir dikifl oluflturacak flekilde çekecek tarzda kumaflın düz tarafı yukarı gelecek flekilde yerlefltirin. Dikifl çizgisine yakın fazla kumaflı kesin. 42
43 BLIND STITCH SETTINGS :Presser foot - Blind Hem Foot :Thread tension control - S - E - Regular blind stitch for normal fabrics POINT INVISIBLE RÉGLAGES :Pied presseur - Pied point invisible :Réglage tension du fil supérieur - S - E - Point invisible pour les tissus tissés - Elastic blind stitch for soft, stretchable fabrics - Point invisible pour les tissus extensibles Reminder: Patterns for blind hemming must be mirror imaged. 1. First finish the raw edge. Do this by turning it under on fine fabrics or overcasting it on medium to heavyweight fabrics. Then turn the hem up the required depth, press and pin in place. Rappel: Il faut choisir Image Miroir pour le point invisible. 1. D abord surfiler les bords avec un zigzag, ensuite plier l ourlet sur la largeur désirée et repasser. 2. Now fold the fabric as illustrated. 2. Maintenant, replier le tissu comme iilustré. 3. Place the fabric under the foot. Turn the handwheel towards you by hand until the needle swings fully to the left. It should just pierce the fold of the fabric. If it does not, adjust the guide (B) on the Blindhem Foot (A) so that the needle just pierces the fabric fold and the guide just rests against the fold. NOTE: For a narrower or wider blindhem, first manually adjust the length and width controls to your desired length and width. Then adjust the guide on the foot. Sew slowly, guiding the fabric carefully along the edge of the guide. 3. Placez le tissu sous le pied. Faites tourner le volant vers vous à la main jusqu à ce que l aiguille aille complètement vers la gauche. Elle ne devrait percer que le pli du tissu. Si elle ne le fait pas, ajustez le guide (B) du pied invisible (A) de façon à ce que l aiguille ne perce que le pli du tissu et que le guide repose juste sur le pli. REMARQUE: pour un point invisible plus étroit ou plus large, ajustez d abord manuellement les commandes de la largeur et de la longueur aux largeurs et longueurs désirées. Puis ajustez le guide du pied. Effectuez la couture lentement, tout en guidant soigneusement le tissu le long du bord du guide. 4. When completed, the stitching is almost invisible on the right side of the fabric. NOTE: It takes practice to sew blind hems. Always make a sewing test first. 4. Lorsque l ourlet est terminé, les points sont presque invisibles sur l endroit du tissu. REMARQUE: la couture d ourlets invisible demande de la pratique. Pour commencer, effectuez toujours une couture d essai. SHELL STITCH SETTINGS :Presser foot - General Purpose Foot :Thread tension control - S - E Turn under the raw edge and press. Place the fabric right side up so that the zigzag part of the stitch sews just over the folded edge, pulling the fabric in to form a shell hem. Trim away excess fabric close to the stitching line. POINT DE LINGERIE RÉGLAGES :Pied presseur - Pied universel :Réglage tension du fil supérieur - S - E C'est un point décoratif très apprécié (utilisé pour la couture des manches ou des devants de blouses et de robes). Pour assembler deux morceaux de tissus, laisser un peu d'espace entre les deux. Pour préparer le tissu: Plier les valeurs de couture, et presser. Bâtir les bords pliés sur du papier en laissant des espaces d'environ 3 mm (1/8"). Coudre par dessus les valeurs de couture de 3 mm (1/8"), en tenant le pli du tissu sur les deux bords avec une aiguille. Retirer les bâtis et le papier; repasser. 43
44 AYARLAR : Baskı ayaşı Genel Amaçlı Ayak : İplik tansiyonu kontrolü S - E AYARLAR : Baskı ayaşı Genel Amaçlı Ayak : İplik tansiyonu kontrolü S - E 44
45 MULTI-STITCH ZIGZAG SETTINGS :Presser foot - General Purpose Foot :Thread tension control - S - E This is a strong stitch because as its name implies, it makes three short stitches where the normal zig-zag makes only one. For this reason it is highly recommended for overcasting all types of fabrics. It is also ideal for mending tears, applying patches and inserting elastic. ZIGZAG MULTI-POINT RÉGLAGES :Pied presseur - Pied universel :Réglage tension du fil supérieur - S - E Pour réparer des déchirures droites ou en angle placez le tissu avec le début de l accroc sous la partie centrale du pied. Lorsque vous avez un accroc en deux parties, reprisez à partir de chaque extrèmité pour revenir au centre. Pour renforcer votre couture, placez un morceau de tissu sous l accroc. Vous pouvez aussi utiliser ce point pour la finition des coutures. FAGOTING SETTINGS :Presser foot - General Purpose Foot :Thread tension control - S - E This is a popular decorative stitch (used in sleeves or fronts of blouses and dresses). To attach two separate pieces of fabric together, leave a little space in between. To prepare the fabric: Fold under the seam allowances on the cut edges, and press. Baste folded edges to tissue paper with about 1/8" (0.3 cm) space between. Stitch over the 1/8" (0.3 cm) allowance, just catching the fabric fold on both sides with needle. Remove bastings and paper; press. POINT AJOURÉ RÉGLAGES :Pied presseur - Pied universel :Réglage tension du fil supérieur - S - E C'est un point décoratif très apprécié (utilisé pour la couture des manches ou des devants de blouses et de robes). Pour assembler deux morceaux de tissus, laisser un peu d'espace entre les deux. Pour préparer le tissu: Plier les valeurs de couture, et presser. Bâtir les bords pliés sur du papier en laissant des espaces d'environ 3 mm (1/8"). Coudre par dessus les valeurs de couture de 3 mm (1/8"), en tenant le pli du tissu sur les deux bords avec une aiguille. Retirer les bâtis et le papier; repasser. 45
46 AYARLAR : Baskı ayaşı Genel Amaçlı Ayak : İplik tansiyonu kontrolü S - E 46
47 STRETCH STITCHES SETTINGS :Presser foot - General Purpose Foot :Thread tension control - S - E Stretch stitches are mainly for use on knit, or stretchable fabrics, but can also be used on ordinary woven materials. STRAIGHT STRETCH STITCH Straight stretch stitch is far stronger than an ordinary straight stitch because it locks three times - forwards, backwards and forwards. It is particularly suitable for reinforcing the seams of sportswear in stretch and non-stretch fabrics, and for curved seams which take a lot of strain. Use this stitch also to top-stitch lapels, collars and cuffs to give a professional finish to your garments. POINTS EXTENSIBLE RÉGLAGES :Pied presseur - Pied universel :Réglage tension du fil supérieur - S - E Les points extensibles sont généralement utilisés pour les tissus élastiques, mais peuvent ètres utilisès sur tissus tissés. POINT DROIT EXTENSIBLE Ce point est beaucoup plus solide que le point ordinaire, vu qu il s exécute en trois fois, une fois en avant, une fois en arrière et ecore une fois en avant. Ce point spécial convient particulièrement bien pour surpiquer les cols, poignets. OVEREDGE STITCH This is the same type stitch used by the garment industry in making sportswear - it forms and finishes the seam in one operation. It s very effective for use in repairing raw or worn edges of older garments. POINT SURJET Point extensible spécial pour assembler et surfiler en une seule opération. Il est utilisé dans l industrie de la confection, surtout pour les vêtements de sport, comme les costumes de bain. Il peut cependant aussi s utiliser sur des tissus nonextensibles. RIC-RAC STITCH The ric-rac stitch is provides a bold topstitch for decorative borders. It is ideal for edging neck-bands, armholes, sleeves and hems. POINT RIC RAC Avec ce point vous surpiquer, vite et facilement les bords de vos tissus; tout en obtenant en même temps un résultat très décoratif! Ce point s utilise surtout pour surpiquer les cols, entrées de manches et manchettes, ainsi que les ourlets. FEATHER STITCH This stitch can be used for topstitching and for attaching lace and trims. It is also ideal for quilting application and faggoting. POINT PLUME L aspect agréable de ce point lui permet de servir de couture visible à plat, ou pour assembler les dentelles, ou pour l insertion de pièces de type lingerie. 47
48 48
49 HONEYCOMB STITCH 1. Make several rows of gathers across the fabric that you wish to smock. 2. With a narrow strip of fabric directly under the line of gathering, stitch over the gathers. The design will be a series of small diamonds. POINT NID D ABEILLE 1. Piquez au point droit, des lignes de fronces séparées de ± 8 mm. Tirez sur le fil inférieur et froncez le tissu jusqu à obtenir la longueur désirée. En cas de besoin, vous pouvez placer un biais à l envers des lignes de fronces. 2. Piquez le nid d abeille entre les lignes de fronces. Quand vous avez terminé, retirez les fils de points droits.. SLANT OVEREDGE STITCH Seams and overcasts in one operation to produce a narrow, supple seam, particularly suited to swimwear, sportswear, T-shirts, babywear in stretch nylon, stretch towelling, jersey and cotton jersey. SURJET OBLIQUE Le surjet sert à la réalisation de couture et surjet en une seule opération. Avec ce point, vous pouvez faire des coutures étroites et souples, parfaitement adaptées aux maillots de bain, vêtements de sport, T-shirts, vêtements de bébé en nylon extensible, tissu en éponge extensible, jersey. Les vêtements en tricot machine ou main peuvent être assemblés avec ce point. Vous pouvez également fixer les bandes d'encolure et les poignets. BLANKET STITCH The decorative appearance combined with practical use of this stitch enables it to be used for hemstitching and to applique a quilt. POINT LANGUETTE Ce point, qui a une apparence décorative a une grande commodité d utilisation, est utilisé pour les ourlets et pour les appliqués pour une courtepointe. TURKISH STITCH The turkish stitch has three main uses. It is perfect for attaching flat elastic when making or repairing lingerie; and for overcasting and for seaming and overcasting in one operation on slightly stretch fabrics and non-stretch ones such as linen, tweed, and medium to heavy-weight cotton. POINT TURC Point spécial pour réaliser ou réparer de la lingerie ou du tricot. Convient particulièrement bien pour assembler et surfiler en une seule opération. C est aussi un point très solide. Il permet également de poser aisément un élastique sur une pièce de lingerie. 49
50 50
51 SLANT PIN STITCH Excellent for hemstitching table and bed covers with an elegant touch. Sew along the raw edge of fabric and trim close to the outside of the stitching. POINT EPINGLE OBLIQUE Très pratique pour faire les ourlets de table et couvre-lit avec une touche élégante. Le point ressemblant à un point picot (ourlet cocotte) peut être effectué sur les tissus fragiles. Cousez le long de la bordure du tissu et coupez près de l extérieur de la couture. REINFORCED OVEREDGE STITCH Both of these stitches are perfect for attaching flat elastic when making or repairing lingerie. They can also be used for smocking and as a seam finish. POINT SURJET RENFORCÉ Convient particulièrement bien pour assembler et surfiler en une seule opération. C est aussi un point très solide. Il permet également de poser aisément un élastique sur une pièce de lingerie. Il convient aussi pour le smocking. THORN STITCH It is a versatile stitch used for joining fabric pieces and as a decorative touch. POINT D ÉPINE C est un point polyvalent utilisé pour joindre des morceaux de tissu et de la broderie. WIZARD STITCH Wizard stitch, as well as being a decorative stitch, is ideal for patching stretch fabrics such as jersey and knitwear. POINT SORCIER Le point de raccommodage extensible, en plus de sa qualite de point decoratif, convient tres bien au raccommodage de tissus élastiques tels que le jersey et les tricots. 51
52 52
53 CROSSED STITCH Use to sew and finish elastic fabrics or for decoration of borders. POINT CROISÉ Utilisez-le pour finir les matières élastiques ou pour la décoration des bords. CHEVRON STITCH Use to create decorative borders and for embroidery. POINT CHEVRON Utilisez-le pour des bordures décoratives et pour la broderie. PIN STITCH The Pin stitch is a traditional stitch pattern used for picot like edges and for applique work. POINT ÉPINGLE Le point épingle est un motif de couture traditionnel utilisé pour le bords de style picot et pour la finition d appliqué. ENTREDEUX STITCH Useful for decorative stitching on borders and for use in heirloom sewing. The Entredeux stitch is most often sewn with a Wing Needle (Singer Style 2040) to create holes in the stitch pattern. POINT ENTREDEUX Utile pour la couture décorative sur bordures et pour l utilisation lors de la couture ancienne. Le point entredeux et le plus souvent cousu à l aide d une aiguille aile (Style Singer 2040) pour créer des trous dans le motif du point. 53
54 54
55 LADDER STITCH The Ladder stitch is primarily used for drawn thread hemstitching. It can also be used for sewing over thin tape in an opposite or same color. Place the stitch in the center and a special effect will be obtained for decoration. Another use for the ladder stitch is couching over narrow ribbon, yarn or elastic. For drawn thread work, choose a medium to heavy weight linen-type fabric. After sewing, draw the thread out from within the ladder for an open, airy appearance. POINT D ÉCHELLE Le point d échelle est principalement utilisé pour la couture d ourlets à fil tiré. Il peut également être utilisé pour effectuer la couture par dessus une mince bande d une couleur opposée ou semblable. Placez le point au centre pour obtenir un effet spécial pour la décoration. Une autre utilisation du point d échelle est le couchage sur des rubans étroits, des fils ou de l élastique. Pour les travaux de fil tiré, choisissez un tissu de type toile grossier et après la couture, tirez le fil de l échelle pour obtenir une apparence ouverte et aérée. CRISS-CROSS STITCH Used to sew and finish stretch fabrics or for decoration especially of borders. POINT ENTRECROISÉ Utilisé pour la couture et la finition des tissus extensibles ou pour la décoration principalement des bords. GREEK KEY STITCH A traditional pattern suited for decorative borders, hems and edge finishings. POINT GREC Un motif traditionel parfait pour les finitions décoratives des ourlets, bords et bordures. FISHBONE STITCH Use to create decorative borders and for embroidery. POINT D ARRETE Utilisez-le pour des bordures décoratives et pour la broderie. 55
56 AYARLAR : Baskı ayaşı Saten dikiş ayağı : İplik tansiyonu kontrolü S - E 56
57 DECORATIVE STITCHING SETTINGS :Presser foot - Satin Foot :Thread tension control - S - E 22 different types of decorative stitches are available. Following are examples of how to use and sew these stitches. You can use other stitches in the same way. * You should carry out a test sewing on a cut-off strip of the fabric being sewn to check the pattern to be used. * Before starting to sew, check that there is enough thread wound onto the bobbin to make sure that the thread will not run out during sewing. MOTIFS DÉCORATIFS RÉGLAGES :Pied presseur - Pied pour point bourdon :Réglage tension du fil supérieur - S - E 22 types différents de points décoratifs sont disponibles. Voici quelques exemples d utilisation et de couture de ces points. Vous pouvez aussi utiliser d autres points de la même façon. * Effectuez une couture d essai sur une bande découpée du tissu que vous utilisez pour la couture pour vérifier le motif à utiliser. * Avant de commencer à coudre, vérifiez s il y a assez de fil bobiné sur la canette pour pouvoir terminer toute la couture. * Diminuez légèrement la tension du fil supérieur. * Slightly loosen top thread tension. TIPS ON DESIGN STITCHING Crescent pattern on collar This is an ideal decorative stitch for finishing the edges of fabrics, such as those used for table linens or children s clothing. When sewing this stitch on a fabric edge, first sew the stitch with a stabilizer underneath the fabric. Trim the edge of the fabric along the edge of the stitch, being careful not to cut into the stitching. Pyramid on bias tape This stitch can be used for embellishing bias binding or creating decorative borders on garments and home dec projects. CONSEILS POUR LES POINTS FANTAISIE Motif croissant sur col Ce point décoratif convient parfaitement à la couture des manches et des cols des vêtements de femmes et d enfants, et permet aussi d obtenir des bords plus propres. Lorsque vous utilisez ce motif de points pour obtenir des bords plus propres, coudre d abord le point puis couper le bord du tissu le long de la bordure des points. Veillez alors porter attention à ne pas couper les points. Pyramide sur galon biais Utilisez une bande en biais et pliez le bord vers l arrière. Cousez le point pyramide par-dessus le bord plié. Arrowhead on lapel In addition to using this pattern as a decorative stitch, it can also be used as a triangular backtack stitch for reinforcing places which can easily unravel. This is particularly useful for sewing both edges of pockets.. Chevron sur revers Ce motif peut être utilisé non seulement comme point décoratif, mais aussi comme point d arrêt triangulaire pour renforcer les endroits susceptibles de s effilocher facilement. Ceci est particulièrement utile pour coudre les deux bords des poches. Domino on bias tape Use bias tape and fold back the edge. Sew the domino stitch on top of this. Domino sur galon biais Utilisez une bande en biais et pliez le bord vers l arrière. Cousez le point domino par-dessus le bord plié. Diamond on narrow hem Fold over the edge of the fabric and use this stitch to tidy up the edge. Scallop stitches and diamond stitches can be combined to create other attractive patterns. Diamant sur ourlet étroit Pliez le bord du tissu et utiliser ce point pour obtenir un bord plus net. Les points feston et les points diamant peuvent être combinés pour créer d autres points attrayants. 57
58 58
59 CONTINUOUS PATTERNS SETTINGS :Presser foot - Zigzag foot :Thread tension control - S - E The patterns illustrated on the right are continuous patterns. Use whichever pattern suit your needs. MOTIFS CONTINUELS RÉGLAGES :Pied presseur - Pied zigzag :Réglage tension du fil supérieur - S - E Ces motifs conviennent parfaitement à la couture des motifs continuels. Utilisez les motifs que vous préférez. 59
60 60 Düğme dikme ayağı
61 NOVELTY PATTERNS SETTINGS :Presser foot - Zigzag foot :Thread tension control - S - E These can be used for sewing single pattern and continuous patterns. MOTIFS SPÉCIALS RÉGLAGES :Pied presseur - Pied zigzag :Réglage tension du fil supérieur - S - E Ceci peut être utilisé pour coudre des motifs uniques et des motifs continuels. SEWING ON A BUTTON SETTINGS :Presser foot - Button sewing foot :Feed dog control - Position your fabric and button under the presser foot. Lower presser foot. Turn the handwheel to make sure needle clears both left and right openings of button. Adjust width if required. Sew 10 stitches across. If a shank is required, place a darning needle on top of the button and sew over top of it. Helpful Hint: To secure thread, pull both threads to the backside of the fabric and tie together. POSE DE BOUTONS RÉGLAGES :Pied presseur - Pied Pied pour boutons :Abaisse-griffes d entraînement - Positionner le tissu et le bouton sous le pied presseur. Abaisser le pied. Tourner le volant afin de s'assurer que I'aiguille passe nettement dans les trous gauche et droit du bouton (régler la largeur du point en fonction du bouton) et coudre le bouton lentement en utilisant approximativement 10 points. Si une tige de maintien est requise, placer une aiguille de reprisage sur la partie supérieur du bouton et coudre. Suggestion utile: Pour fixer le fil, tirez les deux fils vers l arrière du tissu et liez-les ensemble. 61
62 İLİK YAPMA İLİK AÇMA AYAĞININ KULLANILMASI 1. A tırnağıyla B tırnağı arasına bir düğme sokun. 2. İlikler, düğmenin boyutuna uyacak şekilde dikilebilir. Tırnak A tab A Languette A Tırnak B tab B Languette B İlik açarken vurma sesinin meydana gelmemesi için, yardımcı tablayı çıkarın. YÖNTEM * İliklerin yerleştirildiği kıyafetin alanında bir astar kullanın. Dengeleyici veya normal astar kullanılabilir. * Kullandığınız kumaşın artık bir parçasında ilik açma alıştırması yapın. Ardından seçilen düğmeyle ilik açmayı deneyin , 95, 96, 97, 98 ve 99 ilik desenlerinden birisini seçin. 2. Baskı ayağını ilik ayağıyla değiştirin. ( sayfadaki Baskı ayağını değiştirmek konusuna bakın.) 3. Düğmeyi, düğme ayağına sokun. (Yukarıdaki Düğme ayağının kullanılması konusuna bakın.) (C) 4. (A) ve (B) takozlarının arasına dikey düşecek şekilde ilik kolunu (C) ayarlayın. (A) (B) İlik açma ayağı Buttonhole foot Pied boutonnière (C) (C) (C) 62
63 BUTTONHOLE MAKING USING BUTTONHOLE FOOT 1. Insert a button in between tab A and tab B. 2. Buttonholes can be sewn to match the size of the button. It is helpful to remove the extension table when sewing a buttonhole, to avoid hearing the foot make noise when moving across the table. CONFECTION DES BOUTONNIÈRES UTILISATION DU PIED BOUTONNIÈRE 1. Introduisez un bouton entre les butées A et B. 2. Les boutonnières peuvent être cousues de manière à correspondre à la taille du bouton. Pour éviter un bruit sourd pendant la couture d un bouton, retirez le plateau de rallonge. PROCEDURE * Use an interfacing in the area of the garment where buttonholes are placed. Stabilizer or regular interfacing can be used. * Make a practice buttonhole on a scrap of the fabric you are using. Then try the buttonhole with the selected button. PROCÉDURE * Utilisez un entoilage dans la partie du vêtement où les boutonnières doivent être placées. * Faites une boutonnière d essai sur un échantillon du tissu que vous utilisez. Essayez ensuite la boutonnière avec le bouton choisi. 1. Select one of buttonhole patterns 94, 95, 96, 97, 98 and Sélectionnez l un des motifs de boutonnières 94, 95, 96, 97, 98 et Replace the presser foot with the buttonhole foot. (Refer to Changing presser foot on page ) 3. Insert the button into the buttonhole foot. (Refer to Using buttonhole foot above.) 2. Remplacez le pied presseur par le pied boutonnière. (Reportez-vous à la section "Remplacement du pied presseur" à la page ) 3. Introduisez le bouton dans le pied boutonnière. (Reportezvous à la section "Utilisation du pied boutonnière" ci-dessus.) 4. Set the buttonhole lever (C) so that it drops down vertically between the stoppers (A) and (B). 4. Réglez le levier de boutonnière (C) de manière qu il s abaisse verticalement entre les butées (A) et (B). 63
64 5. Kıyafetinizde iliğin konumunu dikkatli bir şekilde işaretleyin. 6. Kumaşı ayağın altına yerleştirin. Kumaşın altındaki masura ipliğini arkaya doğru yaklaşık 4 inç boyunda çekin. 7. Kumaşın üzerindeki ilik işaretini, ilik ayağındaki işaretle hizalayın ve ardından ilik ayağını indirin. Kumaş işareti Fabric marking Marque du tissu İşaret mark Marque 8. Üst ipliği tutarken makineyi çalıştırın. * Dikiş, otomatik olarak aşağıdaki sıralamada tamamlanacaktır İlik açma ayağı hizalama konumu Buttonhole foot alignment position Position d alignement du pied boutonnière Kumaş işareti Fabric marking Marque du tissu 9. Dikme işlemi tamamlandığında iliğin ortasındaki kumaşı açmak için bir ilik açıcı kullanın. Dikiş ipliğini kesmemeye dikkat edin. 64
65 5. Carefully mark the position of buttonhole on your garment. 6. Place the fabric under the foot. Pull out the bobbin thread underneath the fabric to a length of about 4 inches to the rear. 5. Marquez soigneusement la position de la boutonnière sur le vêtement. 6. Placez le tissu sous le pied. Tirez le fil de la bobine sous le tissu sur une longueur d environ 10 centimètres vers l arrière. 7. Align the buttonhole mark on the fabric with the mark on the buttonhole foot, and then lower the buttonhole foot. 7. Alignez la marque de la boutonnière du tissu sur la marque du pied presseur, puis abaissez le pied boutonnière. 8. While holding the top thread, start the machine. 8. Tout en tenant le fil supérieur, démarrez la machine. * Sewing will be completed automatically in the following order. * La couture sera complétée automatiquement dans l ordre indiqué sur l illustration. 9. When sewing is finished, use a buttonhole opener to open up the fabric in the center of the buttonhole. Be careful not to cut any of the bartack threads. 9. Une fois la couture terminée, utilisez un outil d ouverture de boutonnière pour ouvrir le tissu au centre de la boutonnière. Veillez à ne pas couper le fil de la couture. 65
66 KORDONLU İLİKLER Doldurma kordonunu (kroşe ipliği veya ilik çevirme) destek üzerine kancalayın ve kordonun iki ucunu ayağın altına doğru öne çekin. Zigzag kordonu kapatacak şekilde iliği dikin. Tamamlandığı zaman kordonu ayaktan ayırın ve ekstra boyu kesin. Mahmuz Spur Saliente BUTTONHOLING WITH HARD-TO-SEW FABRICS When buttonholing with hard-to-sew fabrics or along the edge of multi-layered garments, attach the under-plate (A) onto the buttonhole foot as illustrated to make perfect buttonholes. Place the fabric between the under-plate and buttonhole foot. (A) 66
67 CORDED BUTTONHOLES Hook filler cord (crochet thread or buttonhole twist) over the spur and pull both ends of the cord forward under the foot and tie off the cord as shown in the illustration. Sew buttonhole so that zigzag stitches cover the cord. When completed, release the cord from foot and snip off extra length. BOUTONNIÈRES GANSEES (RENFORCEES) Accrocher le cordonnet (fil de passe ou fil de soie) sur la tige du pied pour boutonnière et tirer les deux extrémitès sous le pied vers le devant. Coudre la boutonnière de manière à ce que la zig-zag recouvre le cordonnet. La boutonnière terminée, détacher le cordonnet du pied, tirer les bouts vers l avant et tailler la longueur supplémentaire. BUTTONHOLING WITH HARD-TO-SEW FABRICS When buttonholing with hard-to-sew fabrics or along the edge of multi-layered garments, attach the under-plate (A) onto the buttonhole foot as illustrated to make perfect buttonholes. Place the fabric between the under-plate and buttonhole foot. COUTURE DE BOUTONNIÈRES AVEC DES TISSUS DIFFICILES À COUDRE Lorsque vous cousez des boutonnières sur des tissus difficiles à coudre, ou le long des bords de vêtements à plusieurs couches, fixez la sous-plaque (A) sur le pied de boutonnière comme indiqué sur l illustration pour réaliser des boutonnières parfaites. Placez le tissu entre la sous-plaque et le pied de boutonnière. 67
68 İlik açma ayağı Buttonhole foot Pied boutonnière
69 MANUAL BUTTONHOLE * Use the automatic buttonhole foot up to 1 3/4 (45 mm) in length, but don t lower the buttonhole lever or a beep will sound. * Use the satin foot to create larger buttonholes. * Carefully mark the buttonhole length on your garment. Place the fabric with the buttonhole marked under the buttonhole foot. Slide the foot forward so that the needle pierces the fabric at the beginning of the buttonhole. BOUTONNIÈRE MANUELLE * Utilisez le pied pour boutonnière automatique jusqu à 45 mm (1 3/4") de long, mais n abaissez pas le levier pour boutonnière, sinon un bip retentira. * Utilisez le pied pour point bourdon pour créer des boutonnières plus grandes. * Marquez soigneusement la longueur de la boutonnière sur votre vêtement. Placez le tissu avec la boutonnière marquée sous le pied pour boutonnière. Faites glisser le pied vers l avant de façon que l aiguille perce le tissu au début de la boutonnière. PROCEDURE 1. Start the machine to form first bartack and left side of buttonhole. 2. Sew second bartack and stitch backward until needle reaches beginning of buttonhole. 3. Stitch forward to the end of buttonhole mark to complete buttonhole. 4. Push the reverse stitch button to tie off the stitches. NOTE: If stitch length is manually set at 0.75 (mm) for step 1, set the stitch length at 0.75 (mm) for step 3 as well. PROCÉDURE 1. Démarrez la machine pour former le premier point d arrêt et le côté gauche de la boutonnière. 2. Cousez un deuxième point d arrêt et cousez vers l arrière jusqu à ce que l aiguille atteigne le début de la boutonnière. 3. Cousez vers l avant jusqu à la fin de la marque de boutonnière pour terminer la boutonnière. 4. Appuyez sur l interrupteur de point arrière pour nouer les points. REMARQUE: Si vous réglez manuellement la longueur de point à 0,75 (mm) pour l étape 1, réglez la longueur de point à 0,75 (mm) pour l étape 3 aussi. 69
70 3. NAKIŞ DİKİŞİ İÇİN HAZIRLIK Ayak askısı Foot holder Support du pied Vida Screw Vis Baskı ayağı Presser foot Pied de biche zigzag Baskı ayağı çubuğu Presser bar Barre de pied presseur Sürücü kolu Drive lever Levier d entraînement İğne kelepçesi Needle clamp Serre-aiguille Nakış baskı ayağı Embroidery presser foot Pied presseur de broderie sayfaya bakın. 70
71 3. PREPARATION FOR EMBROIDERY SEWING BEFORE ATTACHING EMBROIDERY UNIT ATTACHING EMBROIDERY FOOT 3. PRÉPARATIFS POUR LA BRODERIE AVANT DE FIXER L UNITÉ DE BRODERIE FIXATION DU PIED BRODERIE CAUTION Always be sure to turn off power to machine before changing presser foot. ATTENTION Veillez à toujours couper l alimentation électrique de la machine avant de changer le pied presseur. * Raise presser foot lifter. * Turn hand wheel toward you until needle is in its highest position. 1. Remove presser foot screw, presser foot and foot holder. 2. Attach the embroidery presser foot behind presser bar so that the drive lever is above the needle clamp. Secure it by tightening presser foot screw. 3. Turn hand wheel toward you to move needle up and down, and check that the embroidery presser foot moves up and down together with the needle. * Élevez le releveur de pied presseur. * Tournez le volant vers vous jusqu à ce que l aiguille soit à sa position la plus haute. 1. Retirez la vis du pied presseur, le pied presseur et le support du pied presseur. 2. Fixez le pied presseur de broderie derrière la barre de pied presseur de façon que le levier d entraînement soit situé au-dessus du serre-aiguille. Fixez-le en serrant la vis du pied presseur 3. Tournez le volant vers vous pour déplacer l aiguille vers le haut et vers le bas, et vérifiez si le pied presseur de broderie se déplace bien vers le haut et vers le bas en même temps que l aiguille. CAUTION Be careful not to touch the needle when replacing presser foot. ATTENTION Veillez à ne pas toucher l aiguille lorsque vous remplacez le pied presseur. INSERTING THE BOBBIN Refer to page * A large amount of thread is required for embroidering, so be sure to use full bobbin. ENFILAGE DU FIL DE CANETTE Reportez-vous aux pages * Une grande quantité de fil est nécessaire pour effectuer la broderie; veillez donc à ce que la bobine soit pleine. 71
72 sayfaya bakın. 1 3 İplik verici Thread take-up Releveur de fil 4 2 Tırnak tab Languette sayfaya bakın. ( sayfaya bakın.) Aşağı Down HAUT (A) Transport dişlisi kontrolü Feed dog control Abaisse-griffe d entraînement 72
73 SETTING TOP THREAD Refer to page NOTE: It is recommended to do the threading before data transferring. ENFILAGE DU FIL SUPÉRIEUR Reportez-vous aux pages REMARQUE: Il est recommandé d effectuer l enfilage avant le transfert des donnée. PICKING UP BOBBIN THREAD Refer to page RAPPEL DU FIL INFÉRIEUR Reportez-vous aux pages EXTENSION TABLE 1. Turn off power to machine. 2. Slide the extension table to left to remove it from machine. (Refer to page ) PLATEAU DE RALLONGE 1. Eteindre la machine. 2. Faites glisser la table de rallonge vers la gauche pour la retirer de la machine. (Reportez-vous aux pages ) FEED DOG CONTROL Lower feed dogs by moving feed dog control toward the direction (A). ABAISSE-GRIFFES D'ENTRAÎNEMENT Abaissez les griffes d entraînement en déplaçant la commande des griffes d entraînement vers (A). 73
74 1 Couvercle de connecteur Connector cap Couvercle de connecteur 2 Şaryo Carriage Chariot Soket Connector Connecteur DİKKAT Nakış cihazını takarken veya kullanırken taşı yıcıyı itmeyin veya üstüne fazla baskı uygulamayın; aksi takdirde, nakış cihazı hasar görebilir. Tutamak Handle Poignée 1 Bırakma kolu Release lever Support de cerceau Tutamak Handle Poignée Soket kepi Connector cap Couvercle de connecteur Bırakma kolu Release lever Support de cerceau Tırnak tab Languette 74
75 ATTACHING EMBROIDERY UNIT FIXATION DE L UNITÉ DE BRODERIE CAUTION Always be sure to turn off power to machine before installing embroidery unit. ATTENTION Veillez toujours à mettre la machine hors tension avant d installer l unité de broderie. 1. Turn off power to machine. Remove connector cap from machine. * Re-install connector cap before using machine for general sewing. 1. Eteindre la machine. Retirez le couvercle de connecteur de la machine. * Remettez en place le couvercle de connecteur avant d utiliser la machine pour la couture générale. 2. Slide the embroidery unit onto machine fitting connectors on the machine and embroidery unit. Slide the embroidery unit as far as it will go until it clicks into place. Hold handle of embroidery unit and pull it toward the left direction, and check that embroidery unit does not detach. Note: If embroidery unit is not securely installed, finished shape of pattern may deform. Make sure that embroidery unit is pushed in as far as it will go. CAUTION Don't push the carriage nor put strong pressure on it when attaching or using the embroidery unit or otherwise it may result in the damage of the embroidery unit. 2. Faites glisser l unité de broderie sur la machine en engageant les connecteurs de la machine et de l unité de broderie. Faites glisser bien à fond l unité de broderie jusqu à ce qu elle s enclenche à sa place. Saisissez la poignée de l unité de broderie et tirez-la vers la gauche, en vous assurant que l unité de broderie ne se détache pas. Remarque: Si l unité de broderie n est pas installée bien fermement, la forme finale du motif risquera d être incorrecte. Veillez à pousser l unité de broderie bien à fond. ATTENTION Ne pas pousser ou appuyer fortement sur le chariot lors de la disposition ou de l'utilisation du kit brodeur car vous pourriez l'endommager. REMOVING EMBROIDERY UNIT RETRAIT DE L UNITÉ DE BRODERIE CAUTION Always be sure to turn off power to machine before installing embroidery unit. ATTENTION Veillez toujours mettre la machine hors fonction avant d installer l unité de broderie. * Turn off power to machine. * Remove embroidery hoop from machine. (Refer to pages ) 1. Holding handle of embroidery unit, carefully slide toward the left while pressing release lever. Note: Do not pull carriage when removing embroidery unit. 2. Insert the tab at the bottom of connector cap first, and push in the top of the connector cap with your finger as illustrated. * Mettre la machine hors fonction. * Retirez le cerceau de broderie de la machine. (Reportez-vous aux pages ) 1. En tenant la poignée de l unité de broderie, faites glisser celle-ci progressivement vers la gauche tout en appuyant sur le levier de déverrouillage. Remarque: Ne tirez pas le chariot lorsque vous retirez l unité de broderie 2. Insérez tout d abord la languette dans le bas du couvercle du connecteur, puis enfoncez le haut du couvercle du connecteur avec le doigt, comme indiqué sur l illustration. 75
76 1 2 Kasnak ayarlama vidası Hoop adjusting screw Vis de réglage de cerceau 76
77 SECURING MATERIAL IN EMBROIDERY HOOP 1. Loosen hoop adjusting screw on outer frame and remove inner frame. Place material between inner and outer frame. FIXATION DU TISSU DANS LE CERCEAU DE BRODERIE 1. Desserrez la vis de réglage du cerceau sur le cadre extérieur et retirez le cadre intérieur. Placez le tissu entre le cadre intérieur et le cadre extérieur. 2. Slightly tighten the hoop adjusting screw and pull material edges to remove slack. Fit the two frames together by pressing down on the inner frame. a. Tighten hoop adjusting screw. 2. Serrez légèrement la vis de réglage du cerceau et tirez les bords du tissu pour bien le tendre. Assemblez les deux cadres en appuyant sur le cadre intérieur. a. Serrez la vis de réglage du cerceau. b. Press down on the inner frame to stretch the material into the outer frame, and then re-tighten the screw. b. Appuyez sur le cadre intérieur pour étirer le tissu dans le cadre extérieur, puis resserrez la vis. c. Tighten the material in the frames so that it makes a sound like a drum when the tightened surface is tapped with a finger. Once material is properly positioned in embroidery frame with no slack, securely tighten the screw. c. Serrez le tissu dans les cadres de façon qu il produise un bruit de tambour lorsque vous donner un petit coup à la surface avec le doigt. Une fois que le tissu est bien mis en place dans le cadre de broderie sans aucun pli, serrez fermement la vis. 77
78 MALZEMENİN VE DENGELEYİCİNİN KULLANILMASI Dengeleyici (Yapışkan yüzey aşağı bakıyor) Stabilizer (Adhesive surface facing down) Entoilage (surface adhésive orientée vers le bas) Kasnak konumu Hoop position Position du cerceau Malzeme (Alt taraf) Material (Under side) TISSU (Côté de dessous) Nakış yüzeyi (Üst taraf) Embroidering surface (Top side) Surface de broderie (côté supérieur) 78
79 USING THE MATERIAL AND STABILIZER MATERIAL Use stabilizer to produce best results when embroidering on the following fabrics. Materials which lack firmness or stability such as ligthweight cotton. Thin, soft materials such as hankerchief linens. Because materials such as this lack firmness or stability, embroidery stitches may pull in, which can result in problems such as shrinkage and puckering of the material around the embroidery area. Stretchy materials If the material is stretched when it is being tightened in the hoop, the result may be uneven embroidery. Furthermore, when the material is removed from the hoop after embroidery is complete, the material may shrink and cause the embroidered pattern to become distorted. Embroidery can be applied to many types of fabrics, but it may be necessary to prepare these fabrics in a special manner. * Materials with a loopy or napped surface such as towels, use a soft mesh cut-away type stabilizer on the backside, along with a rinse-away stabilizer on the topside. * Denim and linen are considered unstable because of the loose weave, use a medium weight cut-away stabilizer on the backside. * T-shirt type material usually require at least one, sometimes two layers of soft mesh-type cut-away stabilizer. * For medium to heavyweight stable woven fabric, use a medium to heavy weight tear-away type stabilizer. * For soft or sheer fabrics, use a rinse-away type stabilizer. UTILISATION DU TISSU ET DE L ENTOILAGE TISSU Utilisez l entoilage pour produire des finitions de broderie plus attrayantes lorsque vous utilisez des tissus tels que les suivants. Tissus trop mous, tels que les cotton léger Tissus fins et souples tels que les toilles de lins * Ces types de tissus étant trop mous, les points de la broderie risquent de se chevaucher, ce qui peut causer des problèmes tels qu un rétrécissement du tissu et un motif déformé. Tissus extensibles * Si le tissu est distendu pendant que vous le serrez dans le cerceau, la broderie risquera d être irrégulière. En outre, lorsque vous retirez le tissu du cerceau après avoir terminé la broderie, le tissu risquera de rétrécir et le motif de broderie sera alors déformé. Il est possible d effectuer la broderie sur les tissus suivants en utilisant un soin spécial. * Les tissus avec petits poils comme la ratine ou le velour demande un entoilage à maille sur l envers, avec un entoilage qui part a l eau sur l endroit. * Les tissage laches comme le denim ou la toile de lin demande un entoilage de poid medium, qui se decoupe apres la broderie. * Les T-shirt demande une couche d entoilage et meme parfoit deux couches d entoilages à maille. * Pour les tissus de poid moyen et lourd, utiliser un entoilage d un poid equivalent qui se déchire pour s enlever. * Pour les tissus délicats, utiliser un entoilage qui s enleve à l eau. STABILIZER Stabilizer is a non-woven substance. There are a variety of stabilizers available: tear-away, cut-away, wash-away and those that are removed by applying heat. Which stabilizer you choose will depend on the nature of the fabric on which you are embroidering. Always follow the manufacturer s instructions on how to use and apply the stabilizer correctly. Generally, the stabilizer should be larger in size than the hoop with which it is being used. When embroidery is completed, use a fine point scissor to carefully remove any excess stabilizer from the embroidery area. ENTOILAGE L entoilage est fabriqué à partir de tissus non tissés. Plusieurs entoilages sont disponibles: à déchirer, à découper et à laver. L entoilage à choisir dépend de la nature du tissu sur lequel vous brodez. Pour plus de détails concernant l utilisation et l application correctes de l entoilage, suivez les instructions du fabricant. Généralement, l entoilage doit être plus grand que le cerceau avec lequel il est utilisé. Une fois que vous avez fini de broder, utilisez des ciseaux pour retirer soigneusement l entoilage en excès de la zone de broderie. 79
80 Malzeme kenarında nakış yüzeyi Embroidery surface at material edge Surface de broderie sur le bord du tissu Kurdele türü Stabilizer (Adhesive surface facing) Entoilage (face à la surface adhésive) Dengeleyici Hoop inner frame Cadre intérieur du cerceau Kasnak iç kasası Stabilizer Entoilage Kurdele türü Ribbon tape Ruban Dengeleyici Stabilizer Entoilage Kasnak iç kasası Hoop inner frame Cadre intérieur du cerceau 80
81 If embroidering onto material which is smaller than the hoop size, or when embroidering close to the edge of material, attach the stabilizer as illustrated. WHEN EMBROIDERING ALONG THE EDGE OF MATERIAL SUCH AS A HANDKERCHIEF Si vous effectuez la broderie sur un tissu de taille plus petite que celle du cerceau, ou si vous brodez à proximité du bord du tissu, fixez le stabilisateur comme indiqué sur l illustration. BRODERIE LE LONG DU BORD D UN TISSU TEL QU UN MOUCHOIR WHEN EMBROIDERING A NARROW PIECE OF FABRIC SUCH AS RIBBON TAPE BRODERIE SUR UN TISSU ÉTROIT TEL QU UN RUBAN Use two layers of interfacing if required by the material. Always use a layer of stabilizer which is bigger than the hoop being used. (The stabilizer will not work properly unless it is clamped by the hoop together with the material being embroidered.). Stabilizer can usually be obtained from a fabric store. Stabilizer is available in several different types, from thin to thick. Purchase whichever type suits your embroidering needs. It is generally recommended that the weight of the stabilizer be similar to that of the fabric. Utilisez deux couches d entoilage pour le tissu si nécessaire. Utilisez toujours une couche d entoilage de taille plus grande que celle du cerceau utilisé. (L entoilage ne fonctionnera correctement que s il est fixé dans le cerceau avec le tissu que vous brodez.) Vous pouvez généralement vous procurer l entoilage dans un magasin vendant des tissus. L entoilage en vente dans le commerce est disponible en différents types plus ou moins épais. Achetez le type qui convient à la broderie que vous voulez effectuer. Il est recommandé généralement d utiliser un entoilage d une épaisseur équivalente au tissu. 81
82 ENİN KASNAĞI TAKMADAN ÖNCE MAKİNENİN HAZIRLANMASI 1. İğne en yüksek konumunda oluncaya kadar volan kendinize doğru çevirin. 1 kendinize sine C e se, k ve ısına NAKIŞ KASNAĞININ TAKILMASI VE ÇIKARTILMASI 1. Baskı ayağını ve iğneyi kaldırın ve nakış ayağının (A) kolunu parmağınızla yukarı itip altından nakış kasnağını geçirin. 1 (A) Çıkartmak için nakış kasnağının altından dışarı kaydırmak üzere kasnağı öne doğru çekin. 2. Kasnak montaj plakasındaki kare deliklere (D) kasnak braketindeki burunları (C) takarak kasnak montaj vidalarıyla (D) ve kasnak montaj plakasındaki oluklarla hizalamak suretiyle kasnağı, nakış ünitesine takın. Tornavidayla kasnak montaj vidalarını (D) sağlam bir şekilde sabitleyin. 2 (D) (C) (D) Şaryo Carriage Chariot Çıkartmak için kasnak montaj vidalarını (D) gevşetin ve kasnağı kasnak braketinden çıkartın. NOT: Küçük kasnağı takmadan önce şaryoyu nakış işleme bekleme konumuna getirmek için güç düğmesini açın ve kapatın. (B) (B) Kasnak montaj plakası Hoop mounting plate Plaque de montage de cerceau 82
83 PREPARING THE MACHINE BEFORE INSTALLING THE HOOP 1. Turn hand wheel toward you until needle comes to its highest position. PRÉPARATION DE LA MACHINE AVANT D INSTALLER LE CERCEAU 1. Tournez le volant jusqu à ce que l aiguille soit à sa position la plus haute. ATTACHING AND REMOVING EMBROIDERY HOOP 1. Raise presser foot and needle, and push up lever (A) of embroidery foot with your finger and pass embroidery hoop under it. To remove, pull the hoop forward to slide it out from underneath the embroidery foot. FIXATION ET RETRAIT DU CERCEAU DE BRODERIE 1. Élevez le pied presseur et l aiguille et poussez le levier (A) du pied broderie vers le haut avec le doigt, et passez le cerceau de broderie sous le pied. Pour le retirer, tirez le cerceau vers l avant pour le faire glisser vers l extérieur d en-dessous du pied broderie. 2. Attach hoop to embroidery unit by aligning hoop mounting screws (D) and the grooves in hoop mounting plate, fitting projections (C) on hoop bracket into square holes (B) in hoop mounting plate. Securely tighten hoop mounting screws (D) with screwdriver. To remove, loosen hoop mounting screws (D) and remove the hoop from the hoop bracket. NOTE: Before attaching small hoop, turn on power switch to move the carriage to embroidering standby position. 2. Fixez le cerceau sur l unité de broderie en alignant les vis de montage du cerceau (D) et les rainures dans la plaque de montage du cerceau, en plaçant les extensions (C) sur le support du cerceau dans les trous carrés (B) de la plaque de montage du cerceau. Serrez fermement les vis de montage du cerceau (D) à l aide d un tournevis. Pour le retrait, desserrez les vis de montage du cerceau (D) et retirez le cerceau du support du cerceau. REMARQUE: Avant de fixer le petit cerceau, mettez l interrupteur d alimentation sur la position de marche pour placer le chariot sur la position d attente de broderie. 83
84 YAZILIMIN KURULUMU Bilgisayarınızdaki yazılımı kullanmaya başlamak için öncelikle CD içeriğini bilgisayarınıza yüklemeniz gerekmektedir. Bu prosedüre kurulum prosedürü denmektedir. FUTURA yazılımını bilgisayarınıza başarılı bir biçimde yüklemek için aşağıda listelenen talimatları lütfen izleyiniz. FUTURA yazılımı bir CD-ROM diskiyle gelmektedir. Çoğu bilgisayarda CD-ROM için varsayılan sürücü D harfini taşımaktadır. Lütfen FUTURA CD-ROM unu, bilgisayarınızdaki CD-ROM disk alıcısına sokun. CD-ROM Birkaç saniye sonra yazılımın kurulum prosedürü otomatik olarak başlayacaktır. Kısa bir süre içerisinde başlamaması durumunda, Windows Başlat seçeneğine gidin, Çalıştır seçeneğini kullanarak D:\FuturaStart.exe komutunu yazın ve Tamam a tıklayarak kurulum prosedürünü elle başlatın Birkaç saniye sonra Hoşgeldiniz Ekranı ile birlikte yazılımın adım adım kurulumu başlar. İptal düğmesine tıklayarak kurulum prosedürünü daima sona erdirebilirsiniz. Bir sonraki ekrana geçmek için İleri tuşuna tıklayın. Lisans Sözleşmesi nde belirlenen koşulları okuyup kabul ettikten sonra lütfen Evet seçeneğini tıklayın, ve yeniden İleri öğesine tıklayın ve daha sonra da yazılımın kurulacağı dizini seçin. Varsayılan dizini kullanmanız tavsiye edilmektedir. Devam etmek için İleri öğesine tıklayın. 84
85 INSTALLATION OF SOFTWARE In order to start using the software on your PC you would have to first install the contents of the CD to your PC. This procedure is refered to as installation procedure. Please follow the below listed instructions in order to successfully install FUTURA on your personal computer. The FUTURA software comes on a CD-ROM disc. In most personal computers the default drive setting for a CD-ROM drive is D: Please insert the FUTURA CD-ROM into the CD-ROM disc receiver in your PC. After some seconds, the Installation procedure of the software will start automatically. In case this will not occur after a short while, you can run the installation procedure manually by going to the Start option of Windows, select Run, type D:\FuturaStart..exe and click on OK. After some seconds the step by step installation of the software begins with the Welcome window. You can always abort the installation procedure by clicking on the Cancel button. Click on Next to move on the next screen. INSTALLATION DU LOGICIEL Afin d utiliser le logiciel sur votre PC, vous devez d abord installer les contenus du CD sur votre PC. Il est fait référence à cette procédure par le terme de «procédure d installation». Veuillez suivre les instructions reprises dans la liste ci-dessous, afin d installer avec succès FUTURA sur votre ordinateur personnel. Le FUTURA vous est proposé sur disque CD-ROM. Chez la majorité des ordinateurs personnels, le réglage d unité sélectionné par le système pour le lecteur CD-ROM est «D:» Veuillez introduire le CD-ROM FUTURA dans le lecteur CD-ROM de votre PC. Quelques secondes plus tard, la procédure d installation du logiciel sera automatiquement lancée. Si cela ne se produit pas dans un délai bref, vous pouvez exécuter la procédure d installation manuellement en allant sur l option «Démarrage» de Windows, en sélectionnant «Exécuter», en saisissant «D:\FuturaStart.exe» et en cliquant sur OK. Quelques secondes plus tard, l installation étape par étape du logiciel commence avec la fenêtre de Bienvenue. Il vous est toujours possible d interrompre la procédure d installation en cliquant sur le bouton «Annuler». Cliquez sur «Suivant» pour avancer à l écran suivant. After reading and agreeing with terms given in the License Agreement, please click on Yes, and again click on Next, and then select the directory where the software should be installed. It would be recommended to use the default selected directory. Après avoir lu et convenu avec les termes proposés dans l Accord de Licence, veuillez cliquer sur «Oui», et, à nouveau, cliquez sur Suivant et, ensuite, sélectionnez le répertoire dans lequel le logiciel devrait être installé. Il est recommandé d utiliser le répertoire sélectionné par le système. Simply click on Next to continue. Cliquez simplement sur «Suivant» pour continuer. 85
86 Artık yazılım için gereken kısayolun saklanacağı Program klasörünü seçmek amacıyla bir uyarı alacaksınız. Devam etmek için İleri öğesine tıklayın. Son olarak kurulum ayarları sırasında yapılan tüm seçimleri onaylamanız istenecektir. İleri düğmesine basılması FUTURA yazılımının sabit disk üzerinde belirlenen dizine kopyalanmasını ve yüklenmesini başlatacaktır. Bir ilerleme çubuğu kurulum prosedürünün hangi evresinde olduğunuzu size gösterecektir. %100 e ulaştığında sona erecektir. Kurulum prosedürü tüm gerekli işlemleri sona erdirecek ve bittikten sonra otomatik olarak kapatılacaktır. Bu işlem gerçekleşene dek lütfen kısa bir süre bekleyiniz. Kurulum programı sabit diskinizde boş alan olmadığını belirlerse, bir hata mesajı kuruluma devam etmeden önce sabit diskinizde boş yer açmanız konusunda sizi uyaracaktır. İptal düğmesine tıklayarak kurulum prosedürünü daima sona erdirebilirsiniz. NAKIŞ YAPARKEN DOĞRU BAŞLAMA İŞLEMİ Doğru başlatma işlemi için aşağıdaki adımlara uyulmalıdır. Bu adımlara uyulmazsa, bir İletim Durma hata mesajı verilecektir. Bilgisayarınızı yeniden başlatın ancak, Futura yazılımını açmayın. Sonra, nakış cihazını dikiş makinenize bağlayın ve bilgisayar ile dikiş makinesi arasında USB kablosunu bağlayın. 1. Dikiş makinesini açın. Volanı kendinize doğru çevirerek iğneyi en yüksek pozisyona kaldırdığınızdan emin olun. 2. Kullanmayı planladığınız kasnağı nakış cihazınıza takın. 3. Futura yazılımını açmak için masaüstündeki Futura simgesini çift tıklayın. 4. Şimdi bir tasarımı seçmeye ve makinenize aktarmaya hazırsınız. ÖNEMLİ : Küçük bir kasnak kullanarak nakış yapıyorsanız ve şimdi büyük kasnağı kullanmaya hazırsanız; Makineyi kapatın, Futura yazılımını ve ardından da bilgisayarınızı kapatın. Bir süre bekledikten sonra bilgisayarı açın ve yukarıdaki 1-4 arasındaki adımları takip edin. 86
87 Now you are prompted to select the Program Folder where the shortcut for the software will be stored. Vous êtes, à présent, invité à sélectionner le Dossier de Programmes où le raccourci du logiciel sera mis en mémoire. Simply click on Next to continue. Cliquez simplement sur «Suivant» pour continuer. Finally you are requested to confirm all the selections made during the installation set-up. Il vous est enfin demandé de confirmer toutes les sélections qui ont été effectuées lors de la préparation de l installation. Pressing the Next button will finally start the copy and installation of the FUTURA software files to the given directory on the hard disk. Enfoncer le bouton «Suivant» lancera enfin la copie et l installation des fichiers du logiciel FUTURA au répertoire indiqué, sur le disque dur. A progress bar will indicate the stage at which the installation procedure is. It will finish when it has reached to 100%. The installation procedure is finalizing all required actions and will automatically close after finish. Please wait for a short while until this happens. If the installation utility identifies a lack of available space on your hard disk, an error message will prompt you to free some hard disk space before proceeding with the installation. You can always abort the installation procedure by clicking on Cancel. CORRECT START-UP PROCEDURE WHEN EMBROIDERING The following steps must be followed for proper start-up protocol. If these steps are not followed precisely, you will get a Transmission Pending error message. Boot up your computer, but do not open the Futura software. Next attach the embroidery unit to your sewing machine and connect the USB cable between your computer and sewing machine. 1. Turn on your sewing machine. Make sure the needle has been moved to the highest position by turning the Hand wheel towards you. 2. Attach the hoop that you plan to work with to your embroidery unit. 3. Double click on the Futura Icon on your desktop to open up the Futura Software. 4. You are now ready to select and transmit a design to your machine. IMPORTANT: If you have embroidered using the small hoop, and you are now ready to use your large hoop. Turn off your machine, close the Futura software and then turn OFF your computer. Wait for a moment, turn on your computer and then follow steps 1 through 4 above. Une barre de progression indiquera le stade auquel se trouve la procédure d installation. Elle sera achevée lorsque la barre aura atteint 100%. La procédure d installation finalise toutes les actions nécessaires et sera fermée automatiquement après avoir été achevée. Veuillez attendre quelques secondes jusqu à ce que cela se produise. Si le programme utilitaire d installation détecte un manque d espace disponible sur votre disque dur, un message d erreur vous invitera à libérer de l espace sur le disque dur avant d avancer à l installation. Il vous est toujours possible d interrompre la procédure d installation en cliquant sur le bouton «Annuler». DÉMARRAGE APPROPRIÉ POUR LA BRODERIE Suivez les étapes ci-dessous pour respecter le protocole de démarrage. Si ces étapes ne sont pas suivies avec précision, le message d erreur «Transmission en attente» s affichera. Allumez votre ordinateur, sans ouvrir le programme Futura. Puis reliez l unité de broderie à votre machine et branchez le câble USB entre votre ordinateur et la machine à coudre. 1. Mettez votre machine en marche. Assurez-vous que l aiguille est en position haute en tournant le volant vers vous. 2. Fixez le cerceau que vous souhaitez utiliser avec votre unité de broderie. 3. Double-cliquez sur l icône Futura de votre bureau pour ouvrir le programme. 4. Vous pouvez maintenant sélectionner et transmettre un motif à votre machine. IMPORTANT : si vous avez utilisé un cerceau trop petit pour la broderie et que vous êtes maintenant prêt à utiliser le grand cerceau, éteignez votre machine, fermez le programme Futura, puis éteignez votre ordinateur. Attendez un moment, allumez votre ordinateur, puis suivez les étapes 1 à 4 ci-dessus. 87
88 İğne kaldırma/indirme düğmesi Forward stitch switch Interupteur couture avancé Ters dikiş düğmesi Reverse stitch switch Interrupteur couture arrière LED göstergesi LED indicator Témoin a diode Çalıştırma/durdurma düğmesi (Sadece nakış için) Start/stop switch (For embroidery only) Interrupteur marche/arrêt (Pour la broderie seulement) NOT: Dikiş desenleri Photo Stitch e ait (isteğe bağlı) yazılım tarafından oluşturulduğunda, deseni makineye göndermeden önce iplik gerginliğini 0 a doğru düşürmeniz ve Makine kılavuzundaki onay kutusunu işaretleyerek Hız sınırlayıcıyı (Speed limiter) etkin hale getirmeniz önerilir. Böylece daha sabit bir şekilde dikiş dikme olanağı elde edersiniz. 88
89 OPERATION SWITCHES WHEN EMBROIDERY UNIT IS ATTACHED OPERATION SWITCHES START/STOP SWITCH When start/stop switch is pushed, machine starts slowly, and when the switch is pushed once more, the needle moves and stops at its highest position. TOUCHES DE FONCTIONNEMENT LORSQUE L UNITÉ DE BRODERIE EST FIXÉE TOUCHES DE FONCTIONNEMENT DÉMARRAGE/ARRÊT DE LA MACHINE Lorsque vous appuyez sur la touche de marche/arrêt, la machine démarre progressivement, et lorsque vous appuyez à nouveau sur la touche, l aiguille se déplace et s arrête à sa position la plus haute. FORWARD STITCH SWITCH Embroidering can be advanced one stitch at a time (The hoop moves.), after the embroidery data has been transferred. To advance continuously, press and hold this switch. INTERUPTEUR COUTURE AVANCÉ Vous pouvez avancer la broderie d un point à la fois (le cerceau se déplace), après que les donnés de broderie aient été transférées. Pour avancer de façon continue, maintenez cet touche enfoncé. REVERSE STITCH BUTTON Embroidering can be reversed one stitch at a time (The hoop moves.), after the embroidery data has been transferred. To reverse continuously, press and hold this switch. Embroidering can be reversed until the start of the embroidery data, after which it will no longer move. TOUCHE DE POINT ARRIÈRE Vous pouvez reculer la broderie d un point à la fois (le cerceau se déplace), après que les donnés de broderie aient été transférées. Pour reculer de façon continue, maintenez la touche enfoncé. Vous pouvez reculer la broderie jusqu au début des données de broderie, après quoi il ne sera plus possible de la déplacer. LED INDICATOR Green light indicates machine is ready to start. Red light indicates machine is operating. Flashing red light indicates a problem or an error. * Flashing for 2-3 seconds shows that an incorrect operation was made. * Continuous flashing indicates that machine malfunctions. TÉMOIN A DIODE Le témoin vert indique que la machine est prête à démarrer. Le témoin rouge indique que la machine fonctionne. Un témoin clignotant au rouge indique une problème ou un erreur. * Un clignotement durant 2-3 secondes indique qu une opération incorrecte a été effectuée. * Un clignotement continu indique que la machine ne fonctionne pas normalement. THREAD TENSION CONTROL Set it at E for embroidery to loosen thread tension. RÉGLAGE TENSION DU FIL SUPÉRIEUR Régler sur E pour diminuer la tension du fil pour la broderie. You may wish to re-adjust thread tension according to the type of fabric and threads being used. NOTE: When sewing designs created by the software for Photo Stitch (optional) it is recommended to decrease the thread tension toward 0 and activate the Speed limiter, by checking the box in Machine navigator, before sending the design to the machine. This will give a more stable stitching condition. REMARQUE: Lorsque vous cousez des motifs créés par le logiciel pour Photo Stitch (en option), il est recommandé de réduire la tension du fil vers «0» et d activer le «Limiteur de vitesse», en cochant la case dans le navigateur de la machine, avant d envoyer le motif vers la machine. Ceci assurera un état de couture plus stable. 89
90 savfalara bakın savfalara bakın savfalara bakın savfalara bakın savfalara bakın. 90
91 TROUBLESHOOTING SKIPPED STITCHES AND THREAD BREAKAGES OCCUR DÉPANNAGE DES POINTS SAUTÉS ET LE FIL SE CASSE Needle tip is broken. Thread path is incorrect. La pointe de l aiguille est épointée Le fil est enfilé incorrectement. Replace needle. Refer to pages Remplacez l aiguille. Reportez-vous aux pages Needle is bent. Thread is tangled around spool holder. L aiguille est tordue. L e f i l e s t e m m ê l é dans le porte-bobine. Replace needle. Refer to pages Remplacez l aiguille. R e p o r t e z - v o u s aux pages Needle is not installed correctly. Install the needle correctly. Refer to pages Thread or fabric bits have collected under the needle plate. L aiguille n est pas installée correctement. Installez l aiguille correctement. Reportez-vous aux pages Des chutes de fil ou de tissu se sont accumulées sous la plaque aiguille. Upper thread tension is too tight. Remove the thread or fabric bits. Refer to pages Le fil supérieur est trop tendu. Éliminez les chutes. Reportez-vous à la pages Adjust the thread tension. Refer to pages To check the elasticity of the thread, hold a length of thread of about 6 inches at both ends and pull it, check the length at which it breaks. If using a highly-elastic thread, reduce the upper thread tension. A thin needle is being used for heavy material. Replace with a thicker needle. Generally, at least a #14 needle should be used. Réglez la tension du fil. Reportez-vous aux pages Pour vérifier l élasticité du fil, tenez une longueur de fil d environ 15 cm aux deux extrémités et tirez-le, vérifiez la longueur à laquelle il se casse. Si vous utilisez un fil très élastique, diminuez la tension du fil supérieur. Vous utilisez une aiguille fine avec un tissu épais. Utilisez une aiguille plus grosse. Il faut normalement utiliser une aiguille #14. 91
92 savfalara bakın savfalara bakın savfalara bakın savfalara bakın savfalara bakın. Kasnağın serbest hareket etmesi engellenmiştir savfalara bakın. Kasnağın çevresini kontrol edin ve engellemeye sebep olan cisimleri temizleyin.
93 EMBROIDERY PATTERN IS MIS-ALIGNED MACHINE SIDE HOOP SIDE LE MOTIF DE BRODERIE EST MAL ALIGNÉ CÔTÉ MACHINE CÔTÉ CERCEAU Embroidering is continuing when thread is tangled. No stabilizer attached when using light or stretch material. La broderie continue lorsque le fil est emmêlé. Aucun entoilage n est fixé quand vous utilisez un tissu léger ou extensible. If the thread remains tangled, the fabric may pucker and ruin the finished embroidery. Stop embroidering, remove the hoop and untangle the thread. Attach interfacing to the material. Refer to pages Si le fil reste emmêlé, le tissu pourra être plissé, ce qui abîmera la finition de la broderie. Arrêtez la broderie, retirez le cerceau et démêlez le fil. Fixez de l entoilage sur le tissu. Reportez-vous aux pages Upper thread tension is too tight. Material has not been tightly fitted into hoop. Le fil supérieur est trop tendu. Le tissu n est pas bien tendu dans le cerceau. This can cause the material to pucker and result in uneven feeding, so reduce the thread tension. Refer to pages Tighten the material in the frames so that it makes a sound like a drum when the tightened surface is tapped with a finger. Refer to pages Ceci risque de plisser le tissu et de causer des irrégularités d entraînement; vous devez donc diminuer la tension du fil. Reportez-vous aux pages Serrez le tissu dans le cadres de façon qu il produise un bruit de tambour lorsque vous donner un petit coup avec le doigt. Reportez-vous aux pages Needle tip is broken or needle is too thick. Select a correct needle. Refer to pages Thread is tangled somewhere along the thread path. Embroidery hoop is not correctly attached. Attach the hoop securely to the hoop bracket with the hoop mounting screws. Refer to pages La pointe de l aiguille est épointée ou elle est trop grosse. Choisissez une aiguille correcte. Reportez-vous aux pages Le fil est emmêlé en un point du passage du fil. Le cerceau de broderie n est pas bien fixé. Fixez fermement le cerceau sur le support du cerceau à l aide des vis de montage du cerceau. Reportez-vous aux pages If the thread is tangled on the spool pin or somewhere along the thread path, it will increase the thread tension and cause the material to pucker, so check the thread. Refer to pages Hoop is obstructed against free motion. Check around the h o o p a n d r e m o v e things which cause obstruction. Si le fil est emmêlé dans le porte-bobine ou en un point du passage du fil, la tension du fil augmentera et le tissu sera plissé; vous devez donc vérifier le fil. Reportez-vous aux pages Le cerceau est bloqué. Vérifiez autour du cerceau et retirez les éléments qui peuvent provoquer le blocage. 93
94 FUTURA İLE NAKIŞ İÇİN FAYDALI BİLGİLER 1. Dikişler eksikse Nakış işleme yönü Embroidering direction Direction de broderie Nakış yapılan bölüm Embroidered section Section brodée Nakış makinesi ipliğin koptuğunu tespit ederse, otomatik olarak durmadan önce ipliksiz bir şekilde yaklaşık sekiz dikiş kadar (boş dikiş) nakış işlemeye devam edebilir. Bu tip durumlarda devam etmek için nakış verilerinden geriye gitmek üzere aşağıdaki yöntemi kullanın Nakış verilerinden geriye ilerlemek için ters dikiş düğmesine (dikiş geri dönüşü) basın. Kasnak, her seferinde tek dikiş geri gidecektir. Boş alandan tamamen geçilinceye kadar verilerden geri gidin. 2. Nakış makinesini yeniden başlatın ve nakış işlemeye devam edin. İplik kopmasından kaynaklanan boş dikişler Blank stitches resulting from thread breakage Points vides résultant d une rupture du fil otomatik olarak durma automatically stop S arrête automatiquement Ters dikiş düğmesi Reverse stitch switch Touche couture arrière 2. Bilgisayar ekranında yanıp sönen bir ışık görünecek ve uyarı sesi duyularak ipliğin koptuğu belirtiliyor ancak, iplik kopmamış. İplik, makinenin üst tarafındaki iplik yolundan düzgün geçirilmemiş (bkz. sayfa 24 Üst iplik takma ipuçları ) veya küçük iplik makarasını küçük bir örgü ile kapatabilir ve aksesuar olarak verilen büyük makara için çıkarılabilir iplik kılavuzunu kullanabilirsiniz. 3. Dikiş sırasında masuranın ipliği biterse, 1. Masurayı masura sarıcı mili üzerine yerleştirin ve mili sağa doğru itin. 2. Sarımı başlatmak için başlat/durdur düğmesine basın. (Nakış cihazı takılı iken pedal çalışmaz). 3. Kasnağı makineden ayırın (KUMAŞI KASNAKTAN ÇIKARMAYIN), boş masurayı değiştirin ve kasnağı tekrar takın. 4. Masura ipliğini tutarken tasarımınız bir veya iki dikiş ileri giderse, eski konuma dönmek için geri dikiş düğmesini kullanabilirsiniz. 94
95 HELPFUL INFORMATION FOR EMBROIDERING WITH FUTURA 1. If stitches are missing If the embroidery machine detects that the thread has broken, it may continue to embroider up to about eight stitches without any thread (blank stitches) before it automatically stops. In such cases, use the following procedure to step back through the embroidering data to the point for continuing. 1. Press the reverse switch (stitch return) to step back through the embroidery data. The hoop will move back one stitch at a time. Step back through the data until the blank area has been completely passed over. 2. Restart the embroidery machine and continue embroidering. RENSEIGNEMENTS D'AIDE 1. S il manque des points Si la machine à broder détecte une rupture du fil, elle pourra continuer à broder environ huit points au maximum sans utiliser de fil (points vides) avant de s arrêter automatiquement. Dans ces cas, procédez comme suit pour reculer dans les données de broderie jusqu au point à partir duquel continuer. 1. Appuyez sur la touche de couture arrière (retour de point) pour reculer dans les données de broderie. Le cerceau recule d un point à la fois. Reculez dans les données jusqu à ce que la zone vide a été complètement dépassée. 2. Redémarrez la machine à broder et poursuivez la broderie. 2. Computer screen says thread is broken with flashing light, beeping sound or 88 error message, but thread is not broken. Thread path under transparent cover at top of machine is not threaded correctly (see page Setting the top thread ) or you may want to cover small spool of thread with small net and use removable thread guide for large spool that are supplied with accessories. 2. Un message signale que le fil est cassé, le témoin est allumé et le bip retentit, mais le fil n est pas cassé. Le fil sous le couvercle transparent en haut de la machine n est pas correctement enfilé (voir page «Enfilage du fil supérieur»). Ou bien, vous voulez couvrir la petite bobine de fil avec le petit appareil de tension et utiliser le guide-fil amovible pour la grande bobine, fournis avec les accessoires. 3. When bobbin runs out of thread while sewing 1. Place the bobbin on the bobbin winder shaft and push the shaft towards the right. 2. Press the start/stop switch to begin winding. (The foot control is inoperable with the embroidery unit attached). 3. Remove the hoop from the machine, (DO NOT REMOVE YOUR FABRIC FROM THE HOOP), replace the empty bobbin and then re-insert the hoop. 4. If your design moved forward a stitch or two when you picked up the bobbin thread, you can use the reverse stitch button to move back to your original position. 3. Quand il ne reste plus de fil dans la canette : 1. Placez la canette sur l axe du dévidoir et poussez l axe vers la droite. 2. Appuyez sur la touche marche/arrêt pour commencer le bobinage (la pédale n est pas utilisable quand l unité de broderie est fixée). 3. R e t i r e z l e c e r c e a u d e l a m a c h i n e, ( N E PA S RETIRER LE TISSU DU CERCEAU), remplacez la canette vide, puis réinstallez le cerceau. 4. Si un point ou deux sont piqués vers l avant en sortant le fil de la canette, vous pouvez utiliser le point arrière pour retourner à la position d origine. 95
96 4. Yeterince yoğun olmayan bir tasarımın boyutunu değiştirirken. Futura yazılımı, sadece DESIGN>CHANGE SIZE seçeneği kullanıldığında, boyut ayarlaması sırasında aktarılan tasarımın dikişini yeniden hesaplar. %199 büyütme ve %51 küçültme sınırlaması olmasına rağmen dikişleri doğru hesaplayabilir. 5. Vector art ve Bitmapped art Görüntüyü seçtiğinizde, çok sayıda farklı format olduğunu göreceksiniz. Autopunch,.wmf gibi vektör tipi görüntüler kullanıldığında en iyi sonucu verir. Yazılım, bilginin rengini (blok) tanıyabilmelidir. Bir. bmp, milyonlarca renkten oluştuğundan kullanımı pratik değildir. Clipart, iki ana kategoriden oluşur; Vector Art ve Bitmapped Art. Yazılım,.bmp görüntüsünün doğrultusunu ayarlayabilir ancak, görüntüye bağlı olarak detaylar kaybolabilir. Bu, sanatsal çalışmanın ve AutoPunch ile birlikte kullanılan görüntünün tipini anlamak için gereklidir. Vector Art / Vector Art / Vector Art (mode vectoriel) Vector Art, basit bir açıklamayla, bir grafik renk bloğudur. Bazı genel formatlar;.wmf ve.emf, Auto Punch yazılımının okuyabildiği iki formattır. Bitmapped Art, tarama sırasında kaydedilen format tipidir. Bilgisayar, gerçekçi görüntü tipini yaratmak için milyonlarca rengi görür. Çok basit gördüğümüz 3 renkli bir tasarımın bile milyarlarca pikseli vardır. Yazılımın tanıyabildiği genel formatlar:.bmp,.jpg,.tif,.pcx,.pcd,.tga ve.psd. Auto Punch Yazılımı ile İlgili İpuçları: Yüksek çözünürlüklü tarama ( DPI). Amaçlanan çıkıştan 3-6 kat daha fazla tarama yapar. Sanatsal çalışma silindiğinde, düzgün dikiş yapmak için çok yakın olan çizgiler yazılım tarafından yok edilir. Bitmapped Art / Bitmapped Art / Bitmapped Art (mode point) 96
97 4. When resizing a design it is not dense enough. The Futura software will recalculate the stitch of an imported design when sizing, but only when using the DESIGN>CHANGE SIZE option. It does have a limitation of re-sizing up to 149% and down sizing to 51% and while still being able to re-calculate the stitches correctly. 4. En redimensionnant un motif, la couture n est pas suffisamment serrée Le programme Futura recalcule le point d un motif importé pendant la prise de dimensions, mais seulement si l option DESIGN>CHANGE SIZE (motif>changement de dimension) est sélectionnée. La limite maximum est de 199 % et la limite minimum est de 51 %, limites permettant encore de recalculer les points correctement. 5. Vector art vs Bitmapped art When you choose the image, notice that there are many different formats. Autopunch gives the best result when using vector type images, such as.wmf. The software must be able to recognize a color (block) of information. A. bmp can be made of millions of colors making it impractical for use. Clipart falls into two basic categories, Vector Art and Bitmapped Art. The software is capable of vectorizing the.bmp image, but it may lose detail, depending on the image. It is essential to understand about the type of artwork or image used with AutoPunch. Vector Art is a clean graphic blocks of color by simple definition. Some common formats -.wmf and.emf are two formats that the Auto Punch software can read. Bitmapped Art is the type of format that is typically saved when scanning. The computer sees millions of colors to create the realistic type of image. Even a 3-color design that we see as simple has billions of pixels. Common formats recognized by the software:.bmp,.jpg,.tif,.pcx,.pcd,.tga, and.psd. Tips for Auto Punch: Scan art with a high resolution ( DPI). Scan at 3-6 times larger than the intended output. Lines that are too narrow to properly sew out are eliminated by the software when it cleans up the artwork. 5. Le mode vectoriel par rapport au mode point Quand vous choisissez l image, notez qu il existe différents formats. AutoPunch donne le meilleur résultat avec les images vectorielles, comme.wmf. Le programme doit pouvoir reconnaître un couleur (bloc) d information. Une image.bmp peut se composer de millions de couleurs et de ce fait être inutilisable. Clipart propose deux modes, le mode vectoriel et le mode point. Le programme peut vectoriser les images.bmp, mais en fonction de l image, les détails risquent de ne pas être précis. Il est essentiel de connaître le type d illustration ou d'image pour utiliser AutoPunch. Vector Art (mode vectoriel) se compose de blocs graphiques de couleur par simple définition. Certains formats courants -.wmf et.emf sont deux formats que le programme AutoPunch peut lire. Bitmapped Art (mode point) correspond au type de format normalement enregistré pendant la numérisation. L ordinateur détecte des millions de couleurs pour créer une image réaliste. Même un motif avec 3 couleurs qui semble simple, se compose de milliard de pixels. Les formats les plus reconnus par le programme :.bmp,.jpg,.tif,.pcx,.pcd,.tga et.psd. Conseils pour utiliser AutoPunch : Scannez le motif en haute définition ( dpi). Scannez à une largeur 3 à 6 fois supérieure à la sortie prévue. Les lignes qui sont trop fines pour être correctement cousues, sont supprimées par le programme quand il nettoie l illustration. 97
98 6. Tasarımın boyutu değiştirildiğinde tasarımın yoğunluğu ayarlanacak mı? Futura yazılımında tasarımların boyutunu ayarladığınızda, ekrandaki kasnağın içinde bulunan kütüphaneden tasarımların boyutunu değiştirebilir ve tasarımını bütünlüğünü koruyabilirsiniz. Dikiş sayısını değiştirmek için, diğer bütün formatlar DESIGN/CHANGE SIZE menüsünde değiştirilmelidir. 7. Bireysel harflerin boyutunu ayarlama Kasnağın içine getirdikten ve metin penceresinden çıktıktan sonra, harflerin boyutunu değiştirebilirsiniz. Sol tıklayın, istediğiniz harfi bir kutu içine alın ve boyutunu istediğiniz gibi ayarlayın. Harfler cihazda var olduğundan, uygun yoğunluğu koruyacaklardır. 8. Tasarımın bir kısmını silme Sol tıklayın ve istediğiniz alanı bir kutu içine alın. İlave alanlar seçmek için, CONTROL tuşunu basılı tutun ve sonraki alanın üstünde sol tıklayın. Seçim yapıldıktan sonra, klavyedeki DELETE tuşuna basın. 9. K l a v y e h a r f l e r i n i n y o ğ u n l u ğ u n u arttırmanın bir yolu var mı? Yoğunluk, genellikle harflerin standart yoğunluğu olarak kullanılan mm nin 4/10 standart değerine ayarlanmıştır. Bu değer düzeltilemez. 10. Bir tasarım neden bazen çok küçük parçalara ayrılıyor? Bir renk bloğu, birkaç bloğa bölünebilir. Makinenin kabul edebileceği belli bir dikiş sınırı vardır. Bu yüzden, genellikle sınırı aştıktan sonra bu büyük bloklar kesilerek ayrı bir blok olarak belli sayıda dikiş bırakır (sadece birkaç dikiş olabilir). 98
99 6. Will the density of a design be adjusted when resizing design? When sizing designs in the Futura software you can resize designs from the Library in the hoop on screen and keep the design integrity. All other formats should be changed in the DESIGN/CHANGE SIZE menu in order to change the stitch count. 6. Est-il possible de régler la densité d un motif quand celui-ci est redimensionné? En réglant les dimensions des motifs dans le programme Futura, vous pouvez redimensionner les motifs à partir de la bibliothèque dans le cerceau sur l écran et garder l intégrité du motif. Tous les autres formats doivent être modifiés dans le menu DESIGN/CHANGE SIZE (motif/ changement de dimension) pour changer le nombre de points. 7. Resizing individual letters You can resize individual letters after you have brought them into the hoop and exited the text window. Left click, drag a box around the desired letter, and size accordingly. Because the letters are built-in, the letter will keep the appropriate density. 7. Redimensionner une lettre Vous pouvez redimensionner une lettre après avoir mis toutes les lettres dans le cerceau et avoir quitté la fenêtre du texte. Cliquez à gauche, glissez une case autour de la lettre désirée et réglez aux dimensions choisies. Les lettres étant incorporées, la lettre sélectionnée gardera la densité appropriée. 8. Deleting part of a design Left click and drag a box around the desired area. To select additional areas, hold down the CONTROL key and left click on next area. Once selected, touch the DELETE key on your keyboard. 8. Supprimer une partie d un motif Cliquez à gauche de la souris et faites glisser la case autour de la zone choisie. Pour sélectionner des zones supplémentaires, appuyez de manière prolongée sur la touche CONTROL et cliquez à gauche de la souris sur la zone suivante. Une fois la zone sélectionnée, appuyez sur la touche DELETE (supprimer) du clavier. 9. Is there a way to increase the density of the lettering? The density is set to a standard value of 4/10th of mm, which is usually the standard density used for Lettering. The value is not editable. 9. Existe-t-il un moyen d augmenter la densité des lettres? La densité est réglée sur une valeur standard de 4/10ème de mm, qui correspond habituellement à la densité standard utilisée pour le lettrage. La valeur ne peut être modifiée. 10. Why does a design sometimes split up into very small segments? One color block can end up divided into several blocks. The machine has a certain limit of stitches that it can accept. So what most probably happens is that these are big blocks that are cut after exceeding the limit, leaving a certain number of stitches (could possibly be only a few) as a separate block. 10. Pourquoi un motif peut-il parfois se partager en très petits segments? Un bloc de couleur peut se trouver divisé en plusieurs blocs. La machine ne peut accepter qu une certaine limite de points. Ce qui se produit alors, c est que les gros blocs coupés après avoir dépassé la limite, laissent un nombre de points (il est possible que ce ne soit que peu de points) en bloc séparé. 99
100 11. Makine navigatöründeki Send design seçeneği ile bütün tasarımı bir seferde gönderirken, 1. Blok numaraları, şekilde gösterildiği gibi kontrol panelinde belirtilir. 2. Bir bloğu seçmek isterseniz, makine çalışmıyorken rakamlı seçme tuşuna basın. NOT: Önceki numaralara geri dönmek imkansızdır. 00
101 11. When sending the whole design at once through the option Send design in the machine navigator, 1. Block numbers are indicated on the control panel as illustrated. 2. If you want to select a block, push the numerical selection button while the machine is not running. NOTE: It is not possible to return to previous numbers. 11. Pour envoyer un motif complet en une seule fois avec l option «Send design» (envoi de motif) dans le navigateur : 1. Les numéros de bloc sont signalés sur le panneau de contrôle, comme indiqué. 2. Si vous voulez sélectionner un bloc, poussez les touches de sélection numérique, ceci sans faire fonctionner la machine. REMARQUE : il est impossible de retourner aux numéros précédents. 101
102 4. BİLMENİZ GEREKEN DİĞER HUSUSLAR 102
103 4. OTHER THINGS YOU SHOULD KNOW PRESSER FOOT LIFTER There are three positions for your presser foot. 1. Lower the presser foot to sew. 2. Raise the lifter to the middle position to insert or remove fabric. 3. Lift it to its highest position to change the presser foot or to remove thick fabric. 4. D'AUTRES CHOSES QUE VOUS DEVRIEZ SAVOIR LEVIER DU PIED PRESSEUR Il y a 3 positions pour votre Pied Presseur : 1. Abaisser le levier pour coudre. 2. Soulevez le levier en position médiane pour insérer ou enlever le tissu. 3. Soulever le levier à sa position la plus haute, pour changer le pied ou enlever les tissus épais. FEED DOG CONTROL The feed dogs control the movement of the fabric that is being sewn. They should be raised for all general sewing purposes and lowered for darning, freehand embroidery and monogramming so that you, not the feed dogs, are moving the fabric. CONTRÔLE DES GRIFFES D'ENTRAÎNEMENT Les griffes d entraînement assurent le mouvement du tissu pendant la couture. Elles doivent être remontées pour la couture normale et abaissées pour le reprisage, la broderie à main libre et les monogrammes, de telle façon que c est vous qui déplacez le tissu et non pas les griffes. CONVERTING TO FREE-ARM SEWING Your machine can be used either as a flat- bed or as a freearm model. With the extension table in position, it provides a large working surface as a standard flat-bed model. To remove the extension table, hold it firmly with both hands and pull it off to the left as shown. To replace, slide the extension table back into place until it clicks. With the extension table removed the machine converts into a slim free-arm model for children s clothes, cuffs, trouser legs, and other hard-to-reach places. UTILISATION DU BRAS LIBRE Cette machine peut s utiliser aussi bien sous la forme d une base plane que celle d un bras libre. En conservant la table de rallonge en place, vous disposez d une grande table de travail. Pour retirer la table de rallonge, tenez-la fermement avec les deux mains et tirez-la à gauche vers l extérieur, comme indiqué sur l illustration. Pour la remettre en place, faites glisser la table de rallonge à sa place jusqu à ce qu elle s enclenche. Lorsque la table de rallonge est retirée, la machine est transformée en un modèle à bras libre profilé convenant parfaitement à la couture des vêtements pour enfants, des manchettes, des jambes de pantalons, et autres endroits d accès difficiles. 103
104 Alt taraf Under side Côté de dessous İyi dengelenmiş Well balanced Correct Üst taraf Top side Côté de dessus Üst dikiş çok sıkı Top stitch too tight Fil supérieur trop tendu Üst dikiş çok gevşek Top stitch too loose Fil supérieur trop lâche Tansiyonu düşürün Decrease tension Diminuer la tension Tansiyonu arttırın Increase tension Augmenter la tension 3 Baskı ayağı Presser foot lifter Levier de verrouillage du pied Ayak bırakma düğmesi Foot release button Levier de verrouillage du pied Ayak askısı Foot holder Support du pied
105 ADJUSTING TOP THREAD TENSION STRAIGHT STITCHING The correct appearance of your stitching is largely determined by the balanced tension of both top and bobbin threads. The tension is well balanced when these two threads lock in the middle of layers of fabric you are sewing. If, when you start to sew, you find that the stitching is irregular, you will need to adjust the tension control. Make any adjustments with presser foot down. BOBBIN TENSION The bobbin tension has been correctly set at the factory, so you do not need to adjust it. RÉGLAGE DE LA TENSION DU FIL SUPÉRIEUR POINT DROIT L aspect de votre point droit dépend surtout du bon équilibre entre la tension supérieure et la tension inférieure. Elle est parfaite lorsque les deux fils se nouent entre les deux épaisseurs de tissu. Vous pouvez régler la tension supérieure avec le cadran de réglage de tension. Si la tension supérieure est trop lâche, tourner le cadran vers le haut pour l augmenter. Si elle est trop forte, tournez-la vers l autre côté pour la diminuer. TENSION DE LA CANETTE La tension de la canette a été correctement réglée à l'usine, il est inutile de la corriger. CHANGING PRESSER FOOT Be sure the needle is in the highest position. Raise presser foot lifter. 1. Push presser foot release button to remove the foot. 2. Place the desired foot on the needle plate aligning the presser foot pin with the foot holder. 3. Lower the presser foot lifter so that the foot holder snaps on the foot. REMPLACEMENT DU PIED PRESSEUR Relevez l aiguille au maximum, ainsi que le levier du pied presseur. 1. Poussez le levier de verrouillage et enlever le pied. 2. Placez le pied choisie sur la plaque-aiguille comme illustré. 3. Rabaissez le levier du pied presseur de façon à ce que le pied s enclenche de lui-même sur son support. 105
106 ÇALIŞTIRMA DÜĞMELERI Needle stop position selector switch Touche de position d arrêt d aiguille Ters dikiş düğmesi Reverse stitch button Interrupteur couture arrière Çalıştırma/durdurma düğmesi (Sadece nakış için) Start/stop switch (For embroidery only) Interrupteur marche/arrêt (Pour la broderie seulement) LED göstergesi LED indicator Témoin a diode NEEDLE STOP POSITION SELECTOR SWITCH ( ) TERS DIKIŞ DÜĞMESI Düz ve zig-zag dikişler için geri dikiş fonksiyonu Reverse stitch function for straight and zigzag stitches Fonction couture arrière pour les points droits et zigzags Diğer dikişlerin sağlamlaştırılması için punteriz dikiş fonksiyonu Tacking stitch function for tie-off of other stitches Fonction de point de faufilage pour la jonction avec d autres points ÇALIŞTIRMA/DURDURMA DÜĞMESİ Bu düğme sadece nakış dikerken çalışır. 106 LED GÖSTERGESİ Yeşil ışık, makinenin çalışmaya hazır olduğunu gösterir. Kırmızı ışık makinenin çalışmakta olduğunu gösterir. Yanıp sönen kırmızı ışık, bir sorun veya hata olduğunu gösterir. * 2 3 saniye yanıp sönme, yanlış bir işlemin yapıldığını gösterir. * Sürekli yanıp sönme, makinenin arızalandığını gösterir.
107 OPERATION SWITCHES TOUCHES DE FONCTIONNEMENT NEEDLE STOP POSITION SELECTOR SWITCH ( ) Push the switch and LED lamp will be lit red and needle will stop at down position whenever you stop sewing. Push it again to stop needle at up position. TOUCHE DE POSITION D ARRÊT D AIGUILLE ( ) Quand vous toucher cette touche et la lumière LED est rouge, l aiguille s arrête à la position basse quand vous arrêtez de coudre. Toucher encore une fois pour arrêter l aiguille en position haute. REVERSE STITCH BUTTON * Reverse stitch function for straight and zigzag stitches ( ) Reverse sewing is carried out while the reverse stitch button is pushed. The machine will continue to sew in reverse as long as the reverse switch button is pressed. TOUCHE COUTURE ARRIÈRE * Fonction couture arrière pour les points droits et zigzags ( ) La couture arrière avance lorsque l interrupteur couture arrière reste appuyé. La machine continue la couture en arrière tant que l interrupteur de couture en arrière est appuyé. * Tacking stitch function for tie-off of other stitches ( ) The sewing machine makes 4 tiny tacking stitches to tie off the sewing on all patterns except straight and zigzag stitches. The position of the tacking stitches will be at the exact spot in the pattern where the reverse/tacking stitch button is pushed. * Fonction de point de faufilage pour la jonction avec d autres points ( ) La machine à coudre exécute 4 petits points de faufilage pour terminer la couture de tous les motifs sauf pour les points droit et zigzag. La position des points de faufilage est à l endroit exact du motif où la touche de couture arrière/bride est appuyée. START/STOP SWITCH This switch works only when sewing embroidery. LED INDICATOR Green light indicates machine is ready to start. Red light indicates machine is operating. Flashing red light indicates a problem or an error. * Flashing for 2-3 seconds shows that an incorrect operation was made. * Continuous flashing indicates a machine malfunction. TOUCHE MARCHE/ARRÊT Cet interrupteur ne fonctionne que quand vous cousez une broderie. TÉMOIN A DIODE Le témoin vert indique que la machine est prête à démarrer. Le témoin rouge indique que la machine fonctionne. Un témoin clignotant au rouge indique une anomalie ou une erreur. * Un clignotement durant 2-3 secondes indique qu une opération incorrecte a été effectuée. * Un clignotement continu indique que la machine ne fonctionne pas normalement. 107
108 Daima fişi prizden çekerek makineyi elektrik beslemesinden ayırın. Düz taraf Flat side Côté plat İğneler Needle Aiguille Pim Pin Butée Düz taraf, arkaya doğru Flat side toward the back Côté plat orienté vers l arrière 108
109 NEEDLE, THREAD AND FABRIC CHART Your fabric will determine the choice of a needle and thread. The following table is a practical guide to needle and thread selection. Always refer to it before a new sewing project. Generally, the same size and type of thread is used in the bobbin as in the upper thread. FABRICS THREAD NEEDLES The fabrics below can be of any fiber: cotton, linen, silk, wool, synthetic, rayon, blends. They are listed as examples of weight. TYPE Light- Weight Medium- Weight Medium- Heavy Knits Batiste Chiffon Crepe Corduroy Flannel Gabardine Gingham Linen Muslin Wool Crepe Bonded Wovens Canvas Coating Denim Duck Sailcloth Bonded Knits Double Knit Jersey Tricot Cotton-wrapped 2000 or 2020 Polyester red 100% Polyester shank * Mercerized Size 60 Cotton-wrapped 2000 or 2020 Polyester red 100% Polyester shank * Mercerized Size 50 Nylon Cotton-wrapped 2000 or 2020 Polyester red 100% Polyester shank * Mercerized Size 40 * "Heavy Duty" Cotton-wrapped Polyester Polyester Nylon 2001 or 2045 yellow shank SIZE 11/80 orange band 14/90 blue band 16/100 purple band 18/110 yellow band 11/80 orange band 14/90 blue band 16/100 purple band * Do not use on stretch fabrics. * For best sewing results, always use a Singer Branded Needle. Always disconnect the machine from power supply by removing the plug from the wall-outlet. TABLEAU DES AIGUILLES, FIILS ET TISSUS Le choix d une aiguille et du fil correspondant à votre tissu est très important. Le tableau suivant vous aidera à faire le choix, avant d entreprendre votre ouvrage. Utilisez, sauf cas particulier, Ie même fil pour I aiguille et la canette. TISSUS FIL AIGUILLES Les tissus ci-dessous peuvent être de n importe quelle fibre: coton, lin, soie, laine, synthétique,rayonne, composite. Ils sont énumérés en fonction de leur poids. TYPE CALIBRE LÉGERS Batiste Gaze Crêpe MOYENS Velours côtelé Flanelle Gabardine Guigan Toile de lin Mousseline Crêpe de laine MOYENS- LOURDS MAILLES Tissus apprêtés Toile forte Tissu de manteau Toile de jean Coutil Toile à voiles Mailles apprêtés Maille double Jersey Tricot Polyester-coton 2000 ou /80 100% polyester *Mercerisé calibre 60 tige rouge bague orange Polyester-coton 100% polyester *Mercerisé calibre 50 Nylon Polyester-coton 100%polyester *Mercerisé calibre 40 *Fil fort Polyester-coton Polyester Nylon 2000 ou 2020 tige rouge 14/90 bague bleue 2000 ou /100 tige bague rouge pourpre 18/110 bague jaune 2001 ou /80 tige bague jaune orange 14/90 bague bleue 16/100 bague pourpre * Non recommandés pour les tissus extensibles. * Pour obtenir les meilleurs résultats de couture, utilisez toujours une aiguille de marque Singer. D é b r a n c h e z t o u j o u r s. L a m a c h i n e d e l alimentation électrique en retirant la fiche de la prise murale. Changing the needle 1. Raise the needle bar to its highest position by turning the hand wheel toward you. 2. Loosen the needle clamp screw by turning it toward you. 3. Remove the needle by pulling it downward. 4. Insert the new needle into the needle clamp with the flat side toward the back. Changement d aiguille 1. Relever la barre à aiguille à sa position la plus haute en tournant le volant vers vous. 2. Desserrer la vis du serre-aiguille. 3. Enlever l aiguille en la tirant vers le bas. 4. Insérer la nouvelle aiguille dans le serre- aiguille, avec le côté plat à l arrière. 5. Pousser l aiguille vers le haut, jusqu à la butée. 6. Resserrer la vis du serre-aiguille fermement. 5. Push the needle up as far as it can go. 6. Tighten the needle clamp screw firmly with the screw driver. 109
110 PERFORMANS KONTROL LİSTESİ GENEL SORUNLAR Makine dikmiyor. * Elektrik düğmesi kapalıdır. - Düğmeyi açın. Makine tekliyor/sarsılıyor. * İplik, çağanoza takılmıştır. - Çağanozu temizleyin (bkz. sayfa ) * İğne hasarlıdır. - İğneyi değiştirin (bkz. sayfa ) Kumaş hareket etmiyor. * Baskı ayağı indirilmemiştir baskı ayağını indirin. * Transport dişlisi indirilmiştir (bkz. sayfa ). DİKİŞ SORUNLARI Makine dikiş atlıyor. * İğne, iğne kelepçesine tam girmemiştir. - Bkz. sayfa * İğne eğilmiş veya körelmiştir. - İğneyi değiştirin (bkz. sayfa ) * Makineye iplik doğru takılmamıştır. - Bkz. sayfa * İplik, çağanoza takılmıştır. - Çağanozu temizleyin (bkz. sayfa ) Dikişler düzensizdir. * İğne, iplik ve kumaş için uygun değildir. - Bkz. sayfa * Makineye iplik doğru takılmamıştır. - Bkz. sayfa * Üst iplik tansiyonu çok gevşektir. - Bkz. sayfa * Kumaş çekiliyor veya makine besleme hareketine karşı itiliyor. - Hafifçe yönlendirin. * Masura dengeli sarılmamıştır. - Masurayı tekrar sarın. (bkz. sayfa 14-15) İğne kırılır. * Kumaş çekiliyor veya makine besleme hareketine karşı itiliyor. - Hafifçe yönlendirin. * İğne, iplik ve kumaş için uygun değildir. - Bkz. sayfa * İğne, iğne kelepçesine tam girmemiştir (Bkz. sayfa ). İPLİK SORUNLARI İplik dolanır. * Dikişe başlamadan önce üst ve masura iplikleri, baskı ayağının altına çekilmemiştir. - Her iki ipliği de yaklaşık 4 inç (10 cm) baskı ayağının altına çekin ve birkaç dikiş oluşuncaya kadar tutun. (bkz. sayfa 22-23) İğne ipliği kopuyor. * Makineye iplik doğru takılmamıştır. - Bkz. sayfa * Üst iplik tansiyonu çok sıkı. - Bkz. sayfa * İğne eğilmiş. - İğneyi değiştirin (bkz. sayfa ) * İğne, iplik ve kumaş için uygun değildir - Bkz. sayfa Masura ipliği kopuyor. * Masura yuvasına iplik doğru takılmamıştır. Bkz. sayfa * Bobin yuvasında ve çağanozda tüy birikiyor. - Tüyleri temizleyin (bkz. sayfa ) Kumaş büzüşüyor. * Üst iplik tansiyonu çok sıkı. - İplik tansiyonunu ayarlayın (bkz. sayfa ). * İnce veya yumuşak kumaş için dikiş uzunluğu çok uzundur. (bkz. sayfa 24-27) 110
111 PERFORMANCE CHECKLIST GENERAL PROBLEMS Machine does not sew. * Power switch is turned off.- Turn on the switch (see page 10-11). * Buttonhole lever is not raised when sewing stitch patterns. Raise buttonhole lever (see page 62-65). * Buttonhole lever is not lowered when sewing buttonhole. Lower buttonhole lever (see page 62-65). Machine jams/knocks. * Thread is caught in hook. - Clean hook (see page ). * Needle is damaged. - Replace needle (see page ). Fabric does not move. * Presser foot is not lowered - Lower presser foot (see page ). * Stitch length is too short - Lengthen stitch length (see page 24-27). * Feed dogs are lowered - Raise feed dogs (see page ). STITCHING PROBLEMS Machine skips stitches. * Needle is not all the way up into needle clamp. - See page * Needle is bent or blunt. - Replace needle (see page ). * Machine is not threaded correctly. - See page * Thread is caught in hook. - Clean hook (see page ). Stitches are irregular. * Needle size is not correct for thread and fabric. - See page * Machine is not threaded correctly. - See page * Top thread tension is too loose. - See page * Fabric is being pulled or pushed against machine feeding action. - Guide it gently. * Bobbin has not been wound evenly. - Rewind bobbin (see page 14-15). Needle breaks. * Fabric is being pulled or pushed against machine feeding action. - Guide it gently. * Needle size is not correct for thread and fabric. - See page * Needle is not all the way up into the needle clamp. - See page VÉRIFICATION DES PETITS PROBLÈMES DE COUTURE PROBLÈMES GENERAUX La machine ne coud pas: * L interrupteur est hors fonction. L activé (voir page 10-11) * Le levier pour boutonnière n est pas relevé lorsque vous cousez des motifs de points. - Relevez le levier pour boutonnière (voir page 62-65). * Le levier pour boutonnière n est pas abaissé lorsque vous cousez une boutonnière. - Abaissez le levier pour boutonnière (voir page 62-65). La machine est coincer: * Le fil est cassé dans le crochet - le netoyer (voir page ). * L aiguille est endommagée - remplacer l aiguille (voir page ). Le tissu n avance pas: * Le pied presseur n est pas abaissé - l abaisser (voir page ). * La longueur du point est trop courte - l augmenter (voir page 24-27). * Les griffes d'entraînement sont abaissées - Relevez les griffes (voir page ). PROBLÈMES DE COUTURE La machine saute des points: * L aiguille n est pas bien insérée - Voir page * L aiguille est courbée ou épointée - la changer (voir page ). * La machine n est pas correctement enfilée - Voir page * Le fil est cassé dans le crochet - le nettoyer (voir page ). Les points sont irréguliers: * La grosseur de l aiguille n est pas correcte pour le fil et le tissu - Voir page * La machine n est pas enfilée correctement - Voir page * La tension supérieure est trop lâche - Voir page * Le tissu est tiré ou poussé dans le sens inverse des griffes-le guider correctement. * La canette n a pas été enroulée régulièrement - la refaire (voir page 14-15). L aiguille casse: * Le tissu est tiré ou poussé dans le sens inverse des griffes - le guider correctement. * La grosseur de l aiguille n est pas correcte pour le fil et le tissu (voir page ). * L aiguille n est pas bien insérée - Voir page THREAD PROBLEMS Thread bunches. * Top and bobbin threads are not drawn back under presser foot before starting seam. - Draw both threads back under presser foot about 4 inches (10 cm) and hold until a few stitches are formed (see page 22-23). Needle thread breaks. * Machine is not threaded correctly. - See page * Top thread tension is too tight. - See page * Needle is bent. - Replace needle (see page ). * Needle size is not correct for thread and fabric - See page Bobbin thread breaks. * Bobbin case is not threaded correctly. - See page * Lint accumulates in bobbin case or hook. - Remove lint (see page ). Fabric puckers. * Top thread tension is too tight. - Adjust thread tension (see page ). * Stitch length is too long for sheer or soft fabric. - Shorten stitch length (see page 24-27). PROBLÈMES DE FIL Les fils s emmêlent: * Les fils supérieur et inférieur ne sont pas tirés sous le pied presseur et vers l arrière, avant de commencer les coutures - les maintenir pendant quelques points (voir page 22-23). Le fil de l aiguille casse: * La machine n est pas correctement enfilée - Voir page * La tension du fil supérieur est trop serrée - Voir page * L aiguille est tordue - remplacer l aiguille (voir page ). * La grosseur de l aiguille n est pas correcte pour le fil et le tissue - Voir page Le fil de la canette casse: * La boîte à canette n est pas enfilée correctement - Voir page * La bourre du tissu s est accumulée dans la boîte à canette ou la coursière - l enlever (voir page ). Le tissu fronce: * La tension du fil supérieur et inférieur est trop serrée - l ajuster (voir page ). * La longueur du point est trop longue pour les tissus légers et fins - la réduire (voir page 24-27). 111
112 1 (1) 2 3 (2) 4 (A) (B) 5 (3) (4) 112
113 CLEANING AND OILING HOOK AREA AND FEED DOGS NETTOYAGE DES GRIFFES ET DU CROCHET CAUTION Always disconnect the machine from power supply by removing the plug from the wall-outlet. ATTENTION Débranchez toujours la machine de l alimentation électrique en retirant la fiche de la prise murale. To ensure the best possible operation of your machine, it is necessary to keep the essential parts clean at all times. 1. Raise the needle to its highest position. Pour assurer les meilleures conditions de travail à votre machine, il est nécessaire de garder les pièces essentielles toujours propres. Toujours débrancher la machine de la prise. 1. Relever l aiguille à sa position la plus haute. 2. Remove the needle plate (1). 2. Retirez la plaque aiguille (1). 3. Remove the bobbin case (2). 3. Retirez le boîtier à canette (2). 4. Clean the feed dogs and hook area with the lint brush. Put one drop of sewing machine oil on the hook race as indicated by the arrows. (A, B) 4. Nettoyer les griffes et le crochet avec le pinceau. Mettre une goutte d huile pour machine à coudre sur le doigt au centre de la coursière, comme indiqué par les flèches (A,B). 5. Replace the bobbin case with the projection (3) positioned against the spring (4). Replace the needle plate. 5. Replacez le boîtier à canette avec la butée (3)positionnée contre le ressort (4). Replacez la plaque aiguille. 113
114 ALIN KAPAĞININ YAĞLANMASI 1. İki vidayı ve alın kapaðýný çýkarýn. 2. Oklarla belirtilen noktalara bir damla dikiş makinesi yağı damlatın. 1 Screw Vis Guia Face cover Plaque frontale Cubierta frontal Faydalı İpuçları: Sık kullanılan makine için: Düzenli olarak yağlanmalıdır. Uzun bir aradan sonra kullanılan makine için: Kullanılmadan önce yağlanmalıdır. DİKKAT : Yağlamadan önce daima tozu ve tüyleri temizleyin. En iyi sonuçlar için, daima SINGER Marka Dikiş Makinesi Yağı kullanın. Dikiş Makinesi Yağı dışındaki bir yağın kullanılması makinenin hasar görmesine neden olacaktır
115 OILING INSIDE THE FACE COVER 1. Remove two screws and face cover. 2. Put one drop of sewing machine oil to the points indicated by arrows. GRAISSAGE DANS LA PLAQUE FRONTALE 1. Retirez les deux vis et la plaque frontale. 2. Mettez une goutte d huile pour machine à coudre sur les points indiqués par les flèches. Helpful Hints : For the machine used frequently : It should be oiled periodically. For the machine used after a long interval : It should be oiled before it is used. Conseils utiles : Pour une machine utilisée fréquemment : graissage périodique obligatoire. Pour une machine non utilisée depuis longtemps : graissage avant utilisation. CAUTION: Always remove the dust and lint before oiling. ATTENTION! Nettoyez toujours la poussière et les peluches avant le graissage. For best results always use SINGER Brand Sewing Machine Oil. Use of oil other than Sewing Machine Oil will cause damage to your machine. Pour obtenir les meilleurs résultats, utilisez l huile pour machine à coudre SINGER. L utilisation d une autre marque d huile peut endommager votre machine. 115
116 ÖZEL AKSESUARLAR SATEN DİKİŞ AYAĞI Saten dikiş ayağı, yoğun dikişlerin altından kolayca geçmesi için oluk biçimindedir. Bu ayak saten dikişlerin dikilmesi için ve Düz Dikiş dikerken Genel Amaçlı Ayağın bir alternatifi olarak kullanılır. Yakın mesafeli zig-zag dikişlere saten dikişler denir. Bu, özellikle aplike ve punteriz için kullanılan etkileyici bir dikiştir. Saten dikiş için, üst ipliği hafif gevşetin. Çok ince kumaşlarda büzülmeyi önlemek için bir selpak mendil veya astar kullanın. ÇİFT İĞNE Çift iğne, nervür, çift üst dikiş ve dekoratif dikiş için iki paralel dikiş sırası üretir. Singer Marka 3mm (2025 Tipi) Çift İğnenin kullanı lması tavsiye edilir. Çift iğne, istek üzerine satın alınabilir. İĞNE İPLİĞİNİN TAKILMASI 1. Her bir iplik makarasına bir makara yerleştirin. İki ipliği bir iplik olarak takın. Bir ipliği, her iki iğneden önden arkaya doğru geçirin. 2. Masura ipliğini, tek iğneli dikişte olduğu gibi tutun. Her üç ipliği baskı ayağının altından makinenin arka tarafına doğru çekin ve iplikte 15 cm kadar pay bırakın. NOT: İğne iplik takıcı, çift iğne ipliğini takmak için kullanılamaz. Faydalı İpuçları: 1. Bir desen seçmeden önce daima Çift İğ- ne Modunu seçin. Bu, çift iğnenin kırılması nı önleyecektir. 2. Makinenin kapatılması, normal dikiş moduna dönülmeyi sağlayacaktır. Çift İğne, sadece Çift İğne Düğmesi kırmızı yandı- ğı zaman aktif olacaktır. 116
117 SPECIAL ACCESSORIES SATIN STITCH FOOT The Satin stitch foot is grooved on the bottom to permit dense stitching to pass under it easily. It is most useful for sewing satin stitches. It can also be used as an alternative to the General Purpose Foot when sewing stretch stitches. Closely spaced zig-zag stitches are called satin stitches. This is an attractive stitch used primarily for appliqueing and bar tacking. Slightly loosen top thread tension for satin stitching. Use a backing of stabilizer or interfacing to avoid puckering. ACCESSOIRES SPÉCIALES PIED POUR POINT BOURDON Le dessous du pied pour point bourdon est doté de rainures afin que les points serrés puissent passer facilement par dessous. Il convient bien pour la couture de points bourdon et comme remplacement pour le pied universel lors de la couture de points extensible. Les points zigzag serrés sont appelés points bourdon. Ils conviennent bien au brides et aux appliqués. Pour le point bourdon, diminuer légèrement la tension du fil supérieur. Utiliser un entoilage pour les tissus très fins afin d éviter la formation de fronces. TWIN NEEDLE A twin-needle produces two rows of parallel stitches for pin tucks, double top stitching and decorative sewing. When using twin-needles, the stitch width should never be set above twin needle mark, regardless of the stitch you have selected. Doing so will result in broken needles and possible damage to your machine. Use of a Singer Brand twin needle (Style 2025) is strongly recommended. AIGUILLE JUMELÉE Cette aiguille procure deux rangées de points parallèles pour les nervures, les coutures de recouvrement à plat et des effets décoratifs. L utilisation d une aiguille jumelée de 3 mm de la marque Singer (Style 2025) est fortement recommandée. L aiguille double est un accessoire en option The twin needle is an optional purchase. THREADING THE TWIN NEEDLE 1. Place a spool on each spool pin. Thread the two threads as one. Draw one thread through each needle from front to back. 2. Pick up bobbin thread as for single needle sewing. Pull the three threads together under the presser foot to the back of the machine, leaving about 6 (15 cm) clear. NOTE: Needle threader cannot be used to thread the twin needle. ENFILAGE DE L AIGUILLE JUMELÉE 1. Placer une bobine de fil sur chaque porte bobine. Procèder à l enfilage comme si vous n aviez qu un fil jusqu aux guides fil de l aiguille. Passez un fil dans chaque guide fil et dans chaque aiguille d avant en arrière. 2. Tenir les deux fils dans votre main gauche et faire accomplir au volant un tour complet. Tirer les deux fils vers le haut pour faire remonter le fil de la canette. Passer ces trois fils sous le pied presseur et laisser dépasser à l arrière de celui-ci 6 (15 cm). REMARQUE: Il est impossible d utiliser l enfile-aiguille pour enfiler l aiguille jumelée. Helpful Hints: 1. Always select the Twin Needle Mode prior to selecting a pattern. This will preclude any possibility of the twin needle breaking. 2. Turning off the machine returns the machine to normal sewing mode. Twin Needle is only active when the Twin Needle Switch is lit red. Suggestions utiles: 1. Sélectionnez toujours le mode Aiguille jumelée avant de sélectionner un motif. Ceci évitera toute cassure de l aiguille jumelée. 2. Lorsque vous éteignez la machine, celle-ci revient en mode de couture normale. L aiguille jumelée est activée uniquement quand le commutateur d aiguille jumelée est allumé en rouge. 117
118 FAYDALI MESAJLAR Numara göstergesinde On number display Sur l écran numéraire Bilgisayar ekranında On PC screen Sur l écran de PC Mesajlar kontrol panelinin rakam göstergesinde ve/veya bilgisayar ekranında görünür. Bir mesaj göründüğünde, mesajda belirtilen talimatları takip ederek sorunu çözün. Sorun giderildikten sonra mesaj kaybolacaktır. USB kablosu bağlanmamış. USB kablosunu kullanarak bilgisayarı dikiş makinesine bağlayın. İğne ipliğinin kopması veya yanlış iplik takma durumu algılandı. İpliği kontrol edin. Baskı ayağı indirilmemiş. Baskı ayağı kaldırma kolunu indirerek baskı ayağını indirin. İlik açma kolu indirilmemiş veya kaldırılmamış. İlik açarken ilik açma kolunu indirin. Dikiş dikerken ilik açma kolunu kaldırın. SAFTY DEVICE ACTIVATED İplik mekiğe dolandığından veya dönme engellendiğinden, makine kilitlenmiş. Açma/kapatma düğmesini kapatın ve makinenin durmasına neden olan sorunu ortadan kaldırın. Dikiş sırasında masura sarıcı sağ tarafa gitmiş (çalışma konumu). Masura sarıcısını kontrol edin ve sola doğru itin. Büyük kasnak tasarımı iletildiği halde küçük kasnak takılmış. Açma/kapatma düğmesini kapatın ve büyük kasnağı takın. 118
119 HELPFUL MESSAGES Messages are displayed on number display of control panel and/or PC screen. When a message is displayed, fix the problem following the instruction in the message. The message will disappear, once the problem has been fixed. USB cable is not connected. Connect your PC to the sewing machine with USB cable. MESSAGES D AIDE Les messages apparaissent sur l écran numéraire de l écran de contrôle et/ou l écran de PC.Lorsqu un message apparaît, résolvez le problème en suivant les instructions du message. Le message disparaît une fois que le problème a été résolu. Le câble USB est déconnecté. Branchez votre ordinateur à la machine à coudre FUTURA à l aide du câble USB. Needle thread breakage or incorrectly threaded condition is detected. Check threading. Le fil de l aiguille est cassé ou l enfilage est incorrect. Refaire l enfilage. Presser foot is not lowered. Lower presser foot by lowering presser foot lifter. Le pied presseur est levé. Baisser le pied presseur en abaissant le releveur. Buttonhole lever is not lowered or raised. Lower buttonhole lever when sewing buttonholes. Raise buttonhole lever when sewing stitch patterns. La tige à boutonnière n est pas levée ou baissée. Baisser la tige pour réaliser une boutonnière. Lever la tige pour coudre. Machine is locked up due to thread entangled with bobbin case or rotation interrupted forcibly. Turn off power switch and eliminate the problem that caused the machine to stop. La machine est bloquée parcequ il y a du fil autour du boitier à canettes qui empêche la rotation. Eteindre la machine et éliminer le problème qui cause l arrêt de la machine. Bobbin winder is moved to right (operating position) during sewing. Check bobbin winder and move it to left. L axe de bobinoir est en fonction de bobinage pendant la couture. Pousser l axe du bobinoir vers la gauche. Small hoop is attached when design for large hoop is transmitted. Turn off power switch and attach large hoop. Le petit cadre à broder est installé alors que c est un motif pour le grand cadre qui est transmis. Eteindre la machine et mettre le grand cadre. 119
120 Numara göstergesinde On number display Sur l écran numéraire Bilgisayar ekranında On PC screen Sur l écran de PC Pedal fişinin kablo soketine yabancı maddeler girmiş. Yabancı maddeyi çıkarın. Çift iğne kabiliyeti olmayan desenler seçildiği halde, çift iğne modu düğmesine basılmış. Düğmeye tekrar basın. Küçük kasnak bağlanmış nakış cihazı takılmış. Nakış cihazını ve küçük kasnağı sökün ve nakış cihazını yeniden takın veya küçük kasnağı sökün ve açma/kapatma düğmesini kapatıp yeniden açın. Nakış dikişine başlandığında iğne indirilmiş. Volanı kendinize doğru çevirerek iğneyi kaldırın. Dikiş desenleri dikerken pedal fişi takılıp çıkarılmış. Dikiş sırasında fişe dokunmayın. Nakış dikişi tamamlandı. Kabloyu ve açma/kapatma düğmesini kontrol edin. USB kablosunun bağlandığını ve açma/kapatma düğmesinin açıldığını kontrol edin. Masura sarıcı çalışıyor. 120
121 Foreign particle is inserted into cord socket for foot control plug. Remove foreign particle. Twin needle mode switch is pushed, while patterns without twin needle capability are selected. Push the switch again. Des particules étrangères sont insérées dans la prise du cordon du rhéostat. Retirer les particules étrangères. La touché aiguille double est active alors que le point choisi ne peut être réalisé avec une aiguille double. Appuyer sur le bouton encore une fois. Embroidery unit is installed with small hoop attached. Remove embroidery unit and small hoop and then reattach embroidery unit or remove small hoop and turn off and on power switch. Le kit brodeur est installé avec le petit cadre à broder. Retirer le Kit brodeur et le petit cadre et réinstaller le kit brodeur ou retirer le petit cadre et éteindre et rallumer la machine. Needle is lowered when starting embroidery sewing. Raise needle by rotating hand wheel toward you. L aiguille est levée en début de broderie. Baisser l aiguille en tournant le Volant vers vous. Foot control plug is pushed in and pulled out while sewing patterns. Don t touch the plug while sewing. Le rhéostat est branché et débranché pendant la couture. Ne pas toucher à la prise pendant la couture. Embroidery sewing is completed. La broderie est terminée. Check cable and power switch. Check that USB cable is connected and power switch is turned on. Vérifiez le câble et l interrupteur d alimentation. Vérifiez si le câble USB est bien branché et si l interrupteur d alimentation est bien allumé. Bobbin winder is in operation. Le bobineur est en train de fonctionner. 121
122 Danisma Bilgi hatt : Hatti: ÜRETİCİ HRACATÇI FİRMA / ÜRET C : F RMA: SINGER SOURCING LTD. için JAGUAR C/O Singer INTERNATIONAL Logistics Pte. Ltd. CORPORATION Adres 371 Beach : Road SATA HIGASHI-MACHI Keypoint MORIGUCHI-CITY, Singapore OSAKA Tel: , JAPAN Fax: tarafından üretilmiştir THALATÇI F RMA: SINGER S NGER DIKIS D K fi MAKINALARI MAK NALARI T CARET A. fi. TICARET CENTRUM ANONIM fi MERKEZ SIRKETI AYDINEVLER Ayd nevler Sanayi MAH. Cad. SANAYI No: 3CAD. No CENTRUM Küçükyal / IS STANBUL MERKEZI KUCUKYALI, Tel: (0216) 519 MALTEPE ISTANBUL TURKEY Kullan m Ömrü 10 Y ld r TÜRKÇE / ENGLISH / FRANÇAIS Part No /07 (6) F-4
123 CE-250/CE-350 KULLANIM KILAVUZU INSTRUCTION MANUAL MANUEL D INSTRUCTION
124 Bir elektrikli cihazı kullanırken, aşağıdakiler de dahil, temel güvenlik önlemlerine mutlaka uyulmalıdır: TEHLİKE- Elektrik çarpması riskini azaltmak için: 1. Bu dikiş makinesi, asla fişi prize takılı olarak bırakılmamalıdır. Makineyi kullandıktan hemen sonra ve temizlemeden önce mutlaka fişi prizden çekin. UYARI- Yanma, yangın, elektrik çarpması veya yaralanma riskini azaltmak için: 1. Makinenin bir oyuncak olarak kullanılmasına izin vermeyin. Bu makine çocuklar tarafından veya onların yakınında kullanıldığında aşırı dikkat edilmelidir. 2. Bu makine, sadece bu kullanım kılavuzunda belirtilen amaçlar için kullanılmalıdır. Sadece üretici tarafından tavsiye edilen ve bu kullanım kılavuzunda belirtilen yardımcı donanımları kullanın. 3. Kablo veya fiş hasarlı ise, makine düzgün çalışmıyorsa, düşürülmüş veya hasar görmüşse ya da suyun içine düşmüşse asla bu makineyi çalıştırmayın. Kontrol, onarım, elektrik veya mekanik ayarlama için makineyi en yakın yetkili servise götürün. 4. Makineyi asla havalandırma delikleri kapalıyken çalıştırmayın. Toz, tüy ve bol elbiseleri makinenin havalandırma deliklerinden ve ayak pedalından uzak tutun. 5. Deliklere herhangi bir şey sokmayın. 6. Makineyi evin dışında kullanmayın. 7. Aeorosol (sprey) ürünlerin kullanıldığı veya oksijenin bulunduğu yerlerde makineyi çalıştırmayın. 8. Kapatmak için, düğmeyi kapatın ( 0 ) ve ardından fişi prizden çekin. 9. Fişi prizden çekerken kablodan tutmayın. Fişi çekmek için, kablodan değil, fişten tutun. 10. Parmaklarınızı hareketli parçalardan uzak tutun. Dikiş makinesinin iğnesi çevresinde çalışırken aşırı dikkat gereklidir. 11. İğnenin kırılmasına neden olacağından asla hasarlı bir iğne plakasını kullanmayın. 12. Bükülmüş iğneleri kullanmayın. 13. Dikiş yaparken kumaşı itmeyin veya çekmeyin. Aksi takdirde, iğne kırılabilir. 14. İğne bölgesinde iğneye iplik takma, iğneyi değiştirme, masuraya iplik sarma veya baskı ayağını değiştirme gibi işlemleri yapmadan önce makineyi kapatın ( 0 konumu). 15. Kapakları çıkartırken, yağlama yaparken veya kullanım kılavuzunda belirtilen herhangi bir ayarlama işlemini yaparken daima fişi prizden çekin. DİKKAT- ÖNEMLİ GÜVENLİK TALİMATLARI Hareketli parçalar- Yaralanma tehlikesini azaltmak için, bakım yapmadan önce makineyi kapatın. Makineyi çalıştırmadan önce kapağı kapatın. Ürünün enerji tüketimi açısından verimli kullanımına ilişkin bilgiler ; Sürekli ve yoğun kullanımlarda makinenizi belli aralıklarla dinlendiriniz. Makinenizi ısı kaynaklarından (direk güneş ışığı, soba, radyatör, kalorifer peteği vb ) koruyunuz. Makinenizi çalıştırdığınız yerdeki elektrik voltajını sık sık kontrol ediniz ve makinenizi şebekeden kaynaklanabilecek elektrik dalgalanmalarından koruyunuz. Eğer bulunduğunuz bölgede şebeke elektriğinde voltaj düşmesi yada yükselmesi gibi problemler yaşıyorsanız. Makinenizin bulunduğu yere regülatör taktırmanız makinenizi verimli kullanabilmenize yardımcı olacaktır. Makinenizin bakım ve temizlik işlemlerini mutlaka zamanında yapınız. Makinenizi mutlaka kullanma klavuzunda tarif edilen şekilde çalıştırınız. BU TALİMATLARI SAKLAYIN Bu dikiş makinesi, evde kullanım için tasarlanmıştır. AYAK PEDALI Bu makine ile Yamamoto Elektrikli Model YC-485EC ayak pedalını kullanın. Bu cihaz, elektromanyetik uyumluluk ile ilgili EEC Direktifi 2004/108/EC ye uygundur. Bu ürünün elektronik parçalarının geri dönüşümü (recycling) hakkında bulunduğunuz ülkenin bu konuda geçerli kanun hükümlerine mutlaka dikkat etmelisiniz. Bu konuda kararsız iseniz bayiinizle irtibat kurunuz. SINGER, Singer Company Ltd. veya iştiraklerinin tescilli markasıdır Singer Company Ltd. veya iştirakleri. Tüm hakları saklıdır. F-2
Thank you for choosing the Mobile Broadband USB Stick. With your USB Stick, you can access a wireless network at high speed.
 Thank you for choosing the Mobile Broadband USB Stick. With your USB Stick, you can access a wireless network at high speed. Note: This manual describes the appearance of the USB Stick, as well as the
ASSEMBLY INSTRUCTIONS DIRECTIVES POUR L'ASSEMBLAGE ombre pendant lamp lampe suspendue à tons dégradés, chocolat
 ASSEMBLY INSTRUCTIONS DIRECTIVES POUR L'ASSEMBLAGE ombre pendant lamp lampe suspendue à tons dégradés, chocolat SKU 2728089 INSTRUCTIONAL MANUAL MANUEL D'INSTRUCTIONS 270/2707 COMPONENT LIST LISTE DES
ASSEMBLY INSTRUCTIONS DIRECTIVES POUR L'ASSEMBLAGE luster chandelier lamp chandelier à trois branches en verre lustré
 ASSEMBLY INSTRUCTIONS DIRECTIVES POUR L'ASSEMBLAGE luster chandelier lamp chandelier à trois branches en verre lustré SKU 2711592 INSTRUCTIONAL MANUAL MANUEL D'INSTRUCTIONS 270/2707 COMPONENT LIST LISTE
Folio Case User s Guide
 Fujitsu America, Inc. Folio Case User s Guide I N S T R U C T I O N S This Folio Case is a stylish, lightweight case for protecting your Tablet PC. Elastic Strap Pen Holder Card Holders/ Easel Stops Figure
ENGLISH 4 FRANÇAIS 6 ESPAÑOL 8
 SY ENGLISH 4 FRANÇAIS 6 ESPAÑOL 8 ENGLISH How to lubricate the sewing machine Warning! Always switch off the machine and disconnect it from the power supply before lubricating the sewing machine. 1 Always
GIGABIT PCI DESKTOP ADAPTER DGE-530T. Quick Installation Guide+ Guide d installation+
 GIGABIT PCI DESKTOP ADAPTER Quick Installation Guide+ Guide d installation+ Check Your Package Contents Quick Installation Guide Gigabit Ethernet PCI Adapter CD with Manual and Drivers DO NOT insert the
Parts List Lista de Piezas Liste de pi ces
 Parts List Lista de Piezas Liste de pi ces - AUTO + Line/L nea/line 5 /10 Stitches / Puntos / Points - AUTO + Line/L nea/line 6 / 12 / 20 / Stitches / Puntos / Points A registered trademark of The Singer
03/2013. Mod: WOKI-60IP/TR. Production code: DTWIC 6000
 03/2013 Mod: WOKI-60IP/TR Production code: DTWIC 6000 ENCASTRABLE INDUCTION DROP IN INDUCTION 11/2011 TECHNICAL FEATURES DOCUMENTATION S.A.V. Notice d utilisation : FX00326-A Guide d intervention : ---
Guide d'installation rapide TFM-560X YO.13
 Guide d'installation rapide TFM-560X YO.13 Table of Contents Français 1 1. Avant de commencer 1 2. Procéder à l'installation 2 Troubleshooting 6 Version 06.08.2011 16. Select Install the software automatically
Lavatory Faucet. Instruction Manual. Questions? 1-866-661-9606 [email protected]
 Lavatory Faucet Instruction Manual rev. 19-01-2015 Installation Manual You will need Adjustable Wrench Adjustable Pliers Plumber s Tape Hardware list (included) Allen Key Socket wrench tool Important Follow
Garage Door Monitor Model 829LM
 Garage Door Monitor Model 829LM To prevent possible SERIOUS INJURY or DEATH from a closing garage door: NEVER permit children to operate or play with door control push buttons or remote control transmitters.
How to Login to Career Page
 How to Login to Career Page BASF Canada July 2013 To view this instruction manual in French, please scroll down to page 16 1 Job Postings How to Login/Create your Profile/Sign Up for Job Posting Notifications
Logitech Tablet Keyboard for Windows 8, Windows RT and Android 3.0+ Setup Guide Guide d installation
 Logitech Tablet Keyboard for Windows 8, Windows RT and Android 3.0+ Setup Guide Guide d installation English.......................................... 3 Français.........................................
Notice Technique / Technical Manual
 Contrôle d accès Access control Encodeur USB Mifare ENCOD-USB-AI Notice Technique / Technical Manual SOMMAIRE p.2/10 Sommaire Remerciements... 3 Informations et recommandations... 4 Caractéristiques techniques...
R.V. Table Mounting Instructions
 PTSS165 ACCESSORY MOUNTING INSTRUCTIONS Use these instructions in conjunction with your main manual to properly assemble your gas grill. Refer to the main manual for safety, operating, cleaning and maintenance
Contents Windows 8.1... 2
 Workaround: Installation of IRIS Devices on Windows 8 Contents Windows 8.1... 2 English Français Windows 8... 13 English Français Windows 8.1 1. English Before installing an I.R.I.S. Device, we need to
Fabricant. 2 terminals
 Specifications Fabricant Nominal torque (Nm) 65 Minimal torque (Nm) 0,63 Coil resistance - 20 C (ohms) 20 Rated current DC (A) 1 Rotor inertia (kg.m 2 ) 2.10-3 Weight (kg) 7,20 Heat dissipation continuous
SA-32 / SA-62 INSTRUCTION MANUAL - MANUEL D INSTRUCTIONS
 SA-32 / SA-62 INSTRUCTION MANUAL - MANUEL D INSTRUCTIONS 4 5 6 7 4 5 6 7 1. Telephone Paging Volume Control 1. Contrôle de volume Paging Téléphone 2. Microphone Volume Control 2. Contrôle volume du microphone
Package Contents. System Requirements. Before You Begin
 Package Contents DWA-125 Wireless 150 USB Adapter CD-ROM (contains software, drivers, and manual) Cradle If any of the above items are missing, please contact your reseller. System Requirements A computer
Contrôle d'accès Access control. Notice technique / Technical Manual
 p.1/18 Contrôle d'accès Access control INFX V2-AI Notice technique / Technical Manual p.2/18 Sommaire / Contents Remerciements... 3 Informations et recommandations... 4 Caractéristiques techniques... 5
WEB page builder and server for SCADA applications usable from a WEB navigator
 Générateur de pages WEB et serveur pour supervision accessible à partir d un navigateur WEB WEB page builder and server for SCADA applications usable from a WEB navigator opyright 2007 IRAI Manual Manuel
Once the installation is complete, you can delete the temporary Zip files..
 Sommaire Installation... 2 After the download... 2 From a CD... 2 Access codes... 2 DirectX Compatibility... 2 Using the program... 2 Structure... 4 Lier une structure à une autre... 4 Personnaliser une
Guide d installation Deco Drain inc. DD200
 Guide d installation Deco Drain inc. DD200 Pour plus informations et pour télécharger les guides d installation en couleur, visitez notre site web. www.decodrain.com Soutien technique : Composez le : 514-946-8901
Stainless Steel Solar Wall Light
 V 2.9 Stainless Steel Solar Wall Light User Manual Please read and understand all instructions before use.retain this manual for future reference. V 2.9 Stainless Steel Solar Wall Light SPECIFICATIONS
WINTER BOAT STORAGE SYSTEM SYSTÈME DE REMISAGE HIVERNAL POUR BATEAU
 MANUAL / MANUEL VIDEO WINTER BOAT STORAGE SYSTEM SYSTÈME DE REMISAGE HIVERNAL POUR BATEAU ASSEMBLY INSTRUCTIONS GUIDE D ASSEMBLAGE NAVIGLOO 14-18½ ft/pi FISHING BOAT! RUNABOUT! PONTOON BOAT! SAILBOAT (SAILBOAT
Instructions Mozilla Thunderbird Page 1
 Instructions Mozilla Thunderbird Page 1 Instructions Mozilla Thunderbird Ce manuel est écrit pour les utilisateurs qui font déjà configurer un compte de courrier électronique dans Mozilla Thunderbird et
Paxton. ins-20605. Net2 desktop reader USB
 Paxton ins-20605 Net2 desktop reader USB 1 3 2 4 1 2 Desktop Reader The desktop reader is designed to sit next to the PC. It is used for adding tokens to a Net2 system and also for identifying lost cards.
TABLE DES MATIERES A OBJET PROCEDURE DE CONNEXION
 1 12 rue Denis Papin 37300 JOUE LES TOURS Tel: 02.47.68.34.00 Fax: 02.47.68.35.48 www.herve consultants.net contacts@herve consultants.net TABLE DES MATIERES A Objet...1 B Les équipements et pré-requis...2
Logitech Speaker System Z553 Setup Guide Guide d installation
 Logitech Speaker System Z553 Setup Guide Guide d installation Logitech Speaker System Z553 English................. 3 Français................ 10 www.logitech.com/support...19 2 Package contents Logitech
Using a Walker. 2. Move your injured or weak leg toward the walker first. If you have had surgery on both legs, use either leg to begin walking.
 Using a Walker Walking with a Walker 1. Lift the walker and place it at a comfortable distance in front of you with all four of its legs on the floor. This distance is often equal to an arm s length. 2.
Instructions pour mettre à jour un HFFv2 v1.x.yy v2.0.00
 Instructions pour mettre à jour un HFFv2 v1.x.yy v2.0.00 HFFv2 1. OBJET L accroissement de la taille de code sur la version 2.0.00 a nécessité une évolution du mapping de la flash. La conséquence de ce
Quick Setup Guide Guide de configuration rapide. Tablet Device SGPT12 Series Tablette électronique Série SGPT12
 Quick Setup Guide Guide de configuration rapide Tablet Device SGPT12 Series Tablette électronique Série SGPT12 Welcome / Bienvenue Congratulations on your purchase of this Xperia Tablet S. This Quick Setup
Le No.1 de l économie d énergie pour patinoires.
 Le No.1 de l économie d énergie pour patinoires. Partner of REALice system Economie d énergie et une meilleure qualité de glace La 2ème génération améliorée du système REALice bien connu, est livré en
MONTEGO 3 PERSON CUSHION GARDEN SWING WITH CANOPY ASSEMBLY INSTRUCTIONS ITEM# SC-177-2GS
 MONTEGO 3 PERSON CUSHION GARDEN SWING WITH CANOPY ASSEMBLY INSTRUCTIONS ITEM# SC-177-2GS QUESTIONS, PROBLEMS, MISSING PARTS WITH THIS PRODUCT? DO NOT RETURN TO YOUR RETAILER, PLEASE CALL OUR CUSTOMER SERVICE
Start Here Point de départ
 Start Here Point de départ Epson Stylus C88+ Please read these instructions before using the printer. Lisez ces instructions avant d utiliser l imprimante. Install Ink Cartridges Installez les cartouches
User guide Conference phone Konftel 100
 User guide Conference phone Konftel 100 English I Español I Conference phones for every situation Cet emballage contient: 1 x Guide de l utilisateur 1 x Téléphone pour conférences 1 x Transformateur secteur
APPENDIX 6 BONUS RING FORMAT
 #4 EN FRANÇAIS CI-DESSOUS Preamble and Justification This motion is being presented to the membership as an alternative format for clubs to use to encourage increased entries, both in areas where the exhibitor
Warning: Failure to follow these warnings could result in property damage, or personal injury.
 Western Steel & Tube 1 Storage Locker Extended Storage Locker Storage Cabinet Assembly And Use Instructions Warning: Failure to follow these warnings could result in property damage, or personal injury.
WiFi Security Camera Quick Start Guide. Guide de départ rapide Caméra de surveillance Wi-Fi (P5)
") #45 #46 WiFi Security Camera Quick Start Guide Guide de départ rapide Caméra de surveillance Wi-Fi (P5) #47 Start Here 1 Is this you? TECH SUPPORT CTRL ALT DEL 2 If yes, turn to page three 1 3 If not,
#45 #46 WiFi Security Camera Quick Start Guide Guide de départ rapide Caméra de surveillance Wi-Fi (P5) #47 Start Here 1 Is this you? TECH SUPPORT CTRL ALT DEL 2 If yes, turn to page three 1 3 If not,
AND / ET USER GUIDE UK HARDWIRED CONTROL PANEL UK GUIDE UTILISATEUR CENTRALE D ALARME FILAIRE F 496572 1
 AND / ET UK USER GUIDE HARDWIRED CONTROL PANEL UK F GUIDE UTILISATEUR CENTRALE D ALARME FILAIRE 496572 1 English UK Operator Controls and Displays On both control panel and remote keypad the LEDs display
DOCUMENTATION - FRANCAIS... 2
 DOCUMENTATION MODULE SHOPDECORATION MODULE PRESTASHOP CREE PAR PRESTACREA INDEX : DOCUMENTATION - FRANCAIS... 2 INSTALLATION... 2 Installation automatique... 2 Installation manuelle... 2 Résolution des
PARIS ROISSY CHARLES DE GAULLE
 GPS 2 34 1 E 49 0 46 N GPS* 2 56 56 E 49 0 12 N Votre contact / Your contact: et / and: Accueil : Cabines téléphoniques publiques Reception: Public telephone kiosks Navette Shuttle AÉROPORT DE TT CAR TRANSIT
ARP-090G / ARP-090K NOTICE D'EMPLOI INSTRUCTION MANUAL
 2 7 NOTICE D'EMPLOI INSTRUCTION MANUAL ARP-090G / ARP-090K Lire attentivement la notice avant d utiliser l appareil Before operating this product, please read user manual completely FRANCAIS EMPLACEMENT
My Custom Design ver.1.0
 My Custom Design ver.1.0 Logiciel de création de données de broderie Mode d emploi Avant d utiliser ce logiciel, veuillez lire attentivement ce mode d emploi pour bien l utiliser correctement. Conservez
MODE D EMPLOI USER MANUAL
 notice_cd 853:notice 9/01/08 15:08 Page 1 CAFETIÈRE À DOSETTES Coffee pad machine CD 853 GIACOMO MODE D EMPLOI USER MANUAL notice_cd 853:notice 9/01/08 15:08 Page 2 FRANÇAIS WHITE & BROWN vous félicite
Z-Axis Compliance Device Compliance en z
 Compensation for different vertical positions Collision recognition in Z-direction Protection of parts and work pieces Monitoring of the insertion forces during assembly operations Monitoring of the picking
Quick Installation Guide TEW-AO12O
 Quick Installation Guide TEW-AO12O Table of of Contents Contents Français... 1 1. Avant de commencer... 1 2. Installation du matériel... 2 3. Montage... 4 Troubleshooting... 6 Version 10.04.2007 1. Avant
that the child(ren) was/were in need of protection under Part III of the Child and Family Services Act, and the court made an order on
 was/were in need of protection under Part III of the Child and Family Services Act, and the court made an order on") ONTARIO Court File Number at (Name of court) Court office address Applicant(s) (In most cases, the applicant will be a children s aid society.) Full legal name & address for service street & number, municipality,
ONTARIO Court File Number at (Name of court) Court office address Applicant(s) (In most cases, the applicant will be a children s aid society.) Full legal name & address for service street & number, municipality,
LOGICIEL D'ADMINISTRATION POUR E4000 & G4000 MANAGEMENT SOFTWARE FOR E4000 & G4000
 LOGICIEL D'ADMINISTRATION POUR E4000 & G4000 MANAGEMENT SOFTWARE FOR E4000 & G4000 TABLE DES MATIÈRES TITRE PAGE Présentation - - - - - - - - - - - - - - - - - - - - - - - - - - - - - - - - - - - -4 Le
Utiliser une WebCam. Micro-ordinateurs, informations, idées, trucs et astuces
 Micro-ordinateurs, informations, idées, trucs et astuces Utiliser une WebCam Auteur : François CHAUSSON Date : 8 février 2008 Référence : utiliser une WebCam.doc Préambule Voici quelques informations utiles
Logitech Wireless Performance Combo MX800 Setup Guide Guide d installation
 Logitech Wireless Performance Combo MX800 Setup Guide Guide d installation Logitech Wireless Performance Combo MX800 Setup Guide Guide d installation Important information Safety, compliance, and warranty
3615 SELFIE. http://graffitiresearchlab.fr HOW-TO / GUIDE D'UTILISATION
 3615 SELFIE http://graffitiresearchlab.fr HOW-TO / GUIDE D'UTILISATION Hardware : Minitel Computer DIN FM545 45 connector (http://www.gotronic.fr/art-fiche-din-fm545-4747.htm) Cable Arduino compatible
NEW Fin Fan / Air cooled condenser cleaning
 Air cooled Condensers ( ACC ) Cleaning Air Cooled heat exchangers ( Finfan) Cleaning Cleaning Services Permanente installation NEW Fin Fan / Air cooled condenser cleaning New and revolutionnary high pressure
SYSTÈME JETS D AIR WISH WISH AIR JETS SYSTEM Système de massage à jets d air pour bains en polymère - Air jet massage system for polymer bathtubs
 SYSTME JETS D AIR WISH WISH AIR JETS SYSTEM Système de massage à jets d air pour bains en polymère - Air jet massage system for polymer bathtubs Manuel d installation - Installation manual 6835, RUE PICARD
Nouveautés printemps 2013
 » English Se désinscrire de la liste Nouveautés printemps 2013 19 mars 2013 Dans ce Flash Info, vous trouverez une description des nouveautés et mises à jour des produits La Capitale pour le printemps
USB 598. Quick Start Guide (Windows) Guide de démarrage rapide (Windows) USB Modem. Modem USB. www.sierrawireless.com
 Guide de démarrage rapide (Windows) USB Modem. Modem USB. www.sierrawireless.com") USB 598 With Avec USB Modem Quick Start Guide (Windows) Modem USB Guide de démarrage rapide (Windows) www.sierrawireless.com This guide provides installation instructions for users of: Windows Vista Windows
USB 598 With Avec USB Modem Quick Start Guide (Windows) Modem USB Guide de démarrage rapide (Windows) www.sierrawireless.com This guide provides installation instructions for users of: Windows Vista Windows
3M HEPA Vacuum 497AJK. User s Guide
 3M HEPA Vacuum 497AJK User s Guide Table of Contents Section Page Safety Instructions...3 Grounding Instructions...5 Specifications...7 To Operate...7 To Replace Filter...8 Parts List...9 Regulatory Statements...9
RULE 5 - SERVICE OF DOCUMENTS RÈGLE 5 SIGNIFICATION DE DOCUMENTS. Rule 5 / Règle 5
 RULE 5 - SERVICE OF DOCUMENTS General Rules for Manner of Service Notices of Application and Other Documents 5.01 (1) A notice of application or other document may be served personally, or by an alternative
POINT DROIT. Pour obtenir le point droit triple renforcé, tournez la molette de longueur de point à la position «S1».
 POINT DROIT Point droit - position d aiguille au centre Tournez le sélecteur de point jusqu à ce que le «A» apparaisse dans la fenêtre d af chage du point. Installez le pied-de-biche standard. Réglez la
Principe de TrueCrypt. Créer un volume pour TrueCrypt
 Sommaire : Principe de TrueCrypt...1 Créer un volume pour TrueCrypt...1 Premier montage...6 Réglages...8 Save Currently Mounted Volumes as Favorite...8 Settings > Preferences...9 TrueCrypt Traveller pour
Contrôle d accès Access control MOD-TCPIP-AI. Notice technique / Technical Manual
 Contrôle d accès Access control MOD-TCPIP-AI Notice technique / Technical Manual Notice technique Mod-TCPIP-AI 9 septembre 2008 v.1.0 p.2/16 Sommaire / Contents Sommaire / Contents...2 Remerciements...3
DOCUMENTATION - FRANCAIS... 2
 DOCUMENTATION MODULE CATEGORIESTOPMENU MODULE CREE PAR PRESTACREA INDEX : DOCUMENTATION - FRANCAIS... 2 INSTALLATION... 2 CONFIGURATION... 2 LICENCE ET COPYRIGHT... 3 SUPPORT TECHNIQUE ET MISES A JOUR...
SERVEUR DÉDIÉ DOCUMENTATION
 SERVEUR DÉDIÉ DOCUMENTATION Release 5.0.6.0 19 Juillet 2013 Copyright 2013 GIANTS Software GmbH, All Rights Reserved. 1/9 CHANGE LOG Correction de bug divers (5.0.6.0) Ajout d une option de relance automatique
Règlement sur le télémarketing et les centres d'appel. Call Centres Telemarketing Sales Regulation
 THE CONSUMER PROTECTION ACT (C.C.S.M. c. C200) Call Centres Telemarketing Sales Regulation LOI SUR LA PROTECTION DU CONSOMMATEUR (c. C200 de la C.P.L.M.) Règlement sur le télémarketing et les centres d'appel
PRESENTATION REMOTE TÉLÉCOMMANDE DE PRÉSENTATION. User Guide Manuel de l utilisateur
 PRESENTATION REMOTE TÉLÉCOMMANDE DE PRÉSENTATION User Guide Manuel de l utilisateur Targus Presentation Remote Introduction Thank you for your purchase of the Targus Presentation Remote. This cordless
Propriétés de la matière. Material properties. Sonde de pression Pressure probe. Ref : 242 013. Français p 1. English p 3.
 Propriétés de la matière Material properties Français p 1 English p 3 Sonde de pression Pressure probe Version : 6010 Propriétés de la matière Sonde de pression 1 Principe et description 1.1 Principe La
Monitor LRD. Table des matières
 Folio :1/6 Table des matières 1.Installation du logiciel... 3 2.Utilisation du logiciel... 3 2.1.Description de la fenêtre de commande... 3 2.1.1.Réglage des paramètres de communication... 4 2.1.2.Boutons
«BOREAL 20» MODE D EMPLOI / USER MANUAL REF 983816 S.A HENRI DEPAEPE
 «BOREAL 20» MODE D EMPLOI / USER MANUAL REF 983816 S.A HENRI DEPAEPE 98 AV., DE STALINGRAD -BP 05-92702 COLOMBES CEDEX FRANCE. L appareil «BOREAL 20» de la société DEPAEPE est conforme à la norme de sécurité
SERIE TS-770 SYSTEME CONFERENCE
 SERIE TS-770 SYSTEME CONFERENCE Le système de conférence à fils de TOA installation, utilisation et extension faciles, Avec la participation à distance via IP ou téléphone. Système de conférence compact,
POLICY: FREE MILK PROGRAM CODE: CS-4
 POLICY: FREE MILK PROGRAM CODE: CS-4 Origin: Authority: Reference(s): Community Services Department Cafeteria Services and Nutrition Education Division Resolution #86-02-26-15B.1 POLICY STATEMENT All elementary
Sécurité relative aux sièges auto et aux rehausseurs
 Sécurité relative aux sièges auto et aux rehausseurs Safety with Car Seats and Booster Seats Car crashes are the main cause of accidental death and serious injury of children. Correctly using a car or
ICY wine cooler manual Notice du distributeur à vin. Model / Modèle : CV2T
 ICY wine cooler manual Notice du distributeur à vin Model / Modèle : CV2T I- Avertissements 1. Vous devez utiliser une prise électrique triphasée reliée à la terre. 2. Evitez de tirer sur le cordon d alimentation
GAME CONTENTS CONTENU DU JEU OBJECT OF THE GAME BUT DU JEU
 GAME CONTENTS 3 wooden animals: an elephant, a Polar bear and an African lion 1 Playing Board with two tree stumps, one red and one blue 1 Command Board double sided for two game levels (Green for normal
RAPID 3.34 - Prenez le contrôle sur vos données
 RAPID 3.34 - Prenez le contrôle sur vos données Parmi les fonctions les plus demandées par nos utilisateurs, la navigation au clavier et la possibilité de disposer de champs supplémentaires arrivent aux
Tutoriel de formation SurveyMonkey
 Tutoriel de formation SurveyMonkey SurveyMonkey est un service de sondage en ligne. SurveyMonkey vous permet de créer vos sondages rapidement et facilement. SurveyMonkey est disponible à l adresse suivante
Manuel d installation du clavier S5
 1 Manuel d installation du clavier S5 Table des matières 1. Contenu de l emballage... 3 2. Guide de programmation... 3 3. Description... 4 4. Caractéristiques techniques du clavier S5... 4 5. Spécifications
Logitech G502 Proteus Core Setup Guide Guide d installation
 Logitech G502 Proteus Core Setup Guide Guide d installation English.................. 3 Français................. 13 www.logitech.com/support............................23 2 1 On 3 2 USB Your G502 is ready
Stérilisation / Sterilization
 CONTENEURS Ecoster ecoster CONTAINERS Stérilisation / Sterilization Les conteneurs Ecoster aluminium sont prévus pour contenir des instruments et/ou des tissus pendant toute la durée de la stérilisation
RH-9820 MANUEL D INSTRUCTION BOUTONNIERE ELECTRONIQUE
 MANUEL D INSTRUCTION Veuillez lire ce manuel avant toute utilisation de la machine. Veuillez conserver ce manuel à portée de main afin de pouvoir vous y référer rapidement. BOUTONNIERE ELECTRONIQUE Nous
Gestion des prestations Volontaire
 Gestion des prestations Volontaire Qu estce que l Income Management (Gestion des prestations)? La gestion des prestations est un moyen de vous aider à gérer votre argent pour couvrir vos nécessités et
Notice d utilisation
 Notice d utilisation Prise en main rapide 2 Sortez votre machine de son carton et débarrassez-la de ses emballages plastiques. Rincez le réservoir avec de l eau du robinet, remplissez-le et remettez-le
SYSTÈME DE GAINES À SPIRALE ET RACCORDS TOURNANTS
 SYSTÈME DE GAINES À SPIRALE ET RACCORDS TOURNANTS SPIRAL PVC CONDUIT SYSTEMS AND REVOLVING FITTINGS Gaines a Spirale Matufless...page 190 Matufless spiral PVC conduit Raccords Tournants Matufless...page
Compléter le formulaire «Demande de participation» et l envoyer aux bureaux de SGC* à l adresse suivante :
 FOIRE AUX QUESTIONS COMMENT ADHÉRER? Compléter le formulaire «Demande de participation» et l envoyer aux bureaux de SGC* à l adresse suivante : 275, boul des Braves Bureau 310 Terrebonne (Qc) J6W 3H6 La
The new consumables catalogue from Medisoft is now updated. Please discover this full overview of all our consumables available to you.
 General information 120426_CCD_EN_FR Dear Partner, The new consumables catalogue from Medisoft is now updated. Please discover this full overview of all our consumables available to you. To assist navigation
accidents and repairs:
 accidents and repairs: putting the pieces together accidents et réparations : réunir le tout nobody can repair your Toyota like Toyota Unfortunately, accidents do happen. And the best way to restore your
LECTEUR DE COMPACT DISC CDJ-400
 LECTEUR DE COMPACT DISC CDJ-400 Guide de contrôle DJS Guide de contrôle DJS Raccordez votre CDJ-400 (lecteur de compact disc) à votre ordinateur pour pouvoir commander les programmes sur votre, notamment
Judge Group: P Title: Quel est meilleur: le compost ou le fertilisant chimique? Student(s): Emma O'Shea Grade: 6
: Emma O'Shea Grade: 6") Project No.1114 Title: Quel est meilleur: le compost ou le fertilisant chimique? Level: Student(s): Emma O'Shea Grade: 6 This progect compares the results of compost, chemical fertilizer and normal earth
Project No.1114 Title: Quel est meilleur: le compost ou le fertilisant chimique? Level: Student(s): Emma O'Shea Grade: 6 This progect compares the results of compost, chemical fertilizer and normal earth
Critères à l attention des fabricants et des fournisseurs de biens ou de services : dispositifs mécaniques pour bingo
 Alcohol and Gaming Commission des alcools Commission of Ontario et des jeux de l'ontario Gaming Registration & Lotteries Inscription pour les jeux et loteries 90 Sheppard Avenue East 90, avenue Sheppard
Application Form/ Formulaire de demande
 Application Form/ Formulaire de demande Ecosystem Approaches to Health: Summer Workshop and Field school Approches écosystémiques de la santé: Atelier intensif et stage d été Please submit your application
Master4Light. Caractérisation Optique et Electrique des Sources Lumineuses. Equipement 2-en-1 : source de courant et spectrophotomètre
 DSF-M4L-Rev2.0-04/12 Master4Light Equipement 2-en-1 : source de courant et spectrophotomètre Interface graphique logicielle, connexion USB Configuration personnalisable : laboratoire et in-situ http://www.majantys.com
notebook security DEFCON ultra combination cable lock système de sécurité DEFCON ultra USER GUIDE
 notebook security DEFCON ultra combination cable lock système de sécurité DEFCON ultra USER GUIDE Visit our Website at http://www.targus.com/ca/ Features and specifications subject to change without notice.
Fédération Internationale de Handball. b) Règlement du but
 Règlement du but") Fédération Internationale de Handball b) Règlement du but Edition: Septembre 2007 Table des matières Page 1. Généralités 3 2. Caractéristiques techniques des buts de handball 3 3. Dimensions et schéma
Fédération Internationale de Handball b) Règlement du but Edition: Septembre 2007 Table des matières Page 1. Généralités 3 2. Caractéristiques techniques des buts de handball 3 3. Dimensions et schéma
Notice d utilisation de la : Pro-Ject Debut & Debut Phono SB
 Notice d utilisation de la : Pro-Ject Debut & Debut Phono SB 11 14 11 22 2 1 3 16 17 6 15 1 4 5 8 7 9 20 21 17 9a 3a 25 33 45/78 SPEED 24 10 11 13 12 2 PRO-JECT DEBUT/DEBUT PHONO SB Descriptif du produit
calls.paris-neuroscience.fr Tutoriel pour Candidatures en ligne *** Online Applications Tutorial
 calls.paris-neuroscience.fr Tutoriel pour Candidatures en ligne Online Applications Tutorial 1/4 Pour postuler aux Appels d Offres de l ENP, vous devez aller sur la plateforme : calls.parisneuroscience.fr.
Stainless Steel Deep Fryer HF 1030
 TM Stainless Steel Deep Fryer Friteuse en acier inoxydable 2012, HFEF-CAN US FR UK -10/12 1 Year Limited Warranty Un An De Garantie Limitée Thank you for purchasing the innovative Heaven Fresh Stainless
Cheque Holding Policy Disclosure (Banks) Regulations. Règlement sur la communication de la politique de retenue de chèques (banques) CONSOLIDATION
 Regulations. Règlement sur la communication de la politique de retenue de chèques (banques) CONSOLIDATION") CANADA CONSOLIDATION CODIFICATION Cheque Holding Policy Disclosure (Banks) Regulations Règlement sur la communication de la politique de retenue de chèques (banques) SOR/2002-39 DORS/2002-39 Current to
CANADA CONSOLIDATION CODIFICATION Cheque Holding Policy Disclosure (Banks) Regulations Règlement sur la communication de la politique de retenue de chèques (banques) SOR/2002-39 DORS/2002-39 Current to
Le Cloud Computing est-il l ennemi de la Sécurité?
 Le Cloud Computing est-il l ennemi de la Sécurité? Eric DOMAGE Program manager IDC WE Security products & Solutions Copyright IDC. Reproduction is forbidden unless authorized. All rights reserved. Quelques
/MC Quick Install Guide Guide d installation rapide
 /MC Digital Postage Meter Compteur postal numérique Quick Install Guide Guide d installation rapide Canadian English Version Version canadienne française . Lock Class *#_ Funds GHI Menu ABC JKL PQRS DEF