Facial Ionic Steamer Operating Instructions. Model No. EH2424
|
|
|
- Isabelle Rivard
- il y a 8 ans
- Total affichages :
Transcription
1 Facial Ionic Steamer Operating Instructions Model No. EH2424 Before operating this unit, please read these instructions completely and save this manual for future use. In particular, please carefully read the safety precautions before use to ensure proper operation.

2

3
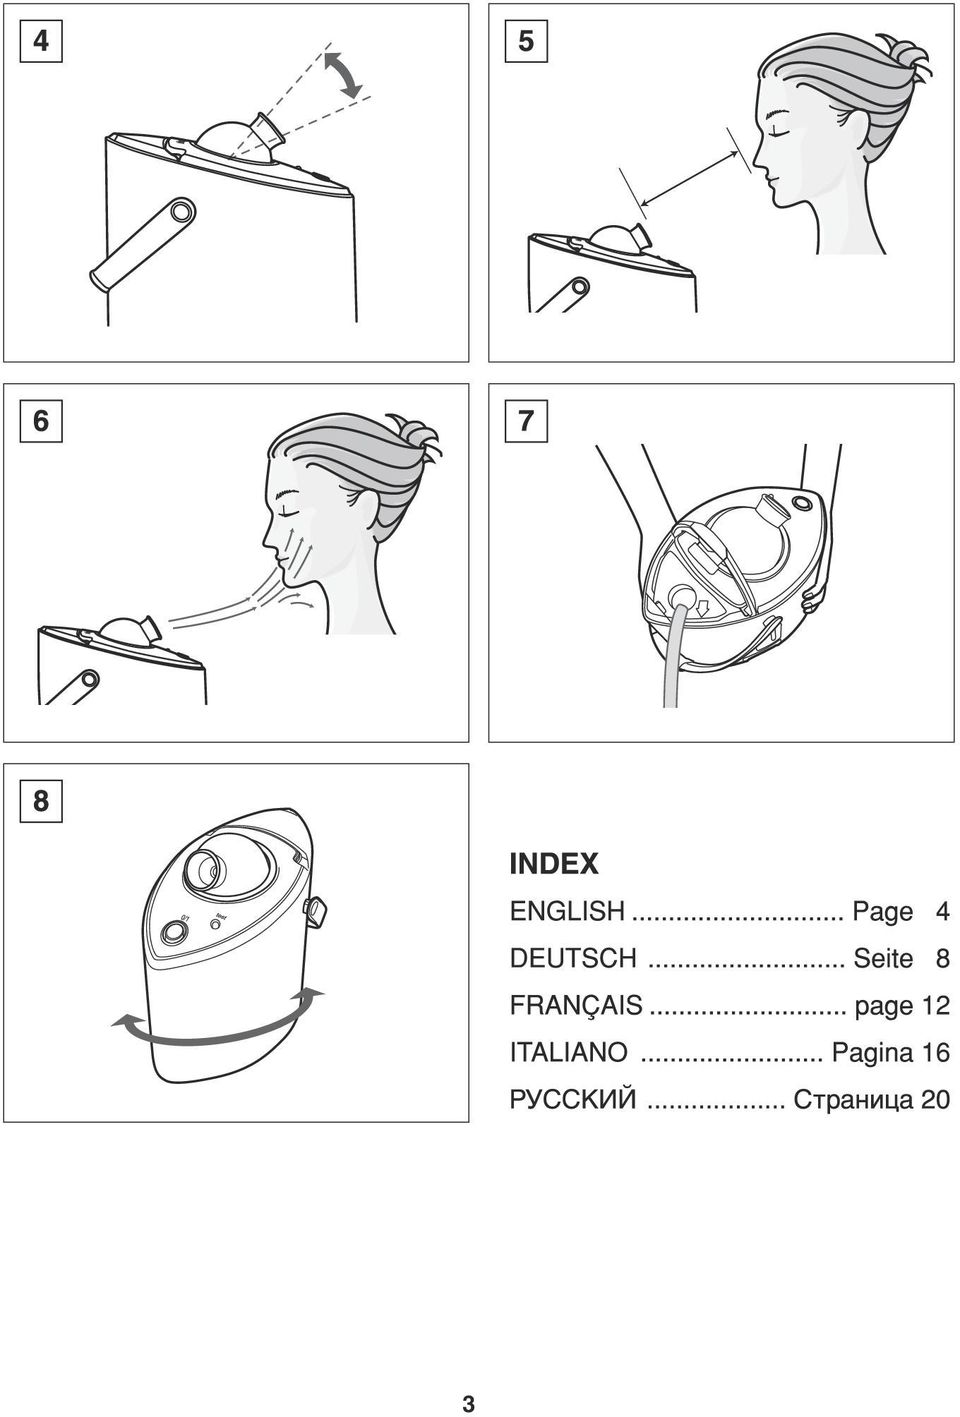
4 Parts identification (Fig. 1) DA q Nozzle w Steam outlet Nano-sized ion steam is discharged. e Power switch r Test switch The test switch is used to check the ionization (atomization) of the steam. The ionize lamp turns off and non-ionized steam is discharged only while the test switch is pressed. t Ionize lamp The lamp turns on when the power is turned on. The lamp turns off while the test switch is pressed. y Cord u Main panel i Cosmetic ring DB o Water inlet gasket!0 Water inlet DC!1 Water supply cover!2 Water supply cover open button!3 Handle!4 Water level When water is filled to the full mark, the appliance can be used for approximately 12 minutes.!5 Drain cup Water collects in the drain cup if too much water is added. D!6 Water supply cup When water is filled to the full mark (top level inside the cup), the appliance can be used for approximately 12 minutes. Before use 1. Excessive use is detrimental to the skin. It is recommended that you start by using the appliance two to three times a week. Thereafter, adjust the frequency and duration of use while observing the condition of your skin. If any skin trouble develops, stop use immediately. Recommended usage is once a day. 2. Your skin condition also may differ according to your health. Use the appliance while observing the condition of your skin. 3. If you feel any skin discomfort, such as rash, redness, itching, and so forth, stop use and consult a physician. 4. Skin problems may be caused by stress, health, organic disorder or cosmetics. In such instances, consult a specialist. Preparation 1. Check that the drain cup is installed in the appliance. 2. Press the water supply cover open button to lift up the water supply cover. (Fig. 2) 3. Use the water supply cup to fill the appliance with water. Use distilled water or water that has been softened by a water softener. The water softener is separately available. (Fig. 3) When using the separately available water softener, read the supplied operating instructions before use. If hard water is used, the mineral content of the water will form deposits on the inside of the boiler of the appliance and may obstruct the flow of steam. Be careful not to let water come in contact with the nozzle, cosmetic ring, main panel, and switch. Dispose any leftover water in the water supply cup. Do not add water past the full mark on the water supply cup or if water remains in the appliance. (Check the water level and add water only when there is no remaining water in the appliance.) 4. Close the water supply cover. Using the facial ionic steamer 1. Insert the plug into a power outlet and press the power switch until a click is heard. Ionize lamp turns on. Ionized steam is released after about 30 seconds. - It is normal for hot water droplets to be discharged at the begining of the steam flow. - A whizzing may be heard. This is the sound of electric discharge which is normal. Do not operate the appliance with the water supply cup placed on the nozzle. 2. Adjust the angle (up/down) of the nozzle. (Fig. 4)

5 Adjust the nozzle while taking care not to directly touch the steam. How to use the steam I Move your face slightly to the left and right so that the steam spreads evenly. I Using the steam on your nose is effective on the T-zone. 1. Keep your face at least 25 cm away from the steam outlet, using the supplied 25-cm measure as a guide. (Fig. 5) 2. Position the steam outlet towards your face slightly above your chin. (Fig. 6) 3. After use, wipe off the water (such as with a tissue), then also apply a lotion to prepare your face and apply an emulsion to supplement skin oil. Examples of the uses of the facial ionic steamer In addition to using the appliance on bare skin, it can also be used in combination with facial treatments. I Before cleansing 1. Use the appliance for about 3 minutes. (This lifts dirt from the skin.) 2. Perform cleansing. I Apply massaging cream and use the steam while massaging your skin. I Use the appliance after applying lotions and face liquids. After use (Be sure to discard the water in the tank every time after use.) 1. Press the power switch until a click is heard to turn off the power and then remove the plug from the power outlet. The lamp turns off. Be careful not to touch the steam when pressing the switch. Do not operate the appliance if it contains no water. - Doing so will quicken the accumulation of water scale, which may result in poor steam discharge. 2. Leave the appliance alone to cool for at least 10 minutes. 3. Discard the water in the drain cup. 4. Pour out the water from the appliance in the direction of the arrow as shown. Emptying the water in a direction other than that indicated by the arrow may get the switch wet, which may cause a malfunction. To prevent risk of burns or scalding when discarding the water, hold the bottom of the appliance. (Fig. 7) Note: When discarding the water, be careful not to get water on the power plug and cord. 5. Wipe off any water from the appliance. Do not wind the cord around the appliance. If the water supply cup is to be placed upside down on the appliance for storage, first wipe off any water from the cup. Cleaning Do not wash or soak the appliance in water. Cleaning around the water inlet and water level. (Clean once a month) I To remove and prevent water scale deposits, let the appliance cool for at least 10 minutes after use and then clean according to the following steps. After the operation in step 4 on After use of the Instruction Manual, replace the drain cup into the appliance. 1. Open the water supply cover and add water using the water supply cup. Add water until the full mark on the appliance. 2. Close the water supply cover and shake the appliance horizontally 3-4 times. Shake the appliance gently without tilting it. (Fig. 8) 3. Open the water supply cover and pour out the water from the appliance in the direction of the arrow as shown. (Fig. 7) Note: Repeat the above steps 2-3 times for effective cleaning. 4. Wipe off any water from the appliance. Even if there are water scale deposits near the water inlet or water level, the discharged steam is not affected. Cleaning the appliance. (Do not wash or soak the appliance in water.) I Wipe the appliance with a cloth moistened with soapy water.
, then also apply a lotion to prepare your face and apply an emulsion to supplement skin oil.")
6 Never use alcohol, thinner, benzine, enamel remover, etc. I Even after draining the water, some water remains in the appliance. - This does not cause any sanitary problems since the water is boiled when used the next time. CAUTION I The following persons should consult a physician before use. Persons with acute illnesses or malignant tumors, persons who are pregnant Persons who have allergies and sensitive skin Persons with skin problems, such as dermatitis, severe sunburn, etc. Persons with skin injuries, eczema, swelling, etc. I Not for use by persons who are unable to feel heat or by children (unless supervised by an adult). I Immediately stop use if pain or discomfort is experienced. I Do not use the appliance near flammable substances (alcohol, thinner, benzine, enamel remover, aerosol sprays, etc.). I Do not use with wet hands! I Do not store the appliance in the bathroom or in other rooms with high humidity. I Do not place the appliance where it may get wet (such as next to a wash basin). I Do not immerse the appliance into water. I Do not use the appliance if it has been damaged by being dropped or hit etc. I Use the appliance only for your face. I Be careful of the steam s high temperature. Use on a flat surface. Not for handheld use. Do not tilt, shake, or carry the appliance during use or within 10 minutes after use. Do not touch or look into the steam outlet during use (or within 30 seconds after the switch has been turned off). Do not allow your face or hand to come into direct contact with the steam within 20 cm of the outlet. Be sure the drain cup is installed in the unit when filling with water or during use. I Do not shake the appliance if it contains water. I Do not drain the water from the outlet. I Do not add water during use or immediately after use. Wait until the appliance has cooled sufficiently before adding water. I Use distilled water or water that has been softened by a water softener. I Be sure to remove the plug from the power outlet after use. I Do not leave the power connected when not in use. I Hold the plug when removing it from the power outlet. I Do not use the appliance under the following conditions. When the cord or plug is damaged or becomes hot. When the plug is loose in the power outlet. I Do not cut, damage, modify, unreason-ably bend, pull, or twist the cord. Also do not place heavy objects on the cord or squeeze the cord. - If the cord or plug of the unit is damaged, discontinue use immediately. Bring the damaged unit to the nearest authorized service center or qualified repair technician for repair or replacement. I Do not attempt to modify, disassemble, or repair the appliance by yourself. I This appliance is not intended for use by persons (including children) with reduced physical, sensory or mental capabilities, or lack of experience and knowledge, unless they have been given supervision or instruction concerning use of the appliance by a person responsible for their safety. Children should be supervised to ensure that they do not play with the appliance. Specifications Power supply: AC V, 50-60Hz Power consumption: W Weight: Approx. 1kg Steam discharge rate: Approx. 6ml/min Steam temperature: Approx. 40 C (at a distance of approx. 25cm from ion steam outlet) Information on Disposal for Users of Waste Electrical & Electronic Equipment (private households) This symbol on the products and/or accompanying documents means that used electrical and electronic products should not be mixed with
.")
7 general household waste. For proper treatment, recovery and recycling, please take these products to designated collection points, where they will be accepted on a free of charge basis. Alternatively, in some countries you may be able to return your products to your local retailer upon the purchase of an equivalent new product. Disposing of this product correctly will help to save valuable resources and prevent any potential negative effects on human health and the environment which could otherwise arise from inappropriate waste handling. Please contact your local authority for further details of your nearest designated collection point. Penalties may be applicable for incorrect disposal of this waste, in accordance with national legislation. For business users in the European Union If you wish to discard electrical and electronic equipment, please contact your dealer or supplier for further information. Information on Disposal in other Countries outside the European Union This symbol is only valid in the European Union. If you wish to discard this product, please contact your local authorities or dealer and ask for the correct method of disposal. ONLY FOR U.K. ELECTRICAL PLUG INFORMATION FOR YOUR SAFETY PLEASE READ THE FOLLOWING TEXT CAREFULLY This appliance is supplied with a moulded three pin mains plug for your safety and convenience. A 13 amp fuse is fitted in this plug. Should the fuse need to be replaced please ensure that the replacement fuse has a rating of 13 amp and that it is approved by ASTA or BSI to BS1362. Check for the ASTA mark or the BSI mark on the body of the fuse. If the plug contains a removable fuse cover you must ensure that it is refitted when the fuse is replaced. If you lose the fuse cover the plug must not be used until a replacement cover is obtained. A replacement fuse cover can be purchased from your local Panasonic Dealer. IF THE FITTED MOULDED PLUG IS UNSUITABLE FOR THE SOCKET OUTLET IN YOUR HOME THEN THE FUSE SHOULD BE REMOVED AND THE PLUG CUT OFF AND DISPOSED OF SAFELY. THERE IS A DANGER OF SEVERE ELECTRICAL SHOCK IF THE CUT OFF PLUG IS INSERTED INTO ANY 13 AMP SOCKET. If a new plug is to be fitted please observe the wiring code as shown below. If in any doubt please consult a qualified electrician. IMPORTANT: The wires in this mains lead are coloured in accordance with the following code: Blue: Neutral Brown: Live As the colours of the wire in the mains lead of this appliance may not correspond with the coloured markings identifying the terminals in your plug, proceed as follows. The wire which is coloured BLUE must be connected to the terminal in the plug which is marked with the letter N or coloured BLACK. The wire which is coloured BROWN must be connected to the terminal in the plug which is marked with the letter L or coloured RED. Under no circumstances should either of these wires be connected to the earth terminal of the three pin plug, marked with the letter E or the Earth Symbol. How to replace the fuse: Open the fuse compartment with a screwdriver and replace the fuse and fuse cover if it is removable.

8 Bezeichnung der Teile (Abb. 1) DA q Düse w Dampfaustritt Austritt von kleinsten Ionendampfteilchen. e Netzschalter r Testschalter Mit dem Testschalter kann die Ionisation (Zerstäubung) des Dampfs geprüft werden. Die Ionisierungsleuchte wird ausgeschaltet und nicht-ionisierter Dampf tritt beim Drücken des Testschalters aus. t Ionisierungsleuchte Die Leuchte wird beim Einschalten des Netzschalters eingeschaltet. Beim Drücken des Testschalters wird die Leuchte ausgeschaltet. y Kabel u Obere Platte i Zierring DB o Wassereinfülldeckeldichtung!0 Wassereinfüllöffnung DC!1 Wassereinfülldeckel!2 Wassereinfülldeckelknopf!3 Griff!4 Wasserpegelanzeige Wenn sich der Wasserstand an der Vollmarkierung befindet, lässt sich das Gerät für ungefähr 12 Minuten verwenden.!5 Auffangschale Falls zu viel Wasser eingefüllt wird, läuft das Wasser in die Auffangschale. D!6 Wasserbecher Wenn sich der Wasserstand an der Vollmarkierung befindet (obere Markierung an der Becherinnenseite), lässt sich das Gerät für ungefähr 12 Minuten verwenden. Vor der Inbetriebnahme 1. Durch eine übermäßige Anwendung können negative Auswirkungen auf die Haut auftreten. Für den Anfang wird empfohlen das Gerät zwei bis dreimal pro Woche anzuwenden. Stimmen Sie danach die Anwendungshäufigkeit und die dauer auf den Zustand der Haut ab. Stoppen Sie die Anwendung sofort, falls negative Auswirkungen festgestellt werden. Empfohlene Anwendung einmal täglich. 2. Der Hautzustand kann auch von Ihrem Gesundheitszustand abhängig sein. Beachten Sie deshalb bei der Anwendung des Gerätes den Zustand Ihrer Haut. 3. Falls Sie Anzeichen, wie Hautausschläge, Röte, Reizungen usw. feststellen, sollten Sie die Anwendung unterbrechen und einen Arzt aufsuchen. 4. Hautprobleme können auch durch Stress, Gesundheitszustand, organische Störungen und Kosmetika verursacht werden. In einem solchen Fall müssen Sie einen Spezialisten zu Rate ziehen. Vorbereitung 1. Kontrollieren Sie, ob die Wasserauffangschale in das Gerät eingesetzt ist. 2. Drücken Sie den Wassereinfülldeckelknopf und öffnen Sie die Wassereinfülldeckel. (Abb. 2) 3. Verwenden Sie den Wasserbecher, um das Gerät mit Wasser aufzufüllen. Verwenden Sie destilliertes Wasser oder mit einem Weichmacher behandeltes Wasser. Der Weichmacher ist separat erhältlich. (Abb. 3) Bei Verwendung eines separat erhältlichen Weichmachers müssen Sie vor der Anwendung die beiliegenden Anweisungen sorgfältig lesen. Bei Verwendung von hartem Wasser können sich die Mineralsalze im Inneren des Dampferzeugers abscheiden und den Dampfstrom beeinträchtigen. Seien Sie vorsichtig, dass kein Wasser auf die Dampfdüse, den Zierring, die obere Platte oder den Schalter gelangt. Gießen Sie eventuell im Wassereinfüllbecher verbleibendes Wasser aus. Füllen Sie kein Wasser nach, falls die Vollmarkierung des Wassereinfüllbechers überschritten ist oder falls bereits Wasser im Gerät vorhanden ist. (Kontrollieren Sie den Wasserpegel und füllen Sie nur Wasser ein, wenn sich im Gerät kein Wasser mehr befindet.) 4. Schließen Sie den Wassereinfülldeckel.

9 Verwendung des Gesichtsbedampfungsgeräts 1. Schließen Sie den Stecker an einer Steckdose an und drücken Sie den Netzschalter, so dass er einrastet. Die Ionisierungsleuchte wird eingeschaltet. Nach ungefähr 30 Sekunden tritt ionisierter Dampf aus. - Es ist normal, dass am Beginn Wassertröpfchen im Dampfstrahl vorhanden sind. - Es kann ein Zischgeräusch auftreten. Dieses Geräusch entsteht bei der elektrischen Entladung und ist normal. Nehmen Sie das Gerät nicht in Betrieb, wenn sich der Wasserbecher an der Dampfdüse befindet. 2. Stellen Sie die Düse nach oben oder unten ein. (Abb. 4) Seien Sie vorsichtig, dass Sie beim Einstellen nicht mit dem Dampfstrom in Berührung kommen. Anwendung des Dampfs I Bewegen Sie das Gesicht etwas nach links und rechts, so dass der Dampf gleichmäßig verteilt wird. I Die Anwendung von Dampf im Nasenbereich ist für den T-Bereich wirkungsvoll. 1. Halten Sie das Gesicht mindestens 25 cm von der Dampfdüse entfernt, verwenden Sie dazu das mitgelieferte 25-cm-Messband. (Abb. 5) 2. Richten Sie den Dampfstrahl gegen das Gesicht, etwas über dem Kinn. (Abb. 6) 3. Wischen Sie das Wasser mit einem Papiertaschentuch ab, tragen eine Lotion zur Vorbereitung auf und wenden Sie eine Emulsion zur Ergänzung der Hautfeuchtigkeit an. Beispiele für die Anwendung des Gesichtsbedampfungsgeräts Neben der Anwendung des Gerätes auf die bloße Haut ist auch eine Anwendung in Kombination mit Gesichtsbehandlungen möglich. I Vor dem Reinigen 1. Wenden Sie das Gerät für ungefähr 3 Minuten an. (Zum Lösen des Schmutzes.) 2. Nehmen Sie die Reinigung vor. I Tragen Sie eine Massagecreme auf und wenden Sie während der Gesichtmassage Dampf an. I Verwenden Sie das Gerät nach dem Auftragen von Lotionen und Gesichtswasser. Nach angeschlossener Verwendung (Nach abgeschlossener Verwendung muss das Wasser im Behälter entleert werden.) 1. Schalten Sie den Netzschalter aus, so dass er einrastet und ziehen Sie den Netzstecker aus der Steckdose. Die Leuchte wird ausgeschaltet. Vermeiden Sie beim Ausschalten des Schalters einen Kontakt mit dem Dampfstrahl. Nehmen Sie die Dampfdusche nicht ohne Wasser in Betrieb. - Dadurch kann die Ansammlung von Wasserstein begünstigt werden, was eine Verschlechterung der Dampferzeugung verursachen kann. 2. Lassen Sie das Gerät für mindestens 10 Minuten abkühlen. 3. Leeren Sie die Wasserauffangschale. 4. Leeren Sie das Wasser in der abgebildeten Richtung aus dem Gerät. Falls das Wasser in eine andere Richtung ausgegossen wird, kann der Schalter nass werden und dies kann zu Betriebsstörungen führen. Halten Sie beim Ausgießen des Wassers das Gerät an der Unterseite, um Verbrennungen oder Verbrühungen zu vermeiden. (Abb. 7) Hinweis: Gießen Sie das Wasser vorsichtig aus, so dass der Netzstecker und das Netzkabel nicht nass werden. 5. Wischen Sie das Wasser vom Gerät ab. Wickeln Sie das Kabel nicht um das Gerät. Falls Sie zum Aufbewahren den Wasserbecher umgekehrt auf das Gerät stellen, müssen Sie den Becher zuerst abwischen.
 Seien Sie vorsichtig, dass Sie beim Einstellen nicht mit dem Dampfstrom in Berührung kommen.")
10 Reinigung Das Gerät darf nicht mit Wasser abgewaschen oder in Wasser eingetaucht werden. Reinigen der Wassereinfüllöffnung und der Wasserpegelanzeige (einmal monatlich) I Zum Entfernen von Wasserstein muss das Gerät für mindestens 10 Minuten abgekühlt werden lassen, bevor Sie die Reinigung wie folgt vornehmen. Nach der Bedienung in Schritt 4 von "Nach abgeschlossener Verwendung" müssen Sie die Auffangschale wieder im Gerät einsetzen. 1. Öffnen Sie das Wassereinfülldeckel und füllen Sie mit dem Wasserbecher ein. Füllen Sie Wasser bis zur Vollmarkierung des Gerätes ein. 2. Schließen Sie den Wassereinfülldeckel und schütteln Sie das Gerät drei- bis viermal in Horizontalrichtung. Schütteln Sie das Gerät leicht, ohne es zu neigen. (Abb. 8) 3. Öffnen Sie den Wassereinfülldeckel und gießen Sie das Wasser in der abgebildeten Richtung aus dem Gerät. (Abb. 7) Hinweis: Wiederholen Sie gegebenenfalls die oben stehenden Schritte zwei- bis dreimal. 4. Wischen Sie das Wasser vom Gerät ab. Auch wenn sich Wasserstein in der Nähe der Wassereinfüllöffnung und der Wasserpegelanzeige gebildet hat, wird dadurch der Dampfaustritt nicht beeinträchtigt. Reinigung des Gerätes (Das Gerät darf nicht mit Wasser abgewaschen oder in Wasser eingetaucht werden.) I Wischen Sie das Gerät mit einem mit Seifenwasser angefeuchteten Tuch ab. Verwenden Sie niemals Farbverdünner, Benzin, Nagellackentferner usw. I Selbst nach dem Ausgießen verbleibt noch etwas Wasser im Gerät. - Falls gekochtes Wasser verwendet wird, gibt es bei der nächsten Verwendung keine hygienischen Probleme. VORSICHT I Die folgenden Personen sollten sich vor der Anwendung von einem Arzt beraten lassen: Schwerkranke Personen, Personen mit bösartigen Tumoren und schwangere Frauen. Personen mit Allergien und empfindlicher Haut Personen mit Hautproblemen, wie Dermatitis, schwerer Sonnenbrand usw. Personen mit Ekzemen, Schwellungen usw. I Personen, die unempfindlich gegen Wärme sind oder unbeaufsichtigte Kinder I Beim Auftreten von Schmerzen oder Unwohlsein muss die Anwendung sofort unterbrochen werden. I Verwenden Sie das Gerät nicht in der Nähe von brennbaren Substanzen (Alkohol, Farbverdünner, Benzin, Nagellackentferner, Aerosolsprays usw.). I Nicht mit nassen Händen verwenden! I Bewahren Sie das Gerät nicht in einem Badezimmer oder an anderen Orten mit hoher Luftfeuchtigkeit auf. I Bewahren Sie das Gerät nicht an einem Ort auf, an dem es nass werden kann, wie in der Nähe eines Waschbeckens. I Das Gerät darf nicht in Wasser eingetaucht werden. I Das Gerät darf nicht verwendet werden, wenn es fallen gelassen oder angeschlagen wurde. I Verwenden Sie das Gerät nur für das Gesicht. I Seien Sie vorsichtig, weil der Dampf heiß ist. Verwenden Sie eine ebene Aufstellfläche. Das Gerät ist nicht dazu vorgesehen, bei der Anwendung in der Hand gehalten zu werden. Bei der Anwendung und bis zu 10 Minuten nach dem Ausschalten darf das Gerät nicht geneigt, geschüttelt oder herum getragen werden. Berühren Sie die Dampfdüse nicht und schauen Sie während der Anwendung oder bis zu 30 Sekunden nach dem Ausschalten nicht hinein. Vermeiden Sie direkten Dampfkontakt, halten Sie das Gesicht oder die Hände nicht näher als 20 cm von der Dampfdüse entfernt. Kontrollieren Sie, ob die Auffangschale beim Einfüllen von Wasser und während der Anwendung eingesetzt ist. I Schütteln Sie das Gerät nicht, falls sie Wasser enthält. 10

11 I Gießen Sie das Wasser nicht durch den Dampfaustritt. I Füllen Sie während der Verwendung und unmittelbar danach kein Wasser nach. Warten Sie bis sich das Gerät ausreichend abgekühlt hat, bevor Sie Wasser nachfüllen. I Verwenden Sie destilliertes Wasser oder mit einem Weichmacher behandeltes Wasser. I Nach der Verwendung muss der Netzstecker aus der Steckdose gezogen werden. I Lassen Sie bei Nichtverwendung die Stromversorgung nicht angeschlossen. I Ziehen Sie das Netzkabel am Netzstecker aus der Steckdose. I Das Gerät darf unter den folgenden Umstanden nicht verwendet werden: Falls das Kabel oder der Stecker beschädigt sind oder heiß werden. Falls der Netzstecker in der Steckdose locker ist. I Das Kabel darf nicht beschädigt, abgeändert, stark gebogen, gezogen oder verdreht werden. Das Kabel darf nicht mit schweren Gegenständen belastet oder eingeklemmt werden. - Bei einer Beschädigung des Kabels oder des Steckers dürfen Sie das Gerät nicht mehr weiter verwenden. Bringen Sie das Gerät zur Reparatur zum nächsten autorisierten Kundendienstzentrum oder zu einem qualifizierten Fachmann. I Versuchen Sie nicht selbst das Gerät zu modifizieren, zu zerlegen oder zu reparieren. I Dieser Apparat ist nicht für die Verwendung durch Personen (einschließlich Kindern) mit verminderten körperlichen, sensorischen oder mentalen Fähigkeiten oder durch nicht ausgebildetes Personal gedacht, solange sie nicht von für die Sicherheit verantwortlichen Personen beaufsichtigt oder in die Benutzung des Apparats eingewiesen wurden. Kinder müssen beaufsichtigt werden, um sicherzustellen, dass sie nicht mit dem Gerät spielen. Technische Daten Stromversorgung: Netz V, Hz Leistungsaufnahme: W Gewicht: ca. 1 kg Dampferzeugung: ca. 6 ml/min. Dampftemperatur: ca. 40 C (bei einem Abstand von ca. 25 cm vom Dampfaustritt) Benutzerinformationen zur Entsorgung von elektrischen und elektronischen Geräten (private Haushalte) Entsprechend der grundlegenden Firmengrundsätzen der Panasonic- Gruppe wurde ihr Produkt aus hochwertigen Materialien und Komponenten entwickelt und hergestellt, die recycelbar und wieder verwendbar sind. Dieses Symbol auf Produkten und/oder begleitenden Dokumenten bedeutet, dass elektrische und elektronische Produkte am Ende ihrer Lebensdauer vom Hausmüll getrennt entsorgt werden müssen. Bringen Sie bitte diese Produkte für die Behandlung, Rohstoffrückgewinnung und Recycling zu den eingerichteten kommunalen Sammelstellen bzw. Wertstoffsammelhöfen, die diese Geräte kostenlos entgegennehmen. Die ordnungsgemäße Entsorgung dieses Produkts dient dem Umweltschutz und verhindert mögliche schädliche Auswirkungen auf Mensch und Umwelt, die sich aus einer unsachgemäßen Handhabung der Geräte am Ende Ihrer Lebensdauer ergeben könnten. Genauere Informationen zur nächstgelegenen Sammelstelle bzw. Recyclinghof erhalten Sie bei Ihrer Gemeindeverwaltung. Für Geschäftskunden in der Europäischen Union Bitte treten Sie mit Ihrem Händler oder Lieferanten in Kontakt, wenn Sie elektrische und elektronische Geräte entsorgen möchten. Er hält weitere Informationen für sie bereit. Informationen zur Entsorgung in Ländern außerhalb der Europäischen Union Dieses Symbol ist nur in der Europäischen Union gültig. 11

12 Identification des pièces (Figure 1) DA q Diffuseur w Sortie de la vapeur La nano vapeur ionique est déchargée e Interrupteur d alimentation r Interrupteur d essai L interrupteur d essai est utilisé pour vérifier l ionisation (atomisation) de la vapeur. La lampe d ionisation s éteint et de la vapeur non ionique est déchargée tant que l interrupteur d essai est pressé. t Lampe d ionisation La lampe s allume lorsque l alimentation est mise sous tension. La lampe s éteint lorsque l interrupteur d essai est pressé. y Cordon u Panneau principal i Anneau cosmétique DB o Joint d admission d eau!0 Admission d eau DC!1 Couvercle d alimentation en eau!2 Bouton d ouverture du couvercle de fourniture d eau!3 Poignée!4 Niveau de l eau Lorsque l eau atteint la marque Full (Plein), l appareil peut être utilisé pendant environ 12 minutes.!5 Godet de vidange Si trop d eau est ajoutée, elle s accumule dans le godet de vidange. D!6 Godet d alimentation en eau Lorsque l eau atteint la marque Full (Plein) (niveau supérieur à l intérieur du godet), l appareil peut être utilisé pendant environ 12 minutes. Avant l utilisation 1. Une utilisation excessive est nocive à la santé de la peau. Il est recommandé de n utiliser l appareil que deux ou trois fois par semaine pour commencer. Par la suite, ajustez la fréquence et la durée de vos utilisations tout en observant la condition de votre peau. Si des problèmes de la peau se développent, arrêtez immédiatement l utilisation. Il est recommandé de n utiliser l appareil qu une fois par jour. 2. La condition de votre peau peut également différer en fonction de l état de votre santé. Utilisez l appareil tout en observant la condition de votre peau. 3. Si vous ressentez tout inconfort de la peau comme de l urticaire, des rougeurs, des démangeaisons, etc., arrêtez l utilisation et consultez un médecin. 4. Les problèmes de la peau sont provoqués par le stress, la santé, des désordres organiques ou cosmétiques. Dans de tels cas, consultez un médecin. Préparatifs 1. Assurez-vous que le godet de vidange est installé dans l appareil. 2. Appuyez sur le bouton d ouverture du couvercle d alimentation en eau pour faire soulever le couvercle d alimentation en eau. (Figure 2) 3. Utilisez le godet d alimentation en eau pour remplir l appareil d eau. (Figure 3) Utilisez de l eau distillée ou de l eau qui a été adoucie au moyen d un adoucisseur d eau. L adoucisseur d eau est disponible séparément. Lors de l utilisation de l adoucisseur d eau disponible séparément, veillez à bien lire les instructions de fonctionnement fournies avant de l utiliser. Si de l eau non adoucie est utilisée, les minéraux contenus dans l eau formeront des dépôts à l intérieur du système de chauffage de l appareil pouvant obstruer le débit de la vapeur. Veillez à ne pas laisser d eau entrer en contact avec le diffuseur, l anneau cosmétique, le panneau principal et l interrupteur. Disposez de toute eau supplémentaire dans le godet d alimentation en eau. N ajoutez pas d eau au-delà de la marque de remplissage du godet d alimentation en eau ou si de l eau reste dans l appareil. (Vérifiez le niveau de l eau et n ajoutez de l eau que lorsqu il ne reste plus d eau dans l appareil.) 4. Refermez le couvercle d alimentation en eau. 12

13 Utilisation de l appareil à vapeur ionique pour le visage 1. Insérez la fiche dans une prise secteur et appuyez sur l interrupteur d alimentation jusqu à ce qu un déclic se fasse entendre. La lampe ionique s allume. La vapeur ionique est émise au bout d environ 30 secondes. - Il est normal que des gouttelettes d eau chaude soient déchargées au début de l émission de la vapeur. - Un sifflement peut se faire entendre. Il s agit du son de la décharge électrique, ce qui est normal. Ne faites pas fonctionner l appareil avec le godet d alimentation en eau placé sur le diffuseur. 2. Ajustez l angle (haut/bas) du diffuseur. (Figure 4) Ajustez le diffuseur tout en veillant à ne pas toucher directement la vapeur. Utilisation de la vapeur I Déplacez doucement votre visage vers la gauche et vers la droite pour répartir la vapeur de façon égale. I L utilisation de la vapeur sur votre nez est efficace sur la zone T. 1. Maintenez votre visage à au moins 25 cm du diffuseur de vapeur en utilisant la mesure de 25 cm fournie comme guide. (Figure 5) 2. Placez le diffuseur de vapeur vers votre visage, légèrement au-dessus du menton. (Figure 6) 3. Après l utilisation, essuyez l eau (avec un mouchoir en papier, par exemple), puis appliquez une lotion pour préparer votre visage et appliquez une émulsion pour suppléer l huile de la peau. Exemples d utilisation de l appareil à vapeur ionique pour le visage En plus de pouvoir utiliser l appareil sur la peau nue, il peut être utilisé en combinaison avec des traitements pour la peau. I Avant de procéder au nettoyage 1. Utilisez l appareil pendant environ 3 minutes. (Ceci sépare la crasse de la peau.) 2. Effectuez le nettoyage. I Appliquez de la crème pour massage et utilisez la vapeur tout en massant votre peau. I Utilisez l appareil après avoir appliqué des lotions et des fluides pour le visage. Après l utilisation (Veillez à jeter l eau du réservoir après chaque utilisation.) 1. Appuyez sur l interrupteur d alimentation jusqu à ce qu un déclic se fasse entendre pour mettre l alimentation hors tension, puis retirez la fiche de la prise secteur. La lampe s éteint Veillez à ne pas toucher la vapeur lorsque vous appuyez sur l interrupteur. Ne faites pas fonctionner l appareil s il ne contient pas d eau. - Cela accélère l accumulation de dépôt pouvant entraîner un mauvais débit de la vapeur. 2. Laissez l appareil refroidir pendant au moins 10 minutes. 3. Jetez l eau du godet de vidange. 4. Versez l eau de l appareil dans le sens de la flèche, comme montré. Si l eau est jetée dans une direction autre que celle indiquée par la flèche, cela peut mouiller l interrupteur, pouvant entraîner un mauvais fonctionnement. Pour prévenir tout risque de brûlure ou d ébouillantage lorsque vous jetez l eau, tenez le fond de l appareil. (Figure 7) Remarque: lorsque vous jetez l eau, veillez à ce qu elle n entre pas en contact avec la fiche et le cordon d alimentation. 5. Essuyez toute eau de l appareil. N enroulez pas le cordon autour de l appareil. Si le godet d alimentation en eau doit être placé à l envers sur l appareil pour le ranger, essuyez d abord toute l humidité du godet. 13
 du diffuseur. (Figure 4) Ajustez le diffuseur tout en veillant à ne pas toucher directement la vapeur.")
14 Nettoyage Ne lavez pas ou ne laissez pas tremper l appareil dans l eau. Nettoyage autour de l entrée d eau et du niveau d eau. (Nettoyez une fois par mois) I Pour retirer les dépôts et en prévenir la formation, laissez l appareil refroidir pendant au moins 10 minutes après l utilisation, puis effectuez le nettoyage en suivant les étapes suivantes. Après avoir effectué l opération de l étape 4 dans «Après l utilisation» du manuel d instructions, replacez le godet de vidange dans l appareil. 1. Ouvrez le couvercle d alimentation en eau et ajoutez l eau en utilisant le godet d alimentation en eau. Ajoutez de l eau jusqu à la marque «Full» (Plein) sur l appareil. 2. Refermez le couvercle d alimentation en eau et secouez horizontalement l appareil 3 ou 4 fois. Secouez doucement l appareil sans l incliner. (Figure 8) 3. Ouvrez le couvercle d alimentation en eau et versez l eau de l appareil dans le sens de la flèche, comme montré. (Figure 7) Remarque: répétez les étapes ci-dessus 2 ou 3 fois pour un nettoyage efficace. 4. Essuyez toute eau de l appareil. Même s il y a des dépôts à proximité de l entrée d eau ou du niveau d eau, la vapeur déchargée n est pas affectée. Nettoyage de l appareil. (Ne lavez pas et ne trempez pas l appareil dans de l eau.) I Essuyez l appareil avec un chiffon humecté d eau savonneuse. N utilisez jamais d alcool, de diluant, de benzène, de décapant, etc. I Un peu d eau reste dans l appareil, même après l avoir vidé. - L eau étant bouillie lors de l utilisation suivante, ceci n engendre aucun problème sanitaire. ATTENTION I Les personnes suivantes doivent consulter un médecin avant l utilisation: Personnes souffrant d une maladie aiguë ou d une tumeur maligne, les femmes enceintes. Les personnes souffrant d allergies ou dont la peau est sensible. Personnes souffrant de problèmes de la peau tels que dermatite, sévère coup de soleil, etc. Personnes souffrant de blessures de la peau, d eczéma, d enflures, etc. I Les personnes incapables de ressentir la chaleur ou les enfants ne doivent pas utiliser cet appareil (à moins qu ils ne soient surveillés par un adulte). I Arrêtez immédiatement l utilisation si des douleurs ou de l inconfort sont ressentis. I N utilisez pas l appareil à proximité de substances inflammables (alcool, diluant, benzène, décapant, vaporisateur d aérosol, etc.). I N utilisez pas l appareil avec les mains mouillées! I Ne rangez pas l appareil dans la salle de bain ou dans toute autre pièce où l humidité est élevée. I Ne placez pas l appareil dans un endroit où il pourrait être mouillé (à côté d un lavabo, par exemple). I Ne submergez pas l appareil dans de l eau. I N utilisez pas l appareil s il a été endommagé, s il est tombé, s il a subi un choc, etc. I N utilisez l appareil que sur votre visage. I Faites attention à la haute température de l appareil. Utilisez l appareil sur une surface plane. Ne l utilisez pas en le tenant à la main. N inclinez pas, ne secouez pas et ne transportez pas l appareil pendant l utilisation ou dans les 10 minutes suivant son utilisation. Ne touchez pas et ne regardez pas le diffuseur pendant l utilisation (ou dans les 30 secondes après que l interrupteur ait été mis hors tension). Ne laissez pas votre visage ou vos mains entrer en contact direct avec la vapeur à moins de 20 cm du diffuseur. Assurez-vous que le godet de vidange est installé dans l appareil lorsque vous le remplissez d eau ou pendant l utilisation. I Ne secouez pas l appareil s il est rempli d eau. I Ne videz pas l eau du diffuseur. 14
 sur l appareil. 2.")
15 I N ajoutez pas d eau pendant l utilisation ou immédiatement après. Attendez que l appareil ait suffisamment refroidi avant d ajouter de l eau. I Utilisez de l eau distillée ou de l eau qui a été adoucie au moyen d un adoucisseur d eau. I Veillez à retirer la fiche d alimentation de la prise secteur après l utilisation. I Ne laissez pas l alimentation sous tension lorsque l appareil n est pas utilisé. I Tenez la fiche pour la retirer de la prise secteur. I N utilisez pas l appareil dans les conditions suivantes: Lorsque le cordon ou la fiche sont endommagés ou chauffent. Lorsque la fiche est lâche dans la prise secteur. I Ne coupez pas, n endommagez pas, ne modifiez pas, ne pliez pas trop ou ne tordez pas le cordon. De même, ne placez pas d objets lourds sur le cordon ou ne le compressez pas. - Si le cordon ou la fiche de l unité sont endommagés, cessez immédiatement l utilisation. Portez l appareil endommagé au centre de service agréé le plus proche ou à un technicien qualifié pour le faire réparer ou remplacer. I N essayez pas de modifier, de démonter ou de réparer l appareil par vous-même. I Cet appareil n a pas été conçu pour être utilisé par des personnes (enfants y compris) souffrant d un handicap physique, sensoriel ou mental, ou ne disposant pas de l expérience et des connaissances nécessaires à une utilisation sûre, à moins qu elles aient reçu toutes les consignes requises par la personne responsable de leur sécurité quant à l utilisation de l appareil. Surveillez les enfants, afin de vous assurer qu ils ne jouent pas avec l'appareil. Fiche technique Alimentation: V CA, 50-60Hz Consommation: W Poids: environ 1 kg Taux de décharge de la vapeur: environ 6ml/min Température de la vapeur: environ 40 C (à une distance d environ 25 cm du diffuseur de vapeur ionique) Informations relatives à l évacuation des déchets, destinées aux utilisateurs d appareils électriques et électroniques (appareils ménagers domestiques) Lorsque ce symbole figure sur les produits et/ou les documents qui les accompagnent, cela signifie que les appareils électriques et électroniques ne doivent pas être jetés avec les ordures ménagères. Pour que ces produits subissent un traitement, une récupération et un recyclage appropriés, envoyez-les dans les points de collecte désignés, où ils peuvent être déposés gratuitement. Dans certains pays, il est possible de renvoyer les produits au revendeur local en cas d achat d un produit équivalent. En éliminant correctement ce produit, vous contribuerez à la conservation des ressources vitales et à la prévention des éventuels effets négatifs sur l environnement et la santé humaine qui pourraient survenir dans le cas contraire. Afin de connaître le point de collecte le plus proche, veuillez contacter vos autorités locales. Des sanctions peuvent être appliquées en cas d élimination incorrecte de ces déchets, conformément à la législation nationale. Utilisateurs professionnels de l Union européenne Pour en savoir plus sur l élimination des appareils électriques et électroniques, contactez votre revendeur ou fournisseur. Informations sur l évacuation des déchets dans les pays ne faisant pas partie de l Union européenne Ce symbole n est reconnu que dans l Union européenne. Pour vous débarrasser de ce produit, veuillez contacter les autorités locales ou votre revendeur afin de connaître la procédure d élimination à suivre. 15

16 Identificazione delle parti (Fig. 1) DA q Ugello w Uscita vapore Viene emesso il flusso di vapore agli ioni in particelle microscopiche. e Interruttore di accensione r Interruttore di prova L'interruttore di prova viene utilizzato per controllare la ionizzazione (atomizzazione) del vapore. La lampada di ionizzazione viene disattivata e viene emesso vapore non ionizzato, solo durante la pressione dell'interruttore di prova. t Lampada di ionizzazione La lampada si accende quando viene fornita alimentazione. La lampada viene disattivata quando viene premuto l'interruttore di prova. y Cavo u Pannello principale i Anello cosmetico DB o Guarnizione entrata acqua!0 Entrata acqua DC!1 Coperchio serbatoio acqua!2 Pulsante di apertura coperchio serbatoio acqua!3 Impugnatura!4 Livello acqua Quando il serbatoio viene riempito fino al segno full, il dispositivo può essere utilizzato per circa 12 minuti.!5 Coppa di drenaggio Se viene aggiunta troppa acqua, questa viene raccolta nella coppa di drenaggio. D!6 Coppa serbatoio acqua Quando il serbatoio viene riempito fino al segno full (livello massimo all'interno della coppa), il dispositivo può essere utilizzato per circa 12 minuti. Prima dell'uso 1. L'uso eccessivo è dannoso per la pelle. Si raccomanda di iniziare a utilizzare il dispositivo da due a tre volte a settimana. Quindi, regolare la frequenza e la durata d'uso in base alle condizioni della pelle. Se si verifica qualsiasi problema di pelle, interrompere immediatamente l'uso. L'uso raccomandato è una volta al giorno. 2. Le condizioni della pelle possono variare in base allo stato di salute. Controllare le condizioni della pelle durante i periodi di utilizzo del dispositivo. 3. Se si verifica qualsiasi problema della pelle, come sfoghi, rossore, prurito e così via, interrompere l'uso e consultare un medico. 4. I problemi della pelle possono essere causati da stress, problemi di salute, disordini organici o prodotti cosmetici. In tali casi, consultare uno specialista. Preparazione 1. Verificare che la coppa di drenaggio sia installata. 2. Premere il pulsante di apertura del coperchio del serbatoio dell'acqua per sollevare il coperchio del serbatoio. (Fig. 2) 3. Riempire il dispositivo di acqua utilizzando la coppa del serbatoio dell'acqua. Utilizzare acqua distillata o acqua non dura (trattata con uno specifico dispositivo, acquistabile separatamente). (Fig. 3) Prima di utilizzare il dispositivo per il trattamento dell'acqua acquistabile separatamente, leggere attentamente le relative istruzioni. Se si utilizza acqua dura, i minerali contenuti nell'acqua formano depositi nella parte interna del dispositivo, che possono ostruire il flusso di vapore. Fare attenzione a non fare entrare in contatto l'acqua con l'ugello, l'anello cosmetico, il pannello principale e l'interruttore. Eliminare sempre l'acqua residua all'interno della coppa del serbatoio dell'acqua. Non aggiungere acqua al di sopra del segno "full" sulla coppa del serbatoio dell'acqua o se nel dispositivo è presente acqua residua (controllare il livello dell'acqua e aggiungere nuova acqua solo se nel dispositivo non è presente acqua residua). 4. Chiudere il coperchio del serbatoio dell'acqua. 16

17 Uso della sauna facciale agli ioni 1. Inserire la spina in una presa e premere l'interruttore di accensione. L'interruttore fa uno scatto. La lampada di ionizzazione si accende. Dopo circa 30 secondi, viene emesso vapore ionizzato. - All'inizio del flusso di vapore, è normale che vengano emesse delle gocce di acqua calda. - Può essere emesso un fischio. Il fischio è causato dalla scarica elettrica e non rappresenta un malfunzionamento. Non utilizzare il dispositivo con la coppa del serbatoio dell'acqua posizionata sull'ugello. 2. Regolare l'angolo (su/giù) dell'ugello. (Fig. 4) Regolare l'ugello facendo attenzione a non toccare direttamente il flusso di vapore. Uso del vapore I Muovere il viso leggermente a destra e a sinistra in modo da spargere il vapore in modo uniforme. I L'uso del vapore sul naso è efficace sulla zona a T. 1. Mantenere il viso ad almeno 25 cm dall'uscita del vapore con i 25-cm misuri forniti come guida. (Fig. 5) 2. Posizionare l'uscita vapore vero il viso, leggermente al di sopra del mento. (Fig. 6) 3. Dopo l'uso, eliminare l'acqua (ad esempio, con un fazzoletto di carta), applicare una lozione per preparare il viso e quindi un'emulsione per integrare l'olio naturale della pelle. Esempi d'uso della sauna facciale agli ioni Il dispositivo può essere utilizzato sulla pelle non trattata, ma anche unitamente a trattamenti per il viso. I Prima della pulizia 1. Utilizzare il dispositivo per circa 3 minuti (questa procedura elimina le impurità dalla pelle). 2. Eseguire la pulizia del viso. I Applicare crema per massaggi e utilizzare il dispositivo mentre si massaggia la pelle. I Utilizzare il dispositivo dopo l'applicazione di lozioni o prodotti liquidi per il viso. Dopo l'uso (Eliminare l'acqua dal serbatoio dopo ciascun utilizzo.) 1. Premere l'interruttore di accensione per spegnere il dispositivo. L'interruttore fa uno scatto. Rimuovere la spina dalla presa di corrente. La lampada si spegne. Fare attenzione a non toccare il getto di vapore quando si preme l'interruttore. Non utilizzare il dispositivo se questo non contiene acqua. - In caso contrario, si formeranno rapidamente incrostazioni di calcare che indeboliranno il flusso di vapore. 2. Lasciare raffreddare il dispositivo per almeno 10 minuti. 3. Eliminare l'acqua residua nella coppa di drenaggio. 4. Eliminare l'acqua residua dal dispositivo versandola nella direzione indicata dalla freccia, come illustrato. Versando l'acqua in una direzione diversa da quella indicata, si potrebbe bagnare l'interruttore e provocare malfunzionamenti. Per evitare il rischio di ustioni durante l'eliminazione dell'acqua, maneggiare il dispositivo dalla parte inferiore. (Fig. 7) Nota: quando si elimina l'acqua, fare attenzione a non versarla sulla spina o sul cavo di alimentazione. 5. Asciugare l'acqua rimasta sul dispositivo. Non avvolgere il cavo attorno al dispositivo. Se si intende posizionare la coppa del serbatoio dell'acqua capovolta sopra il dispositivo quando questo viene riposto, asciugare prima qualsiasi residuo di acqua dalla coppa. 17
 dell'ugello. (Fig. 4) Regolare l'ugello facendo attenzione a non toccare direttamente il flusso di vapore.")
18 Pulizia Non lavare o immergere in acqua il dispositivo. Pulizia intorno all'entrata acqua e al livello acqua (pulire una volta al mese). I Per rimuovere e prevenire depositi di calcare, lasciare raffreddare il dispositivo per almeno 10 minuti dopo l'uso, quindi procedere alla pulizia in base alle seguenti istruzioni. Dopo l'operazione descritta nella fase 4 della sezione Dopo l'uso nel presente Manuale di istruzioni, riposizionare la coppa di drenaggio sul dispositivo. 1. Aprire il coperchio del serbatoio dell'acqua e aggiungere acqua utilizzando la coppa del serbatoio dell'acqua. Aggiungere acqua fino al segno full indicato sul dispositivo. 2. Chiudere il coperchio del serbatoio dell'acqua e scuotere il dispositivo orizzontalmente per 3-4 volte. Scuotere delicatamente il dispositivo senza capovolgerlo. (Fig. 8) 3. Aprire il coperchio del serbatoio e versare l'acqua nella direzione indicata dalla freccia, come indicato. (Fig. 7) Nota: per una efficace pulizia, ripetere 2-3 volte le fasi sopra descritte. 4. Asciugare l'acqua rimasta sul dispositivo. Anche in presenza di depositi di calcare vicino all'entrata acqua e al livello acqua, il flusso di vapore non viene ridotto. Pulizia del dispositivo. Non lavare o immergere in acqua il dispositivo. I Pulire il dispositivo con un panno inumidito con acqua e sapone. Non utilizzare mai alcool, solventi, benzene, prodotti per la rimozione di smalti, ecc. I Anche dopo aver eliminato tutta l'acqua, una quantità di acqua residua rimane nel dispositivo. - Ciò non causa alcun problema sanitario, poiché l'acqua è bollita. ATTENZIONE I Nei seguenti casi si consiglia di consultare un medico prima dell'uso: Persone affette da malattie acute o tumori maligni, donne in stato di gravidanza Persone con allergie o pelli sensibili Persone con problemi dermatologici, come dermatiti, ustioni gravi, ecc. Persone con lesioni epidermiche, eczema, gonfiori, ecc. I Il prodotto non deve essere utilizzato da persone con ridotte capacità di percezione del calore o dai bambini (se non sotto la supervisione di un adulto). I In caso di dolore o di sensazioni spiacevoli, interrompere immediatamente l'uso. I Non utilizzare il dispositivo in prossimità di sostanze infiammabili (alcool, solventi, benzene, prodotti per la rimozione di smalti, spray per inalazione, ecc.). I Non maneggiare il dispositivo con le mani bagnate. I Non riporre il dispositivo in bagno o in altri ambienti umidi. I Non posizionare il dispositivo in punti in cui potrebbe bagnarsi (ad esempio, vicino a un lavabo). I Non immergere il dispositivo in acqua. I Non utilizzare il dispositivo se questo ha subito danni, cadute, colpi, ecc. I Utilizzare il dispositivo solo sul viso. I Fare attenzione alla elevata temperatura del vapore. Utilizzare su una superficie piana. Il dispositivo non è portatile. Non capovolgere, scuotere o spostare il dispositivo durante l'uso o prima di 10 minuti dall'ultimo uso. Non toccare e non rivolgere lo sguardo verso il getto di vapore durante l'uso (o prima di 30 secondi dopo lo spegnimento del dispositivo). Mantenere il viso e le mani a non meno di 20 cm dall'ugello di uscita del vapore. Accertarsi che la coppa di drenaggio sia installata quando si aggiunge l'acqua o durante l'uso. I Non scuotere il dispositivo se questo contiene acqua. I Non eliminare l'acqua versandola dall'uscita. 18

19 I Non aggiungere acqua durante l'uso o immediatamente dopo l'uso. Prima di aggiungere acqua, attendere che il dispositivo si sia raffreddato a sufficienza. I Utilizzare acqua distillata o acqua non dura (trattata con uno specifico dispositivo). I Dopo l'uso, rimuovere sempre la spina dalla presa di corrente. I Non lasciare il dispositivo collegato all'alimentazione quando non viene utilizzato. I Per rimuovere la spina dalla presa di corrente, tirare la spina, non il cavo. I Nei seguenti casi, non utilizzare il dispositivo: Il cavo o la spina sono danneggiati o si scaldano. La spina è lenta all'interno della presa. I Non tagliare, danneggiare, modificare, piegare, tirare o attorcigliare il cavo. Non posizionare oggetti pesanti sul cavo e non schiacciarlo. - Se il cavo di alimentazione o la spina dell'unità sono danneggiati, interrompere immediatamente l'uso. Rivolgersi a un centro di assistenza autorizzato o a un tecnico qualificato per la riparazione o la sostituzione dell'unità. I Non modificare, smontare o tentare di riparare il dispositivo. I Questo apparecchio non è stato ideato per essere utilizzato da persone (compresi bambini) con capacità fisiche, sensoriali o mentali ridotte o prive dell'esperienza o delle conoscenze necessarie, se non sotto lo stretto controllo o previa istruzione sull'uso dell'apparecchio da parte di una persona responsabile della loro sicurezza. I bambini devono essere sempre sotto lo stretto controllo di un adulto, per evitare che facciano un utilizzo errato dell apparecchio. Specifiche tecniche Alimentatore: V CA, 50-60Hz Consumo: W Peso: circa 1kg Emissione vapore: circa 6 ml/min Temperatura del vapore: circa 40 C (a una distanza di circa 25 cm dall'uscita del vapore ionizzato) Informazioni per gli utenti sullo smaltimento di apparecchiature elettriche ed elettroniche obsolete (per i nuclei familiari privati) Questo simbolo sui prodotti e/o sulla documentazione di accompagnamento significa che i prodotti elettrici ed elettronici usati non devono essere mescolati con i rifiuti domestici generici. Per un corretto trattamento, recupero e riciclaggio, portare questi prodotti ai punti di raccolta designati, dove verranno accettati gratuitamente. In alternativa, in alcune nazioni potrebbe essere possibile restituire i prodotti al rivenditore locale, al momento dell'acquisto di un nuovo prodotto equivalente. Uno smaltimento corretto di questo prodotto contribuirà a far risparmiare preziose risorse ed evitare potenziali effetti negativi sulla salute umana e sull'ambiente, che potrebbero derivare, altrimenti, da uno smaltimento inappropriato. Per ulteriori dettagli, contattare la propria autorità locale o il punto di raccolta designato più vicino. In caso di smaltimento errato di questo materiale di scarto, potrebbero venire applicate delle penali, in base alle leggi nazionali. Per gli utenti aziendali nell'unione Europea Qualora si desideri smaltire apparecchiature elettriche ed elettroniche, contattare il rivenditore o il fornitore per ulteriori informazioni. Informazioni sullo smaltimento in nazioni al di fuori dell'unione Europea Questo simbolo è valido solo nell'unione Europea. Qualora si desideri smaltire questo prodotto, contattare le autorità locali o il rivenditore e chiedere informazioni sul metodo corretto di smaltimento. 19

20 Комплектация (рис.1) A q Шарообразная насадка w Отверстие для выхода пара Расщепленного на наночастицы e Выключатель питания r Кнопка включения тестового режима Используется для проверки ионизации лампы. Во время нажатия на кнопку лампа не работает. t Лампа-ионизатор Включение лампы происходит одновременно с включением прибора. При включении тестового режима лампа не работает. y Сетевой шнур u Панель управления i Кольцо B o Резиновая прокладка резервуара для воды!0 Резервуар для воды C!1 Крышка резервуара для воды!2 Кнопка открытия резервуара для воды!3 Ручка!4 Индикатор уровня воды в резервуаре Резервуар, заполненный водой до отметки Full обеспечивает возможность работы аппарата в течение 12 минут.!5 Чаша для излишков воды Вода собирается в чаше, если резервуар переполнен. D!6 Мерный стакан Количество воды, соответствующее отметке full дает возможность непрерывной работы прибора в течение 12 минут. Перед использованием 1. Чрезмерное использование вредно для кожи. На начальном этапе рекомендуется использование прибора 2-3 раза в неделю. В последствии, Вы самостоятельно можете решить как часто Вам необходимо использовать вапоризатор. Следите за состоянием своей кожи. При возникно-вении каких-либо проблем (аллергии), процедуру следует немедленно прервать. Рекомендуется использовать прибор ежедневно. 2. Состояние Вашей кожи напрямую связано с состоянием Вашего здоровья. Используя прибор, постоянно наблюдайте за состоянием Вашей кожи. 3. Если во время использования прибора у Вас появилась сыпь, краснота, зуд и т.д. немедленно прекратите процедуру и обратитесь к врачу. 4. Подобного рода проблемы с кожей могут быть следствием нервного напряжения, стресса, хронических заболеваний, аллергии на косметические препараты и т.д. Точную причину поможет определить врач. Подготовка к процедуре 1. Проверьте, установлена ли чаша для излишков воды. 2. Откройте крышку резервуара для воды, нажав на кнопку открытия резервуара. (рис.2) 3. Наполните резервуар водой, используя мерный стакан. Используйте дистиллированную воду или воду, прпрошедшую обработку в смягчителе воды. (рис.3) Используя смягчитель для воды, строго следуйте его инструкции по эксплуатации. Если использовать обычную, жесткую воду, то минералы, содержащиеся в ней, образуют налет на внутренних частях вапоризатора, который будет препятствовать свободному прохождению пара. Будьте осторожны! Не допускайте контакта воды с шарообразной насадкой, кольцом, панелью управления и выключателем питания. Лишнюю воду оставьте в мерном стакане. Не наливайте воду выше отметки full индикатора уровня воды в приборе. Проверяйте уровень воды в приборе перед тем, как заполнить резервуар. Наливайте воду только в случае ее отсутствия в резервуаре. 4. Закройте крышку резервуара для воды

ASSEMBLY INSTRUCTIONS DIRECTIVES POUR L'ASSEMBLAGE ombre pendant lamp lampe suspendue à tons dégradés, chocolat
 ASSEMBLY INSTRUCTIONS DIRECTIVES POUR L'ASSEMBLAGE ombre pendant lamp lampe suspendue à tons dégradés, chocolat SKU 2728089 INSTRUCTIONAL MANUAL MANUEL D'INSTRUCTIONS 270/2707 COMPONENT LIST LISTE DES
ASSEMBLY INSTRUCTIONS DIRECTIVES POUR L'ASSEMBLAGE luster chandelier lamp chandelier à trois branches en verre lustré
 ASSEMBLY INSTRUCTIONS DIRECTIVES POUR L'ASSEMBLAGE luster chandelier lamp chandelier à trois branches en verre lustré SKU 2711592 INSTRUCTIONAL MANUAL MANUEL D'INSTRUCTIONS 270/2707 COMPONENT LIST LISTE
MODE D EMPLOI USER MANUAL
 notice_cd 853:notice 9/01/08 15:08 Page 1 CAFETIÈRE À DOSETTES Coffee pad machine CD 853 GIACOMO MODE D EMPLOI USER MANUAL notice_cd 853:notice 9/01/08 15:08 Page 2 FRANÇAIS WHITE & BROWN vous félicite
Contrôle d'accès Access control. Notice technique / Technical Manual
 p.1/18 Contrôle d'accès Access control INFX V2-AI Notice technique / Technical Manual p.2/18 Sommaire / Contents Remerciements... 3 Informations et recommandations... 4 Caractéristiques techniques... 5
Thank you for choosing the Mobile Broadband USB Stick. With your USB Stick, you can access a wireless network at high speed.
 Thank you for choosing the Mobile Broadband USB Stick. With your USB Stick, you can access a wireless network at high speed. Note: This manual describes the appearance of the USB Stick, as well as the
Paxton. ins-20605. Net2 desktop reader USB
 Paxton ins-20605 Net2 desktop reader USB 1 3 2 4 1 2 Desktop Reader The desktop reader is designed to sit next to the PC. It is used for adding tokens to a Net2 system and also for identifying lost cards.
ARP-090G / ARP-090K NOTICE D'EMPLOI INSTRUCTION MANUAL
 2 7 NOTICE D'EMPLOI INSTRUCTION MANUAL ARP-090G / ARP-090K Lire attentivement la notice avant d utiliser l appareil Before operating this product, please read user manual completely FRANCAIS EMPLACEMENT
Notice Technique / Technical Manual
 Contrôle d accès Access control Encodeur USB Mifare ENCOD-USB-AI Notice Technique / Technical Manual SOMMAIRE p.2/10 Sommaire Remerciements... 3 Informations et recommandations... 4 Caractéristiques techniques...
Fabricant. 2 terminals
 Specifications Fabricant Nominal torque (Nm) 65 Minimal torque (Nm) 0,63 Coil resistance - 20 C (ohms) 20 Rated current DC (A) 1 Rotor inertia (kg.m 2 ) 2.10-3 Weight (kg) 7,20 Heat dissipation continuous
Lavatory Faucet. Instruction Manual. Questions? 1-866-661-9606 customerservice@artikaworld.com
 Lavatory Faucet Instruction Manual rev. 19-01-2015 Installation Manual You will need Adjustable Wrench Adjustable Pliers Plumber s Tape Hardware list (included) Allen Key Socket wrench tool Important Follow
GIGABIT PCI DESKTOP ADAPTER DGE-530T. Quick Installation Guide+ Guide d installation+
 GIGABIT PCI DESKTOP ADAPTER Quick Installation Guide+ Guide d installation+ Check Your Package Contents Quick Installation Guide Gigabit Ethernet PCI Adapter CD with Manual and Drivers DO NOT insert the
Instructions Mozilla Thunderbird Page 1
 Instructions Mozilla Thunderbird Page 1 Instructions Mozilla Thunderbird Ce manuel est écrit pour les utilisateurs qui font déjà configurer un compte de courrier électronique dans Mozilla Thunderbird et
WLAN Magic-Box einrichten S. 2 Installer WLAN Magic-Box p. 10 Installare WLAN Magic-Box p. 18 WLAN Magic-Box setup p. 26
 Swisscom (Schweiz) AG Contact Center CH-3050 Bern 07/2012 www.swisscom.ch WLAN einrichten S. 2 Installer WLAN p. 10 Installare WLAN p. 18 WLAN setup p. 26 YM.AP.4742.UM.SW.D00 WLAN On/Off WLAN On/Off Nous
Thank you for choosing the Mobile Broadband USB Stick. With your USB Stick, you can access a wireless network at high speed.
 Thank you for choosing the Mobile Broadband USB Stick. With your USB Stick, you can access a wireless network at high speed. Note: This manual describes the appearance of the USB Stick, as well as the
1. Raison de la modification
 T Service Documentation Technicocommerciale Information Technique Rubrique F Les régulations Nouvelle version de programme de la carte SU : F1.4 P5253 JS F 67580 Mertzwiller N ITOE0117 26/09/2011 FR 1.
Your Pirelli VDSL router has been preconfigured with the following settings:
 Important Information & Installation Instructions VDSL (Analog) Dear Netstream customer Your Pirelli VDSL router has been preconfigured with the following settings: LAN IP Adress of the Pirelli router:
APPENDIX 6 BONUS RING FORMAT
 #4 EN FRANÇAIS CI-DESSOUS Preamble and Justification This motion is being presented to the membership as an alternative format for clubs to use to encourage increased entries, both in areas where the exhibitor
Contents Windows 8.1... 2
 Workaround: Installation of IRIS Devices on Windows 8 Contents Windows 8.1... 2 English Français Windows 8... 13 English Français Windows 8.1 1. English Before installing an I.R.I.S. Device, we need to
Le No.1 de l économie d énergie pour patinoires.
 Le No.1 de l économie d énergie pour patinoires. Partner of REALice system Economie d énergie et une meilleure qualité de glace La 2ème génération améliorée du système REALice bien connu, est livré en
Instructions pour mettre à jour un HFFv2 v1.x.yy v2.0.00
 Instructions pour mettre à jour un HFFv2 v1.x.yy v2.0.00 HFFv2 1. OBJET L accroissement de la taille de code sur la version 2.0.00 a nécessité une évolution du mapping de la flash. La conséquence de ce
SIMATIC. SIMATIC STEP 7 PID Professional V12. Welcome Tour. Totally Integrated Automation www.siemens.com/tia-portal-welcometour PORTAL
 SIMATIC STEP 7 PID Professional V12 Welcome Tour Totally Integrated Automation www.siemens.com/tia-portal-welcometour Totally Integrated Automation PORTAL www.siemens.com/tia-portal SIMATIC Siemens Aktiengesellschaft
P-W. 0,5 Nm. 2 Nm. Optional. fissare su piastra fix on the plate auf der Platte befestigen fixer sur plaque fijar en la placa
 7 P-W 8 5 Optional 4 nel caso P-W aggiungere il connettore optional e continuare con la sequenza della fig. 8 In case of P-W, the optional connector must be added and procedure as in picture 8 followed
Réserve Personnelle. Persönliche Reserve. Emprunter et épargner en fonction de vos besoins. Leihen und sparen je nach Bedarf
 crédit épargne Réserve Personnelle Emprunter et épargner en fonction de vos besoins Persönliche Reserve Leihen und sparen je nach Bedarf Réserve Personnelle Vous voulez disposer à tout moment des moyens
TABLE DES MATIERES A OBJET PROCEDURE DE CONNEXION
 1 12 rue Denis Papin 37300 JOUE LES TOURS Tel: 02.47.68.34.00 Fax: 02.47.68.35.48 www.herve consultants.net contacts@herve consultants.net TABLE DES MATIERES A Objet...1 B Les équipements et pré-requis...2
Warning: Failure to follow these warnings could result in property damage, or personal injury.
 Western Steel & Tube 1 Storage Locker Extended Storage Locker Storage Cabinet Assembly And Use Instructions Warning: Failure to follow these warnings could result in property damage, or personal injury.
Using a Walker. 2. Move your injured or weak leg toward the walker first. If you have had surgery on both legs, use either leg to begin walking.
 Using a Walker Walking with a Walker 1. Lift the walker and place it at a comfortable distance in front of you with all four of its legs on the floor. This distance is often equal to an arm s length. 2.
Règlement sur le télémarketing et les centres d'appel. Call Centres Telemarketing Sales Regulation
 THE CONSUMER PROTECTION ACT (C.C.S.M. c. C200) Call Centres Telemarketing Sales Regulation LOI SUR LA PROTECTION DU CONSOMMATEUR (c. C200 de la C.P.L.M.) Règlement sur le télémarketing et les centres d'appel
Stainless Steel Deep Fryer HF 1030
 TM Stainless Steel Deep Fryer Friteuse en acier inoxydable 2012, HFEF-CAN US FR UK -10/12 1 Year Limited Warranty Un An De Garantie Limitée Thank you for purchasing the innovative Heaven Fresh Stainless
SA-32 / SA-62 INSTRUCTION MANUAL - MANUEL D INSTRUCTIONS
 SA-32 / SA-62 INSTRUCTION MANUAL - MANUEL D INSTRUCTIONS 4 5 6 7 4 5 6 7 1. Telephone Paging Volume Control 1. Contrôle de volume Paging Téléphone 2. Microphone Volume Control 2. Contrôle volume du microphone
Garage Door Monitor Model 829LM
 Garage Door Monitor Model 829LM To prevent possible SERIOUS INJURY or DEATH from a closing garage door: NEVER permit children to operate or play with door control push buttons or remote control transmitters.
Guide d'installation rapide TFM-560X YO.13
 Guide d'installation rapide TFM-560X YO.13 Table of Contents Français 1 1. Avant de commencer 1 2. Procéder à l'installation 2 Troubleshooting 6 Version 06.08.2011 16. Select Install the software automatically
ENGLISH 4 FRANÇAIS 6 ESPAÑOL 8
 SY ENGLISH 4 FRANÇAIS 6 ESPAÑOL 8 ENGLISH How to lubricate the sewing machine Warning! Always switch off the machine and disconnect it from the power supply before lubricating the sewing machine. 1 Always
Gestion des prestations Volontaire
 Gestion des prestations Volontaire Qu estce que l Income Management (Gestion des prestations)? La gestion des prestations est un moyen de vous aider à gérer votre argent pour couvrir vos nécessités et
Guide d installation Deco Drain inc. DD200
 Guide d installation Deco Drain inc. DD200 Pour plus informations et pour télécharger les guides d installation en couleur, visitez notre site web. www.decodrain.com Soutien technique : Composez le : 514-946-8901
03/2013. Mod: WOKI-60IP/TR. Production code: DTWIC 6000
 03/2013 Mod: WOKI-60IP/TR Production code: DTWIC 6000 ENCASTRABLE INDUCTION DROP IN INDUCTION 11/2011 TECHNICAL FEATURES DOCUMENTATION S.A.V. Notice d utilisation : FX00326-A Guide d intervention : ---
that the child(ren) was/were in need of protection under Part III of the Child and Family Services Act, and the court made an order on
 was/were in need of protection under Part III of the Child and Family Services Act, and the court made an order on") ONTARIO Court File Number at (Name of court) Court office address Applicant(s) (In most cases, the applicant will be a children s aid society.) Full legal name & address for service street & number, municipality,
ONTARIO Court File Number at (Name of court) Court office address Applicant(s) (In most cases, the applicant will be a children s aid society.) Full legal name & address for service street & number, municipality,
R.V. Table Mounting Instructions
 PTSS165 ACCESSORY MOUNTING INSTRUCTIONS Use these instructions in conjunction with your main manual to properly assemble your gas grill. Refer to the main manual for safety, operating, cleaning and maintenance
Sécurité relative aux sièges auto et aux rehausseurs
 Sécurité relative aux sièges auto et aux rehausseurs Safety with Car Seats and Booster Seats Car crashes are the main cause of accidental death and serious injury of children. Correctly using a car or
DOCUMENTATION - FRANCAIS... 2
 DOCUMENTATION MODULE SHOPDECORATION MODULE PRESTASHOP CREE PAR PRESTACREA INDEX : DOCUMENTATION - FRANCAIS... 2 INSTALLATION... 2 Installation automatique... 2 Installation manuelle... 2 Résolution des
Folio Case User s Guide
 Fujitsu America, Inc. Folio Case User s Guide I N S T R U C T I O N S This Folio Case is a stylish, lightweight case for protecting your Tablet PC. Elastic Strap Pen Holder Card Holders/ Easel Stops Figure
How to Login to Career Page
 How to Login to Career Page BASF Canada July 2013 To view this instruction manual in French, please scroll down to page 16 1 Job Postings How to Login/Create your Profile/Sign Up for Job Posting Notifications
AMARICAM JUNIOR 100M FRANCAIS ENGLISH DEUTSCH ITALIANO ESPANOL NEDERLANDS PORTUGUESES MANUEL UTILISATEUR USER S GUIDE BENUTZERHANDBUCH
 AMARICAM JUNIOR 100M MANUEL UTILISATEUR USER S GUIDE BENUTZERHANDBUCH GUIDA PER L UTENTE GUIA DEL USUARIO GEBRUIKERSGIDS MANUAL DO USUARIO FRANCAIS ENGLISH DEUTSCH ITALIANO ESPANOL NEDERLANDS PORTUGUESES
Betriebsanleitung Programmierkabel PRKAB 560 Mode d emploi Câble de programmation PRKAB 560 Operating Instructions Programming cable PRKAB 560
 Betriebsanleitung Programmierkabel Câble de programmation Operating Instructions Programming cable B d-f-e 146 599-02 03.06 Camille Bauer AG Aargauerstrasse 7 CH-5610 Wohlen/Switzerland Telefon +41 56
Archived Content. Contenu archivé
 ARCHIVED - Archiving Content ARCHIVÉE - Contenu archivé Archived Content Contenu archivé Information identified as archived is provided for reference, research or recordkeeping purposes. It is not subject
Manuel d installation et de maintenance (serrures LR128 E)
") Manuel d installation et de maintenance (serrures LR128 E) Manuel comprenant : Installation de la gâche GV et GVR :............................................ page 2 Position et réglage du shunt - Cales
Manuel d installation et de maintenance (serrures LR128 E) Manuel comprenant : Installation de la gâche GV et GVR :............................................ page 2 Position et réglage du shunt - Cales
POLICY: FREE MILK PROGRAM CODE: CS-4
 POLICY: FREE MILK PROGRAM CODE: CS-4 Origin: Authority: Reference(s): Community Services Department Cafeteria Services and Nutrition Education Division Resolution #86-02-26-15B.1 POLICY STATEMENT All elementary
DOCUMENTATION - FRANCAIS... 2
 DOCUMENTATION MODULE CATEGORIESTOPMENU MODULE CREE PAR PRESTACREA INDEX : DOCUMENTATION - FRANCAIS... 2 INSTALLATION... 2 CONFIGURATION... 2 LICENCE ET COPYRIGHT... 3 SUPPORT TECHNIQUE ET MISES A JOUR...
PRIMER WIRELESS STEREO HEADSET QUICK START GUIDE
 PRIMER WIRELESS STEREO HEADSET QUICK START GUIDE ! WARNING! BEFORE USING THIS PRODUCT, READ THE MANUALS FOR THIS ACCESSORY AND THE XBOX 360 CONSOLE (AND ANY OTHER APPLICABLE MANUALS) FOR IMPORTANT SAFETY
PARIS ROISSY CHARLES DE GAULLE
 GPS 2 34 1 E 49 0 46 N GPS* 2 56 56 E 49 0 12 N Votre contact / Your contact: et / and: Accueil : Cabines téléphoniques publiques Reception: Public telephone kiosks Navette Shuttle AÉROPORT DE TT CAR TRANSIT
WiFi Security Camera Quick Start Guide. Guide de départ rapide Caméra de surveillance Wi-Fi (P5)
") #45 #46 WiFi Security Camera Quick Start Guide Guide de départ rapide Caméra de surveillance Wi-Fi (P5) #47 Start Here 1 Is this you? TECH SUPPORT CTRL ALT DEL 2 If yes, turn to page three 1 3 If not,
#45 #46 WiFi Security Camera Quick Start Guide Guide de départ rapide Caméra de surveillance Wi-Fi (P5) #47 Start Here 1 Is this you? TECH SUPPORT CTRL ALT DEL 2 If yes, turn to page three 1 3 If not,
3615 SELFIE. http://graffitiresearchlab.fr HOW-TO / GUIDE D'UTILISATION
 3615 SELFIE http://graffitiresearchlab.fr HOW-TO / GUIDE D'UTILISATION Hardware : Minitel Computer DIN FM545 45 connector (http://www.gotronic.fr/art-fiche-din-fm545-4747.htm) Cable Arduino compatible
Stainless Steel Solar Wall Light
 V 2.9 Stainless Steel Solar Wall Light User Manual Please read and understand all instructions before use.retain this manual for future reference. V 2.9 Stainless Steel Solar Wall Light SPECIFICATIONS
printed by www.klv.ch
 Zentralkommission für die Lehrabschlussprüfungen des Verkaufspersonals im Detailhandel Lehrabschlussprüfungen für Detailhandelsangestellte 2006 Französisch Leseverständnis und gelenkte Sprachproduktion
Cheque Holding Policy Disclosure (Banks) Regulations. Règlement sur la communication de la politique de retenue de chèques (banques) CONSOLIDATION
 Regulations. Règlement sur la communication de la politique de retenue de chèques (banques) CONSOLIDATION") CANADA CONSOLIDATION CODIFICATION Cheque Holding Policy Disclosure (Banks) Regulations Règlement sur la communication de la politique de retenue de chèques (banques) SOR/2002-39 DORS/2002-39 Current to
CANADA CONSOLIDATION CODIFICATION Cheque Holding Policy Disclosure (Banks) Regulations Règlement sur la communication de la politique de retenue de chèques (banques) SOR/2002-39 DORS/2002-39 Current to
Package Contents. System Requirements. Before You Begin
 Package Contents DWA-125 Wireless 150 USB Adapter CD-ROM (contains software, drivers, and manual) Cradle If any of the above items are missing, please contact your reseller. System Requirements A computer
Activity Space: acrobatica a squadre
 Activity Space: acrobatica a squadre Nell activity show dell acrobatica a squadre potete costruire diverse forme. Provate a formare diverse figure. Potete anche creare delle nuove forme voi stessi. È importante
Application Form/ Formulaire de demande
 Application Form/ Formulaire de demande Ecosystem Approaches to Health: Summer Workshop and Field school Approches écosystémiques de la santé: Atelier intensif et stage d été Please submit your application
TECHNICAL MANUAL FT GEN 17
 IT MANUALE TECNICO EN TECHNICAL MANUAL FR MANUEL TECHNIQUE FT GEN 7 3 4 5 6 Schede opzionali Art. 5733 e Art. 5734 per Monitor serie Bravo Optional cards Art. 5733 and Art. 5734 for Bravo series Monitor
3M HEPA Vacuum 497AJK. User s Guide
 3M HEPA Vacuum 497AJK User s Guide Table of Contents Section Page Safety Instructions...3 Grounding Instructions...5 Specifications...7 To Operate...7 To Replace Filter...8 Parts List...9 Regulatory Statements...9
Cafetière. Mode d Emploi. 1Notice cafetière v1.0
 Cafetière Mode d Emploi 1Notice cafetière v1.0 SOMMAIRE 1 CONSIGNES DE SÉCURITÉ... 3 2INSTALLATION DE L APPAREIL EN TOUTE SÉCURITÉ...4 3PRECAUTION CONCERNANT L UTILISATION DE L APPAREIL...5 4DESCRIPTION
AMENDMENT TO BILL 32 AMENDEMENT AU PROJET DE LOI 32
 THAT the proposed clause 6(1), as set out in Clause 6(1) of the Bill, be replaced with the following: Trustee to respond promptly 6(1) A trustee shall respond to a request as promptly as required in the
Commutateur clavier-écran-souris 2/4 ports DKVM-2/4. Guide d utilisation. Rév. 1.3
 Commutateur clavier-écran-souris 2/4 ports DKVM-2/4 Guide d utilisation Rév. 1.3 Table des matières Introduction...1 Fonctionnalités...2 Contenu de l emballage...2 Installation du matériel...3 Face avant...
Sun Type 7 Keyboard and Mouse Installation Guide
 Sun Type 7 Keyboard and Mouse Installation Guide Guide d installation du clavier et de la souris Sun Type 7 Sun Type 7-Tastatur Installationshandbuch Guida all installazione della tastiera e del mouse
APPENDIX 2. Provisions to be included in the contract between the Provider and the. Holder
 Page 1 APPENDIX 2 Provisions to be included in the contract between the Provider and the Obligations and rights of the Applicant / Holder Holder 1. The Applicant or Licensee acknowledges that it has read
SERVEUR DÉDIÉ DOCUMENTATION
 SERVEUR DÉDIÉ DOCUMENTATION Release 5.0.6.0 19 Juillet 2013 Copyright 2013 GIANTS Software GmbH, All Rights Reserved. 1/9 CHANGE LOG Correction de bug divers (5.0.6.0) Ajout d une option de relance automatique
First Nations Assessment Inspection Regulations. Règlement sur l inspection aux fins d évaluation foncière des premières nations CONSOLIDATION
 CANADA CONSOLIDATION CODIFICATION First Nations Assessment Inspection Regulations Règlement sur l inspection aux fins d évaluation foncière des premières nations SOR/2007-242 DORS/2007-242 Current to September
ETABLISSEMENT D ENSEIGNEMENT OU ORGANISME DE FORMATION / UNIVERSITY OR COLLEGE:
 8. Tripartite internship agreement La présente convention a pour objet de définir les conditions dans lesquelles le stagiaire ci-après nommé sera accueilli dans l entreprise. This contract defines the
RULE 5 - SERVICE OF DOCUMENTS RÈGLE 5 SIGNIFICATION DE DOCUMENTS. Rule 5 / Règle 5
 RULE 5 - SERVICE OF DOCUMENTS General Rules for Manner of Service Notices of Application and Other Documents 5.01 (1) A notice of application or other document may be served personally, or by an alternative
Quick Setup Guide Guide de configuration rapide. Tablet Device SGPT12 Series Tablette électronique Série SGPT12
 Quick Setup Guide Guide de configuration rapide Tablet Device SGPT12 Series Tablette électronique Série SGPT12 Welcome / Bienvenue Congratulations on your purchase of this Xperia Tablet S. This Quick Setup
WINTER BOAT STORAGE SYSTEM SYSTÈME DE REMISAGE HIVERNAL POUR BATEAU
 MANUAL / MANUEL VIDEO WINTER BOAT STORAGE SYSTEM SYSTÈME DE REMISAGE HIVERNAL POUR BATEAU ASSEMBLY INSTRUCTIONS GUIDE D ASSEMBLAGE NAVIGLOO 14-18½ ft/pi FISHING BOAT! RUNABOUT! PONTOON BOAT! SAILBOAT (SAILBOAT
GASKET FOR TONER COLLECTION BOTTLE
 Technical Service Bulletin PRODUCT CREATED DATE MODIFIED DATE FILE ALL PRINTERS 08/07/2011 201108 REV A GASKET FOR TONER COLLECTION BOTTLE Voir version française dans la section suivante. Due to a manufacturing
BILL 203 PROJET DE LOI 203
 Bill 203 Private Member's Bill Projet de loi 203 Projet de loi d'un député 4 th Session, 40 th Legislature, Manitoba, 63 Elizabeth II, 2014 4 e session, 40 e législature, Manitoba, 63 Elizabeth II, 2014
Nouveautés printemps 2013
 » English Se désinscrire de la liste Nouveautés printemps 2013 19 mars 2013 Dans ce Flash Info, vous trouverez une description des nouveautés et mises à jour des produits La Capitale pour le printemps
MC1-F www.primo-elektro.be
 NOTICE D UTILISATION CAFETIÈRE MUG ISOTHERME www.primo-elektro.be WWW.PRIMO-ELEKTRO.BE 2 WWW.PRIMO-ELEKTRO.BE Lisez toutes les instructions Conservez-les pour consultation ultérieure 1. CONDITIONS DE GARANTIE
AUFZIEHSERVICE SERVICE DE LAMINAGE
 SEVICE DE LAMINAGE Gratis-Fax 0800 300 444 Telefon 071 913 94 94 Online bestellen www.wilerrahmen.ch 2015 359 SEVICE DE LAMINAGE 360 2015 Fax gratuit 0800 300 444 Téléphone 071 913 94 94 Commande en ligne
ASSEMBLYcomponents H 10. Grundplatte. Base plate. Plaque de base BEM 3 BEW 3. FP 3 Base plate 30001121 1,1kg BEM 6 BEM 6D BEW 6
 S ASSEMBLYcomponents Base plate FP H 10 Die Grundplatten sind aus Stahl 700 N/mm 2 hergestellt. Sie sind brüniert und beidseitig geschliffen. Die Passfedern werden mitgeliefert. Die SUHNER-Bearbeitungseinheiten
Compléter le formulaire «Demande de participation» et l envoyer aux bureaux de SGC* à l adresse suivante :
 FOIRE AUX QUESTIONS COMMENT ADHÉRER? Compléter le formulaire «Demande de participation» et l envoyer aux bureaux de SGC* à l adresse suivante : 275, boul des Braves Bureau 310 Terrebonne (Qc) J6W 3H6 La
Wie können meine Abschlüsse in Frankreich anerkannt werden?
 Wie können meine Abschlüsse in Frankreich anerkannt werden? Trotz der mittlerweile in Kraft getretenen europäischen Regelungen der beruflichen Anerkennung von Ausbildungen und Hochschuldiplomen, liegt
PROJET DE LOI. An Act to Amend the Employment Standards Act. Loi modifiant la Loi sur les normes d emploi
 2nd Session, 57th Legislature New Brunswick 60-61 Elizabeth II, 2011-2012 2 e session, 57 e législature Nouveau-Brunswick 60-61 Elizabeth II, 2011-2012 BILL PROJET DE LOI 7 7 An Act to Amend the Employment
Dans une agence de location immobilière...
 > Dans une agence de location immobilière... In a property rental agency... dans, pour et depuis vocabulaire: «une location» et «une situation» Si vous voulez séjourner à Lyon, vous pouvez louer un appartement.
Contrôle d accès Access control MOD-TCPIP-AI. Notice technique / Technical Manual
 Contrôle d accès Access control MOD-TCPIP-AI Notice technique / Technical Manual Notice technique Mod-TCPIP-AI 9 septembre 2008 v.1.0 p.2/16 Sommaire / Contents Sommaire / Contents...2 Remerciements...3
PRESENTATION REMOTE TÉLÉCOMMANDE DE PRÉSENTATION. User Guide Manuel de l utilisateur
 PRESENTATION REMOTE TÉLÉCOMMANDE DE PRÉSENTATION User Guide Manuel de l utilisateur Targus Presentation Remote Introduction Thank you for your purchase of the Targus Presentation Remote. This cordless
WEB page builder and server for SCADA applications usable from a WEB navigator
 Générateur de pages WEB et serveur pour supervision accessible à partir d un navigateur WEB WEB page builder and server for SCADA applications usable from a WEB navigator opyright 2007 IRAI Manual Manuel
Support Orders and Support Provisions (Banks and Authorized Foreign Banks) Regulations
 Regulations") CANADA CONSOLIDATION CODIFICATION Support Orders and Support Provisions (Banks and Authorized Foreign Banks) Regulations Règlement sur les ordonnances alimentaires et les dispositions alimentaires (banques
CANADA CONSOLIDATION CODIFICATION Support Orders and Support Provisions (Banks and Authorized Foreign Banks) Regulations Règlement sur les ordonnances alimentaires et les dispositions alimentaires (banques
Once the installation is complete, you can delete the temporary Zip files..
 Sommaire Installation... 2 After the download... 2 From a CD... 2 Access codes... 2 DirectX Compatibility... 2 Using the program... 2 Structure... 4 Lier une structure à une autre... 4 Personnaliser une
Deadline(s): Assignment: in week 8 of block C Exam: in week 7 (oral exam) and in the exam week (written exam) of block D
: Assignment: in week 8 of block C Exam: in week 7 (oral exam) and in the exam week (written exam) of block D") ICM STUDENT MANUAL French 2 JIC-FRE2.2V-12 Module Change Management and Media Research Study Year 2 1. Course overview Books: Français.com, niveau intermédiaire, livre d élève+ dvd- rom, 2ième édition,
ICM STUDENT MANUAL French 2 JIC-FRE2.2V-12 Module Change Management and Media Research Study Year 2 1. Course overview Books: Français.com, niveau intermédiaire, livre d élève+ dvd- rom, 2ième édition,
NORME INTERNATIONALE INTERNATIONAL STANDARD. Dispositifs à semiconducteurs Dispositifs discrets. Semiconductor devices Discrete devices
 NORME INTERNATIONALE INTERNATIONAL STANDARD CEI IEC 747-6-3 QC 750113 Première édition First edition 1993-11 Dispositifs à semiconducteurs Dispositifs discrets Partie 6: Thyristors Section trois Spécification
UNIVERSITE DE YAOUNDE II
 UNIVERSITE DE YAOUNDE II The UNIVERSITY OF YAOUNDE II INSTITUT DES RELATIONS INTERNATIONALES DU CAMEROUN INTERNATIONAL RELATIONS INSTITUTE OF CAMEROON B.P. 1637 YAOUNDE -CAMEROUN Tél. 22 31 03 05 Fax (237)
NEW Fin Fan / Air cooled condenser cleaning
 Air cooled Condensers ( ACC ) Cleaning Air Cooled heat exchangers ( Finfan) Cleaning Cleaning Services Permanente installation NEW Fin Fan / Air cooled condenser cleaning New and revolutionnary high pressure
MANUEL D'UTILISATION
 CAFETIERE MANUEL D'UTILISATION Modèle : KF12 Merci de lire attentivement ce document avant la première utilisation de l'appareil CONSIGNES DE SECURITE Lors de l'utilisation d'appareils électriques, des
calls.paris-neuroscience.fr Tutoriel pour Candidatures en ligne *** Online Applications Tutorial
 calls.paris-neuroscience.fr Tutoriel pour Candidatures en ligne Online Applications Tutorial 1/4 Pour postuler aux Appels d Offres de l ENP, vous devez aller sur la plateforme : calls.parisneuroscience.fr.
THE LAW SOCIETY OF UPPER CANADA BY-LAW 19 [HANDLING OF MONEY AND OTHER PROPERTY] MOTION TO BE MOVED AT THE MEETING OF CONVOCATION ON JANUARY 24, 2002
![THE LAW SOCIETY OF UPPER CANADA BY-LAW 19 [HANDLING OF MONEY AND OTHER PROPERTY] MOTION TO BE MOVED AT THE MEETING OF CONVOCATION ON JANUARY 24, 2002](/thumbs/19/276456.jpg "THE LAW SOCIETY OF UPPER CANADA BY-LAW 19 [HANDLING OF MONEY AND OTHER PROPERTY] MOTION TO BE MOVED AT THE MEETING OF CONVOCATION ON JANUARY 24, 2002") 2-aes THE LAW SOCIETY OF UPPER CANADA BY-LAW 19 [HANDLING OF MONEY AND OTHER PROPERTY] MOTION TO BE MOVED AT THE MEETING OF CONVOCATION ON JANUARY 24, 2002 MOVED BY SECONDED BY THAT By-Law 19 [Handling
2-aes THE LAW SOCIETY OF UPPER CANADA BY-LAW 19 [HANDLING OF MONEY AND OTHER PROPERTY] MOTION TO BE MOVED AT THE MEETING OF CONVOCATION ON JANUARY 24, 2002 MOVED BY SECONDED BY THAT By-Law 19 [Handling
CALCUL DE LA CONTRIBUTION - FONDS VERT Budget 2008/2009
 Société en commandite Gaz Métro CALCUL DE LA CONTRIBUTION - FONDS VERT Budget 2008/2009 Taux de la contribution au Fonds vert au 1 er janvier 2009 Description Volume Coûts Taux 10³m³ 000 $ /m³ (1) (2)
MODE D EMPLOI PLAQUE DE CUISSON À INDUCTION POSABLE PC 491 - PC
 notice PC 491-492: notice PC 481/482 3/10/11 9:09 Page 1 MODE D EMPLOI PLAQUE DE CUISSON À INDUCTION POSABLE PC 491 - PC 492 PC 491 PC 492 notice PC 491-492: notice PC 481/482 3/10/11 9:09 Page 2 FRANÇAIS
Parcage. Bases légales. Office des ponts et chaussées du canton de Berne. Tiefbauamt des Kantons Bern. Bau-, Verkehrsund Energiedirektion
 Tiefbauamt des Kantons Bern Bau-, Verkehrsund Energiedirektion Office des ponts et chaussées du canton de Berne Direction des travaux publics, des transports et de l'énergie Tâches spéciales Technique
Principe de TrueCrypt. Créer un volume pour TrueCrypt
 Sommaire : Principe de TrueCrypt...1 Créer un volume pour TrueCrypt...1 Premier montage...6 Réglages...8 Save Currently Mounted Volumes as Favorite...8 Settings > Preferences...9 TrueCrypt Traveller pour
If you understand the roles nouns (and their accompanying baggage) play in a sentence...
 play in a sentence...") If you understand the roles nouns (and their accompanying baggage) play in a sentence...... you can use pronouns with ease (words like lui, leur, le/la/les, eux and elles)...... understand complicated
If you understand the roles nouns (and their accompanying baggage) play in a sentence...... you can use pronouns with ease (words like lui, leur, le/la/les, eux and elles)...... understand complicated
Le passé composé. C'est le passé! Tout ça c'est du passé! That's the past! All that's in the past!
 > Le passé composé le passé composé C'est le passé! Tout ça c'est du passé! That's the past! All that's in the past! «Je suis vieux maintenant, et ma femme est vieille aussi. Nous n'avons pas eu d'enfants.
FICHE D INSCRIPTION ET FICHE D INFORMATION MEDICALE POUR ELEVES LYCEE FRANÇAIS INTERNATIONAL
 FICHE D INSCRIPTION ET FICHE D INFORMATION MEDICALE POUR ELEVES LYCEE FRANÇAIS INTERNATIONAL Information sur participant Nom de l élève Prénom Age Sexe Date de naissance J M A ID/ Numéro de passeport Nom