LEGGERE ATTENTAMENTE E CONSERVARE PER FUTURA CONSULTAZIONE! READ CAREFULLY AND KEEP INSTRUCTIONS FOR FUTURE REFERENCE!
|
|
|
- Clémence Paris
- il y a 10 ans
- Total affichages :
Transcription
1 Fly n Board LEGGERE ATTENTAMENTE E CONSERVARE PER FUTURA CONSULTAZIONE! READ CAREFULLY AND KEEP INSTRUCTIONS FOR FUTURE REFERENCE!

2 2
3 3
4 4
5 5

6 6

7 7

8 8
9 9

10 ISTRUZIONI DI MONTAGGIO ED USO LEGGERE ATTENTAMENTE E CONSERVARE PER FUTURA CONSULTAZIONE Per un corretto uso della pedana FLY'N BOARD vi consigliamo di dedicare alcuni minuti alla lettura di questo manuale. GARANZIA DI QUALITÀ: - La nostra pedanina è fabbricata secondo le norme europee EN 1888 : Questo prodotto è garantito per il periodo previsto dalle leggi vigenti. - Non possono essere reclamati difetti e/o deterioramenti dovuti ad un utilizzo non adeguato, al non rispetto delle norme di sicurezza, di montaggio e d'uso descritte o a modifiche fatte al prodotto. - Il naturale consumo e i danni causati da uso improprio o scorretto non sono contestabili. - Graffi, usura, opacizzazione o ingiallimento delle parti dovuto allo sfregamento, all'uso di detergenti, sudore o fenomeni atmosferici non sono un difetto di fabbricazione. - Errati lavaggi, tessuti lasciati umidi, non ben asciugati possono dar vita a forme di muffa e non sono difetti di fabbricazione. IMPORTANTE!: PRIMA DI UTILIZZARE QUESTO ARTICOLO, LEGGERE ATTENTAMENTE LE ISTRUZIONI E LA SEQUENZA DI MONTAGGIO PER EVITARE INUTILI PERICOLI AL VOSTRO BAMBINO! RIMUOVERE ED ELIMINARE TUTTI I SACCHETTI DI PLASTICA, POTREBBERO ESSERE FONTE DI SOFFOCAMENTO O STRANGOLAMENTO PER IL VOSTRO BAMBINO! MAI LASCIARE IL BAMBINO INCUSTODITO! La pedana FLY'N BOARD consente di trasportare un secondo bambino con voi oltre al piccolo nel passeggino/carrozzina. Grazie alle innumerevoli regolazioni, questa pedana è utilizzabile su quasi tutti i modelli di passeggini e di carrozzine in commercio. ATTENZIONE: Questa pedana è progettata per un uso su passeggino o carrozzine con un interasse tra i tubi delle ruote che va da un MINIMO di 35 cm ad un MASSIMO di 50 cm! 10

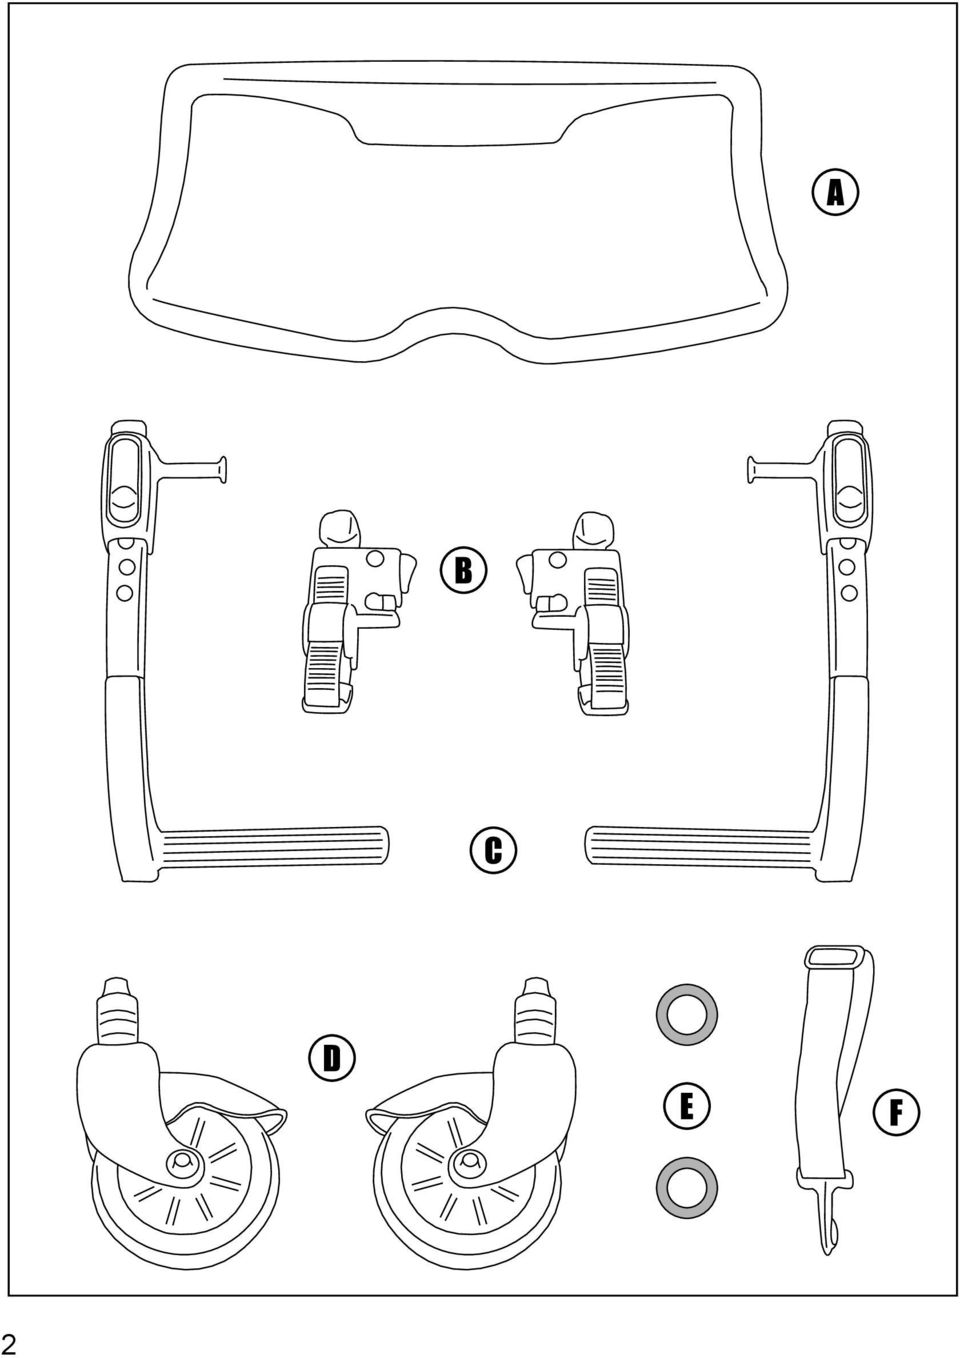
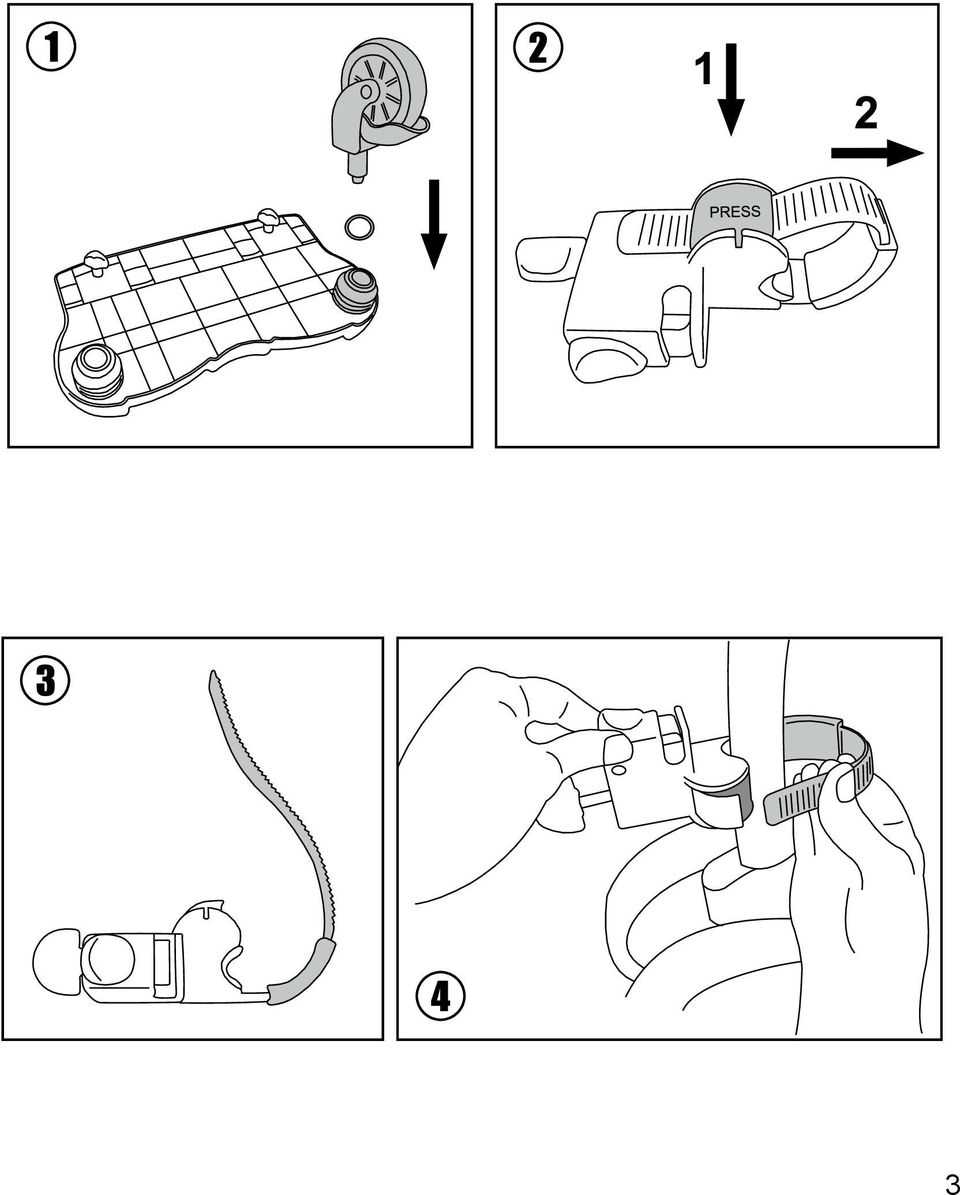
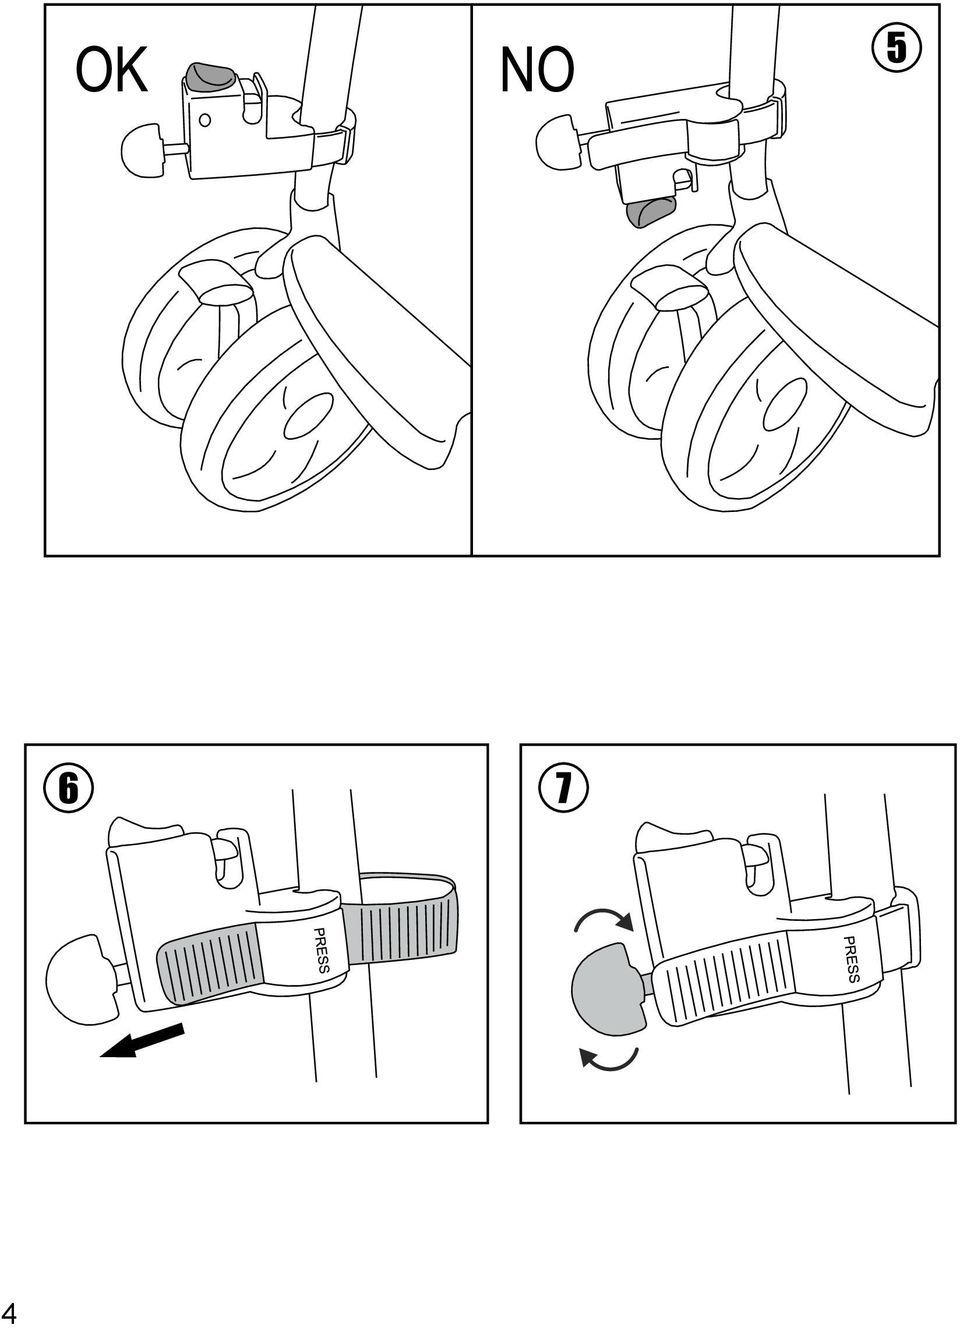
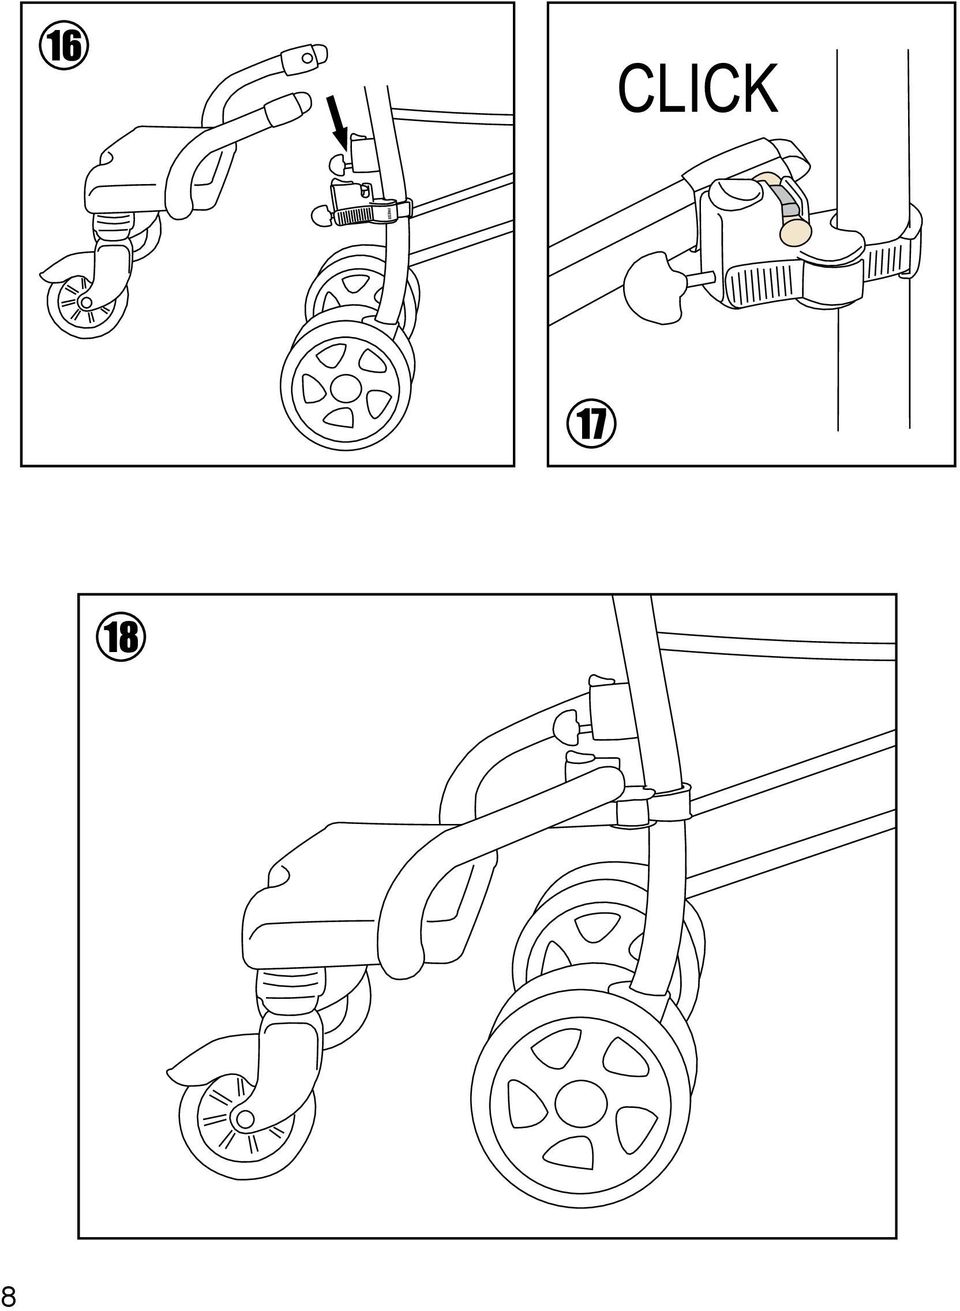
11 COMPONENTI: Oltre a questo manuale di istruzioni, all'interno dell'imballo troverete i seguenti componenti per il montaggio e fissaggio della pedana al passeggino: A - Pedana 1 Pezzo B - Connettori di fissaggio (Destro e Sinistro) 2 Pezzi C - Bracci (Destro e Sinistro) 2 Pezzi D - Ruote 2 Pezzi E - Rondelle 2 Pezzi F - Cinghia di trasporto 1 Pezzo MONTAGGIO DELLA PEDANA: Ruotare la pedana a faccia in giù (con il logo rivolto verso il basso), inserire la rondella sul mozzo della ruota (a meno che non sia già all'interno della sede della ruota) e poi inserite il tutto nella sede, spingendo bene fino in fondo (CLICLK) (Fig. 1). Compiere le medesime operazioni per l'altra ruota. Prendere un connettore, premere il pulsante di sblocco della linguetta e sfilarla (Fig. 2) bene fino in fondo. Assicuratevi che sia completamente fuoriuscita e libera (Fig. 3). Avvicinate un connettore al tubo del passeggino ed infilate la cinghia nell'asola (Fig.4). IMPORTANTE!: Per il corretto fissaggio dei connettori sui tubi del passeggino/carrozzina, il cursore di sbloccaggio deve esser verso l'alto (Fig. 5). Tirate la cinghia bene finché il connettore è completamente aderente al tubo (Fig. 6). Fatelo aderire al tubo avvitando (girando in senso orario) leggermente il pomello (Fig. 7). Fate le stesse operazioni per l'altro connettore. Assicuratevi che entrambi i connettori siano alla stessa altezza da terra! Svitate leggermente i volantini sotto la pedana (Fig. 8) ed inserite i due bracci nelle apposite sedi laterali (Fig. 9). Per determinare l'angolo d'inclinazione dei bracci (Fig. 10), posizionate la pedana con le ruote appoggiate a terra e vicino agli agganci, in modo che sia parallela al terreno (Fig. 11). Regolate poi la larghezza dei bracci a secondo della distanza delle ruote (Fig. 12) tenendo la pedana equidistante da entrambi i bracci. Potete avvicinare o allontanare la pedana dal passeggino (Fig. 13) premendo il pulsante di sblocco dello scorrevole e regolando poi la sua posizione, più o meno vicina al passeggino (Fig. 14). Una volta compiute tutte le regolazioni, bloccare i bracci avvitando i volantini sotto la pedana (Fig. 15) su ambo i lati, attaccare la pedana ai connettori (Fig. 16) verificando che la linguetta del bloccaggio sul connettore sia fuoriuscita correttamente (CLICK) (Fig. 17). Ora la vostra pedana FLY'N BOARD è pronta per l'uso (Fig. 18). Controllate che tutte la parti siano ben fissate e correttamente montate. 11
 (Fig. 1). Compiere le medesime operazioni per l'altra ruota. Prendere un connettore, premere il pulsante di sblocco della linguetta e sfilarla (Fig.")
12 MODO D'USO: Quando il secondo bambino non è sulla pedana ma state usando la carrozzina/passeggino, potete sollevare la pedana appendendola ai manici del passeggino (Fig. 19) utilizzando la cinghia di trasporto. Fissate il gancio della cinghia nel foro sul retro della pedana (Fig. 20) e fissare poi la cinghia ai manici. Staccate la cinghia quando non la utilizzate; potrebbe esser fonte di pericolo. SMONTAGGIO DELLA PEDANA: Quando volete togliere la pedana dal passeggino, tirate i cursori di sblocco sui connettori ed estraete la pedana (Fig. 21). Riponetela sempre in un luogo protetto e sicuro; non deve essere fonte di pericolo per i vostri bambini. IMPORTANTE: Quando si smette di usare definitivamente il passeggino/carrozzina o la pedana, RICORDARSI DI SMONTARE I CONNETTORI dal telaio e di fissarli alla pedana PER EVITARE DI PERDERLI. AVVERTENZE: LEGGERE ATTENTAMENTE LE ISTRUZIONI PRIMA DELL'ASSEMBLAGGIO DELLA PEDANA. CONSERVARE QUESTO MANUALE PER RIFERIMENTI FUTURI. L'INOSSERVANZA DI QUESTE AVVERTENZE E DELLE ISTRUZIONI DI UTILIZZO PUÒ CAUSARE GRAVI CONSEGUENZE ALLA SICUREZZA DEL VOSTRO BAMBINO. - ATTENZIONE: MAI LASCIARE IL BAMBINO INCUSTODITO, SENZA LA SORVEGLIANZA DI UN ADULTO. LA SICUREZZA DEL BAMBINO È SOTTO LA VOSTRA RESPONSABILITÀ. - Gettare e tenere fuori dalla portata dei bambini i sacchetti di plastica dell'imballo, per evitare casi di soffocamento. - Verificare prima di ogni utilizzo che tutti i meccanismi di bloccaggio siano funzionanti correttamente e tutte le componenti non presentino difetti o danneggiamenti; in tal caso non utilizzare il prodotto. - Verificare che la pedana non abbia viti allentate o avvitate scorrettamente o altri elementi che potrebbero ferire il bambino. Non utilizzare con parti rotte, difettose o mancanti. - Svolgere le operazioni di montaggio e installazione SENZA alcun bambino nei paraggi. L'assemblaggio di questo prodotto deve essere effettuato da un adulto. 12
.")
13 - Non apportare alcuna modifica o aggiungere altri elementi che possano compromettere la sicurezza dell'articolo; potrebbe essere pericoloso. Non utilizzare con parti rotte, difettose o mancanti. - AVVERTENZA: Questo articolo NON è adatto a bambini di età inferiore ai 24 mesi circa. - AVVERTENZA: Questo articolo NON è adatto a bambini di peso superiore a 20 Kg. - Tenere lontano da fonti di calore, prese elettriche, forni, fuochi, finestre e altri tipi di pericoli. - Quando si lascia il prodotto esposto al sole aspettare che si raffreddi prima di utilizzarlo. - Non apportare alcuna modifica che possa compromettere la sicurezza del prodotto; potrebbe essere pericoloso utilizzare accessori non approvati dal costruttore. - ATTENZIONE: Durante l'utilizzo non date al bambino e non posizionate il prodotto in prossimità di corde o cinghie, potrebbero essere fonte di strangolamento. - Non utilizzare la pedana finché il bambino non è in grado di camminare da solo. - Mentre è sulla pedana il bambino deve rimanere in posizione eretta. Non fatelo sedere o sdraiare. - AVVERTENZA: Ogni peso attaccato al manico influisce sulla stabilità del passeggino e ne compromette la stabilità e la sicurezza. - AVVERTENZA: Questo prodotto non è adatto per correre o pattinare. - Non usare la pedana su scale o scale mobili; in tal caso togliere i bambini, chiudete il passeggino e togliete la pedana. - Prestare particolare attenzione ai tratti di terreno irregolari, ai gradini e ai marciapiedi. - Verificare prima di ogni utilizzo che la pedana sia correttamente fissata al passeggino. - Per assicurarsi il pieno controllo del passeggino tenere con entrambe le mani l'impugnatura. - In caso di utilizzo in spiaggia, pulire con attenzione da granelli di sabbia e salsedine le ruote e le parti dei movimenti e degli scorrimenti. - Anche per un normale uso del prodotto assicurarsi periodicamente che tutte le parti siano pulite da polvere o sporco, si eviteranno così attriti che potrebbero compromettere il funzionamento dello stesso. - Questa pedana è destinata esclusivamente per un uso esterno. Non utilizzare sulla neve o su superfici poco stabili. - La pedana è progettata e costruita per portare un solo bambino per volta. - Impugnare sempre le maniglie del passeggino/carrozzina quando usate la pedana e quando c'è un bambino sopra. Non frenate mai la carrozzina/passeggino con un bambino sulla pedana. 13

14 - Rimuovere la pedana prima di frenare il passeggino o prima di chiuderlo. - Evitare sovraccarichi aggiungendo pesi diversi da quelli indicati in queste istruzioni e in quelle della carrozzina. - Vanno comunque rispettate e seguite le norme e le avvertenze del passeggino prima dell'utilizzo della pedana. - Questo articolo non è un giocattolo, non lasciate che il vostro bambino giochi con la pedana. - Non rimuovere le etichette adesive; potrebbero rendere il prodotto non conforme ai sensi di norma. - ATTENZIONE: Non effettuare nessuna manovra di regolazione o smontaggio della pedana con sopra il vostro bambino o oggetti vari. Allontanare il vostro bambino quando si effettuano queste operazioni. - Evitare di infilare le dita nei sistemi di bloccaggio e nei vari meccanismi. CURA E MANTENIMENTO DEL PRODOTTO: Per un miglior funzionamento e mantenimento del prodotto, vi consigliamo di seguire questi consigli di manutenzione. Le operazioni di pulizia e manutenzione devono essere effettuate solo da adulti. - Controllare regolarmente che l'articolo e i suoi accessori non abbiano parti rotte, difettose o mancanti. - Per pulire le parti plastiche e i tessuti, usare strofinacci con acqua tiepida e detergenti neutri. - Non usare solventi. Non candeggiare. Asciugare perfettamente prima di utilizzarlo o riporlo. - Asciugare bene le parti in ferro per prevenire la ruggine. - Proteggere il prodotto da agenti atmosferici, acqua, pioggia o neve; l'esposizione continua e prolungata al sole potrebbe causare cambiamenti di colore. - Tenete puliti da polvere e sabbia i tubi e le parti dei movimenti e degli scorrimenti per evitare inceppamenti, attriti e mal-funzionamenti. - Controllare periodicamente le ruote e la loro usura; tenerle pulite da polvere e sabbia. - Non utilizzare pezzi di ricambio che non siano stati approvati e forniti dal produttore. Usare esclusivamente ricambi Plebani. Il produttore potrà apportare in qualsiasi momento modifiche all'articolo al fine di migliorarlo. Plebani s.r.l. declina ogni responsabilità per danni a cose o persone derivanti da un utilizzo improprio e/o scorretto del prodotto. 14

15 NOTE IMPORTANTI: - Tenere medicinali, piccoli oggetti e oggetti pericolosi per il bambino lontani dal prodotto. - Tenere il seguente manuale vicino al prodotto per eventuali consultazioni future. - NON POSIZIONARE l'articolo vicino a fonti di calore, prese elettriche...o dove il bambino possa venire a contatto con qualsiasi rischio. - Assicurarsi che chi utilizza questo articolo sia a conoscenza dell'esatto funzionamento dello stesso e delle norme di sicurezza. Grazie per aver scelto un prodotto Plebani. Tutti i testi, i disegni e ogni contenuto presente in questo manuale sono di proprietà ESCLUSIVA della Plebani s.r.l. e sono tutelati dalle leggi in vigore. Ogni copia e/o riproduzione è punita dalla legge. 15

16 ASSEMBLY AND USE INSTRUCTIONS READ CAREFULLY AND KEEP FOR FUTURE REFERENCE For a correct use of FLY'N BOARD buggy-board we recommend you to take few minutes to read this manual. QUALITY GUARANTIES: - Our board is made according to European safety standards EN 1888 : This product is guaranteed for a period as stated by the laws in force. - All defects and/or deteriorations caused by wrong use, by the non respect of security standards, assembling and use here mentioned or by modifications made on the product, cannot be claimed. - The natural consumption and damage caused by incorrect or wrong use are not disputed. - Scratches, wear, dullness or the turning yellow of the parts due to rubbing, to the use of detergents, sweat or weather phenomena are not a manufacturing defect. - Wrong washes, wet and not well dried fabrics may create molds and cannot be considered as manufacturing defects. IMPORTANT!: BEFORE USING THIS ARTICLE, READ CAREFULLY THE INSTRUCTIONS AND THE SEQUENCE OF ASSEMBLY TO AVOID UNNECESSARY HAZARDS TO YOUR CHILD. THROW AWAY AND REMOVE ALL POLY BAGS OF PACKING, THEY MIGHT BE RISKS OF SUFFOCATION FOR YOUR BABY! NEVER LEAVE YOUR CHILD UNATTENDED! "FLY'N BOARD" board lets you carry a second child with you in addition to the baby into stroller/pram. Thanks to the countless adjustments, you can use this board on nearly all models of strollers and carry-cot in commerce. WARNING: This board is designed for use on a stroller or pram with distance between wheels' frames from 35 cm MINIMUM to 50 cm MAXIMUM! 16

17 COMPONENTS: In addition to this instruction manual, inside packing you will find the following components for assembling and fixing the board to stroller: A - Board 1 Pc B - Fixing Connectors (Left & Right) 2 Pcs C - Arms (Left & Right) 2 Pcs D - Wheels 2 Pcs E - Washers 2 Pcs F - Carrying Strap 1 Pcs BOARD ASSEMBLING: Turn board face down (with the logo facing down), insert the washer on the wheel hub (unless it is already inside wheel's housing) and insert everything into hole, pushing well to bottom (CLICLK) (Fig. 1). Make the same operations for the other wheel. Take a connector, press the release button and slip strap off (Fig. 2) right to the end. Make sure it's completely out and free (Fig. 3). Get a connector closer to stroller's tube and insert strap into slot (Fig. 4). IMPORTANT!: For correct assembling of connectors on tubes of stroller/pram, release slider must be upwards (Fig. 5). Pull strap well until connector is fully fitted to frame (Fig. 6). Let it fit to tube screwing (clockwise) slightly the knob (Fig. 7). Do the same operation for the other connector. Make sure that both connectors are at the same height from the ground! Unscrew knobs under board (Fig. 8) and insert the two arms in their side seats (Fig. 9). To determine arms inclination angle (Fig. 10), put boar with wheels on ground and close to the hooks, so that it is parallel to ground (Fig. 11). Then adjust arms width depending on the distance of the wheels (Fig. 12) maintaining board at same distance from both arms. You can closer to or farther the board from stroller (Fig. 13) by pressing release button of slider and then adjusting its position, more or less close to the stroller (Fig. 14). Once made all adjustments, lock arms screwing knob under board (Fig. 15) on both sides, fix board to connectors (Fig. 16) checking that the locking tab on the connector is properly out (CLICK) (Fig. 17). Now your "FLY'N BOARD" is ready for use (Fig. 18). Check that all the parts are well fixed and properly assembled. 17
 right to the end. Make sure it's completely out and free (Fig. 3).")
18 WAY OF USE: When the second child is not on board but are using the pram/stroller, you can raise board hanging it to the handles of the stroller (Fig. 19) using strap. Fasten the strap hook into the hole on the back of the board (Fig. 20) and then attach strap to the handles. Remove strap when not in use; it could be a source of danger. BOARD REMOVING: When you want to remove board from stroller, pull unlock slider on connectors and remove the board (Fig. 21). Always store it in a protected and safe place; board should not be a source of danger to your children. IMPORTANT: When you definitely stop using stroller/pram or board, REMEMBER TO REMOVE THE CONNECTORS from the frame and fix them to board TO AVOID LOSING. WARNINGS: READ CAREFULLY THESE INSTRUCTIONS BEFORE ASSEMBLY OF BUGGY-BOARD. KEEP THIS MANUAL FOR FUTURE REFERENCES. THE NON-OBSERVANCE OF THESE WARNINGS AND USE INSTRUCTIONS COULD CAUSE SERIOUS CONSEQUENCES TO YOUR BABY'S SAFETY. - WARNING: NEVER LEAVE YOUR CHILD UNATTENDED, WITHOUT THE SUPERVISION OF AN ADULT. THE SAFETY OF YOUR CHILD IS UNDER YOUR RESPONSIBILITY. - Throw away and keep out of baby's reach the poly bags of the packing, they might be risks of suffocation. - Before every use check all locking systems work correctly and all components are not defected or damaged, in this case do not use the item any longer. - Check that board doesn't have any loosened or improperly assembled screws, or any other elements which can injure your baby. Do not use with any broken, defected or loosen parts. - Make assembly and installation operations WITHOUT any babies around. Assembly of this product should be made by an adult. - Do not make any modifications or add other elements that may compromise the safety of the item; it could be dangerous. Do not use with any broken, defective or missing parts. 18

19 - WARNING: This product is NOT suitable for children under the age of about 24 months. - WARNING: This product is NOT suitable for children with 20 Kg MAXIMUM weight. - Keep it far from sources of heat, current-taps, ovens, fires, windows...and any other type of danger. - When you leave the product exposed to the sun, wait it becomes cooler before using it. - Do not make any modifications that could damage safety of the product; it may be dangerous use spare parts not approved by manufacturer. - WARINING: When using do not give to your baby, and do not place the product near the ropes or straps, they could be a source of strangulation. - Do not use board until baby can walk alone. - While child is on board, he must remain in an upright position. Do let him not sit or lie down. - WARNING: Any weight attached on handle affects on stroller stability and may affect its stability and safety. - WARNING: This item is not suitable to run or to skate. - Do not use board on stairs or escalators; in this case, remove the children, close the stroller and remove board. - Pay many attention to the uneven grounds, to steps and sidewalks. - Check before every use that board is correctly fixed to stroller. - In order to have full control of the stroller hold the handle with both hands. - In case of using on the beach, clean with carefully from grains of sand and salt wheels and parts of movements and sliding. - Even for a normal use of the product, regularly make sure that all parts are clean from dust or dirt, this will avoid frictions that may affect the operating of the board. - This board is only intended for outdoor use. Do not use on snow or on unstable surfaces. - Board is designed and built to carry only one child at a time. - Always hold handles of the stroller/pram when using board and when there is a baby on it. Never brake the carry-cot/stroller with a baby on board. 19

20 - Remove board before braking the stroller or before closing. - Avoid overloading by adding weights than those listed in these instructions and those of the pram. - Anycase warnings and safety standards of the stroller must be respected and followed before use of board. - This product is not a toy, do not let your child play with it. - Do not remove labels; it may let the product not conform to safety standards. - WARNING: Do not make any adjustment or removing operations of board with baby or any objects on it. Keep your baby away when you make these operations. - Avoid to put fingers in locking systems and in various mechanisms. CARE AND MAINTENANCE OF THE PRODUCT: For better operation and maintenance of the product, we suggest you to follow these maintenance advices. The cleaning and maintenance must be done only by adults. - Regularly check that item and its accessories have no broken, defective or missing parts. - To clean plastic parts and fabric, use towels with hot water and neutral detergents. - Do not use solvents. Do not bleach. Dry thoroughly before using or storing it. - Dry well iron parts to prevent rust. - Protect the product from weather, water, rain or snow; continuous and prolonged exposure to sunlight may cause color changes. - Keep clean from dust and sand pipes and parts of movements and flows to prevent jamming, friction and malfunctions. - Regularly check wheels and their wear and tear; keep them clean from dust and sand. - Do not use spare parts not approved and supplied by the manufacturer. Use only Plebani spare parts. The manufacturer may make changes to the article at any time to improve it. Plebani s.r.l. disclaims any liability for damage or injury caused by improper use and/or misuse of the product. 20

21 IMPORTANT NOTES: - Keep medicines, small objects and any dangerous items for baby far from the item. - Keep this manual near the product for future reference. - DO NOT PLACE this item near heat sources, electrical outlets or where the baby can contact with any risk. - Be sure that those who use this product is aware of precise operation of product and all safeties standards. Thank you for choosing a Plebani s product. All text, drawings and any content contained in this manual are EXCLUSIVE property of Plebani s.r.l. and are protected by the laws in force. Any copying and/or reproduction is punishable by law. 21
22 INSTRUCTIONS D'ASSEMBLAGE ET D'EMPLOI LIRE ATTENTIVEMENT ET GARDER POUR CONSULTATION FUTURE Pour une utilisation correcte de la plate-forme FLY'N BOARD nous vous recommandons de prendre quelques minutes pour lire ce manuel. GARANTIE DE QUALITÉ: - Notre plate-forme est fabriquée en conformité avec les normes Européennes EN 1888 : Ce produit est garanti pour la période prévue par les lois en vigueur. - Ne sont pas acceptées réclamations pour des défauts ou détériorations par une utilisation impropre, par le non respect des normes de sécurité, d'assemblage et d'emploi décrites ou par des modifications faites au produit. - Une usure naturelle et dommages causés par un usage impropre ou pas correct ne font objet de contestation. - Griffades, usure, déglaçage ou jaunissement dû au frottement, par usage de détergents impropres, sueur, phénomènes atmosphériques ne sont pas des défauts de fabrication. - Lavages incorrects et tissus pas bien séchés qui peuvent produire des moisissures ne sont des défauts de fabrication. IMPORTANT!: AVANT D'UTILISER CET ARTICLE, LIRE ATTENTIVEMENT LES INSTRUCTIONS ET SEQUENCE D'INSTALLATION POUR EVITER DES RISQUES INUTILES A VOTRE ENFANT! ENLEVER ET JETER LE SACS EN PLASTIQUE, PEUT ÊTRE UNE SOURCE DE SUFFOCATION OU D'ETRANGLEMENT POUR VOS ENFANTS! NE JAMAIS LAISSER L'ENFANT SANS SURVEILLANCE! La plate-forme "FLY'N BOARD" vous permet de transporter un deuxième enfant avec vous, en plus au petit dans la poussette/landau. Grâce aux innombrables ajustements, cette plate-forme peut être utilisé sur presque tous les modèles de poussettes et de landau sur le marché. ATTENTION: Cette plate-forme est conçue pour une utilisation sur une poussette ou landau avec une distance entre les tubes des roues qui va d'un MINIMUM de 35 cm à un MAXIMUM de 50 cm! 22
23 ASSEMBLAGE DU CADRE: En plus à ce manuel d'instruction, dans le paquet vous trouverez les éléments suivants pour le montage et la fixation de la plate-forme pour la poussette: A - Plate-forme 1 Pièce B - Connecteurs de fixation (droite et gauche) 2 Pièces C - Bras (droite et gauche) 2 Pièces D - Roues 2 Pièces E - Rondelles 2 Pièces F - Sangle 1 Pièce ASSEMBLAGE DE LA PLATE-FORME: Tournez la plate-forme vers le bas (avec le logo vers le bas), insérez la rondelle sur le moyeu de la roue (sauf se elle est déjà à l'intérieur du siège de la roue), puis mettez tout en places, poussant jusqu'à au fond (CLICLK) (Fig. 1). Répetez les mêmes opérations pour l'autre roue. Prenez un connecteur, appuyez sur le bouton de déverrouillage et retirez la languette (Fig. 2) jusqu'à la fin. Assurez-vous qu'elle est complètement sortie et libre (Fig. 3). Approché un connecteur au tube de la poussette et enfilées la fente dans la sangle (Fig. 4). IMPORTANT!: Pour la fixation correcte des connecteurs sur les tubes de la poussette / landau, le bouton de déverrouillage rapide doit être en haut (Fig. 5). Tirez sur la sangle bien jusqu'à ce que le connecteur est bien adhère au tube (Fig. 6). Faitez-le adhèrer parfaitement au tube en le vissant (tournez en sens-horaire) légèrement la molette (Fig. 7). Faites de même pour l'autre connecteur. Assurez-vous que les deux connecteurs sont à la même hauteur du sol! Dévissez légèrement les volants sous la plate-forme (Fig. 8) et insérez les deux bras dans le côté des sièges (Fig. 9). Pour déterminer l'angle d'inclinaison des bras (Fig. 10), positionner la plate-forme avec les roues reposant sur le sol et à proximité des crochets, de sorte qu'elle soit parallèle au sol (Fig. 11). Ensuite, ajuster la largeur des bras en fonction de la distance entre les roues (Fig. 12) en maintenant la plate-forme à égale distance de deux bras. Vous pouvez approcher ou éloigner la plate-forme de la poussette (Fig. 13) en appuyant sur le bouton de déverrouillage, puis en ajustant sa position, plus ou moins proches de la poussette (Fig. 14). Une fois tous les réglages effectués, bloquer les bras en vissant les volants sous la plateforme (Fig. 15) sur les deux côtés, attacher la plate-forme aux connecteurs (Fig. 16) vérifiant que la languette de verrouillage sur le connecteur soit correctement sortie (CLICK) (Fig. 17). Maintenant, votre plate-forme "FLY'N BOARD" est prête à l'emploi (Fig. 18). Vérifiez que toutes les pièces sont en sécurité et correctement montées. 23
24 MODE D'EMPLOI: Lorsque le deuxième enfant n'est pas sur la plate-forme mais vous utilisez le landau / poussette, vous pouvez soulever la plate-forme en l'accrochant aux poignées de la poussette (Fig. 19) en utilisant la sangle de transport. Fixer le crochet de la sangle dans le trou à l'arrière de la plate-forme (Fig. 20), puis attacher la sangle aux poignées. Retirez la sangle lorsqu'il ne est pas en cours d'utilisation; pourrait être une source de danger. RETRAIT DE LA PLATE-FORME: Lorsque vous voulez enlever la plate-forme de la poussette, tirer les curseurs libération sur les connecteurs et retirez la plate-forme (Fig. 21). Toujours ranger dans lieu protégé et sûr; ne devrait pas être une source de danger pour vos enfants. IMPORTANT: Lorsque vous arrêtez enfin en utilisant la poussette/landau ou la plate-forme, PENSEZ A RETIRER LES CONNECTEURS du châssis et fixez-les à la plate-forme POUR EVITER DE LES PERDRE. AVVERTISSEMENTS: LIRE ATTENTIVEMENT LES INSTRUCTIONS AVANT L'ASSEMBLAGE DU PLATE- FORM. CONSERVER CES INSTRUCTIONS POUR CONSULTATIONS FUTURES. NON RESPECT DE CES AVVERTISSEMENTS ET MODE D'EMPLOI PEUT ENTRAINER DES CONSEQUENCES GRAVES POUR LA SECURITE DE VOTRE ENFANT. - ATTENTION: JAMAIS LAISSER LE BÉBÉ SANS LA SURVEILLANCE CONSTANTE D'ADULTES. LA SECURITE' DE L'ENFANT EST SOUS VOTRE RESPONSABILITÉ. - Jeter ou garder hors de la portée des enfants les emballages et sacs de plastique, pour éviter la suffocation. - Vérifier avant chaque utilisation que tous les mécanismes de verrouillage fonctionnent correctement et tous les composants sont exempts de défauts ou de dommages qui n'y a pas des vis lâches ou mal fixés ou autres objets qui pourraient blesser l'enfant; dans ce cas, ne pas utiliser le produit. - Assurez-vous que la plate-forme ne dispose des vis desserrées ou mal serrées ou d'autres parties qui pourraient blesser le bébé. Ne pas utiliser avec pièces cassées, défectueuses ou manquantes. - Effectuer le montage et l'installation SANS n'importe quel enfant dans le quartier. Le montage de ce produit doit être effectuée par un adulte. 24
25 - Ne pas apporter des modifications ou ajouter d'autres éléments qui pourraient compromettre la sécurité de l'article; pourrait être dangereux. Ne pas utiliser avec les pièces cassées, défectueux ou manquant. - AVERTISSEMENT: Ce produit n'est PAS adapte aux enfants de moins de 24 mois approximativement. - AVERTISSEMENT: Ce produit n'est PAS adapte aux enfants d'un poids plus de 20 kg MAXIMUM. - Tenir à l'écart des sources de chaleur, des prises électriques, fours, plaques de cuisson, fenêtres...et d'autres types de risques. - Lorsque vous quittez le produit exposé au soleil, il faut attendre qu'il refroidisse avant de l'utiliser. - Ne pas apporter des modifications qui pourraient compromettre la sécurité du produit; pourrait être dangereux d'utiliser des accessoires non approuvés par le fabricant. - ATTENTION: Lorsque vous utilisez le produit ne pas donner à votre enfant, et ne pas placer le produit près des cordes ou des sangles, ils pourraient être une source de strangulation. - Ne pas utiliser la plate-forme jusqu'à ce que l'enfant est capable de marcher tout seul. - Sur la plate-forme l'enfant doit rester en position verticale. Ne pas le faire assesoir ou se allonger. - AVERTISSEMENT: Toute charge fixée à la poignée affecte la stabilité de la poussette et porte atteinte à la stabilité et à la sécurité. - AVERTISSEMENT: Ce produit ne convient pas pour la course ou le patinage. - Ne pas utiliser la plate-forme sur les escaliers ou les escaliers mécaniques; en ce cas, enlever les enfants, fermer la poussette et enlever le repose-pied. - Accorder une attention particulière au cas de terrain accidenté, les étapes et les trottoirs. - Vérifiez avant chaque utilisation de cette plateforme est correctement attaché à la poussette. - Pour assurer le plein contrôle de la poussette tenir la poignée avec les deux mains. - Lors de l'utilisation de la poussette à la plage nettoyer avec une attention particulière aux grains de sable et de sel les roues et pièces de mouvements et des flux. - Même pour une utilisation normale du produit, s'assurer périodiquement que toutes les pièces sont propres et exempts de poussière ou de saleté, pour éviter les frictions qui peuvent affecter le fonctionnement du même. - Cette plate-forme est uniquement destiné à une utilisation à extérieur. Ne pas utiliser sur la neige ou sur des surfaces instables. - La plate-forme est conçue et construite pour transporter un seul enfant à la fois. - Tenez toujours les poignées de la poussette/landau lorsque vous utilisez la plate-forme et quand il y a un enfant ci-dessus. Freinez jamais la poussette avec un bébé sur la plateforme. 25
26 - Retirer la plate-forme avant de freiner la poussette ou avant la fermeture. - Évitez de surcharger en ajoutant du poids que celles énumérées dans ces instructions et celles de la poussette. - Doivent être respectés et suivi les règles et les avertissements de la poussette avant l'utilisation de la plate-forme. - Ce produit ne est pas un jouet, ne laissez pas votre enfant jouer avec la plate-forme. - Ne retirez pas les étiquettes adhésives et tissées; peut rendre le produit ne correspondant pas à la norme. - AVERTISSEMENT: Ne pas effectuer opération de réglage ou démontage de la plateforme avec le bébé ou articles divers au-dessus. Déplacez l'enfant lorsque vous effectuez ces étapes. - Ne mettez pas vos doigts dans les systèmes de blocage et les différents mécanismes de verrouillage. SOIN ET MAINTENANCE DU PRODUIT: Pour une meilleure exploitation et la maintenance du produit, nous vous recommandons de suivre ces conseils d'entretien. Le nettoyage et l'entretien doivent être effectués uniquement par des adultes. - Vérifiez régulièrement que l'article et ses accessoires n'ont parties cassées, défectueuses ou manquantes. - Pour le nettoyage des parties plastiques et des tissus, utiliser des linges avec eau tiède et détergents neutres. - Ne pas utiliser de solvants. Ne pas blanchir. Séchez soigneusement avant d'utiliser ou de stocker. - Sécher bien les pièces de fer pour éviter la rouille. - Protéger le produit contre les agents atmosphériques, l'eau, la pluie ou la neige; l'exposition continue et prolongée au soleil peut provoquer des changements de couleur. - Veillez à la propreté de poussière et de sable tuyaux et pièces de mouvements et de flux pour empêcher le brouillage, la friction et des dysfonctionnements. - Vérifier régulièrement les roues et de leur usure; garder propres de la poussière et de sable. - Ne pas utiliser de pièces de rechange qui n'ont pas été approuvées et fournies par le fabricant. Utilisez uniquement des pièces de rechange Plebani. Le fabricant peut à tout moment apporter des modifications à l'article afin de l'améliorer. Plebani s.r.l. décline toute responsabilité pour les dommages à choses ou personnes causés par l'utilisation et/ou la mauvaise utilisation du produit non conforme. 26
27 NOTES IMPORTANTES: - Gardez les médicaments, les petits objets et articles dangereux pour le bébé loin du produit. - Conservez ce manuel à proximité du produit pour référence future. - NE PLACEZ PAS le produit à proximité de sources de chaleur, des prises électriques...ou si l'enfant peut entrer en contact avec aucun risque. - Veiller à ce que toute personne qui utilise l'article est au courant de l'exacte fonctionnement et des règles de sécurité. Merci d'avoir choisi un produit Plebani. Tous les textes, dessins, et tout contenu figurant dans ce manuel sont propriété EXCLUSIVE de Plebani srl et sont protégés par les lois en vigueur. Toute copies et/ou reproduction est punissable par la loi. 27
28 UPUTSTVO ZA UPOTREBU - FLY N BOARD DODATAK ZA DRUGO DETE PAŽLJIVO PROČITAJTE UPUTSTVO I SAČUVAJTE GA ZA BUDUĆE UPOTREBE Za pravilnu upotrebu FLY N BOARD preporučujemo da izdvojite vreme kako bi pročitali ovo uputstvo. GARANCIJA KVALITETA: - Proizvod je napravljen u skladu sa evropskim bezbednosnim standardom EN 1888 : Ovaj proizvod je u garanciji onaj period koji je naveden u zakonu koji je na snazi. - Sve greške i/ili nedostaci nastali pogrešnom upotrebom, nepoštovanjem bezbednosnih standarda, modifikacije na proizvodu, ne spadaju pod garanciju. - Prirodna potrošnja i šteta prozrokovana nepravilnom ili pogrešnom upotrebom ne spadaju pod garanciju. - Ogrebotine, izbelelost nastale zbog pogrešnog pranja ili korišćenja nisu proizvodna greška. - Pogrešno ispiranje, vlažne i neosušene krpe mogu uzokovati pojavu rđi na metalnim delovima što nije prozvodna greška. VAŽNO!: PRE UPOTREBE OVOG UPUTSTVA PAŽLJIVO PROČITAJTE UPUTSTVO I KORAKE KAKO BI SE IZBEGLA OPASNOST ZA VAŠE DETE! BACITE I UKLONITE SVE PLASTIČNE KESE, ONE MOGU PREDSTAVLJATI RIZIK OD GUŠENJA ZA VAŠU BEBU! NIKADA NE OSTAVLJAJTE DECU BEZ NADZORA! Fly N Board dodatak za kolica za drugo dete, Vam omogućava da vozite drugo dete sa Vama pored bebe koja je u kolicima. Zahvaljujući sposobnosti prilagođavanja, možete da koristite ovaj dodatak na skoro svim modelima kolica. UPOZORENJE: Ovaj proizvod je namenjen za upotrebu na kolicima sa razmakom od točkova kolica 35cm MINIMUM i 50 cm MAKSIMUM! 28
29 DELOVI: Pored ovog uputstva za uputrebu untar ovog pakovanja naći ćete sledeće komponente za montežu i fiksiranje platforme za kolica: A - Platforma 1 komad B - Konektori 2 komada C - Ručke (leva i desna) 2 komada D - Točkovi 2 komada Е - Zavrtanj 2 komada F - Traka za nošenje 1 komad MONTAŽA DODATKA ZA DRUGO DETE: Okrenite platformu na dole (sa logoom okrenutim ka dole), postavite zupčanik na točak a zatim točak ubacite u odgovarajuću rupu, pritisnite ga na dole dok ne čujete KLIK (slika 1). Ponovite istu operaciju i sa drugim točkom. Uzmite konektor, pritisnite dugme za otpuštanje i izvucite kaiš napolje (slika2) do samog kraja. Budite sigurni da je potpuno van i slobodan (slika 3). Obavijte konektor oko cevi i ubacite kaiš u kopču (slika 4). VAŽNO!: Za pravilnu montažu konktora oko cevi kolica, oslobađajući prekidač mora biti okrenut kka gore (slika 5). Povucite kaiš jako dok konektor ne bude u potpunosti pričvršćen (slika 6). Okrenite dugme u smeru kazaljke na satu kako bi ga zaključali (slika 7). Ponovite istu operaciju za drugi konektor. Uverite se da su oba konektora na istoj visini od zemlje. Odvrnite šrafove koji se nalaze sa donje strane platforme (slika 8) i ubacite ručke u odgovarajuća ležišta (slika 9). Kako biste utvrdili ugao nagiba ručki (slika 10), postavite platformu sa točkovima na zemlju i blizu rupa na konektoru tako da platfoma bude paralelna sa zemljom (slika 11). Zatim podesite širinu ručki u zavisnosti od razdaljine točkova (slika 12), tako da platforma ostane na istoj razdaljini od obe ručke. Možete približiti ili odaljiti platformu od kolica (slika 13) pritiskom na klizni taster i tako podesiti željenu poziciju, bliže ili dalje od kolica (slika 14). Kada ste izvršili sva željena podešavanja, zategnite zavrtanj ispod platforme (slika 15) sa obe strane, prikačite platformu za konektore (slika 16) i proverite da je bravica na konektoru ispravno zaključana (da se čuje KLIK ) (slika 17). Sada je Vaša platforma FLY'N BOARD spremna za korišćenje (slika 18). Proverite da li su svi delovi dobro učvršćeni i pravilno povezani. 29
30 NAČIN KORIŠĆENJA: Kada drugo dete nije na platformi ali koristite kolica, možete podići platformu i zakačiti je za ručke kolica koristeći kaiš (slika 19). Pričvrstite kuku sa kaiša za otvor na zadnjoj strani platforme (slika 20), a zatim pričvrstite kaiš za ručke. Skinite kaiš kada se ne koristi, može biti opasan. SKIDANJE PLATFORME: Kada želite da skinete platformu sa kolica, pritisnite klizni taster za otključavanje na konektoru i skinite platformu (slika 21). Uvek je čuvajte na sigurnom mestu; platforma ne bi trebalo da bude opasna za Vašu decu. VAŽNO: Kada prestanete da koristite kolica ili platformu OBAVEZNO SKINITE KONEKTORE sa rama kolica i prikačite ih za platformu, KAKO BISTE SPREČILI DA SE IZGUBE. UPOZORENJA: PAŽLJIVO PROČITATI UPUTSTVA PRE SASTAVLJANJA PROIZOVDA. ČUVATI OVAJ PRIRUČNIK ZA BUDUĆE POTREBE. NEPOŠTOVANJE OVIH UPOZORENJA I UPUTSTAVA ZA KORIŠĆENJE MOŽE DOVESTI DO OZBILJNIH POSLEDICA KOJE SE TIČU BEZBEDNOSTI VAŠE BEBE. - UPOZORENJE: NIKADA NE OSTAVLJAJTE VAŠE DETE SAMO I BEZ NADZORA ODRASLE OSOBE. BEZBEDNOST VAŠEG DETETA JE POD VAŠOM ODGOVORNOŠĆU. - Bacite i držite van domašaja bebe plastične kese za pakovanje, kako biste izbegli opasnost od ugušenja. - Pre svake upotrebe proverite da li svi sistemi za zaključavanje rade pravilno i i da su svi delovi bez ikakvih oštećenja ili nedostataka; u suprotnom ne koristiti proizvod. - Proverite da proizvod nema neke nepravilno ili nedovoljno zavijene šrafove, ili bilo koje druge elemente koji mogu povrediti Vašu bebu. Ne koristiti proizvod ukoliko ima neke polomljene, oštećene ili labave delove. - Obavite sastavljanje i operacije instaliranja BEZ bebe u okolini. Sastavljanje ovog proizvoda treba da sprovede odrasla osoba. 30
31 - Ne pravite nikakve modifikacije na proizvodu a takođe nemojte ni dodavati neke druge elemente koji mogu ugroziti bezbednost ovog proizvoda; to može biti opasno. Ne koristiti proizvod sa polomljenim ili oštećenim delovima niti ukoliko neki od delova nedostaje. - UPOZORENJE: Ovaj proizvod NIJE PRIKLADAN za decu ispod 24 meseca starosti. - UPOZORENJE: Ovaj proizvod NIJE PRIKLADAN za decu težu od 20kg. - Držati proizvod dalje od izvora toplote, strujnih priključaka, rerni, vatre, prozora...i bilo kojih drugih tipova opasnosti. - Kada ostavite proizvod izložen suncu, sačekajte da se ohladi pre nego što ga koristite. - Ne pravite nikakve modifikacije na proizvodu koje mogu ugroziti bezbednost proizvoda; može biti opasno koristiti rezervne delove koji nisu odobreni od strane proizvođača. - UPOZORENJE: Kada koristite proizvod i ne postavljajte ga u blizini konopaca ili kaiševa, to može biti izvor opasnosti od gušenja. - Ne koristite proizvod sve dok beba nije u stanju da hoda sama. - Dok je dete na platformi, ono mora ostati u uspravnom položaju. Ne dozvolite detetu da sedne ili legne. - UPOZORENJE: Bilo koja težina dodata na ručku utiče na stabilnost kolica i kao i na bezbednost. - UPOZORENJE: Ovaj proizvod nije pogodan za trčanje ili klizanje. - Ne koristite proizvod po stepenicama ili liftovima; u tom slučaju, sklonite decu, sklopite kolice i uklonite platformu. - Posebno obratite pažnju na neravne površine, stepenike i na trotoare. - Proverite pre svake upotrebe da je dodatak pravilno pričvršćen za kolica. - Kako biste imali potpunu kontrolu nad kolicima držite ručku za upravljanje sa obe ruke. - U slučaju da koristite kolica na plaži, nakon korišćenja pažljivo očistite kolica od peska i soli na točkovima i delovima koji su pokretni ili klizaju. - Čak i za normalnu upotrebu proizvoda, redovno proveravajte da su svi delovi čisti od prašine i prljavštine, ovo će umanjiti trenje koje može uticati na korišćenje proizvoda. - Uklonite platformu pre sklapanja kolica. - Izbegavajte da preopterećujte kolica sa stvarima težine koja nije predviđena u ovom uputstvu i u uputstvu kolica. 31
32 - U svakom slučaju neophodno je poštovati bezbednosne standarde i upozorenja navedena u ovom uputstvu. - Ovaj proizvod nije igračka, ne dopuštajte da se Vaše dete igra sa istim. - Ne skidajte nalepnice na proizvodu; možda neki proiuvod nije u skladu sa bezbednosnim standardima. - UPOZORENJE!: Ne podešavajte proizvod i ne skidajte delove proizvoda dok je dete na njemu. Držite dete van domašaja kada obaljate ove operacije. - Izbegavajte da ubacujte prste u siteme za zaključavanje i slične mehanizme. ČUVANJE I ODRŽAVANJE PROIZVODA: Za lakše funkcionisanje i održavanje proizvoda, predlažemo Vam da sledite ove savete za održavanje. Čišćenje i održavanje može obaviti samo odrasla osoba. - Redovno proveravajte da proizvod i njegovi delovi nisu slomljeni, neipsravni ili nedostaju. - Za čišćenje plastičnih delova i materijala, koristite krpu sa toplom vodom i neutralnim deterdžentom. - Ne koristite rastvarače. Ne izbeljivati. Potpuno osušite proizvod pre korišćenja ili odlaganja istog. - Osušite dobro metalne delove kako bi sprečili pojavu rđe. - Zaštite proizvod od vremenskih uslova, vode, kiše i snega; predugo izlaganje suncu može izazvati promenu boje proizvoda. - Držite proiizvod daleko od prašine i peska kako bi sprečili kvarove i smetnje u vožnji. - Redovno proveravajte točkove i njihovo habanje; redovno čistite od prašine i peska. - Ne koristite rezervne delove koji nisu odobreni od strane proizvođača. Koristite samo Plebani rezervne delove. Proizvođač može da vrši izmene ovog uputstva s namrom njegovog poboljšanja. Plebani s.r.l. ne snosi nikakvu odgovornost za štetu i povrede nastale zbog nepravilne upotrebe i/ili zloupotrebe proizvoda. 32
33 VAŽNO: - Držite lekove, male predmete i sve opasne predmete daleko od proizvoda. - Čuvajte ovo uputstvo u blizini proizvoda za dalju upotrebu. - NE POSTAVLJAJTE proizvod u blizini izvora toplote, električnih utičnica...ili gde dete može doći u kontakt sa rizičnim predmetima. - Uverite se da onaj koji koristi proizvod je svestan pravilnog korišćenja proizvoda i bezbednosih standarda. Hvala vam što ste izabrali Plebani proizvod! Svi tekstovi, crteži i sav sadržaj koji se nalazi u ovom uputstvu su isključivo vlasništvo Plebani s.r.l. i zaštićeni su važećim zakonima. Bilo kakvo koipranje ili plagijat je kažnjivo po zakonu. 33
34 34
35 35
36 Per visitare la nostra collezione completa digita: To see our full items collection, digit: PLEBANI s.r.l. VIA DELL ARTIGIANATO TELGATE (BG) ITALY Tel Fax [email protected] Fly n Board
ASSEMBLY INSTRUCTIONS DIRECTIVES POUR L'ASSEMBLAGE ombre pendant lamp lampe suspendue à tons dégradés, chocolat
 ASSEMBLY INSTRUCTIONS DIRECTIVES POUR L'ASSEMBLAGE ombre pendant lamp lampe suspendue à tons dégradés, chocolat SKU 2728089 INSTRUCTIONAL MANUAL MANUEL D'INSTRUCTIONS 270/2707 COMPONENT LIST LISTE DES
ASSEMBLY INSTRUCTIONS DIRECTIVES POUR L'ASSEMBLAGE luster chandelier lamp chandelier à trois branches en verre lustré
 ASSEMBLY INSTRUCTIONS DIRECTIVES POUR L'ASSEMBLAGE luster chandelier lamp chandelier à trois branches en verre lustré SKU 2711592 INSTRUCTIONAL MANUAL MANUEL D'INSTRUCTIONS 270/2707 COMPONENT LIST LISTE
Lavatory Faucet. Instruction Manual. Questions? 1-866-661-9606 [email protected]
 Lavatory Faucet Instruction Manual rev. 19-01-2015 Installation Manual You will need Adjustable Wrench Adjustable Pliers Plumber s Tape Hardware list (included) Allen Key Socket wrench tool Important Follow
Folio Case User s Guide
 Fujitsu America, Inc. Folio Case User s Guide I N S T R U C T I O N S This Folio Case is a stylish, lightweight case for protecting your Tablet PC. Elastic Strap Pen Holder Card Holders/ Easel Stops Figure
Sécurité relative aux sièges auto et aux rehausseurs
 Sécurité relative aux sièges auto et aux rehausseurs Safety with Car Seats and Booster Seats Car crashes are the main cause of accidental death and serious injury of children. Correctly using a car or
TECHNICAL MANUAL FT GEN 17
 IT MANUALE TECNICO EN TECHNICAL MANUAL FR MANUEL TECHNIQUE FT GEN 7 3 4 5 6 Schede opzionali Art. 5733 e Art. 5734 per Monitor serie Bravo Optional cards Art. 5733 and Art. 5734 for Bravo series Monitor
WINTER BOAT STORAGE SYSTEM SYSTÈME DE REMISAGE HIVERNAL POUR BATEAU
 MANUAL / MANUEL VIDEO WINTER BOAT STORAGE SYSTEM SYSTÈME DE REMISAGE HIVERNAL POUR BATEAU ASSEMBLY INSTRUCTIONS GUIDE D ASSEMBLAGE NAVIGLOO 14-18½ ft/pi FISHING BOAT! RUNABOUT! PONTOON BOAT! SAILBOAT (SAILBOAT
R.V. Table Mounting Instructions
 PTSS165 ACCESSORY MOUNTING INSTRUCTIONS Use these instructions in conjunction with your main manual to properly assemble your gas grill. Refer to the main manual for safety, operating, cleaning and maintenance
Warning: Failure to follow these warnings could result in property damage, or personal injury.
 Western Steel & Tube 1 Storage Locker Extended Storage Locker Storage Cabinet Assembly And Use Instructions Warning: Failure to follow these warnings could result in property damage, or personal injury.
Notice Technique / Technical Manual
 Contrôle d accès Access control Encodeur USB Mifare ENCOD-USB-AI Notice Technique / Technical Manual SOMMAIRE p.2/10 Sommaire Remerciements... 3 Informations et recommandations... 4 Caractéristiques techniques...
MONTEGO 3 PERSON CUSHION GARDEN SWING WITH CANOPY ASSEMBLY INSTRUCTIONS ITEM# SC-177-2GS
 MONTEGO 3 PERSON CUSHION GARDEN SWING WITH CANOPY ASSEMBLY INSTRUCTIONS ITEM# SC-177-2GS QUESTIONS, PROBLEMS, MISSING PARTS WITH THIS PRODUCT? DO NOT RETURN TO YOUR RETAILER, PLEASE CALL OUR CUSTOMER SERVICE
SPEZZATRICE AUTOMATICA PRESSABURRO ITALIAN BAKERIES MACHINERY AUTOMATIC BUTTER PRESSING MACHINE MACHINE AUTOMATIQUE PRESSE-BEURRE LA PÂTE
 SPEZZATRICE AUTOMATICA PRESSABURRO ITALIAN BAKERIES MACHINERY AUTOMATIC BUTTER PRESSING MACHINE MACHINE AUTOMATIQUE PRESSE-BEURRE LA PÂTE ITALIAN BAKERIES MACHINERY PRESSABURRO VERNICIATA BUTTER PRESSING
Contrôle d'accès Access control. Notice technique / Technical Manual
 p.1/18 Contrôle d'accès Access control INFX V2-AI Notice technique / Technical Manual p.2/18 Sommaire / Contents Remerciements... 3 Informations et recommandations... 4 Caractéristiques techniques... 5
Thank you for choosing the Mobile Broadband USB Stick. With your USB Stick, you can access a wireless network at high speed.
 Thank you for choosing the Mobile Broadband USB Stick. With your USB Stick, you can access a wireless network at high speed. Note: This manual describes the appearance of the USB Stick, as well as the
Using a Walker. 2. Move your injured or weak leg toward the walker first. If you have had surgery on both legs, use either leg to begin walking.
 Using a Walker Walking with a Walker 1. Lift the walker and place it at a comfortable distance in front of you with all four of its legs on the floor. This distance is often equal to an arm s length. 2.
GIGABIT PCI DESKTOP ADAPTER DGE-530T. Quick Installation Guide+ Guide d installation+
 GIGABIT PCI DESKTOP ADAPTER Quick Installation Guide+ Guide d installation+ Check Your Package Contents Quick Installation Guide Gigabit Ethernet PCI Adapter CD with Manual and Drivers DO NOT insert the
Fabricant. 2 terminals
 Specifications Fabricant Nominal torque (Nm) 65 Minimal torque (Nm) 0,63 Coil resistance - 20 C (ohms) 20 Rated current DC (A) 1 Rotor inertia (kg.m 2 ) 2.10-3 Weight (kg) 7,20 Heat dissipation continuous
Instructions Mozilla Thunderbird Page 1
 Instructions Mozilla Thunderbird Page 1 Instructions Mozilla Thunderbird Ce manuel est écrit pour les utilisateurs qui font déjà configurer un compte de courrier électronique dans Mozilla Thunderbird et
Thank you for choosing the Mobile Broadband USB Stick. With your USB Stick, you can access a wireless network at high speed.
 Thank you for choosing the Mobile Broadband USB Stick. With your USB Stick, you can access a wireless network at high speed. Note: This manual describes the appearance of the USB Stick, as well as the
MODE D EMPLOI USER MANUAL
 notice_cd 853:notice 9/01/08 15:08 Page 1 CAFETIÈRE À DOSETTES Coffee pad machine CD 853 GIACOMO MODE D EMPLOI USER MANUAL notice_cd 853:notice 9/01/08 15:08 Page 2 FRANÇAIS WHITE & BROWN vous félicite
Activity Space: acrobatica a squadre
 Activity Space: acrobatica a squadre Nell activity show dell acrobatica a squadre potete costruire diverse forme. Provate a formare diverse figure. Potete anche creare delle nuove forme voi stessi. È importante
Contents Windows 8.1... 2
 Workaround: Installation of IRIS Devices on Windows 8 Contents Windows 8.1... 2 English Français Windows 8... 13 English Français Windows 8.1 1. English Before installing an I.R.I.S. Device, we need to
Z-Axis Compliance Device Compliance en z
 Compensation for different vertical positions Collision recognition in Z-direction Protection of parts and work pieces Monitoring of the insertion forces during assembly operations Monitoring of the picking
RÈGLEMENT SUR LES CEINTURES DE SÉCURITÉ ET LES ENSEMBLES DE RETENUE POUR ENFANTS R.R.T.N.-O. 1990, ch. M-35
 MOTOR VEHICLES ACT SEAT BELT ASSEMBLY AND CHILD RESTRAINT SYSTEM REGULATIONS R.R.N.W.T. 1990,c.M-35 LOI SUR LES VÉHICULES AUTOMOBILES RÈGLEMENT SUR LES CEINTURES DE SÉCURITÉ ET LES ENSEMBLES DE RETENUE
POLICY: FREE MILK PROGRAM CODE: CS-4
 POLICY: FREE MILK PROGRAM CODE: CS-4 Origin: Authority: Reference(s): Community Services Department Cafeteria Services and Nutrition Education Division Resolution #86-02-26-15B.1 POLICY STATEMENT All elementary
Garage Door Monitor Model 829LM
 Garage Door Monitor Model 829LM To prevent possible SERIOUS INJURY or DEATH from a closing garage door: NEVER permit children to operate or play with door control push buttons or remote control transmitters.
DOCUMENTATION - FRANCAIS... 2
 DOCUMENTATION MODULE SHOPDECORATION MODULE PRESTASHOP CREE PAR PRESTACREA INDEX : DOCUMENTATION - FRANCAIS... 2 INSTALLATION... 2 Installation automatique... 2 Installation manuelle... 2 Résolution des
that the child(ren) was/were in need of protection under Part III of the Child and Family Services Act, and the court made an order on
 was/were in need of protection under Part III of the Child and Family Services Act, and the court made an order on") ONTARIO Court File Number at (Name of court) Court office address Applicant(s) (In most cases, the applicant will be a children s aid society.) Full legal name & address for service street & number, municipality,
ONTARIO Court File Number at (Name of court) Court office address Applicant(s) (In most cases, the applicant will be a children s aid society.) Full legal name & address for service street & number, municipality,
Guide d'installation rapide TFM-560X YO.13
 Guide d'installation rapide TFM-560X YO.13 Table of Contents Français 1 1. Avant de commencer 1 2. Procéder à l'installation 2 Troubleshooting 6 Version 06.08.2011 16. Select Install the software automatically
How to Login to Career Page
 How to Login to Career Page BASF Canada July 2013 To view this instruction manual in French, please scroll down to page 16 1 Job Postings How to Login/Create your Profile/Sign Up for Job Posting Notifications
Stainless Steel Solar Wall Light
 V 2.9 Stainless Steel Solar Wall Light User Manual Please read and understand all instructions before use.retain this manual for future reference. V 2.9 Stainless Steel Solar Wall Light SPECIFICATIONS
P-W. 0,5 Nm. 2 Nm. Optional. fissare su piastra fix on the plate auf der Platte befestigen fixer sur plaque fijar en la placa
 7 P-W 8 5 Optional 4 nel caso P-W aggiungere il connettore optional e continuare con la sequenza della fig. 8 In case of P-W, the optional connector must be added and procedure as in picture 8 followed
ENGLISH 4 FRANÇAIS 6 ESPAÑOL 8
 SY ENGLISH 4 FRANÇAIS 6 ESPAÑOL 8 ENGLISH How to lubricate the sewing machine Warning! Always switch off the machine and disconnect it from the power supply before lubricating the sewing machine. 1 Always
WEB page builder and server for SCADA applications usable from a WEB navigator
 Générateur de pages WEB et serveur pour supervision accessible à partir d un navigateur WEB WEB page builder and server for SCADA applications usable from a WEB navigator opyright 2007 IRAI Manual Manuel
Gestion des prestations Volontaire
 Gestion des prestations Volontaire Qu estce que l Income Management (Gestion des prestations)? La gestion des prestations est un moyen de vous aider à gérer votre argent pour couvrir vos nécessités et
Quel temps fait-il chez toi?
 Quel temps fait-il chez toi? -------------------------------------------------------------------------------------------------------------------------------------- Teacher s note: We have prepared a teaching
Package Contents. System Requirements. Before You Begin
 Package Contents DWA-125 Wireless 150 USB Adapter CD-ROM (contains software, drivers, and manual) Cradle If any of the above items are missing, please contact your reseller. System Requirements A computer
DOCUMENTATION - FRANCAIS... 2
 DOCUMENTATION MODULE CATEGORIESTOPMENU MODULE CREE PAR PRESTACREA INDEX : DOCUMENTATION - FRANCAIS... 2 INSTALLATION... 2 CONFIGURATION... 2 LICENCE ET COPYRIGHT... 3 SUPPORT TECHNIQUE ET MISES A JOUR...
03/2013. Mod: WOKI-60IP/TR. Production code: DTWIC 6000
 03/2013 Mod: WOKI-60IP/TR Production code: DTWIC 6000 ENCASTRABLE INDUCTION DROP IN INDUCTION 11/2011 TECHNICAL FEATURES DOCUMENTATION S.A.V. Notice d utilisation : FX00326-A Guide d intervention : ---
calls.paris-neuroscience.fr Tutoriel pour Candidatures en ligne *** Online Applications Tutorial
 calls.paris-neuroscience.fr Tutoriel pour Candidatures en ligne Online Applications Tutorial 1/4 Pour postuler aux Appels d Offres de l ENP, vous devez aller sur la plateforme : calls.parisneuroscience.fr.
72" STORAGE SHELF OR WORKBENCH ÉTAGERÈ DE RANGEMENT OU ETABLI DE 72 PO
 OPERATING AND SAFETY MANUAL MANUEL D UTILISATION ET DE SÉCURITÉ MODEL MODÈLE: 1TJT004SBH 72" STORAGE SHELF OR WORKBENCH ÉTAGERÈ DE RANGEMENT OU ETABLI DE 72 PO IMPORTANT PLEASE NOTE: WHEN YOU OPEN THE
Guide d installation Deco Drain inc. DD200
 Guide d installation Deco Drain inc. DD200 Pour plus informations et pour télécharger les guides d installation en couleur, visitez notre site web. www.decodrain.com Soutien technique : Composez le : 514-946-8901
APPENDIX 6 BONUS RING FORMAT
 #4 EN FRANÇAIS CI-DESSOUS Preamble and Justification This motion is being presented to the membership as an alternative format for clubs to use to encourage increased entries, both in areas where the exhibitor
Monitor LRD. Table des matières
 Folio :1/6 Table des matières 1.Installation du logiciel... 3 2.Utilisation du logiciel... 3 2.1.Description de la fenêtre de commande... 3 2.1.1.Réglage des paramètres de communication... 4 2.1.2.Boutons
DOCUMENTATION MODULE BLOCKCATEGORIESCUSTOM Module crée par Prestacrea - Version : 2.0
 DOCUMENTATION MODULE BLOCKCATEGORIESCUSTOM Module crée par Prestacrea - Version : 2.0 INDEX : DOCUMENTATION - FRANCAIS... 2 1. INSTALLATION... 2 2. CONFIGURATION... 2 3. LICENCE ET COPYRIGHT... 3 4. MISES
Paxton. ins-20605. Net2 desktop reader USB
 Paxton ins-20605 Net2 desktop reader USB 1 3 2 4 1 2 Desktop Reader The desktop reader is designed to sit next to the PC. It is used for adding tokens to a Net2 system and also for identifying lost cards.
Important information. New SIMATIC HMI Panels. Migration made easy start now. SIMATIC HMI Panels. siemens.com/simatic-panels
 Important information New SIMATIC HMI Panels Migration made easy start now SIMATIC HMI Panels siemens.com/simatic-panels Totally Integrated Automation Portal (TIA Portal) est l environnement d ingénierie
Tutoriel de formation SurveyMonkey
 Tutoriel de formation SurveyMonkey SurveyMonkey est un service de sondage en ligne. SurveyMonkey vous permet de créer vos sondages rapidement et facilement. SurveyMonkey est disponible à l adresse suivante
Tammy: Something exceptional happened today. I met somebody legendary. Tex: Qui as-tu rencontré? Tex: Who did you meet?
 page: pro10 1. quelqu'un, quelque chose 2. chacun vs. aucun 3. more indefinite pronouns A pronoun replaces a noun which has been mentioned or is obvious from context. An indefinite pronoun refers to people
3615 SELFIE. http://graffitiresearchlab.fr HOW-TO / GUIDE D'UTILISATION
 3615 SELFIE http://graffitiresearchlab.fr HOW-TO / GUIDE D'UTILISATION Hardware : Minitel Computer DIN FM545 45 connector (http://www.gotronic.fr/art-fiche-din-fm545-4747.htm) Cable Arduino compatible
WiFi Security Camera Quick Start Guide. Guide de départ rapide Caméra de surveillance Wi-Fi (P5)
") #45 #46 WiFi Security Camera Quick Start Guide Guide de départ rapide Caméra de surveillance Wi-Fi (P5) #47 Start Here 1 Is this you? TECH SUPPORT CTRL ALT DEL 2 If yes, turn to page three 1 3 If not,
#45 #46 WiFi Security Camera Quick Start Guide Guide de départ rapide Caméra de surveillance Wi-Fi (P5) #47 Start Here 1 Is this you? TECH SUPPORT CTRL ALT DEL 2 If yes, turn to page three 1 3 If not,
Instructions pour mettre à jour un HFFv2 v1.x.yy v2.0.00
 Instructions pour mettre à jour un HFFv2 v1.x.yy v2.0.00 HFFv2 1. OBJET L accroissement de la taille de code sur la version 2.0.00 a nécessité une évolution du mapping de la flash. La conséquence de ce
Confirmation du titulaire de la carte en cas de contestation de transaction(s) Cardholder s Certification of Disputed Transactions
 Cardholder s Certification of Disputed Transactions") Confirmation du titulaire de la carte en cas de contestation de transaction(s) Cardholder s Certification of Disputed Transactions Informations personnelles Nom/Prénom Name / Firstname Numéro de la carte
Confirmation du titulaire de la carte en cas de contestation de transaction(s) Cardholder s Certification of Disputed Transactions Informations personnelles Nom/Prénom Name / Firstname Numéro de la carte
COUNCIL OF THE EUROPEAN UNION. Brussels, 18 September 2008 (19.09) (OR. fr) 13156/08 LIMITE PI 53
 (OR. fr) 13156/08 LIMITE PI 53") COUNCIL OF THE EUROPEAN UNION Brussels, 18 September 2008 (19.09) (OR. fr) 13156/08 LIMITE PI 53 WORKING DOCUMENT from : Presidency to : delegations No prev. doc.: 12621/08 PI 44 Subject : Revised draft
COUNCIL OF THE EUROPEAN UNION Brussels, 18 September 2008 (19.09) (OR. fr) 13156/08 LIMITE PI 53 WORKING DOCUMENT from : Presidency to : delegations No prev. doc.: 12621/08 PI 44 Subject : Revised draft
Profilés pour escalier Prostep Cerfix Prostep Wood
 PROFILPAS S.P.A. VIA EINSTEIN, 38 35010 CADONEGHE (PADOVA) ITALY TEL. +39 (0)49 8878411 +39 (0)49 8878412 FAX. +39 (0)49-706692 EMAIL: [email protected] s pour escalier Prostep Cerfix Prostep Wood Application
Nouveautés printemps 2013
 » English Se désinscrire de la liste Nouveautés printemps 2013 19 mars 2013 Dans ce Flash Info, vous trouverez une description des nouveautés et mises à jour des produits La Capitale pour le printemps
Logitech Tablet Keyboard for Windows 8, Windows RT and Android 3.0+ Setup Guide Guide d installation
 Logitech Tablet Keyboard for Windows 8, Windows RT and Android 3.0+ Setup Guide Guide d installation English.......................................... 3 Français.........................................
Principe de TrueCrypt. Créer un volume pour TrueCrypt
 Sommaire : Principe de TrueCrypt...1 Créer un volume pour TrueCrypt...1 Premier montage...6 Réglages...8 Save Currently Mounted Volumes as Favorite...8 Settings > Preferences...9 TrueCrypt Traveller pour
1.The pronouns me, te, nous, and vous are object pronouns.
 1.The pronouns me, te, nous, and vous are object pronouns.! Marie t invite au théâtre?!! Oui, elle m invite au théâtre.! Elle te parle au téléphone?!! Oui, elle me parle au téléphone.! Le prof vous regarde?!!!
lundi 3 août 2009 Choose your language What is Document Connection for Mac? Communautés Numériques L informatique à la portée du Grand Public
 Communautés Numériques L informatique à la portée du Grand Public Initiation et perfectionnement à l utilisation de la micro-informatique Microsoft Document Connection pour Mac. Microsoft Document Connection
33 inch open & closed storage Rangement à espace fermé et ouvert de 33po (83.7cm) 33 pulgadas almacenaje abierto y cerra
 33 pulgadas almacenaje abierto y cerra") 33 inch open & closed storage 33 pulgadas almacenaje abierto y cerra! o not throw away packaging materials until assembly is complete.! Assemble this item on a soft surface, such as cardboard or carpet,
33 inch open & closed storage 33 pulgadas almacenaje abierto y cerra! o not throw away packaging materials until assembly is complete.! Assemble this item on a soft surface, such as cardboard or carpet,
Micro-ordinateurs, informations, idées, trucs et astuces utiliser le Bureau à distance
 Micro-ordinateurs, informations, idées, trucs et astuces utiliser le Bureau à distance Auteur : François CHAUSSON Date : 8 février 2008 Référence : utiliser le Bureau a distance.doc Préambule Voici quelques
Once the installation is complete, you can delete the temporary Zip files..
 Sommaire Installation... 2 After the download... 2 From a CD... 2 Access codes... 2 DirectX Compatibility... 2 Using the program... 2 Structure... 4 Lier une structure à une autre... 4 Personnaliser une
accidents and repairs:
 accidents and repairs: putting the pieces together accidents et réparations : réunir le tout nobody can repair your Toyota like Toyota Unfortunately, accidents do happen. And the best way to restore your
GAME CONTENTS CONTENU DU JEU OBJECT OF THE GAME BUT DU JEU
 GAME CONTENTS 3 wooden animals: an elephant, a Polar bear and an African lion 1 Playing Board with two tree stumps, one red and one blue 1 Command Board double sided for two game levels (Green for normal
12, Chemin de la Forge L Islet (Québec) G0R 1X0 CANADA
 G0R 1X0 CANADA") REMORQUES FOR 1005 TRAILER FABRIQUÉ PAR / MANUFACTURED BY : 12, Chemin de la Forge L Islet (Québec) G0R 1X0 CANADA Customer s English Service: (418) 247-7709 Service français : (418) 247-5626 Télécopieur
REMORQUES FOR 1005 TRAILER FABRIQUÉ PAR / MANUFACTURED BY : 12, Chemin de la Forge L Islet (Québec) G0R 1X0 CANADA Customer s English Service: (418) 247-7709 Service français : (418) 247-5626 Télécopieur
Nettoyeur d escalier mécanique et de trottoir roulant
 Mode d emploi Modèle X46 Nettoyeur d escalier mécanique et de trottoir roulant ATTENTION LIRE CES INSTRUCTIONS AVANT D UTILISER LA MACHINE 03-7845-0000 Iss.1 07/04 Fig 1 Fig 2 2 Table des matières Page
Please kindly find below a synoptic table showing the various ways of transport from Mahe to La Digue, with a stop over on Praslin:
 Travel information: Island? Please kindly find below a synoptic table showing the various ways of transport from Mahe to La Digue, with a stop over on Praslin: From Mahé to Praslin From Praslin to La Digue
Application Form/ Formulaire de demande
 Application Form/ Formulaire de demande Ecosystem Approaches to Health: Summer Workshop and Field school Approches écosystémiques de la santé: Atelier intensif et stage d été Please submit your application
ONTARIO Court File Number. Form 17E: Trial Management Conference Brief. Date of trial management conference. Name of party filing this brief
 ONTARIO Court File Number at (Name of court) Court office address Form 17E: Trial Management Conference Brief Name of party filing this brief Date of trial management conference Applicant(s) Full legal
Exemple PLS avec SAS
 Exemple PLS avec SAS This example, from Umetrics (1995), demonstrates different ways to examine a PLS model. The data come from the field of drug discovery. New drugs are developed from chemicals that
L. Obert, T. Lascar, A. Adam
 Améliorer la consolidation des tubérosités grâce au système OMS (Offset Modular System) et l autogreffe Improving tuberosity consolidation using the OMS system (Offset Modular System) L. Obert, T. Lascar,
Qualité et ERP CLOUD & SECURITY (HACKING) Alireza MOKHTARI. 9/12/2014 Cloud & Security
 Alireza MOKHTARI. 9/12/2014 Cloud & Security") Qualité et ERP CLOUD & SECURITY (HACKING) Alireza MOKHTARI 9/12/2014 Cloud & Security Sommaire Rappel court de Cloud Pour quoi cette sujet est important? Données sensibles dans le Cloud Les risques Top
Qualité et ERP CLOUD & SECURITY (HACKING) Alireza MOKHTARI 9/12/2014 Cloud & Security Sommaire Rappel court de Cloud Pour quoi cette sujet est important? Données sensibles dans le Cloud Les risques Top
Catalogue 2015. Equip piscine. L innovation pour les établissements aquatiques
 Catalogue 2015 Equip piscine L innovation pour les établissements aquatiques 1 Equip piscine conçoit des équipements innovants en plastique recyclé pour les établissement aquatiques. À ce jour, Equip piscine
Manuel d utilisation. Mon panda Little App. 2013 VTech Imprimé en Chine 91-002829-002 FR
 Manuel d utilisation Mon panda Little App 2013 VTech Imprimé en Chine 91-002829-002 FR INTRODUCTION Vous venez d acquérir Mon panda Little App de VTech. Félicitations! Cette peluche toute douce est également
MELTING POTES, LA SECTION INTERNATIONALE DU BELLASSO (Association étudiante de lʼensaparis-belleville) PRESENTE :
 PRESENTE :") MELTING POTES, LA SECTION INTERNATIONALE DU BELLASSO (Association étudiante de lʼensaparis-belleville) PRESENTE : Housing system est un service gratuit, qui vous propose de vous mettre en relation avec
MELTING POTES, LA SECTION INTERNATIONALE DU BELLASSO (Association étudiante de lʼensaparis-belleville) PRESENTE : Housing system est un service gratuit, qui vous propose de vous mettre en relation avec
Guide pour l Installation des Disques Durs SATA et Configuration RAID
 Guide pour l Installation des Disques Durs SATA et Configuration RAID 1. Guide pour l Installation des Disques Durs SATA.. 2 1.1 Installation de disques durs Série ATA (SATA).. 2 1.2 Créer une disquette
INVESTMENT REGULATIONS R-090-2001 In force October 1, 2001. RÈGLEMENT SUR LES INVESTISSEMENTS R-090-2001 En vigueur le 1 er octobre 2001
 FINANCIAL ADMINISTRATION ACT INVESTMENT REGULATIONS R-090-2001 In force October 1, 2001 LOI SUR LA GESTION DES FINANCES PUBLIQUES RÈGLEMENT SUR LES INVESTISSEMENTS R-090-2001 En vigueur le 1 er octobre
Mesure chimique. Chemical measurement. Sonde de température Pt 1000 Inox Pt 1000 stainless steel. Ref : 703 262. Français p 1.
 Mesure chimique Chemical measurement Français p 1 English p 3 Sonde de température Pt 1000 Inox Pt 1000 stainless steel Version : 6010 Mesure chimique Sonde de température Pt 1000 Inox 1 Description La
Institut français des sciences et technologies des transports, de l aménagement
 Institut français des sciences et technologies des transports, de l aménagement et des réseaux Session 3 Big Data and IT in Transport: Applications, Implications, Limitations Jacques Ehrlich/IFSTTAR h/ifsttar
GASKET FOR TONER COLLECTION BOTTLE
 Technical Service Bulletin PRODUCT CREATED DATE MODIFIED DATE FILE ALL PRINTERS 08/07/2011 201108 REV A GASKET FOR TONER COLLECTION BOTTLE Voir version française dans la section suivante. Due to a manufacturing
TABLE DES MATIERES A OBJET PROCEDURE DE CONNEXION
 1 12 rue Denis Papin 37300 JOUE LES TOURS Tel: 02.47.68.34.00 Fax: 02.47.68.35.48 www.herve consultants.net contacts@herve consultants.net TABLE DES MATIERES A Objet...1 B Les équipements et pré-requis...2
Logitech Speaker System Z553 Setup Guide Guide d installation
 Logitech Speaker System Z553 Setup Guide Guide d installation Logitech Speaker System Z553 English................. 3 Français................ 10 www.logitech.com/support...19 2 Package contents Logitech
DERAILLEUR AVANT SR / R / CH - GAMME ACTUELLE
 DERAILLEUR AVANT SR / R / CH - GAMME ACTUELLE 1 - SPÉCIFICITÉS TECHNIQUES 55 2 - COMPATIBILITÉ (GAMME ACTUELLE) ATTENTION! Les associations différentes de celles figurant dans le tableau pourraient entraîner
Le No.1 de l économie d énergie pour patinoires.
 Le No.1 de l économie d énergie pour patinoires. Partner of REALice system Economie d énergie et une meilleure qualité de glace La 2ème génération améliorée du système REALice bien connu, est livré en
Support Orders and Support Provisions (Banks and Authorized Foreign Banks) Regulations
 Regulations") CANADA CONSOLIDATION CODIFICATION Support Orders and Support Provisions (Banks and Authorized Foreign Banks) Regulations Règlement sur les ordonnances alimentaires et les dispositions alimentaires (banques
CANADA CONSOLIDATION CODIFICATION Support Orders and Support Provisions (Banks and Authorized Foreign Banks) Regulations Règlement sur les ordonnances alimentaires et les dispositions alimentaires (banques
Trim Kit Installation Instruction
 Trim Kit Installation Instruction Instrucciones para la Instalación del Kit de Molduras Instructions pour l'installation du Kit d'encastrement m If any hardware or parts are damaged or missing, contact
SERVEUR DÉDIÉ DOCUMENTATION
 SERVEUR DÉDIÉ DOCUMENTATION Release 5.0.6.0 19 Juillet 2013 Copyright 2013 GIANTS Software GmbH, All Rights Reserved. 1/9 CHANGE LOG Correction de bug divers (5.0.6.0) Ajout d une option de relance automatique
CEST POUR MIEUX PLACER MES PDF
 CEST POUR MIEUX PLACER MES PDF ==> Download: CEST POUR MIEUX PLACER MES PDF CEST POUR MIEUX PLACER MES PDF - Are you searching for Cest Pour Mieux Placer Mes Books? Now, you will be happy that at this
Start Here Point de départ
 Start Here Point de départ Epson Stylus C88+ Please read these instructions before using the printer. Lisez ces instructions avant d utiliser l imprimante. Install Ink Cartridges Installez les cartouches
RAPID 3.34 - Prenez le contrôle sur vos données
 RAPID 3.34 - Prenez le contrôle sur vos données Parmi les fonctions les plus demandées par nos utilisateurs, la navigation au clavier et la possibilité de disposer de champs supplémentaires arrivent aux
Le passé composé. C'est le passé! Tout ça c'est du passé! That's the past! All that's in the past!
 > Le passé composé le passé composé C'est le passé! Tout ça c'est du passé! That's the past! All that's in the past! «Je suis vieux maintenant, et ma femme est vieille aussi. Nous n'avons pas eu d'enfants.
Lesson Plan Physical Descriptions. belle vieille grande petite grosse laide mignonne jolie. beau vieux grand petit gros laid mignon
 Lesson Plan Physical Descriptions Objective: Students will comprehend and describe the physical appearance of others. Vocabulary: Elle est Il est Elle/Il est Elle/Il a les cheveux belle vieille grande
CONVENTION DE STAGE TYPE STANDART TRAINING CONTRACT
 CONVENTION DE STAGE TYPE STANDART TRAINING CONTRACT La présente convention a pour objet de définir les conditions dans lesquelles le stagiaire ci-après nommé sera accueilli dans l entreprise. This contract
DOCUMENTATION - FRANCAIS... 2
 DOCUMENTATION MODULE PRETTYSLIDER MODULE PRESTASHOP CREE PAR PRESTACREA INDEX : DOCUMENTATION - FRANCAIS... 2 INSTALLATION... 2 Installation automatique... 2 Installation manuelle... 2 Résolution des problèmes...
INSTITUT MARITIME DE PREVENTION. For improvement in health and security at work. Created in 1992 Under the aegis of State and the ENIM
 INSTITUT MARITIME DE PREVENTION For improvement in health and security at work Created in 1992 Under the aegis of State and the ENIM Maritime fishing Shellfish-farming Sea transport 2005 Le pilier social
Exercices sur SQL server 2000
 Exercices sur SQL server 2000 La diagramme de classe : Exercices sur SQL server 2000 Le modèle relationnel correspondant : 1 Créer les tables Clic-droit on Tables et choisir «New Table» Créer la table
has brought a motion to change the order of Justice, dated. the agreement between you and (name of party bringing this motion), dated.
, dated.") ONTARIO Court File Number SEAL at (Name of court) Court office address Form 15: Motion to Change the order of Justice dated the agreement for support between the parties dated filed with the court on Applicant(s)
ONTARIO Court File Number SEAL at (Name of court) Court office address Form 15: Motion to Change the order of Justice dated the agreement for support between the parties dated filed with the court on Applicant(s)
Hamac pour nouveau-né Thule Instructions
 Hamac pour nouveau-né Thule Instructions D 51100933 Description des pièces Harnais d'épaule Boucles de bretelles Boucles de bretelles Harnais d'épaule Cadre de siège Sangles supérieures Barre inférieure