Guide de l utilisateur. Owner s Manual. Savino 3.66 m x 4.27 m (12 x 14 ft.) Hardtop Gazebo
|
|
|
- Arthur Chénier
- il y a 6 ans
- Total affichages :
Transcription


 Sojag code:")

1 Owner s Manual Savino 3.66 m x 4.27 m (12 x 14 ft.) Hardtop Gazebo Guide de l utilisateur Abri quatre saisons à toit rigide Savino de 3,66 m x 4,27 m (12 pi x 14 pi) Sojag code: UPC code: Costco code: Code Sojag : Code CUP : Code Costco :
2
3 TABLE OF CONTENTS Safety Information...3 Warranty...4 What is Covered...4 What is Not Covered...4 Operation...4 Maintenance...5 Care and Cleaning...5 Pre-assembly...6 Planning Assembly...6 Tools Required...6 Hardware Included...7 Package Contents Assembly SAFETY INFORMATION WARNING: KEEP ALL FLAME AND HEAT SOURCES AWAY FROM THIS SHELTER. It is very important to read and follow the safety precautions before assembly and during the use of the product. TABLE DES MATIÈRES Règles de sécurité...3 Garantie...4 Ce qui est couvert...4 Ce qui n est pas couvert...4 Fonctionnement...4 Entretien...5 Soins et nettoyage...5 Préassemblage Outils requis...6 Trousse de quincaillerie incluse...7 Liste des pièces Assemblage RÈGLES DE SÉCURITÉ AVERTISSEMENT : GARDER TOUTES SOURCES DE FLAMME OU DE CHALEUR LOIN DES Il est très important de lire et de suivre les règles de sécurité avant de procéder à l assemblage et durant l utilisation de l abri. 1. Keep all children and pets away from assembly area. 2. When assembling and using this product, basic safety precautions must always be followed to reduce risks of personal injuries and damages to the product and its surroundings. 3. Make sure that all the parts are in the boxes before starting the assembly. It is recommended to wear protective gloves since some of the parts have sharp edges. 4. This unit will take at least 6 hours to put up. You must schedule enough time to complete the assembly. You cannot leave the unit unattended if it is not fully assembled, even if bolted to the ground. A minimum of 3 persons is required for a safe assembly of the unit. 5. Begin the assembly and install the unit more than 6 feet away from any obstructions including, but not limited to, a fence, a garage, a house, overhanging branches, a laundry line or electrical wires. 6. Always install the unit on a leveled platform. The unit must be anchored to either wood or concrete using the appropriate screws 7. Check all screws for tightness before and during the use of the unit. Tighten the screws at least twice a year. 8. Your shelter has been created for all four seasons. However, you must remove any snow accumulation on the roof. 9. Do not place any type of heat source under the sun shelter or or a space heater. 10. Do not install the unit in a space where there is the possibility of high winds. 1. Garder les enfants et les animaux loin de la zone d assemblage. 2. Pendant l assemblage et l utilisation de ce produit, les règles de sécurité de base doivent toujours être suivies dans le but de réduire les risques de blessures et les dommages causés sur le produit et son environnement. l assemblage. Certaines pièces peuvent avoir des côtés coupants; il est recommandé de porter des gants de protection. 4. Cet abri prendra au moins six heures à assembler. Il est important de laisser cet abri sans surveillance si l assemblage n est pas complètement terminé, même si ce dernier est vissé au sol. Un minimum de trois personnes est requis pour effectuer l assemblage de cet abri. 5. Débuter l assemblage et installer l abri à plus de six pieds de toutes obstructions, incluant, mais ne se limitant pas à une clôture, un garage, une maison, des plus possible à un endroit protégé du vent. 6. Toujours installer la structure sur un sol nivelé. L abri doit être ancré à resserrer au minimum 2 fois par année. l extérieur durant toute l année. Cependant, toute accumulation de neige doit être retirée du toit de l abri. incluant, sans toutefois s y limiter, un BBQ ou un chauffage d appoint. 10. Ne pas installer l abri dans un endroit où il y a possibilité de vent important. 3
4 WARRANTY WHAT IS COVERED This unit is guaranteed against defective materials for one year from the date of purchase and based on normal residential use of the product. This limited warranty is applicable on parts only, labour is not included. The warranty is not transferable. The for damages due to hail. Shipping fees for replacement parts are WHAT IS NOT COVERED Damages due to vandalism, abuse or wrong use of the product are not covered by the warranty. Damages caused by severe weather conditions such as thunderstorms, wind or snow discolouration of the structure or the fabric are not covered by the warranty. If any instructions in the OPERATION or SAFETY INFORMATION sections are not followed, the warranty will be voided. Any GARANTIE CE QUI EST COUVERT Cet abri est garanti pendant un an, à partir de la date d achat, contre les défauts de fabrication basés sur un usage normal et résidentiel. Cette garantie limitée est applicable sur les pièces seulement, la main-d œuvre est en sus. Cette garantie est non transférable. Les panneaux de polycarbonate ont une garantie de des pièces de remplacement sont gratuits la première année suivant la date d achat. CE QUI N EST PAS COUVERT Les dommages causés par le vandalisme, les abus ou le mauvais usage de ce produit ne sont pas couverts par la garantie. que les orages et les tempêtes de vent ou de neige ne sont pas tissu ne sont pas couverts par la garantie. Si l une des instructions de la section FONCTIONNEMENT ou RÈGLES DE SÉCURITÉ n est pas respectée, la garantie sera alors la garantie. OPERATION 1. The unit is a four-season sun shelter, meaning that it may be left up year-round. However, any accumulation of snow must be removed from the roof of the unit. 2. Optional mosquito nets and curtains must be removed and stored during winter. 3. The unit must be anchored using the appropriate screws 4. Roof panels must be installed with the UV protected side facing the sun. 5. This unit should not be used as a storage shelter during the winter. 6. Check all screws for tightness before and during usage of the unit. Tighten the screws at least twice a year. 7. Do not hang any items to the structure. FONCTIONNEMENT laissé à l extérieur durant toute l année. Cependant, toute accumulation de neige doit être retirée du toit de l abri. 2. Les moustiquaires et les rideaux optionnels doivent être enlevés et mis de côté durant l hiver. 3. L abri doit être ancré au sol en utilisant les vis appropriées au 4. Les panneaux de toit doivent être installés en plaçant le côté ce côté soit placé face au soleil. 5. L abri ne doit pas être utilisé comme abri d entreposage durant la période hivernale. et les resserrer au minimum 2 fois par année. 7. Ne rien suspendre à la structure. 4
5 MAINTENANCE If this shelter needs repairs: 1. In case of a defective part or if a problem occurs while using this product, please contact SOJAG Customer Service at To order replacement parts, use the model number and the part numbers on the parts list. 3. The curtains are sold separately while supplies last. To order, go to: ENTRETIEN Si cet abri a besoin de réparations : 1. Pour une pièce défectueuse, ou si un problème survient pendant l utilisation de ce produit, nous vous prions de contacter le service à la clientèle de SOJAG au remplacer, référez-vous au numéro de modèle de l abri ainsi qu aux lettres qui sont indiquées sur la liste de pièces. 3. Les rideaux sont vendus séparément jusqu à l épuisement des stocks. Pour passer une commande, visiter le site : CARE AND CLEANING 1. For cleaning: use a household soap or soft detergent and wash with warm water, using a sponge or fabric cloth. Rinse with clean water. SOINS ET NETTOYAGE 1. Pour le nettoyage : utiliser un savon domestique ou un détergent l eau tiède. Rincer à l eau claire. 5
6 PRE-ASSEMBLY IMPORTANT: PLANNING ASSEMBLY 1. It is the consumer s responsibility to comply with building rules, regulations/zoning restrictions orders or any other regional restrictions and obtain the required permits before purchasing this product and installing it. 2. Make sure that every part is in the box before beginning installation. 3. Some parts may have sharp edges; it is recommended to wear gloves, protection glasses and closed shoes. 4. This unit will take at least 6 hours to put up. You must schedule enough time to complete the assembly. 5. You cannot leave the unit unattended if it is not fully assembled, even if bolted to the ground. 6. A minimum of 3 persons is required for a safe assembly of the unit. 7. Follow each instruction carefully to ensure the strength of the unit. 8. To avoid damages to the unit and its parts, use the proper tools. Do not use the shelter as a support. The use of a ladder is recommended. 9. Keep the instruction manual and the parts list in case of future needs or references. 10. Do not assemble the unit in days of wind or rain. PRÉASSEMBLAGE IMPORTANT : PLANIFICATION DE L ASSEMBLAGE 1. Il est de la responsabilité du consommateur de se conformer aux règles de bâtiment, aux règlements/ limitation de zonage, aux ordonnances ou toutes autres restrictions régionales et d obtenir les permis requis avant l achat de ce produit et d en faire son installation. débuter l assemblage. 3. Certaines pièces peuvent avoir des côtés coupants. Il est recommandé de porter des gants et des lunettes de protection et des souliers fermés. 4. Cet abri prendra au moins six heures à assembler. Vous devrez 5. On ne doit pas laisser cet abri sans surveillance si l assemblage n est pas complètement terminé, même si ce dernier est vissé au sol. 6. Un minimum de trois personnes est requis pour effectuer l assemblage de cet abri. 7. Suivre toutes les instructions pour s assurer de la solidité de l abri. 8. Pour éviter les dommages à l abri et ses composantes, utilisez les outils appropriés. Ne pas utiliser la structure comme support. L utilisation d un escabeau est recommandée. 9. Garder le manuel d instructions et la liste de pièces en cas de besoins futurs. 10. Ne pas assembler par journée de vent ou de pluie. TOOLS REQUIRED OUTILS REQUIS SAFETY GOGGLES SAFETY HAT LEVEL LUNETTES DE SÉCURITÉ CASQUE DE SÉCURITÉ NIVEAU GLOVES STEPLADDER PHILLIPS SCREWDRIVER GANTS ESCABEAU TOURNEVIS ÉTOILE 6
7 HARDWARE KIT NOTE: TROUSSE DE QUINCAILLERIE NOTE : U X102 U1 X20 U2 X8 V X40 V1 X3 V2 X8 X X48 Y X26 Y1 X4 Item Description Qty U Screw M6X U1 Screw M6X12 20 U2 Screw M6X12 8 V Screw M6X35 40 V1 Screw M6X30 3 V2 Screw M6X20 8 X Screw St4x15 48 Y Screw M6X10 with Cap Nut 26 Y1 Screw M6x12 with Cap Nut 4 Pièce Description Qté U Vis M6X U1 Vis M6X12 20 U2 Vis M6X12 8 V Vis M6X35 40 V1 Vis M6X30 3 V2 Vis M6X20 8 X Vis St4x15 48 Y Vis M6X10 et écrou borgne 26 Y1 Vis M6x12 et écrou borgne 4 7
8 PARTS LIST NOTE: Parts not shown to actual size and not to scale. LISTE DES PIÈCES NOTE : A X4 C X2 A1 X4 C1 X2 D X4 A2 X4 E X6 F X4 B X2 F1 X4 B1 X2 F2 X2 Item Description Qty A Small Panel 4 A1 Small Panel 4 A2 Large Panel 4 B Short Ogee with Steel Union 2 B1 Short Ogee 2 C Long Ogee with Steel Union 2 C1 Long Ogee 2 D Corner Roof Bar 4 E Middle Roof Bar 6 F Left Roof Finishing Bar 4 F1 Right Roof Finishing Bar 4 F2 Middle Roof Finishing Bar 2 Pièce Description Qté A Petit panneau 4 A1 Petit panneau 4 A2 Grand panneau 4 B Moulure courte avec barre d union 2 B1 Moulure courte 2 C Moulure longue avec barre d union 2 C1 Moulure longue 2 D Barre de toit de coin 4 E Barre de toit du centre 6 F Barre de finition de toit de gauche 4 F1 Barre de finition de toit de droite 4 F2 Barre de finition de toit du centre 2 8
9 H X4 H1 X4 H2 X2 I X4 I1 X4 I2 X2 J X1 J1 X1 K X4 K2 X4 L X8 L3 X8 L1 X4 L2 X8 Item Description Qty H Solidifying Bar 4 H1 Solidifying Bar 4 H2 Solidifying Bar 2 I Solidifying Bar 4 I1 Solidifying Bar 4 I2 Solidifying Bar 2 J Outside Roof Connector 1 J1 Inside Roof Connector 1 K Corner Ogee 4 K2 Finishing Corner 4 L Corner Cover 8 L1 Joint Cover 4 L2 Iron Plate 8 L3 Iron Angle 8 Pièce Description Qté H Barre de renfort 4 H1 Barre de renfort 4 H2 Barre de renfort 2 I Barre de renfort 4 I1 Barre de renfort 4 I2 Barre de renfort 2 J Connecteur de toit extérieur 1 J1 Connecteur de toit intérieur 1 K Moulure de coin 4 K2 Coin de finition 4 L Cache-coin 8 L1 Cache-joint 4 L2 Plaque 8 L3 Fer-angle 8 9
10 PARTS LIST (CONTINUED) NOTE: LISTE DE PIÈCES (SUITE) NOTE : Ma X4 P X2 M1a X4 Mb X4 P1 X2 M1b X4 N X4 N1 X4 N2 X2 O X4 O1 X6 S X4 S1 X4 T X116 Item Description Qty Ma Left Roof Panel (upside) 4 Mb Left Roof Panel (downside) 4 M1a Right Roof Panel (upside) 4 M1b Right Roof Panel (downside) 4 P Middle Roof Panel (upside) 2 P1 Middle Roof Panel (downside) 2 N Left Roof Support Bar 4 N1 Right Roof Support Bar 4 N2 Middle Roof Support Bar 2 O Corner Finishing End 4 O1 Finishing End 6 S Curtain 4 S1 Mosquito Net 4 T Hook 116 Pièce Description Qté Ma Panneau de toit de gauche (haut) 4 Mb Panneau de toit de gauche (bas) 4 M1a Panneau de toit de droite (haut) 4 M1b Panneau de toit de droite (bas) 4 P Panneau de toit du centre (haut) 2 P1 Panneau de toit du centre (bas) 2 N Barre de support de toit (gauche) 4 N1 Barre de support de toit (droite) 4 N2 Barre de support de toit (centre) 2 O Embout de finition de coin 4 O1 Embout de finition 6 S Rideau 4 S1 Moustiquaire 4 T Crochet
11 ASSEMBLY Step Attach the panels (A, A2 and A1) together using the screws (V) as illustrated. Repeat for all remaining panels (A, A2 and A1). ASSEMBLAGE Étape Attacher les panneaux (A, A2 et A1) ensemble en utilisant les vis (V) tel qu illustré. Répéter pour les panneaux (A, A2 et A1) restants. 1 A A2 A1 A 1 1 X24 V A2 1 1 X4 1 1 Parts required for this step / Pièces requises pour cette étape : A X4 V X24 A2 X4 A1 X4 11
12 ASSEMBLY Step Insert 6 hooks (T) into the first track and 5 hooks (T) into the second track of each short ogee (B and B1) as illustrated. 2.2 Slide the short ogee (B) into the short ogee (B1). 2.3 Attach the short ogee (B) to the short ogee (B1) using the screws (U). Repeat for all remaining short ogees (B and B1). ASSEMBLAGE Étape Insérer six crochets (T) dans le premier rail et cinq crochets (T) dans le deuxième rail de chaque moulure courte (B et B1) tel qu illustré. 2.2 Insérer le bout d une moulure courte (B) au bout d une moulure courte (B1). 2.3 Attacher les moulures courtes (B et B1) ensemble en utilisant les vis (U). Répéter pour les moulures courtes (B et B1) restantes. X4 T B X2 X6 X5 B1 T B T B1 B X2 B1 U Parts required for this step / Pièces requises pour cette étape : B X2 B1 X2 T X44 U X8 12
13 ASSEMBLY Step Insert 7 hooks (T) into the first track and 6 hooks (T) into the second track of each long ogee (C and C1) as illustrated. 3.2 Slide the long ogee (C) into the long ogee (C1). 3.3 Attach the long ogee (C) to the long ogee (C1) using the screws (U). Repeat for all remaining long ogees (C and C1). ASSEMBLAGE Étape Insérer sept crochets (T) dans le premier rail et six crochets (T) dans le deuxième rail de chaque moulure longue (C et C1) tel qu illustré. 3.2 Insérer le bout d une moulure longue (C) au bout d une moulure longue (C1). 3.3 Attacher les moulures longues (C et C1) ensemble en utilisant les vis (U). Répéter pour les moulures longues (C et C1) restantes. T X4 C X2 X7 X6 C1 C T T C1 C X2 C1 U Parts required for this step / Pièces requises pour cette étape : C X2 T X52 U X8 C1 X2 13
14 ASSEMBLY Step Insert 3 hooks (T) into the first track and 2 hooks (T) into the second track of each corner ogee (K) as illustrated. Repeat for all remaining corner ogees (K). ASSEMBLAGE Étape Insérer trois crochets (T) dans le premier rail et deux crochets (T) dans le deuxième rail de chaque moulure de coin (K) tel qu illustré. Répéter pour les moulures de coin (K) restantes. X4 T X3 X2 K X4 T Parts required for this step / Pièces requises pour cette étape : K X4 T X20 14
15 ASSEMBLY Step Attach ogees (B, B1, C, C1 and K) together using the corner cover (L) and the screws (X) on each corner of the unit as illustrated 5.2 Install the joint cover plate (L1) using the screws (X and U2) on the joint between the short ogees (B and B1) and the long ogees (C and C1). L ASSEMBLAGE Étape Attacher les moulures (B, B1, C, C1 et K) ensemble en utilisant les cache-coin (L) et les vis (X) dans chaque coin de la structure tel qu illustré. 5.2 Attacher un cache-joint (L1) en utilisant les vis (X et U2) sur tous les joints unissant les moulures courtes (B et B1) et sur tous les joints unissant les moulures longues (C et C1). L L L1 B K C1 L1 K B1 C L L C L1 C1 K B L1 B1 K X L X L L X X8 L1 U2 X4 Parts required for this step / Pièces requises pour cette étape : L X8 L1 X4 U2 X8 X X40 15
16 ASSEMBLY IMPORTANT: Always install the shelter on a level platform, wood or concrete. CAUTION: Three people are required for this step. Step Install the ogee assembly (B, B1, C, C1 and K) over the pre-assembly panels (A, A2 and A1). 6.2 Attach the ogees (B, B1, C, C1 and K) to the structure as illustrated. Ensure to not forget the screws (V). Repeat in each corner of the structure. ASSEMBLAGE IMPORTANT : Toujours installer la structure sur une surface de niveau. AVERTISSEMENT : Trois personnes sont requises pour cette étape. Étape Installer le montage des moulures (B, B1, C, C1 et K) au dessus des panneaux (A, A2 et A1) préassemblés. 6.2 Attacher les moulures (B, B1, C, C1 et K) à la structure tel qu illustré. S assurer de ne pas oublier d installer les vis (V). Répéter dans chaque coin de la structure. Parts required for this step / Pièces requises pour cette étape : L2 X8 U X80 L3 X8 V X16 16
17 L2 L3 K L3 L2 X4 U V U V V U V U 17
18 ASSEMBLY Step Attach the finishing corners (K2) over the corner ogees (K) using the screw (X) as illustrated. ASSEMBLAGE Étape Attacher les coins de finition (K2) au dessus des moulures de coin (K) en utilisant les vis (X) tel qu illustré. Parts required for this step / Pièces requises pour cette étape : K2 X4 X X8 18
19 X X4 K2 K K2 K2 K2 K2 19
20 ASSEMBLY ASSEMBLAGE IMPORTANT: This step may already been done at the factory. IMPORTANT : Cette étape peut avoir déjà été fait à l usine. Step Slide two screws (Y) into the rail of each corner roof bar (D) and each middle roof bar (E). Étape Glisser deux vis (Y) dans le rail de chaque barre de toit de coin (D) et dans chaque barre de toit du centre (E). X10 D Y X2 E Y X4 Y X6 Parts required for this step / Pièces requises pour cette étape : D X4 Y X20 E X6 20
21 ASSEMBLY Step Install the corner roof bars (D ) to the inside roof connector (J1) using the screws (U1) as illustrated. Repeat this step for all remaining corner roof bars (D). ASSEMBLAGE Étape Installer les barres de toit de coin (D) au connecteur de toit intérieur (J1) en utilisant les vis (U1) tel qu illustré. Répéter cette étape pour les barres de toit de coin (D) restantes. X4 D D J1 U1 D J1 D D Parts required for this step / Pièces requises pour cette étape : D X4 J1 X1 U1 X8 21
22 ASSEMBLY Step Place the roof structure on top of the ogees Screw the corner roof bars (D) to the structure using the screws (V2). ASSEMBLAGE Étape Placer la structure du toit sur le dessus des moulures Visser les barres de coin de toit (D) à la structure en utilisant les vis (V2). Parts required for this step / Pièces requises pour cette étape : V2 X8 22
23 D V2 X4 D1 D D D1 23
24 ASSEMBLY Step Install the middle roof bar (E) to the inside roof connector (J1) using the screws (U1) Screw the iron angle found on the middle roof bar (E) to the ogees (B, B1, C & C1) using a screw (U). Repeat for all remaining middle roof bars (E). ASSEMBLAGE Étape Installer les barres de toit du centre (E) au connecteur de toit intérieur (J1) en utilisant les vis (U1) Visser le fer angle trouvé sur la barre de toit du centre (E) aux moulures (B, B1, C et C1) en utilisant une vis (U). Répéter pour toutes les barres de toit du centre (E) restantes. Parts required for this step / Pièces requises pour cette étape : U1 X12 E X6 U X6 24
25 X6 E U J1 U1 E X6 E B C1 B1 E E C C E E E C1 B B1 25
26 ASSEMBLY Step Install the outside roof connector (J) on the inside roof connector (J1) using the screws (V1). ASSEMBLAGE Étape Installer le connecteur de toit extérieur (J) sur le connecteur de toit intérieur (J1) en utilisant les vis (V1). Parts required for this step / Pièces requises pour cette étape : J X1 V1 X3 26
27 J J1 V1 V1 J V1 27
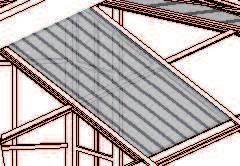
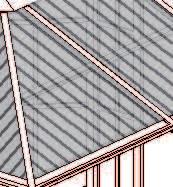
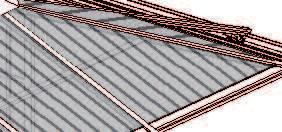
28 ASSEMBLY NOTE: The roof panels are covered with a plastic film identifying which side has a UV protector. Once the plastic film is removed it is impossible to know which side has the UV protector. We recommend removing the film one at a time just prior to installing the roof panel. CAUTION: One side of the roof panels is UV protected. Ensure that the UV protected side is facing up. It is a very important procedure; if not followed as described, your roof will not be covered by the warranty. Step Install the left roof panel (Ma) and the right roof panel (M1a) according to the picture, by sliding into the upper tracks of roof bars (D and E) Insert middle roof panel (P) from the end of the middle roof bars (E) in the middle of the 4.27 m (14 ft.) side of the shelter Align the base of middle roof panel (P) with bases of the left roof panel (Ma) and the right roof panel (M1a). This may require that middle roof panel (P) not be completely pushed to the back of the tracks Slide the roof support bars (N, N1 and N2) into the lower track on the roof bars (D and E) as illustrated. Repeat this step all around the structure. ASSEMBLAGE NOTE : Les panneaux de toit sont recouverts d une pellicule de plastique identifiant le côté ayant une protection UV. Une fois que cette pellicule est enlevée, il est impossible d identifier quel côté est protégé contre les rayons UV du soleil. Il est recommandé de retirer les pellicules de plastique une à la fois, avant l installation de chacun des panneaux. MISE EN GARDE : Un des côtés du panneau de toit a une protection UV. S assurer d exposer le côté protégé contre les rayons UV du soleil vers l extérieur de l abri. Cette étape est très importante, si elle n est pas respectée telle que décrite, le toit ne sera pas couvert par la garantie. Étape Installer les panneaux de toit de gauche (Ma) et les panneaux de toit de droite (M1a) tel qu illustré en les glissant dans les rails du haut des barres de toit (D et E) Insérer les panneaux de toit du centre (P) à partir du bout des barres de toit du centre (E) au milieu du côté de 4,27 m (14 pi) de l abri Aligner la base du panneau de toit du centre (P) avec la base du panneau de toit de gauche (Ma) et la base du panneau de toit de droite (M1a). Cela peut demander que les panneaux de toit du centre (P) ne soient pas poussés complètement au fond des rails Glisser les barres de support de toit (N, N1 et N2) dans le rail du bas des barres de toit (D et E) tel qu illustré. Répéter cette étape sur tous les côtés de l abri. Parts required for this step / Pièces requises pour cette étape : Ma X4 P X2 M1a X4 N X4 N1 X4 N2 X2 28
29 D D N E Ma N2 E P N1 M1a Ma N M1a N1 E D D This Side Up Ce côté vers le haut 29
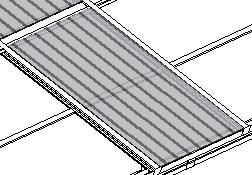
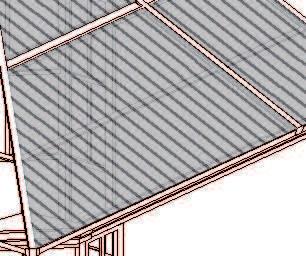
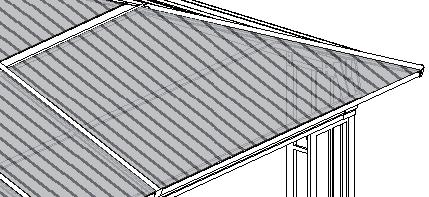
30 ASSEMBLY NOTE: The roof panels are covered with a plastic film identifying which side has a UV protector. Once the plastic film is removed it is impossible to know which side has the UV protector. We recommend removing the film one at a time just prior to installing the roof panel. CAUTION: One side of the roof panels is UV protected. Ensure that the UV protected side is facing up. It is a very important procedure; if not followed as described, your roof will not be covered by the warranty. Step Install the left roof panel (Mb) and the right roof panel (M1b) according to the picture, by sliding into the upper tracks of roof bars (D and E) Insert middle roof panel (P1) from the end of the middle roof bars (E) in the middle of the 4.27 m (14 ft.) side of the shelter. Repeat this step all around the structure. ASSEMBLAGE NOTE : Les panneaux de toit sont recouverts d une pellicule de plastique identifiant le côté ayant une protection UV. Une fois que cette pellicule est enlevée, il est impossible d identifier quel côté est protégé contre les rayons UV du soleil. Il est recommandé de retirer les pellicules de plastique une à la fois, avant l installation de chacun des panneaux. MISE EN GARDE : Un des côtés du panneau de toit a une protection UV. S assurer d exposer le côté protégé contre les rayons UV du soleil vers l extérieur de l abri. Cette étape est très importante, si elle n est pas respectée telle que décrite, le toit ne sera pas couvert par la garantie. Étape Installer les panneaux de toit de gauche (Mb) et les panneaux de toit de droite (M1b) tel qu illustré en les glissant dans les rails du haut des barres de toit (D et E) Insérer les panneaux de toit du centre (P1) à partir du bout des barres de toit du centre (E) au milieu du côté de 4,27 m (14 pi) de l abri. Répéter cette étape sur tous les côtés de l abri. Parts required for this step / Pièces requises pour cette étape : Mb X4 P1 X2 M1b X4 30
31 Mb P1 M1b M1b Mb This Side Up Ce côté vers le haut 31
32 ASSEMBLY CAUTION: Two people are required for this step. Step Secure the left side of a left roof finishing bar (F) with a screw and cap nut (Y1) in the left corner of the 4.27 m (14 ft.) side of the unit. This cap nut (Y1) will be undone and re-inserted at the end of this step Place a middle roof finishing bar (F2) next to the left roof finishing bar (F) and align the pre-drilled holes in each bar one on top of the other. Place finishing end (O1) over the aligned holes and secure with screw and cap nut (Y1) Repeat this step with the right roof finishing bar (F1) by securing it to the middle roof finishing bar (F2) with a finishing end (O1) and a screw and cap nut (Y1) In order to transition from the 4.27 m (14 ft.) side of the unit to the 3.66 m (12 ft.) side, align the remaining pre-drilled hole of the right roof finishing bar (F1) with that of a left roof finishing bar (F) on the 3.66 m (12 ft.) in the corner of the unit. Secure both bars in the corner with a corner finishing end (O) by inserting a screw and cap nut (Y1) Secure a right roof finishing bar (F1) to the left roof finishing bar (F) on the 3.66 m (12 ft.) side with a finishing end (O1) and a screw and cap nut (Y1) Repeat these steps working your way around the entire unit until coming to the last corner where the installation of the roof finishing bar began Undo the first cap nut (Y1) and align the pre-drilled holes of the first and last roof finishing bar which were installed. Secure both bars in the corner with a corner finishing end (O) by using the cap nut (Y1). ASSEMBLAGE AVERTISSEMENT : Deux personnes sont requises pour cette étape. Étape Attacher le côté gauche de la barre de finition de toit (F) avec une vis et écrou borgne (Y1) dans le coin gauche du côté de 4,27 m (14 pi) de l abri. Cet écrou borgne (Y1) sera défait et inséré de nouveau à la fin de cette étape dans le but d accrocher un embout de finition de coin (O) Placer une barre de finition de toit de centre (F2) à droite de la barre de finition de toit gauche (F) et aligner les trous les uns par-dessus les autres. Placer un embout de finition (O1) par-dessus les trous et les attacher avec une vis et écrou borgne (Y1) Répéter cette étape avec une barre de finition de toit droite (F1) en l attachant sur la barre de finition de toit du centre (F2) avec un embout de finition (O1) et une vis et écrou borgne (Y1) Dans le but de faire la transition du côté de 4,27 m (14 pi) au côté de 3,66 m (12 pi), aligner le trou restant de la barre de finition de toit droite (F1) avec celui de la barre de finition de toit gauche (F) sur le côté de 3,66 m (12 pi) au coin de l abri. Attacher les deux barres au coin avec un embout de finition de coin (O) en y insérant une vis et écrou borgne (Y1) Attacher une barre de finition de toit droite (F1) à la barre de finition de toit gauche (F) sur le côté de 3,66 m (12 pi) avec un embout de finition (O1) et une vis et écrou borgne (Y1) Répéter ces étapes jusqu à ce que vous ayez fait le tour de l abri et que vous arriviez au dernier coin où vous avez commencé l installation de la première barre de finition de toit Défaire l écrou borgne (Y1) et aligner les trous de la première et de la dernière barre de finition de toit qui ont été installées. Attacher les deux barres au coin avec un embout de finition de coin (O) en y insérant l écrou borgne (Y1) que vous avez défait. Parts required for this step / Pièces requises pour cette étape : F X4 O1 X6 Y1 O X4 X4 F2 X2 F1 X4 32
33 START HERE DÉBUTER ICI O F O1 F2 O1 F1 O F O1 F1 O D Y1 F1 E O Y1 F X4 O1 Y1 Y1 X6 X10 Slide the screw (Y1) into the rail. Glisser la vis (Y1) dans le rail. Y1 33
34 ASSEMBLY Step From the inside of the shelter, attach the solidifying bars (I, I1, I2, H, H1 & H2) using the pre-inserted screws and cap nut (Y) as illustrated. Each screw and cap nut (Y) must be inserted in two ends of a solidifying bar prior to screw. ASSEMBLAGE Étape De l intérieur de l abri, installer les barres de renfort (I, I1, I2, H, H1 et H2) en utilisant les vis préinsérées (Y) et ses écrous borgnes tel qu illustré. S assurer que chaque vis est insérée dans les extrémités de deux barres de renfort adjacentes avant de visser. Parts required for this step / Pièces requises pour cette étape : H X4 H1 X4 H2 X2 I X4 I1 X4 I2 X2 34
35 H1 I1 I2 I I1 I H2 H H H1 View from underside of shelter Vue lorsque vous êtes positionné à l intérieur de l abri Pre-inserted screw (Y) Vis (Y) pré-insérée X20 Y 35
36 ASSEMBLY NOTE: The netting and curtain should be installed starting in the middle of the 3.66 m (12 ft.) side of the unit, wrap around the inside of the post, and finish the installation in the middle of the next side of the unit. The zippers to close the netting will therefore meet in the centre of each side of the sun shelter. Step Install the mosquito netting (S1) and the curtain (S) along the tracks by inserting the hooks (T) one at a time into the eyelets found along the top border of the panels. Repeat for all four netting panels (S1) and curtain panels (S). ASSEMBLAGE NOTE : Les moustiquaires et les rideaux doivent être installées à l intérieur de l abri, en commençant par le milieu d un côté de 3,66 m (12 pi) de l abri et en se terminant au milieu du côté adjacent. Les fermetures à glissière vont alors se rencontrer au centre de chacun des côtés de l abri. Étape Installer les moustiquaires (S1) et les rideaux (S) sur les rails en insérant les crochets (T), les uns après les autres, dans chacun des oeillets. Répéter cette étape pour les quatre moustiquaires (S1) et rideaux (S). Parts required for this step / Pièces requises pour cette étape : S X4 S1 X4 36
37 S S1 37
38 Notes
39 Notes
40 Printed in China / Imprimé en Chine
ASSEMBLY INSTRUCTIONS DIRECTIVES POUR L'ASSEMBLAGE ombre pendant lamp lampe suspendue à tons dégradés, chocolat
 ASSEMBLY INSTRUCTIONS DIRECTIVES POUR L'ASSEMBLAGE ombre pendant lamp lampe suspendue à tons dégradés, chocolat SKU 2728089 INSTRUCTIONAL MANUAL MANUEL D'INSTRUCTIONS 270/2707 COMPONENT LIST LISTE DES
ASSEMBLY INSTRUCTIONS DIRECTIVES POUR L'ASSEMBLAGE luster chandelier lamp chandelier à trois branches en verre lustré
 ASSEMBLY INSTRUCTIONS DIRECTIVES POUR L'ASSEMBLAGE luster chandelier lamp chandelier à trois branches en verre lustré SKU 2711592 INSTRUCTIONAL MANUAL MANUEL D'INSTRUCTIONS 270/2707 COMPONENT LIST LISTE
Lavatory Faucet. Instruction Manual. Questions? 1-866-661-9606 customerservice@artikaworld.com
 Lavatory Faucet Instruction Manual rev. 19-01-2015 Installation Manual You will need Adjustable Wrench Adjustable Pliers Plumber s Tape Hardware list (included) Allen Key Socket wrench tool Important Follow
GIGABIT PCI DESKTOP ADAPTER DGE-530T. Quick Installation Guide+ Guide d installation+
 GIGABIT PCI DESKTOP ADAPTER Quick Installation Guide+ Guide d installation+ Check Your Package Contents Quick Installation Guide Gigabit Ethernet PCI Adapter CD with Manual and Drivers DO NOT insert the
Instructions Mozilla Thunderbird Page 1
 Instructions Mozilla Thunderbird Page 1 Instructions Mozilla Thunderbird Ce manuel est écrit pour les utilisateurs qui font déjà configurer un compte de courrier électronique dans Mozilla Thunderbird et
Warning: Failure to follow these warnings could result in property damage, or personal injury.
 Western Steel & Tube 1 Storage Locker Extended Storage Locker Storage Cabinet Assembly And Use Instructions Warning: Failure to follow these warnings could result in property damage, or personal injury.
WINTER BOAT STORAGE SYSTEM SYSTÈME DE REMISAGE HIVERNAL POUR BATEAU
 MANUAL / MANUEL VIDEO WINTER BOAT STORAGE SYSTEM SYSTÈME DE REMISAGE HIVERNAL POUR BATEAU ASSEMBLY INSTRUCTIONS GUIDE D ASSEMBLAGE NAVIGLOO 14-18½ ft/pi FISHING BOAT! RUNABOUT! PONTOON BOAT! SAILBOAT (SAILBOAT
Thank you for choosing the Mobile Broadband USB Stick. With your USB Stick, you can access a wireless network at high speed.
 Thank you for choosing the Mobile Broadband USB Stick. With your USB Stick, you can access a wireless network at high speed. Note: This manual describes the appearance of the USB Stick, as well as the
MONTEGO 3 PERSON CUSHION GARDEN SWING WITH CANOPY ASSEMBLY INSTRUCTIONS ITEM# SC-177-2GS
 MONTEGO 3 PERSON CUSHION GARDEN SWING WITH CANOPY ASSEMBLY INSTRUCTIONS ITEM# SC-177-2GS QUESTIONS, PROBLEMS, MISSING PARTS WITH THIS PRODUCT? DO NOT RETURN TO YOUR RETAILER, PLEASE CALL OUR CUSTOMER SERVICE
POLICY: FREE MILK PROGRAM CODE: CS-4
 POLICY: FREE MILK PROGRAM CODE: CS-4 Origin: Authority: Reference(s): Community Services Department Cafeteria Services and Nutrition Education Division Resolution #86-02-26-15B.1 POLICY STATEMENT All elementary
R.V. Table Mounting Instructions
 PTSS165 ACCESSORY MOUNTING INSTRUCTIONS Use these instructions in conjunction with your main manual to properly assemble your gas grill. Refer to the main manual for safety, operating, cleaning and maintenance
How to Login to Career Page
 How to Login to Career Page BASF Canada July 2013 To view this instruction manual in French, please scroll down to page 16 1 Job Postings How to Login/Create your Profile/Sign Up for Job Posting Notifications
Folio Case User s Guide
 Fujitsu America, Inc. Folio Case User s Guide I N S T R U C T I O N S This Folio Case is a stylish, lightweight case for protecting your Tablet PC. Elastic Strap Pen Holder Card Holders/ Easel Stops Figure
Guide d'installation rapide TFM-560X YO.13
 Guide d'installation rapide TFM-560X YO.13 Table of Contents Français 1 1. Avant de commencer 1 2. Procéder à l'installation 2 Troubleshooting 6 Version 06.08.2011 16. Select Install the software automatically
GASKET FOR TONER COLLECTION BOTTLE
 Technical Service Bulletin PRODUCT CREATED DATE MODIFIED DATE FILE ALL PRINTERS 08/07/2011 201108 REV A GASKET FOR TONER COLLECTION BOTTLE Voir version française dans la section suivante. Due to a manufacturing
Le No.1 de l économie d énergie pour patinoires.
 Le No.1 de l économie d énergie pour patinoires. Partner of REALice system Economie d énergie et une meilleure qualité de glace La 2ème génération améliorée du système REALice bien connu, est livré en
Package Contents. System Requirements. Before You Begin
 Package Contents DWA-125 Wireless 150 USB Adapter CD-ROM (contains software, drivers, and manual) Cradle If any of the above items are missing, please contact your reseller. System Requirements A computer
Garage Door Monitor Model 829LM
 Garage Door Monitor Model 829LM To prevent possible SERIOUS INJURY or DEATH from a closing garage door: NEVER permit children to operate or play with door control push buttons or remote control transmitters.
Instructions pour mettre à jour un HFFv2 v1.x.yy v2.0.00
 Instructions pour mettre à jour un HFFv2 v1.x.yy v2.0.00 HFFv2 1. OBJET L accroissement de la taille de code sur la version 2.0.00 a nécessité une évolution du mapping de la flash. La conséquence de ce
Guide d installation Deco Drain inc. DD200
 Guide d installation Deco Drain inc. DD200 Pour plus informations et pour télécharger les guides d installation en couleur, visitez notre site web. www.decodrain.com Soutien technique : Composez le : 514-946-8901
Practice Direction. Class Proceedings
 Effective Date: 2010/07/01 Number: PD - 5 Title: Practice Direction Class Proceedings Summary: This Practice Direction describes the procedure for requesting the assignment of a judge in a proceeding under
Règlement sur le télémarketing et les centres d'appel. Call Centres Telemarketing Sales Regulation
 THE CONSUMER PROTECTION ACT (C.C.S.M. c. C200) Call Centres Telemarketing Sales Regulation LOI SUR LA PROTECTION DU CONSOMMATEUR (c. C200 de la C.P.L.M.) Règlement sur le télémarketing et les centres d'appel
Using a Walker. 2. Move your injured or weak leg toward the walker first. If you have had surgery on both legs, use either leg to begin walking.
 Using a Walker Walking with a Walker 1. Lift the walker and place it at a comfortable distance in front of you with all four of its legs on the floor. This distance is often equal to an arm s length. 2.
Contents Windows 8.1... 2
 Workaround: Installation of IRIS Devices on Windows 8 Contents Windows 8.1... 2 English Français Windows 8... 13 English Français Windows 8.1 1. English Before installing an I.R.I.S. Device, we need to
calls.paris-neuroscience.fr Tutoriel pour Candidatures en ligne *** Online Applications Tutorial
 calls.paris-neuroscience.fr Tutoriel pour Candidatures en ligne Online Applications Tutorial 1/4 Pour postuler aux Appels d Offres de l ENP, vous devez aller sur la plateforme : calls.parisneuroscience.fr.
DOCUMENTATION - FRANCAIS... 2
 DOCUMENTATION MODULE CATEGORIESTOPMENU MODULE CREE PAR PRESTACREA INDEX : DOCUMENTATION - FRANCAIS... 2 INSTALLATION... 2 CONFIGURATION... 2 LICENCE ET COPYRIGHT... 3 SUPPORT TECHNIQUE ET MISES A JOUR...
SERVEUR DÉDIÉ DOCUMENTATION
 SERVEUR DÉDIÉ DOCUMENTATION Release 5.0.6.0 19 Juillet 2013 Copyright 2013 GIANTS Software GmbH, All Rights Reserved. 1/9 CHANGE LOG Correction de bug divers (5.0.6.0) Ajout d une option de relance automatique
The new consumables catalogue from Medisoft is now updated. Please discover this full overview of all our consumables available to you.
 General information 120426_CCD_EN_FR Dear Partner, The new consumables catalogue from Medisoft is now updated. Please discover this full overview of all our consumables available to you. To assist navigation
Sécurité relative aux sièges auto et aux rehausseurs
 Sécurité relative aux sièges auto et aux rehausseurs Safety with Car Seats and Booster Seats Car crashes are the main cause of accidental death and serious injury of children. Correctly using a car or
Editing and managing Systems engineering processes at Snecma
 Editing and managing Systems engineering processes at Snecma Atego workshop 2014-04-03 Ce document et les informations qu il contient sont la propriété de Ils ne doivent pas être copiés ni communiqués
Application Form/ Formulaire de demande
 Application Form/ Formulaire de demande Ecosystem Approaches to Health: Summer Workshop and Field school Approches écosystémiques de la santé: Atelier intensif et stage d été Please submit your application
Quel temps fait-il chez toi?
 Quel temps fait-il chez toi? -------------------------------------------------------------------------------------------------------------------------------------- Teacher s note: We have prepared a teaching
Quick Start Guide This guide is intended to get you started with Rational ClearCase or Rational ClearCase MultiSite.
 Rational ClearCase or ClearCase MultiSite Version 7.0.1 Quick Start Guide This guide is intended to get you started with Rational ClearCase or Rational ClearCase MultiSite. Product Overview IBM Rational
72" STORAGE SHELF OR WORKBENCH ÉTAGERÈ DE RANGEMENT OU ETABLI DE 72 PO
 OPERATING AND SAFETY MANUAL MANUEL D UTILISATION ET DE SÉCURITÉ MODEL MODÈLE: 1TJT004SBH 72" STORAGE SHELF OR WORKBENCH ÉTAGERÈ DE RANGEMENT OU ETABLI DE 72 PO IMPORTANT PLEASE NOTE: WHEN YOU OPEN THE
Gestion des prestations Volontaire
 Gestion des prestations Volontaire Qu estce que l Income Management (Gestion des prestations)? La gestion des prestations est un moyen de vous aider à gérer votre argent pour couvrir vos nécessités et
ETABLISSEMENT D ENSEIGNEMENT OU ORGANISME DE FORMATION / UNIVERSITY OR COLLEGE:
 8. Tripartite internship agreement La présente convention a pour objet de définir les conditions dans lesquelles le stagiaire ci-après nommé sera accueilli dans l entreprise. This contract defines the
PARIS ROISSY CHARLES DE GAULLE
 GPS 2 34 1 E 49 0 46 N GPS* 2 56 56 E 49 0 12 N Votre contact / Your contact: et / and: Accueil : Cabines téléphoniques publiques Reception: Public telephone kiosks Navette Shuttle AÉROPORT DE TT CAR TRANSIT
CONVENTION DE STAGE TYPE STANDART TRAINING CONTRACT
 CONVENTION DE STAGE TYPE STANDART TRAINING CONTRACT La présente convention a pour objet de définir les conditions dans lesquelles le stagiaire ci-après nommé sera accueilli dans l entreprise. This contract
Embases pour raccordement G1/8 - G1/4
 Embases pour raccordement - Manifolds for spool valves Informations générales General information Embases modulaires pour distributeurs et Multiple sub-bases for and spool valves Embases monobloc pour
Notice Technique / Technical Manual
 Contrôle d accès Access control Encodeur USB Mifare ENCOD-USB-AI Notice Technique / Technical Manual SOMMAIRE p.2/10 Sommaire Remerciements... 3 Informations et recommandations... 4 Caractéristiques techniques...
Compléter le formulaire «Demande de participation» et l envoyer aux bureaux de SGC* à l adresse suivante :
 FOIRE AUX QUESTIONS COMMENT ADHÉRER? Compléter le formulaire «Demande de participation» et l envoyer aux bureaux de SGC* à l adresse suivante : 275, boul des Braves Bureau 310 Terrebonne (Qc) J6W 3H6 La
GAME CONTENTS CONTENU DU JEU OBJECT OF THE GAME BUT DU JEU
 GAME CONTENTS 3 wooden animals: an elephant, a Polar bear and an African lion 1 Playing Board with two tree stumps, one red and one blue 1 Command Board double sided for two game levels (Green for normal
TABLE DES MATIERES A OBJET PROCEDURE DE CONNEXION
 1 12 rue Denis Papin 37300 JOUE LES TOURS Tel: 02.47.68.34.00 Fax: 02.47.68.35.48 www.herve consultants.net contacts@herve consultants.net TABLE DES MATIERES A Objet...1 B Les équipements et pré-requis...2
Stainless Steel Solar Wall Light
 V 2.9 Stainless Steel Solar Wall Light User Manual Please read and understand all instructions before use.retain this manual for future reference. V 2.9 Stainless Steel Solar Wall Light SPECIFICATIONS
APPENDIX 6 BONUS RING FORMAT
 #4 EN FRANÇAIS CI-DESSOUS Preamble and Justification This motion is being presented to the membership as an alternative format for clubs to use to encourage increased entries, both in areas where the exhibitor
Trim Kit Installation Instruction
 Trim Kit Installation Instruction Instrucciones para la Instalación del Kit de Molduras Instructions pour l'installation du Kit d'encastrement m If any hardware or parts are damaged or missing, contact
Archived Content. Contenu archivé
 ARCHIVED - Archiving Content ARCHIVÉE - Contenu archivé Archived Content Contenu archivé Information identified as archived is provided for reference, research or recordkeeping purposes. It is not subject
SYSTÈME JETS D AIR WISH WISH AIR JETS SYSTEM Système de massage à jets d air pour bains en polymère - Air jet massage system for polymer bathtubs
 SYSTME JETS D AIR WISH WISH AIR JETS SYSTEM Système de massage à jets d air pour bains en polymère - Air jet massage system for polymer bathtubs Manuel d installation - Installation manual 6835, RUE PICARD
Module Title: French 4
 CORK INSTITUTE OF TECHNOLOGY INSTITIÚID TEICNEOLAÍOCHTA CHORCAÍ Semester 2 Examinations 2010 Module Title: French 4 Module Code: LANG 6020 School: Business Programme Title: Bachelor of Business Stage 2
Tutoriel de formation SurveyMonkey
 Tutoriel de formation SurveyMonkey SurveyMonkey est un service de sondage en ligne. SurveyMonkey vous permet de créer vos sondages rapidement et facilement. SurveyMonkey est disponible à l adresse suivante
Cheque Holding Policy Disclosure (Banks) Regulations. Règlement sur la communication de la politique de retenue de chèques (banques) CONSOLIDATION
 Regulations. Règlement sur la communication de la politique de retenue de chèques (banques) CONSOLIDATION") CANADA CONSOLIDATION CODIFICATION Cheque Holding Policy Disclosure (Banks) Regulations Règlement sur la communication de la politique de retenue de chèques (banques) SOR/2002-39 DORS/2002-39 Current to
CANADA CONSOLIDATION CODIFICATION Cheque Holding Policy Disclosure (Banks) Regulations Règlement sur la communication de la politique de retenue de chèques (banques) SOR/2002-39 DORS/2002-39 Current to
that the child(ren) was/were in need of protection under Part III of the Child and Family Services Act, and the court made an order on
 was/were in need of protection under Part III of the Child and Family Services Act, and the court made an order on") ONTARIO Court File Number at (Name of court) Court office address Applicant(s) (In most cases, the applicant will be a children s aid society.) Full legal name & address for service street & number, municipality,
ONTARIO Court File Number at (Name of court) Court office address Applicant(s) (In most cases, the applicant will be a children s aid society.) Full legal name & address for service street & number, municipality,
DOCUMENTATION - FRANCAIS... 2
 DOCUMENTATION MODULE SHOPDECORATION MODULE PRESTASHOP CREE PAR PRESTACREA INDEX : DOCUMENTATION - FRANCAIS... 2 INSTALLATION... 2 Installation automatique... 2 Installation manuelle... 2 Résolution des
Logitech Tablet Keyboard for Windows 8, Windows RT and Android 3.0+ Setup Guide Guide d installation
 Logitech Tablet Keyboard for Windows 8, Windows RT and Android 3.0+ Setup Guide Guide d installation English.......................................... 3 Français.........................................
NOM ENTREPRISE. Document : Plan Qualité Spécifique du Projet / Project Specific Quality Plan
 Document : Plan Qualité Spécifique du Projet Project Specific Quality Plan Référence Reference : QP-3130-Rev 01 Date Date : 12022008 Nombre de Pages Number of Pages : 6 Projet Project : JR 100 Rédacteur
accidents and repairs:
 accidents and repairs: putting the pieces together accidents et réparations : réunir le tout nobody can repair your Toyota like Toyota Unfortunately, accidents do happen. And the best way to restore your
Comprendre l impact de l utilisation des réseaux sociaux en entreprise SYNTHESE DES RESULTATS : EUROPE ET FRANCE
 Comprendre l impact de l utilisation des réseaux sociaux en entreprise SYNTHESE DES RESULTATS : EUROPE ET FRANCE 1 Objectifs de l étude Comprendre l impact des réseaux sociaux externes ( Facebook, LinkedIn,
12, Chemin de la Forge L Islet (Québec) G0R 1X0 CANADA
 G0R 1X0 CANADA") REMORQUES FOR 1005 TRAILER FABRIQUÉ PAR / MANUFACTURED BY : 12, Chemin de la Forge L Islet (Québec) G0R 1X0 CANADA Customer s English Service: (418) 247-7709 Service français : (418) 247-5626 Télécopieur
REMORQUES FOR 1005 TRAILER FABRIQUÉ PAR / MANUFACTURED BY : 12, Chemin de la Forge L Islet (Québec) G0R 1X0 CANADA Customer s English Service: (418) 247-7709 Service français : (418) 247-5626 Télécopieur
Le Cloud Computing est-il l ennemi de la Sécurité?
 Le Cloud Computing est-il l ennemi de la Sécurité? Eric DOMAGE Program manager IDC WE Security products & Solutions Copyright IDC. Reproduction is forbidden unless authorized. All rights reserved. Quelques
EN UNE PAGE PLAN STRATÉGIQUE
 EN UNE PAGE PLAN STRATÉGIQUE PLAN STRATÉGIQUE EN UNE PAGE Nom de l entreprise Votre nom Date VALEUR PRINCIPALES/CROYANCES (Devrait/Devrait pas) RAISON (Pourquoi) OBJECTIFS (- AN) (Où) BUT ( AN) (Quoi)
INVESTMENT REGULATIONS R-090-2001 In force October 1, 2001. RÈGLEMENT SUR LES INVESTISSEMENTS R-090-2001 En vigueur le 1 er octobre 2001
 FINANCIAL ADMINISTRATION ACT INVESTMENT REGULATIONS R-090-2001 In force October 1, 2001 LOI SUR LA GESTION DES FINANCES PUBLIQUES RÈGLEMENT SUR LES INVESTISSEMENTS R-090-2001 En vigueur le 1 er octobre
Frequently Asked Questions
 GS1 Canada-1WorldSync Partnership Frequently Asked Questions 1. What is the nature of the GS1 Canada-1WorldSync partnership? GS1 Canada has entered into a partnership agreement with 1WorldSync for the
THE LAW SOCIETY OF UPPER CANADA BY-LAW 19 [HANDLING OF MONEY AND OTHER PROPERTY] MOTION TO BE MOVED AT THE MEETING OF CONVOCATION ON JANUARY 24, 2002
![THE LAW SOCIETY OF UPPER CANADA BY-LAW 19 [HANDLING OF MONEY AND OTHER PROPERTY] MOTION TO BE MOVED AT THE MEETING OF CONVOCATION ON JANUARY 24, 2002](/thumbs/19/276456.jpg "THE LAW SOCIETY OF UPPER CANADA BY-LAW 19 [HANDLING OF MONEY AND OTHER PROPERTY] MOTION TO BE MOVED AT THE MEETING OF CONVOCATION ON JANUARY 24, 2002") 2-aes THE LAW SOCIETY OF UPPER CANADA BY-LAW 19 [HANDLING OF MONEY AND OTHER PROPERTY] MOTION TO BE MOVED AT THE MEETING OF CONVOCATION ON JANUARY 24, 2002 MOVED BY SECONDED BY THAT By-Law 19 [Handling
2-aes THE LAW SOCIETY OF UPPER CANADA BY-LAW 19 [HANDLING OF MONEY AND OTHER PROPERTY] MOTION TO BE MOVED AT THE MEETING OF CONVOCATION ON JANUARY 24, 2002 MOVED BY SECONDED BY THAT By-Law 19 [Handling
03/2013. Mod: WOKI-60IP/TR. Production code: DTWIC 6000
 03/2013 Mod: WOKI-60IP/TR Production code: DTWIC 6000 ENCASTRABLE INDUCTION DROP IN INDUCTION 11/2011 TECHNICAL FEATURES DOCUMENTATION S.A.V. Notice d utilisation : FX00326-A Guide d intervention : ---
Contrôle d'accès Access control. Notice technique / Technical Manual
 p.1/18 Contrôle d'accès Access control INFX V2-AI Notice technique / Technical Manual p.2/18 Sommaire / Contents Remerciements... 3 Informations et recommandations... 4 Caractéristiques techniques... 5
33 inch open & closed storage Rangement à espace fermé et ouvert de 33po (83.7cm) 33 pulgadas almacenaje abierto y cerra
 33 pulgadas almacenaje abierto y cerra") 33 inch open & closed storage 33 pulgadas almacenaje abierto y cerra! o not throw away packaging materials until assembly is complete.! Assemble this item on a soft surface, such as cardboard or carpet,
33 inch open & closed storage 33 pulgadas almacenaje abierto y cerra! o not throw away packaging materials until assembly is complete.! Assemble this item on a soft surface, such as cardboard or carpet,
Fabricant. 2 terminals
 Specifications Fabricant Nominal torque (Nm) 65 Minimal torque (Nm) 0,63 Coil resistance - 20 C (ohms) 20 Rated current DC (A) 1 Rotor inertia (kg.m 2 ) 2.10-3 Weight (kg) 7,20 Heat dissipation continuous
Support Orders and Support Provisions (Banks and Authorized Foreign Banks) Regulations
 Regulations") CANADA CONSOLIDATION CODIFICATION Support Orders and Support Provisions (Banks and Authorized Foreign Banks) Regulations Règlement sur les ordonnances alimentaires et les dispositions alimentaires (banques
CANADA CONSOLIDATION CODIFICATION Support Orders and Support Provisions (Banks and Authorized Foreign Banks) Regulations Règlement sur les ordonnances alimentaires et les dispositions alimentaires (banques
Le passé composé. C'est le passé! Tout ça c'est du passé! That's the past! All that's in the past!
 > Le passé composé le passé composé C'est le passé! Tout ça c'est du passé! That's the past! All that's in the past! «Je suis vieux maintenant, et ma femme est vieille aussi. Nous n'avons pas eu d'enfants.
Dans une agence de location immobilière...
 > Dans une agence de location immobilière... In a property rental agency... dans, pour et depuis vocabulaire: «une location» et «une situation» Si vous voulez séjourner à Lyon, vous pouvez louer un appartement.
INTERNATIONAL CONSULTANT & SUPPLIERS TO THE WINE & SPIRITS TRADE
 Conditions Générales de Vente Article 1 Sauf stipulation contraire, nos offres s entendent sans engagement. Les ordres reçus ne nous lient qu après notre confirmation. Article 2 Sauf convention contraire,
Once the installation is complete, you can delete the temporary Zip files..
 Sommaire Installation... 2 After the download... 2 From a CD... 2 Access codes... 2 DirectX Compatibility... 2 Using the program... 2 Structure... 4 Lier une structure à une autre... 4 Personnaliser une
Logitech Speaker System Z553 Setup Guide Guide d installation
 Logitech Speaker System Z553 Setup Guide Guide d installation Logitech Speaker System Z553 English................. 3 Français................ 10 www.logitech.com/support...19 2 Package contents Logitech
MODE D EMPLOI USER MANUAL
 notice_cd 853:notice 9/01/08 15:08 Page 1 CAFETIÈRE À DOSETTES Coffee pad machine CD 853 GIACOMO MODE D EMPLOI USER MANUAL notice_cd 853:notice 9/01/08 15:08 Page 2 FRANÇAIS WHITE & BROWN vous félicite
OBJECT PRONOUNS. French III
 OBJECT PRONOUNS French III Les pronoms objets roulent!!! Complément d'objet direct (COD) SubjectS do the action, objects receive the action Direct objects are the people or things in a sentence which receive
If you understand the roles nouns (and their accompanying baggage) play in a sentence...
 play in a sentence...") If you understand the roles nouns (and their accompanying baggage) play in a sentence...... you can use pronouns with ease (words like lui, leur, le/la/les, eux and elles)...... understand complicated
If you understand the roles nouns (and their accompanying baggage) play in a sentence...... you can use pronouns with ease (words like lui, leur, le/la/les, eux and elles)...... understand complicated
General Import Permit No. 13 Beef and Veal for Personal Use. Licence générale d importation n O 13 bœuf et veau pour usage personnel CONSOLIDATION
 CANADA CONSOLIDATION CODIFICATION General Import Permit No. 13 Beef and Veal for Personal Use Licence générale d importation n O 13 bœuf et veau pour usage personnel SOR/95-43 DORS/95-43 Current to June
Paxton. ins-20605. Net2 desktop reader USB
 Paxton ins-20605 Net2 desktop reader USB 1 3 2 4 1 2 Desktop Reader The desktop reader is designed to sit next to the PC. It is used for adding tokens to a Net2 system and also for identifying lost cards.
has brought a motion to change the order of Justice, dated. the agreement between you and (name of party bringing this motion), dated.
, dated.") ONTARIO Court File Number SEAL at (Name of court) Court office address Form 15: Motion to Change the order of Justice dated the agreement for support between the parties dated filed with the court on Applicant(s)
ONTARIO Court File Number SEAL at (Name of court) Court office address Form 15: Motion to Change the order of Justice dated the agreement for support between the parties dated filed with the court on Applicant(s)
Stratégie DataCenters Société Générale Enjeux, objectifs et rôle d un partenaire comme Data4
 Stratégie DataCenters Société Générale Enjeux, objectifs et rôle d un partenaire comme Data4 Stéphane MARCHINI Responsable Global des services DataCenters Espace Grande Arche Paris La Défense SG figures
Free filter reminders! Sign up online at: santevia.com/filterease. need help? Contact Santevia! 1-866-943-9220 help@santevia.com.
 Free filter reminders! Sign up online at: need help? Contact Santevia! -866-9-90 help@santevia.com Shower Filter English about our santevia Shower Filter Prevent leaks This shower filter employs NMC leading
THE SUBJUNCTIVE MOOD. Twenty-nineth lesson Vingt-neuvième leçon
 THE SUBJUNCTIVE MOOD Twenty-nineth lesson Vingt-neuvième leçon SOMMAIRE 1) Definition 2) Uses 2.1) Common expressions of doubt 2.2) Common expressions of necessity 2.3) Common expressions of desirability
WEB page builder and server for SCADA applications usable from a WEB navigator
 Générateur de pages WEB et serveur pour supervision accessible à partir d un navigateur WEB WEB page builder and server for SCADA applications usable from a WEB navigator opyright 2007 IRAI Manual Manuel
Interest Rate for Customs Purposes Regulations. Règlement sur le taux d intérêt aux fins des douanes CONSOLIDATION CODIFICATION
 CANADA CONSOLIDATION CODIFICATION Interest Rate for Customs Purposes Regulations Règlement sur le taux d intérêt aux fins des douanes SOR/86-1121 DORS/86-1121 Current to August 4, 2015 À jour au 4 août
First Nations Assessment Inspection Regulations. Règlement sur l inspection aux fins d évaluation foncière des premières nations CONSOLIDATION
 CANADA CONSOLIDATION CODIFICATION First Nations Assessment Inspection Regulations Règlement sur l inspection aux fins d évaluation foncière des premières nations SOR/2007-242 DORS/2007-242 Current to September
DOCUMENTATION MODULE BLOCKCATEGORIESCUSTOM Module crée par Prestacrea - Version : 2.0
 DOCUMENTATION MODULE BLOCKCATEGORIESCUSTOM Module crée par Prestacrea - Version : 2.0 INDEX : DOCUMENTATION - FRANCAIS... 2 1. INSTALLATION... 2 2. CONFIGURATION... 2 3. LICENCE ET COPYRIGHT... 3 4. MISES
English Q&A #1 Braille Services Requirement PPTC 144918. Q1. Would you like our proposal to be shipped or do you prefer an electronic submission?
 English Q&A #1 Braille Services Requirement PPTC 144918 Q1. Would you like our proposal to be shipped or do you prefer an electronic submission? A1. Passport Canada requests that bidders provide their
3615 SELFIE. http://graffitiresearchlab.fr HOW-TO / GUIDE D'UTILISATION
 3615 SELFIE http://graffitiresearchlab.fr HOW-TO / GUIDE D'UTILISATION Hardware : Minitel Computer DIN FM545 45 connector (http://www.gotronic.fr/art-fiche-din-fm545-4747.htm) Cable Arduino compatible
FCM 2015 ANNUAL CONFERENCE AND TRADE SHOW Terms and Conditions for Delegates and Companions Shaw Convention Centre, Edmonton, AB June 5 8, 2015
 FCM 2015 ANNUAL CONFERENCE AND TRADE SHOW Terms and Conditions for Delegates and Companions Shaw Convention Centre, Edmonton, AB June 5 8, 2015 Early-bird registration Early-bird registration ends April
MELTING POTES, LA SECTION INTERNATIONALE DU BELLASSO (Association étudiante de lʼensaparis-belleville) PRESENTE :
 PRESENTE :") MELTING POTES, LA SECTION INTERNATIONALE DU BELLASSO (Association étudiante de lʼensaparis-belleville) PRESENTE : Housing system est un service gratuit, qui vous propose de vous mettre en relation avec
MELTING POTES, LA SECTION INTERNATIONALE DU BELLASSO (Association étudiante de lʼensaparis-belleville) PRESENTE : Housing system est un service gratuit, qui vous propose de vous mettre en relation avec
AUDIT COMMITTEE: TERMS OF REFERENCE
 AUDIT COMMITTEE: TERMS OF REFERENCE PURPOSE The Audit Committee (the Committee), assists the Board of Trustees to fulfill its oversight responsibilities to the Crown, as shareholder, for the following
ONTARIO Court File Number. Form 17E: Trial Management Conference Brief. Date of trial management conference. Name of party filing this brief
 ONTARIO Court File Number at (Name of court) Court office address Form 17E: Trial Management Conference Brief Name of party filing this brief Date of trial management conference Applicant(s) Full legal
Utiliser un proxy sous linux
 Utiliser un proxy sous linux Par LoiselJP Le 22/05/2013 Objectif Les systèmes d exploitation sont de plus en plus gourmand en ressource, notemment en consommation réseau. C est d autant plus vrai que Linux
RULE 5 - SERVICE OF DOCUMENTS RÈGLE 5 SIGNIFICATION DE DOCUMENTS. Rule 5 / Règle 5
 RULE 5 - SERVICE OF DOCUMENTS General Rules for Manner of Service Notices of Application and Other Documents 5.01 (1) A notice of application or other document may be served personally, or by an alternative
LOOPED THREAD OSTEOSUTURE: SMARTLOOP
 Améliorer la consolidation des tubérosités grâce à une ostéosuture au fil boucle : le smartloop Improve tuberosity consolidation using a looped thread osteosuture: Smartloop T. Lascar, L. Obert Introduction
Exercices sur SQL server 2000
 Exercices sur SQL server 2000 La diagramme de classe : Exercices sur SQL server 2000 Le modèle relationnel correspondant : 1 Créer les tables Clic-droit on Tables et choisir «New Table» Créer la table
IDENTITÉ DE L ÉTUDIANT / APPLICANT INFORMATION
 vice Direction des Partenariats Internationaux Pôle Mobilités Prrogrramme de bourrses Intterrnattiionalles en Mastterr (MIEM) Intterrnattiionall Mastterr Schollarrshiip Prrogrramme Sorrbonne Parriis Ciitté
Nouveautés printemps 2013
 » English Se désinscrire de la liste Nouveautés printemps 2013 19 mars 2013 Dans ce Flash Info, vous trouverez une description des nouveautés et mises à jour des produits La Capitale pour le printemps
1.The pronouns me, te, nous, and vous are object pronouns.
 1.The pronouns me, te, nous, and vous are object pronouns.! Marie t invite au théâtre?!! Oui, elle m invite au théâtre.! Elle te parle au téléphone?!! Oui, elle me parle au téléphone.! Le prof vous regarde?!!!